https://www.youtube.com/watch?v=-QjQtco8Iuw
How to Setup Zebra zp450 Thermal Printer Full Installation Tutorial for Mac, PC Windows 10 + Android
How's it going ?
Everybody ?
My name is Eric .
And in this video , I'm going to show you how to set up a zebra ZP 450 this zebra ZP 450 with a Windows computer , Macbook computer , an Android phone and then a Google Chromebook except for the Google chromebook is just going to be pointing you to another video .
So if you want to get to that quickly , just go into the description and at any other time if you want to skip to another section of the video , there is an index in the description to save you some time .
You don't have to watch a Mac tutorial .
If you're just here to find out how to print from Android , I encourage everyone to watch the first part of the video which is like printer setup , calibration , printing a configuration page , things that you might be curious about if you didn't already know and then jump into the specific installation for your device .
With that all being said , if you haven't already , please give the video a thumbs up and if you already subscribe to the channel , consider subscribing and let's get into the tutorial .
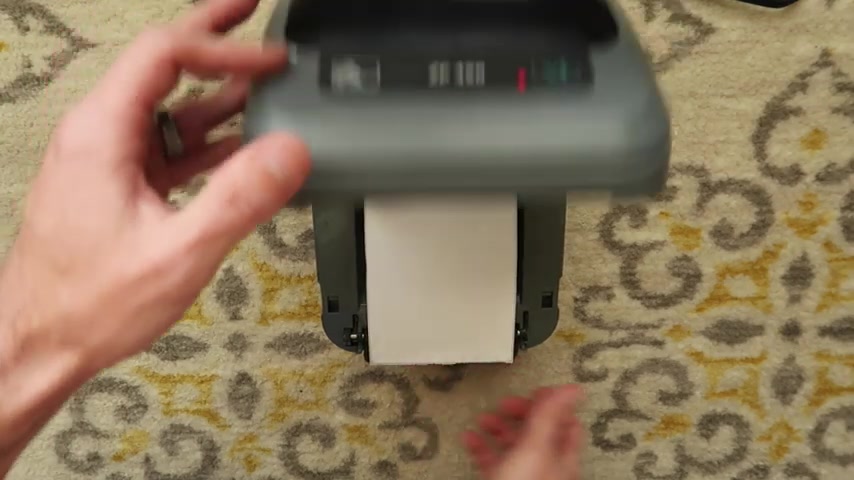
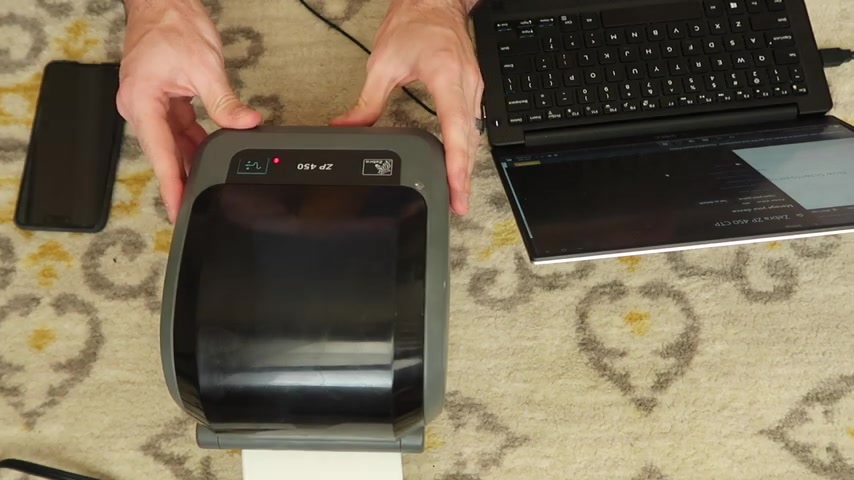
Here is the printer .
We have a feed button on the front two levers to press and open on the back .
We have our built in power supply right here that takes just a three prong power cord .
We have an on off switch off is in the circle position on is in the line position .
We have a USB port for a USB cable and we have a real port not really going to use that .
We're just going to be using this in the back here .
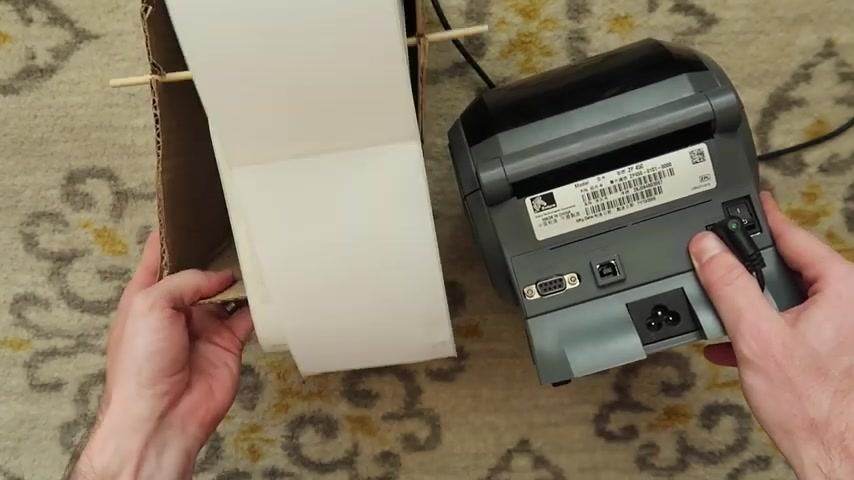
You can actually feed through labels if you have a gigantic roll like this and you have a stand for it or you could put in some fan fold labels behind the printer uh up at the top , we have our print head , that's what actually heats up and makes contact with the thermal paper in order to print an image or a bar code or text .
Here , we have our holder for a core of labels .
This one specifically is for a four inch wide core because this printer I think was designed only for four by six labels from like a UPS store on the front .
We have our platin roller .
Sometimes this thing will get dusty and dirty and you can wipe that off with some isopropyl alcohol as well .
And this specific model has this thing on the front that I will show you guys in a demonstration later on the video to where if you feed the labels through there , close it , it will give you the label pre peeled , ready to be stuck on a package and sent into the post .
So that is our printer .
Now , we're gonna plug it in and calibrate it .
So we're gonna turn it over , plug our power into there .
There is an led indicator light that there is power getting to this cord right here .
And if that isn't already plugged in , plug it in and it could make some noise .
It's trying to calibrate right now , but there's no labels in there .
So I need to put some labels in here .
I'm gonna feed some labels through the back and just press down on it like that .
Another thing that this printer will do if it's set up for it and mine is if I turn it off , if I turn it off and then turn it on with labels in it , it should self calibrate once it boots up , which it's doing right now is just going through the distance between the labels with its sensors reading where one label starts and where one label finishes .
Any time I turn off or on the printer , it will calibrate .
That is another setting that we can change in windows that I will show you later on in this video if you do want to change that setting .
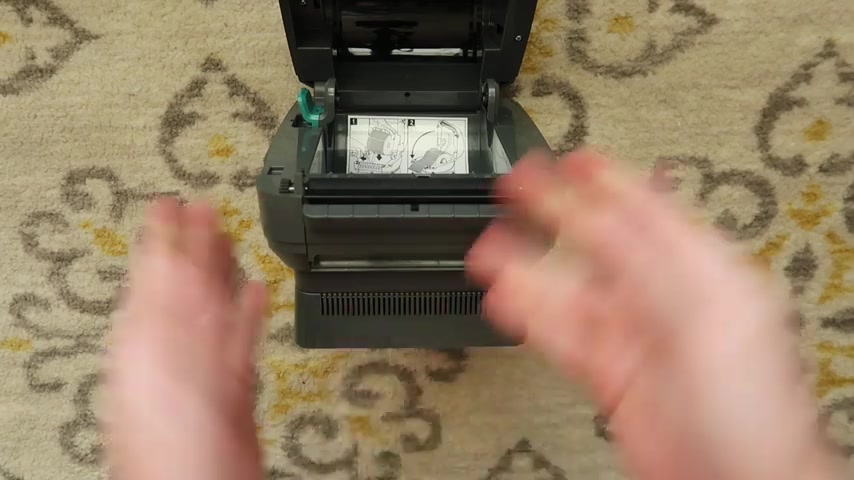
But I'm going to pull these labels back and when I press this down , you're gonna see , it's gonna give me the blink , I have to press a feed in order to get it into the solid green ready position .
So this specific one only has this label loading mechanism like that .
There are models that will open and close and have a feed guide right here that you can adjust .
But I did just want to show how this will drop in if you have this exact same model and you're going to use a roll .
But for this , I'm just gonna be pulling some through from my big role in using it .
That way .
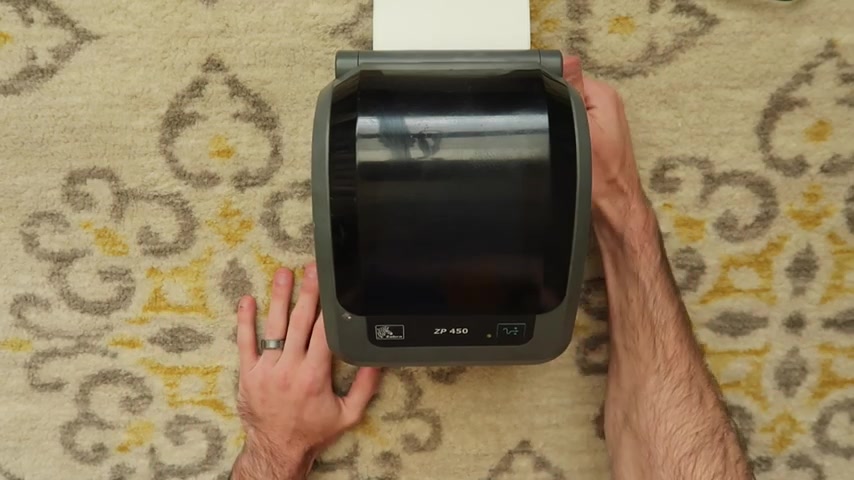
If you hold the front button for one blink and release it , you'll get this configuration page .
The interesting thing about this configuration page is down here at the bottom .
It gives you in a number of total usage in inches which you could backwards calculate by dividing it by six .
Figure out how many labels have actually printed through your printer .
It's got some other settings on here like darkness , print speed , other things you can ignore .
But if you see right here where it says media power up and head close .
It says calibration and feed , that means any time I open and close the head , I'm going to have to feed one label that's a setting that I can change in windows .

And I can also change the auto calibrate the once I turn the printer on and off , if I don't want to calibrate it every time the printer turns on and off .
I'll show you how to do that in windows coming up in this tutorial .
Another way to calibrate this print another way to calibrate .
This printer is to hold the front button down until two blinks 12 and then let go , it will go through a calibration reading the label sizes .
If for some reason , you have turned off the auto calibrate , when you turn the printer on and off , you can always calibrate it by hand this way .
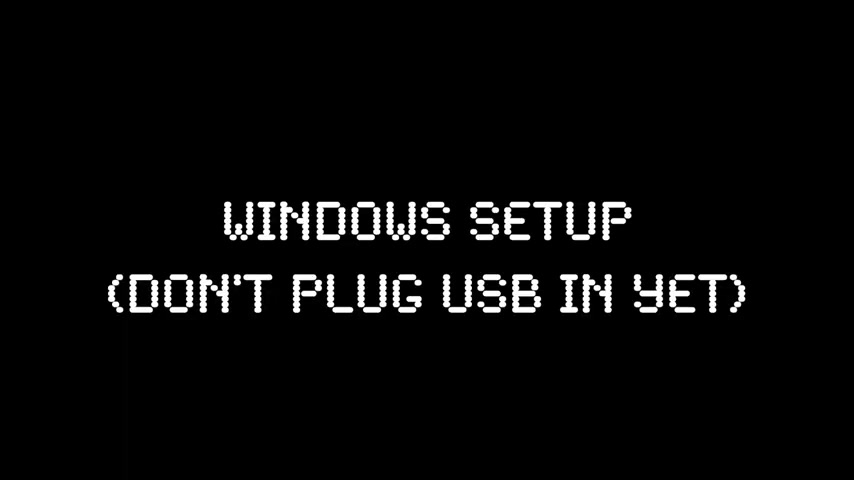
So before we go into the computer to install it , we are going to plug the USB in the back .
And for whatever reason , the zebra printers like to be finicky when you plug this into the computer .
So don't plug it into the Windows computer yet .
I will let you guys know when I'm plugging it in .
So it installs as smoothly as possible .
So now I'm going to take you guys into the computer .
So here we are on a Windows computer .
I already have the driver website opened .
I will put a link to this in the description for ease .
And then you're gonna want to hit download .
It's going to download the driver file .
It's 50 something megabytes .
So it might take 30 seconds to a minute or so depending on your internet speed to download .
So once it's done downloading , you can click down here or navigate to your downloads folder to open the dot exe , we're going to accept the license agreement hit next .
You're gonna hit next again .
You don't really need to read the installation instructions .
We're just gonna run driver after unpacking the drivers .
Now , a little shield is blinking down here .
I'm gonna click on that .
It's gonna pop up asking me if I want to allow this app to make changes to my device .
I don't know why it doesn't show up on screen record , but we're gonna hit .
Yes .
What would we like to do ?
Install printer drivers hit next .
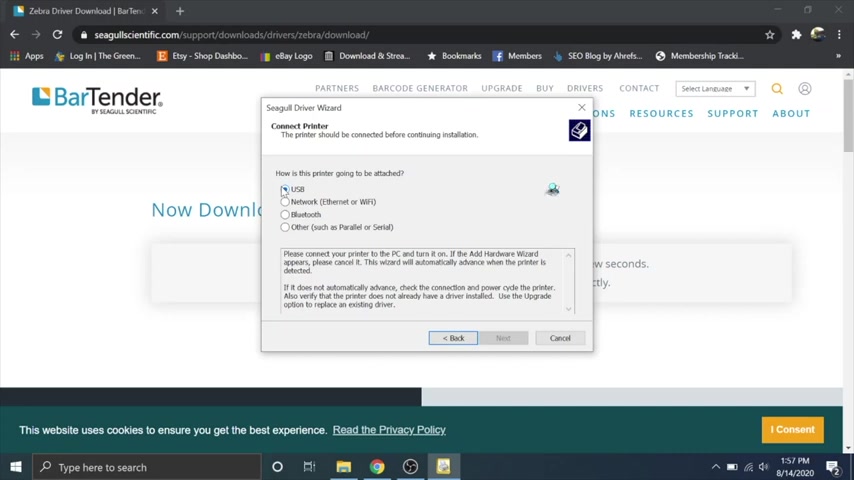
How is this going to be attached by USB ?
Now , I'm plugging the printer into the USB port on the computer and it recognizes it because it's looking for it specifically .
I'm going to click the ZP 4 50 CTP USB 001 and then I'm gonna hit next .
You can change the printer name to whatever you want or you can leave it like that next .
Then I'm going to hit , finish .
It looks like it was completed successfully .
Now , I can hit close .
I'm going to go down here and type in printers and scanners .
Hit , enter and here we are with the ZP 4 50 CTP .
Before we get into any test prints or anything .
I want to go over here to manage , change a couple of settings by going to printing preferences and then we're gonna go to graphics right off the bat .
If you're printing shipping labels , you're gonna want to change this dithering to none and then hit apply .
Save that right off the bat .
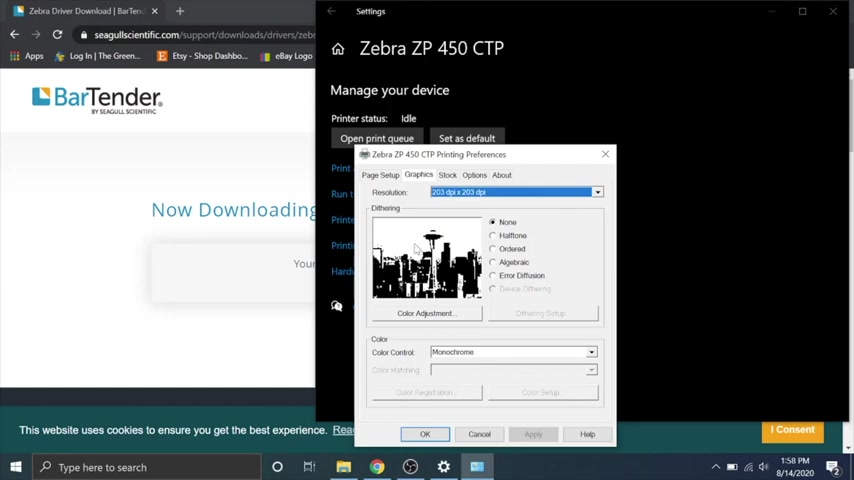
That's the first thing you could do because it's gonna make your bar codes a lot crisper on windows .
Next thing you're gonna wanna do is go to page set up and whatever you're gonna be printing your label dimensions .
So for instance , I'm gonna be using four by six labels .
I'm gonna pick four by six and then I'm gonna hit apply and over here in options , it's where you can change darkness and speed depending on how your printer is printing .
If you need to bump up the darkness a little bit , you can do that or if you need to turn down the print speed , it's printing too light or if it's airing out because it's overheating and printing too dark , you can change this , you can change those settings like that .
But we're just gonna leave it as current printer settings right now and then hit apply .
Now , we're going to go into printer properties and over to tools and remember when I was telling you that it powers up and it'll calibrate or if you close the top of it , it'll want to spit out a label .
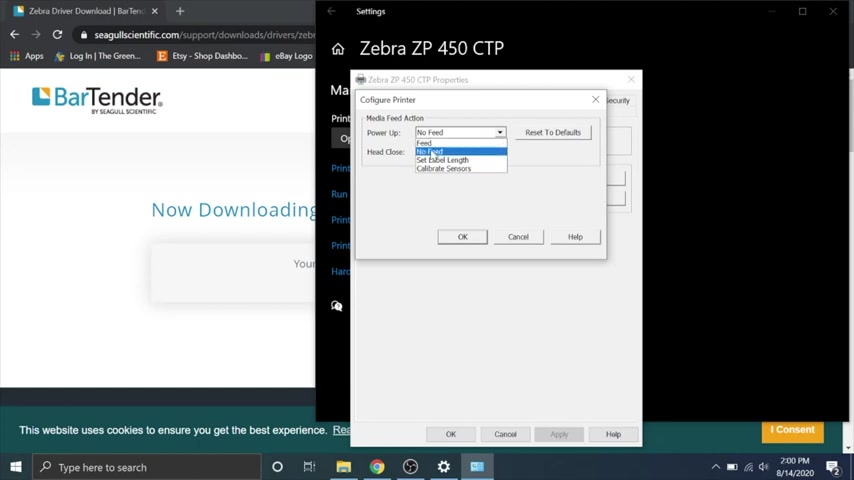
I'm going to go to configure here and configure printer .
It says when it powers up , do we want to feed a label ?
Not feed a label , calibrate ?
We're gonna do no feed just in case I want to turn the printer off and on every day , I don't want it to calibrate .
I just feel like it's easier to not have it feed labels and waste labels and the same thing with head clothes , I'm not gonna feed labels .
However , if you were running a business where you were changing the label sizes and you didn't wanna have to count it in between changing the labels .
And the only time , the only time you opened the printer was when you were changing the labels , maybe you would want it to calibrate when you're opening it up .
So that's the custom ability of zebra .
And that's what I really like about these printers is they are very , very highly customizable , which is why they are the leader in thermal barcode printing .
Uh So we're gonna hit , OK ?
And then hit OK ?
Once again .
Now with those settings , if I open and close the printer , it doesn't feed a label before it would feed a label .
Now it doesn't .
So it saves the label .
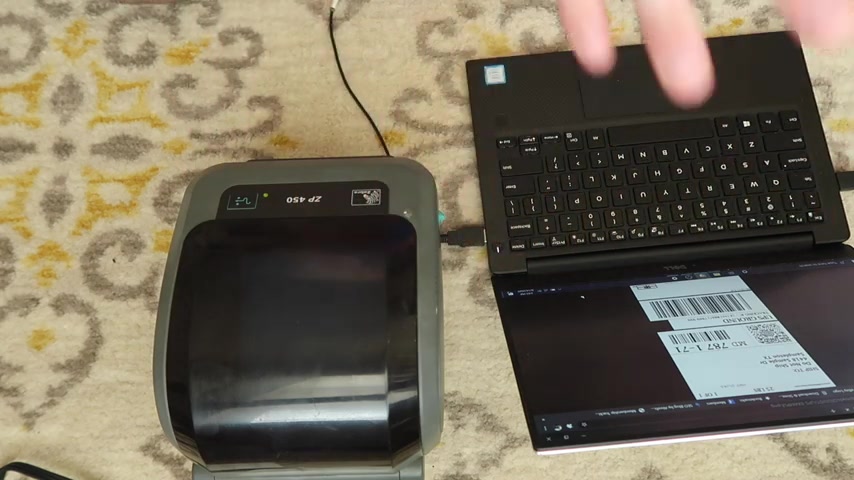
I'm going to throw a test page to the printer just to see that it's communicating .
It's not a bar code or anything .
It's just a windows printer test page .
And now I'm going to send a label to the printer as a test page and I'm gonna get that label from fulfilled merchant dot com .
I will put a link to this in the description as well .
You just click on that press control P .
You're gonna want to make sure you pick your printer more settings just to make sure it's four by six .
Everything looks good .
I'm gonna hit print and it should send the signal to the printer and there it is right there .
Everything looks good .
I would say that this printer has been successfully installed on this Windows computer before we go to the Mac .
I want to let you know that you will have to go in and change the settings for the specific platform that you're using .
So if it's like ebay or Etsy , you're gonna have to go into the that to change the label settings to four by six .
I do have a video on that .
I will link in the description .
So make sure you check that out .
Otherwise your printers are gonna , your labels are gonna be like printing sideways and all junked up and it's probably gonna be frustrating .
So make sure you check that video out .
Now we're gonna set this bad boy up on a Mac and I have a newer Macbook Pro that doesn't have a USB port .
So you're gonna have to use some sort of USB C converter .
I have these little dongles , I really like them .
I will put a link to this in the description so we can plug it into our Mac .
The installation is actually a lot easier on Mac .
You can go up here to the finder type in printers and scanners , click on top hit printer and scanners .
That's also in preference system preferences is another way you can find it .
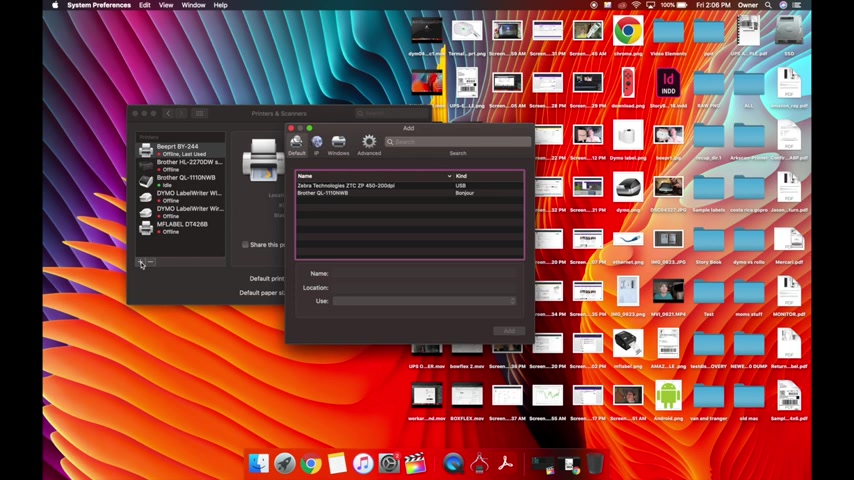
You're going to hit the plus button with the printer plugged in , turned on everything going .
It should pop up as a zebra ZTCZP 4 50 USB printer .
You can ignore this other stuff .
Those are other printers that I have on my network down here .
You're going to hit the drop down , choose a driver , select software and type in zebra and pick the EP L two label , printer driver then hit , ok .
Hit add .
It's going to go through the little installation just like that the printer is installed .
Now you're gonna have to , now you're gonna have to print a test print .
I have a sample label from fulfilled merchant dot com .
I'm gonna hit command p more settings and you want to make sure that your paper size is four by six and your scale can be on default and then you can hit print .
The only thing that matters is that they scan .
And as you can see , the only thing that matters is that it will scan when it gets to the post office .
And as you can see , they both scan this bar code won't scan , but it won't scan on that one either the way that I edited the practice file .
I made it so that this is actually not a real bar code , so it won't scan .
But this one up here is .
And as you can see , although it's a little fuzzier , it still is able to be read by our handy dandy barcode reader .
If for some reason , you need to change the darkness or the print speed on a Mac , you can go to more settings , print using system dialogue and then you're going to have to change to four by six again .
And then you go to layout , printer features , feature set , printer settings and then you can change your darkness up or down a little bit and you can change your print speed up or down a little bit as well and then change your presets to last use settings .
And then it will save all of that for the next time you print .

So you only have to do this once and then you can hit print and have a little bit of more darkness and speed customization .
While I have your attention here , I would encourage you to watch this thermal printer , printing sideways how to set up the settings .
Video , I will put a link to that in the description and that lets you know how to change the settings on ebay , Etsy Posh mark a couple different platforms because you are going to have to go into those platforms and change the settings because most of them are set up to 8.5 by 11 by default .
And we're trying to print four by six .
So it's something you're going to have to go and do .
Hopefully , it will save you a little bit of frustration .
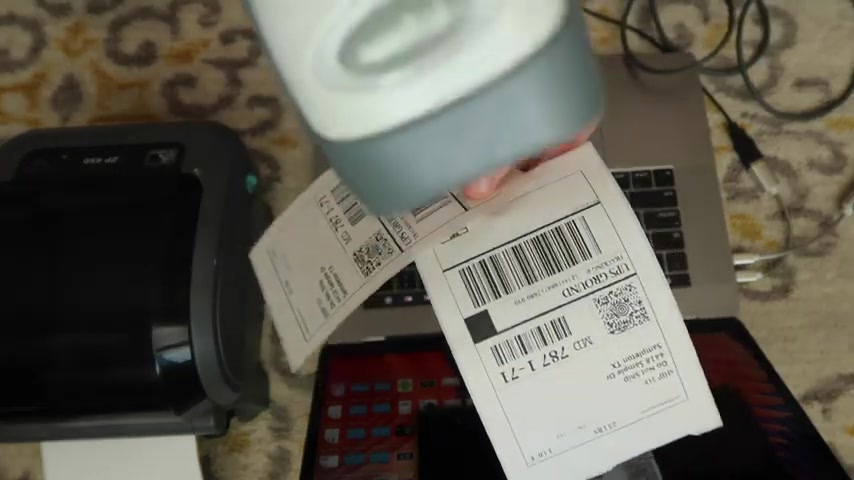
So again , link to that is in the description for an Android phone or tablet with a USB C port .
You're going to need a converter to actually plug in this cable to your phone .
So this USB to USB C cable converter is perfect .
I do have a link to that in the description .
They're not that expensive and then I download this app called Noco Print .
It is in the app store for free .
They also have a paid version that gets rid of the ads .
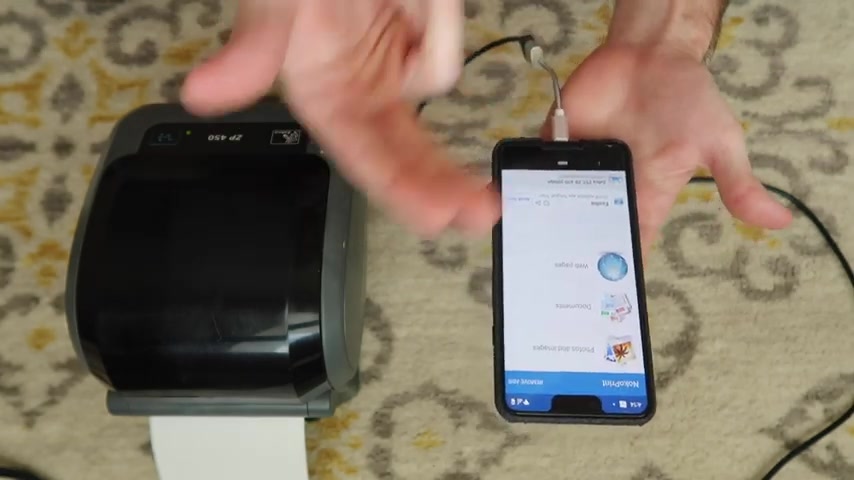
And when I plug it in , I'm going to say it should recognize that it's a ZP 4 50 pick the ZP four and 50 driver when you plug it in , if not uh manually navigate to ZP 4 50 then it should install perfectly fine .
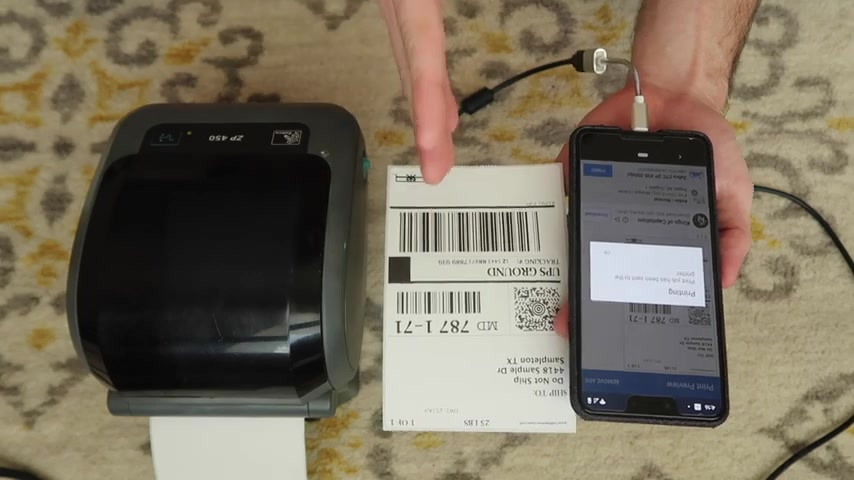
And now you're going to want to um and to actually print files , you have to download them to your phone and then you'll have to navigate to that file and then three dots at the top open with Noco Print and then it should figure out what it's supposed to be set up as and then hit print and that's how it prints .
You will still have to go into the platform settings where you're generating the label and change it to four by six before you're able to print it correctly from your phone .
I do have a video on that in the description and I will also link you guys to my step by step tutorial on how to do this , set up with a uh it's a different printer , but it's the same process .
I will put a link to that in the corner and in the description as well .
So check that out if you want a more in depth tutorial on how to set it up on an Android phone .
Last but not least chromebook people .
I have a tutorial on how to set up a Zebra LP 28 44 with a chromebook .
But it's the same process as the ZP 4 50 .
And rather than duplicating all the content , I'll just give you a link to that in the corner and in the description , you can check that video out .
It's a step by step , same process , same file , same installation and this has been known uh and this is known to work on a Google chromebook as well as the LP 28 44 .
And this is actually a better printer than the LP 28 44 .
It's newer .
So I would recommend getting this for a chromebook over the LP 28 44 if you were trying to decide between those .
But anyways , that's a different video .
So that's the tutorial .
Thank you guys so much for watching .
I hope you learned something if you had any problems after watching the entire video and you still haven't solved them .
Please let me know about it in the comments .
I will try my best to get back to you and thank you guys again for watching .
If you haven't already , please give the video a thumbs up and I'll talk to you in the next one .
Bye .
Are you looking for a way to reach a wider audience and get more views on your videos?
Our innovative video to text transcribing service can help you do just that.
We provide accurate transcriptions of your videos along with visual content that will help you attract new viewers and keep them engaged. Plus, our data analytics and ad campaign tools can help you monetize your content and maximize your revenue.
Let's partner up and take your video content to the next level!
Contact us today to learn more.