https://www.youtube.com/watch?v=Xh-LKm9cgqk
How to Draw the HEAD and FACE - REILLY METHOD - Art Tutorial
Hey , everybody .
Welcome back to Art by Galen .
I'm Galen Eel .
And today I'm gonna be going over the Riley method of drawing the head in the face .
Now , the Riley method is something that I recently discovered .
Uh I'm admittedly , I've been using the Luis Method for a very long time and it's worked fine for me .
Um Up until recently , I've not been so happy with my , my human figures and , and my faces .
So I've been working really hard to try to improve those .
So if you're unfamiliar with the Luis method , it's essentially just a circle divided into quarters .
And then from that , you can , you can roughly gauge out the location of the nose and the mouth and the , you know , the uh the eye sockets and everything .
Um The reason that I love the Riley method as much as I do is simply because of how much more detail that you can actually get .
So we're gonna turn this off and I'm gonna go over this with you and we'll do it step by step .
There's a , there's a lot of steps .
So hang in there with me .
OK ?
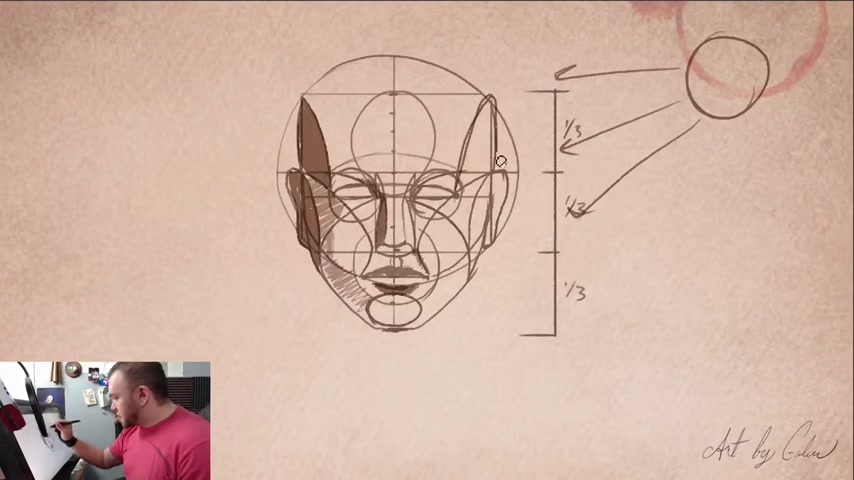
Um The first thing you wanna do is uh the first few steps are much like using the Luis method .
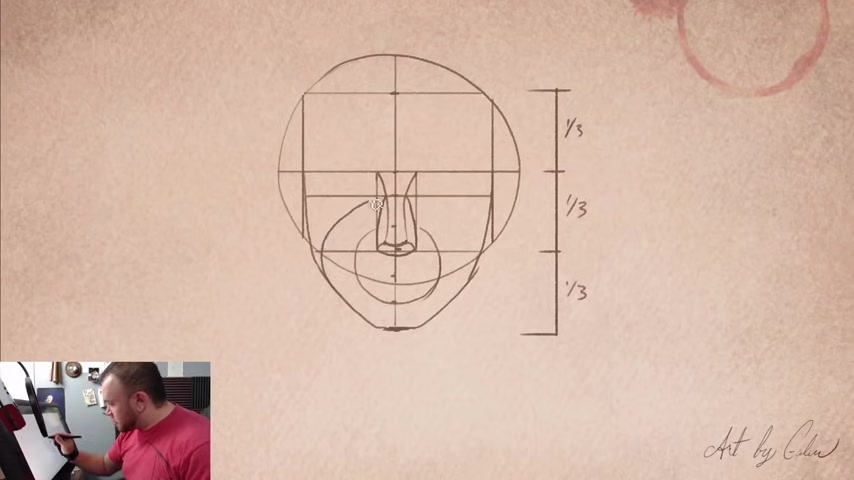
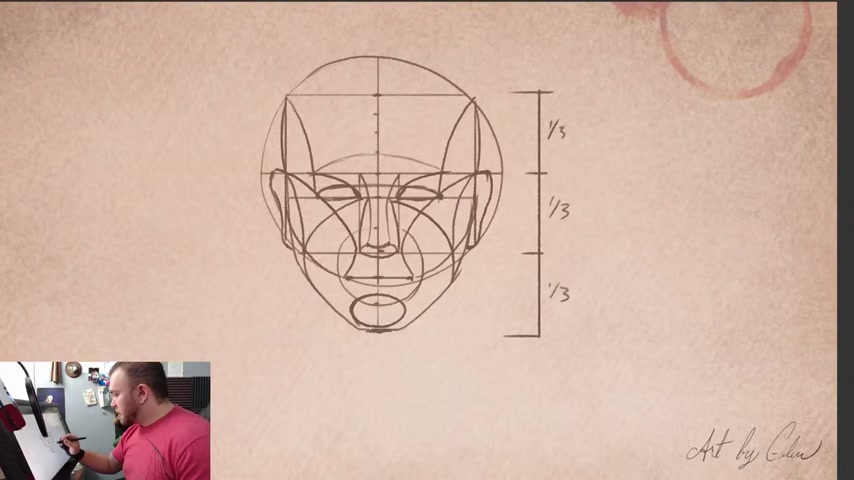
But then we will build from that starting by just doing a big circle for the head .
And we'll divide that in half vertically and horizontally .
And then we will um and then we'll slice the sides of the head off because nobody has a perfect like circular head .
Um And then what we'll do is I'll take the points roughly that the sides are cut off and I will draw lines across and sort of square that a little bit just to give me some equal sections .
So I've got a section here section here and we'll take about that same distance and do a section at the bottom .
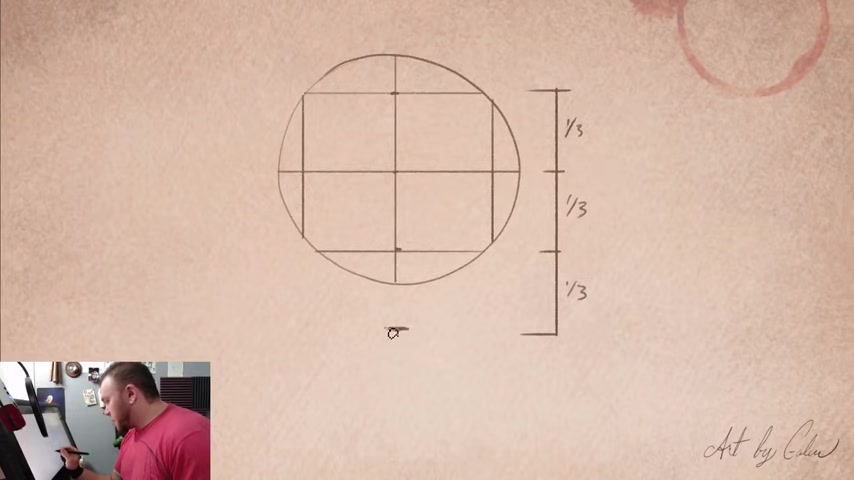
And what that does is gives us divisions of three .
And so we take that main part , we've got a third , a third and another third from here .
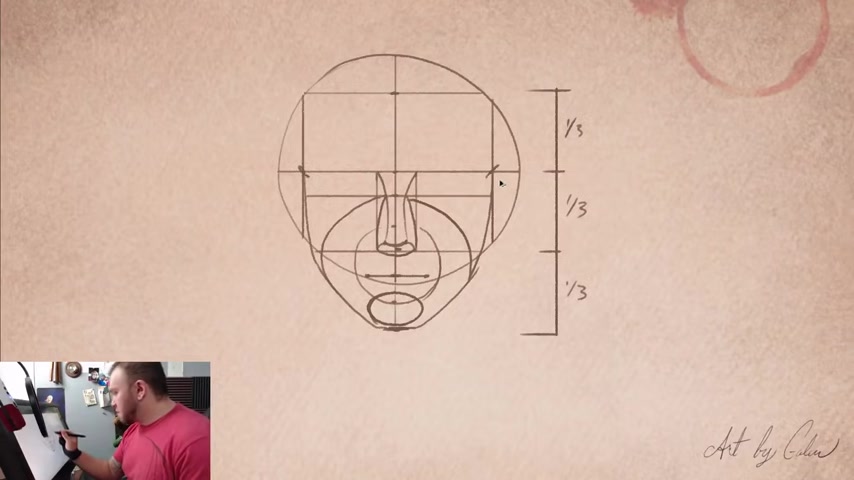
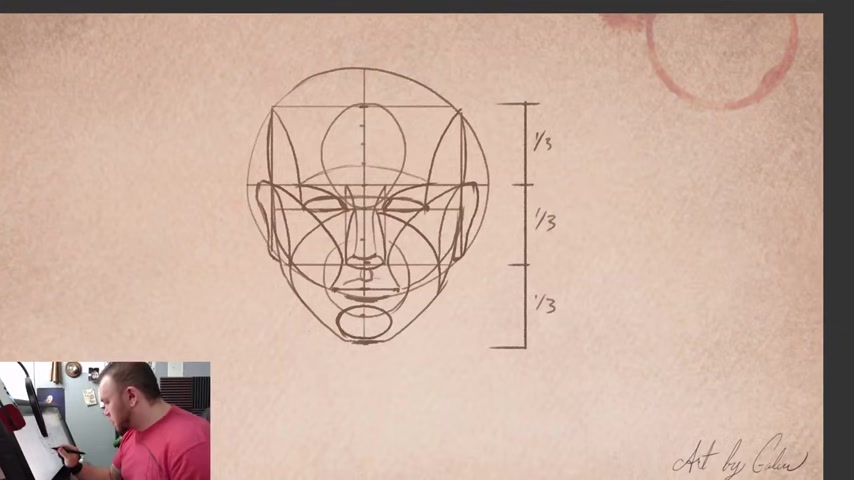
We need to get the chin in place .
So we'll figure out about how wide we want the chin to be and we'll come from these intersections here in the middle on the sides , we'll come down and we'll start straying off of that side lining and just start placing in the jaw .
And if that's , you know , you draw the jaw to whatever shape you want , people vary quite a bit .
So it's more preference than anything here .
Now , this one looks a little bit too round for me .
So I'm gonna put it in and then it about like , so , and I'll mimic that shape on the other side .
Ok .
So that gives me the rough , you know , placement of my head and , or not my head .
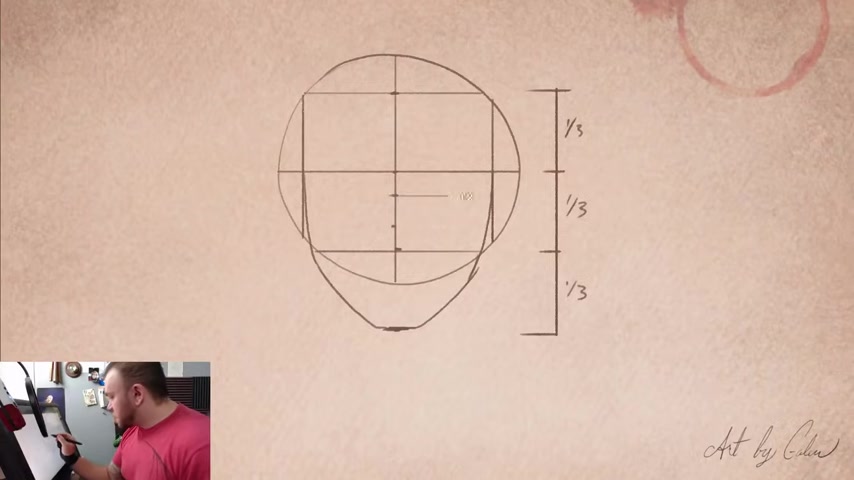
But , you know , um , now the next thing I'll do is I'll divide this intersection into thirds .
So that way here , here and here are all equal or roughly at least .
And I'm gonna give myself a horizontal line across that top notch .
And that gives me the , uh , you know , this line is the brow of the eye and this will be the bottom of the eye .
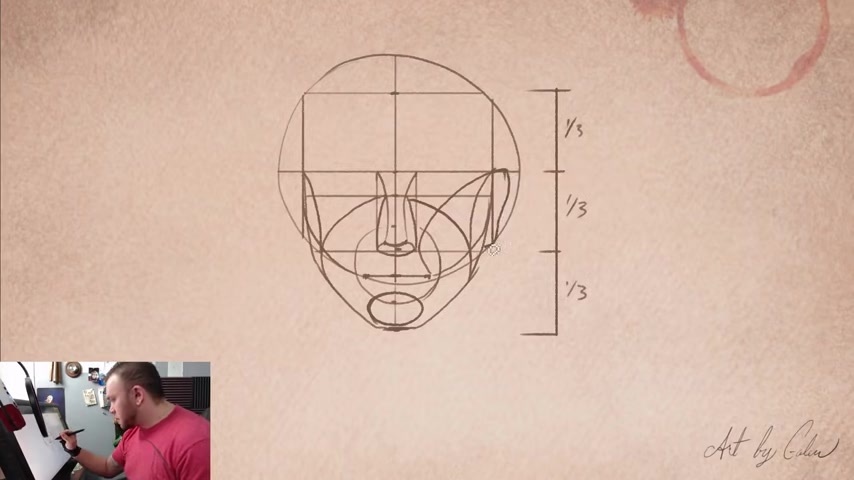
After we've done that , we're gonna figure out about the width of our nose and give ourselves a vertical line from the brow line down to this line here , which is the bottom of the nose and just a little bit up from the bottom , we'll do a little crescent shape and that's the bottom of the , the ball of the nose .
And then we can put these little rounded sides coming down to where that intersects with that line .

And that gives us the sides of the , like the nostrils or the wing of the nose as some people call it .
Um , and then if we do and a little arch from , from those two points that will give us the bottom side of the nose where like where the nostrils would be .
Ok .
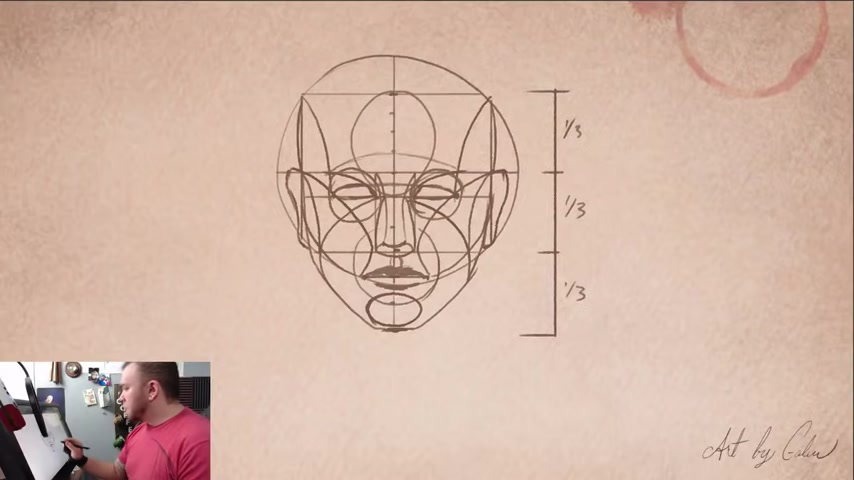
Now , from here , we're gonna take these points at the side of the ball of the nose and we're gonna make a very slight arch going inward at first and then coming outward to the top of the brow .
And we'll do that on both sides .
And what this does is , it gives us two things .
It gives us the top plane of the nose and it gives us this little inside plane of the brow in between the eyes from there .
If we do an arc line from the side of the nostril and come up to where that line intersects with the lower eye line that gives us the outer plane of the nose .

And that's , that's all we'll do with the nose for .
Now .
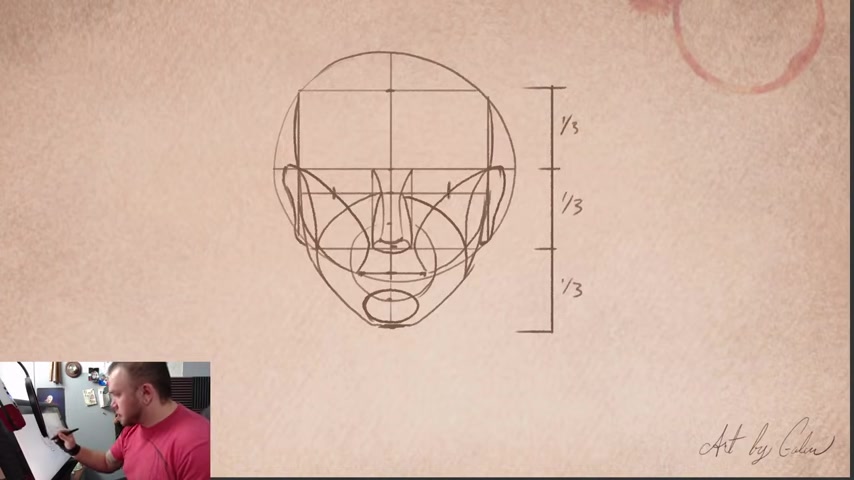
Um Now we're gonna move to this bottom section .
We're gonna divide that the same way we did the middle section , we're gonna divide that into roughly thirds .
And what we wanna do is take from here , this 1st , 3rd line on the , on the middle section down to here , the 1st 3rd line on the bottom section .
And we're gonna do basically a circle and this creates kind of that muzzle area around the mouth .
Um And this is essentially the plane inside uh or the sphere inside the mouth like , you know where the , where the teeth would reside and everything else .
It also gives us these little lines that come right off the side of our nose .
And then from here , we'll mimic that curve coming up from the jaw line .
And just before we hit the cheek , we'll pull it up and bring it in to this intersection point .
We'll do that on both sides and that gives us this bit of tissue that's on , you know , the side of our faces as well as like kind of the crest of the , the cheekbones are part of it , at least .
Um , now after we've done that , we'll do a smaller oval down at the bottom that will be the protrusion of the chin and that's the little part that sticks out and that will overlap with the inner circle of the , the mouth area .
Um And then from there , we'll go up to this , this notch here , the , the top third and we'll mark in just a line for where our mouth will be from here .
There's a few lines that we're gonna make that help measure out the rest of the cheek and the cheekbone area and that is coming from this point on each side .
And that's that middle intersection top of the brow where it intersects with where you cut the sides of the head start here .
And we're gonna pull that down to where this outer circle intersects with the bottom of the nose line .
We're gonna do that on both sides and that gives you sort of the side plane of the face from here .
There's also another plane line that will come from the side of the mouth and go up to the side of the head .
Now this next one is probably the most difficult one to get right , but it's the most important one , in my opinion .
Um But anyway , it starts at the corners of the mouth .
So we're gonna start on this right side .
You start here and you go inward towards the wing of the nose , like toward the outside of the nostril and then you curve right back out towards the top of the brow line .
And if you pull that out , that actually gives you the top of the ear here , now , the bottom of the ear should be relatively even with the bottom of the nose .
And so that'll give you the shape of the ear and we can do that on the other side .
And you want these , you want these curves to be relatively similar , they don't have to be perfect because no one is actually truly symmetrical , but you want them to be pretty close .
Ok ?
And from here , uh once we've gotten the ears in place , we can see like the , the sides of the head , which would be right here .
Nobody , um , or very few people I would imagine are , are perfectly straight line .
So we wanna kind of round those off , ok ?
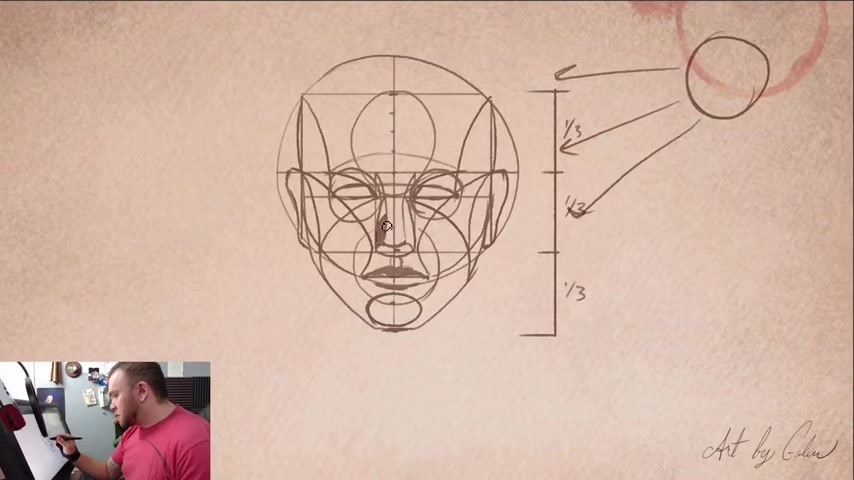
And now we're gonna take a line from , from these points here and that's if you , if you can't say that's here and here and we're gonna take that line and we're gonna pull it down to where to where these lines intersect with that lower eye line .
So we're gonna come from here and swoop down to just like that .
And this does a couple of things .
This gives us the uh the temples like the , the flat sides of our head .
It also gives us roughly the outer edge of where the eye placement will be .
And the inner edge of the eye placement will be here where the width of the nose intersects with that line .
And so with that knowledge , we can then start to create the arch of our eyes and we can pull that line all the way across and bring it back down to the other side .

And then from these inner points , we can pull the inside of the eye where the tear ducts and everything are and you can create your eyes from that .
Now , the next line that I do is from the tear duct intersection up to this corner of the brow .
So we do an arc like that and it doesn't , this isn't the actual eyebrow line .
But what this does is it gives you information that you can use for the shape of your face where like um let me switch to a different color and I can show you kind of what I mean like right here just under that arc that we just drew , that is the high point of the brow that generally will catch a little bit of light .
It's , it's under the eyebrow itself but it's an , it's a point that protrudes and you can use that information .
Once we've done those , we can do the actual brow line .
And if we take this top third section and divide it into quarters , so do half and then break those in half and then you throw an arc from here up and then back down to the other one just to help give you a little bit of shape on the face .
And then the rest of this isn't necessarily required , but it does help .
Um You can , there's an , there's an oblong like oval shape that you can put in here from the bottom of the eye line to the top of that third line .
And that gives you that little protrusion and some that some people have visible in the front .
Uh And it's just dependent on the shape of the skull .
Um We can do go in and put in the bottom lip and the top lip .
There's also a tiny , little oval that happens right here .
That's that little dimple in between your lip and your nose where they come together and I'll shave that in just to make that a little more visible .
And the other thing that you can do is putting in circles for the eye sockets and that can give you a couple of other things that can give you , um , like if the person is either maybe aged or if they have a lot of loose skin on their face .
This will help you map out the eyelids and you know , the , the saggy eyelids as well that happen .
And , um , the cool thing about this is , it's not , it's not hard number measurements .
The only part that's hard is that it's broken into thirds and all the points are relative to each other .

And so you can take those and you can literally distort them in any way that you want to , you can distort them as a whole or you can distort groups of them individually .
But as long as they're relative , um you can still use them , you know , if you have a character with a really long and narrow face , I mean , I'm exaggerating it here , but this would work and everything would appear to be in the right proportions .
Same thing if you had like a squat character that was , you know , very wide and very large , you could do the same thing , but , you know , stretched out horizontally .
The main thing to keep in mind is that this is , this is like an average composite .
This isn't the end all be all .
I mean , all of this can be tweaked , but it gives you a whole lot more information than um than just the uh what the , what the Lummi method does .
And I'm not knocking the Lummi method .
It's very effective .
But this has been incredibly useful to me and I'll , I'll give you one more example of what I'm talking about .
OK .
So I'll make a new layer and um , we'll go back to this color , maybe a little bit lighter .
All right .
So let's say I have a light source on the side of his head over here and that light source is , is directly on the side .
So it's shining right at him .
Ok .
Now , I can use this as sort of a wire frame to give me the information of where my shadows would need to go .
I know that this side of the head would be the brightest .
I know that this side of the head should be the darkest as long as there's not another light source .
So that means that this section here , the side of the nose , the inside of the nose would be dark , it would be filled in this area here under the eyebrow would be dark .
Um This section here inside that little flap of skin under the lip , this whole section on the left side that would give you the most extreme shadows .
And then as you move further inward , the uh it would , it would still be shadowed , but it would gradually start to get lighter .
And you can work out most of that information by these shapes .
You know , it's not gonna be perfectly broken into these shapes , but it definitely helps in terms of figuring out where these things are , um , like the parts that are gonna catch the most light obviously would be these sections uh hang on the parts that are going to catch the most light are gonna be these sections here .
So they would be the brightest just as this side of the nose , this part of the eyebrow or under the eyebrow on this side of the forehead .
And then this , this whole section of the cheek like that would all catch the most light .
So they would actually be the lightest and we could , we could even come in and fill that in white just to demonstrate .

But anyhow , you can see where this is going and see where it's leading to .
It's a , it's a much more detailed approach to drawing the head in the face .
If you have any questions or comments , be sure to leave them down below .
I'll do my best to answer everything that comes in .
This might seem a little complicated if you're not familiar with drawing faces and if you're not , if this feels like it's too much , I highly recommend looking up the Andrew Loomis method of drawing the head and face and get familiar with that first .
As long as you get familiar with that , that should help you , you know , branch into this if this seems difficult for you .
But I hope that it's not too bad .
I hope it's not too convoluted .
Stay tuned next week .
We'll be tackling this from a three quarter view .
I hope you enjoyed today's tutorial .
I really appreciate you dropping by and sticking around if you watched all the way to the end here , uh Be sure to like the video if you enjoyed the content , if you'd like to see more of my content and get notifications , be sure to hit that subscribe button down below as well .
Anyhow .
Thanks again and until next time , take care .
Are you looking for a way to reach a wider audience and get more views on your videos?
Our innovative video to text transcribing service can help you do just that.
We provide accurate transcriptions of your videos along with visual content that will help you attract new viewers and keep them engaged. Plus, our data analytics and ad campaign tools can help you monetize your content and maximize your revenue.
Let's partner up and take your video content to the next level!
Contact us today to learn more.