https://www.youtube.com/watch?v=06owBb23UiQ
How To Create Custom Front End WordPress Dashboard For Your Website Clients

so working with clients can be quite a stressful situation , especially if they go in and nobody really know what they're doing and they end up breaking things .
You have to sort it out .
And sometimes you're doing that for absolutely no money .
So what will be a better solution for this ?
How about taking a look at creating a fully customised WordPress dashboard , where you get to control exactly what they can and can't do and what they can access on today's video ?
I'm gonna show you how you can do just that with a couple of different tools .
So if you're interested , join me as I jump on the dashboard of WordPress and we take a look at what tools we need to achieve this customised user dashboard for WordPress .
So before we start building things , let's take a quick look at what we're actually going to build .
So once you've gone through the process of logging in like you normally would , If you're an editor , you'll automatically be redirected to your own custom dashboard .
So as you can see , we've got a welcome message that will welcome you based upon your user name .
You've got your profile image if you've set one , and then we've got a range of different options .
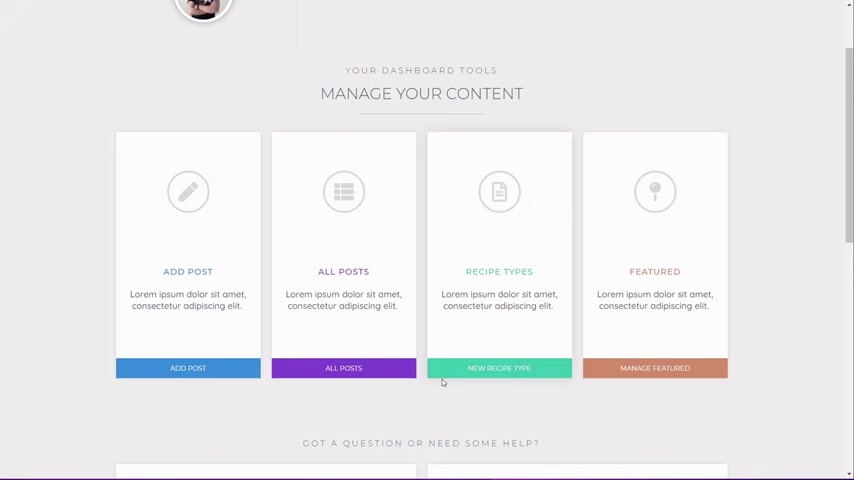
So things like adding posts , editing posts .

We've got some custom post types that's the A vehicle and edit vehicle to scroll down .
You can see I've also got site options and your profile .
The manage users and comments is just part of the template , so you can effectively ignore that .
It's more a case of once I demonstrate how you do these things and how you can use the tools we're going to take a look at .
You can basically expand this in lots of different ways , So let me just show you what I'm talking about .
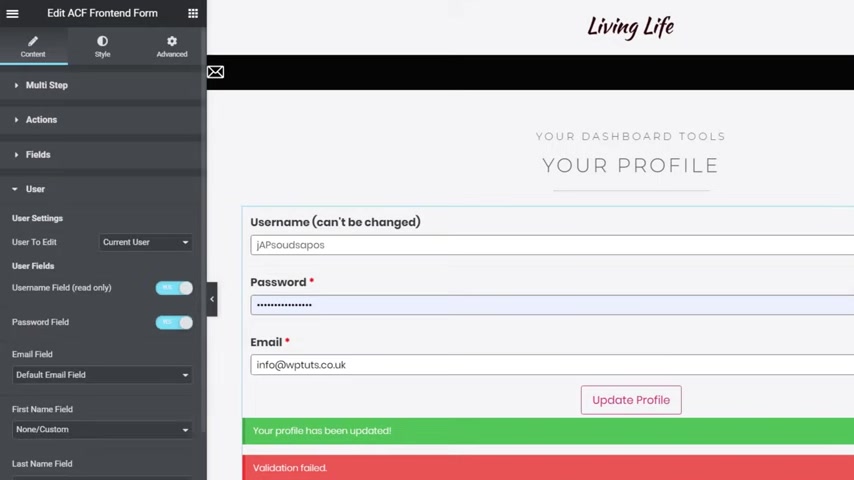
If I want to edit my profile , I can simply click on the edit profile option That'll take me into my profile , at which point I can now go through and do things like change my password , my email address , my first name , my surname and a biographical information .
If I come back out of that , we'll just leave this and I come into site options .
These are global site options that you can change things like the logo site , name , site tagline and so on .
I'll cover this in its own dedicated video , which I will link in the description below .
So you can check this out and see exactly what I'm talking about and how you can harness the power of this .
I'll just briefly go over it in this video on how we set things up .
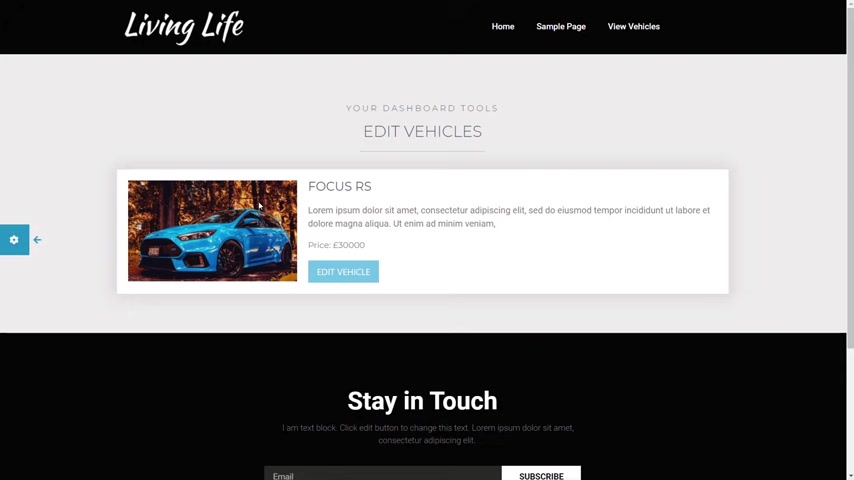
If we come back out and go into something like the edit vehicle and click on there , we'll open that up and you can see I'll have any vehicles that are listed to me as the person that actually created the Post .
So anybody else's posts I won't see .
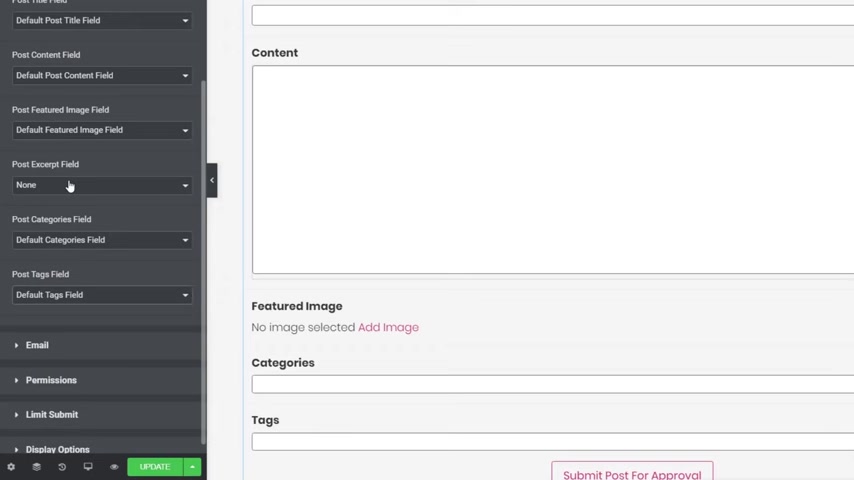
I will only see my own specific posts , at which point when I find the one that I want , I can click on Edit vehicle and I will open up a pop up , at which point I can then go through and edit the normal information as part of a post the title , the content , the featured image .
But if you scroll down , you can see I've also got all the extra information that's part of this custom post type , so things like the price , the manufacturer , the vehicle colour and so on .
So we've got a very , very versatile way of being able to create a custom user dashboard , all set up to remove any access , then to the dashboard of WordPress itself .
Plus , it also looks a lot better .
So let me just take you through how we're going to go through and build this entire dashboard .
So first thing , let's take a look at the plugins that we need to be able to achieve this now , before we move on and take a look at these in any real detail .
I want to say that we're going to be editing the Functions PHP file as part of this particular tutorial .
If you don't want to do that , there are plenty of plugins out there that allow you to do what we're going to cover in that functions .
PHP edit .
So things like setting where people can access redirect and things along those lines .
So if you want to take a look at those by all means , take a look at those .
And if you want some suggestions , let me know in the comment section below , and I'll take a quick look and pull up some options that I think will do the same kind of thing .
But Let's take a look at those plugins first .
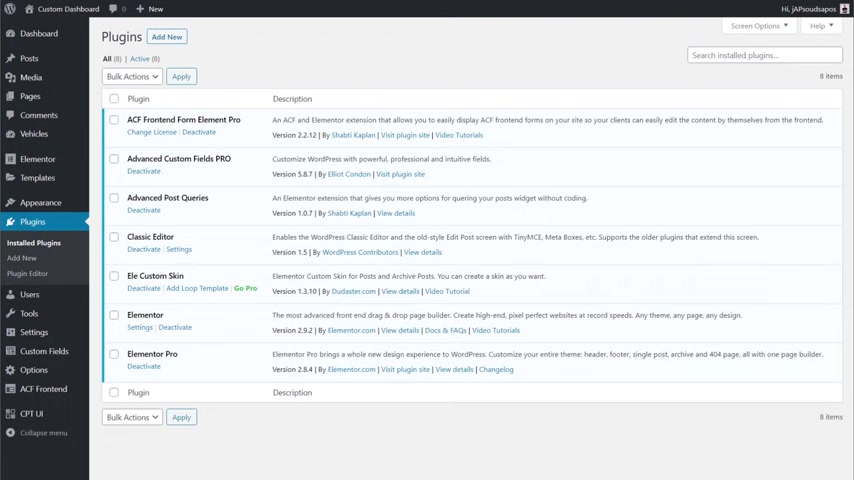
OK , so we've got elemental and elemental pro installed .
We're going to use Elemental Pro because we want to use the functions we have inside the theme editor .
So that's very useful .
Elemental custom skin or custom skin allows us to create templates for custom loop items , and we're gonna use this then for the listings where we take a look at our posts and our custom post types inside this dashboard like I just showed you .
Now it's worth mentioning .
While I won't be going into tonnes of detail with each of the different plugins we'll be using , I have covered most of them in their own dedicated tutorials .
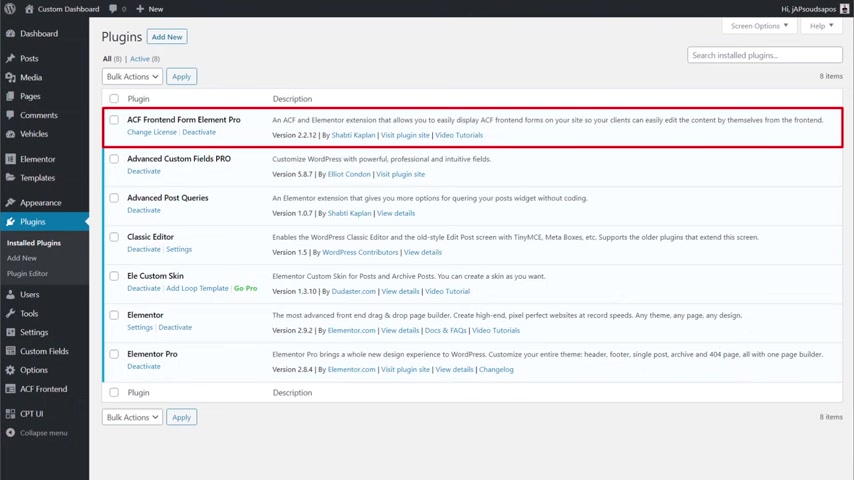
So things like elemental custom skin AC , F , front end form element .
These have been covered in their own dedicated tutorials , and I'll put links in the description below , so you can take a look at those if you want to learn more about these great tools .
OK , so we've got elemental custom skill that you just said classic editor just because I prefer that to the Gutenberg editor .
But it's in to you , which you work with .
We're not really using that in this tutorial , anyway , Advanced custom feels pro .
We've got that set up in there because we want to take advantage of the things like the options pages .
And finally we've got AC , F , front end Element Pro .
Now this is the pro version .
I've previously covered the free version , which has an absolute tonne of options available , and you don't necessarily need to use the pro version .
If you don't want to do things like tap into the options and things along those lines , the free version will give you probably most of what we need to cover in this tutorial .
However , the pro version does give you that extra functionality that it is definitely worth taking a look at , and I will be covering this pro version in its own dedicated tutorial later on down the line .
So if you want to learn more about that , I will be covering the pro version as well .
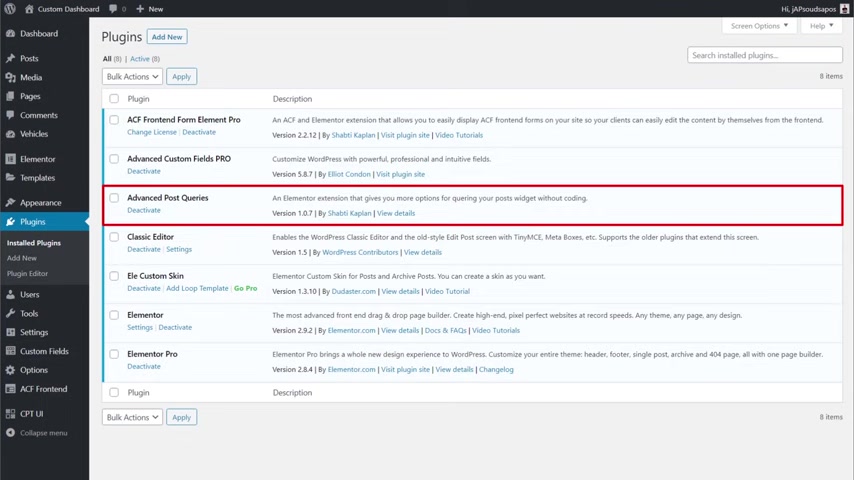
Now , the final plug in I needed to show you is advanced Post queries .
This is by the same developer as AC F , front end form element pro , and what this allows us to do is philtre and lock away content based upon the currently logged in user .
This is a vital part of this entire tutorial .
So we're going to use that in this as well .
So they are all the tools we're going to be using .
The next thing we're gonna do is jump over and take a look at how we can edit this functions .
PHP file .
Now there are a number of ways in which you can edit the functions PHP file Probably the easiest way to do it .
And the safest way to do it is not through the dashboard of WordPress .
However , if you want to , you can do that and I'll quickly show you how you can do that .
But then I'll show you my preferred way of working .
If you want to , you can come over to the appearance section and come down to the theme editor .
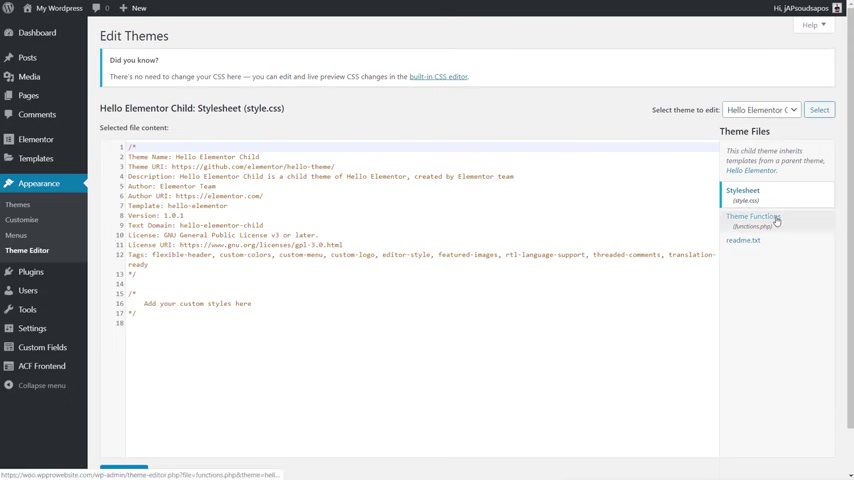
If it's your first time accessing this , you will get a warning notification to say that you can potentially break your site .
And then what you need to do is to take a look on the right hand side , click on theme functions and that will open up the functions dot PHP file , at which point you can now edit this information if you wanted to .
The easier and probably safer route for doing this is take a look at how to do it through the file manager .
That's part of your hosting account .
So I'm using site ground for this example .
As you can see , I've got all my sites on the left hand side and I've opened up the site we're taking a look at , opened up the public underscore HTML file folder and we're now looking at the root of this particular site .
So these will show you all the folders and all the files inside this particular website .
What I need to do is come down to WP content and open that up inside there .
We're looking for the Themes folder and inside there that will show us all of the themes we currently have installed .
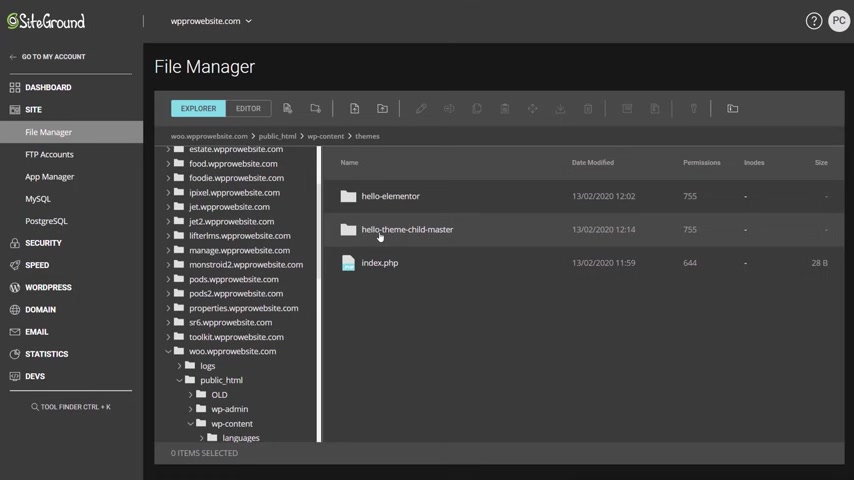
Now I'm using Hello , But I've also got the child theme installed , which means that if I make changes to this and there's an update to the hello theme in the future , then I can update it knowing that I'm not going to break any changes I've made to the functions PHP file or the CS S file or a multitude of other files .
We may want to add in for various different reasons .
So if you're using hello or using any other kind of theme , always install the child theme version of that alongside the main theme and then make any edits to the child theme .
That way you save yourself from having problems later on down the line when you need to update your theme .
So with that said , we need to open up the hello theme at Child Master and inside there you can see we've got the functions PHP file .
So now I can click on that , and if I want to , I can right click .
And I can edit this if I want to .
So I click on Edit , and that will now show us all of the data inside that particular file .
Now this is a very stripped down version , and the way that a child theme basically works is anything you place inside the functions PHP file or the styles dot CS S file .
That information will be added on top of the normal functions dot PHPP file or the styles dot CS S files that you've got as part of the parent theme .
Don't worry if this doesn't make a lot of sense , it's more a case of making sure that what changes you make are done to the child version .
That way you just save yourself from problems .
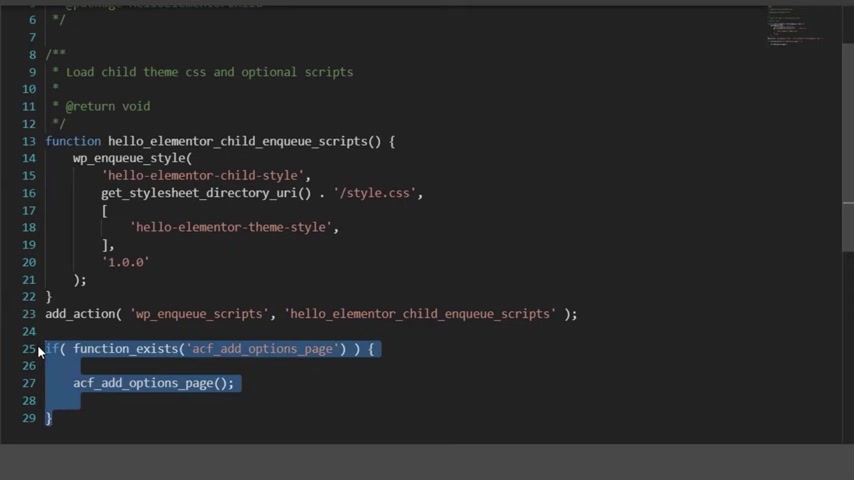
So the first thing we want to put in is just make a little bit of space for this , and we're just going to drop this simple little function in and what this does .
Is it , Technically , just says , Make an options page inside the dashboard of WordPress , and then I can do things with it .
It does nothing more than create a blank options page .
So with that in place , if we save this now , so you come up and click on Save , we come back into our dashboard and we'll just refresh this .
Take a look at the bottom .
You can see there's nothing there that says options .
Once we refresh this , we now have a new section called Options .
If we click to open that up , you can see it basically says there's nothing here .
You'll need to go and create your first custom field group and put some data inside there .
So we created that That's the first thing .
Let's come back into the file manager .
We're gonna add one more piece of information underneath this , and this is the important one .
This is the one that redirects our editors to a specified location .
So I'm going to paste this in , and we're going to take a quick look at it now .
Don't worry if this makes no sense , as long as you know what to edit , that's all you really need to do .
And I'll put links to this code for both of these different code blocks into the description below , so you can copy and paste , making sure you don't have any problems .
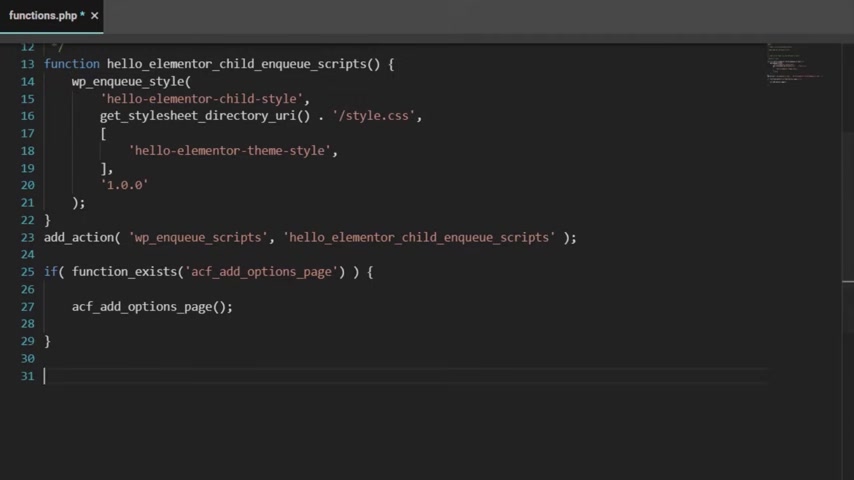
So let's quickly take a look at what this is doing .
It's basically saying to set a function for my login redirect , and then it tells us we want the arguments of URL request and user .
In other words , what's the URL we want to redirect to ?
What's the request and what type of user do we want to push over to the If we take a look underneath now you can see it , says administrator , user and author .
So it's basically saying If you're an administrator or an author , then be redirected .
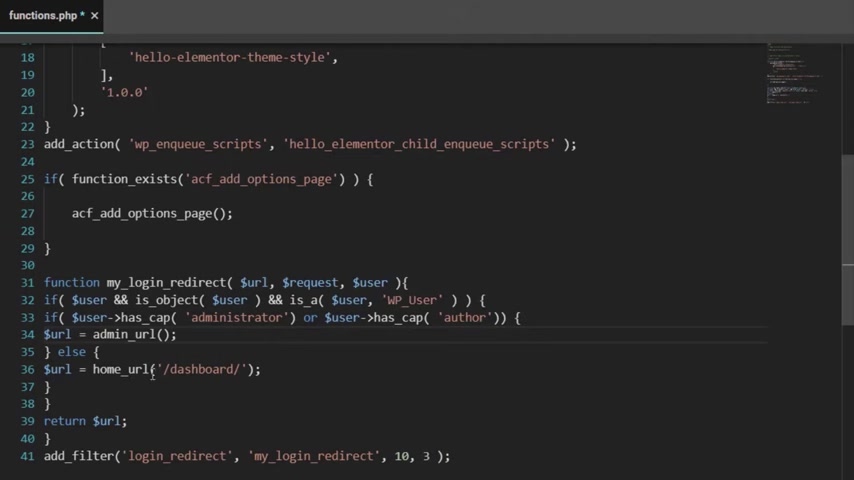
If you're not , then you just carry on going to the normal location so you can see it says home URL is dashboard .
So if you're an administrator or author , you're going to be redirected to the dashboard .
So what we need to do is quickly change this from being an author , and we want to set this to be editor .
So all we need to do is click inside there and replace author with editor come up and hit Save .
And that's now set everything up inside there for us when we come back over now to our dashboard and refresh that nothing's really gonna happen because we've set something up that has to be triggered when a user logs in .
OK , so that's the first part done .
We've now gone through and set up the functions PHP file , So let's quickly make sure this is all working the way we'd expect it to .
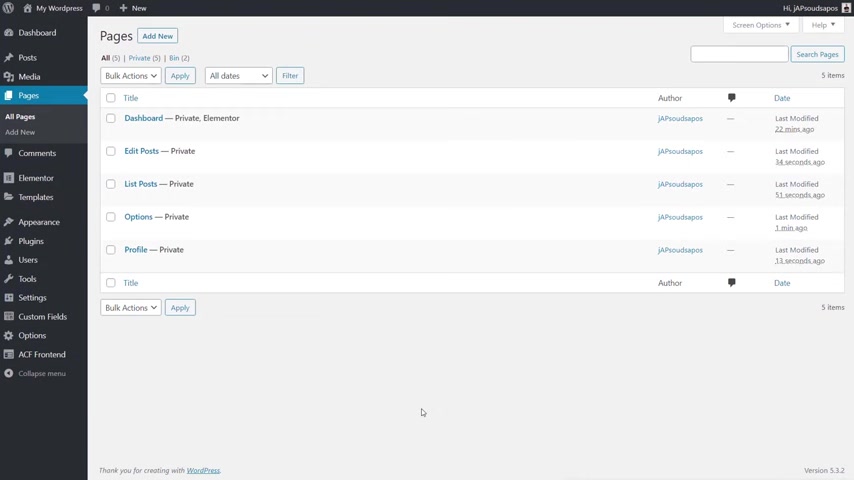
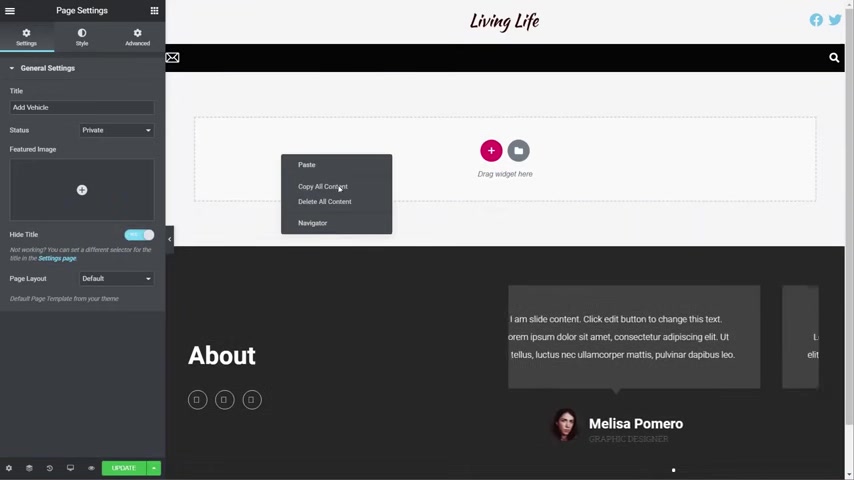
Let's go to the pages section .
We're going to add a new page , which we're gonna call Dashboard .
We'll click on publish , but for a little bit of extra security , we're going to change the visibility from public .
We're gonna edit that and We're going to say this is private and we click on OK and click on update .
And what does Private do ?
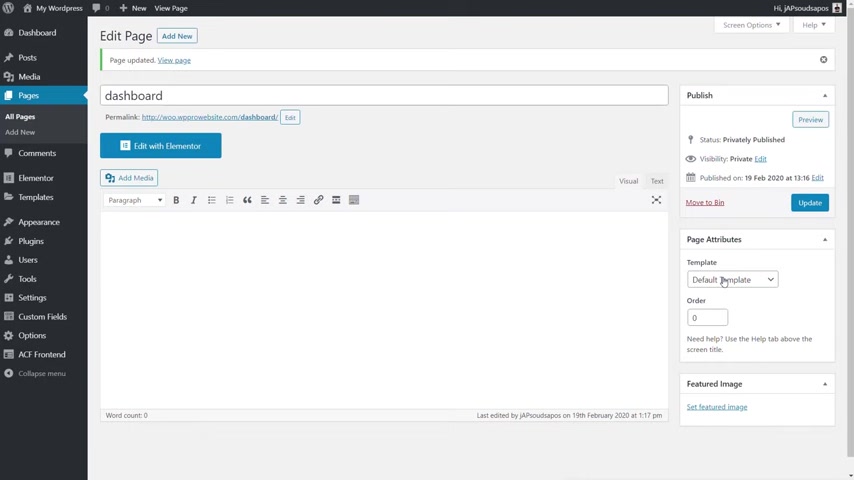
It basically restricts who can access this particular page now .
Is it bulletproof ?
Not really , no .
I mean , if you want to get into security side of things , this is a pretty weak way of doing it .
Because this dashboard is kind of tied into the use that logs in , then it's not really too much of a worry , but if you want to go above and put some more security in there , there's tonnes of plugins that can restrict access to content based upon user levels and so on .
We're going to keep , like I say this fairly straightforward , just so I can demonstrate .
But what that will do is it means if you're an administrator , an editor or an author , you'll be able to access this page .
If you're a subscriber or a non logged in user , you won't be able to access it at all , so it gives a little bit of security in there from that aspect of things .
So once we've done that , we don't need to worry too much about putting anything in here , we'll just drop in .
This is my dashboard just so we can see that there's something on there now .
Let's quickly create another user that's going to be set up as an editor , so we can use that as a good example then of testing things out .
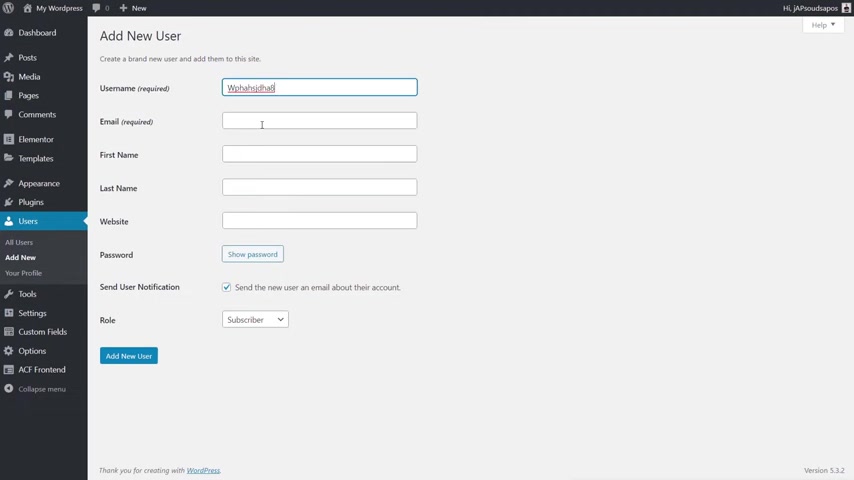
So we'll just create a user name and we'll drop in an email .
It doesn't really matter what we're going to use in there , and we're going to drop in passwords .
We'll say Show password and what we'll do is we just copy a bit of that and we'll set those to be an editor and we'll remove that from there .
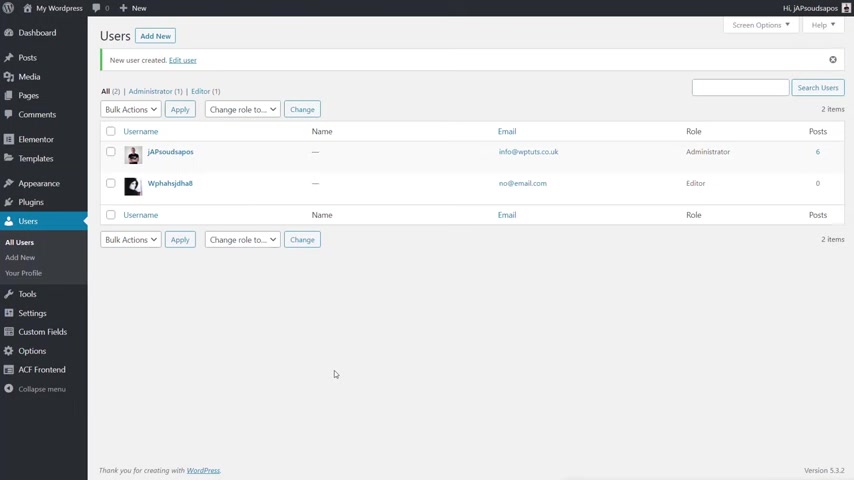
OK , we'll quickly add that user to create the new user role .
And we've done that now .
So we've got an editor .
So then we can check this .
We can try logging in , and we should then automatically get redirected through to our new dashboard page .
OK , so we come over to the WP dash admin page .
We're going to log in .
We should find out .
There we go .
We're taken through to our dashboard .
Now it tells us this is private , so we can see at the top .
We're in a private section of our site , and we can see it in the dashboard and what we just set up and created .
So we know that the redirect for any editor is going through to the relevant location .
So now we can go through and start building out all the different things that we want inside this dashboard area .
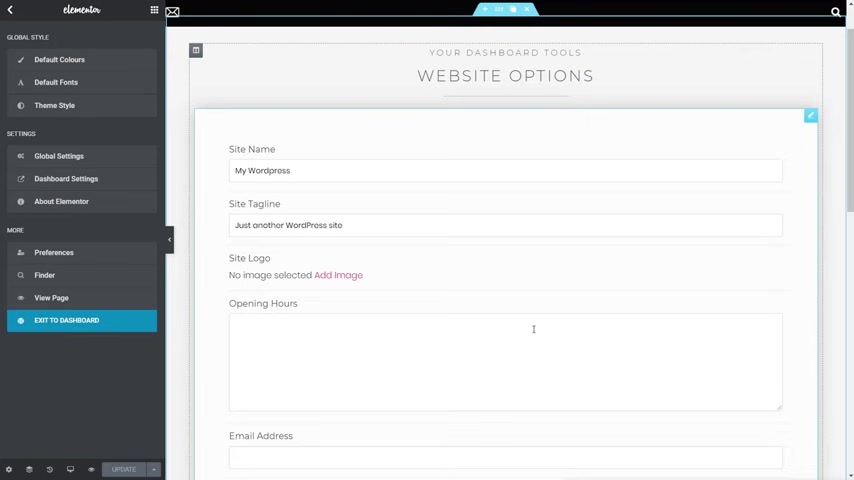
So the first thing we need to do is start working with the options page .
Now the options are basically a way where we can say global values that we want to use inside different templates in different parts of our site .
So you may want to put things like opening hours , contact details and things like that .
But you may also want to reference things like the site title .
You might want to do things like the logo .
Well , you can use AC F to do that and use that with the meta fields .
But AC F front end form pro has recently been updated , and these have been added into the option section or the site section , so you don't need to put these in it .
You can reference and use the tools built into the plug in .
It's up to you .
If you want to go down that route or if you'd like to have complete control and do it through AC F or just use a combination of the two , we're going to do the the last one .
A combination of the two , so we're gonna do is come over into custom fields and say , Add new from there , we're just going to call this options , and then we're going to set up where we want to reference this .
Now , by default , you can see it says under location .
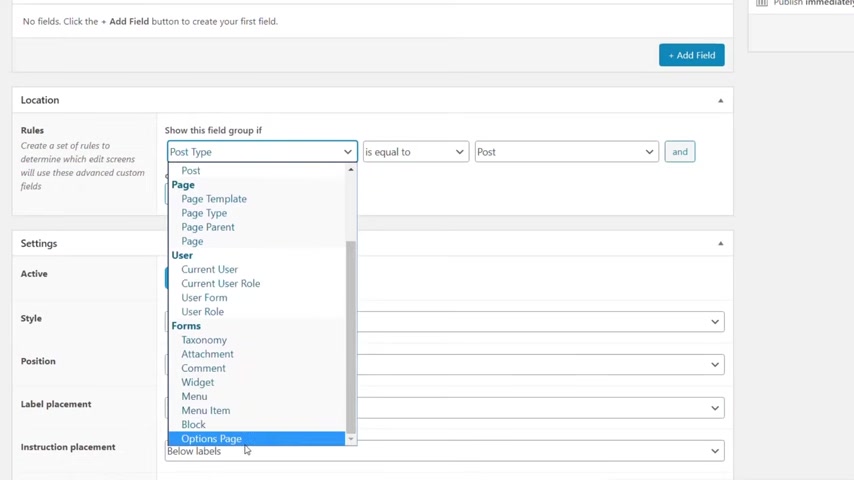
Post type is equal to post .
What we need to do is change this and just come down and find the option .
There we go at the bottom of the list .
We've got options Page and you can see it says options .
Page is equal to options now .
Options is just the name of the options page , and there's a lot of options I know that we've created and because we only want one , this is perfectly fine and it's going to work straight out of the box .
You then got the things like the settings , which we don't really need to change anything inside .
There we can effectively leave that exactly as it is .
All we need to do is come in and start adding in the custom fields that we want .
So let's add our first field in and from there we're just going to call this opening hours .
You can see that's fine text .
We're going to change that .
We want to put a text area inside there .
Everything else can be left as is and come down from there .
And we're gonna add another field and we'll just say email address and we'll change that to email .

And finally , we'll add one more in , and we'll just call this telephone .
There we go , and we'll set that to be a number .
So we basically created three simple , repeatable kinds of pieces of information that might be used in various different parts of our site .
Inside the templates .
Like I say , I'm not going to show you how to build those templates and start linking this data through .
I've already covered that in its own video , which is linked below .
That's going to be a much better thing to follow along than me trying to shoehorn everything into this particular video .
So once you've seen this video .
Check that one out as well hit , publish .
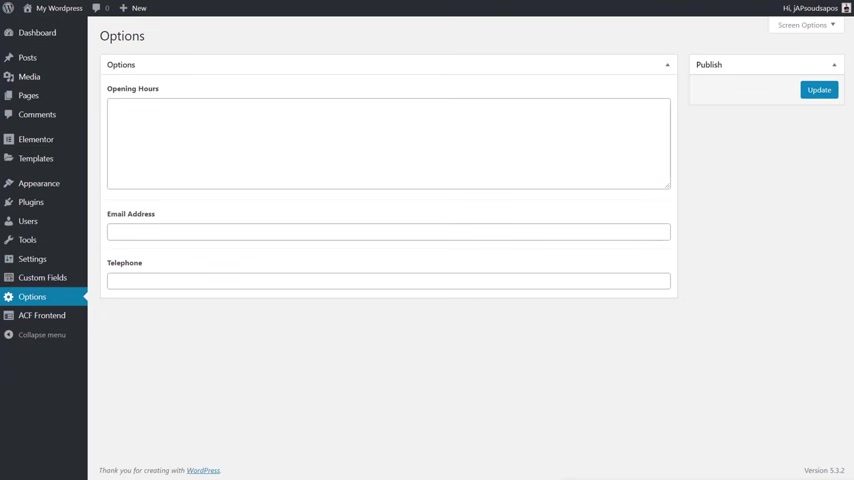
And once we've done that , we're going to come into the options section and you can see now we have three new fields , the opening hours , email address and telephone .
So we now have some basic information inside there .
But you'll notice we don't have those fields I talked about as part of AC F , front end form pro .
They are controlled inside the plug in itself .
So we'll take a look at those when we start building out the dashboard page .
But there you go .
There's our options , All set up .
Ready Now inside our options page , the next thing we want to do is start setting up the dashboard itself .
We created the blank page , but we've got nothing really on it .
So to make life easy , I've already created a template .
And if you want access to this , I'll put a link in the description below so you can grab this yourself and use this as the basis of building yours out , or just see how I've set things up now to do This is very , very easy .
We're going to come into the template section and from there , we're going to come into saves templates .
We then come up and say import templates and we now just need to simply drag and drop in the json file .
So I say , I'll drag and drop that into there and import that once that's done , that'll go through .
So you've now got dashboard template instances , none who is not being used anywhere on the site at the moment .
So what we need to do now to be able to start using this is come back into our pages section and go to all pages .
There's our dashboard page we created earlier on .
Let's just come in now and edit this .
Once you've done that , we're going to get rid of this text at the top .

So we've got a blank document to work with , and we're going to say , Edit with elemental .
Once we've done that , we can just simply load in that template .
So first of all , let's just click on this template option , and inside there we're going to come up to my templates and you see , there's our dashboard template can insert that you say yes to that .
And then we took a couple of seconds .
There's our dashboard template all set up .
If you wanted to , you could get rid of the header and footer section of this .
So you've got a completely unique area .
And for this example , we're going to do just that .
Gonna come in and we're gonna say we want to work with the elemental canvas so I don't have any headers or footers to distract anything we're doing .
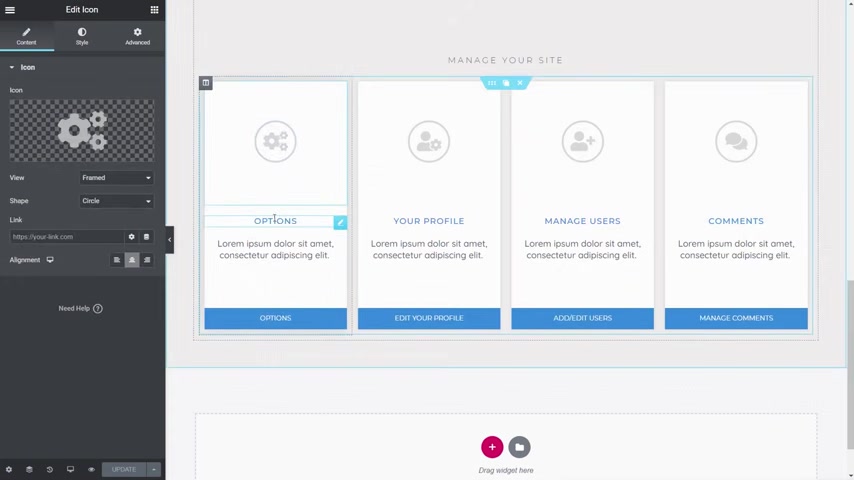
Now , let me just show you some of the things that I've got set up on here .
You can basically ignore all of these different entries , these icons , because we're going to change those .
This is from a completely different type of site anyway , so we can change everything inside you , and it's all incredibly easy .
It's all just made up of normal elemental widgets at the top .
You can see we've got the profile picture , and we've also got the name that I'm logged in under .
How do we do that ?
Well , that's very easy , So let's just get rid of this .
Just delete that from there , and I'll show you exactly how to do it .
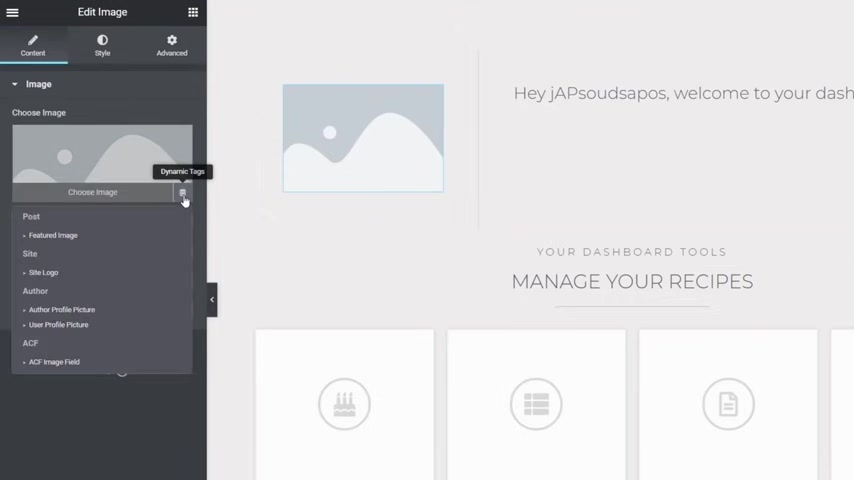
Gonna come in and we're going to just choose an image .
We're going to drag and drop that image into there .
We're gonna click on the little dynamic tags Option , click and open that up and you can see this now gives us a tonne of different options on where we can pull this particular image from .
So we're gonna say , user profile picture Gonna click on that , You can see that pulls in my profile picture .
We set that to be centred .
And then all I need to do is come into style , for example , and I can come in here and I can do whatever styling that I want .
So if I want to , I can simply put in things like a border .
We say a solid border .
We set that border to be white .
Once we've done that , we're going to set the border to be five pixels and we're gonna set a border radius of 100 and that gives us a nice circular picture and we can drag and put a little box shadow in there .
So super , super easy .
If you want to make that link to something , you could do that as well .
This works fundamentally the same way .
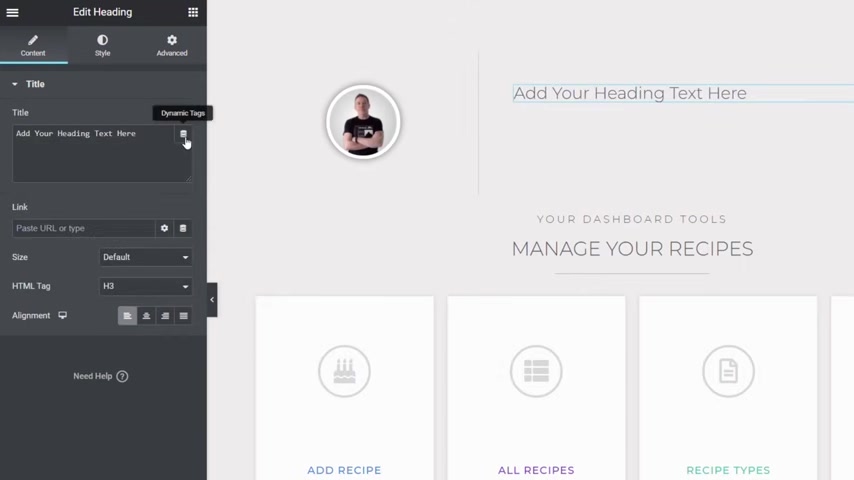
Then on this particular section , all I've done click on There Is I put in heading .
We've used the user title , which again is just another one of those fields .
So let's just get rid of that .
All we can do is we can click on the little dynamic tags option .
We can come down and we can find exactly what we want , which is if we scroll right the way down .
You can see you've got user info .
We've also got Author so it's up to us .
We can simply come in and say user info , Click on there and we can say Choose the info we want to use so we can pull in the display .
Name the user name first name , last name , whatever you want .
But obviously , if you use things like the first name or last name , this could end up being empty because not everybody fills in and updates that data , whereas their display name or their user name , they will do so .
Let's just say display name .
And once we've done that , we can come into advance and we can put in whatever we want to before and whatever we want to after so we can just put something like , Hey , your name .

What would you like to do today ?
So we've got a nice little user message on there that's linked through to the actual user name .
The name they want to use for the display name and everything just looks pretty cool .
So super simple way of being able to reference dynamic data of the logged in user and make this a nicer place to be because you make it a little bit more personalised from the get go .
OK , so the final thing we do before we start creating all the pages is just tidy things up .
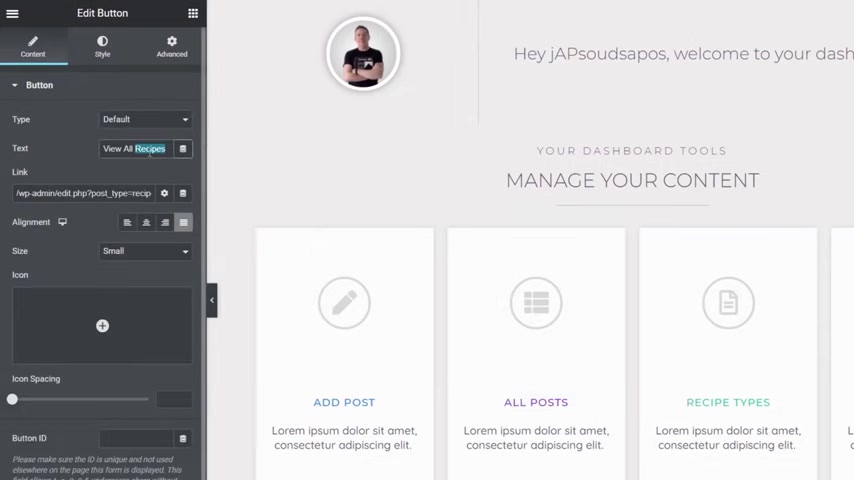
So we're gonna change this from manage your recipes because obviously it makes no sense and we'll just say content .
OK , so let's update that and we've got the basics of our template now are all in place .
So what we're gonna do next is create all the blank pages which will hold all the data for the different things that we want to do .
So let's exit out of this section , and once we've done that , we can now come into the all pages and we start adding new pages in for us .
So I just wanted to pause the video here and just say that if you're enjoying what we're covering in this video , please consider subscribing or smash in the bell icon below to become part of the W crew .
I'll be notified every time I release more content like this .
Anyway , let's crack on with the rest of the video , OK , so let's start off just by creating those blank pages .
So I'm gonna add a new page in , and this one is first of all , going to be called options .
We'll set this again to Private OK , that and update .
So we're going to set all of these different pages that are part of our dashboard .
Every one of them is going to be private .
Next page we need is just to simply come in and we're going to say we want to add in list posts again .
Set that to private .
OK , publish .
So I'm gonna quickly run through now all the different pages we need to add into this and then we'll come back and take a look at what I've added in .
There we go .
We've got our five different sections set up .
Now we will take a look at adding in some advanced custom fields based custom post types a little later on , but that'll be towards the end of the video .
Once we've covered the basics of doing the things that everybody that might want to set up a custom dashboard is going to need to do not everyone's going to be using custom post types .
So we've got edit posts , list posts , options and profile .
So let's start off with our options .
Let's just come in and edit this .
And once we're inside here , we're going to just quickly open up elemental edit with elemental .
And from there we can now just pull in and start doing what you want .
So first thing we're gonna do is come up to the settings and we're going to come in and say to hide the title .
We don't want that inside there .
Next , we're gonna come over and we're just gonna go and search for front end .
There we go .
There's our front end form .
So we're gonna drag and drop that over into there .
So what we can do now is we can go in and style this way we want , but we need to go through and set this up to configure it , to tell it exactly what we want to start editing and what we want to start working with .
Now , what we currently have is just basically the placeholder information with just a set of basic parameters set up .
They're not specific to what we are looking to do .
So we need to change that .
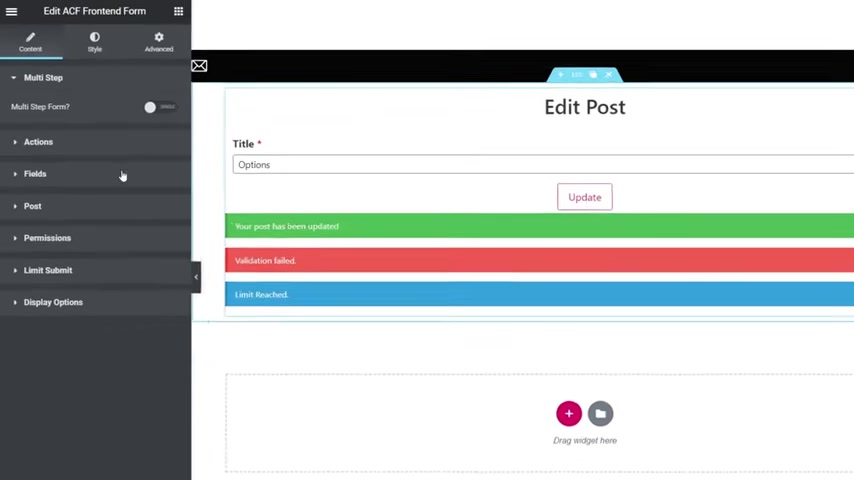
At the moment is tell us we're gonna edit a post , but we're not really going to a post now .
First things first on the left hand side , we've got multi step .
So if you've got something that has a lot of different content to update , you may want to put this into a logical step by step order .
But for what we're doing here , we don't need to worry about that .
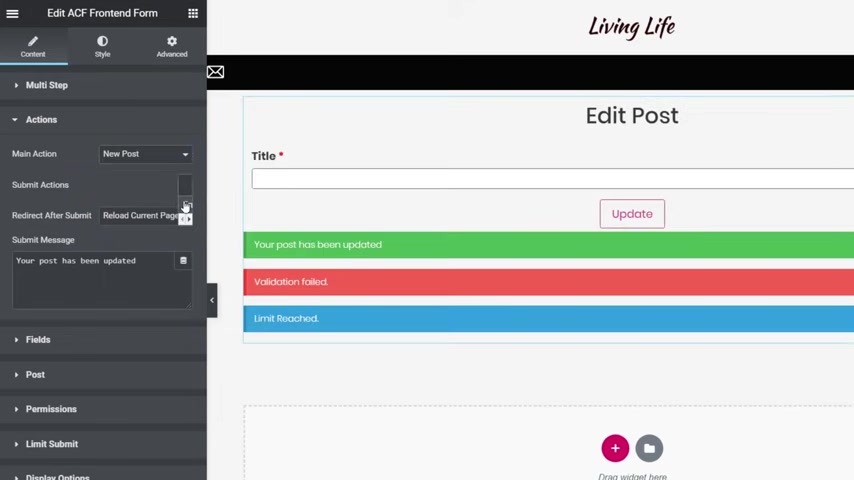
Let's open up the action section and inside there you can see it currently , says Edit Post .
We're not working with Post .
We're working with options , so if we click to open this up , you can see we have the option at the bottom that says edit options .
And this is where the pro version is required .
The free version doesn't allow you to edit options , but it does allow you to do things like edit posts , new posts and users and so on .
So options .
We can click on there and you can see that now pulls in the default site name , site , title or tag tagline on the site logo .
So we've pulled in those default entries .
It's up to us now .
If you want to tag on , if we want to take any of those off , we may not want people to control all these different things .
It's up to us how we want to do deal with it .

Then they will submit actions so you can see we've got things like email .
So , for example , if you had an editor that you wanted to give access to the ability to edit things like these sort of like options through at the site , you may want to be notified via email that someone has made a change .
This is where you can do that .
So once this action is is sort of taken .
Once that submit button is clicked , emails are going to be sent and you see that automatically opens up an option towards the bottom called email .
We don't want to worry about that for this example , we don't want any submit action .
Then you've got redirect after submit so you can see we've got reload the current page or post a custom URL or a new post URL .
It's up to you Normally with something like this , you probably just want to reload the same page because people are gonna come back , maybe continue editing whatever .
So again , like I say , the options are there .
You can do whichever you want .
We're gonna set this to reload the current page .
You can also put in a custom message when this is actually submitted .

We're going to leave that as it is , Fields , We're going to come down to there and we can take a look at now what we can do .
You can see we've got edit .
Post is set for the form title , which is what you can see at the top there .
We don't want that .
We're gonna get rid of that .
We've got our own custom title in there , so we're going to get rid of that .
Take it out .
It just removes it from the actual layout itself .
So that's pretty cool .
Field groups , you can see we can set that or we can choose individual fields .
If we want to specify specific fields from any particular location in this example , the options , uh , custom fields we've set up .
However , we're going to set this to all fields for the field group .
And then we can say , What's the field group we want to use ?
We click and any of the AC F met The fields that we've created will be listed here .
Options is the only one we currently have , so we can choose that and you see that immediately pulls in now all the extra data for that particular field group .
So we haven't had to go through the process of adding these in one at a time .
It literally just add all of them in .
Then we've got the submit button text where you're just going to save this to save options , and you can see that now updates the button at the bottom .
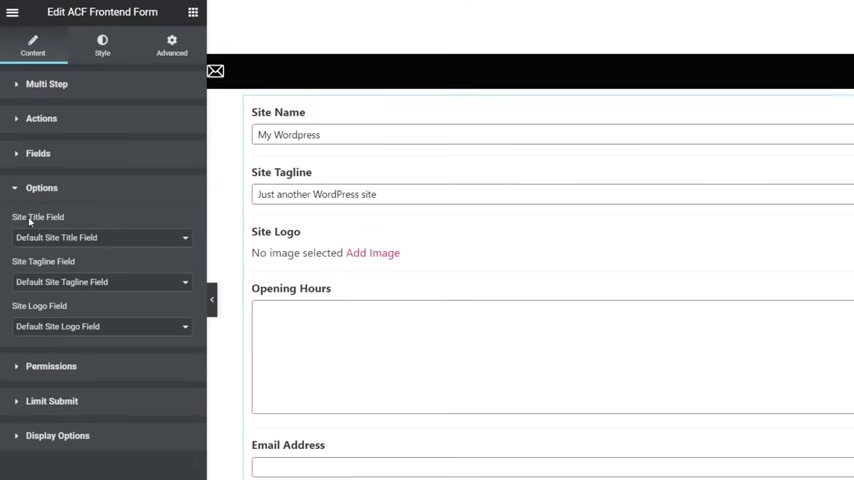
Then we're gonna come down to the options and take a quick look in there .
So this is where we've got the first three entries .
The site name , tagline and site logo .
You can see it just maps those to the default locations that are part of the core of WordPress .
However you could if you wanted to set them to be not used at all by , set them to none or you could set a custom .
So if you set up your own custom fields for things like the logo and so on , because maybe you want to add extra options inside there you could do that , set it to custom and then reference that custom AC , F field and all the extra information .
All the extra settings you've applied to that AC F field will be used instead of the normal word press core functionality .
Again , I hope that makes sense .
And we've got the same option then for each of these for the site title , tagline and logo field , so you can mix and match as you need to .
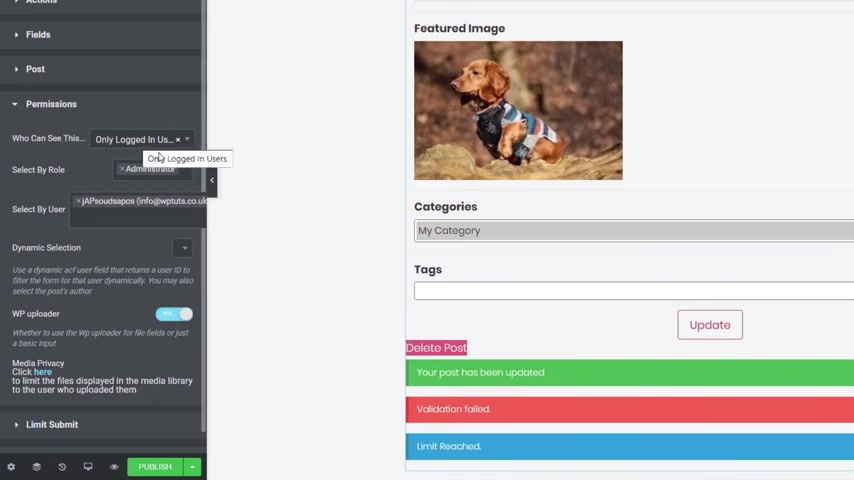
You've then got permission .
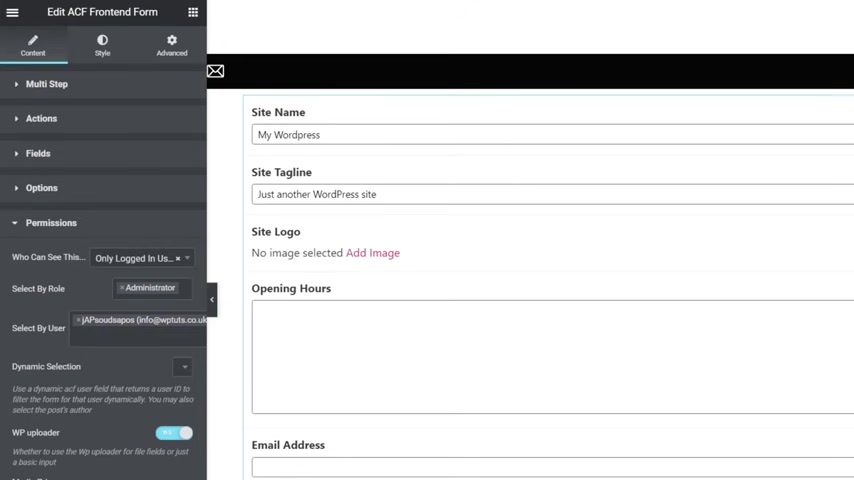
Now this is the important step you can see it says who can see this .
So even if we've said someone and someone's access this particular part of our site , the dashboard that shouldn't be in there , we can still lock it down further to when they click on something and come over to this particular part to edit things like the website options or add new posts and so on .
We can still limit who can actually use it .
So you say , Who can see this only logged in users only logged out or all users .
Obviously , we want this to be only logged in users .
We can add another level on top of that now , because we know we're only allowing people that are either an administrator or an editor .
We can select by role on top .
So let's do just that .
We click and say , Select by role and we're just gonna click on editor .
So now we've got this that only people that are logged in that are either an administrator or an editor will able to see this .
You can also get really fine and say exactly what users are allowed to view this as well .
Now you can see by default .
It's just pulling me in as the main administrator for the site .
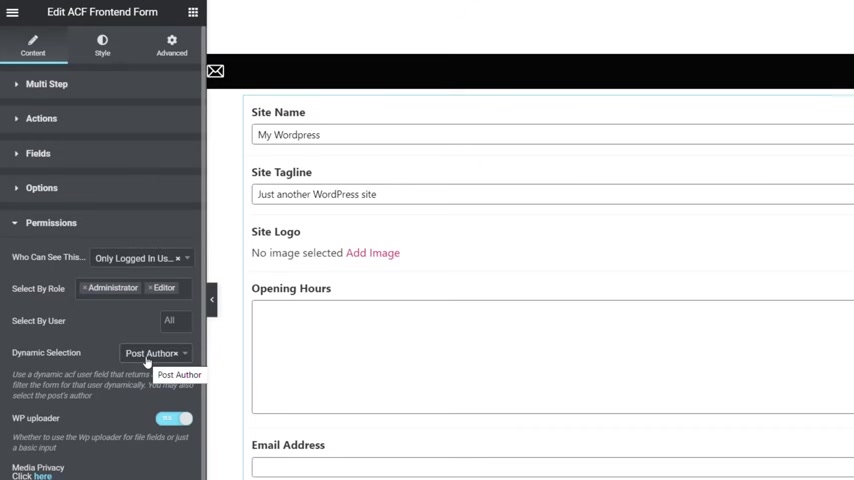
However , I'm going to get rid of that because I want all users that match the other criteria can see this information .
We also have dynamic selection .
If we click to expand that out , we click and you see it says Post author now , because we're dealing with global site options , so nobody actually authors this .
Everybody that has access to this section could see this and use it because the options are a global option .
We wouldn't want to put the author inside there , but when we take a look at creating the other pages , this is another one of those things .
That's very useful because it means that only the author's posts will actually be available to edit .
So anybody else's posts won't be gonna get rid of that for this example .
Because , like I say , this is an option section , we then have the WP upload .
Do we want to use the normal WordPress upload for the file fields or just a basic input ?
It's up to you how you want to deal with that now , because we're only dealing with the logo and it's a global thing .
I would probably say use the upload because then anybody can access that logo .
You've also then got options for the media privacy , so I'd recommend taking a quick look at that to see exactly what options are available and see if there's things that you want to set up inside there as well limiting submit .
So this allows us to put restrictions on who can submit or how many times can be submitted .
We don't need to worry about that because this is not something we want to restrict in this particular example .
And finally , we have display options so you can see we've got show in model , which we'll take a look at in one of the other stages .
Show field labels , which is where you can see opening hours , site logo and so on .
So if you wanted to hide those , you could hide those completely and put your own in if you wanted to .
Or you can enable those and specify whether they're above or whether they're in line so you can see you've got styling options available there and also to show the required mark .
So if you've got something that's a required field , it makes sense to put something on there normally with the little red asterisks .
Just to denote that that is a required field .
And then , if you've used instructions , where do you want those instructions to be placed , whether above the field or below the field ?
So up to you .
So that's the basics .
That's the function side of things all set up and configured .
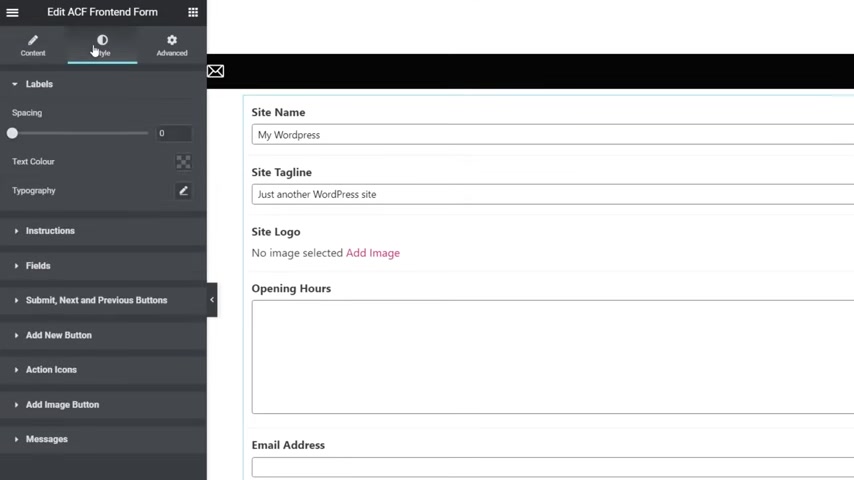
What you can do is you can come into the styles option .
Now , this is again something that you need the pro version of this plug in .
Because when you want to style these forms and you want to do it directly inside the plug in , all those options are there for the labels , instructions , fields and so on .
So you can style or configure how this all looks to make it perfect in keeping with your particular site .
So that's how we go about setting up the options page .
Now .
Obviously , there's no style everything on here .
So I'm gonna go quickly behind the scenes and I'll start it so everything is in keeping .
There's no point of me showing you this because if you follow this tutorial , I'm pretty sure you're gonna know how to go in and start starting things that part of elemental .
It's pretty simple , straightforward stuff .
OK , so there we go there with a little bit of styling added .
So what we're gonna do now is quickly jump back over onto the site and take a look at this on the dashboard itself and how we start to link things through together .
So first of all we need to do is go back into our dashboard .
Let's exit out of this .
Come back into our pages section , and from there we're going to come into our dashboard .
We say edit with elemental .
And we can now just link this up from our dashboard template through to that actual page .
Just scroll down to our option section the click on the button at the bottom , and from there we're going to come up and we're going to say we want to link this So we named this page option .
So all we need to do is Click and we're going to put in options and we're going to put a slash at the end of it .
So this basically says it doesn't matter what the domain is .
We just want the options page .
Now , if you're wondering why it isn't automatically popping up , that's probably because we're dealing with a private page , so it's not necessarily available to everybody .
However , if you're kind of wondering , Well , what exactly is the link you want to use ?
If my page is set to private and I can't see it through this .
Come back over to your pages and you can see if you come in and quick edit the slug .
That's all you need to grab hold of .
So with that in place , we're gonna hit on update and we now have that link set up on there .
Now , anywhere else , you've got this link like the icon at the top or the options title .
You can make sure you've got the same link applied on there just to make sure that everything links through the way you want it to .
I'm not gonna worry about that right now .
I'll update that behind the scenes .
So I hop back over into the dashboard .
Now our custom dashboard .
Let's scroll down to our options section and let's click to open that up and you see , there's our new options page .
We've got our site title , our site tagline .
No logo image uploaded at the moment , we can fill in our opening hours , email address and telephone number , so let's do just that .
Let's add something in this .
Let's just say no at email dot com and we'll say the telephone number there we go add an image .
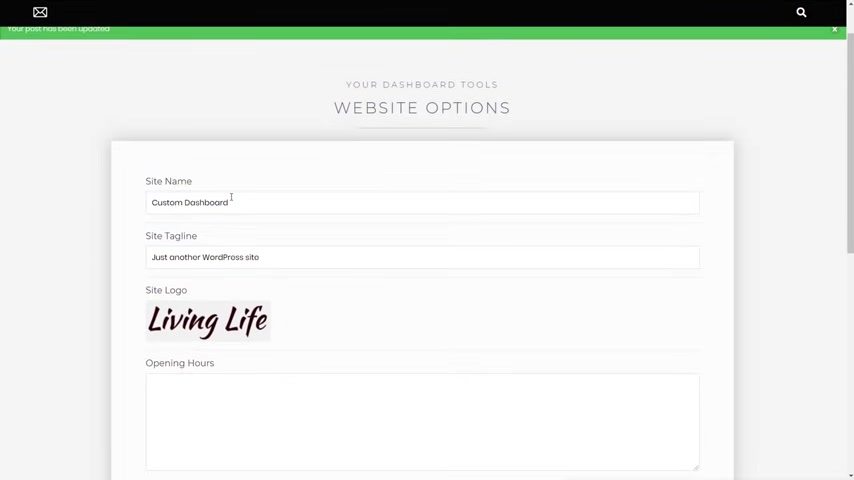
We choose the logo we want to use and say Select if you want to drop some open now as we can and we're just going to change this and we're going to call this one custom dashboard now , providing everything is linked up and working .
OK , when we hit save options , We should get a notification to say your post has been updated and you can see all the data now that we've updated has been reflected inside this section .
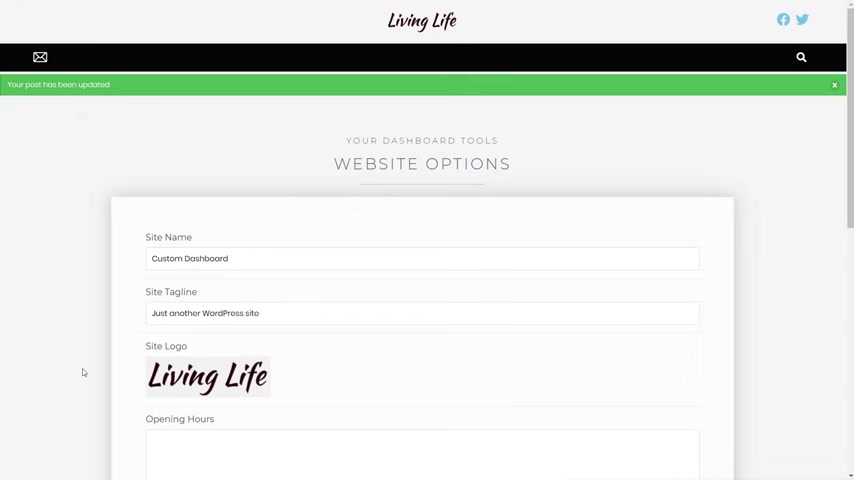
If you want to make sure this all works , if I just pull this down a little bit and we can see the tags at the top , you can see now we have custom dashboard , which is the custom site name that we've just set up inside our options panel .
So you can see everything is working as it should be .
And anywhere we've got the logo referenced anywhere we've got the email reference or the telephone number referenced , they will all be updated accordingly throughout our template and everything else we've set up to use them .
So that's the options pages .
And like I say , if you want to find out a lot more about how you can use this , all this kind of functionality , how you can link this through to your templates and all those kinds of things .
Check out the video that I've linked in the description below , because it'll go into a lot more detail on how this specific function works inside this particular plug in .
But that's our options .
Pages set up .
Next .
Let's take a look at how we can work with the actual content .
In other words , our posts .
Now , when we're working with the posts inside our custom dashboard , we've got two different sections .
We've got the ability to list our posts , at which point we could then edit them or we could delete them .
And we've also got a section where we can go in and add new posts , so the first thing we're gonna do is going to concentrate on the add new posts .
Then we'll take a look at the different stages we need to list and edit the post .
There's a little bit more , sort of like a little bit more detail to go on in there .
OK , so let's come in and add posts , and we're just going to come in to edit that .
And as of before , we're gonna click on edit with Elemental .
Once we're inside there , we're going to quickly just come down , get rid of this title section , and now we're going to come in and add our widgets in and again .
We want front end .
So we drag and drop that into there .
And once we're inside there , we now just need to go through and configure exactly what that's going to do .
So again , you can see by default .
It sets up to become an edit post section , which obviously we don't want to do that .
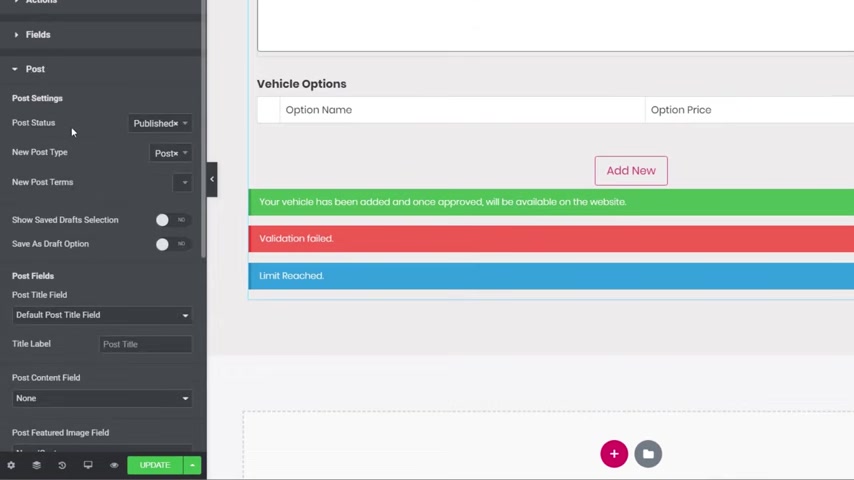
We want to add a new post .
So underneath the actions , we're going to change this from Edit Post to New Post , submit actions .
We're going to drop in there .
We're gonna say emails .
So what's gonna happen is whenever a new post is added to the site by an editor , they'll automatically generate an email and we'll get a copy of that , then , coming through , redirect that to submit Well , we'll reload the current page .
That's perfectly fine .
So then we can carry on editing .
Sure , we need to , and then we can drop in a new submit message .
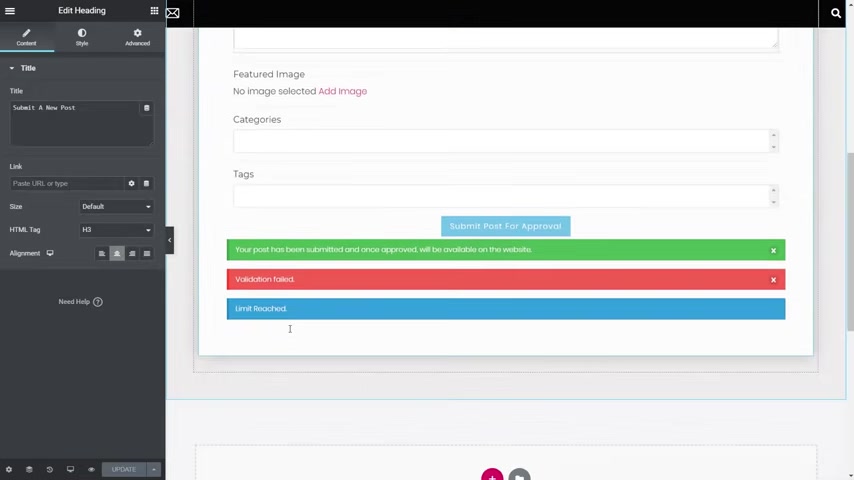
So at the moment your post has been updated , doesn't make a lot of sense .
We'll drop in something that does make a little more sense , just letting them know that their post has been submitted .
And once it's approved , it will be available on the website .
So what we're doing here is we're telling them that it's not going to be automatically added .
It's going to be approved first , and we can set that up in a moment .
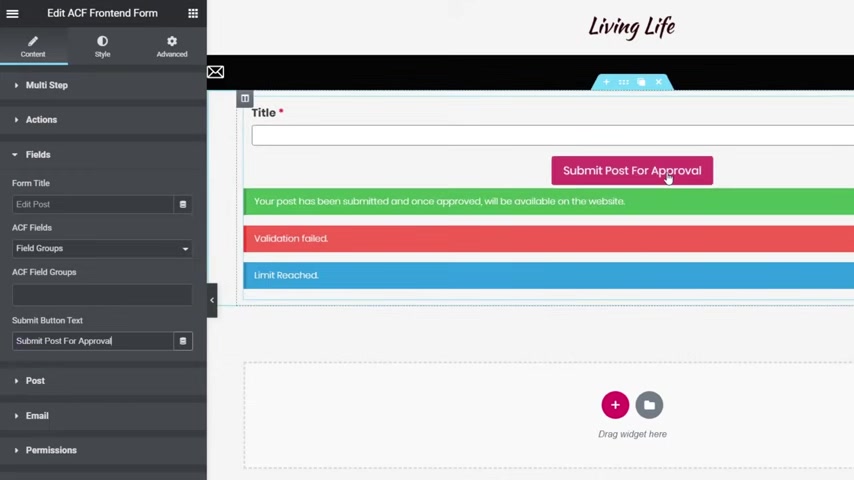
Next thing you want to do is come to the field section and inside here we've got Edit Post , which we need to change that , and we're just going to get rid of that completely to up our own custom title at the top of this later on field groups is perfectly fine .
Then we can just ignore all the rest of the information there .
But we can change this where it says submit post for approval .
We're going to change from update so you can see now that changes the button .
And currently all we have is title set up in here .
Now , if you're wondering why we're saying like the AC F fields underneath this field section we're just saying field groups and then putting nothing in the field groups .
It's because , well , we're not using AC F for this particular section so we can close that down and we can come down into our post section , and from here we can come in and we can configure all the different things we want people to do .
First of all , we've got new post type and you can see we can click on there and we can say a post we can if you want to as well create pages .
However , I would probably recommend staying away from doing that and keeping your editors to just creating posts .
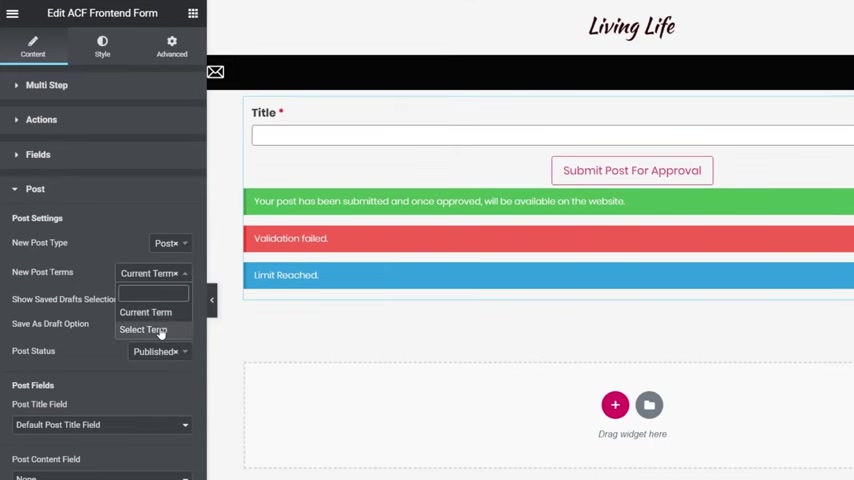
But if you want to , that option is available to you .
We leave that set as posts , then we've got new post terms .
We can click on there and you can see now there's a little bit of a graphical glitch .
This doesn't always open up the way you expect it to .
We have current term , and we also have select term .
Now , we're not gonna worry about this at all .
We're gonna set that to be absolutely nothing .
So we're gonna leave that blank from there .
We're gonna delete that .
And then you've got the options .
Then for saying show saved draught selection .
So if we were allowing them to save a draught , we could save that on there and say Save draught , save as draught option .
So it's up to us if we want to allow draughts to be used as part of this set up .
If you do want to allow them to create draughts , then you can just enable this option .
It's up to you .
I'm gonna leave those turned off for now , then the post status .
What this basically means is when they submit this , what's going to happen ?
We can set it to be a draught .
We can set it to be private .
Set it a pending review or we can publish it directly .
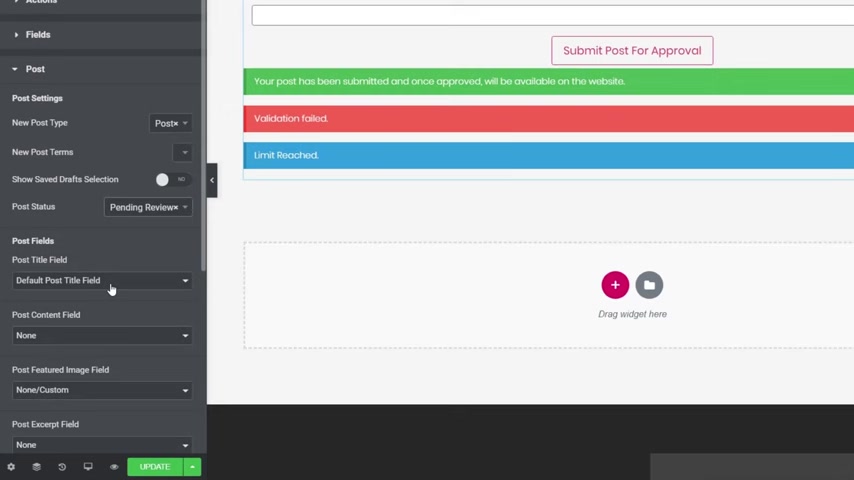
Now for me , I would recommend we're going to put this into pending review .
So that basically means that the administrator of the site will get an email saying there's been a new post submitted .
They will come through .
They'll see it pending .
They can review it , make sure they're happy with all the content .
Once they're happy , then they can make it published .
Obviously it's up to you then we've got the post fields and these just map through to the normal default WordPress core function fields .
In other words , the post title , the post content featured image and so on .
So post title field is fine .
We're gonna change all of these to be their default values .
So we're going to change every single one of them to be default .
Now , if you don't want to use the post excerpt , which I'm not going to , I'm gonna leave .
That said to none the post category .
We can set that to default and post tags .
If you want to use tags inside there , you can set that to default as well .
So if we take a look on the right hand side now , you can see you've got title content , featured image categories and tags .
These are normal things you'd expect to see as part of a typical post inside WordPress .
But again , you do have the option .
If you want to map these through to custom AC F fields , you could do just that .
I say I'm just going to keep this so it just links through to the normal things you'd expect .
Open up the email option and you can see now we can do this .
We can say email short codes and we can say emails .
So currently it's not set up to send an email to anybody .
If we click on , add an item , you can see we can now come in and configure this .
Whatever we want .
We can give this a name .
We can set any two CC and BC C values inside there , so you can see this will come through to what is the default administrator's email address for the website itself .
But you can set this up to anything else you want , including , like I say , CCS and B CCS for copies and carbon copies .
You can set the form , the reply to the subject and the message , and you can see it's going to use short codes inside there .
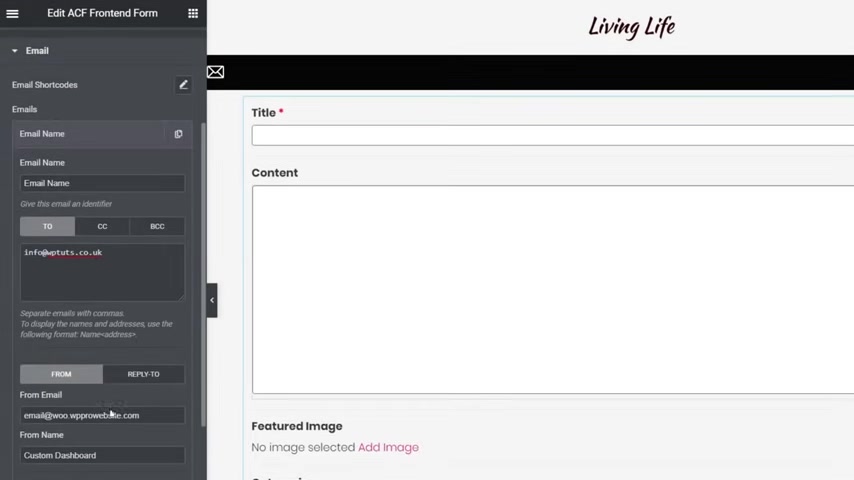
And then you've got the normal method data you just expect to see as part of the normal , uh , email contact form kind of thing inside element or pro itself .
So I take off the credit , the remote IP and the user agent , and just leave things like the date and time there .
Once you've done that , you can set up additional ones .
If you want this , you could easily set this up to send different types of emails to different people very , very easily inside here .
I'm not gonna worry too much about that .
Obviously , you can figure that to be exactly what you would want .
Then we've got the permissions option again .
So we're going to do exactly the same inside here as we did on the previous one .
We're gonna set this to be administrator and editor for only logged in users .
And we're going to get rid of select by user and dynamic selection .
Well , because we put a new one in , we don't want to select this and philtre it by the actual author .
We can leave that as is .
And then , if you want to , you can set the WP upload the limit submit and the display option .
So it's up to you how you want to set these up .
It's entirely up to you .
And then you can go through and style it and everything .
So I'll do just that .
I'll quickly style this off camera and then we'll take a look at this in action .
OK , so there's all my styling and everything is all now in place .
So the final thing we need to do is just quickly hop back over and link this through in our dashboard so we can simply come up , exit out of our dashboard exit back to all pages , and we can take a look .
So this is called a post .
So if we click edit this , we can see there's the slug that we want .
So we're gonna copy that from there , come back into our pages into a dashboard , and we're gonna edit this with elemental .
And from there , we're simply going to come in .
Now , choose this add recipe and change the details on there to make sense .
So you say Add Post , Same for the button at the bottom .
So we'll just change that to add post , and then we just need to link all these up together .
So we're gonna change that .
We're going to drop in forward , add posts , forward slash Just we've got the link as we need it .
So copy that again from there .
Change this now for the title and change this for the button to make sure everything is exactly as we need it to be .
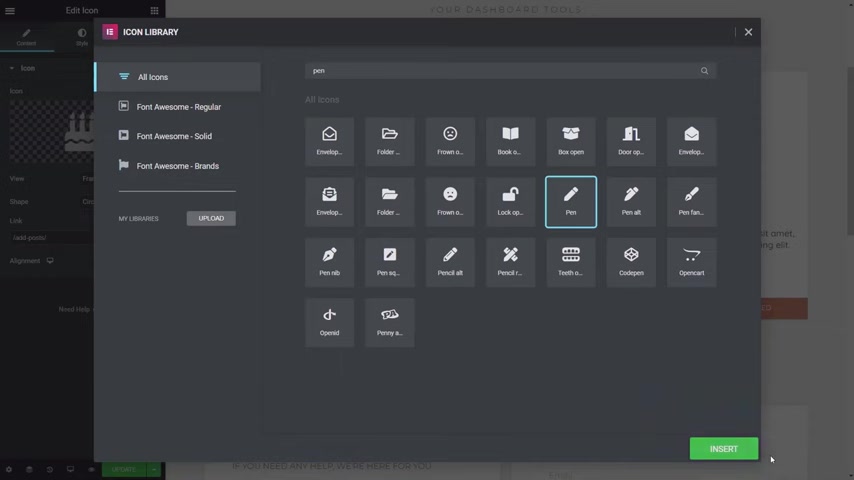
Obviously , you can come in and change the icon on there so we can just come in and find an icon that we think is going to be relevant .
We if we choose this pen option so it looks like we're writing something and we'll click insert , so that makes a bit more sense .
Now we'll hit update on there .
Providing everything is the way we expect it to .
Let's come back over into our dashboard and refresh this .
So you've got the latest version and you see there's our add post .
Let's click to go over to that and you see , there's our submit our new post .
Everything is all set up and style the way we want .
The nice thing is , we've also got our categories listed in there .
If we're using tags , we can add tags in .
We've got the nice whizz Wiig editor we'd expect to see inside WordPress itself , and everything looks nice and tidy and in keeping with everything we're setting up inside this particular dashboard .

So that's how easy it is to create a new submit New post section Now , working with editing and working with your old posts , that's a little bit more sort of full featured , shall we say ?
So let's take a look at doing that next now to create the option to allow us to see all the posts that we've added in and the ability then to go through and select the one and we can edit it and do different things to it .
We need to create a custom loop this because we really want to get in there and control exactly what's going to be displayed as part of our listings .
So let me just show you what we're gonna do back in the dashboard and we're gonna do is we're going to come over to the template section and we're gonna come down to the theme builder .
And from there we've got a new option That's part of elemental custom skin called Loop .
Gonna click to open that up and you can see we can now add in a new loop and click Add new loop and we're just going to call this list posts clear template .
Once we've done that , we come into the normal library .
We can close that that we don't want to use that , and we're now into elemental itself .
Let's make this a little easier .
Let's just set everything up .
So the page layout is using the elemental canvas .
So you've got no headers and footers to get in our way .
Now what we're gonna do is we're gonna create an individual item , a loop item that will display the featured image , the title , a brief information about the actual post itself .
And if we were dealing with custom post types , we could also put in some custom AC F data for this example .
We don't need to worry about that .
But I will show you that later on when we take a look at creating our own custom post type section for this dashboard .
OK , so what do we need to do ?
First things first ?
Let's just get the basics all set up for ourselves .
We're gonna come over , we're going to drag in an inner section .
This just allows us to create a nice layout .
So we've gonna have our featured image on the left hand side , and then we'll have all the data we want , including the edit button on the right hand side .
So let's just make this a little smaller .
About 20% .
We'll be fine .
We're gonna worry too much about that .
And then we can just drop in the different things that we want .
So we're gonna come over and we're going to say that we want to use the featured image , the drag , and drop that inside there .
So that'll pull a featured image in and you can see that pulls the first one in for me .
Next step .
We can come through now and start adding the extra data in .
So all we need to do is just come in and do things like add the post title Drop that in there .
Let that pull that data in will come over back over .
And this time we're going to say we want to have a little bit of text , so we're gonna drop the normal text option inside there .
And the reason being one of the extra things we have as part of elemental custom skin is the ability to just put in a summary taken from the normal body text .
This just means it's just a lot easier to work with and have just some info on there .
Click on the little dynamic tags icon and from there we've got post Summary .
This is a new entry that's part like I say of elemental custom skin .
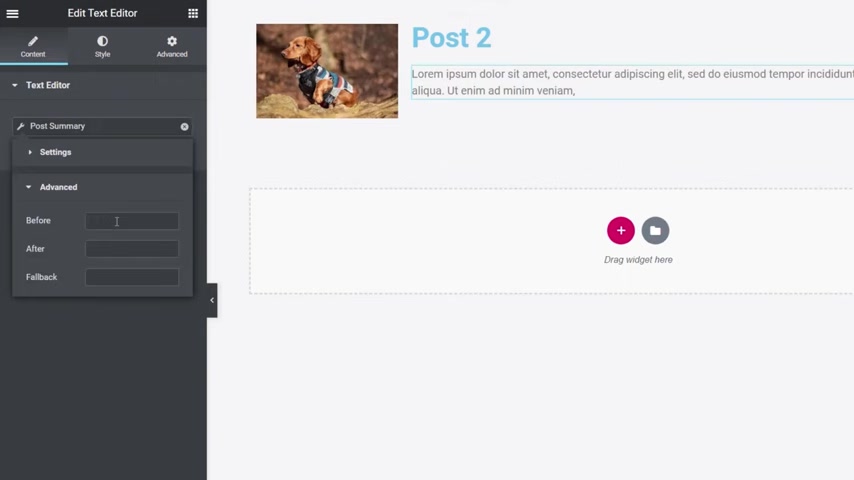
Click on that and if you want to , then you can click on the little Wrench icon and control exactly what information the number of words are going to be used .
The advance anything you want , but before , after and fall back , we'll leave that set as default values .
That's fine .
And finally , we just need to put in the button that allows us to edit this particular post .
So all we need to do is come over like we've done before , come into the option for front end a drag , and drop that over onto this section .
Now , even though you can see all of this data inside there and when we're working with it , we'll do just that .
We will set this up to open up its own modal window , which means we get a much nicer , more streamlined way of viewing our posts , and then we can quickly edit those in a super simple fashion .
So first things first , let's come through and just set up all the values that we need to to get this working .
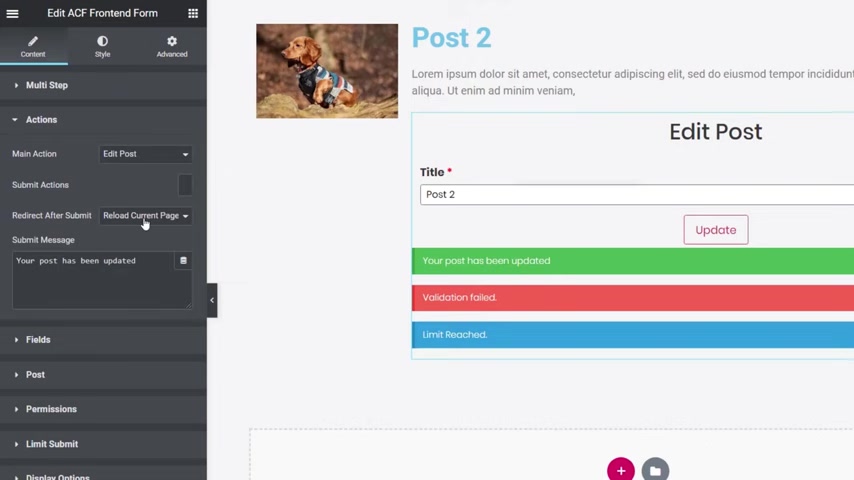
First of all , underneath the actions we're gonna say Edit Post in this example is perfectly fine .
Submit actions .
Well , we're gonna leave that as is we're not gonna worry because someone's editing their post .
We don't need to have an email to let us know that something's happened .
We can just leave that as it is , we know the current page again is perfectly fine .
The fields .
We're going to come down today now because we're dealing with the Post .
We don't need to worry because we're only dealing with core WordPress files so we can ignore the field section , come into posts and like we did in the previous when we were adding a new post , we now go through and configure various different options .
And most of these are the default values that are part of the core post functionality inside WordPress itself .
So post to edit current post post status , we'll leave that set as published delete post option .
Do we want to allow them to have the ability to delete a post ?
Yes , we do delete button , so we'll just change that to delete post .
Then we've got a message to confirm that just so you can't accidentally click on it and then delete something without the ability to confirm first .
Once we've done that , we're going to come through now and map these fields .
So post content , we'll set that to default .
Featured image set to default excerpt .
We're not using the categories we are .
And the tags we are .
So we set those you see now everything is being pulled in the way you'd expect it to .
We've got to delete post update and all those kinds of things .
Next up , we've got the permissions .
And this , like I say , is where we set everything up to make sure that everything is working the way you'd expect .
So we're gonna change .
This logged in users is perfectly fine .
And we want to set this to include editors .
Like we said before , we don't want to select by user .
Next up , we're gonna jump over to the display options .
So we've got the form all set up Now , obviously , we could style this if we wanted to , as well , which I would pretty much recommend that you do do .
But what we're gonna do is say , show in model .
And once we select that , you'll find that this will now disappear and just show us the button .
So we want to change that to edit post .
You see the button now updates accordingly .
So now we can go through the process of setting any of these field values and so on and also going through and styling everything .
So as before , I'll quickly style this behind the scenes and then we'll move on to the next stage .
They've done a little bit of basic styling and we're ready to publish this .
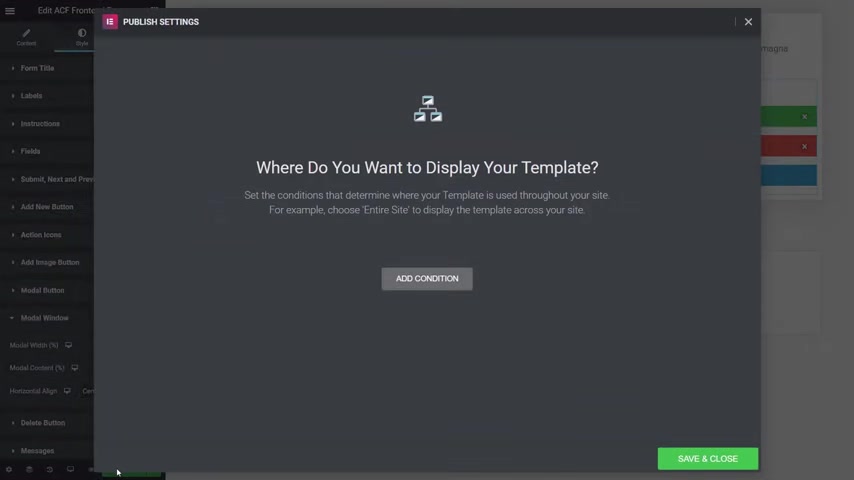
So we're gonna click on Publish now because we've created a template .
The first thing it's gonna do is say , What conditions do you want to set for this template ?
We don't want to set any .
We're just going to use this to create the layout .
We don't need to set any conditions , so we say save and close .
Once we've done that , we can exit out of this and we're now ready to start building out the page that's actually gonna list our posts .
So let's come back into the pages section and come into all pages , and from there we're going to open up our list posts option .
Open that up and click .
Edit with elemental .
And once we've done that , we can now come in and choose exactly what we want to show .
So let's just get rid of the page title on there .
That's pretty cool .
I like that .
That's the good .
So what we now need to do is drop in the list that we want to work with .
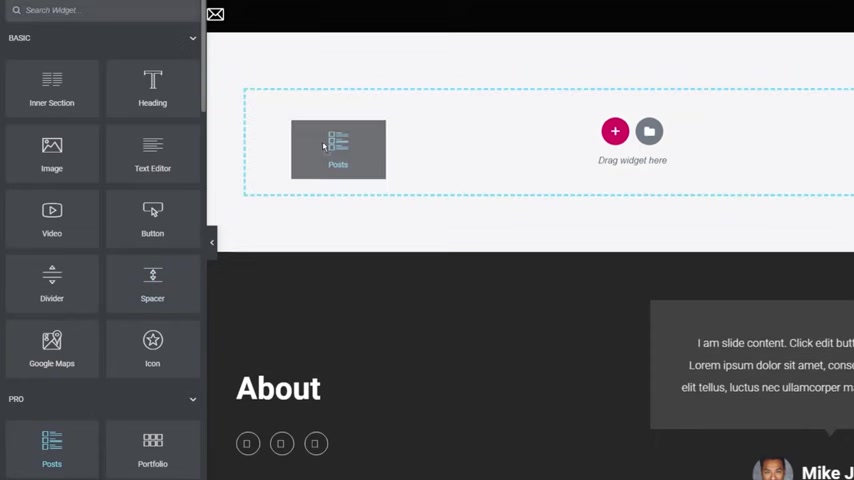
So we're gonna come back over into a widget .
So we're going to choose the post option as part of elemental pro drag and drop that in and by default .
That's going to pull in both the template .
That's the normal classic template , and we're going to just pull in .
Basically all the posts so we need to do is change this skin from classic .
I'm going to come out the custom , and from there we're going to choose our list posts , which is our custom template .
Once you've done that , you can see that now pulls that in and shows the the sort of styling we set up .
We need to change a few other things inside here , though .
Let's just scroll down to the columns .
We're going to set that to be 16 per page is perfectly fine and now under the query section .
This is where we need to configure things .
Now , this is where that other plug in , which is the ability to philtre data is really , really useful .
So what we're gonna do is we're gonna say we're going to set up an advanced query , so first thing to do is click on there and we're going to say that we want to use a dynamic user .
Once we've done that , we can choose what user we're talking about .
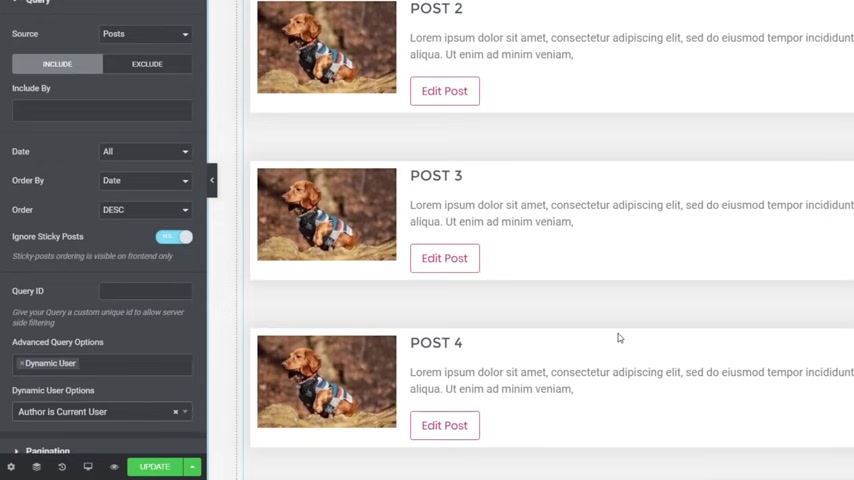
So we're gonna open this up and we say Author is current user .
So click on that .
And what that's gonna do is that's gonna philtre these down now to only show the results that match the currently logged in user or author , which should be you .
So with that in mind , even though we're going to see everything on here because I'm set up currently to have both posted all these , we'll take a look at this in a moment when I assign some of these over to a different user .
So that's the basics of that .
We want to put some page in there because we probably gonna have more than six posts .
So we can just say we want to put numbers and previous you'll see nothing is showing up at the bottom and they won't because we don't have that many posts .
So if we come back at our layout and we change this over to something like Post for Page three , you'll see now we start to get the page options inside there , so we can very quickly and easily start styling those out .
I'm gonna put that to five , though I think so .
That'll look nice and neat and tidy .
So there's our listings if you want to , we can fine tune and configure the way this all looks to make it all nice and neat and tidy .
And I'll go through and do that in a moment , and then we'll jump over and take a look at how this looks and how everything operates inside our custom dashboard .
As before , we're just going to quickly come into our dashboard , edit that with Element , or we're gonna link things up to take a suit to the right section .
So this time we want to change this from all recipes and just say all posts change this to all posts as well and we can change the link on the just to make sure it goes through to the right location .
So we'll do the same now for the title and for the icon , and we'll hit .
Update on that and we'll come back over into our dashboard now and take a little look .
So let's refresh our dashboard .
There's all our posts , so we click to go into that that'll take us through now views all the posts that we've got associated with us .
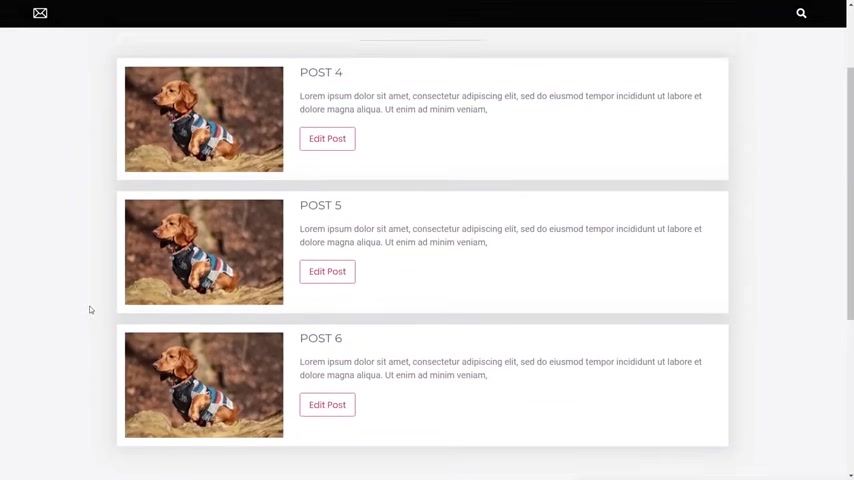
If we click on edit post , you can see that now opens up a modal window with all the data inside there , our delete post update tags , categories featured image .
Everything is all set up inside there , just waiting to be styled to make sure everything looks nice and neat and tidy .
Now , just to prove what I'm talking about , I'm going to change some of the owners of these particular posts and we'll see how that changes the number of posts we'll see inside this particular section in the dashboard .
So I quickly change the ownership now for posts 12 and three to the different owner .
So a different author so you can see now all I have access to is posts for five and six , so it's very easy .
When you log in , you're only going to see the data that's associated with you .
You logged in user .
So that's how we can go through the process of now , creating these edit post options .
And like I say , if you want to , you can come in and you can delete a post .
It'll ask you , you sure you want to delete it so you can't accidentally do that ?
We can cancel that .
We can change things .
So we want to apply a tag so we can just say dogs , for example , Hit the little plus , then on the right hand side to add that in .
So we can just say dogs inside there .
Add that we've now added a new tag in so you see that's been tagged with that .
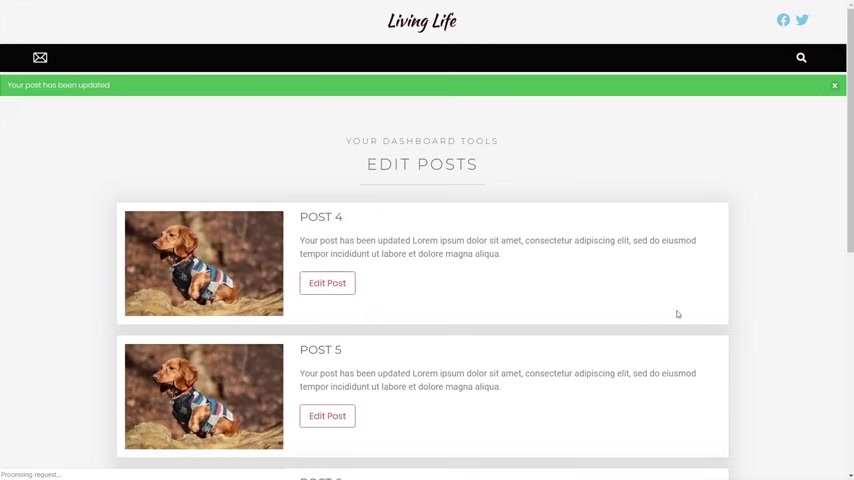
We'll update our post .
Once that's updated .
We open that post back up again to edit .
You'll see Dogs now has been associated with that .
So it's very , very easy to work with these kinds of things .
We've now got a nice , simple way of , you know , to go through and view all the different posts associated with your account and edit them , update them or delete them .
So that's how we deal with the whole post side of things .
Next up , we're going to take a look at the user profile details and how we can manage that .
And then finally , we'll move on and take a look at how we can set things up with AC , F and how we can then use that and link everything through and how easy it is to create very complex , rich dashboard options for the end user .
OK , so let's take a look now at those user options .
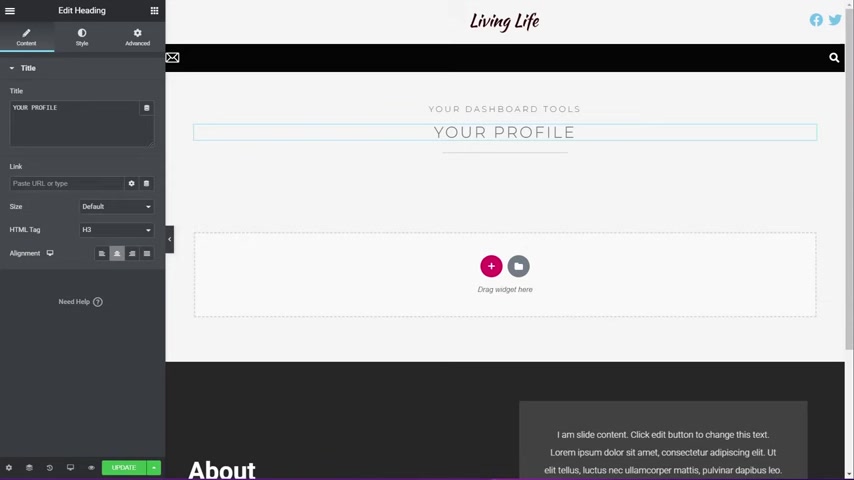
Next up on our to do list is our profile now already gone ahead and to set things up , ready to go .
All we need to do now is go through the process of putting the form in and setting everything up and linking it .
Everything else I've done you've already seen me do in the last couple of videos , so we need to do is come in and search for that front end form .
So let's just search for that drag and drop that into our design .
And there we go .
Everything is now in place So as we've done before , we need to come into the actions .
Change this from the default edit post .
We're gonna come down and say Edit user From there , we're going to make sure that we've got anything we want to set up .
Like submit actions .
Well , we don't need to send an email every time someone updates their profile so we can leave that as it is , we'll change the message because that doesn't make a lot of sense in there .
Then the next thing we can do is we can map any custom fields .
If you've got those in there and we can also change the form titles , we'll get rid of that .
We're not using it in any AC F fields , but obviously , if you wanted to expand the user profile by adding in some custom advanced custom fields sort of fields , you could do exactly that .
However , we're going to keep this simple , but if you needed to , you could add that in there , and I will show you in the next stage how we reference these AC F fields when we take a look at that particular step .
Next up , we've got the user tag in there , we can come in and we can set up all the things we need .
So it says user to edit is current user .
But if you want to , we could select the user .
Obviously , that wouldn't make a lot of sense at this point in time .
So current user is perfectly fine .
User name Field is read only now , this is something I would suggest you leave in place because it's one of those things that when you're inside a WordPress itself , you can't update your user name .
That's something that can't be changed .
But if you needed to have that option where it could be changed , you can enable this .
If you want to password field , you can see if we can enable or disable that If we don't want anyone to update their password again .
This is a personal choice , and it is entirely up to you .
Which way you'd like to go with it .
Then we've got the main fields .
We can map the email field the first name , last name , biography and the roll field .
So what we're gonna do is we can see the name field is already set in place .
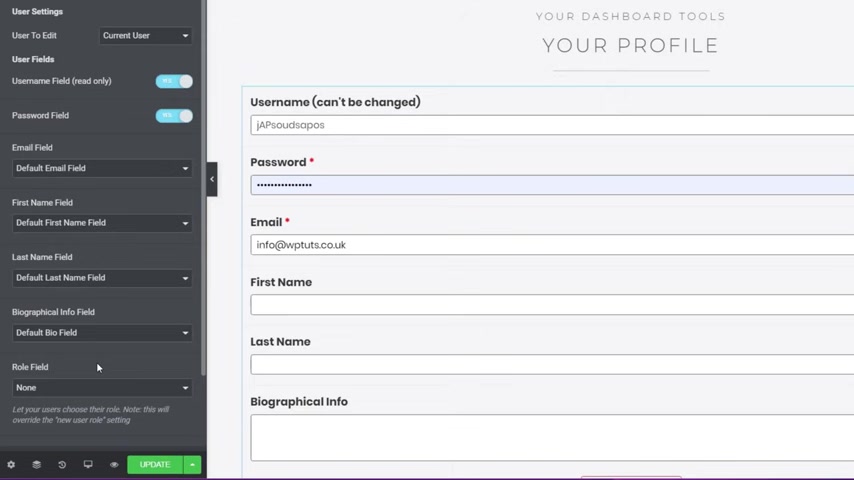
We'll just set everything else up , then to be their default values , as opposed to none or custom .
The only one we won't put in is the role field , because we don't want a user to be able to change their role .
You don't want them to be able to set themselves as an administrator or something along those lines .
OK , with that in place , we can then just check .
Everything else is as it should be .
So the permission side of things again , what we need to do is set this up so it's only administrator and editor only logged in .
Users will remove the specific user , and we'll leave everything basically as it is inside there .
Limit submit .
Well , it's only editing the profile , so it doesn't really matter .
Then , inside the display , we can configure anything we want in there to make sure everything looks the way you want it to .
So that's the basics of being able to edit your profile .
Other than styling .
That's pretty much all there is to it .
So I'll do my usual go ahead , style this , and then I'll show you this in action inside the dashboard we just created .
So by now you should be able to see that working with this particular plug in and setting things up is pretty straightforward .
It is literally a case of setting the parameters , mapping the fields you want to edit , making the ones you don't want to edit and available , and basically that's it .
But it does open up a tonne of possibilities .
So let's just scroll down to the profile area .
We'll edit our profile and you see this is now our profile area .
We can't click inside to change the user name .
We can change the password and email , first name , last name and biographical information if you want to , then simply hit update profile when everything is done and dusted .
So that really is all there is to the profile .
The next stage is we will take a look at how we can start using advanced custom fields and tie in that into this particular form and how we can customise things in there .
So let's take a look at that next Now for this step , we're gonna add one more plug in in because we're going to create a custom post type , so it's simply going to install custom post type U I and that allows me to create my custom post types , create that custom post , set things up and map in the AC F fields that we want into it .
So I'll activate that now .
I'm not going to take you through the process of creating a custom post type and adding in a sort of meta fields and so on .
I've covered this in their own dedicated video .
So if you're at this point and you don't really know how to do this , I would suggest checking out that video .
I will put a link in the description below so you can take a look at that and get up to speed on how you use both AC F and custom post type U I to create your own WordPress custom posts .
With that being said , I'm quickly going to go in , set everything up and then come back and show you how we can start mapping this out to our dashboard .
So with all our AC F fields set up our custom post type set up , the next thing we need to do is just create the new page , ready to take this information inside our dashboard .
So we're gonna come in , click add new .
And from there we're gonna say add vehicle .
We'll come up and set that visibility to be private , OK ?
And publish that once you've done that , edit with elemental to open the editor up and we can start working so we'll do the usual get rid of the bits that we don't want .
I've copied the basic design , so we're going to paste that in There's our basic layout and now we're gonna come back over to our widgets and we're going to search for that front end .
So we're gonna drag and drop that into place .
And now let's simply go through and set everything up .
So let's jump on to the action section .
We're gonna change this to New Post Redirect .
That's perfectly fine .
We'll set the message you want to use once someone has submitted a vehicle .
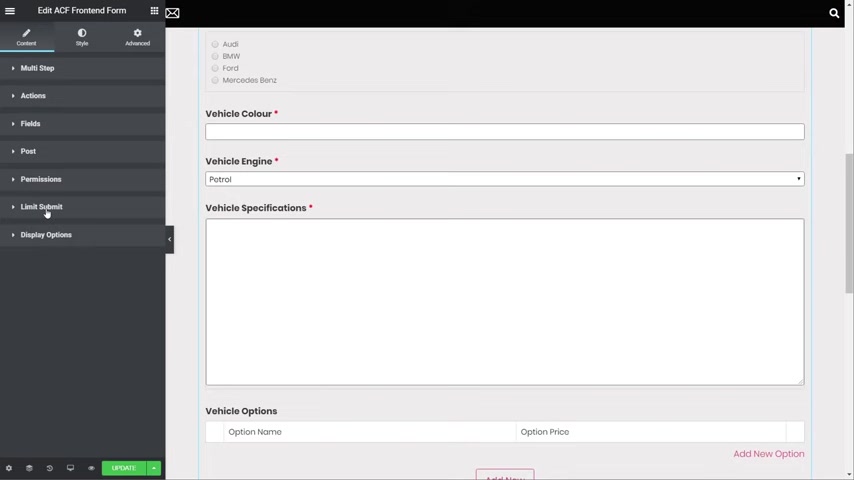
There we go next up , we're now going to come into the field section , and this is where we can go through now and start setting things up that are specific to an AC F and custom post type set up .
So at the moment you see it says edit Post we want to change that and get rid of it .
If you are a title at the top anyway , field groups is fine .
Like I said , we've got two options in there .
Field groups allows us to pull in an entire field group , whereas fields allows us to choose which fields we want to use from all available custom fields and normal kinds of fields .
So if you have a custom post type with a tonne of fields that you don't want to use all of them , then you'd need to use the fields option and then you can click underneath and just go through and find out which fields you want .
And you see everything is in brackets afterwards , which tells you what AC F group they come from .
However , we want to pull in all the fields from the field groups .
We select that click underneath .
We now have options , which is the previous .
When we set up for the site options and we now have vehicle details , choose vehicle details and you can see that immediately pulls in all of the relevant fields all the way through , including things like repeater regions .
So we've got a lot of flexibility built into this .
Now , again , this is a very , very simple thing to set up .
But taking your time to do it is the most important thing .
So we've changed this now to add new and we come out the post , you can see we've got things like post status .
We've got all the different things on there , including the normal fields you'd have as part of WordPress .
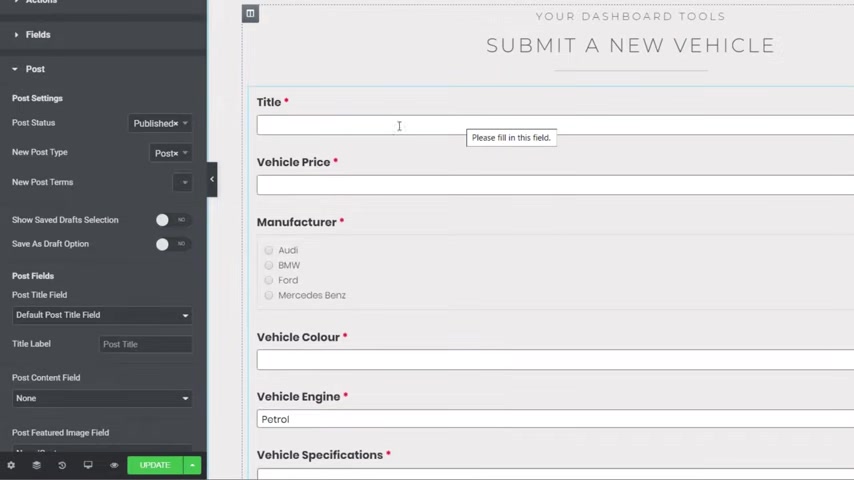
Now , if we scroll back at the top , you'll see we've got title in there , because if we take a look at these post Fields , title is set up and that's fine .
But we don't have post content featured image and so on .
So we need to reference those as well .
If you're using them , we're going to do .
First of all , though , is we can see Title doesn't make a lot of sense , so let's just change that to vehicle name , so that now makes a lot more sense up there .
Vehicle price is fine , but we want to put in the default post content field again .
We can change this content label so we could say description .
So these are just little things that make the whole process a lot easier referencing these , but where they don't necessarily make sense Using their normal default titles as part of WordPress , we can customise those featured image .
We'll say That's perfectly fine .
Featured Image is also great .
We're not using a post excerpt .
We're not using post categories , and we're not using tags in this example reason being We've got manufacturer , which is our own , uh , taxonomy .
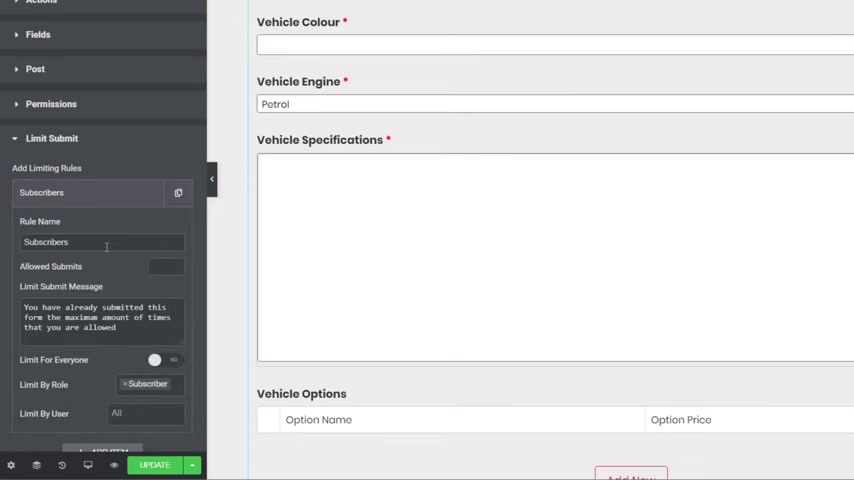
And we've also got things like I say , like , you know , repeated regions and so on permissions we come into today .
We need to set this up like we've done every other time .
Set that to who has permissions .
So we get administer administrator and editor and only logged in users .
That's all perfectly fine .
So like we saw back at the beginning when we took a look at the options you have limit submit .
So if you want to restrict the number of times and things like that , we can apply limiting rules .
I'm not going to bother with that because we don't really need it .
But you can see we can easily come in , set the rules out what they allow them to do , how many times they can do it we can also set it based upon the actual role .
So we may say that editors are only allowed to upload five entries .
Well , we could set that up inside the limiting options .
So if you do want to limit things you can do now , while I'm recording this , I just want to say that at the moment there's no option for charging people to submit information .
This is something that I know is coming in either the next version or one or two .
After that , it's going to start off with stripe , but I understand it's also going to expand out to PayPal .
So if you're using this or you think you'd like to use this , but you really need to have that ability to charge for listings that is coming in a very near near future .
So keep an eye on the channel because I will be covering the pro version of this in an own dedicated video so you'll be able to see all of that .
But I am going to wait for those sort of payment options to come up because I think for a lot of people that's going to be an integral part of it .
OK , so we've got everything we need in place .
The only thing we need to do now is really go through and style things .
I've already saved that styling out .
So I just going to paste in the style and everything is now looking pretty cool .
So all I need to do now is go back into the dashboard index , set the links up , and then we can take a look at this before we move on and do the final stage , which is setting up the custom listing with some custom data from AC F .
We're going to use that same loop kind of technology that we used earlier on .
We took a look at the posts where you could select what post you want to edit .
We're gonna expand upon that a little bit where we can pull in and reference AC F data .
So stick with me .
We've got one more main part coming up , and then we are going to wrap up .
So a quick look , we're back in the dashboard .

Let's add our vehicle .
That'll take us over .
And there's our nicely styled new vehicle options .
Everything set out the way we wanted to I could say , including things like repeater region .
So you get some advanced tools and technologies that integrate directly into this .
And as you can see , it's super simple to work with .
So that's how we add vehicles in .
Now let's take a look at how we can edit and delete vehicles .
So for this section , we need to come back into the theme builder that's part of elemental pro and specifically into the loop section .
So we're gonna do the same kind of things we did originally with the listing posts where we could choose what we want to edit there .
But like I say with this time , we've got some advanced custom fields information we can put in should we want to .
So let's do just that .
Let's add a new item .
We're gonna call this vehicle loop and we'll say , create template like we did last time .
All we need to do is close this down and we're gonna come in and we're just going to add in an inner section , which we're going to break up into two parts .
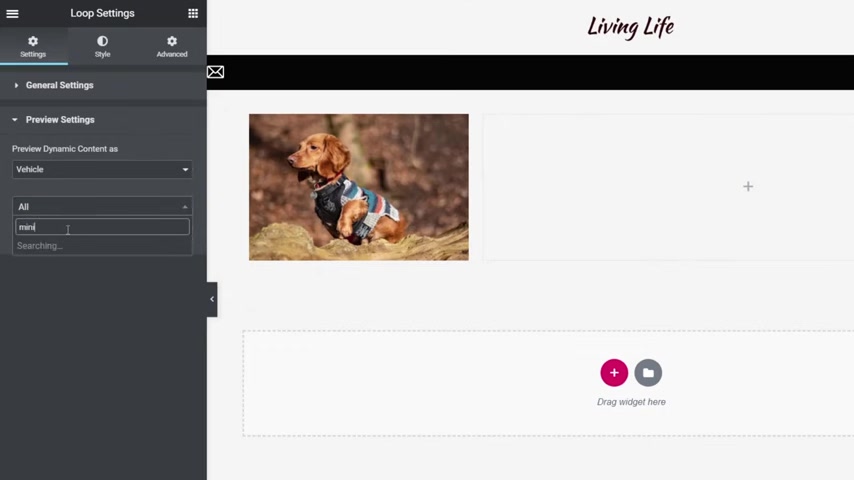
We're gonna put the image on the left hand side , and we're gonna put the details on the right hand side along with the edit button , so we can just come back in and we can just come in and choose all the different bits and pieces that we want .
So we'll start off with the featured image .
We'll drag and drop that into there .
Now you can see this is not pulling in the right data , and that's because it's by default , just going to pull in the data for the posts , the normal WordPress posts .
We can change that if we come at the settings into the preview settings option and change this to choose our custom post type , which is vehicle .
And then if we want to , we can just choose a specific one .
So we'll go for the mini .
We say Mini Cooper apply and preview , and that should then refresh update and show us the details for that particular vehicle .
So we know we are working with the right data , knowing exactly what's going on so we can do the same thing as we did before .
We'll drop the post title in there .
We're gonna come up and we're gonna just drop in some texts , so we're going to come down .
We say the text editor .
Drop that underneath the title For this .

Choose the little dynamic tags and we're going to use that elemental custom skins widget .
The post summary option inside there set any values we want .
25 is perfectly fine .
So all those things are exactly the same as we did last time .
However , if we want to put in additional data , which would be useful , especially when you're working with advanced custom fields , you may want to check out things like prices , colours , all those extra details .
We can do just that .
I'm only gonna show you one example , but this is the same process repeated just changing the data source .
So let's just come over and just pick the heading .
We'll drop the heading underneath there , and we'll just choose the price for this example .
We'll set this to something like heading five .
So it's not particularly important and we're gonna do is we're gonna cut the little Dina mic tags and click on them .
Scroll right the way to the bottom .
So we see AC F fields click to open that up and then click on the little wrench icon and change this over now So what we're gonna do is gonna come down and say vehicle price .
You see , after a second or two that will pull the price in for us .
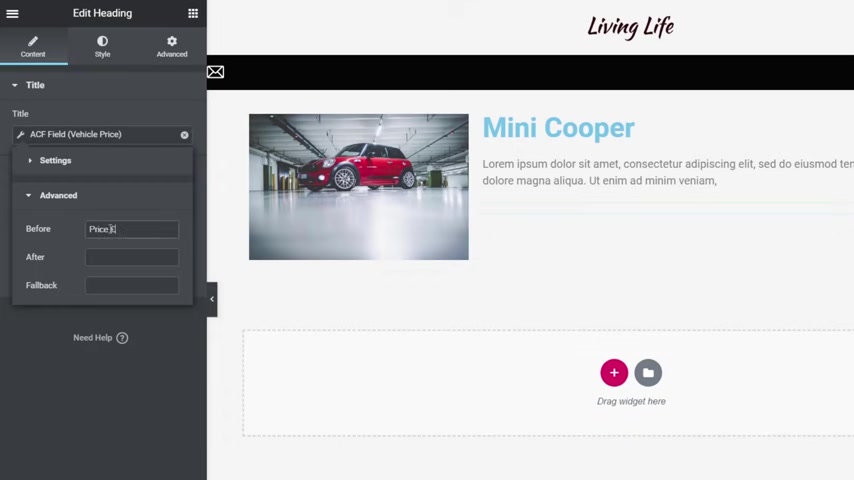
Now we can use these advanced options and we can just put in some additional information so we can save Price and we put Pound sign and then a space so that that update and that now makes a little bit more sense .
Actually , let's get rid of that and put the full call on the other side .
There we go .
That that makes a little bit more sense .
So we've created the basic layout .
We can style that like we did last time .
So that's the basics .
We can repeat that as many times as we want .
We now just want to go ahead and drop in that front end form .
So the same thing again .
Search for a front end form , drop that underneath , and we're going to use the modal option for this .
But we'll do that like we did before , right at the end .
Once everything is all set up and configured , so we don't have to worry , we can just see everything that's going on .
So actions we're going to come in today .
Edit post is perfectly fine .
We're gonna say reload at the current page .
We're just going to say your post will be update .
That's fine .
Fields .
We can come into there if we want to .
And we can choose what fields we want .
So again , we're going to repeat the same kind of thing as we did earlier on .
We were adding posts .
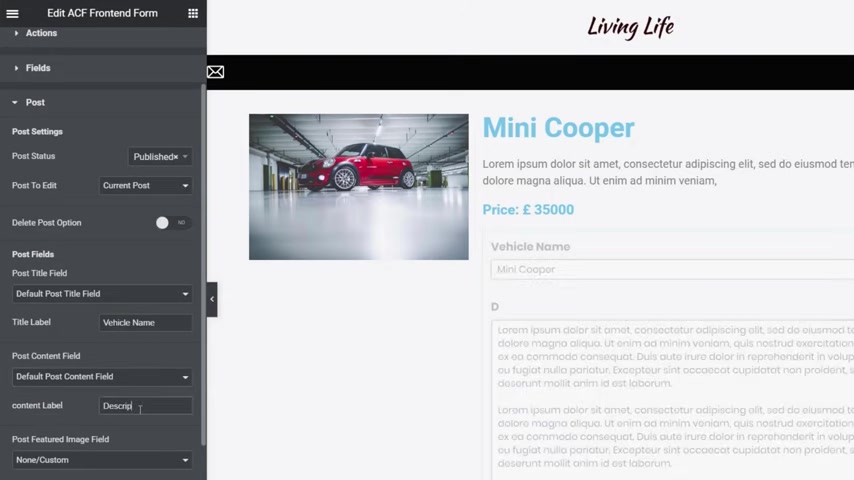
We're gonna take out the post title .
We're going to use field groups .
We're gonna click underneath and choose vehicle details update .
That's perfectly fine .
We can or we can put update vehicle .
If you want to edit vehicle , whatever you kind of want to put in there and the post , we're going to do the same thing there as well .
So you're gonna come in default .
Post title is fine .
We're going to change that from title to vehicle vehicle name .
We're going to change the post content field that we can use the default one there and just change that to description featured image .
Same as before .
Set that the featured image .
And now you can see all the data that we need is now set up inside .
There and again , including the repeated regions and everything is prefilled out for this particular vehicle so we can see everything is in place there .
All we need to do now is map any additional fields that we want , or we can then come down to the option for permissions .
We can set everything up inside there to make sure this allows us to do exactly what we want .
So set that to editor as well remove the select by user .
From there .
Everything else is looking good display options again .
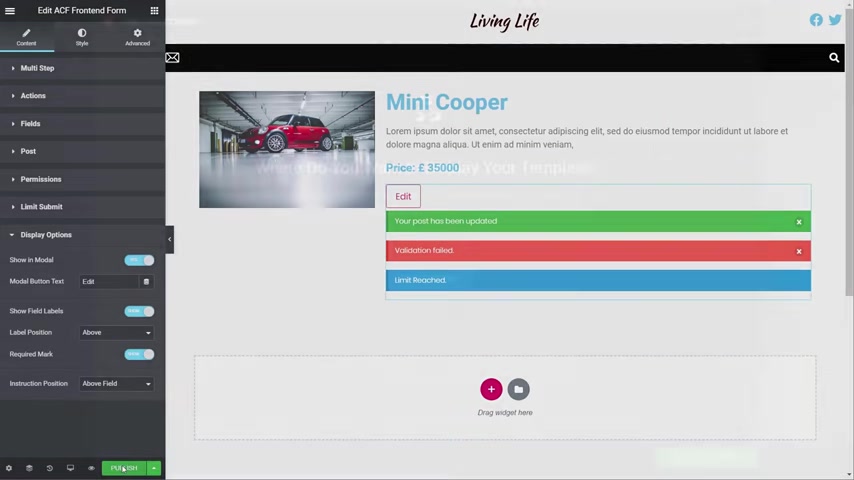
We can do everything we want inside there .
The only thing we need to change , though , is just change this to show modal .
And there we go That's now created the model link for us .
So other than styling , that should have pretty much everything in place for this part of it .
The next thing we need to do go through , set the page up , set the filtering up and then use this as the template .
So let's click on publish as before .
We don't want to set any conditions because we're just using this as an internal template in something else .
Save and close and we are done so let's move on to the next stage .
So the first thing we need to do just hop back over into our pages , view all our pages and we want to come down and add a new page .
So I say add new , I'm gonna say edit vehicle set that like we've done before to be private and we'll publish that .
Now , we'll just open up , edit with elemental close down anything that may be open , clean up the page to make sure everything is in place and then just basically paste in the basic layout .
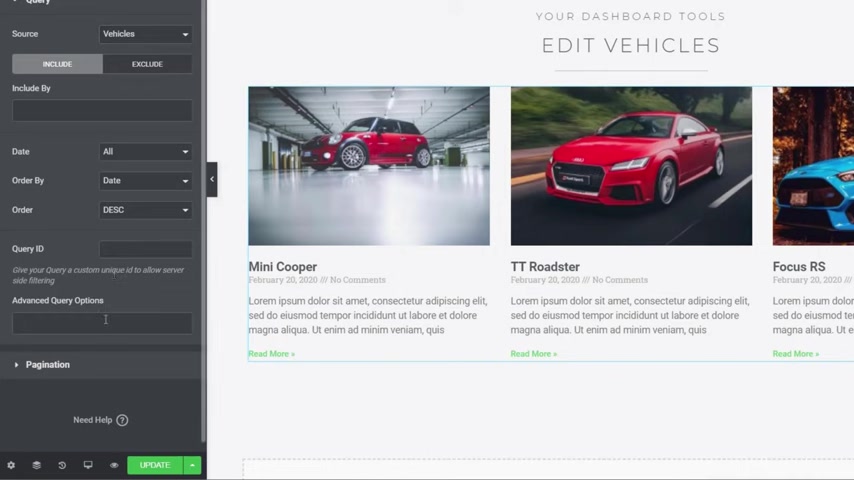
OK , with that in place , all we need to do is come back over to our widget .
So we're gonna search for Post and we want to drag in the posts option like we did previously .
So we're gonna drop that where we need it to be .
So we'll put that underneath there you can see like before it just pulls in everything which we just need to change .
So let's scroll down to our query .
Change that from there .
Change this though , to vehicles as the source .
So that's the first part of it done .
Next thing we need to do now is just set up the query to make sure that everything is working fine again .
This is where we're going to use that advanced query option .
So we're gonna click on there and we're gonna say author is current user .
So it say , Dina mic , user author is current user , so that will philtre it out .
You can see out of the three vehicles that I currently have inserted into this particular website , two of those are associated with me .
A third one is associated with a different author , which means that I can only see the ones that are associated with me .
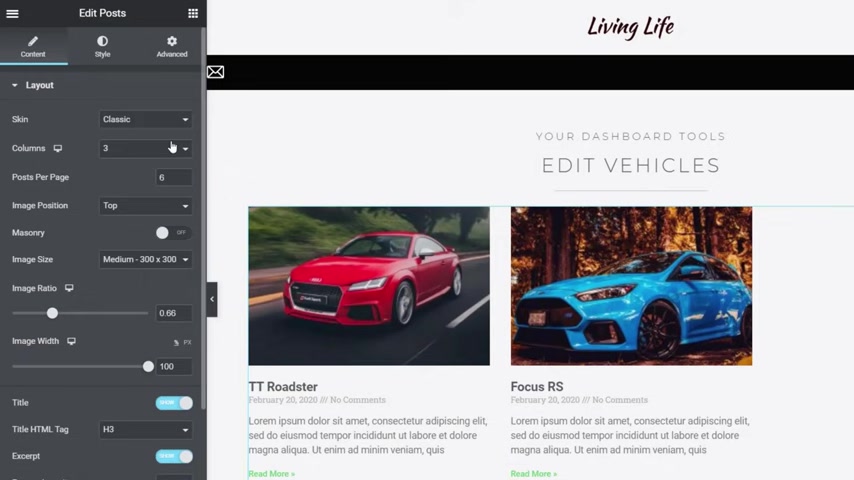
Now , what we need to do is come back up to our layout and we can just fine tune this to get exactly what we need Change from classic for the skin , and we're gonna come down to custom .
Then we're gonna come down underneath , and we're gonna say vehicle loop and you see that now pause In the design that we've created , all we need to do is come down and set things up .
So columns is going to be set to one post per page is set to five , and we're just gonna enable page like we did before .
So other than styling , everything else is now pretty much in place .
So what we're gonna do is we're gonna save this page and gonna make a few little fine edits to it to make sure that everything looks good .
Then we're gonna hop over to the dashboard that we've created , and we'll see exactly how this all works .
We're back into the dashboard .
Edit vehicle is all set up .
I've linked everything .
So let's click on edit vehicle That will then take us over like we can see .
And we can see all the edits that I can make to the vehicles that are associated with my particular account .
Click on edit and you can see we get exactly the same as we did before .
Open it up .
We can style this which I haven't done .
But everything is all in place .
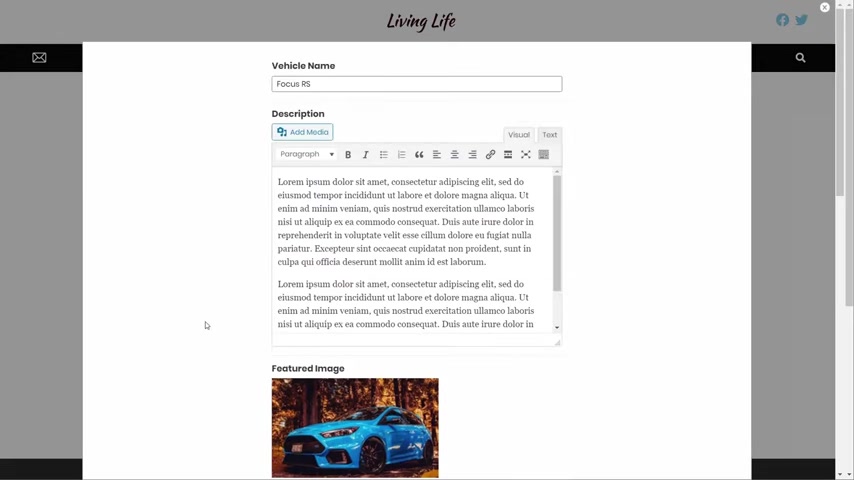
If I close out of this one and come back and choose the full focus , we'll edit that .
And as you can see , that takes us through .
We can edit any of the details we want inside here .
Add anything new change , anything , whatever we want to do .
So now what we have is pretty much a fully customised dashboard that restricts who can access things redirects automatically based upon being an editor and just gives you a really good way of keeping people out of the dashboard of WordPress itself .
Is it infallible ?
Obviously not .
There's still a few other things that you could do to make sure that security is in place .
You restrict access completely to the dashboard to only your admin users .
That's something that's beyond what I need to do in this tutorial .
This is more a case of showing you the basic way you can do it .
Then you can expand this and do whatever you want with it .
Take it as far as you want .
Well , I think you'll agree .
That's a great way of being able to create custom dashboards .
To keep your clients out of the normal WordPress dashboard .
Limit the availability to the different tools .
You have an option and give you complete control over what you'd like them to do .
The best thing is , I love the fact you can tie this in with advanced custom fields as well as the normal WordPress features and also some theme design options .
But what do you think of this video ?
Is it something you could see yourself using as it opens your eyes to some of the opportunities on what you could do with WordPress Advanced custom fields and elemental pro alongside some of the other tools featured in this video .
If you have let me know in the comments section below because I'd love to get your feedback on what you thought of this video the topic covered and what you'd like to see in future videos .
As always , all of the applicable links , including time stamps , are all down in that description below .
So if you want to follow along , jump back or whatever you want to do , all that option is available for you there .
Some of those links are affiliate links , but they cost you no more money whatsoever .
But it does help support the channel .
Moving forward as always , minus Paul C .
This is WPT And until next time , take care
Are you looking for a way to reach a wider audience and get more views on your videos?
Our innovative video to text transcribing service can help you do just that.
We provide accurate transcriptions of your videos along with visual content that will help you attract new viewers and keep them engaged. Plus, our data analytics and ad campaign tools can help you monetize your content and maximize your revenue.
Let's partner up and take your video content to the next level!
Contact us today to learn more.