https://www.youtube.com/watch?v=ZqAE19OIfMc
How To Make Traditional French Baguettes At Home

Not everybody is lucky enough to live next to a bakery that makes good croissant .
Not everyone is lucky enough to live next to a proper French bakery that makes good baguettes .
But what if I told you that you can make your own proper baguette in your oven ?
And this isn't some kitty recipe .
This is the real deal .
Oh You see .
So first things first , this is a sourdough bread .
If you don't have a sourdough starter , you got to have one .
I do have a video on how to create your own sourdough starter .
That video will be in the link in the description .
I would test my beginner sourdough bread recipe first before doing this .
But if you want to take the leap do it .
It's not that bad .
It's actually surprisingly easy .

The shaping takes a little bit of practice .
But once you get it down , you're a baguette master or maybe a baguette Jedi because it's already in the shape of a light .
OK .
Point is I'll stop talking and let's make this .
Now , like I said before , you're gonna need your sourdough starter for this .
Now , this is a 100% hydration sourdough starter .
If you don't know what that means , then you're gonna need to revert back to my sour dough starter Mastery guide , which will also link below .
I know there's a lot of links going on .
Now , once your 100% hydration , sourdough starter is mature , meaning that it has risen and just begun to fall a little bit , then you're gonna turn it into a 50% hydration , stiff Levan .
And to do that , you're gonna take 28 g of whole wheat flour , 20 g of bread , flour and add 24 g of your mature liquid starter , which should be at 100% hydration .
If you're using my sourdough starter guide , then add 24 g of room temperature filtered water , that'll put it at 50% hydration for this stiff laban .
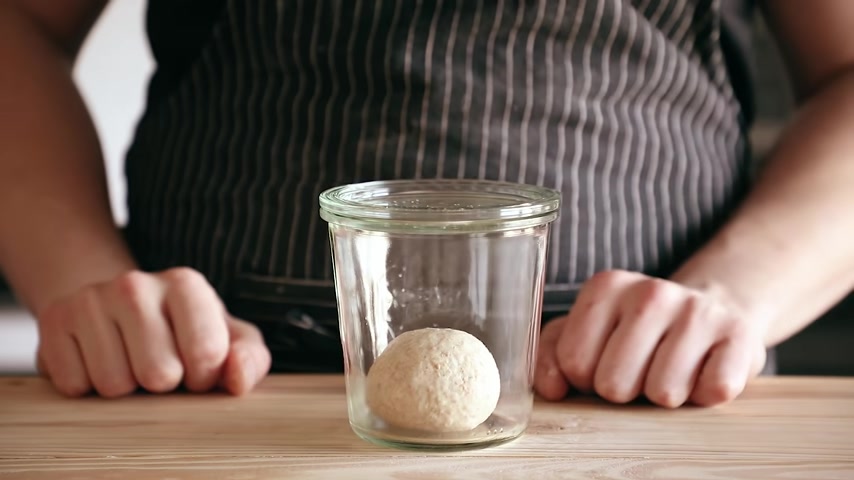
Now give that a good mix until it comes together and need that for a minute or so until smooth and stiff , roll that into a ball and place it in a jar with a loose fitting lid .
Make sure you have enough room for this thing to double or even triple .
It'd be really sad if it spews out the sides .
Now , this is your stiff lavan .
Then just place that in a warm area at 80 F for 4 to 5 hours .
I of course , knowing myself , use my fermentation station or you can use your oven with just the light on .
Obviously , not as accurate but totally doable uh If you do use your oven , be sure to monitor the temperature .
Trust me , you're gonna wanna do that .
Now for the bread dough as for the flowers , I actually use some freshly milled iron corn wheat using my mill all links in the description , but you can absolutely just do all whole wheat for the whole grains in this .
I'll explain in a second .
So you're gonna wanna do this part 1.5 hours before your stiff Levan is done fermenting .
And by the way , guys , if this is getting a little bit confusing with the timing , don't worry , I'm gonna have a schedule in the description .
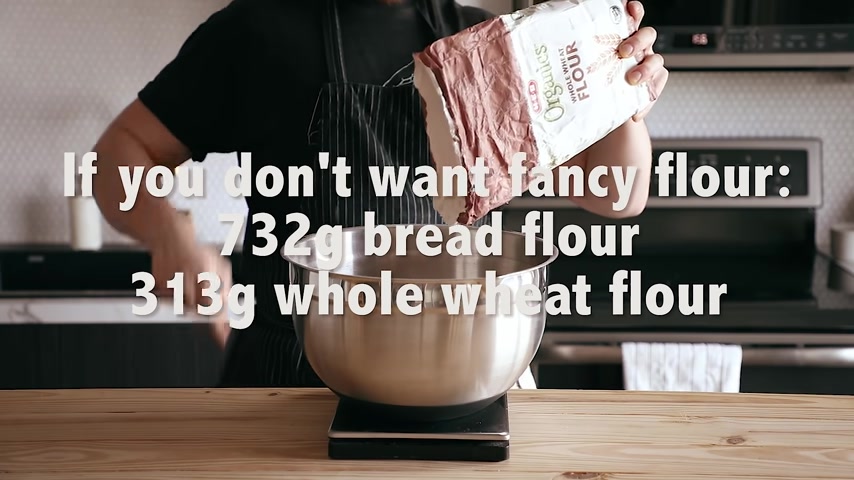
But anyway , so you're gonna start by mixing just 732 g of bread flour , 273 g of freshly milled i corn and 40 g of whole wheat together just to get them kind of mixed together and incorporated .
If you don't want to use fresh milk , then obviously , you can simply just add the weight of the whole wheat flour and the freshly milled flour together and then just use all whole wheat for that number .
Obviously keeping the bread flour amount the same .
So then just add 778 g of water at 90 F and mix that just until thoroughly incorporated .
You don't wanna get any gluten development here .
We're just getting the flour and water to know each other .
Cover that with plaster wrap or a damp cloth and let that sit in the same warm spot as your van for 1.5 hours to which is really just a fancy term for letting your flour to get fully hydrated and help out its gluten development later down the line .
So once your van is ready and your bread dough is , then you're gonna measure 100 g of water at room temp in a separate bowl .
Don't worry , this is gonna be used for a bunch of different things .
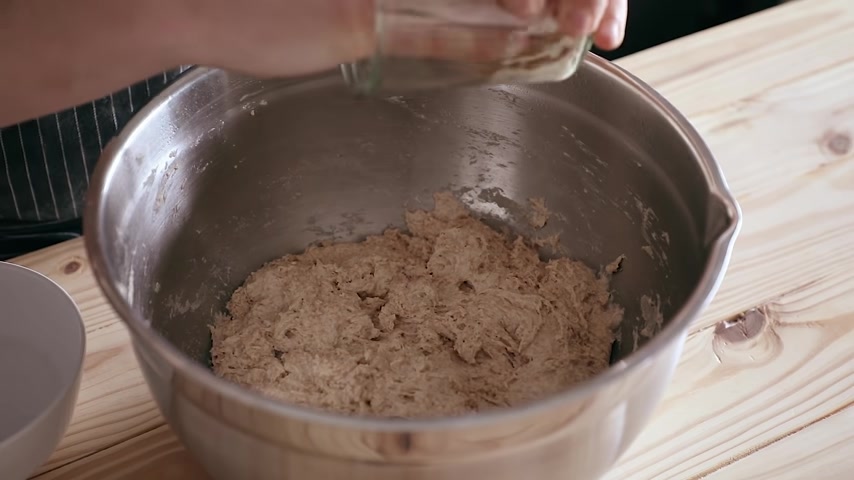
Now , dampen your hands with that water and tear your van into little bits and scatter it evenly across the surface of your dough , then Sprinkle 20 g of fine sea salt and then add all of the water that you have reserved on the side into your dough bowl .
Now , I know it seems crazy .
I know it's gonna be really weird .
It's gonna look like it's never gonna come together .
Don't cry , whatever you do do not cry .
Just use your fingertips to dimple the van into the dough and mix the dough with your hand gently folding , mixing until it comes together .
And like I said , don't worry , stay calm , just keep gently pinching the dough together and mixing and pinching the dough to mixing .
And that's gonna kind of help incorporate that water into that already made dough .
Now , once the dough comes together , you're gonna dump it out on the counter and perform something called slap and folds while facing the dough , you're gonna pick the dough up from the front and the back , not the sides but the front and the back , you're gonna slap the bottom half against some sort of counter and it's gonna stick a little bit and then fold it over , sort of like throw it back at the counter .
It'll naturally fold over itself .
Uh , this is kind of just gonna take practice and learning how to do .
It's gonna be sticky , it's gonna be messy and you're just gonna repeat that , you're gonna keep picking it up and slapping it and folding it over itself and then it'll eventually come together and then finally stop sticking so bad and it'll firm up .
Er , and that's when you'll know that you're doing it right .
And you're gonna repeat those slap and folds for about 1 to 2 minutes or until the dough begins to show a smooth surface .
Now , this is a crucial step .
So do not skip this .
This is all about gluten development .
It's kind of like needing , then you're gonna cover that bowl back up with plastic wrap or damn cloth .
I know I'm a terrible person for using plastic wrap .
We're really trying to get better about it .
Ok ?
I'm sorry .
And you're gonna let that rest for another 15 minutes in that warm environment .
So then you're gonna perform slap and folds for another minute or two until it begins to firm up a little more a little bit more of a smooth surface and you start to see little air pockets in there , which means it's sort of starting to pick up some air .
Now , once you're done with that second set of slap and folds , you're gonna cover your bowl yet again and place it back in that warm environment , which should still be at 80 F .
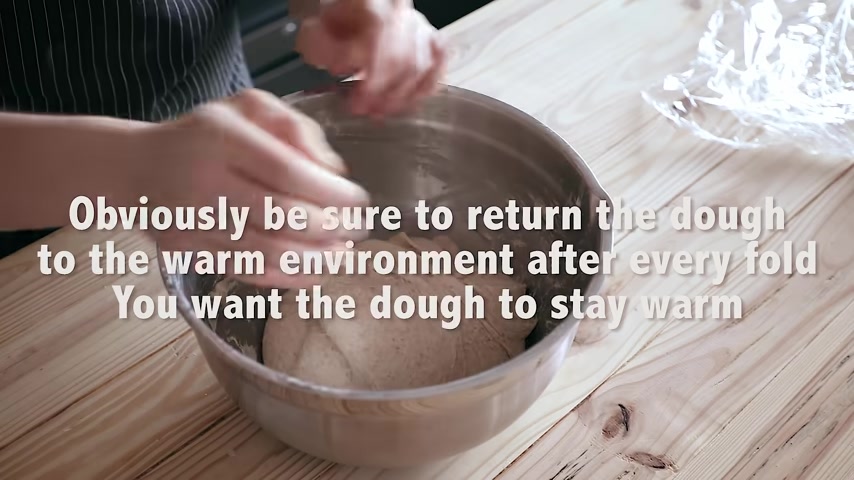
I don't know why it would have changed and you're gonna let it bulk ferment for two hours during that bulk ferment , you're going to do three sets of dough folds spaced out by 30 minutes each , obviously covering it each time in between .
Now to do a dough fold , which you should have seen at least a bajillion times on this channel by now .
But if you haven't seen it yet , you literally just gonna grab a small segment of the dough in while it's still in the bowl .
You don't have to take it out and you're gonna stretch it to its maximum stretch and fold it over itself and do that all the way around the perimeter of the ball .
Boom .
Once you've reached the end , you are done with that fold , cover it back up and put it back .
Repeat that three times .
Yeah , you got it .
Then once you've performed all those , you're literally just gonna let it rest for the remainder of its little time out in that fermentation station .
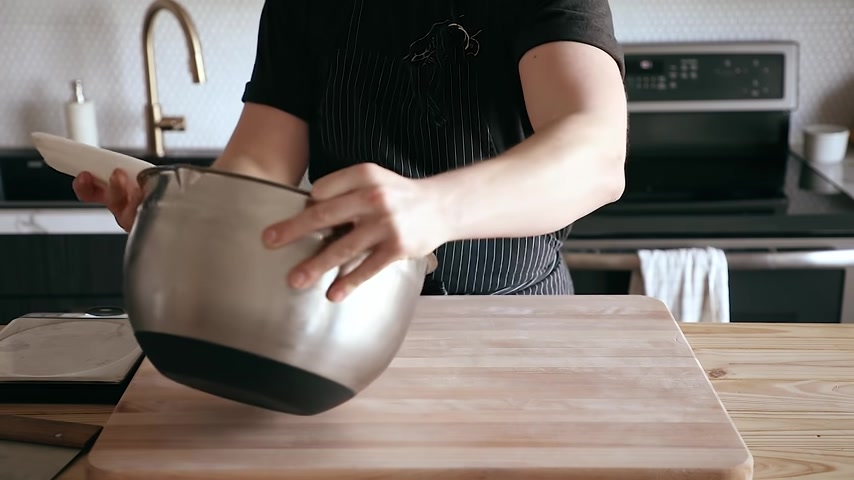
Now , once it's done , wrap that bad boy completely with something totally airtight like well plastic wrap .
I'm sorry .
It really hurts me to say it now and then place it in your refrigerator overnight .
Anywhere between 12 to 20 hours .
I found that 18 hours is a pretty good amount of time .
Now , if you don't make it air tight , your dough is gonna dry out in there .
And that is really sad when that happens .
Don't let that happen .
Ok , so it's the next day .
Now , just as a reminder in the description , I will be leaving a sample schedule for all these timings .
I know it's a little confusing .
Ok .
So now we're gonna pre shape our dough .
So first you're gonna take your dough out of the refrigerator and then you're gonna dump it out onto an unf flowered work surface .
That's right unf flowered and then using a wet hand and a wet bench knife , you're gonna divide that dough into six even pieces , which should weigh around 335 g each around that number .
It's ok .
If they're a little off , then you're gonna use your bench scraper to shape each piece of dough into a lightly taught bow .
You don't want to put too much tension on these .
You just want it into the general shape .
Now , I'm essentially pushing the piece of dough along the board while keeping tension underneath the dough and rotating it in the same time .
This way , it's essentially folding the dough underneath itself .
If the dough sticks to you too much .
You can always just dampen your bench knife a little bit and dampen your hand a little bit .
And that should help out .
Then you're gonna let your pre shaped dough rest for 45 minutes to one hour uncovered , un floured just as they are .
You're basically looking for the dough to start to relax and not be so ice cold .
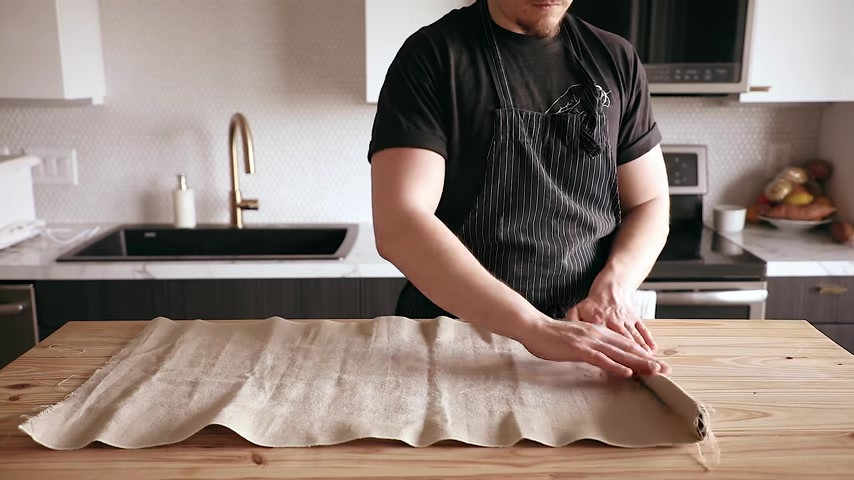
Now , this next part can get a little bit tricky because in order to proof these shaped loaves , once you do the final shape , you're gonna need something called a couch or couch .
I , I don't know , just yell at me in the comments about it .
Now I'm gonna put a link in the description for where you can buy one of those .
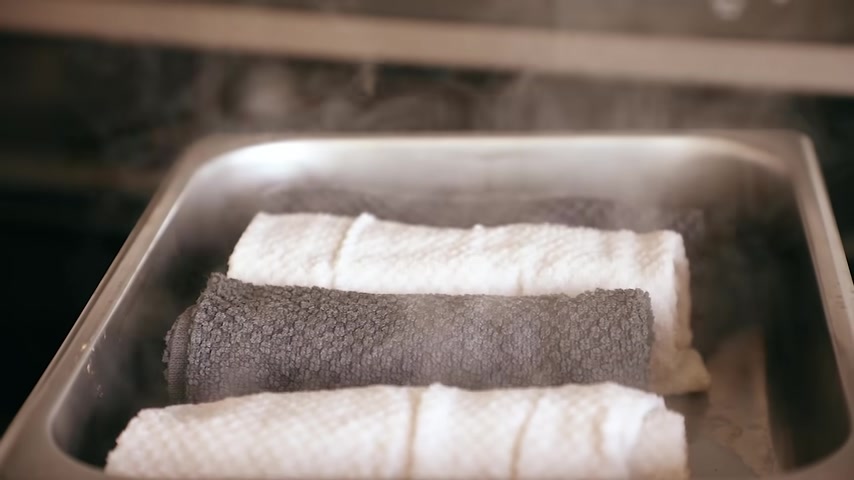
But if you don't have one or you don't want to get one , you can always just use a really big kitchen towel if you have one that's large enough and you're willing to get it covered in flour .
So yeah , anyway , to do the final shape , lightly flour , the top of one of the rounds and then using your bench scraper , flip it over so that the flour part is now on the bottom and then gently fold the bottom of the piece of dough , which is closest to you up to the middle and then fold the top down just overlapping the other one .
I like to turn the dough around every time that I make a fold so that the fold is actually folding away from me .
But , you know , you can do it however you want .
Now you sort of got this log , then you're gonna use your fingers and gently press the center of this log and fold it in half , very , very , very gently .
And then using your palm , you're going to crease just the very end of it where those two pieces meet just to fuse them together .
Do not palm down the entire thing .
You're just gently fusing the bottom together .

If you press down on the entire piece of dough , you're gonna degas the entire thing .
And that is a very sad day .
Now , with those few bits facing directly down against your board , you're gonna use your fingertips and you're going to run them along the entire length of your baguette while going forwards and backwards , keeping constant contact with your work surface .
That way you're creating tension , you're basically forcing the dough underneath itself .
You may need to flower your hands while doing this so that the dough doesn't stick too much .
Then once it's gotten to about 12 to 13 inches , you're then going , you just lightly roll , starting from the inside and then working towards the outside and then tapering the ends gently to taper those ends .
You're literally just gonna gradually apply more pressure as you're rolling when you get closer to the ends .
That's it until it's about anywhere between 13 and 14 inches long and then you've got a bag out , then carefully transfer that to your or I don't know how to say it , which has been generously dusted with rice flour and all purpose flour and you're gonna layer them , increases with the couch in between each baguette so that they're not directly touching each other .

It's almost like a little holster in between each baguette that you can see here .
Then you're just gonna repeat that with all of your dough pieces .
It's gonna take some practice , but you'll get it over time .
Then once you have all your pieces of dough , you can use any excess of that couch or couch or whatever the hell it's called and fold it over itself just to cover them up .
If it doesn't cover the baguettes all the way up , then you can also just use a cloth to cover them just so that they're not exposed to the open air directly .
And then you're just gonna let those proof like that for two hours .
Now , you'll be baking these with my oven steaming method .
So if you don't have a steam set up , you're also gonna have to do that because these can't be done in a Dutch oven because they were way too long .
So you have to have a steam set up for this .
My guide for oven steaming will also be link below .
So knowing that , make sure that you're preheating your oven one hour after they start proofing that way .
You have time for your oven to preheat for a full hour before baking .
Now , once your oven is ready and your bats are proof , you're gonna bake three of these at a time .
So basically two different baking intervals .
So line a pizza peel with a piece of parchment that matches the size of your baking tiles .
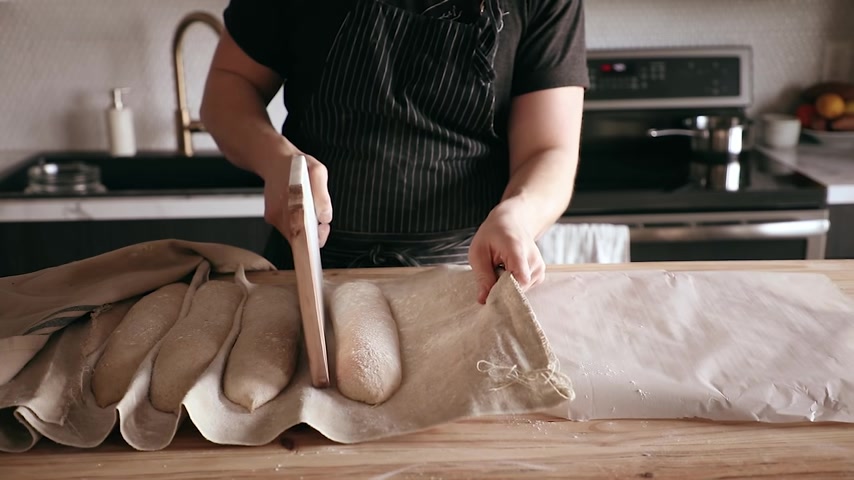
This should be at least 14 inches long , then lightly dust , three of your loaves , pull them away from the folds you made in your couch and place some sort of transfer board .
I used a long cheese board .
You know , you , you do , you , you make do with what you got and then place that board in between one of those now open seams because you pulled it away .
So that little fold , that crease that was holding them together should now open up and create a little seam and then place your board in between that seam and pick up the couch and gently roll the flour dough onto that board and gently transfer it to the parchment paper and then line that paper with three baguettes evenly allowing room for expansion .
Obviously , then you're gonna score your dough using a lo holding it at about a 30 degree angle and you're gonna score diagonally three scores along the length of the dough .
Don't score across the top from left to right .
You're gonna score at a really sharp angle as you can see here .
And assuming you already preheated your at 500 F and slide your parchment loaves into the oven .
Reduce the temp to 475 F and bake with steam for 20 minutes .
Then remove your steamers and lower the temp to 435 F and bake for an additional 20 to 30 minutes or until deep brown .
Don't go skimpy light on this dude .
I'm gonna bake this bold .
This is the bold baking gang .
All right , we don't , we don't do little blonde loaves , bake it dark brown then just be sure to give your oven and your steamer's little 15 minute preheat at 500 before baking your second batch .
Then unfortunately , there's one last part which is the hardest part of all time , which is to wait for them to come down to room temperature .
Let them cool off .
I know it's a lot to ask .
It's a tall order .
That's it .
And by that's it .
I mean , this was a freaking doozy , but we made it and hopefully you have baguettes by the end of this and if you do , I love you and it's time for B roll .
Yeah .

All right guys .
And that is it sourdough baguettes made as properly as they could be made at home .
But I am so incredibly grateful and thankful for all of you and all the support and keep it up because it's good for me and it's good for you .
That sounded awful .
But anyway , long story short , subscribe , please .
Now if you guys want to keep up to date with me and see what I'm working on before the videos come out , then go check me out on Instagram or Twitter .
The links are in my description .
But anyway , if you enjoy this video or you learn something , leave a like subscribe and I will see you next week .
Are you looking for a way to reach a wider audience and get more views on your videos?
Our innovative video to text transcribing service can help you do just that.
We provide accurate transcriptions of your videos along with visual content that will help you attract new viewers and keep them engaged. Plus, our data analytics and ad campaign tools can help you monetize your content and maximize your revenue.
Let's partner up and take your video content to the next level!
Contact us today to learn more.