https://www.youtube.com/watch?v=LiWFkQmZmh0
How to DRAW A NOSE for BEGINNERS! (Face Drawing Tutorial #4)
Hello , everybody .
This is brushes and bunnies .
Welcome back to my channel and I would like to welcome you to the fourth video tutorial of my face drawing series .
In this video , I'm going to be showing you the basic technique that I use to drawing noses as well as how you can place a nose on a face .
If you're interested in taking a look at the basic construction of a face , do check out my part one and part two videos of this face drawing series in these videos .
I really hash out the lum method and talk about the nitty gritty details of drawing faces .
So this is something I would definitely recommend that you check out before you get into the details such as drawing noses , eyes and lips or mouth .
You can find links to these videos down below in the video description .
Without further ado , let's just jump right into how to draw a nose when it comes to drawing a nose on a character's face .
There's a super helpful guideline that you can use that will make everything so much easier for you .
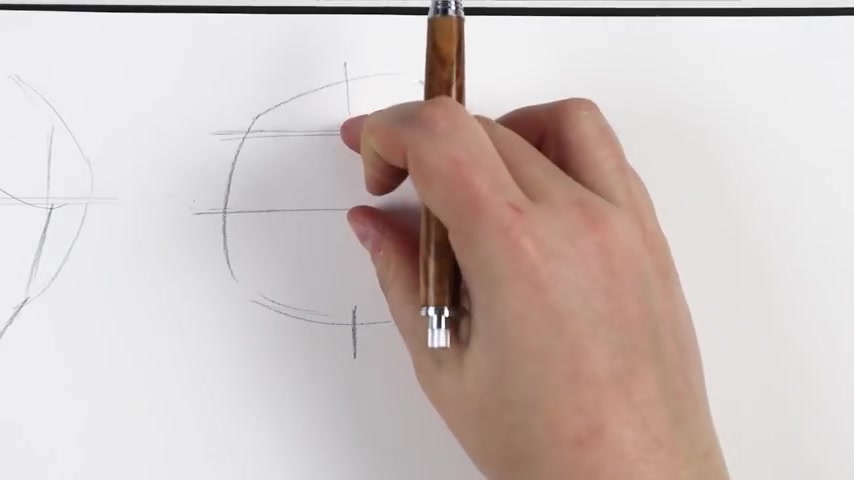
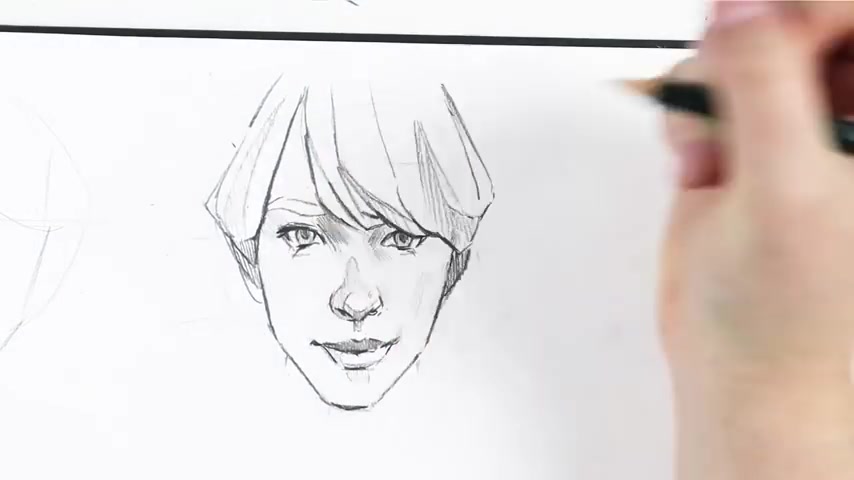
The first thing we're gonna do is just draw a very rough outline of the overall head shape .
So I always start off with a circle and then I use a horizontal line to kind of dictate the sort of position or angle of the face .
I then cut the circle in half .
And this will basically be the guideline for the eyes .
And then I divide the rest of the sort of circle shape and also a little bit beyond the circle shape for the chin into three equal parts .
Now the third line that I drew in this case , this is actually the point of reference that you will use for where the notes will be positioned .
So if we basically just pause the video here for a second , you can see that there are three lines drawn across the head shape and the very third line , this is the line that you're going to use as a reference point on where you're going to be drawing the nose area .
And again , if you want to learn more how to divide the head shape into three equal parts , do check out my part , one of this face draw series where I talk about this in a lot more detail .
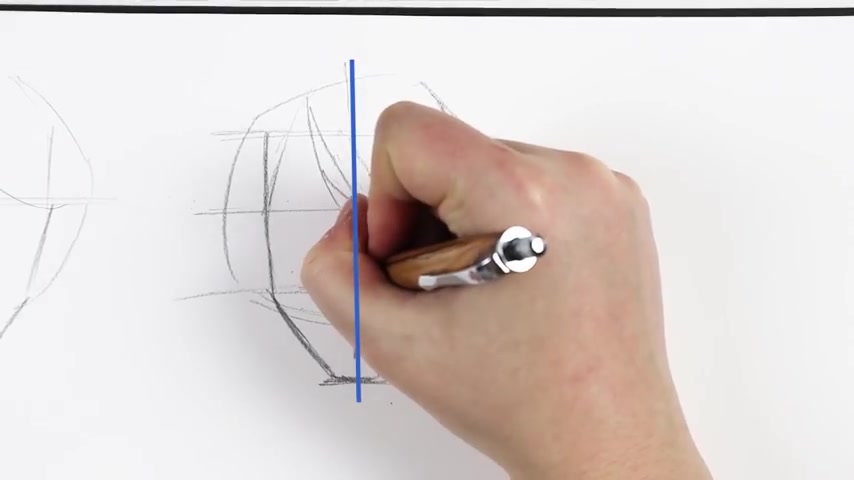
I'm just gonna go ahead and draw the very rough outline of the nose shape directly above the third line .
I also use the horizontal line as a another point of reference .
This horizontal line will help you dictate whether the nose is a little bit to the left or to the right of the face .
So basically , the angle of where the nose is pointed towards , in this case , it's super easy because it's just a straight on shot of the character .
So I'm gonna basically draw the nose in the center and directly above the third line .
I'm just going to be fast forwarding the rest of this drawing just so that you can see the lum method in action when it comes to adding the eyes and the mouth .
And um basically just kind of like outlining the rest of the overall face in proportion to the nose that we drew .
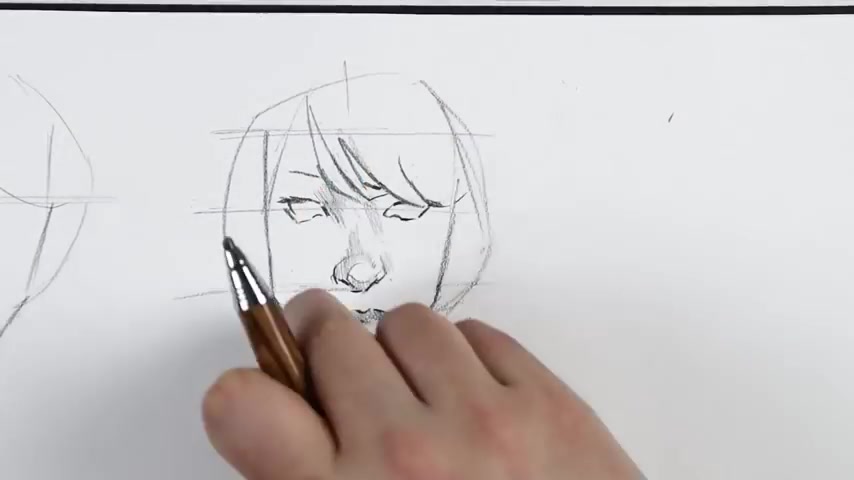
I do have to say that the nose is really the first point of reference that I draw when it comes to drawing faces .
So I tend to start off with the basic mechanics of the head shape and then I will pop the nose right in and then from then on , I can draw the eyes and then I can draw the nose .
A lot of this is basically referenced in my other videos as well .
So if you want to know more details , I do urge you to check all the other videos out um when it comes to eyes and or overall face , I know I keep repeating this but it's actually quite important um just because there's too many details to really talk about um when it comes to small areas of the face .
But in this case , this is more or less the method that I use in terms of basic shapes .
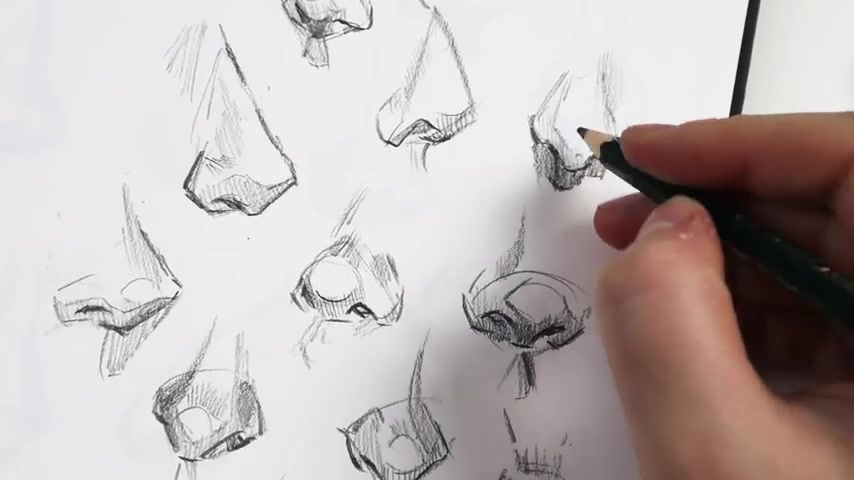
I will discuss this in the next part of this video and I'll show you in more detail on how I built the nose , just the overall shape of the nose and how you can use these shapes to basically play with um , the different types of noses out there .
This basically speaks for the shading .
So I'll be talking a lot about how to shade the nose and sort of my technique behind it because a lot of the shading does end up making your nose look a lot better .
You can basically make or break your nose depending on how you shade it .
So I will be touching base on this in the next part .
Let me just walk you through very quickly on the basics of drawing your nose and how I approach it .
So the very first thing I do is on the third line of the face .
So let's say we have the line here that goes across the face .
This is the line that I used to put my nose on .
And in this case , what we're gonna do is I tend to just draw the nose directly above this line .
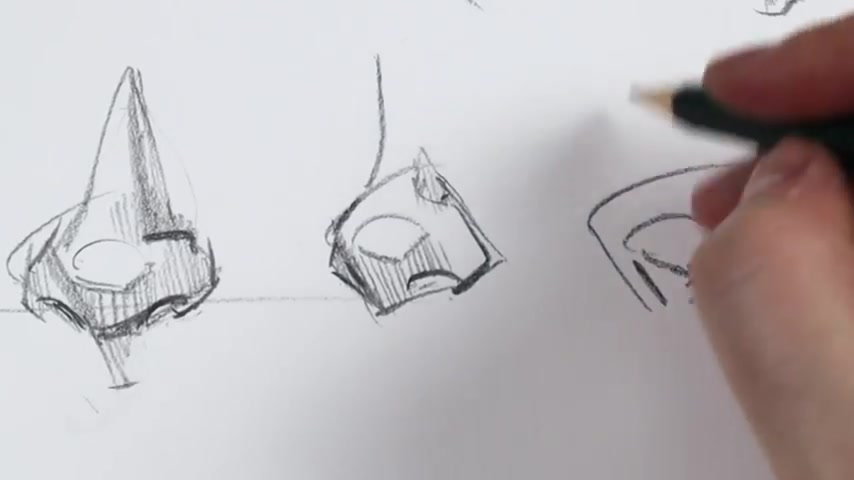
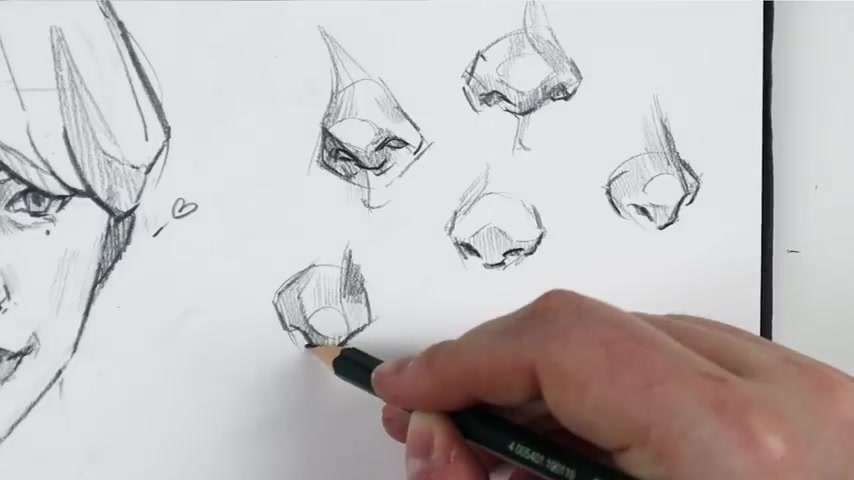
And the first shape that I draw is kind of the rough outline of the nose area .
And I will use this as a guideline um when it comes to drawing the details of the nose .
The second thing that I tend to do is draw the tip of the nose .
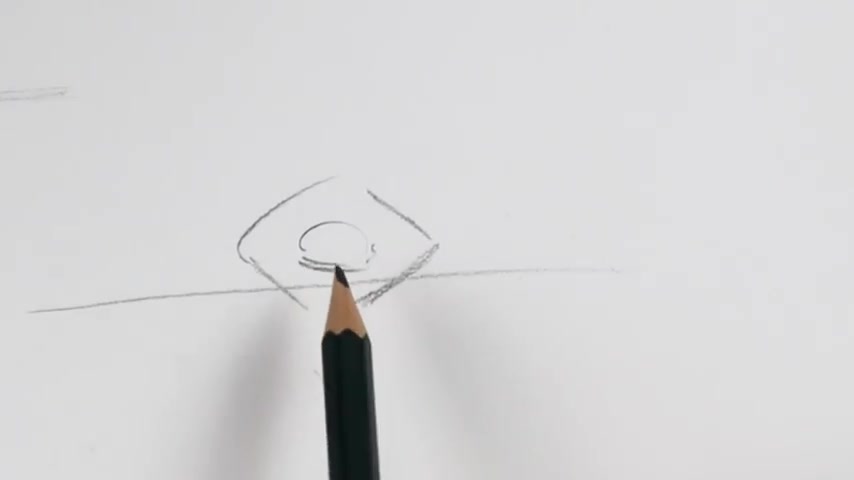
Um So in this case , I just tend to do like an oval shape and this will really show you the direction of where the nose looks into .
So if I , if I would draw a nose that's looking , you know , through quarter view or profile , um , then the tip of the nose will start to change direction and I will use that as a point of reference .
So in this case , it's a little bit slanted to the left .
And , um , from that point on , we can then start with the nostrils , depending again on the angle of the nose , the nostrils will either come directly below this , um , this kind of like tip or a little bit underneath .
And I will actually use the bottom of the diamond as a guideline .
So in this case , we're actually going to do that , we're going to add the first nostril just a little bit above this guideline here and we're gonna use the sides of the diamond as a point of reference for the nostrils .
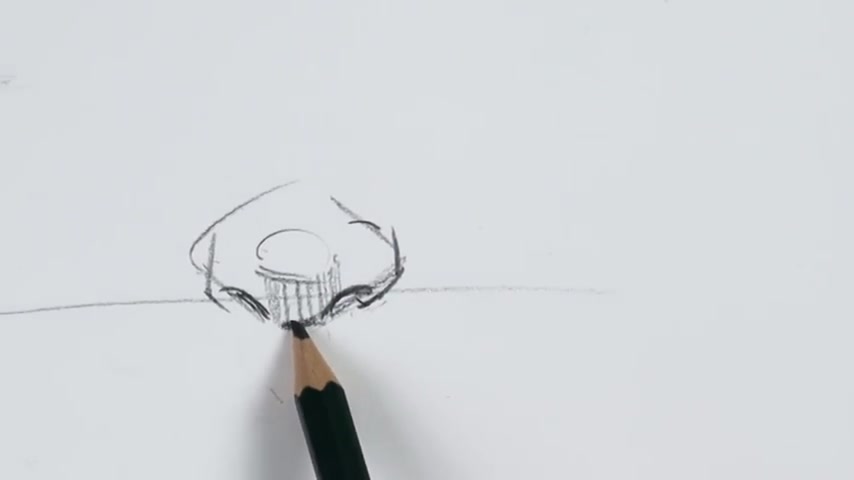
So I will shade below the tip of the nose to the bottom of the nose here .
This is where I tend to shade and I just kind of shade a bit around and you can also just bring the shape up a bit , um , as you kind of progress up towards the top of the nose where the eyes are , there's another triangle shape that you can use .
Um So again , this is a lot more prominent when you're drawing um the whole face altogether .
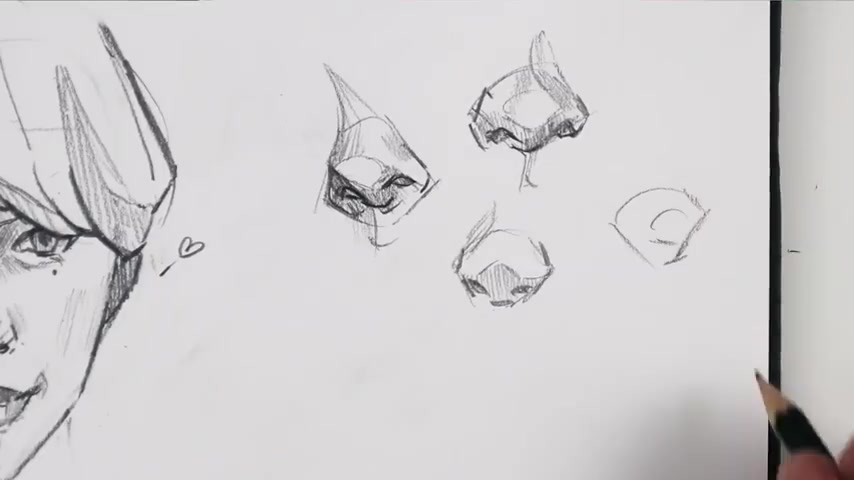
So let's try another example of kind of a more a dramatic angle .
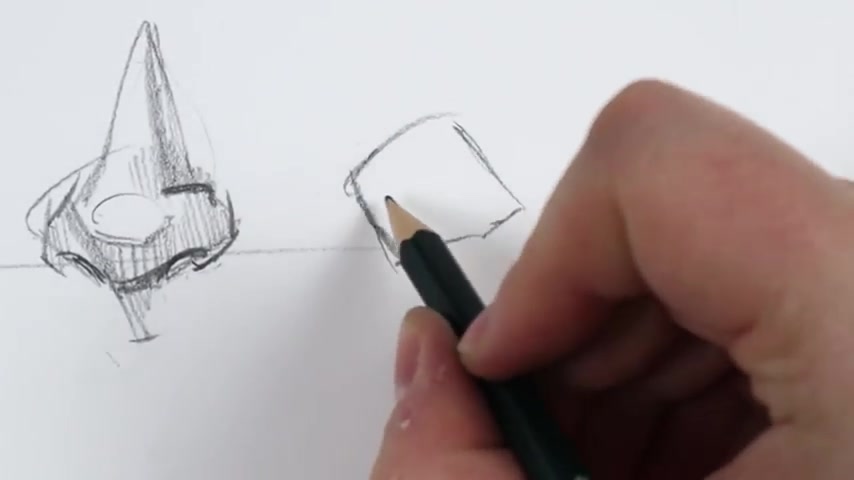
So in this case , we're going to do the three quarter view and I tried to do again , the diamond shape , the diamond shape will change depending on like the shape of the nose , of course , um It's all up to you how you want to do it .
And in this case , we're just gonna do the tip of the nose here like that .
So you can already see the angle that is starting to develop .
And we're just gonna draw the nostril above the line and bring the side of the nostril up here like that .
And we're actually just going to add an additional line here for the profile or the three quarter view and we're gonna start to shade it in and here .
So here now just to make it look obvious that it's actually , you know , a side three quarter view shot of the nose , we can just bring up a curved line like that .
All right , let's do another one very quickly .
So we're gonna do another diamond shape .
The tip of the nose is this way here like that and basically just fill in the details .
So the nostrils are a little bit above the bottom of the diamond .
We take the bottom , we draw a line here to simulate the , you know , like the very bottom of the nose , the tip of the nose , I should say , maybe , I don't know if this is considered the tip of the nose .
And here we can bring up our lines just basically work around the diamond shape that you drew to add details to the nostrils and um kind of flesh out the general shape of the nose .
And of course , when you're drawing noses shading is your best friend .
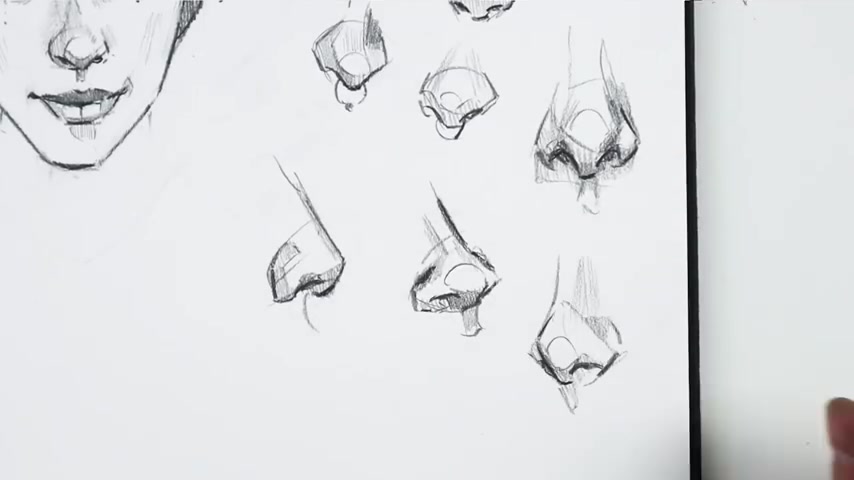
The third part of this video is basically just some advice from me to you .
I would recommend taking the things that I've shown you and probably what you've learned from part two and part one of this video and take that information and apply it in your sketchbook .
Just practice with all kinds of noses out there , select different shapes , different angles , the profile view , everything you can think of , try and just sketch it very quickly in your sketchbook .
This is actually a really fun exercise to do and the more you do them , the easier they become .
And um it's actually a lot of fun .
The same piece of advice could be said for also eyes and for mouths , which is something that I'll most likely repeat in my other videos when I cover these topics .
Um But yeah , practice makes perfect .
Like , honestly , I think it's just a matter of , you know , picking up a pencil and just sketching shapes , trying different things , not being afraid of trying odd , you know , weird shapes , elongated , widening , um the noses and also trying to see what method or technique of shading will work for you to summarize this video .
I really want to say that there is not really one defined way on how to draw noses .
If you check out for nose tutorials out there on the internet , you're going to find all kinds of different methods and techniques , you're going to find some that are a lot more realistic in nature , a lot more cartoonish .
Um It's , it really all depends on your style .
So I tried to show you the technique that I use , which is mostly using reference lines as well as geometric shapes such as triangular , triangles , triangles , diamonds and um oval or circular shapes .
And then when it comes to the shading , I tend to shade the un under part of the nose as well as a little bit on the sides around the nostrils and up once the nose meets the eye area , this is where I tend to focus mostly on the shading .
So as you keep practicing , you're going to find the technique that works for you .
Um But yeah , this is the technique that I use .
So I do hope that it has helped you in some way .
Um If you're looking for more video tutorials on face drawing , of course , I do have a whole series as I mentioned like 50 times in this video .
So I do apologize for that .
Um But all the links can be found down below in the video description .
And the next video covering for this face drawing series is actually going to be surrounding the lips in the mouth .
And um we're gonna get into more advanced techniques later on .
Um you know , drawing different um facial expressions as well as different the amount .
Um I don't really cover this in much detail in my videos .
So I really want to do an entire video outlining these sort of like advanced angles for certain parts of the face .
Um But yeah , this is all coming in the future .
So yeah , I hope you did like this .
Um Leave a comment down below .
Don't forget to subscribe and yeah , check out my social media , Facebook , Instagram and also my Etsy stores .
I just launched it actually once more .
I am offering pet portraits for watercolor and oils .
Check that out .
I would really appreciate it .
That being said , I wish you all a great um evening and uh a great start to the week .
We'll see you next week .
Bye .
Are you looking for a way to reach a wider audience and get more views on your videos?
Our innovative video to text transcribing service can help you do just that.
We provide accurate transcriptions of your videos along with visual content that will help you attract new viewers and keep them engaged. Plus, our data analytics and ad campaign tools can help you monetize your content and maximize your revenue.
Let's partner up and take your video content to the next level!
Contact us today to learn more.