https://www.youtube.com/watch?v=qqq7B2uUNzU
How To Create Amazon Affiliate Website _ Earn Upto 10000$ _ Complete Video
और आप देख रहे हैं बाली फॉर यू आज की फॅस जो स्पॅाट मार्किटिंग से पैसे अर्न करना चाहते हैं ।
आप मार्किटिंग क्या होता है इसमें आॅन फ्लिपकार्ड या फिर जो भी शॉपिंग साइट है उनके प्रोडक्ट ऍम कर सकते हो , उनके ऍम मिंट कर सकते हो ।
अगर कोई बंदा आपके अॅान वगैरह पे आता है और वहाँ पे आ कर के वो प्रोडक्ट या फिर कोई भी प्रोडक्ट खरीदता है तो उसका आपको कमिशन मिलता है वो भी डॅान दे दी है ।
तो आज की ये विडियो है फॅमिली की आप फॅमिली एट करेंगे ।
मतलब जहाँ पे ऍम फ्लिपकार्ड या फिर जो भी शॉपिंग साइट है उनके प्रोडक्ट को लिस्ट कर सके ।
चाहे वो आर्टिकल के फॉर्म में हॅूं ।
हाँ फाइव ॅ और वहाँ पे उस प्रोडक्ट को अपने ऍम कर दिया हो और वहाँ से अगर कोई ऍम के ऊपर आकर के वो प्रोडक्ट खरीदता है तो उसका आपको कमिशन मिलेगा या फिर आप जो है मुँह बना सकते हो ।
फॅमिली की आज क्या क्या डील मिल रहा है या फिर आप जो है प्रोडक्ट सजेस्ट कर सकते हो कि कौन सा प्रोडक्ट ॅ बना सकते हो तो कम्पलीट साइड कैसे बनाते हैं स्पॅाट इनके लिए है आगे हम लोग जो है देखेंगे की क्यू पाॅल की कम्पलीट वेबसाइड कैसे बनाते हैं ।
आगे की विडियो में आपको देखने को मिलेगी ।
लेकिन आज के विडियो शुरू करने से पहले ये जरूरी है कि आपने हमारी दो विडियो जरूर देखे हो ।
सबसे पहले विडियो की शॉपिंग साइट कैसे क्रिकेट करते हो और दूसरी विडीओ ऍम हाँ ।
ऊपर अकाउंट जो है वो कैसे क्रीएट करते हैं तो दोनों वीडियो कॉलिंग डिस्क्रिप्शन में आपको मिल जाएंगे ।
चलिए शुरू करते हैं जो भी लिंक है इस विडियो में यूस की गयी वो सभी लिंक आपको जो है डिस्क्रिप्शन में मिल जायेंगे ।
तो चलिए शुरू करते हैं वो देखते हैं कॅश कैसे क्रीएट करेंगे ।
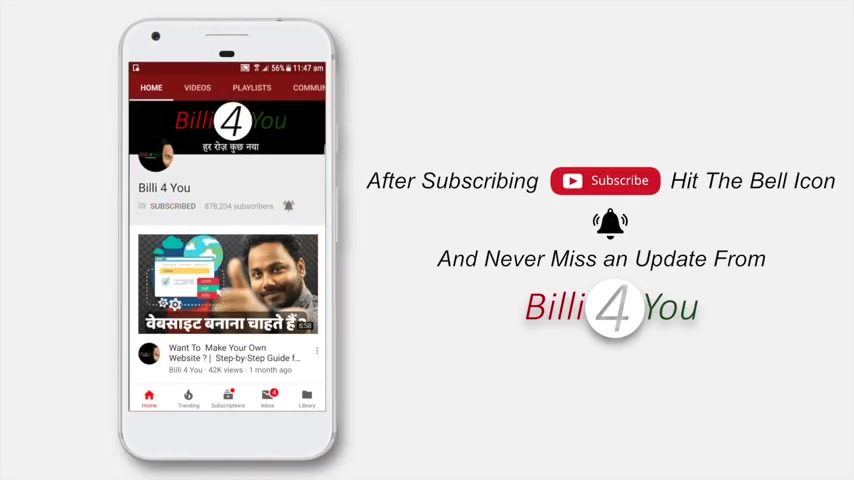
सब्स्क्राइब करने के साथ ही बॅाक्स आपको मिलेगा नहीं मुँह नोटिफिकेशिन ओके गाइड तो ये है मेरी फॅमिली उम्मीद करता हूँ कि आपने मेरी शाॅपिंग क्रीएट करने वाली विडीओ जरूर देखी होगी ।
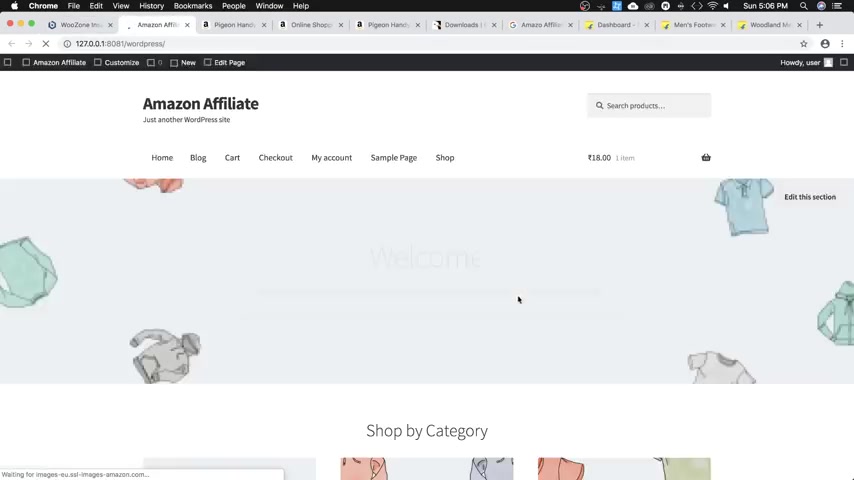
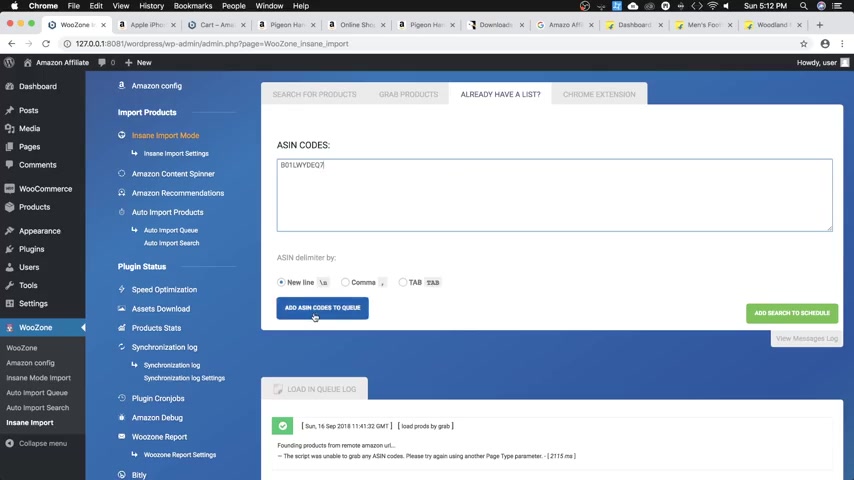
अब यहाँ पे अगर आप देखे तो मैंने कुछ प्रोडक्ट लिस्ट किया हुआ है ।
फॅालो यहाँ पे नू इनकी जगह बेस्ट ऑफर या तो डील ऐसा कुछ टाइटल हो और वहाँ पे ॅ हो यहाँ पे कुछ प्रोडक्ट अगर आप देखे तो यहाँ ऍफ का ऑप्शन आ रहा ।
लेकिन इस प्रोडक्ट में बाइप्रोडक्ट का ऑप्शन आ रहा अगर इसके ऊपर हम लोग क्लिक करते हैं और यहाँ से अगर बाइप्रोडक्ट के ऊपर क्लिक करते हैं तो ये ऑॅफ इनके ऊपर रीफर हो जा रहा है और ऍम के प्रोडक्ट पेज के ऊपर आ गया ।
अब अगर इस लिंक में अगर आप देखेंगे तो यहाँ पे जो है ना इसमें कहीं पे मेरा जो रिफल है है वो यहाँ पे इनक्लूड किया गया है ।
बाली फॉर यू ऍम ये मेरा रिफल है ।
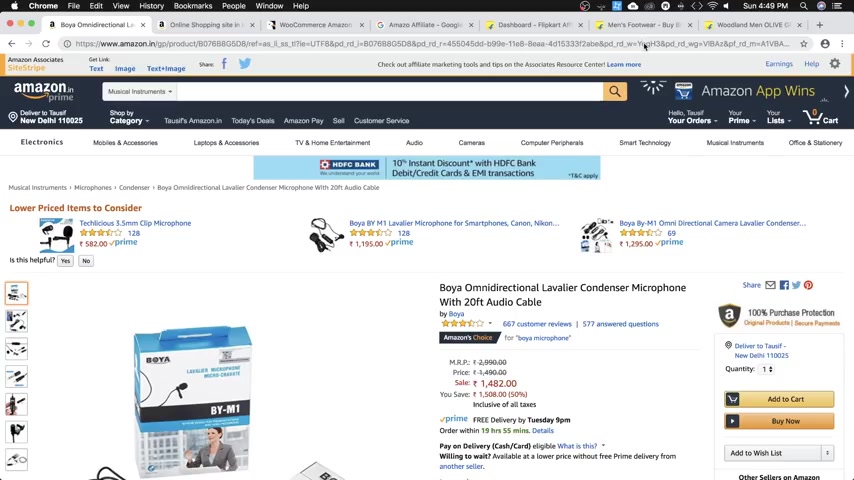
तो अब अगर इस प्रोडक्ट को कोई खरीदेगा मेरी साइड से आकर के तो मुझे इसका कमिशन मिलेगा क्यों ?
क्योंकि इस लिंग में मेरी ऍम कोई इससे पता चलता है कि मैंने इसे रीफर किया है तो ये प्रोडक्ट मैंने कैसे ऍप्स इम्प्लीमॅन्ट बना सकते हैं ।
फॅसे आप जो है फॅमिली पॉट जो भी जिस शॉपिंग साइट का भी प्रोडक्ट ॅ करना चाहे आप ॅ कर सकते हैं तो चलिए देखते हैं कि कैसे हम जो है अपनी साइड के ऊपर ऍम करेंगे तो सबसे पहले आपको आॅड बिन लाॅगिन करना पडेगा ।
उम्मीद करता हूँ आपको पता होगा ये सारी चीजें हम लोग चलते हैं यहाँ से डाॅॅ बोर्ड में हम सिंपल ॅ सकते हैं या फिर यहाँ पे जो प्रोडक्ट्स का ऑप्शन है ।
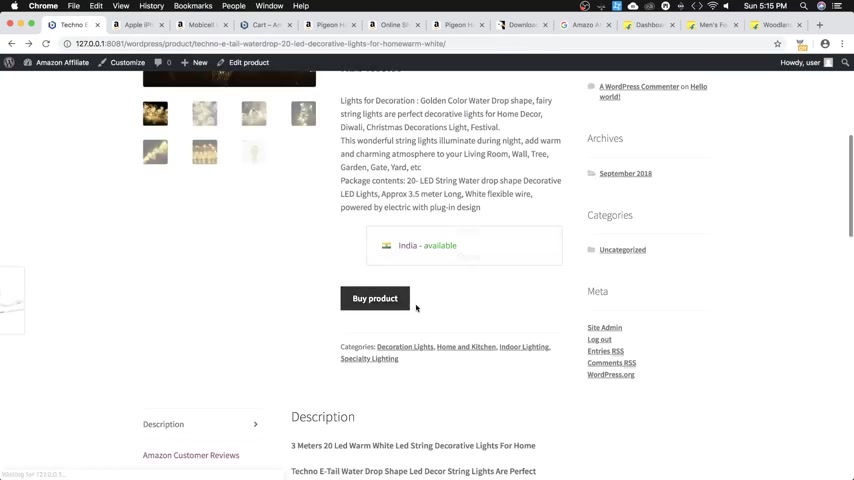
इसके अंदर ऍम और उसके बाद ऍम पाल चलते हैं हम लोग ऍम के ऊपर और ये प्रोडक्ट है इसे हम लोग ॅ करके देखते हैं तो मैं इसके टाइटल को यहाँ से काँपी कर लेता हूँ ।
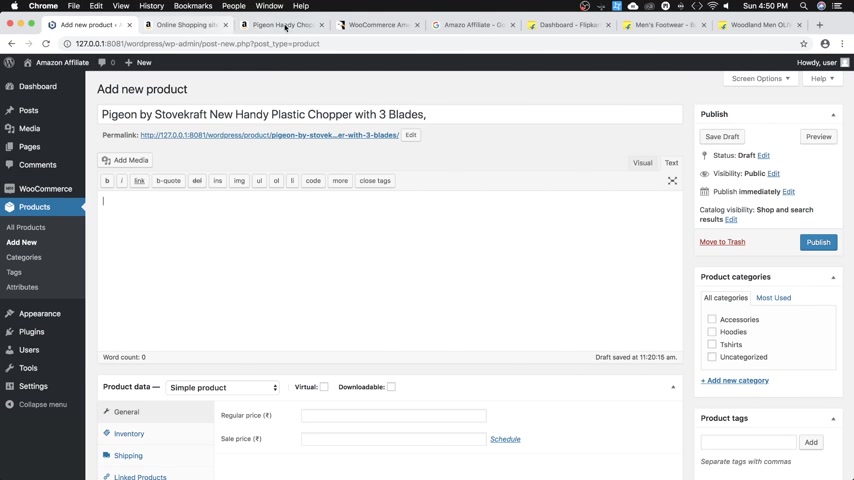
हाँ पी और उसके बाद यहाँ पे पेस्ट कर देता हूँ ।
ऍम पाल के लिए देख लेते हैं यहाँ पे शॅल ऑंग डिस्क्रिप्शन है तो मैं यहाँ से डिस्क्रिप्शन को काँपी कर लेता हूँ ।
हाँ पि ऍफ उसके बाद यहाँ पे लॉन्ग डिस्क्रिप्शन में और नीचे शॉर्ट डिस्क्रिप्शन में मैं कर देता हूँ उं उसके साथ ही यहाँ पे जो है मैं प्रोडक्ट ॅ कर देता हूँ ।
इसके लिए मैंने ऑलरेडी जो है डाउनलोड किया हुआ है ।
प्रोडक्ट इमेज ये है प्रोडक्ट इमेज मैंने इसे ॅ किया और उसके बाद प्रोडक्ट ऍम कर दिया और यहाँ पे मैंने कॅटेगरी भी चूज कर ली ।
कुछ फॅमिली है तो वो भी चीज हमने डाल दी ।
अब सबसे इम्पॉर्टेंट चीज क्या है ?
अगर इसको हमलोग प्रीव्यू करके देखे तो अभी हमने प्राइस नहीं किया है ।
और कोई भी ये जो लिंक जाॅब नहीं किया तो यहाँ पे अभी कुछ भी नहीं आ रहा है ।
अब यहाँ पे सबसे इंपॉर्टेंट है ।
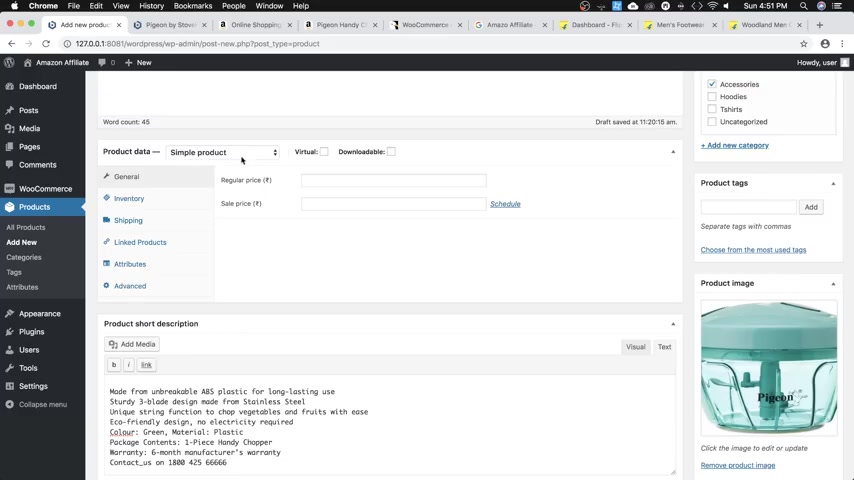
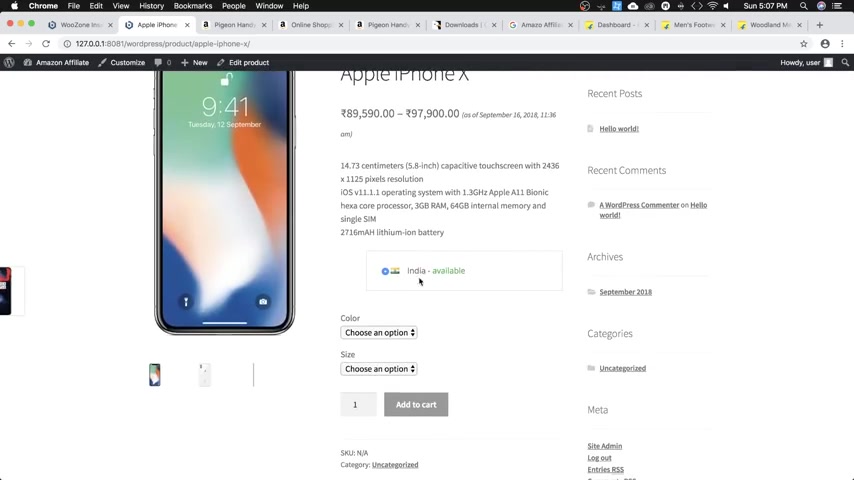
नॉर्मल कंडिशन में जब हम लोग अपनी ऍम करते हैं तो यहाँ पे सिंपल प्रोडक्ट का ऑप्शन होता है और यहाँ पे हम रेगुलर प्राइस और सेल प्राइस लिखते हैं ।
इन सब ऑप्शन से हमें मतलब नहीं है अभी लेकिन ऍम करने के लिए हम लोग यहाँ पे जायेंगे प्राॅडक्ट और इसके ऊपर क्लिक करेंगे अब यहाँ पे हमें प्रोडक्ट का यूअर डालना है तो इस यूअर में हम अपना रिफल लिंक जो ऍम डालेंगे ऍम के ऊपर हूँ मैं ये हमारा प्रोडक्ट है ।
आपको पता है कि जैसे हम लोग फॅमिली के ऊपर साइन अप करते हैं तो ये स्ट्रिप जो है हमारा आज आता है अगर सेम अकाउंट से हम ऍम के ऊपर लॉगिन करते हैं ।
अगर आपको आइडिया नहीं है कि मैं क्या बता रहा हूँ तो आप ऍम विडीओ जरूर देख लें ।
डिस्क्रिप्शन में आपको लिख मिल जाएंगे तो मैं यहाँ से फॅमिली कर लेता हूँ ।
वो सिम्पली ये है हम फॅस और ये लिंक है मैं इसको कॉपी कर लेता हूँ ।
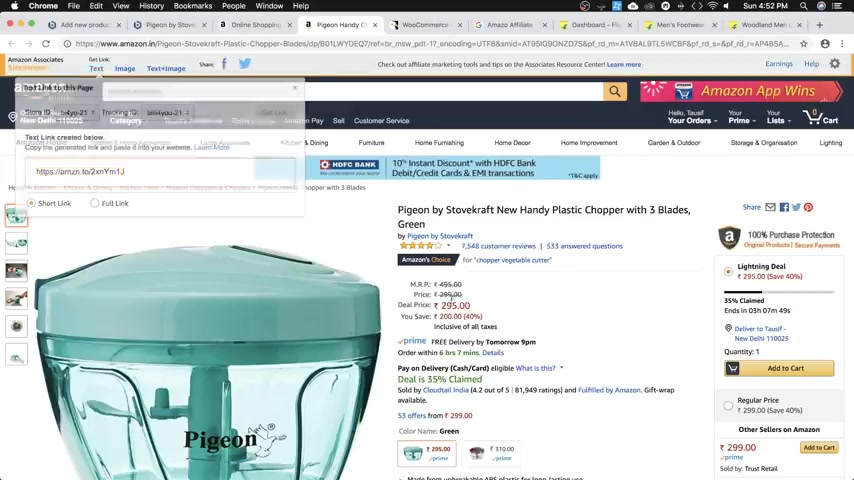
हाँ फीलिंग्स और उसके बाद यहाँ पे मैं इसे पेस्ट कर देता हूँ ।
मैंने पेस्ट कर दिया ।
बाॅडी फॉल्ट रहने देता हूँ ।
प्राइस मैं यहाँ से कॉपी कर लूँगा ।
प्राइस कितना इस प्रोडक्ट का तो टू नाइंटी फाइव है ।
फॅमिली प्राइस में डाल देता हूँ ।
वन मुँह और ऍम प्राइस डाल देता हूँ ।
टू नाइंटी फाइव फॅमिली काफी डिस्काउंट यहाँ पे शो करने लगेगा ।
अब मैंने सारी इन्फर्मेशन डाल दी ।
अब मैं इसे पब्लिश कर देता हूँ ।
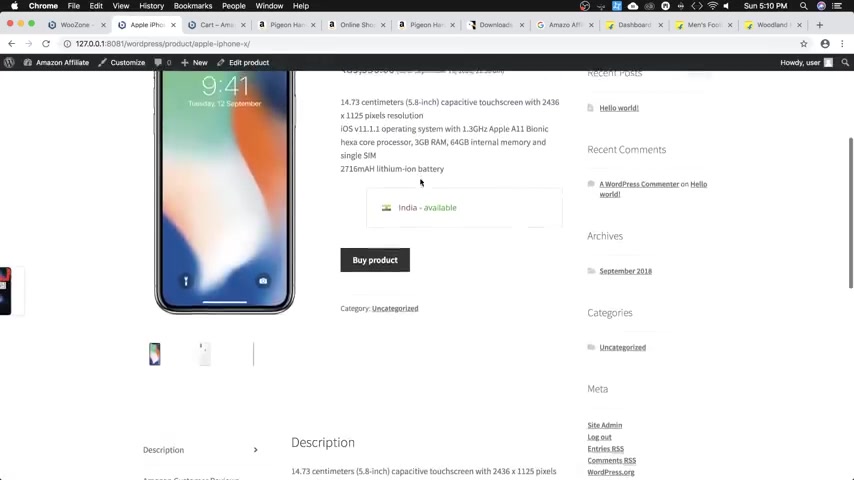
पब्लिश करने के बाद हम लोग चलते हैं अपनी साइड के ऊपर और यहाँ पे देखते हैं ये देखिये ये प्रोडक्ट हमारा हो गया और यहाँ पे मुँह दिखा रहा है मुँह प्राइस है वॅार प्राइस टू नाइंटी फाइव का ये प्रोडक्ट है ।
अब इसके ऊपर अगर कोई क्लिक करता है और बाइप्रोडक्ट के ऊपर जाता है तो वो ऑॅल के ऊपर आ जाएगा ।
तो इस तरीके से आप किसी भी ॅ हैं जैसे कि ये ऍम ये शूट है , इसका जो है ये फ्लिपकार्ट है ।
This video is brought to you by monster insights .
Monster insights makes it easy to double your traffic and sales by showing you exactly how people find and use your website .
Just click on the link in the description below to get started .
The 1st 200 people to use the coupon code W PB VIP will get 50% off monster insights .
Throughout this video series .
We've been talking about how to make money with your website .
And in today's video , I'll be walking you through how to set up affiliate marketing or website .
There are several different ways that you can do this , but I want to keep this simple as possible so you can get up and running quickly .
So if you're ready , let's get going .
These are the five main areas that we'll be working on .
We're going to be using wordpress .
Wordpress is the largest platform in the world in creating websites .
There's like over 32% of the world's websites that run on wordpress .
When you're building a website .
It's very similar to what's happening .
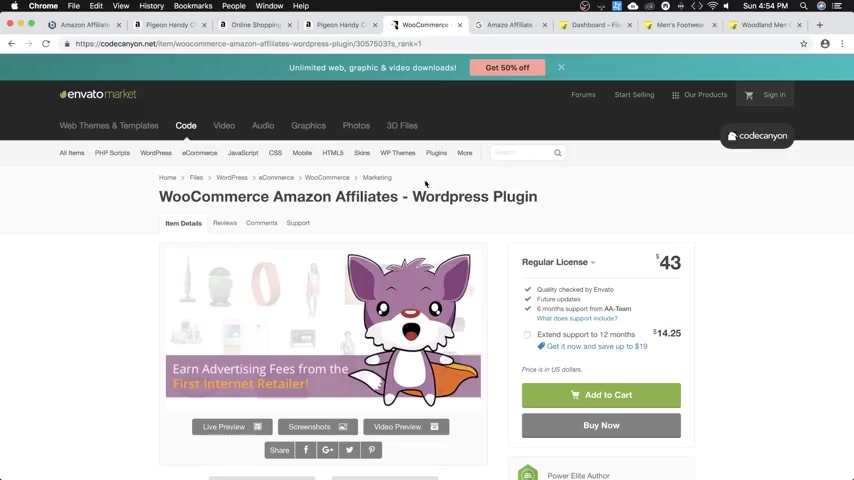
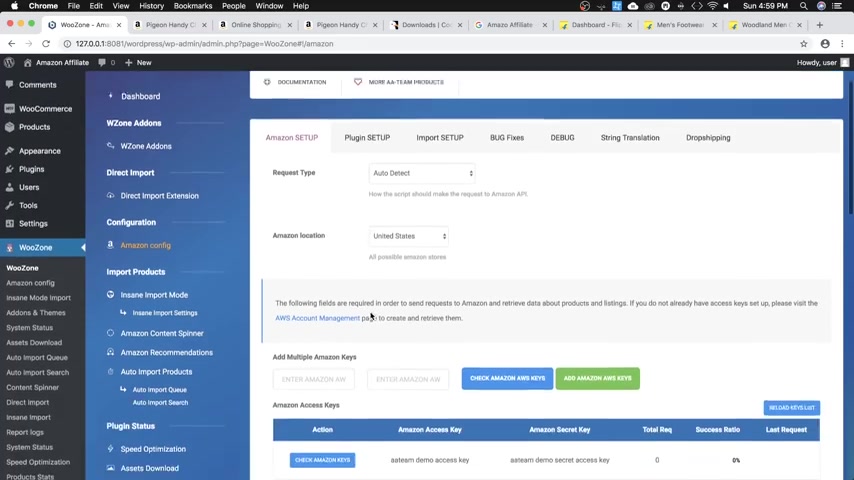
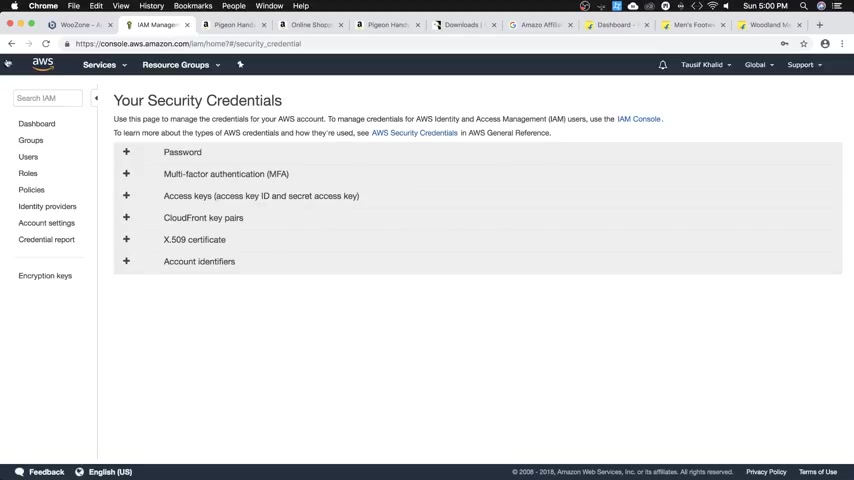
आपको फॅमिली कुछ भी करने की जरूरत नहीं पडेगी तो इसके लिए आपको जाना होगा ॅ के ऊपर और वहाँ से ये प्लगिन जो है वो आपको डाउनलोड करना पडेगा ।
बाइक करना पडेगा इसका कॉस्ट है अप रॉक्स फोर्टी त्रि डॉलर मतलब इंडियन रौं अगर हम बात करें तो ये आपको मिल जायेगा ।
अपां स्त्री तौं के करीब में तो अगर आप ऍम करना चाहते हैं तो ये प्लगिन बेस्ट है ।
आप यहाँ पे देख सकते हैं कि इससे ऍम थ्री हंड्रेड सिक्स लो ।
लोगों ने जो खरीदा है और इसमें अभी जो है ।
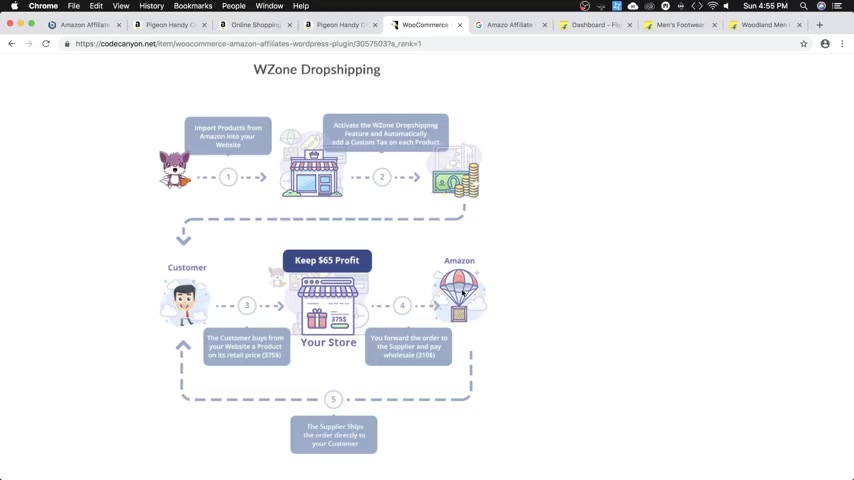
नए अपडेट में ड्रोप शिपिंग का फीचर किया गया है ।
मतलब अगर आप ये चाहते हैं कि आप ऍम पेमेंट आपके पास आये और आप उससे जो है उस प्रोडक्ट ऍम डिलिवर्ड करो ।
तो वो चीज अब आप इस ब्लॉकिंग से कर सकते हैं ।
When you build a house , you have the land that you need to use to put the house on .
That's the same as the hosting provider .
The hosting provider has servers that all of your files and folders will go on .
Next you have an address and that's so people know where to find you .
And the address is your domain name or your web address .
You want to start building your website and your website is your home .
That's what houses all of your files , all of your images , the color structure , the way that looks the functionality of it via the plugins .
Finally , you have your mailbox , which is your email address and that's how people can contact you .
And all of these come together to make up your whole website on the web .
Now , at WP beginner , we recommend using blue hosts as your hosting provider .
They have great customer support .
They are one of the oldest most established hosting companies out there .
They're officially recommended by the wordpress dot org organization and WP beginner users can get 60% off and a free domain by using our discount code to get that discount .
Just go to wwwwp beginner dot com , forward slash refer forward slash blue host hit enter and it'll take you to that page .
We also have a link below that you can use as well from here .
Just click on the big green , get started button and it'll take you to the select your plan page .
You can choose your plan here .
The biggest difference between these two is with this one , it's very basic and you're only allowed one website .
Whereas with this one , if you have web addresses or multiple websites that you want to set up , then this might be the best one for you .
After you've chosen which setup you want , go ahead and sign up with a new domain name that you want .
Since it comes free and click next from here , you want to go ahead and create your account by filling in all of this information .
And then down here you want to verify the package information .
I would say that your domain privacy you don't need .
We normally just turn that off .
Things like backup site and site locker .
There are a lot of great plugins and features available with wordpress .
So you don't need that either .
Once you fill out all the information , you see the amount that's being discounted .
Now , just fill in your payment information and you'll have your hosting account set up now that we've signed up .
We'll get a congratulations screen and we'll just need to click on the next screen where we can create our password .
This password will be used to manage our hosting account .
Once you create the password , they will start setting up the account for you .
One of the great things about blue hosts is now they've made installing wordpress even easier from here .
You can select a theme that you might like to go with your site since I'll be walking , you through the whole process .
Let's go ahead and skip this step and now they automatically set up wordpress for you .
You no longer have to go into your blue host account and install wordpress and go through that process .
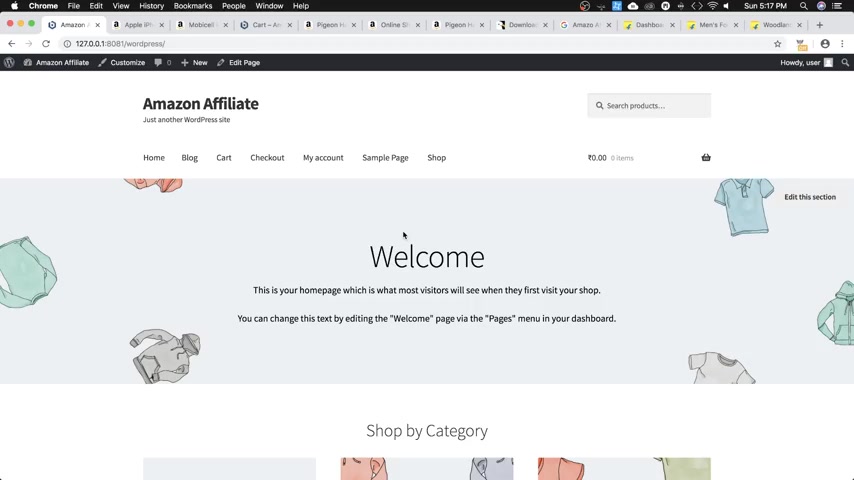
Once we get everything set up , you can click start building and we'll be taken to the back end of our wordpress dashboard where we can start customizing it .
Once you log in to your dashboard , it might look something like this where we have a lot of notifications and things like that .
What we want to do first is kind of clean everything up .
There will be some plugins that we install , but for now , I'll just walk you through how you can remove everything .
So you can start with a clean slate first .
So we'll head over to our plugins area and when we do that , we can scroll down all the way down till we see all of the plugins and we can select them all and click , deactivate and you want to click on , apply .
And that's because we don't have a , an SSL certificate installed on there , making sure that your site has an SSL certificate installed and activated , does a couple of things .
Of course , it is more secure for your readers or the people who come to your website .
It's also a slight ranking factor with Google because it tells Google that you are a secure site .
In the past , you used to have to pay like 60 to 100 and $50 to get a secure certificate installed on your site .
But nowadays , companies like lets encrypt have made this process super easy with our hosting providers like blue host .
What you can do is go back into your dashboard , go down to security and then you can ask for a let's encrypt certificate .
It'll might take a little bit of time for them to set that up .
But once they do , then we can go in and set it up for ourselves .

Once you go there , you can request a certificate and you'll see that it is pending and that they're working on it .
As you can see , it can take a little bit of time for them to get that set up once that is done and set up , the next thing we can do is go to our wordpress dashboard .
You'll want to log in with the credentials that you saved before from our dashboard .
Go over to plugins , add new and we can type in SSL .
What we're looking for is this plug in and it's called really simple SSL .
What we want to do is we want to install that and then we also want to activate it .
Once we activate it , you can see that it's active in the plugins area and then we can go to settings to set it up from here .
You see some detections , we can see that it's not enabled , but the SSL certificate is detected on our site .
So we can go ahead and activate the SSL .
Great .
Now that it's activated , you see up here , we have HTTP S and everything is active and we also have the little padlock connected .
So that's a good start .
And now we can move on to designing the rest of our site .
Ok .
Now that we have some of the technical aspects out of the way let's go ahead and start taking a look at our theme .
This is the theme by default , I've removed the coming soon plug in and so you can see what our theme looks like out of the box .
When wordpress first is installed on your site , it comes with a theme already and it's usually set up for the year that it's installed .
For instance , this is the 2019 theme and you see it's pretty good .
It's nice and clean , but it's a little lacking and we're going to fix that next .
So to show you what theme we have , you can go into appearance themes and you see by default , this is the current theme .
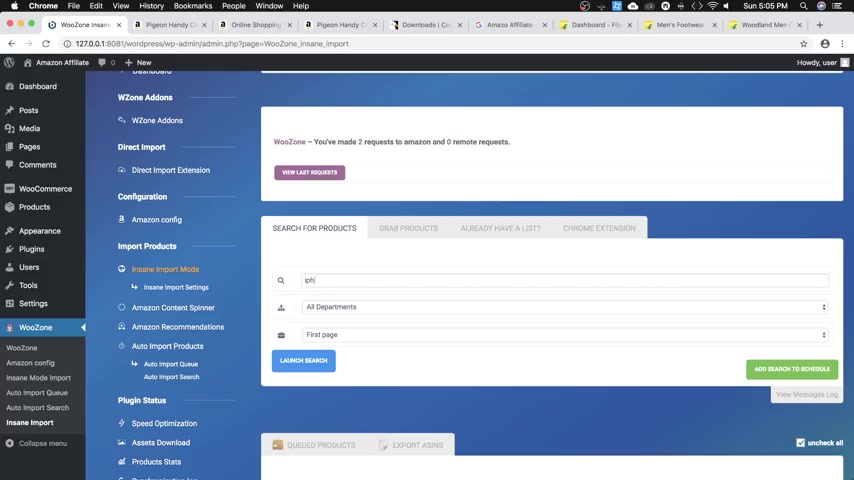
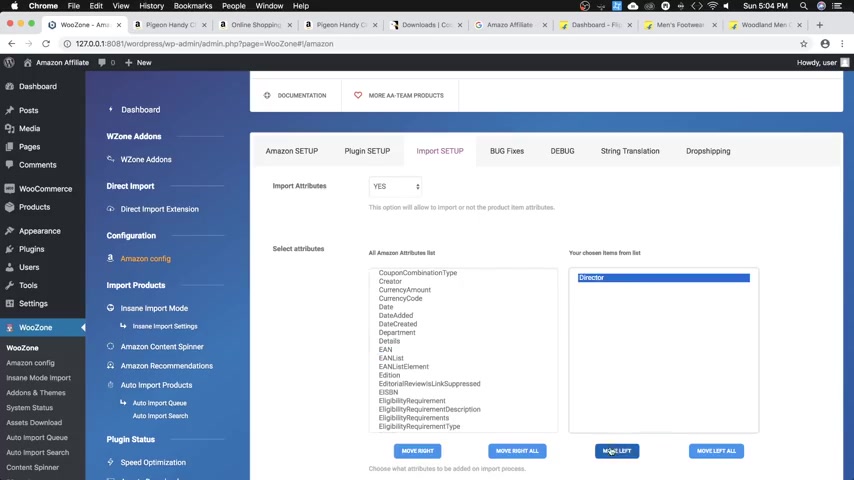
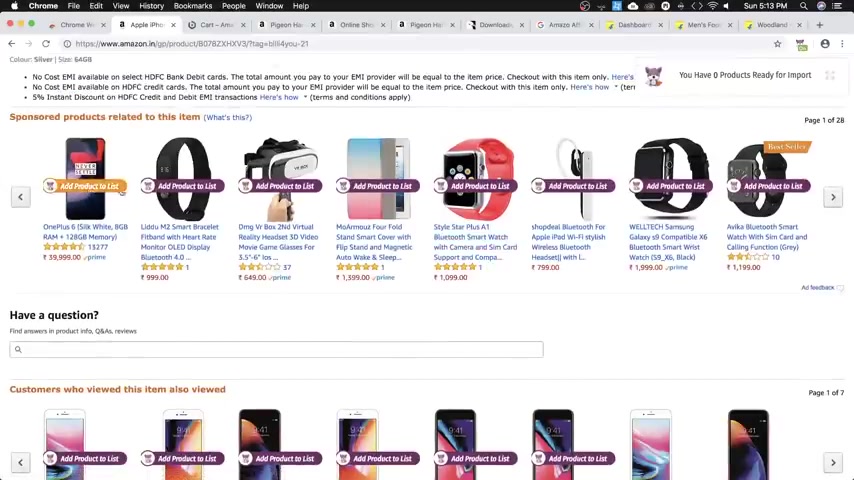
है ना इम्प्लीमॅन्ट क्या फोन फोन मैंने सर्च किया उसके बाद आप चाहे तो यहाँ ॅ वगैरह चूस कर सकते हैं ।
लॉन्च सर्च ओके और यहाँ पे आप देख सकते हैं नीचे काफी सारे प्रोडक्ट जो है वो आ गए ।
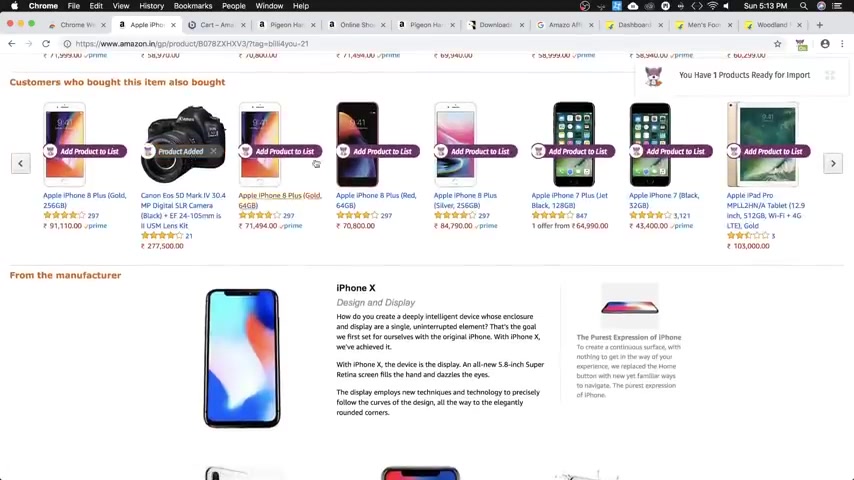
अब इस में से किसी को हमें इंपोर्ट करना है ।
फॅस सारे को हमें इंपोर्ट करना है तो हमने सभी को माँग कर दिया है ना या फिर ऍम कर सकते है यहाँ पे और उसके बाद हम लोग नीचे आते हैं ।
यहाँ पे नीचे आने के बाद जो है इंपोर्ट प्रोडक्ट का ऑप्शन है यहाँ पे कुछ और ऍम कर सकते हैं ।
मतलब सारे कितना सारा प्रोडक्ट जो है वो बिल्कुल ।
जैसे अभी अरेंज है वो नहीं रहेगा वो स्पिन कर देगा ।
इसके बाद वो प्रोडक्ट , उसके बाद वो प्रोडक्ट उसके बाद इम्पोर्ट ।
इन आप चाहे तो फॅमिली है जिस हिसाब से उसी हिसाब से इम्पोर्ट कर सकते हैं या फिर अपनी किसी कॅटेगरी में इम्पोर्ट कर सकते हैं उसके बाद सिम्पली आप जो इम्पोर्ट प्रोडक्ट्स के ऊपर क्लिक कीजिये और ये हमारा इम्पोर्ट का प्रोसेस स्टार्ट हो गया ।
You see it showing right here and it's the 2019 theme automatically installed by wordpress .
When you want to install a new theme for your website , you can simply go click on the add new and it will go into the Wordpress repository where all the free themes that are vetted and proven to be ok for wordpress are here .
But for this video , we're actually going to be using the Astra theme .
It's a very specific theme .
It is a great theme to allow you to customize your site exactly how you want it to look .
We need to install it and we also need to activate it .
So now this is our theme that is on our site and we'll take a look at it .
You see it's still pretty bland , but we're about to fix that .
So let's head back over and with the Astro theme , what they've done now is they've created what's called starter sites .
Basically .
What used to happen if you had a theme and you wanted to install it on wordpress , you had to go through the documentation and follow along , hope that there's good documentation on how to make your site look like the demo that you saw on that wanted .
And it was a lot of frustration for a lot of people .
What Astra has done is they've created these starter sites that make everything look exactly like the demo that you're seeing and the demo site that you want .
So to get this going , we need to install a plug-in .
So let's head over to our plugins area , add new and let's type in the Astra starter sites .
This is the one that we want .
So let's go ahead and click install now .
And then once it's installed , we also have to make sure that we activate it .
And now we see this plug-in is active .
So now we can click on the ready starter sites here .
And from here , we want to select the page builder in this video .

We'll be using the Beaver Builder and that is a light page builder .
There's also a pro version .
But for this , I'll show you how to work with the light Page builder .
So we'll click Beaver Builder and then let's click next and now here are all of the starter sites that we can choose from to install on our site .
And when you see agency that's for a premium version , but we can click on the free version and you'll see , we even with the free version , we still have like 35 sites that we can choose from .
So you want to just take a minute to go through and see which one of these starter sites do you want to choose to start with ?
Like , what , what is it that you're ultimately building ?
What type of blog are you building ?
What type of website are you building ?
Is this for a business ?
Is this for fitness ?
Is this for outdoors ?
Do you have a product that you're wanting to sell ?
Just go through there and figure out which one you want to do ?
And even if you hover over it , it actually also will show you what the home page will look like and it kind of scrolls down for you so you can see it all .
Now , I've been talking a lot about gardens so I can look at this one and I think I'm going to use the garden maintenance for this theme .
So I want to take a look and preview it , see it in action and you see it showing up on my site and it gives me a good idea of what this will look like .
This is the one I want to use .
So I'm gonna go ahead and click import site .
Now , before I do , you want to see that these are all the check marks that it's doing and it's letting you know what all is happening .
And now you can click on the little question mark here and it will tell you everything that it's installing when it imports all this stuff .
You see that it's going to also install some astro widgets , the Beaver builder plug-in light version .
We will get the ultimate add-ons for beef for Builder Light .
And then it's also going to install the WP forms Light plug in which is a contact form plug in .
And that is also our sister site and it's a really great dragon drop contact form plug in .
Aside from that , it also import some customizer settings and then it will also import some content to make the site look exactly how the demo looks .
So we're ok with all of that .
Once we review everything , let's go ahead and click import site and you see it can take anywhere from 2 to 10 minutes for this setup .
What I'm going to do is go ahead and speed this up so that you're not having to wait around for this , ok , in real time , that took a little bit longer than a minute to import all of those plugins and all those settings .
So those are really super fast .
And now we see that the site is done and we can take a look at it .
So opening it up in a new tab , opening up in a new tab .
We see this is what our site looks like and I do notice that some of the pages are double , but I'll take care of that later .
It's probably just some glitch but scrolling through and looking at all of this , it looks really good .
All you really need to do is add your actual content put in your information and your site is pretty much good to go .
That is way faster than what it usually takes for wordpress sites to get going .
So now that we see what this looks like , let me walk you through how you can make some changes to your site .
One of the first things we want to do is going up at the top .
You see , we have our logo , the blog title and things like that .
We can customize that by clicking on the customized button from here and it will open up this customizer area and now you'll see these little pencil areas and these are the things that we can change .
So if I click on this , you can see I can change my logo here .
हर प्रोडक्ट के साथ जो ॅ लिस्ट का ऑप्शन आ गया तो फॅमिली मुझे ये प्रोडक्ट चाहिए ।
1237.63 --> 1324.97
If I want , I can also remove it , clicking on these other items .
This will change my site title .
And so let me change that to something that is more about my blog .
I'll call it my garden blog and we can decide if we want to display that here or not , the same thing with the tag line , that's simply what your site is about .
So you can update that here as well .
And then we can choose to display the site tag line if you want or not .
And then when you do the in line logo , that will either put it underneath the logo or in line with it , we'll keep it in line for now .
Now , the little site icon , that's this little guy up here and we want to make that change here by default , you'll typically want to have something by 5 12 by 5 12 .
Their ultimate goal is to have a good clear logo to work with and you want it square if you can .
But we're going to select this one and you see if it's not square , it'll let you crop it , which is what I'm gonna do here .
So I'll crop the image and now it's automatically placed up there .
So that looks pretty good .
We can click the publish area .
OK ?
And now you see that there are some duplicates that usually shouldn't happen in this case , it did , but that's OK .
We can just go in and I'll remove those extra pages .
So I'm gonna go back to the site , I'm gonna go to pages and I'll remove the duplicates here .
Select all the duplicates and go up to the top and move to trash .
Then I'll also want to make sure I go into the trash area , select them all again and I want to delete them permanently .

It's a two part process in case you delete something that you don't want to delete , then you can go back in and get it back , but we'll keep that deleted .
And now it looks pretty good .
I'm in the customizer area so we can do some more customizations .
You'll also see over here there are other pencil areas and this will let you change up some of these items .
For instance , we can change the menu area here .
We can edit the menu and we can choose which ones we want on there .
You can also add an item .
Since this is a blog , I want to add a page and right here , it'll let me add a blog , you know , create that page on the fly and add that to my menu .
You see that that is my primary menu .
If you wanted to , you could also add another footer menu and that would go at the bottom .
Are you looking for a way to reach a wider audience and get more views on your videos?
Our innovative video to text transcribing service can help you do just that.
We provide accurate transcriptions of your videos along with visual content that will help you attract new viewers and keep them engaged. Plus, our data analytics and ad campaign tools can help you monetize your content and maximize your revenue.
Let's partner up and take your video content to the next level!
Contact us today to learn more.