https://www.youtube.com/watch?v=UoTBlOfelTs
Drawing Heads on Different Angles

Good day , ladies and gentlemen , welcome to draw with jazz .
I'm jazz .
And in this video we're going to be talking about drawing a head on different angles .
Now , this is actually a tutorial that's been requested quite a bit recently , so I thought I'd address it .
And there are very good reasons as to why people want to know how to draw a head on different angles .
Um , when we learn to draw or even animate in particular actually , um , we tend to want to create a character or or emulate another character and draw it on different angles or doing different things .
And that really kind of comes down to understanding the shape and the construction and how that moves .
And so today we're going to be talking about the head and how we can draw that on different angles .
Now , the way I like to approach this the way I kind of visualise it in my head and think about it is like building a house .
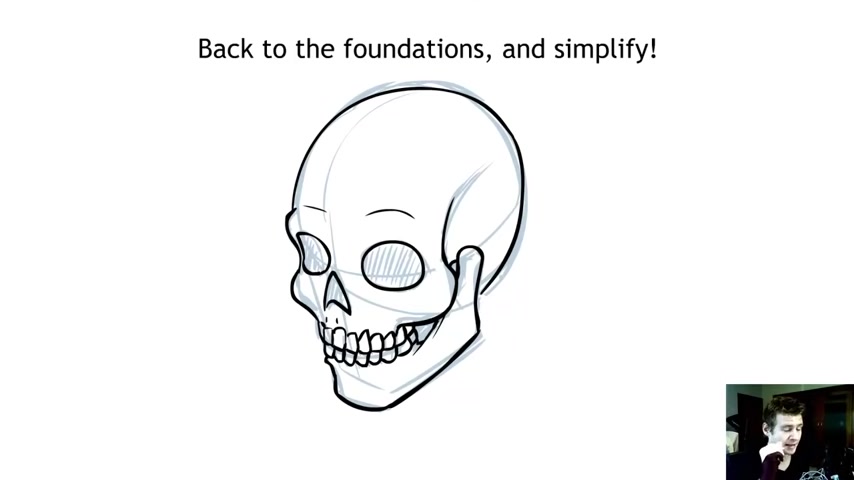
So the drawing of your head is the finished house , But , uh , before we we get to adding the the walls and the the tiles on the roof and the carpet and all the details that make a house feel like a home .
You really got to put up the timber frames .
You gotta do the construction , the really basic foundations .
And so when drawing the head , what is that basic foundation ?
Well , it's the skull .
Um , our face takes shape from our skull and our bone structure , and , uh , from there , everything kind of is added on to it .
Now , we obviously don't want to have to draw the skull every time we draw a person's head , but that shape is something that we need to have an understanding of .
But we need to take that complexity and simplify it because , let's face it , a skull is probably more difficult to draw than an actual head .
So today we're going to be going through that process we have here on the left .
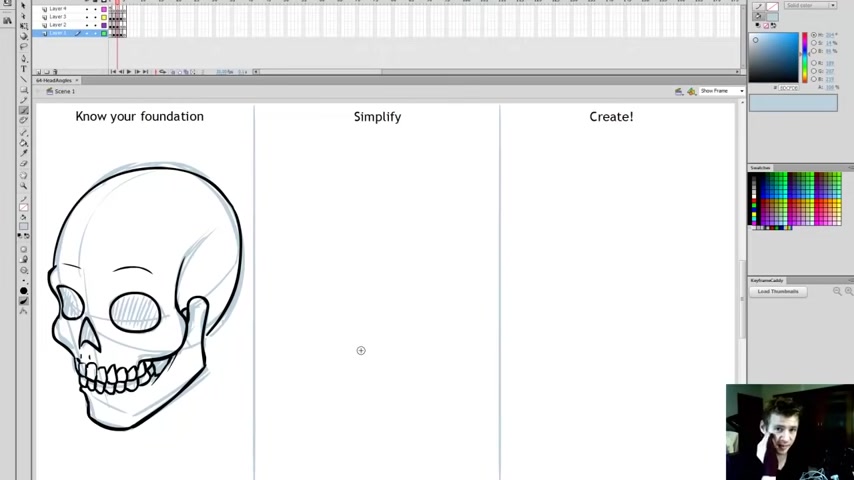
Our foundation , which is the skull the , uh the the shape from which everything else kind of comes about the nose , the head , the eyes , every everything , its position , its broadness , everything like that .
So what I'm going to do is show you how I simplify it .
So I'm gonna just draw a couple of reference lines across here , so I have the right height and so to simplify it , I draw it in two basic shapes .
First , we have this part of the skull here , and I'll draw it with a red line so you can see what I'm talking about .
This kind of circle , this ball shape and then the jaw is a completely separate part to the head .
It's it's it can be removed it It's not part of the one piece .
So when I simplify the skull shape , I begin by drawing that first circle like that .
And then I add to it the jaw like this .
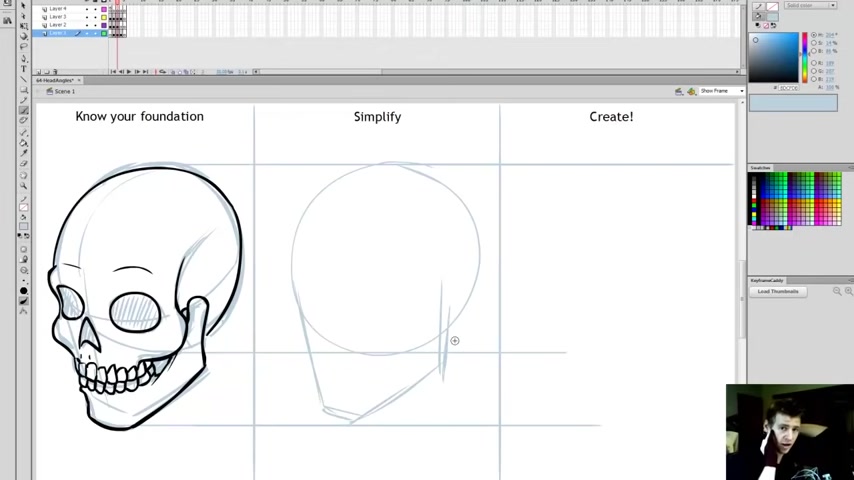
OK , so the jaw doesn't go all the way back to the circle .
It kind of comes to about this a bit past midway point .
So if you actually kind of you can use your hands and and feel your own head and you you can kind of feel that ball that we have inside our head , and it kind of comes up under the eyes .
But then the jaw itself stops midway at our neck , and then it continues to go to the back .
So the first thing that we draw is that circle and then we add the jaw now when we draw different angles , which we're going to get to in a moment .
Ah , this changes because the ball is a ball .
It always stays the same .
No matter how I turn it , it's going to be a ball .
So when we're drawing different angles , we'll we'll get to that .
But we'll talk about how that jaw changes shape and how we can know how to distort that , so that when we create our final drawing , it holds the proper form that it should .
So from there I add two directional lines .
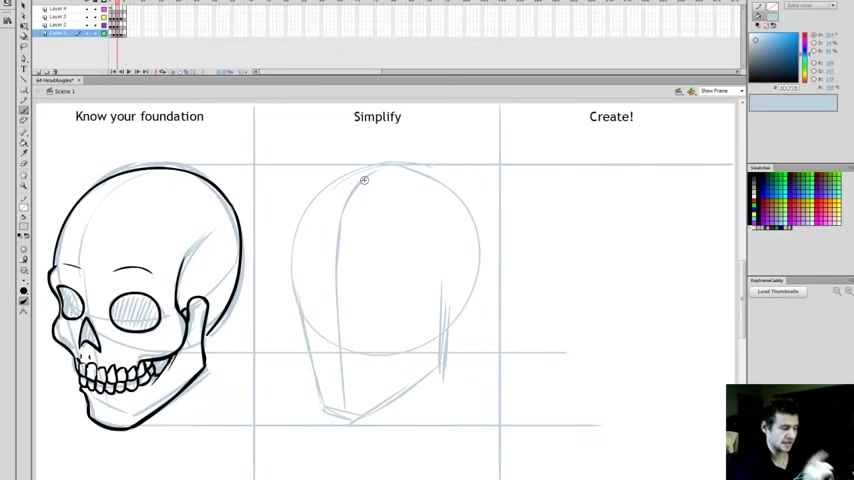
Now , this is a a way to kind of give yourself a guide to create , uh , a proper proportion to follow , to place the eyes and the nose and and position the head properly .
Now , as you can see here , he's facing on a three quarter sort of angle , and so I draw a line around the skull to show to indicate where the front is .
It's kind of like a pointer .
Now the second line that I draw is the eye line .
So the level at which I draw the eyes and it also indicates the angle that the head is at If it was completely flat , the face would be facing forward .
But because in this instance the head's facing down slightly .
I curve it downwards like that .
OK ?
And that is all I do to create the , uh , simple base from which I make a head so I can take this here .
I'll just steal the drawing that I've done , and I'm gonna paste it , copy and paste it and bring it over here .
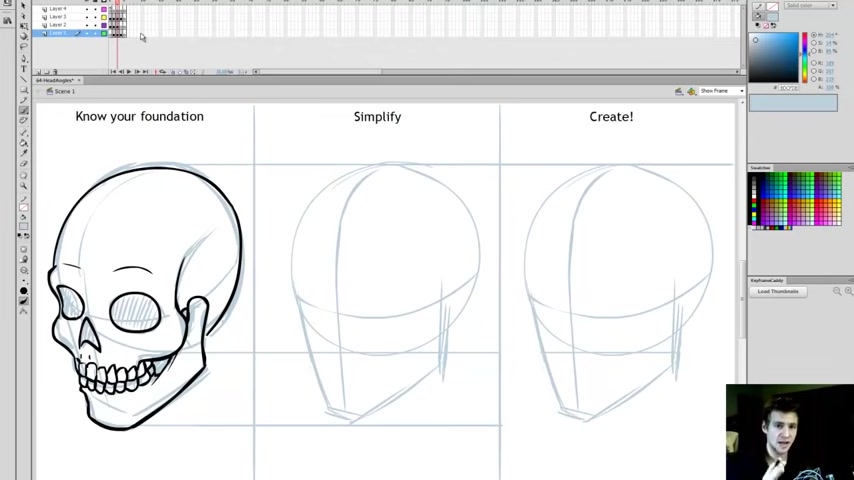
And I'm gonna show you how I use this to draw ahead on this angle .
Now , the ball is the same the whole time .
Remember that .
But , uh , from there we use the jaw to give it a a , uh , an angle .
And then we use the lines to give it a direction and keep things in proportion .
Sorry .
Oops .
On top of my reference lines , I add my nose , I add my eyes .
But now I have other tutorials in drawing eyes and noses and all this stuff , and it even goes into drawing them on different angles as well .
So if you want to know a little bit more about that , go check that out .
But this is a little bit more about the structure of the head itself .
So I'm gonna draw my eyes .
I don't wanna spend too much time on this because I really want to get to drawing different angles , which is what this is all about , Really ?
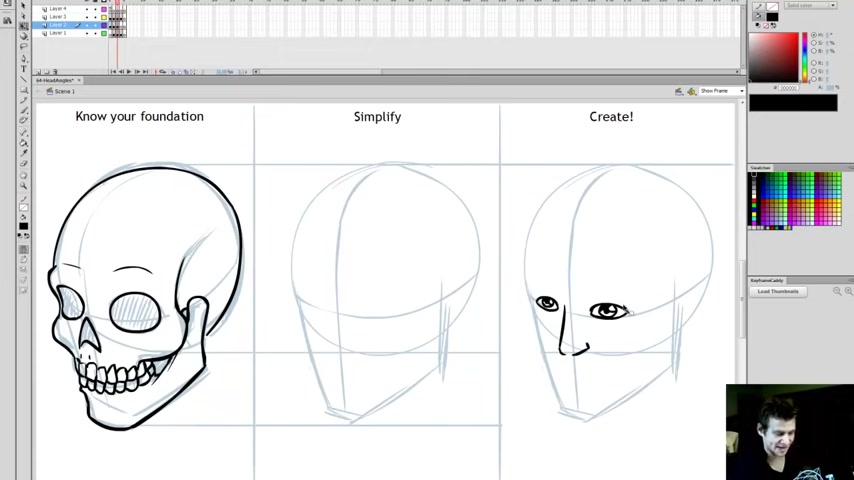
So I'll just speed up my process here so you can see it when I'm done .
And so you can see ladies and gentlemen that I've finished this here and from my foundation , the knowledge of my foundation of how the skull is built .
I simplified that into these two parts .
The circle , the jawline hopes it's a little bit like this , and then we add the directional lines .
So this becomes this when I simplify it .
And then this in turn can be expanded upon to create more detail .
And that detail I is , uh , much more correctly proportioned and positioned than it would otherwise be if I didn't have a reference to follow .
So I'm quite happy with that example .
So you can see how this foundation of knowledge is simplified , and then we use that to create .
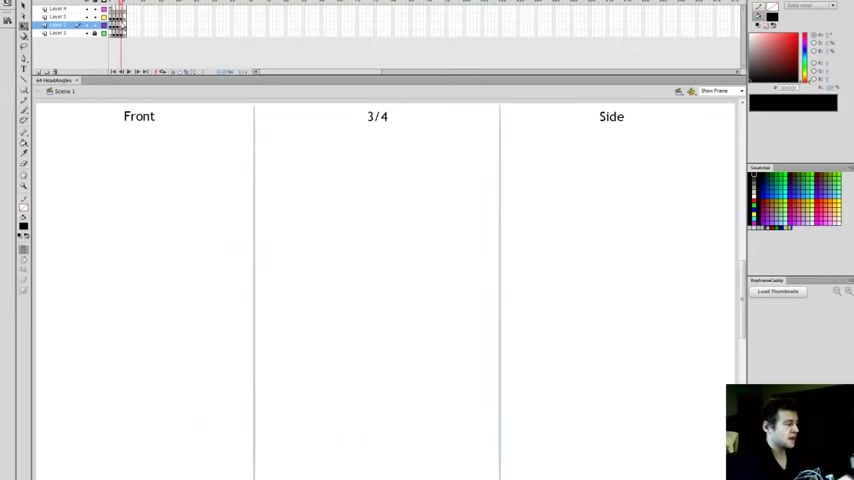
So I'm going to go through now and create an example for the front .
A three quarter view and the side so over here on the left , I'm going to draw a circle .
It's always hard to draw a good circle , isn't it ?
There we go .
That'll do .
So .
This can be my base circle , and I'm going to copy and paste that across here .
And I just reuse that for all three .
Because , as I said , it doesn't matter what angle that's on the circle is a circle .
If he's looking up like that or down like that or in whatever weird angle , the circle is a circle .
So for the front view , I generally like if I know I'm drawing a front view .
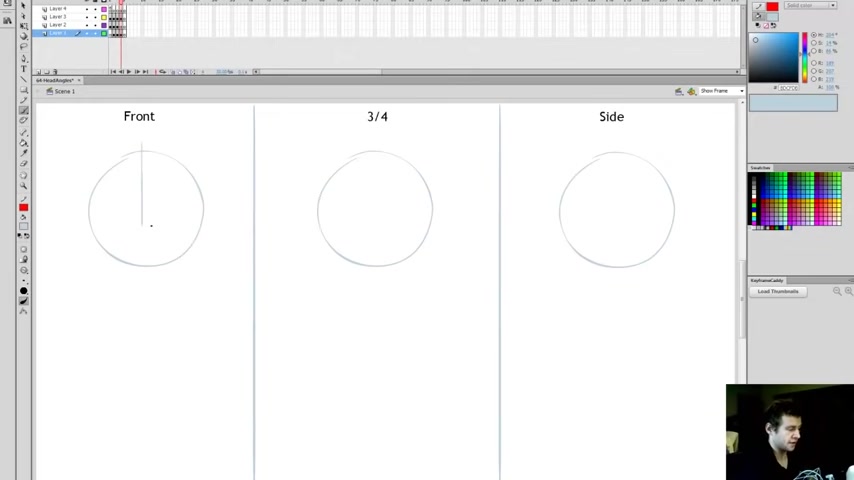
I generally like to draw a direct line first to create an instant feeling of symmetry so that I can follow that along .
And then from there I bring in the jaw .
Now it tapers in , and it starts in slightly in from the width of the circle itself and it .
Then it kind of tapers in again .
So it has about has two kind of movements that has this first oops , I .
I think I'll til the end of it and up so mis proportioned it slightly has this first angle .
That's something like that and then a second angle that goes in like that .
And then we always want to add a little bit of a flat for the jaw .
Unless you're drawing anime , of course .
In which case it's always super pointy .
And then from there I have my eye line , which usually begins around the place where the jaw meets that skull .
So there we go .
I've done my front view .
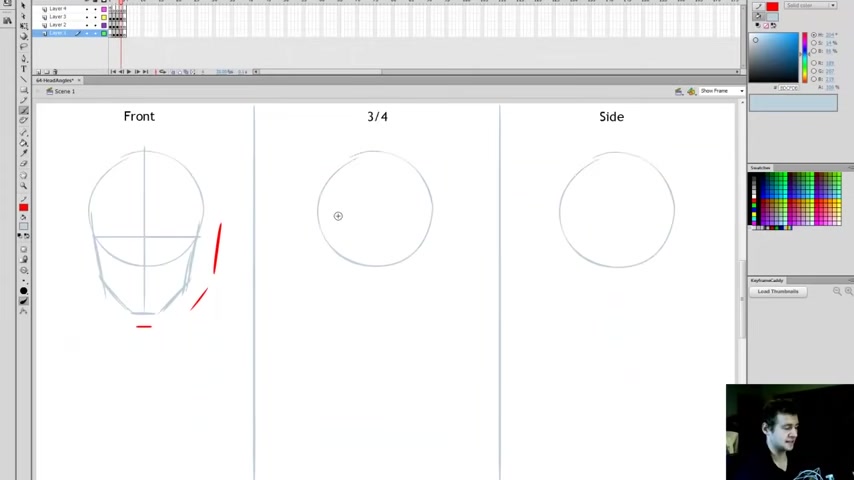
So enjoying the three quarter view , as I demonstrated in this view in , except in this example , we won't have him facing down .
We are , uh , we bring the jaw out and where that ear point would be , we begin the same sort of process .
We have the jaw , have those two motions now .
It will be more extreme in this case because in the front view it's a little more kind of straight on and and solid , whereas on the side , it kind of angles in a bit more .
So it's a little more of an angle there , and the front always tapers in , and then we give ourselves that , um , front directional line and then a nice flat eye line where the eyes will go and then finally , on the side , and you can see that the the , uh , the three quarter view is kind of a mix of both , so it's actually easier to draw a direct front or a direct side view .
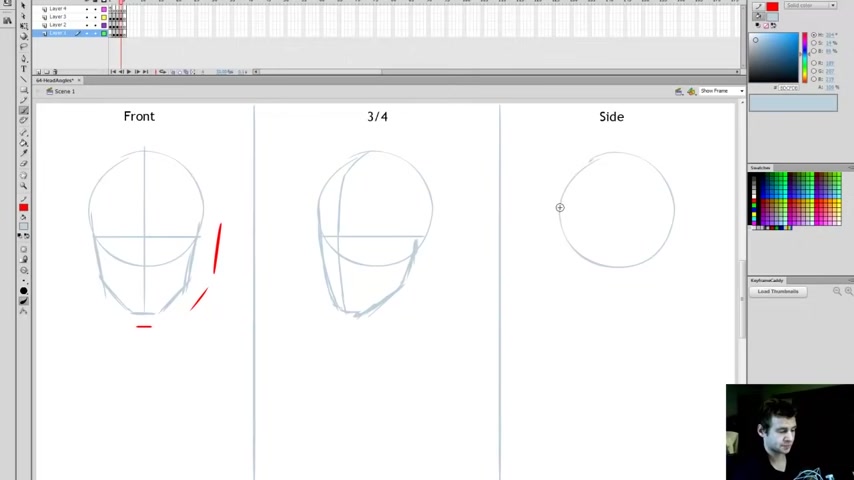
So when I draw the side , I draw a line directly down from the front of that ball shape .
And then I find where the end of the jaw will be and I bring it out and up like that .
So it should be a bit more tilted like that .
So that's my mistake there .
So it's not a direct down line .
It's a bit bit of an angle , OK , and then when we draw the , uh , the face itself , the jaw points out a bit and you'll I mean , you'll kind of come to get a feeling as to how the features of the face sit on this construction line the But I'm just kind of giving you some reference lines here so you can see the basic sort of shapes that I have .
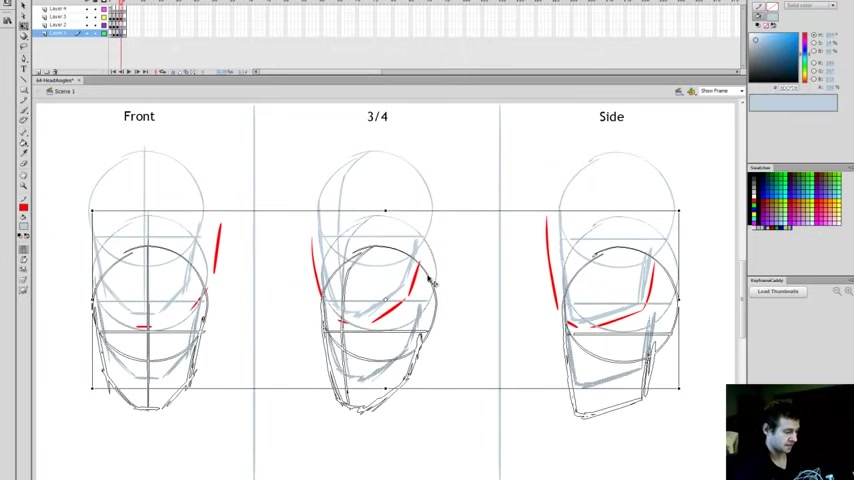
OK , so that's what I have to work with here , and I'm going to now select these construction lines , copy and paste them and bring them down here , and I'm going to draw an actual face for each of them so you can see how I would go about doing that .
And I'll fast forward it so you can see the process and then I'll explain the finish process once I'm finished .
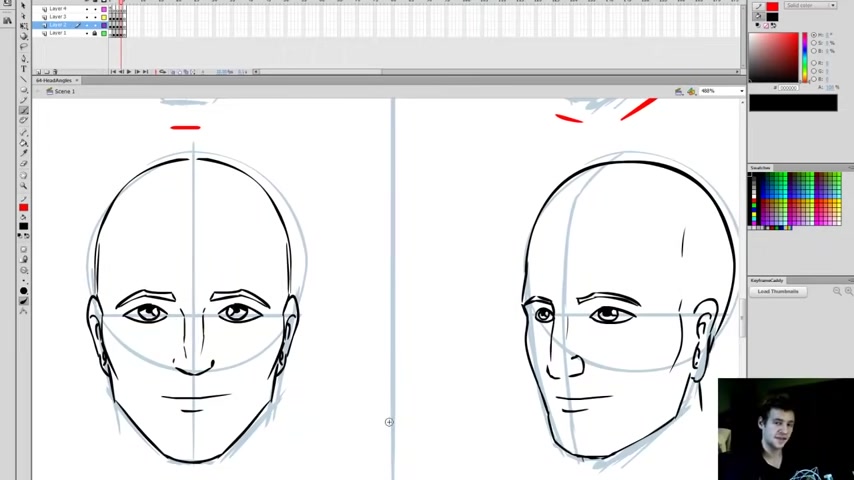
So as you can see , ladies and gentlemen , I've finished my front three quarter and side drawn faces on top of my construction lines .
So I'm gonna zoom in here , and what I've done here is , as the front view is usually pretty symmetrical , I pretty much drew one side and kind of put it over the other side .
Um , and the front view almost identically follows the shape of the construction lines you drew .
It doesn't deviate from that too much in the three quarter view .
We start having to mess around a little bit .
We start having to know where certain protrusions are that we didn't draw in the initial construction lines .
These are things like the Brow Ridge .
These are things where on the top of the skull that we see here , you can see that kind of pops out a bit .
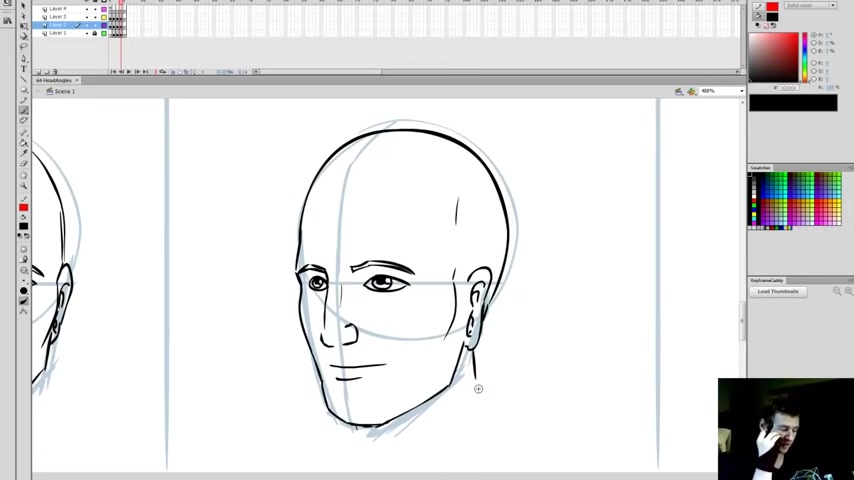
So we just kind of gotta do that instinctively as we get to know how the face shape works and then popping out a little bit in the cheeks and at the bottom of the chin where we have , you know , build-up of fat and cartilage and all that stuff where the muscles kind of gather and everything like that , and , uh , and then the ear , which we haven't drawn in the construction line and the nose , the ear and the nose are the ones that kind of pop out the most , because they're pretty much things that are just , like , added to the face .
If we didn't have the ear and the nose , everything would be mostly fairly flat and then coming across here to our side view .
Like I said with the nose , it's kind of one of the more protruding things , so you can't be too careful .
You can't be too hesitant to draw a nose , you know ?
So you wanna make sure it sits out properly .
Add a nice brow ridge , like I said before , and then make sure the ear is positioned and this is basically how I position things now .
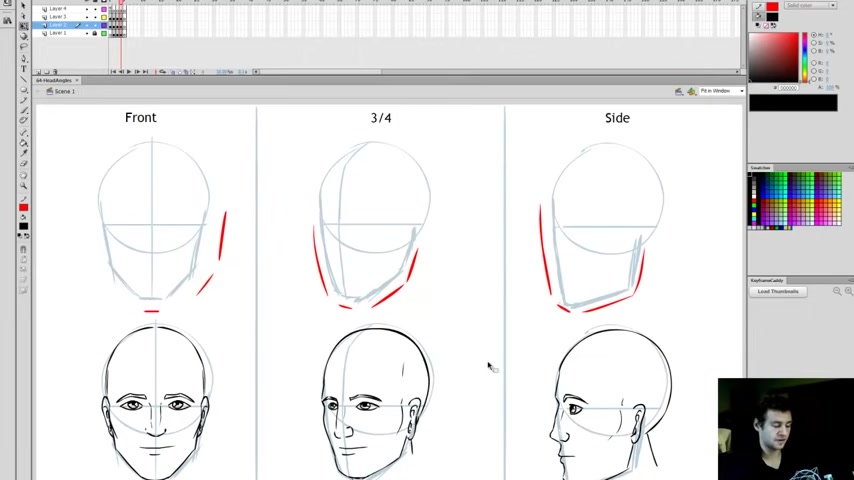
It might not be anatomically perfect , but it's good enough to get the point across , so you can see how these are simple , basic construction bases have turned into a more detailed version of the face .
Now , what we're gonna do next is do a couple more complicated views just to kind of demonstrate how we might go about doing that in certain ways .
So one that I'm gonna start off with is let's draw someone looking up and facing a little bit away from the camera or , you know , wherever we're looking so again , as always with the skull , I begin with my circle .
So this is my circle .
So I want him facing away .
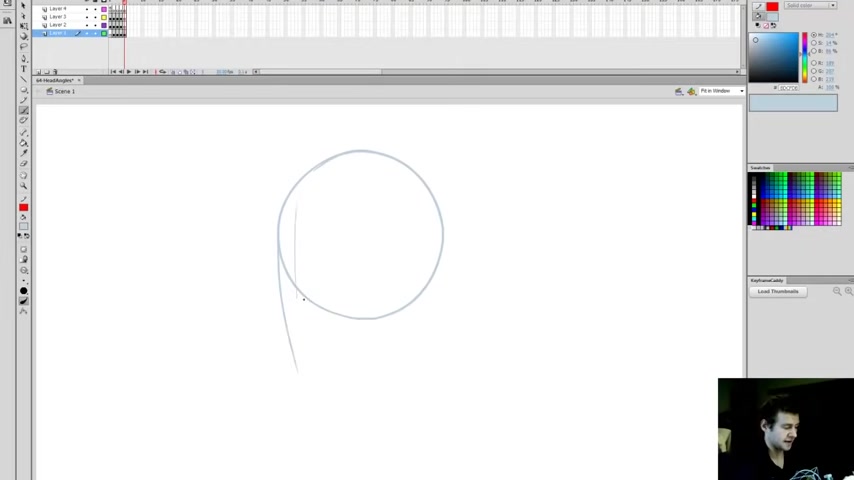
So I'm going to be drawing the front of the face and imagining that the very front of the face is kind of tucked behind this edge here , and the jaw would finish about halfway and kind of wrap around so you can see that what I've drawn here , that's the back of the skull and the neck kind of comes out like this .
Yeah , so , quite simply , I've already drawn the construction lines .
It's that simple .
So I've got my circle .
I've added my jaw .
I've also had to have had enough of an understanding of the shape of the jaw , uh , to kind of imagine how it would wrap around the skull like that because it really does wrap around .
It's kind of in isolation .
If I were to separate it , the jaw in this instance , if it was separated from the skull , would look a little something like this .
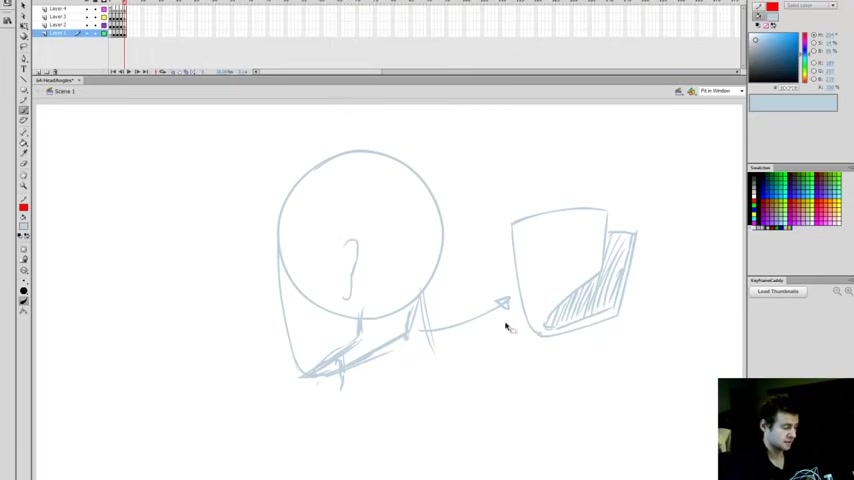
So it's kind of this 3D object in itself .
It's like a a thing wrapped around , if that makes sense , OK , so from there I start adding the features that I want .
So I've got my ear .
Actually , no I .
I actually use a proper colour here .
Lines , I should say .
So bring this over here in the corner and make this a bit smaller .
OK , so now I'll draw the actual head that I want to draw , so I'll make this one a bit bigger so you can see how it turns out .
Lock that and then when I'm drawing the features , I've got the ear again .
I have a tutorial on ears , so if you want to check that out , feel free to check it out , and that one of the defining features to show where there are eyes is is the brow .
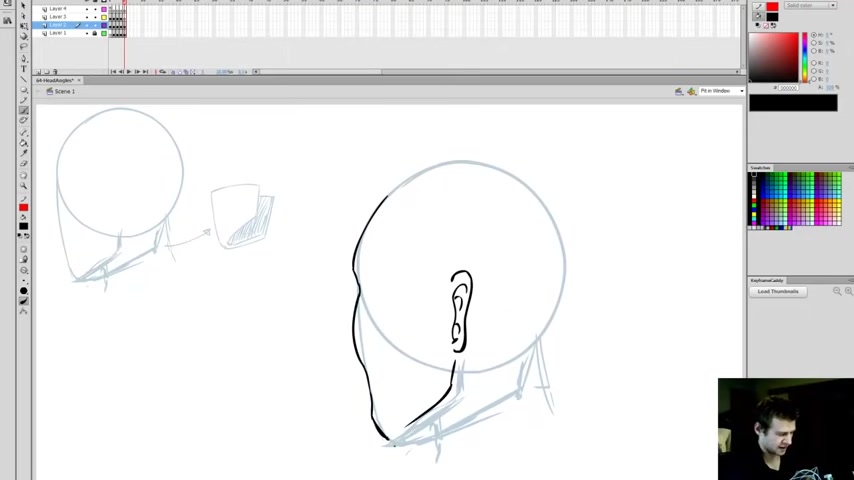
But because their eyes are going to be fairly invisible , if not entirely invisible .
I'm just gonna draw that .
And the cheekbone go straight into the jaw .
And all we have here is this kind of defining jawline that tucks into the chin .
But we also show the bottom of , uh , our chin here that our jaw because that goes into the other side of the jaw .
So that only really shows when we turn the head like that .
And then finally we draw the back of the head .
So this is a face ahead facing in this direction , OK , so you can see how that simplified construction line can become this .
So that's one example .
You can see how quickly I kind of put that together .
Uh , there probably should be something of a nose , shouldn't there ?
It would be very kind of hard to see because it's all tucked behind there .
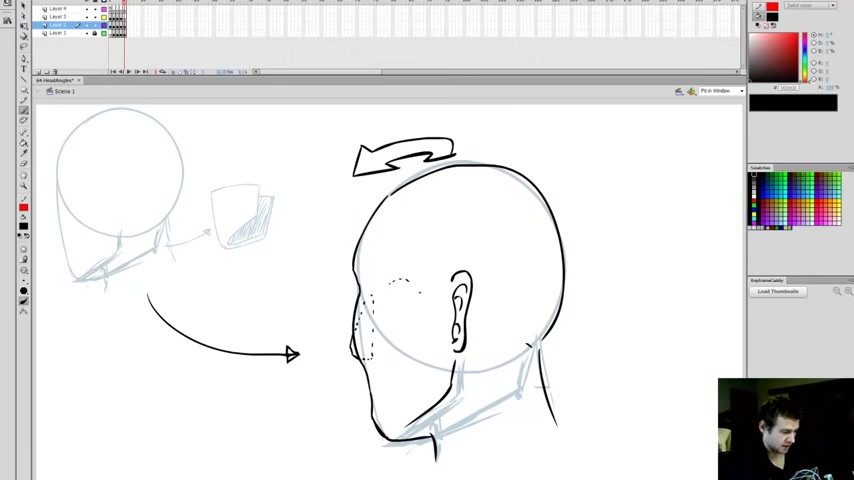
See how tucked behind everything is If I was to draw behind it , there would be eyes kind of behind in that area .
The nose would would go through like this , and the other eye would be around here so you can kind of see what I mean by , uh , having an understanding of the shape .
Now , this sort of stuff is half technique and half instinct .
You really do have to grow an understanding of shape , of how things form .
Now that does happen with practise and time , and some people do have a natural knack to it that others might have to take a lot more time refining .
Kind of like how some people can just jump on a musical instrument and play it and other people really have to apply themselves , but it can be learned .
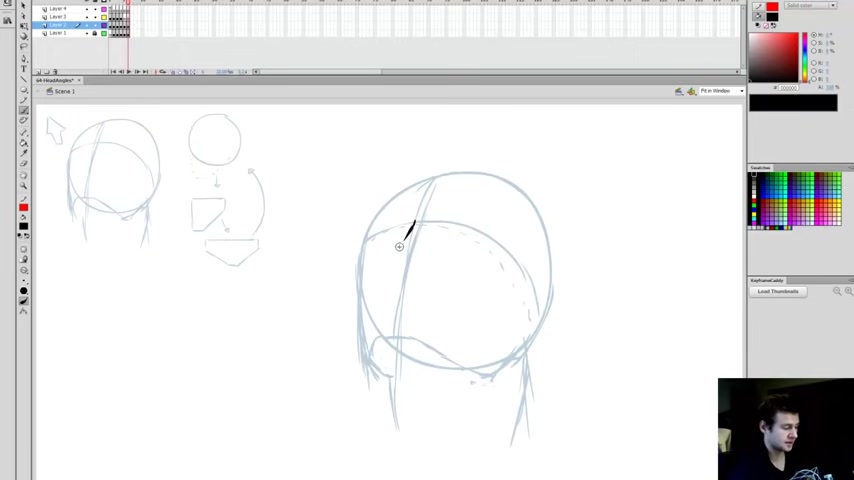
So another thing that we're gonna do Let's do another strange angle here , Let's do one looking up .
So I'm gonna draw a circle .
I'm gonna redraw my circle until I make it a circle that I actually am happy with .
There you go .
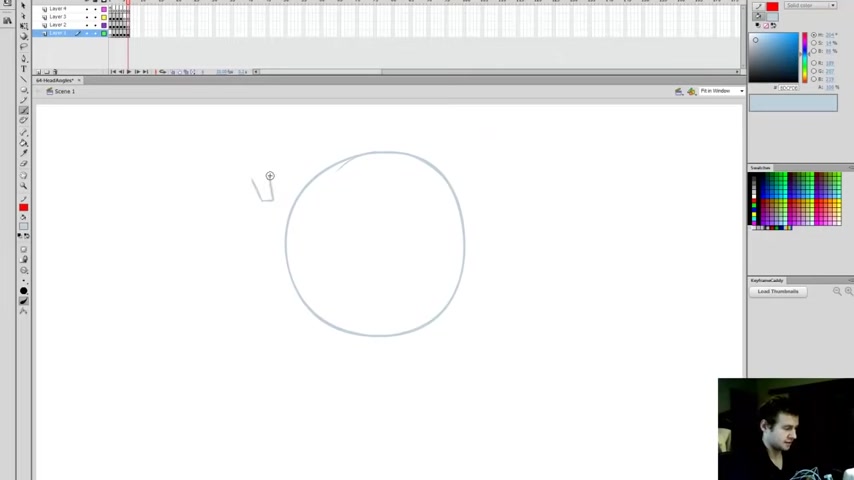
That I'll do OK , So if I'm drawing a a face looking up and , uh , I'm thinking up in kind of this direction , I would begin by I instinctively kind of want to add the front line just to show the direction that I want to face .
And then I start adding the jaw .
But now this is interesting .
If we imagine the head in pieces , we have that circle that we drew and then added to that is this 3D sort of jaw shape that wraps around .
And if that were unfolded , it would look like this Kind of like underpants that kind of wrap around the face .
Does that make sense ?
So kind of picture underpants wrapped around a circle .
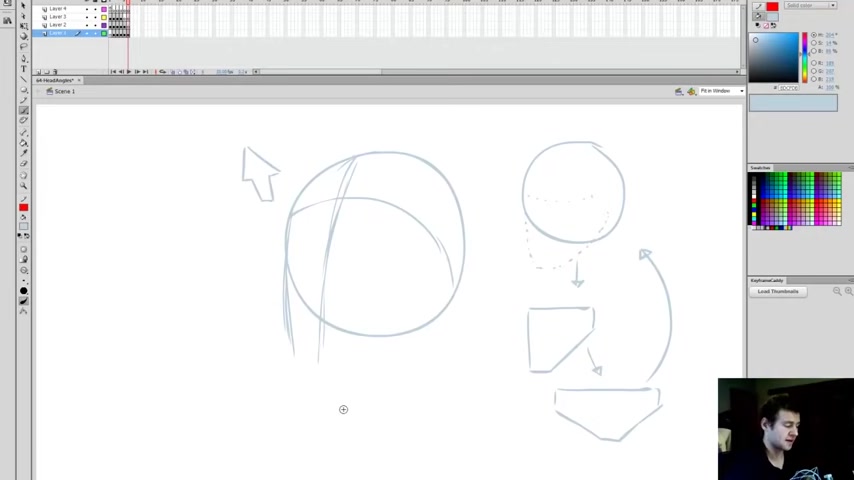
So in this case , the eye line would be about here .
And so if you imagine the underpants wrapping around that circle , the bottom of the underpants isn't down here .
Like with the other jaw lines .
It's actually closer to up here , and the way the jaw folds around , it kind of tucks down instead of up , as in the other cases .
So it's a bit of a bit of a tricky one , this one quite a tricky one .
In fact , I often have difficulty with it .
So if we were to muck around with it , adding features , it would be something like this .
So I'm gonna add my bigger version here , and I'm gonna talk about how about the future so you can see on my construction line .
You imagine my underpants folded around the circle .
Not my underpants , but a pair of underpants .
My underpants might not look like that .
I we're really pretty ones .
It's nice to feel good , isn't it ?
I'm talking crap now , OK , so I'm gonna lock that layer , and I'm gonna begin by drawing the nose , because in this case , the nose is kind of like the directional , most protruding part of the face .
So I've got the nose kind of sticking out like that .
OK , I'm gonna add my mouth now .
The mouth is frowning by default because of that angle .
Everything kind of wraps around the head .
I can't really help that .
And I'm gonna draw my ear to give myself something of a guide .
OK , so I'm using the things that are most apparent to me to use this kind of a guide .
And now I'm gonna start drawing the shape of the head .
And so the jawline would be really kind of strong as as well as the cheekbones , because everything's kind of popped up like that .
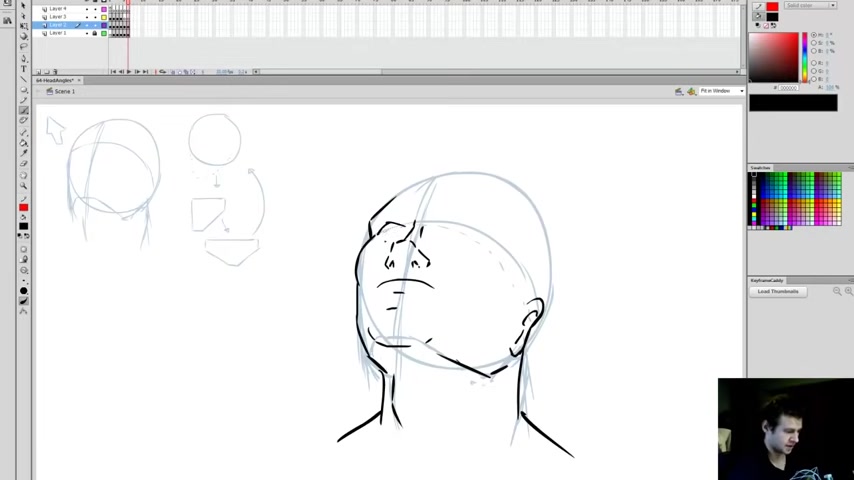
So we have our chin and their jaw line , which has kind of popped down like that .
That's a really awkward sort of angle .
So nothing's gonna look very pretty when we're drawn like this .
My eyes are really kind of wrapped around the head as well .
And then we have the brows up the top here .
OK , so it's really not a pretty angle .
And I didn't do a very good job of it , did I ?
It looks actually quite disgusting .
You can see , uh , that it's actually a very difficult thing to do .
Oh , I'm not happy with that .
But whatever , Who cares ?
That's the kind of thing where you really got to spend a lot of time use references .
I didn't really use a reference in this case .
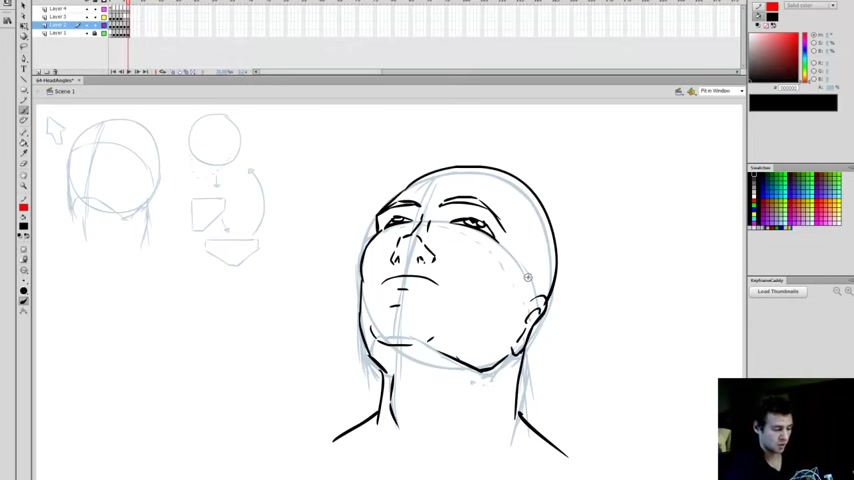
I would normally if I was to draw something where I actually had to draw something that looks decent on this angle , I would find a reference I would either take photographs of my own head or I would find a 3D tool and , uh , you know , find something to use to create it and make it a little more believable .
So I'm not hugely happy with this .
I think it's the jaw line .
That's really unsettling to me .
Oops .
Maybe I just kinda wanna add some shade underneath you because this shouldn't be very clear .
Looks a little better .
Still not great , but it'll do OK but you get the idea .
You can see that you can see what I'm communicating here .
You can see .
The result is something along the lines of what I'm trying to convey .
I'll just tilt this a little bit .
I'll do one more and this one will be , Hm .
Let me see .
We can't get too complicated because we might not be able to make out what these things are .
But I'll do one more one on a really kind of steep angle , and these ones are kind of fun to do .
So I draw my front facing line first , and I bring the draw in jaw in .
And when we're tapering it down and it's the steep angle , it's It's all really drawn in like perspective wires like that so you can see very quickly .
I've already drawn my construction lines .
I've got my , um , my jaw line .
It's all taped in very much because of the perspective , and I've got my eye position , and from there I'm just going to bring this over here and make my other one block the layer and then start adding the features .
So as with the other ones , we kind of add the most protruding features first .
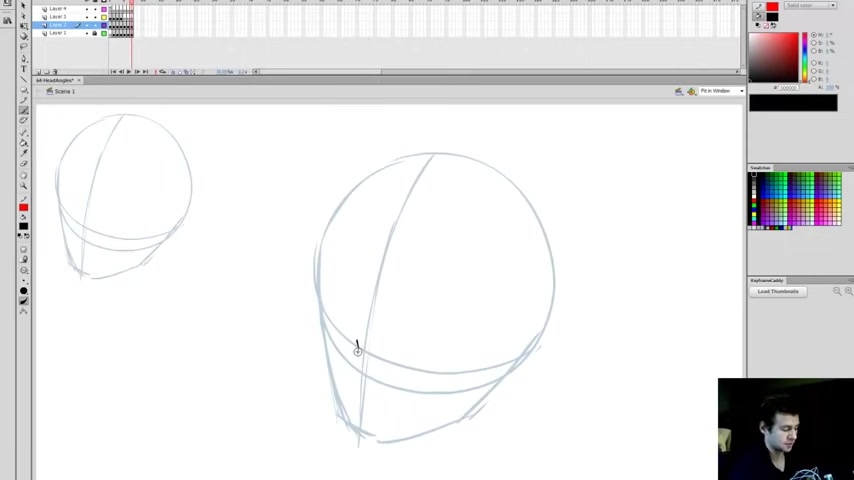
In this case , it would be the nose because it's really just looking down immediately .
So that's gonna be really the first thing that sticks out like that .
And then we're gonna have our eyebrows because they really pop out as well .
They kind of shape the , uh , the head itself so you can see how the brow line and the the cheek kind of follows along with that .
And the eyes are somewhat hidden under the brows because they're so stooped over it because the angle is so low and then the mouth is pretty much behind the nose here .
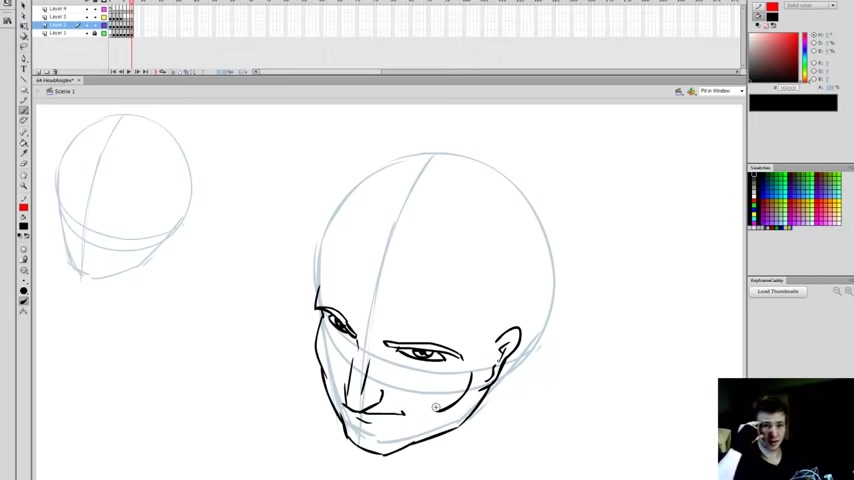
Oops , I bring our jaw in , look at that and then have our ear kind of pull up .
Now the ear length I usually work out to be about from the eyes to the nose , you know , that kind of thing .
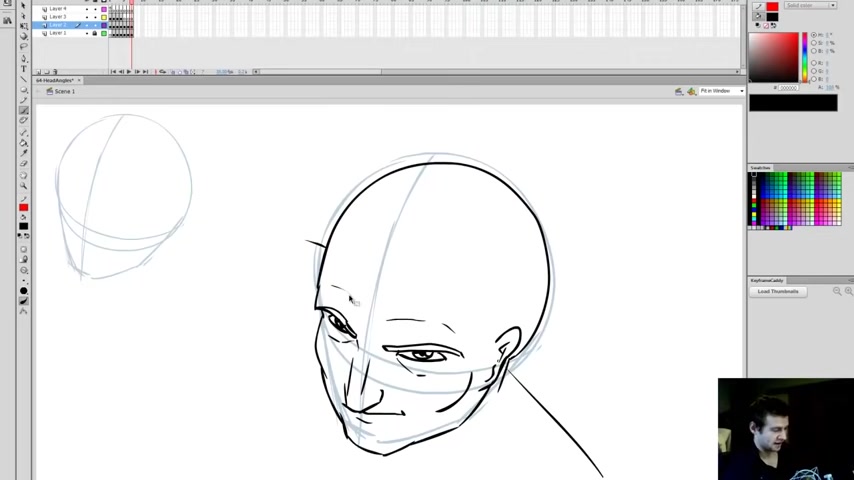
But in this case , because the angle is so sharp and on this kind of corner we've got to follow the shape of the head so the eyes are kind of curving like that , and as you can see , that line would go around up to where the ear starts , and then the bottom of the nose is where the ear ends .
So we got to kind of use those curvature lines to know where to position things .
And then I'll finally draw the the skull shape itself .
Can you imagine if they were the shoulders here ?
It's like him looking up , up to the sky from a camera sort of up in the sky .
And you get the you get the basic idea .
So I hope that this tutorial has been somewhat helpful , even though some of my drawings have been pretty horrifying I , I hope I've been somewhat useful otherwise , ladies and gentlemen , make sure to download the reference file below .
There's a PDF of this so you can kind of see some of the things that we've talked about as well as the original flash file .
If you have flash in C , S3 and above , in which it works until next time , ladies and gentlemen , I will see you later .
Thanks for watching .
Make sure to subscribe .
If you enjoy my videos , you can download the reference files from this tutorial by clicking the link in the description and remember to share any art , animation or game you make on new grounds dot com until next time .
See you later
Are you looking for a way to reach a wider audience and get more views on your videos?
Our innovative video to text transcribing service can help you do just that.
We provide accurate transcriptions of your videos along with visual content that will help you attract new viewers and keep them engaged. Plus, our data analytics and ad campaign tools can help you monetize your content and maximize your revenue.
Let's partner up and take your video content to the next level!
Contact us today to learn more.