https://www.youtube.com/watch?v=U6E0pYj4CNE
How to Draw Front Face of bride In Mehendi Design _ Learn Front face, nose, eyes, mouth
Good day , ladies and gentlemen , welcome to draw with jazz .
I'm jazz and this is the jazz face cake .
And it was made by chopper from the YouTube channel Cakes by Chopper , who I've met a couple of times , is a very talented cake decorator .
And as he has taken the liberty to make my face into a cake , it is only fair that I make his face into a drawing .
So this is going to be a video tutorial on the very fundamentals of drawing a cartoon face .
Uh , if you're interested in seeing Chopper's Jazz a face cake , make sure to click the annotation on the screen or the link in the description to go to his channel and make sure to check out his other videos .
He's got some really cool stuff on his channel .
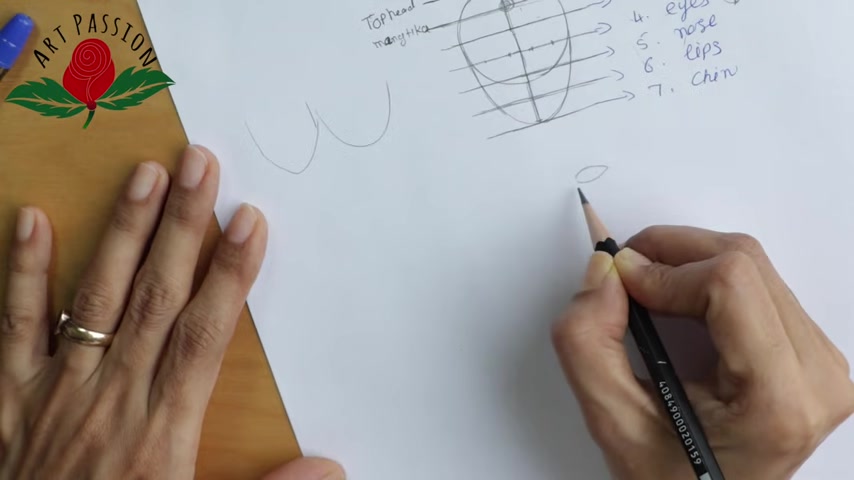
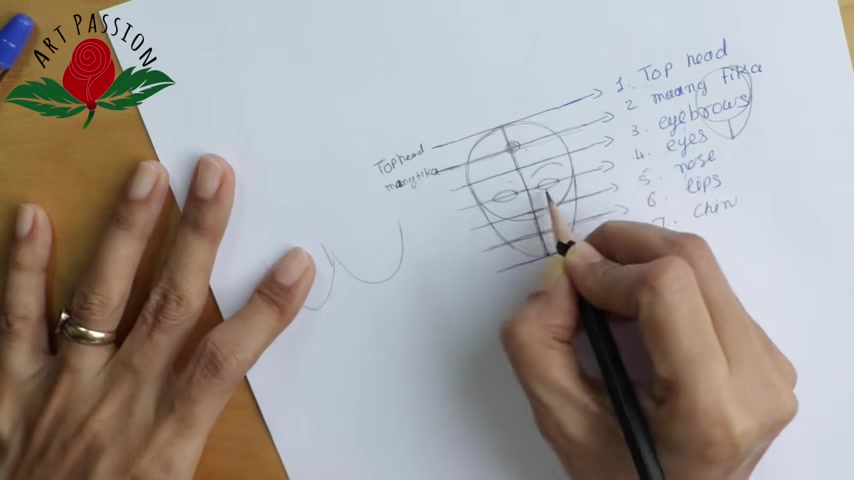
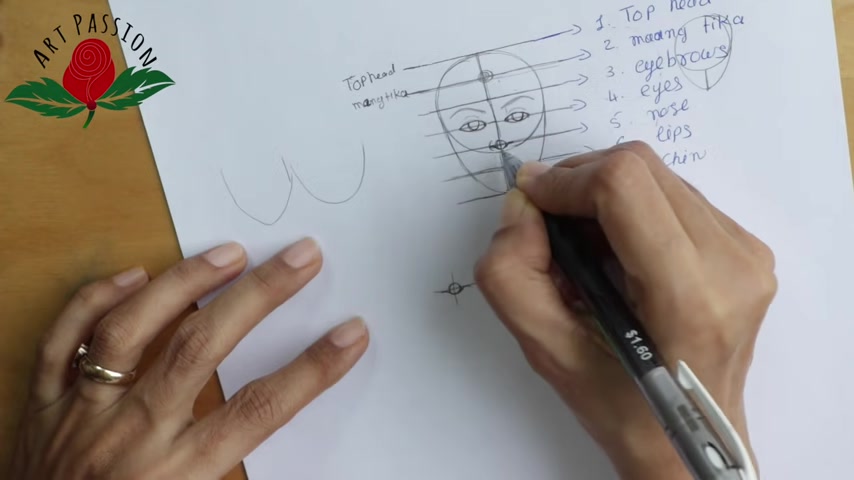
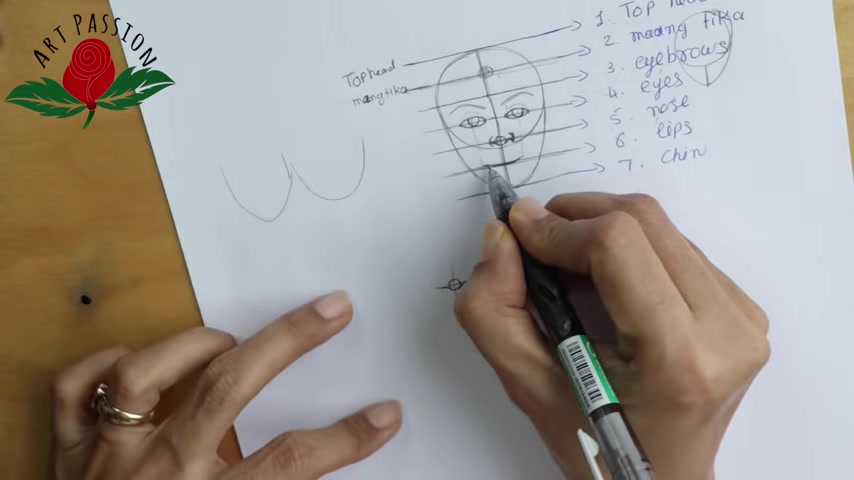
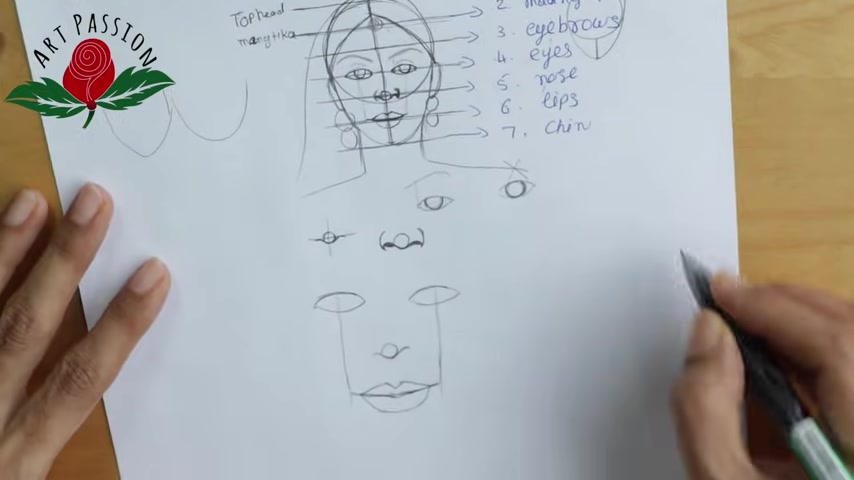
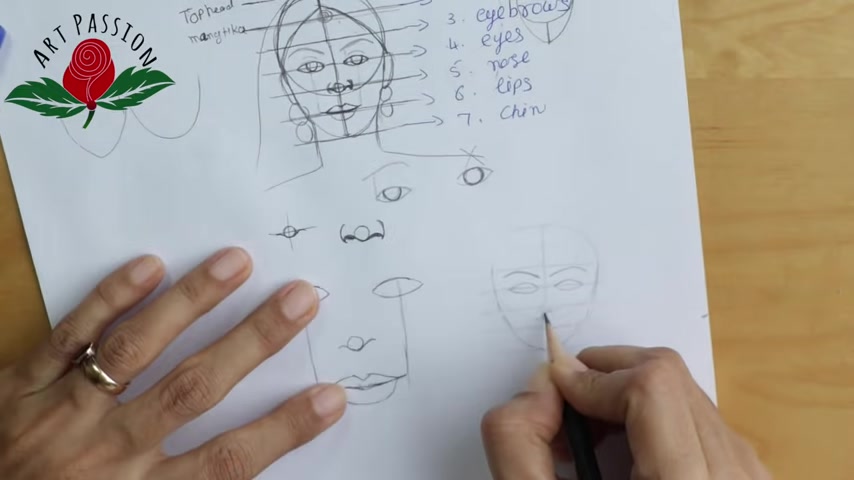
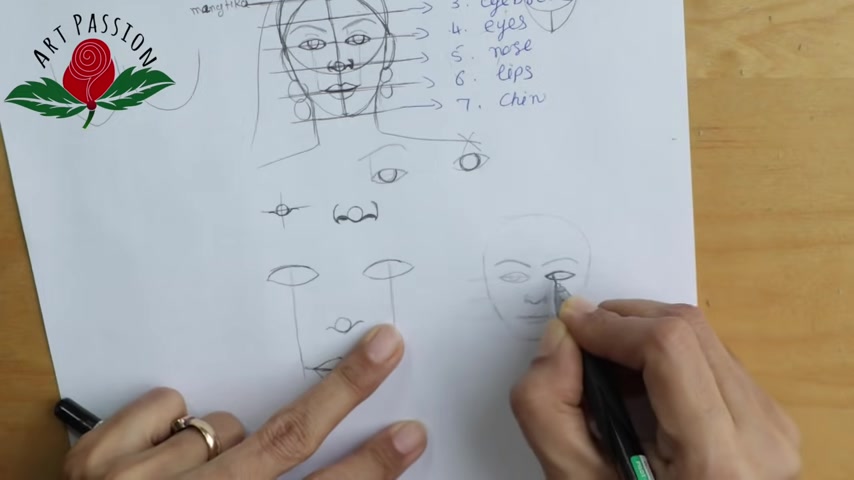
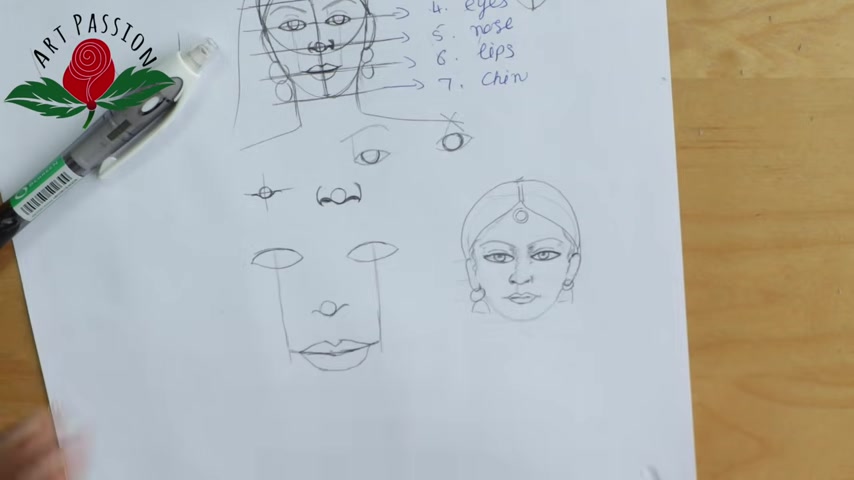
So the fundamentals of drawing a human cartoon face I begin with something I call construction lines , which is where basically , I draw very simple shapes and put them together in what will end up being the face .
It kind of makes something of a pseudo skeleton .
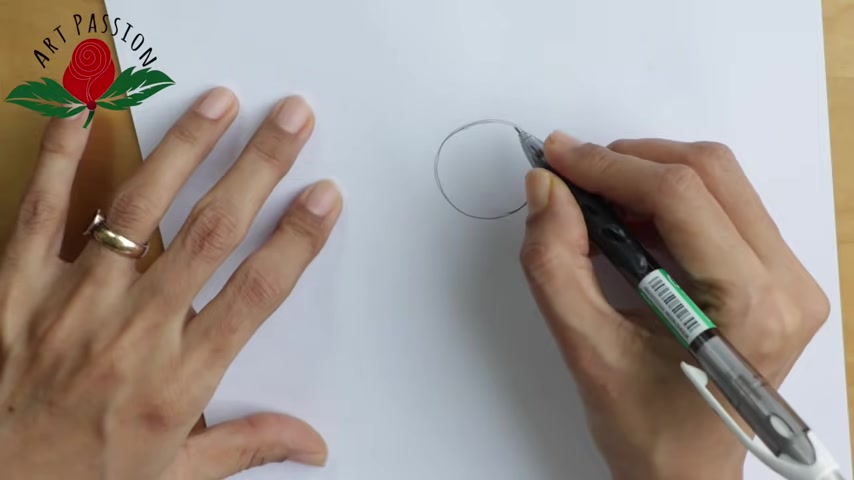
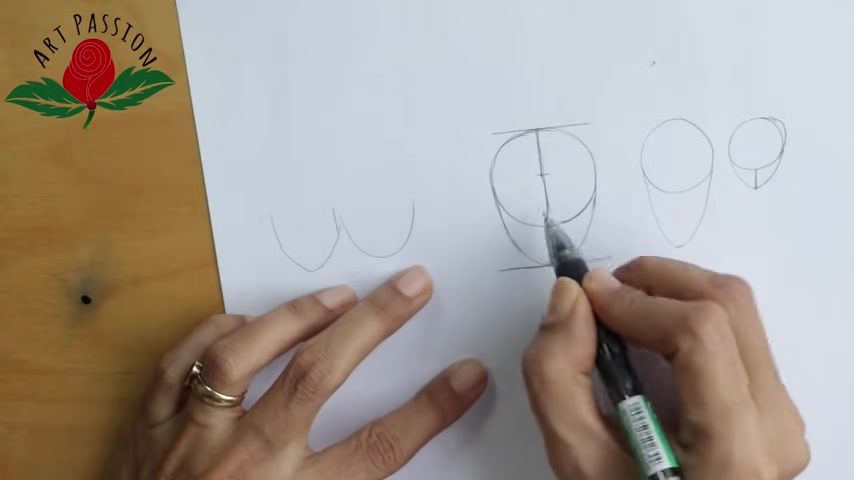
तो सबसे पहले हम अपना फेस ड्रॉ करना शुरू करते हैं ।
हम हमेशा सर्कल बनाते हैं ।
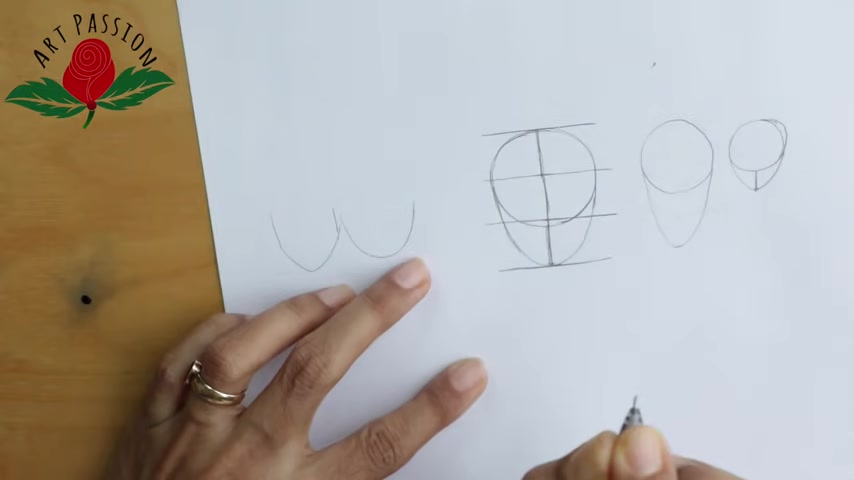
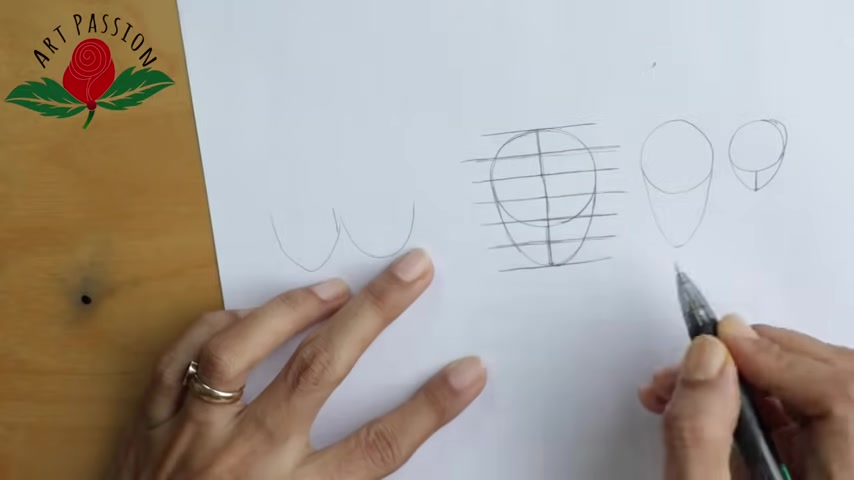
सर्कल ये तय करता है कि आपका फेस कितना बडा या छोटा बनेगा और फिर उसके बाद नीचे का एक पोषण आता है ।
अब ये कितना लेना है वो सबको बहुत एक कन्फ्यूजन रहता है ।
सर्कल के नीचे का पोषण कितना लेना है वो कन्फ्यूजिंग रहता है ।
मैंने जो रेशिओ वर्कआउट किया है , जो मेरे लिए काम करता है वो है सर्कल का ।
जितना जो सर्कल का जो है , जो भी उसका तार टी या फोर्टी परसेंट आप सर्कल माने की एक इंच है तो एक बीच का जो थर्टी फोर्टी परसेंट हुआ उतना आप यहाँ पे नीचे ले लीजिये ।
होप ये बात आप लोगों को क्लियर हो रही है ।
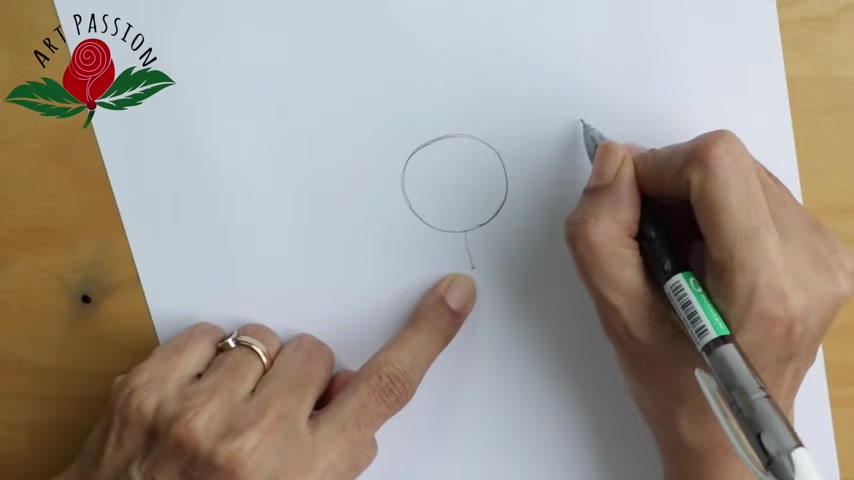
So , as you can see here , I've got a circle which is acting like the main part of the skull and then this extension area down the bottom here , which is gonna be the jaw .
Now it's OK that it's scribbly .
We're just kind of roughing it all out and getting all the basics in there .
So we've got our skull there next .
What I do is add a line down the middle .
This is what I call a direction line .
This dictates where the face is heading .
And then I put a line horizontally across the middle of the face where the eyes are going to go , and I call this the eye line .
Now on my left here , I've got a picture of chopper from cakes by chopper and I'm gonna be using this photo as a reference throughout this process and identifying the basic shapes of parts of his face and , uh , converting that into the cartoon head .
So first we draw the basic features things like the nose .
We wanna make sure we're kind of keeping roughly the same proportions .
But we're also cartooning , so really simplifying it here .
So , putting in the eyes , we don't want to go for exactly the same eye shape as we have in photos and things like that because it ends up looking kind of pseudo real , and we're gonna be drawing a cartoon face today .
Now , one thing you want to keep in mind when you're sketching this process is to really focus on the shape of the face , the silhouette of parts of the face and what stands out .
So , for example , what stands out most to me in this picture of chopper are his cheekbones .
So I'm gonna kind of make the cheeks pop out here , and I'm gonna accentuate that over on the left side here as well .
I'm gonna then go in and rough out his mouth .
Now he's requested that he have a little more of an open tooth grin , which is fine .
So I'll just kind of open out his mouth a little bit , give him a bit more of a a toothy grin , and then we continue to follow around with the shape of his face .
We're pretty much getting the style that we're going for here .
So we're getting this face to come together .
I think the jaw kind of comes forward a little too much at the bottom , so I'm quite happy with how that looks so now that we've got the rough face shape , another thing that really pops out is the eyes .
So I'm gonna make the eyes fairly large and , uh , give him quite large pupils cos you can see in this picture he's got quite prominent , darker eyes , and next , we're gonna start doing the cap .
And as you can see , we have a very clear line that we follow there .
So I'm just gonna do the same over here of that line around , Continue with the silhouette and bring it out until it's finished .
And there we go .
We've got the very rough sketch of our chopper face here .
So the next thing I'm gonna do is I'm gonna make my line work a bit lighter just so that it kind of goes into the background as a reference and I'm gonna select a solid black line and with it very slightly thicker , I'm gonna go around where all my reference lines are and just find the solid lines that I'm gonna follow .
Now a question that I get a lot is what programme am I using because some people notice that it's smooth out the lines for me This programme is called Adobe Flash , and it's a vector based art programme .
So it's not your kind of General Bitmap art programme .
It does smooth things out a little bit , but it also can be quite , uh , tricky to control sometimes .
So it takes a little bit of practise and experience to work with , but you get there in the end .
So again , using the reference that we've drawn up , we're just following the basic shapes and silhouettes again , accentuate the cheek , have a bit of a cheek there on the left as well , and then having the cartoon features pop out now , something to keep in mind is that less is more you really want to focus on , uh , nice smooth lines and also making sure that the shapes are really flowing well , So it's not so much about detail , uh , or really putting in all the lines on a face or on a hat or anything like that .
If anything , too many lines on a face or on clothing , uh , can be quite distracting .
And also pull this weird area between like in the uncanny between realism and cartoony , where it starts to look a little uncomfortable and always , always be ready to adjust and fix things up as you go .
So don't be afraid of the mistakes that you make in fixing them .
274.99 --> 383.27
So I might grab this here and , uh , deselect some areas and just kind of bring the jaw along and back a bit just because I think it was jutting forward a bit too much .
And now we're putting on the final lines .
Now , something that people you will notice is that I do a lot of redoing and undoing .
I do a lot of control Z , and that's OK .
You're really kind of finding your way around the piece as you go .
And then finally , the very last lines of the picture are done .
There we go .
So we have our cartoon face .
The next thing I'm gonna do is colour the cartoon face .
Now , something you can do when you're ready to do your colouring is use the eye dropper tool and just kind of pinch an area of skin that you think it's about the right tone .
So for the shadows , I might kind of go something like this .
Now , when flash , I select this brush area here or when I have brush selected it and move it to paint behind .
And that means whenever I use the brush , it appears behind the brush work that I've already done .
So now I can start drawing these line areas and filling them in .
Now , I feel like this is a little bit too pink , so that's fine .
We'll just select this colour wheel and just bring it up in to a little more of a desaturated pink .
There you go .
So that's a bit better .
And now I can outline where the shadows are gonna go .
So this is my preferred method of colouring in in the Doby flash .
Um , because basically , you just kind of cut off the areas where the shadow is gonna be , and then you just kind of paint them in .
Now , as you can see here , it's got a bit of a cheek highlight .
So with my lighter colour , I'm just gonna block off that area to leave it for the highlights , select a very lighter colour , and then just put them there .
So we have our cheek highlights as well .
And then next we want to , of course , put in our hair colours and then find our hat colours .
So I've got a dark black for the bottom of the hat and then a bit more of a charcoal mid grey for the top of the hat .
Now I notice there's a little bit of a shadow area I probably should have filled in , so I'm just gonna draw that in , like , here .
As you can see , there's a little bit more shadow there .
There you go .
Fill that in .
And now I can just paint .
And I feel like that looks a little bit closer to my reference picture .
Now I can select my white paint in the teeth and the whites and bubbles of the eyes and then select a colour a nice , rich brown for the eyes themselves .
Now I'm nearly done .
I've got all of the basics here , and I can actually hide that and delete my reference lines .
And now that I've got that there , I'm gonna add a layer on top where I'm gonna do two things .
I'm gonna add some rosy cheeks because we can see we've got a little bit of a rosy cheek thing happening here .
So I'm just gonna select a gradient .
I'm gonna draw a circle gradient .
And I'm gonna change this so that the inside red is at about 5% or 6% alpha and then the outside will be a red and a 0% alpha .
And what that does is it makes this little red glow area , and then I can just copy paste and put that on both sides of the face .
And we end up with a very slight , uh , touch of red to the cheeks , which is all you really need .
And then the other thing I'm gonna do is on the layer above it .
I'm just gonna select a random colour which I suppose turns out to be green .
And I'm gonna highlight this area where facial hair would go now because , as we can see , we've got a little bit of facial hair there .
We're not gonna go overboard , but we just wanna add a kind of an illusion to the fact that it's there .
So then I replace that random colour with a gradient and the top white part of the gradient .
I'm gonna make a brown , and I'm gonna make it 0% .
And then the bottom part of the gradient I'll make a brown again , and I'll make that about 10% .
And then when I deselect that , you can see that there's a very light gradient at the bottom of the face .
So we have a little bit of rosy cheeks , a little bit of , uh , facial hair , and it just adds that touch of connection between our reference pictures and the character's face here .
So there you go , ladies and gentlemen , then we have chopper from cakes by chopper .
Thank you very much for watching and anyone who's come over from Chopper's YouTube channel to check out this video .
Thank you for joining me .
I hope you enjoyed it .
Make sure to check out my other videos and , uh , if you're interested , subscribe for more lessons and anyone from my channel .
593.94 --> 662.37
If you're interested in decorating some awesome cakes can go to cakes by chopper or click the link in the annotation to follow at the end of the video to go check out the cake you made of my face .
Thanks for joining me , ladies and gentlemen .
And until next time I'll see you later .
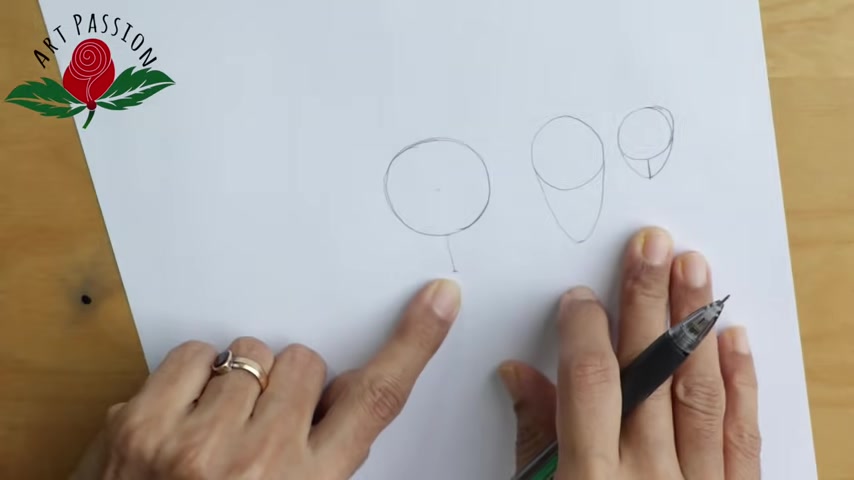
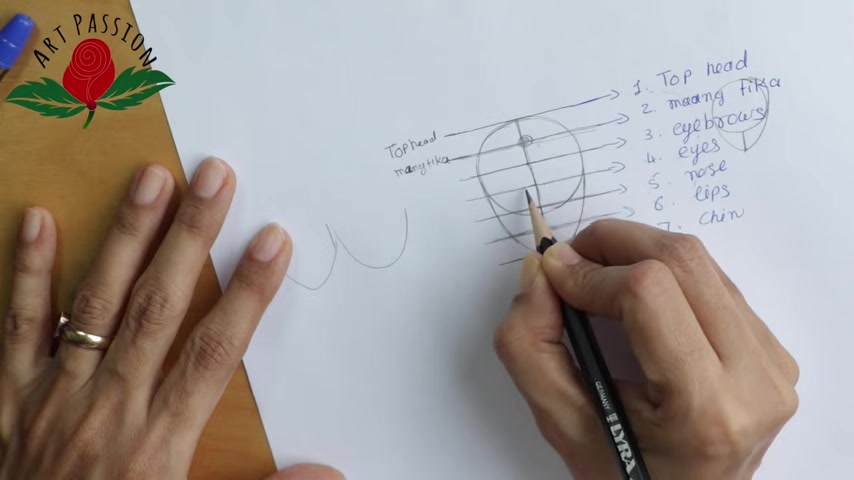
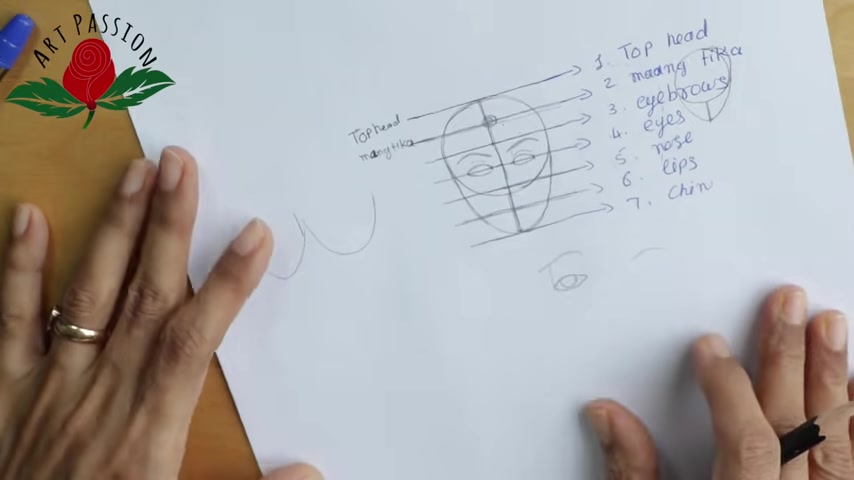
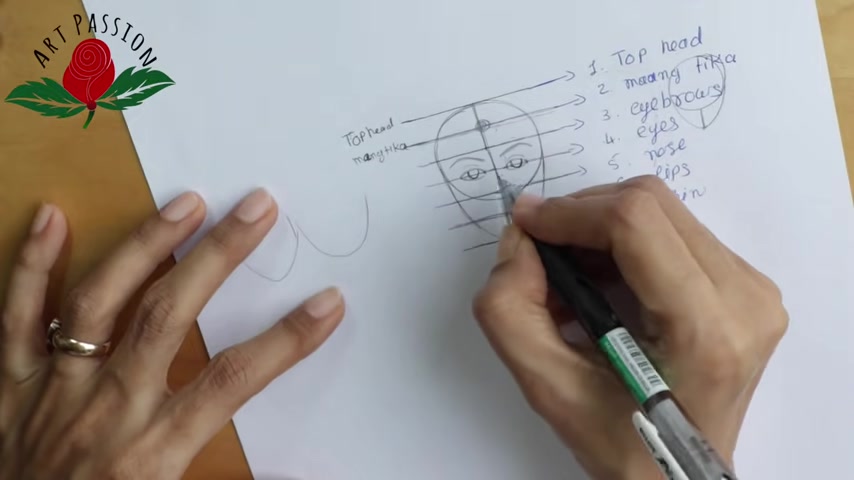
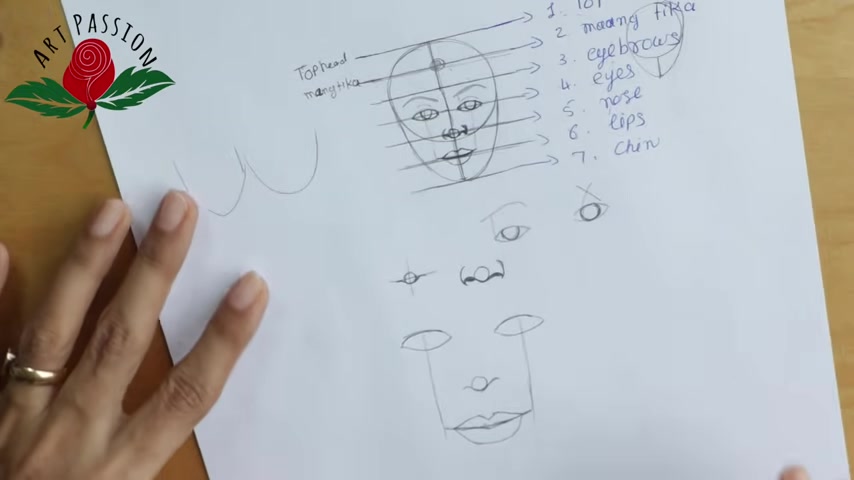
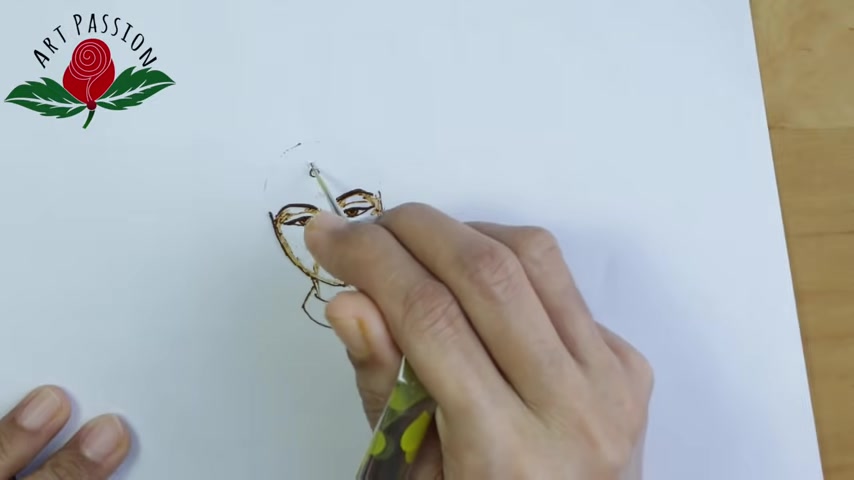
लेकिन हम लिप्स बनाना शुरू करेंगे बीच में ऐसे डीप और ये हमारे बन गए लिप्स तो अगर आपकी आँखें मैं यहाँ पे आपको एक्स प्लेन कर देती हूँ क्योंकि यहाँ पे गाइडलाइन के बीच में कुछ इन्फर्मेशन लॉस हो रही है ।
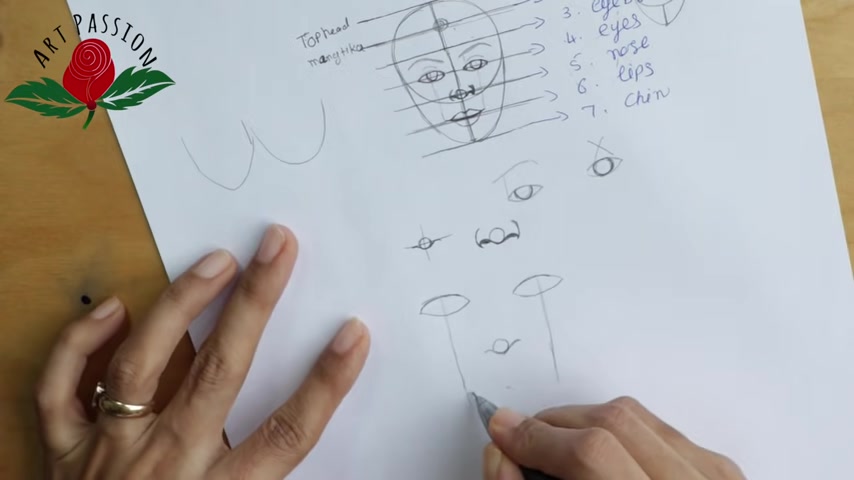
अगर आपकी आँखें हैं आपका नौं यहाँ पे हैं और लिप्स अगर यहाँ पे ड्रॉ करना है तो आँखों की जो सेंटर है तकरीबन ऍम ना जाओ तो कोई बात नहीं लेकिन तकरीबन आपके लिप्स उतने होते हैं ज्यादातर आप स्माइल करते होता तो आपने स्माइली लाइन बनाई और लेकिन आप यहाँ से शुरू नहीं करोगे ड्रॉ करना ड्रॉ करना थोडा सा छोड के फिर इस तरह से वी इस तरह से आप ड्रॉ करोगे लिप्स को और कोशिश करोगे कि यहाँ पे भी थोडा सा ये उसको फॉलो करो ।
781.69 --> 851.16
मैं यहाँ पे पूरा पॅाल से पहले ड्रॉ करती हूँ ताकि जो भी कुछ डाउट रह गए हैं वो आपको समझ में आ जाए ।
थोडा पेंट प्लाइंट्स से अब मैं ड्रॉ करती हूँ सर्कल ताकि आपको वो तो समझ में आ ही गया है ।
मैंने अपना ये मार्क लिया अंडे का शेप बनाया , थोडा सा नीचे चला गया है ।
जब भी हम फेस ड्रॉ करते हैं थोडा सा कंसन्ट्रेट के साथ करेंगे तो अच्छा होता है इसलिए मैं बोल भी नहीं पाती ।
जब भी मैं इसको ड्रॉ करती हूँ लेकिन आप लोगों को दिख रहा है ।
जो भी मैंने एक्सप्लेन किया है मैं उसी तरह से फॉलो कर रही हूँ ।
अब हम पॅाल से कर रहे हैं तो हम ये गाइडलाइन मिटा सकते हैं लेकिन मेहंदी से इसको मिटाना बहुत ही मुश्किल है ।
इसीलिए जब भी हम मेहंदी से करेंगे तो हम ये सारी इतनी सारी गाइडलाइन नहीं ड्रॉ करेंगे ।
तब हम सिर्फ आँखों का जो जंक्शन है वो पॉइंट देंगे ।
ये नौं पॉइंट लेंगे और लिप्स का पॉइंट देंगे ।
बस उतना ही हम मार्किंग करेंगे ।
वो भी बहुत ही फ्रेंड लाइन से हो गया हमारा फ्रंट फेस ।
अब हम मेहंदी में शुरुआत करते हैं ।
थोडा शेडिंग के बारे में भी मैं यहाँ पे ही बता देती हूँ आप लोगों को कि जब हम थोडा आपके पास यहाँ पे शॅपिंग करेंगे हल्का सा नो ।
उसका ये एरिया थोडा शॉपिंग करेंगे ।
शेडिंग थोडा सा कम ही रखियेगा ।
अगर आपको इतना प्रैक्टिस नहीं है क्योंकि शेडिंग बहुत ही टेक्निकल चीज है तो अगर नहीं उसमें इतनी फॉर्वर्ड है तो उसकी वजह से भी आपका ड्रॉइंग खराब हो सकता है ।
तो थोडा सा ही आप शेडिंग आँखों के पास इस तरह से कर दीजियेगा तो आपका काम हो जाएगा ।
लिप्स में थोडा सा ऐसे शेडिंग से ही काम कीजिएगा ।
ठीक तो चलिए अब हम मेहंदी में बनाते हैं ।
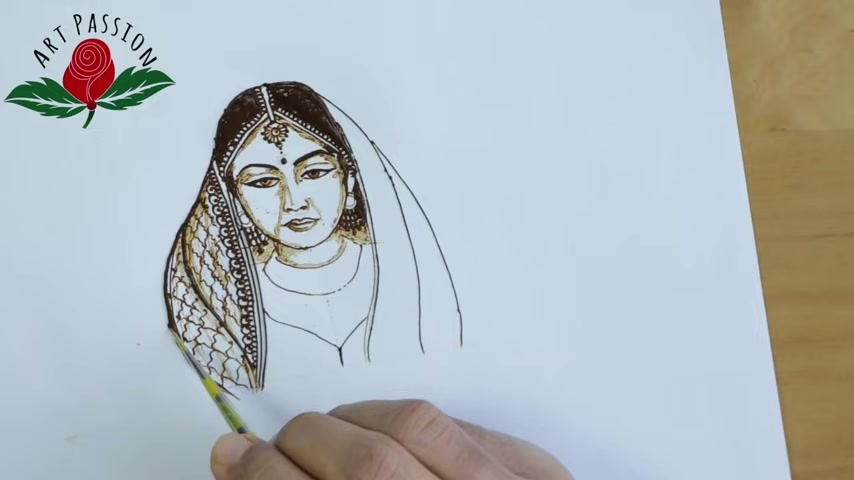
जो टेक्नीक मैंने अभी आप लोगों को एक्स प्लेन की फॅमिली उसी टेक्नीक का इस्तेमाल करते हुए मैं अब ये ब्राइट ड्रॉ कर रही हूँ ।
लेकिन जैसे मैंने आप लोगों को बताया कि पॅाल में हम जितनी ऍम लाइन ड्रॉ कर सकते है , मेहंदी में हम उतनी ऍम स्लाइन ड्रॉ नहीं कर सकते ।
इसलिए जो हमारी बेसिक इंपॉर्टेंट की पॉइंट्स ऍप्स पॉइंट्स है वही मैंने यहाँ पे ड्रॉ किये है ।
जैसे कि मैंने सर्कल में सिर्फ ऊपर का भाग ड्रॉ क्या है ?
फिर हमारा जो आई के बीच का जो पॉइंट है वो मैंने ड्रॉ किया है और चीन का पार्ट मैंने थोडा सा ॅ लाइन में ड्रॉ किया है लेकिन वो फॅस लाइन भी मैंने बहुत ही फेंट डाँट से बनाई है जो आगे जाके मैं पूरा जो फेस ड्रॉ करुँगी उसमे मर्ज हो जाएगी या तो शेडिंग में कन्वर्ट हो जाएगी अब जो ब्राइड मैं यहाँ पे ड्रॉ कर रही हूँ आप उसको ध्यान से देखिए कौन कौन सी लाइन किस तरह से मैं ड्रॉ कर रही हूँ ।
आप ध्यान से उसको देखिये और प्रैक्टिस कीजिये कम और एक बात इसमें जो शेडिंग मैंने की है वो शेडिंग थोडी हाई लेवल की है जहाँ पे हम कौन को बिल्कुल भी फॅसने हीं करते ।
मैं आप लोगों को यहाँ पे ही एक्सप्लेन कर देती हूँ कि हम वहाँ पे कौन को बिल्कुल भी प्रेशर नहीं देते ।
जो मेहंदी चिपकी हुई होती है कौन के टिप के ऊपर उससे ही हम पूरा ये शेडिंग करते हैं ।
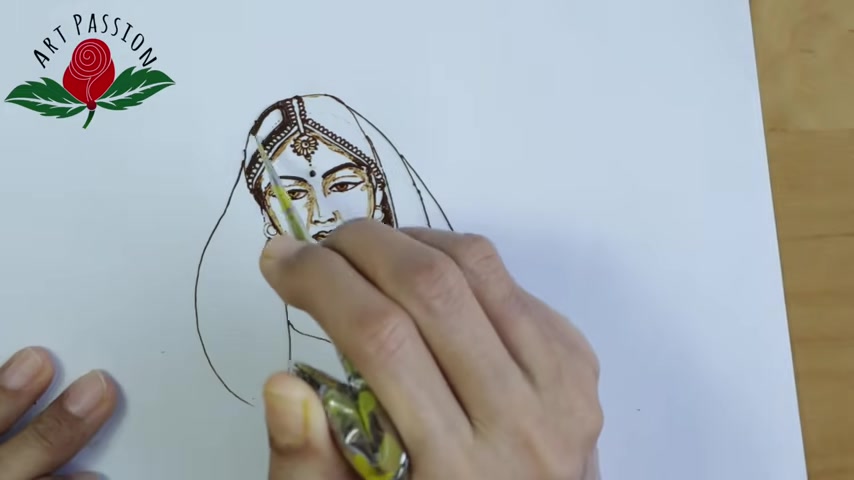
अगर आप कान्फिडेंट नहीं है मैं बार बार ये बात दोहरा रही हूँ ।
अगर आप कॉन्फिडेंट नहीं है शेडिंग के साथ तो प्लीज ज्यादा शेडिंग मत कीजिये का इस पूरे ड्रॉइंग में क्योंकि वो एक्चुअली बिगाड देगा ।
आपका पूरा फिगर ड्रॉइंग को फेस के ड्रॉइंग को बिगाड देगा ।
आप सिर्फ आँखों के पास साइड में बस उसी दो तीन जगह पे ही शेडिंग का इस्तेमाल कीजिएगा तो इसी के साथ मैं आप लोगों से विदा लेती हूँ ।
आप देखते रहिए की किस तरह से मैं पूरी ये ब्राइट ड्रॉ करती हूँ ।
एक्चुअली विडियो बहुत लम्बा हो रहा था फिर भी मैंने इसको एक ही पैर ट् में आप लोगों के साथ शेयर किया है तो आप ध्यान से इसको देख देखिए प्रैक्टिस कीजिये और अगर आप प्रैक्टिस करते हो तो हमारे साथ शेर कीजिये आपका ड्रॉइंग ताकि दूसरे लोगों को भी इससे इंस्पिरेशन मिले और सब्स्क्राइब नहीं किया है ।
चैनल को सब्सक्राइब जरूर कर दीजिए और शेर भी कीजिये जिनको ये सीखना है तो उनको भी ये सीखना मिले सीखने के लिए काम में आये हमारा जो विडीओ है फ्रंट फेस का क्योंकि इतने डिटेल में तो कोई सिखाएगा नहीं जैसे मेरे दूसरे व्यूअर हमेशा बोलते हैं ।
आप बहुत डिटेल में जाती है लेकिन उनको क्या मालूम कि हमारे ऑडियंस को डिटेल में एक्सप्लेनेशन ही अच्छा लगता है ।
तो इसी के साथ में आप संविदा लेती हूँ मैंने अपना प्रॉमिस पूरा क्या आप भी अपना प्रॉमिस पूरा कीजिये और बहुत जल्दी वापस मिलते हैं ।
तब तक के लिए स्टे ब्लाॅस्ट स्टेइन स्पाॅट इंस्पायरिंग ऍम बाइ सी यू
Are you looking for a way to reach a wider audience and get more views on your videos?
Our innovative video to text transcribing service can help you do just that.
We provide accurate transcriptions of your videos along with visual content that will help you attract new viewers and keep them engaged. Plus, our data analytics and ad campaign tools can help you monetize your content and maximize your revenue.
Let's partner up and take your video content to the next level!
Contact us today to learn more.