https://www.youtube.com/watch?v=_dX5Xm9n3dg
2023-07-12 12:40:18
A Common Chess Tactic You Might Be Overlooking - The Alekhine's Gun Chess Tactic
What's up guys today ?
We're talking about the Alek kinds gun tactic .
It's actually not really a tactic , more of a setup of your pieces .
But there are a lot of tactics that arise when you have your pieces in this position .
We're gonna start with some very basic examples like this one right here .
We're gonna work our way through to some more complicated ones like this one over here .
And regardless of what your rating is , I think you're gonna learn a lot today .
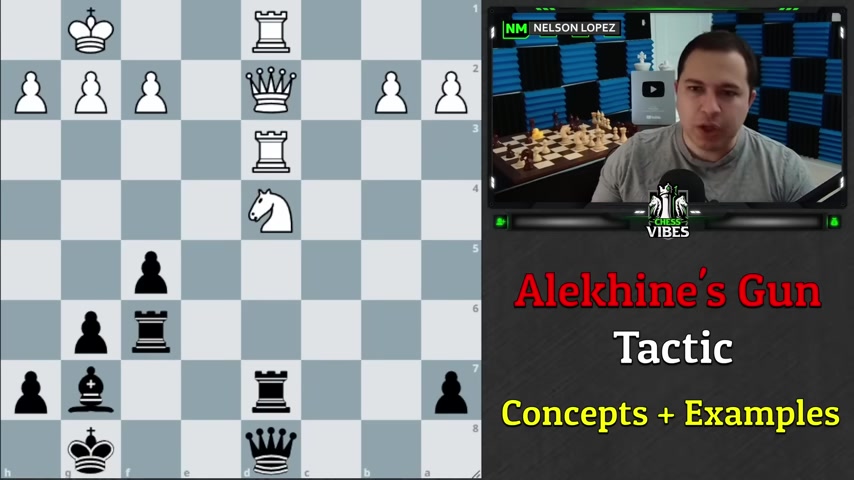
So first things first , when we say Alek , he's gun , we're talking about a battery that you create with your pieces .
Now , if you don't know batteries , when you line up your pieces , either on a rank of file or a diagonal .
In this case , we've lined up our pieces on the D file creating this battery , Alek kind's gun .
To my understanding usually means that both of the rooks are in the front of the queen .
Now , you could switch these , maybe the queens in the middle and occasionally the queen might be in the front .
But generally speaking , it's gonna be most effective this way .
And that's because you can , if you needed to trade or sometimes sacrifice these rooks , you'll be able to end up with the queen as the final piece , which is the most powerful .
And so that's why usually the queen going to the back is a good idea .
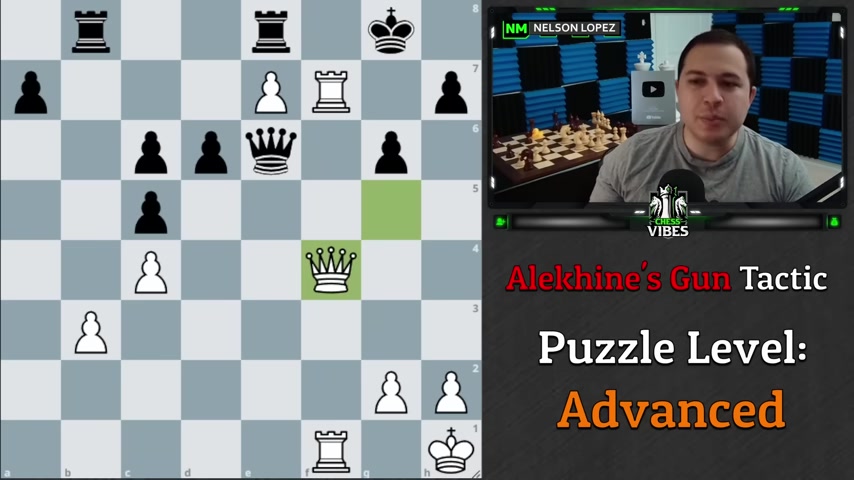
So , um once we have this , you can see how it creates a lot of pressure on your opponent's position .
In this case , black is really trying to defend that pawn .
We might play a move like knight to F five and we're probably gonna be able to win that pawn .
OK ?
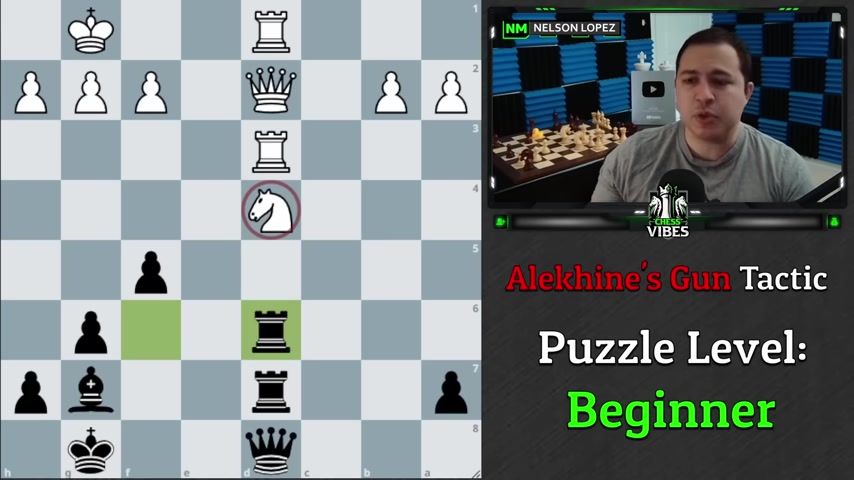
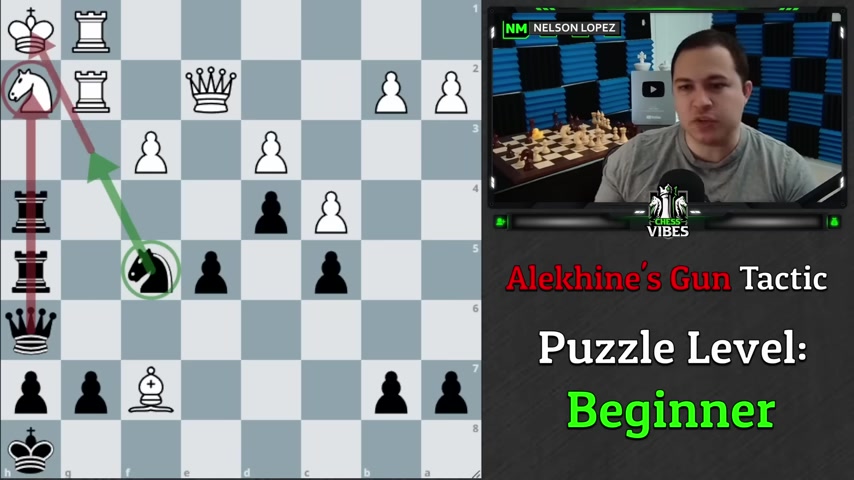
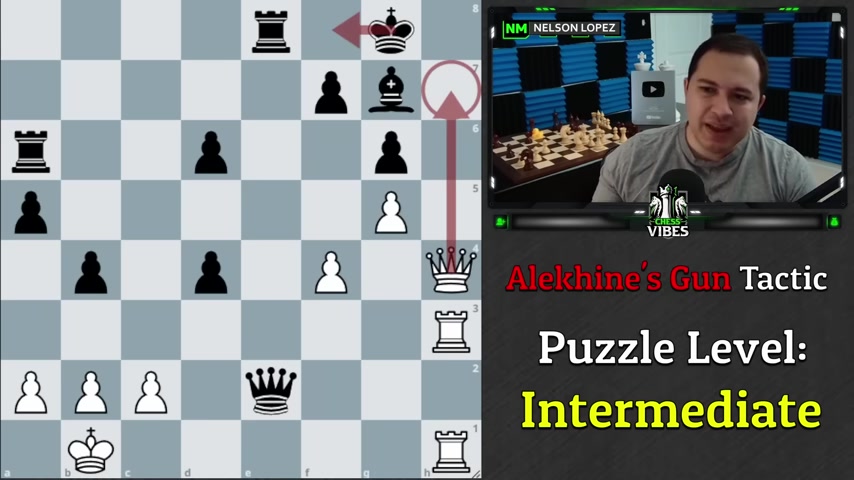
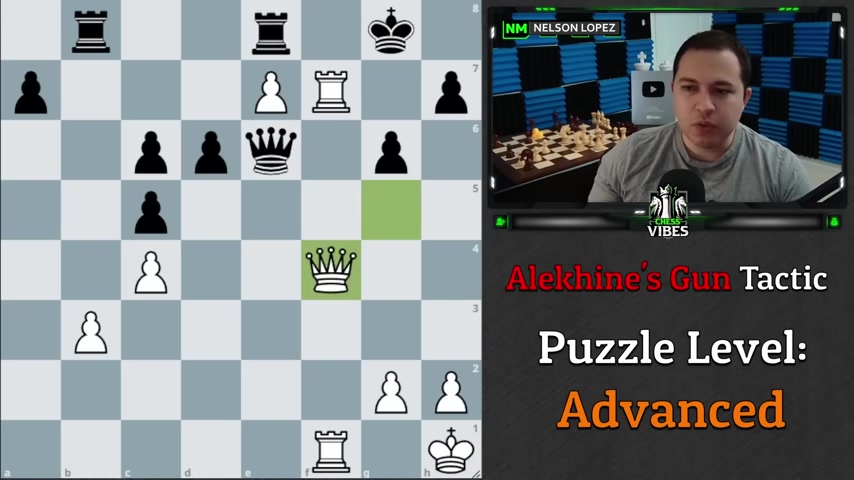
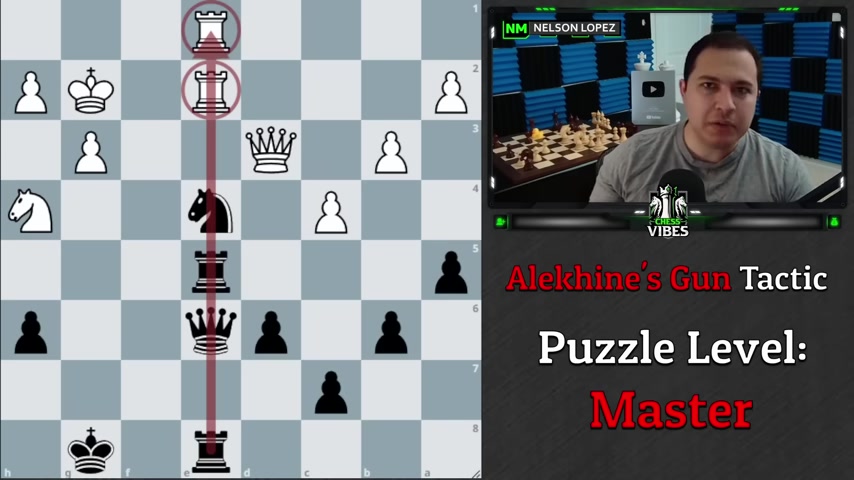
So let's start with our first example here .
It's black to play .
What is black's best move in this position ?
All right .
If you had a chance to look at that , the move is simply rook to D six .
And this looks very similar to what I just showed you , you create the Ale Kines gun battery and you're attacking the night and look at this , we have actually four pieces attacking the night and it's only defended three times .
And so if white wants to save the night , they have to move it somewhere .
However , if they do , then again , we have three pieces lined up on this rook and only two defending it .
So you can see we can just simply take and we come out on top because we had the extra piece .
All right .
So that's just a good example of how it's very powerful when you line up those pieces onto a good target .
That's the key you want to make sure that you're lining them up onto a good file or in this case AAA piece that you're attacking , OK ?
You can't just put them anywhere and expect it to be effective .
For example , if this pawn was on B three and we line up our pieces over here attacking that pawn , then it's probably not gonna be that , you know , effective .
All right , let's go to the next example .
Black to play and win .
What should black play ?
All right , if you had a chance to look at that .
So the first thing you want to ask yourself is what is the , the battery or the Alkins gun attacking ?
Well , it's attacking the H two square , but if we count up 1 to 3 Attackers , white has 1 to 3 defenders .
And so it's simply just taking isn't gonna cut it in this position .
However , we have this nice little night move night to G three check , which is a fork .
And even though the rook can take us , we lure that rook away and once the rook is gone , now , if we recount white only has two pieces defending , we have three attacking and so we can simply take , take again and that's checkmate .
Ok .
So a good example of how you had to pair that Aines gun uh battery along with something else in the position .
In this case , it was 92 G three check which ultimately led to the checkmate .
All right , let's look at the next one .
It's black to play and win .
What is black's best move ?
All right , if you had a chance to look at that .
So again , we have the battery this time , it's switched around a little bit .
The queen's in the middle , right ?
Um But again , if we count 123 and 123 , it looks like white's defended .
So we have to do something different .
And in this case , the move is knight takes D three .
Again , it's a nice little fork and notice how if white captures us , then the rook is left undefended down there and we simply take it .
And now we , we basically won the rook for the night .
Ok .
So another example of how we had to pair something else going on in the position along with the threat from the Aines gun .
All right , let's go to the next one and they are gonna start to get more difficult .
It's white to play and win .
What is White's best move in this position ?
All right .
If you had a chance to look at that , when I first looked at this position , I was tempted to say the move queen to age seven .
But then the king goes to F eight and the king is escaping and we don't really have a follow up .
And so the move in this position is queen to H eight .
It's a queen sacrifice of course , the , the black uh king can't escape .
So he has to take it and then we simply take the check , we bring this rook down and it's a really beautiful checkmate with the two rooks because the king is just trapped in our pond is actually playing a vital role in this one .
So that's a good one to be aware of .
If you've never seen that before , you probably had a hard time thinking of that move .
But now that you've seen it , um you know , you'll , you'll spot this one in the future .
I , I think .
All right , let's go to the next one .
All right , it's white to play .
What is white's best move in this position ?
All right , if you had a chance to look at that .
So the first thing , uh we have this lined up here , but it's , you know , defended two times .
So that doesn't really help us .
We also have a threat here on G7 with our queen in a row , but it's also defended .
We don't want to take this and lose our queen .
That's defended .
It looks like everything is defended .
However , if we think about the Aleks gun and the fact that we might want to triple up our pieces , you might notice the move queen to D five check .
And as soon as you think about that , black has to waste a move moving to king somewhere and notice what we've done .
12 .
Now we have three pieces lined up on the rook .
It's only defended twice and we simply can go for this trade and we're gonna come out on top and now we're winning .
Ok .
So again , another example of there was this idea of the Ale Kines Gun , but you had to pair it with the fact that there was a check and that's ultimately what led to , to the winning position .
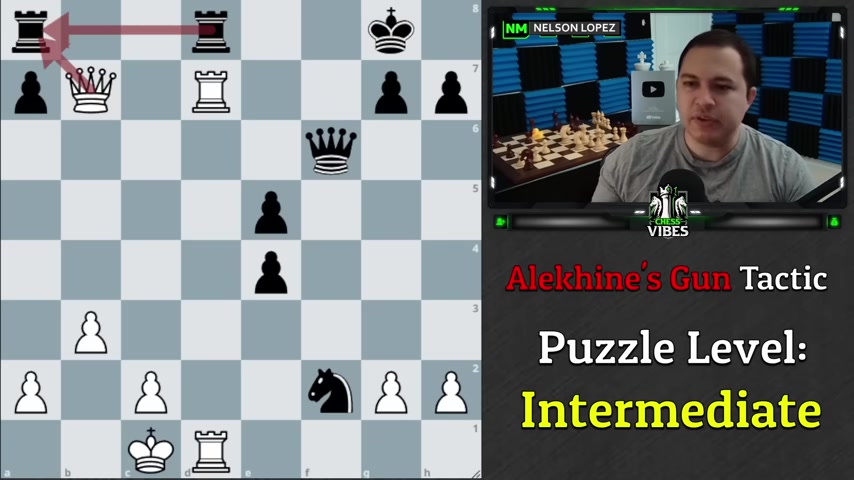
All right , let's go to the next one .
It's black to play .
What is Black's best move ?
All right .
If you had a chance to look at that , the move is rook to D one check .
And White's king has a problem , you can either move here or you can try to block with the rook .
Those are the only two options you have .
If you try to run here , we can simply bring the queen in and this is check mate .
And so most likely White would try to block with the rook , but then we can simply take and then the queen comes down and it's also checkmate .
Here's a good example of how I said , you know , having the queen either in the middle or in the back can be beneficial because once that first rook goes down and in this case gets traded off , we can follow up with the queen and it's checkmate .
Ok ?
So it's kind of important sometimes the order that the , the pieces are in .
If the rooks are in the front or if the queen's in the front or , you know , kind of depends on the position , but when you're setting up the Alek kinds gun yourself , you want to be thinking through those things .
What , what's most likely to happen ?
Am I most likely gonna trade one or two rooks ?
Would it be beneficial for my queen to be in the middle or at the end ?
Uh , and sometimes you , you know , you can't control that , Like just depending on what happens in the game , it just ends up a certain way , but just keep those things in mind .
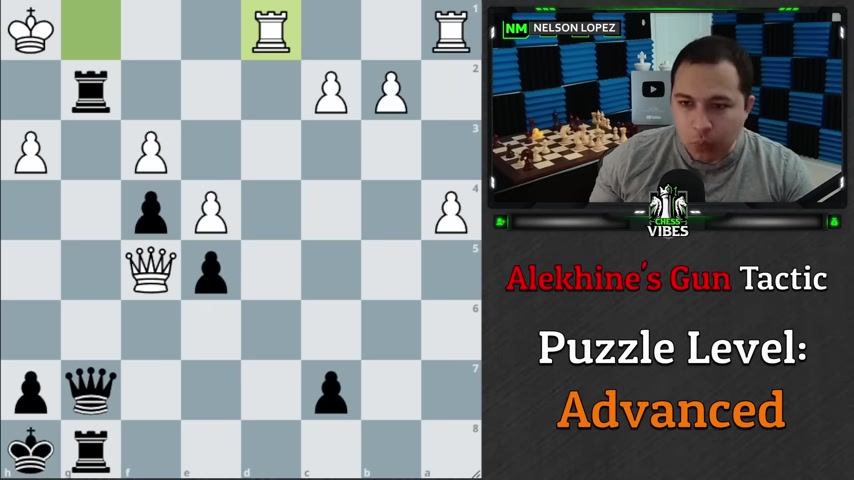
All right , let's go to the next one .
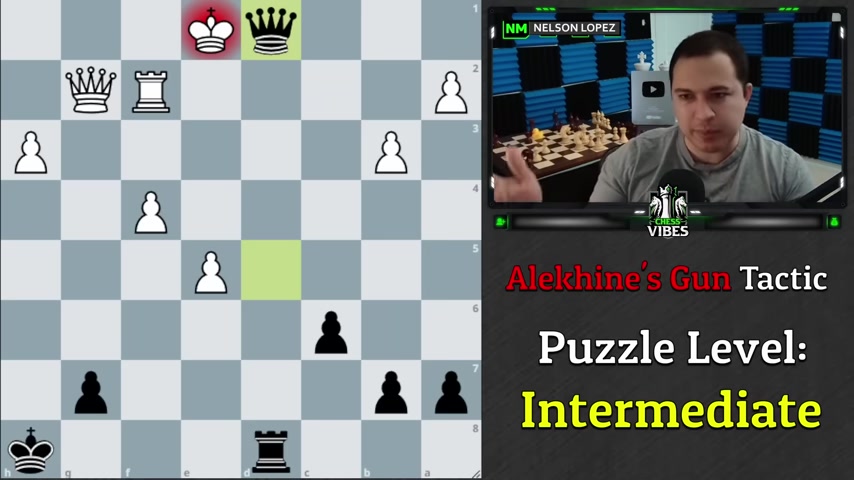
Ok ?
It's white to play .
What should white play ?
All right .
Well , if you had a chance to look at that , you might have been tempted to say queen here , check , thinking that you're gonna win the rook .
Let's just say the king moves here and you take the rook .
The problem with that is your own king is not safe and black is gonna come over here and now you just lose .
Ok ?
You get check it .
So what you needed to see and this is actually very similar to a previous one that I showed you guys .
But after we take here with check takes , takes and look at this same kind of pattern that we saw before .
Check and checkmate .
There's not enough spaces for the king to hide and we can deliver the checkmate with the rooks and the pawn ok .
So that one was a little bit trickier .
It was kind of disguised , but hopefully you're getting you , you're starting to pick up on that pattern .
Uh where even you can , you can even sacrifice your queen .
All right , let's go to the next one .
I have three more for you .
They are gonna start to get more difficult white to play .
What should white play in this position ?
All right , if you had a chance to look at that .
So this one is interesting because it really looks like queens at age six would be a really strong move trying to go for check made here .
The problem is that black has the option then to just give up the queen for the two rooks .
Yes , you can take here with check .
But then the king moves and you're probably gonna have to just keep giving him checks .
Eventually black can take this if you stop giving them checks and it's gonna be hard to win .
Ok ?
So because of that , we needed to find something better and the better move is queen to F four .
And what we're doing here is creating a major threat on F 8123 .
Now we have four pieces threatening to go here .
And the only way that black could really stop , that would be a move like queen to C eight lining up there so that if we can go here , they can take and take and take and that works out fine for black .
However , now we can go queen to age six .
The queen is no longer threatening to take our rook .
And now black can't stop the checkmate .
And so because of that , uh Blackwood , I don't know what they would do , maybe take this with the rook .
But then we can use this to take advantage of the F eight square with rook to F eight if they take its checkmate , so they would probably move here and we simply take their rook .
Ok .
And so we're , we're winning a rook .
And it all started with a very simple kind of quiet move of just sliding the queen back creating that triple battery , which ultimately caused so many problems for black .
And so you can see how , how powerful this is .
Uh when you pair it with some other stuff going on in the position .
In this case , it was this past uh that ultimately was too much for black to handle .
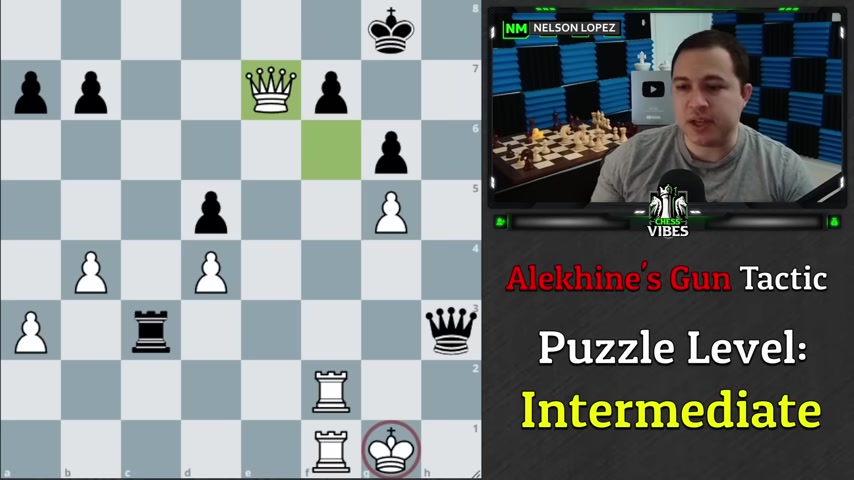
All right , let's go to the next one .
It's black to play .
What move should black play ?
All right .
Well , if you had a chance to look at that , uh again , we have the same kind of idea , a very quiet move .
You can see there's some , some stuff happening here , but all we need to do is slide our queen back .
If white tanks , we simply recapture , we're not worried about that .
But what we've done now is create the triple threat here and we're threatening to just take this .
And if White takes , it's gonna be checkmate and White doesn't actually have a good way to defend this king to h one is , is a tribe .
But now we could simply take , of course they can't take us or it's checkmate if they take here , like I mentioned , we take here and White's just in big trouble .
Uh They , I think they have to give up the queen .
Otherwise we're just gonna take here and checkmate them .
Um Or I should point out if they move the rook away .
We have a nice finish here if you want to pause .
That's right .
We have the move rook to H two working in the take and then queen G is checkmate .
Ok ?
And again , you see how powerful it is when you have these , these , you know , rooks and queens are powerful pieces .
And so when you put all of them on the same file , it really creates some serious threats that your opponent has to watch out for .
Ok .
All right .
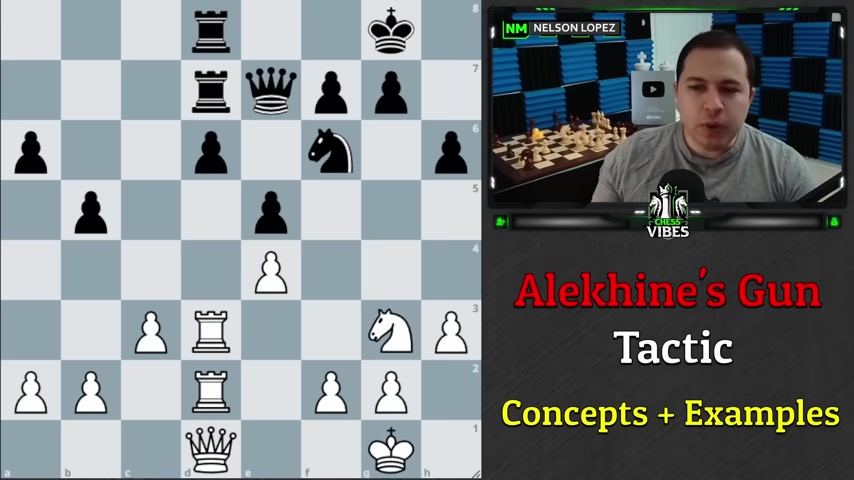
I have one more for you guys .
This is the most difficult one that we've looked at uh black to play .
What move should black play ?
All right .
Well , if you had a chance to look at that , so we have the triple battery , but white also has , you know , the two rooks kind of lined up as well .
There's a queen which might potentially come down here .
There's a night , there's , there's kind of a lot happening .
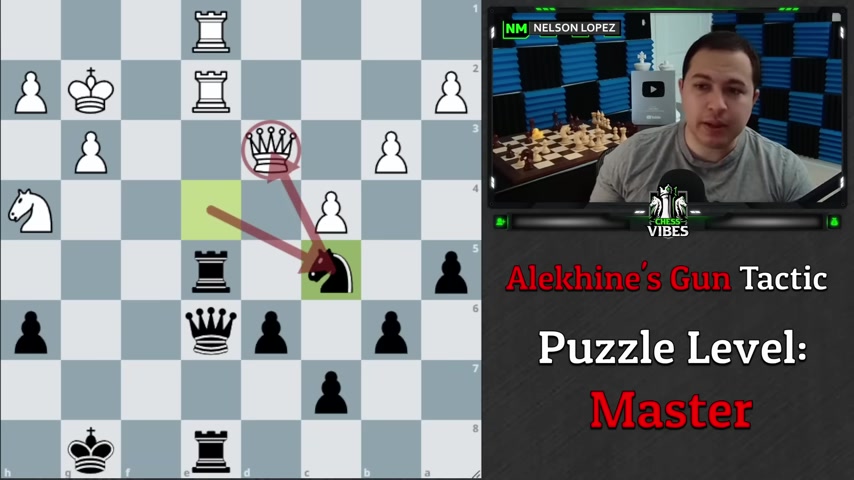
However , we have a nice move here and it's the move knight to C five .
And what we're doing is we're pairing this battery .
So creating a threat on the rook along with another major threat , which is attacking the queen , right ?
Like White doesn't want to just lose their queen .
And there's a couple of things that they could try .
Number one if they do go for this queen trade , like I mentioned , we simply take it and since we've got the battery , we are able to take White's truck .
So that doesn't work for White .
Now , the interesting line that you really needed to calculate is what happens if they just take our rook because then they create an attack on our queen too .
And you needed to see that we could take here with the fork .
They have to take our queen because we just took their queen and here's the key .
We take the rook with check , right ?
If we didn't have that check , this wouldn't work because white would be able to take us .
But because it's with check , uh White has the tough decision , do they move the king and allow us to take the rook ?
We're up a rook or do they take our night and then we take the rook , we're still up the exchange .
We have a rook for the night , which is good for us , right ?
So , uh that was a pretty you know , pretty difficult one , a little bit more complicated , but it's the same idea of pairing that , you know , powerful battery along with something else that's going on in the position .
And ultimately the tactics work out in our favor .
Ok .
So these are the kind of things you want to think about in your games when you have three pieces lined up and , and hey , if you're not lining up your pieces like this , maybe you need to start doing that , like pick an open file , right ?
And start lining up your pieces , triple batteries .
You can probably create a lot of tactics in , in your games if you start doing this .
Ok .
So I hope you guys learned something from this and um , let me know your thoughts down below on the Alan Kines Battery , but I will see you guys next time as always , stay sharp , play smart and take care .
Partnership
Are you looking for a way to reach a wider audience and get more views on your videos?
Our innovative video to text transcribing service can help you do just that.
We provide accurate transcriptions of your videos along with visual content that will help you attract new viewers and keep them engaged. Plus, our data analytics and ad campaign tools can help you monetize your content and maximize your revenue.
Let's partner up and take your video content to the next level!
Contact us today to learn more.