https://www.youtube.com/watch?v=q5xDT62LrQE
This Tactic Is So Much Fun - Windmill Chess Tactic - Concepts + Examples
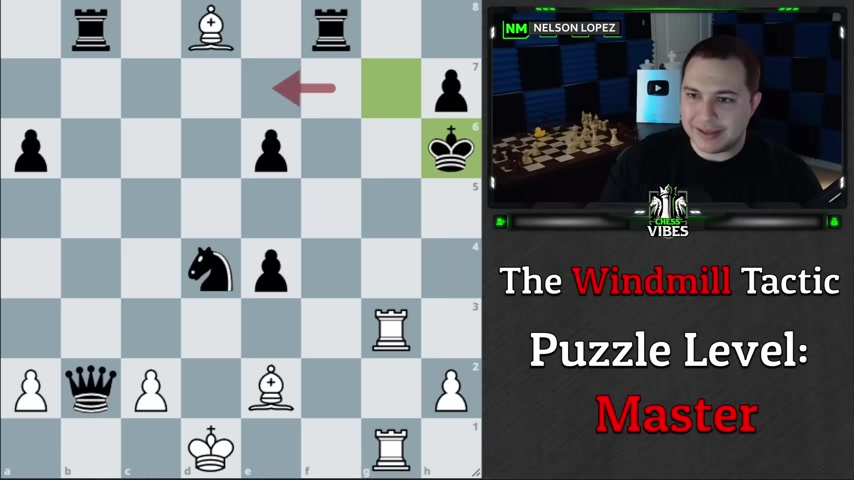
Today , we're talking about the windmill tactic in chess .
Now , this is one of the coolest tactics , in my opinion because of how you get to just take a bunch of pieces and your opponent really can't do anything .
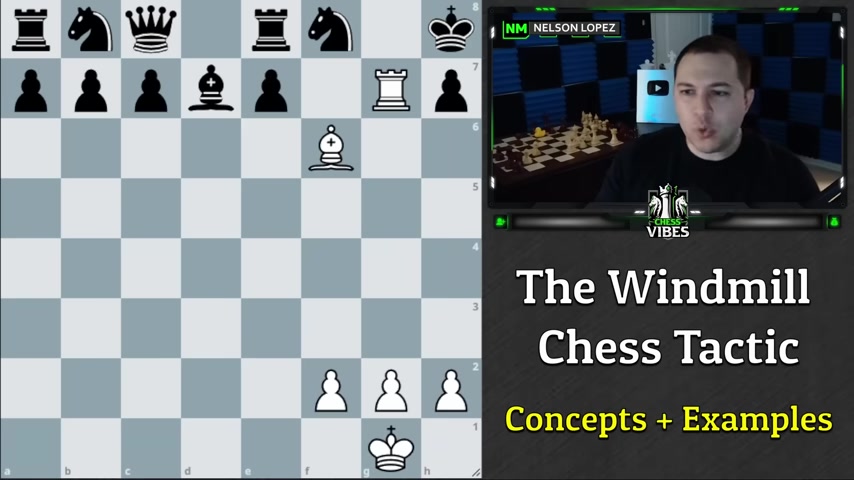
So usually the important thing about the windmill tactic is that you have a bishop in a rook most of the time it could happen .
But I guess with a queen and a rook as well , but usually it's a bishop in a rook and the bishop is lined up on the king and the rook is in between something like this .
Ok ?
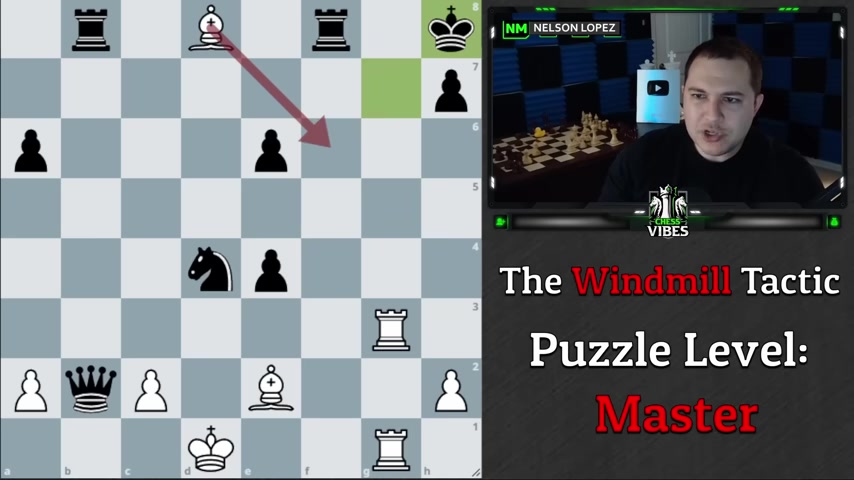
And the way the windmill tactic works is you move the rook away in this position .
I would take this pawn .
It creates a check on the opponent's king .
They have only , usually only one option and then you just go back and they have to go back in the corner and you get the same exact position except you just took a pawn for free .
And then you could , in theory , if you wanted to just do the same thing , you take the bishop with check and the king has to go back and you come back and then they have to go to the corner and guess what , it's your turn again and you know what , I'm just gonna keep taking stuff .
Right .
Because what can Black do check ?
And I'm just gonna keep taking stuff and you can actually take everything on the , the sec seventh rank , which is pretty funny .
Right .
And black just has to go back and forth and I could have check , made it actually sooner and this is just checkmate .
So in this position , I didn't have to do that , but I wanted to illustrate the point that it's pretty cool .
Right ?
Black literally can't do anything .
Now , this was a made up position where I put the pieces perfectly for this to work out , you know , in white's favor .
But what you're gonna see is that even in real games , the same concept can apply .
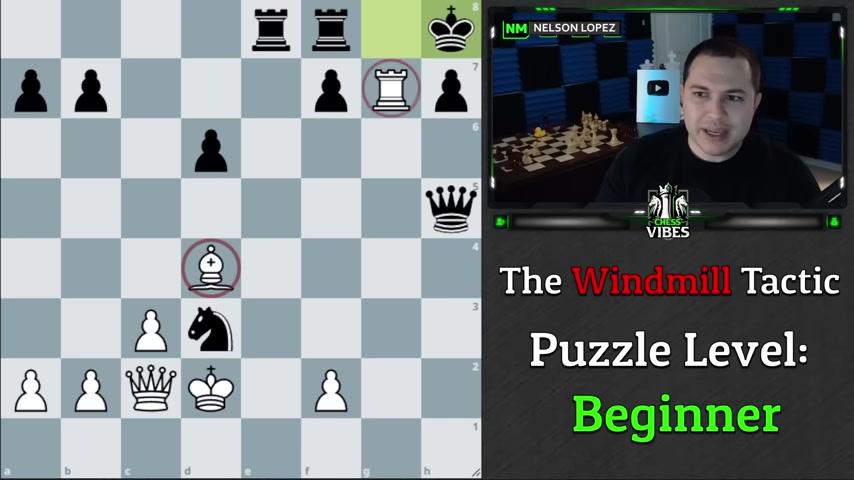
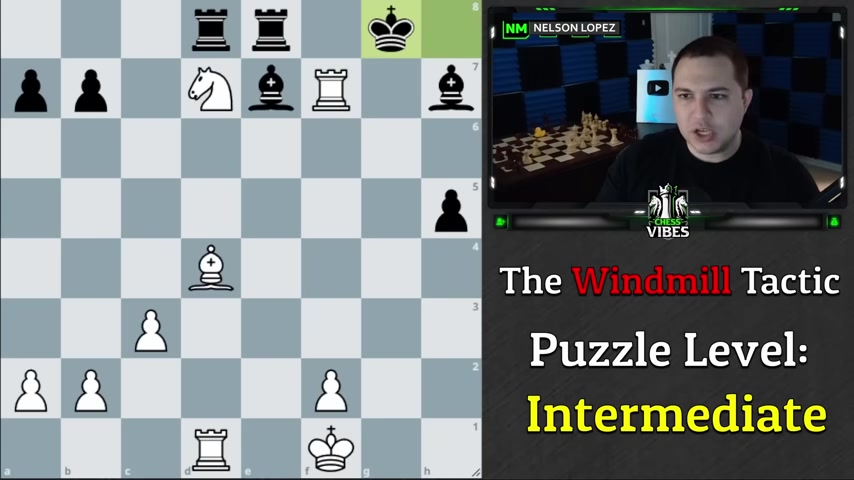
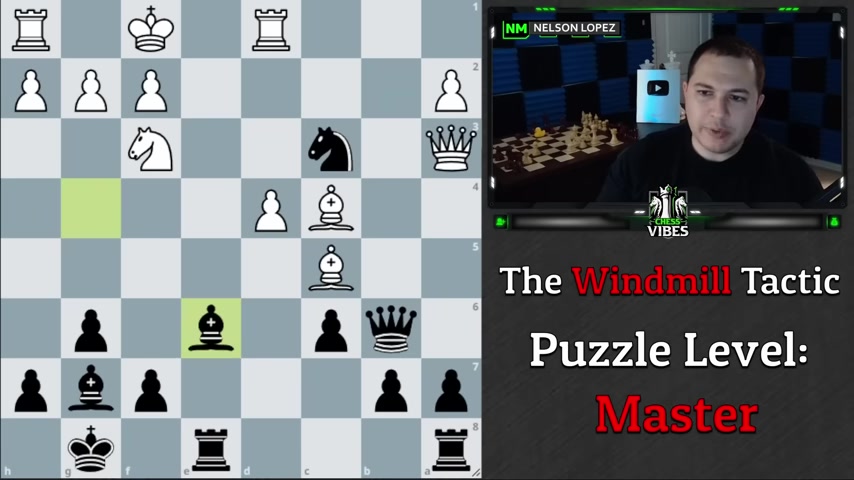
So let's take a look at another example from an actual game , it's white to play .
What do you think white should play ?
Given what we've already talked about ?
All right .
Well , if you had a chance to look at that , the move is rook takes G7 check and then when the king goes over , notice we have the same type of setup that I was talking about .
You've got the bishop lined up on the king with the rook in between .
And now it's a question of where should we move the rook to ?
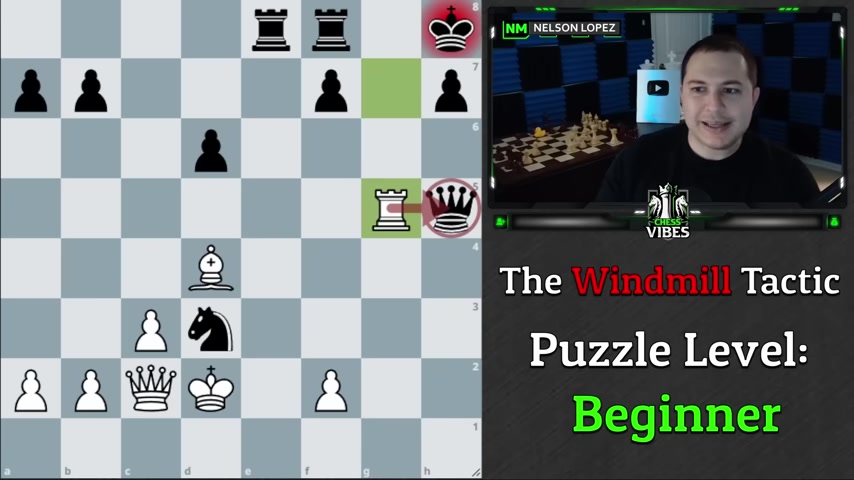
And in this case , the best move is rook to G five creating the attack on the queen .
Now , you might be saying , well , why don't we , you know , take all of the pawns or take all the pawns like you mentioned and then go and do that , right ?
Which is a good idea .
However , in this example , if we go here , black has knight to E five , it blocks off the bishop , our fun is over and we actually are just gonna lose .
So this is an important point .
Sometimes you , you have more freedom with where you can move the rook to because of the position .
And sometimes you can't .
This is one of those situations where we have to be , you know , bear in mind that this knight can block our bishop .
So because of that , this is an example where we only really have one chance to move the rook because the night's gonna block .
So we have to make the most of it in this case , which is why we go to G five .
So we can get the queen if black were to play this , we simply take the queen and we're , we're winning .
So keep that in mind depending on the position you may or may not have multiple chances to do it .
Sometimes you only have one .
OK .
Let's go to the next example .
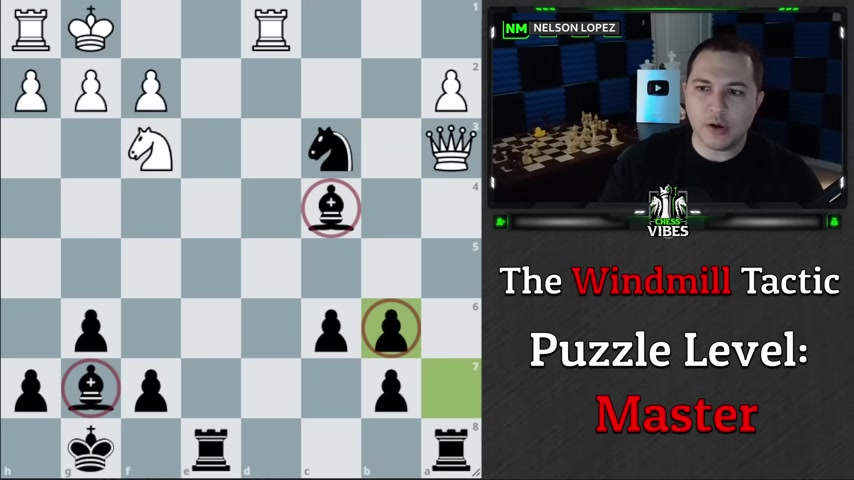
It's black to play .
What move should black play ?
And what's the follow up ?
Well , the first move , I'm gonna go ahead and assume everybody can see we take here and the king goes to the corner .
Now , it's a question of what is the follow up ?
So I'll let you pause right here .
What should we play as black ?
All right .
Well , this one is a little bit tricky because it almost looks like if we just slide the rook back somewhere , let's just say here it's checkmate because the king can't move .
However white has F three , they block it .
They , they , you know , basically get out of trouble .
That's not what we need to do .
In this case , we take here first check , get rid of the pawn .
Then we go back , right ?
Using this idea of repeating the position except now we've removed the pawn and now we can move the rook .
Let's just say the G four and guess what ?
There's no more pawn .
And now white has to give up the rook and its checkmate .
Ok .
So that was a subtle detail , but we did need to take the pawn that was important .
Ok .
Let's go to the next one .
All right .
So the black to play and win .

And if even if you see the first move , try to see all the way through and calculate all the variations to the end to see the final puzzle for this one .
All right .
Well , you had a chance to look at that .
So of course , we're gonna start with the ruck check , which is the king in the corner and again we're gonna get rid of that pawn because this is pretty common .
A lot of times the F three pawn will block our bishop if we don't take it right away .
So we take it right away , force the king back , go back to G two .
And then a lot of times once you get rid of that F pawn in situations like this , you just simply drop the rook back because now they have no way to , to block it .
You want the rook to take away the , the G one square in this case , because it's simply checkmate in other situations , you might go for the , you know , taking all these along the sec the second rank , but you do have to be careful because it does give white the option like in this case to sacrifice their rook and we no longer have checkmate because now the king can actually escape .
Ok ?
So even though it kind of looked good , like we're gonna get some pieces , which it kind of was checkmate is better .
And in this case , the only way to get checkmate was to go back here and force this to happen , right ?
So keep that in mind , even though it's kind of a simple tactic , there are some subtle things that you know , you have to be aware of .
All right , let's go to the next one .
Wait to play .
What should you play and try to calculate through the entire uh the entire line if you can .
All right .
Well , if you had a chance to do that , this one again , we take with the rook and even though there's no rook sitting there to stop the king , we actually have this knight .
And so it's kind of the same type of thing .
It looks a little bit different , but it's the same concept .
The king has to go over .
What do we want to get rid of ?
a lot of the times first that F pawn , right ?
If we try to go back here for checkmate , the block would just block and it's gonna be much more difficult for us .
So we want to take that first force the king over , go back and then we can deliver the checkmate by moving the rook really , anywhere that we want to .
And once the bishop blocks , we simply take it and we have a nice little checkmate .
Ok ?
Ok .
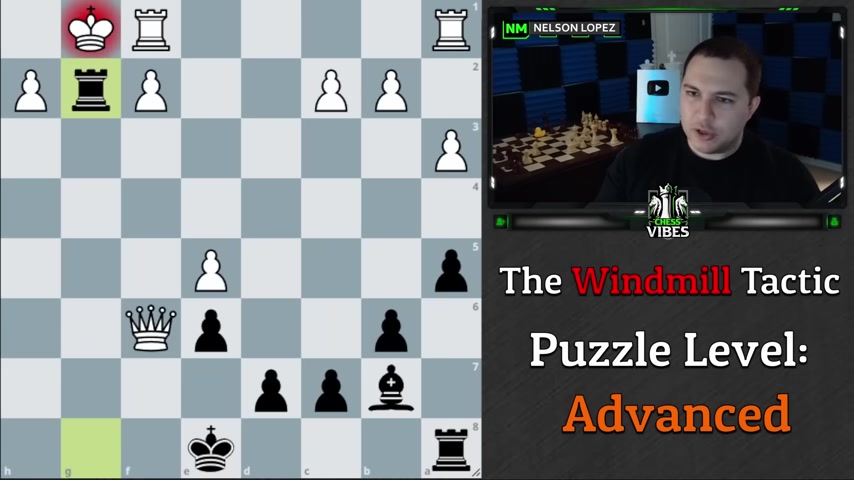
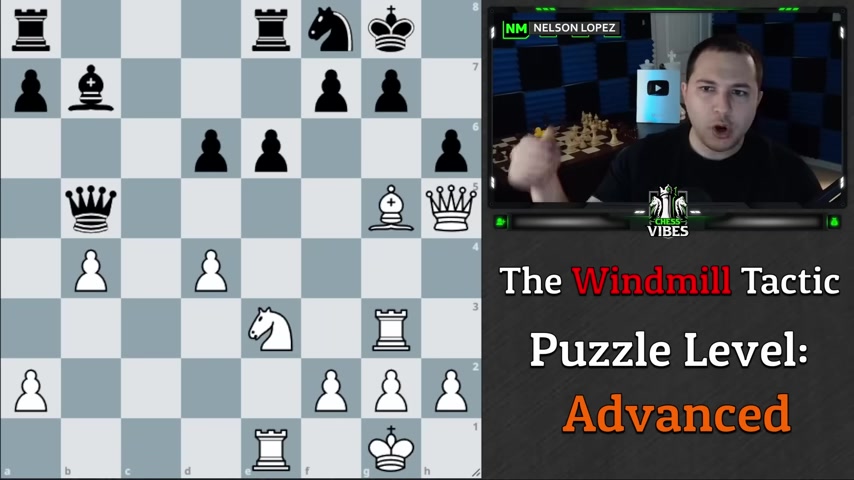
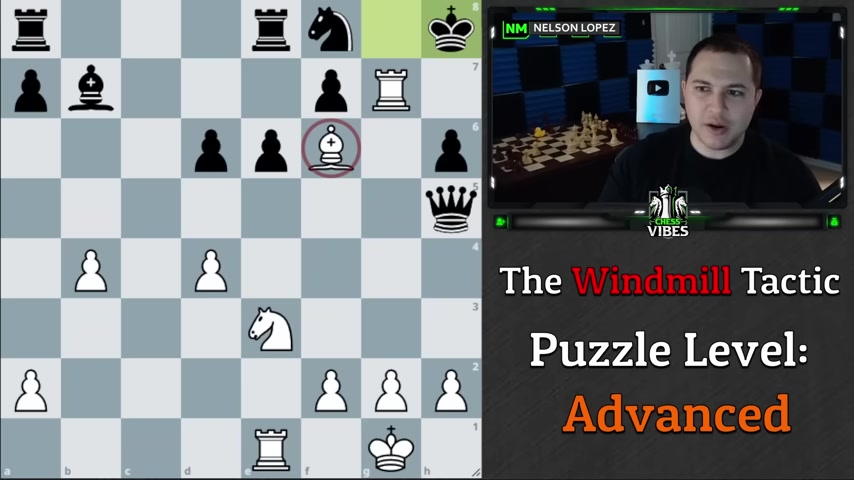
Let's go to another one black to play again .
Try to calculate the whole line out in your head before you look at the solution .
All right .
Well , if you had a chance to do that , of course , we're gonna take here first with check king has to go in the corner .
And again , this is kind of the same deal .
We don't want to allow the pawn to block us .
Ok ?
So we take it first king has to go back .
We go to G two check king goes here and here is where it's a little bit tricky because you might have been tempted to say , well , I guess we just take all the pawns .
The problem with that is white has the option of rook to F three because the queen is defending and the windmill is over , the bishop has been blocked and we're gonna actually lose .
Now , the best we can do is take this , the game goes on .
We're , we're down to queen for Rook .
So in this case , this is one of those examples where we kind of only had one more opportunity after we took the F pon to do something else .
So it's a little bit tricky .
But we need to do is play rook to G three check and this is a key move because it's almost checkmate .
But Rook to F three white stops .
Why do we have to go to G three ?
Well , we needed to be able to attack that square .
So now when we take this with our bishop , it's defended by the rook and the king is stuck , white has to give up the queen and we come out uh you know , up a rook into a winning end game .
So that one was a little bit more tricky there .
Uh Hopefully you saw that .
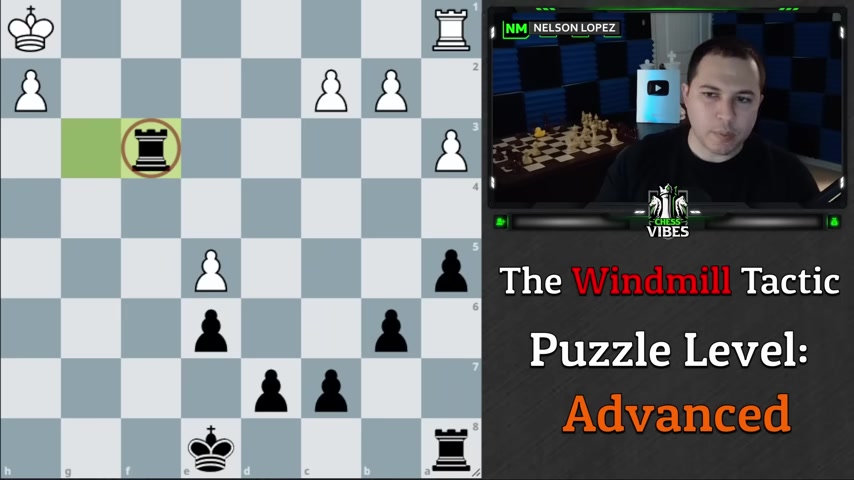
Now , the last three positions I'm going to share with you are much more difficult .
OK .
So we're gonna start off with this one right here .
It's white to play and win .
Same kind of concept , but there's a bit more going on in this position .
So go ahead and pause , try to see through what we need to do and then we'll talk about this one .
All right , if you had a chance to look at that one , this one is tricky because when you first look at this , you might not even think that it's a windmill tactic , right ?
It's like where , where's the windmill at ?
Exactly .
So you , you , you need to sacrifice the queen to lure the king out and it steps in line with this discovered check .
So we get to choose where do we want to move our bishop ?
And it's going to put the king in check .
Now , some of you might have been tempted to say , well , we just go back check and attack the queen .
We're gonna win Black's queen .
The problem with this is we just sacrificed our queen .
And so Black can just make a random move like here .
And yes , we take the queen , but then the rook comes down , we're kind of even material wise , but blacks just in a better position this night is really strong .
The king is coming to the center to help out the rook is very active .
This is actually losing for us .
Ok .
So it's not good enough .
The other thing that you might have noticed is that maybe we can go somewhere like let's just say E seven , hoping that the king might go back into the corner .
There's a problem here though .
And that's the king's gonna come over .
And even though we have a check , it's not check made because they take our bishop .
Ok ?
And of course , we can't go to F six or the king takes if we go to H four , black is gonna play the move king to H six because now we don't have a checkmate over here , which we would have had .
So , for example , if we moved the bishop , uh well , let me just tell you the correct move is bishop to D eight .
And then we'll explain a little bit why .
So bishop D eight , if the king goes here , we have checkmate .
OK ?
So now you can see why H four doesn't accomplish the same thing .
Um E seven , I talked about how the king can capture .
We need to keep the bishop on this diagonal because if we try to go , let's just say to F four , then the king can actually escape on F six .
And it's gonna kind of have lots of options to get away .
So very tricky follow up here to the queen's sacrifice of where do we move the bishop to ?
Right ?
And this is uh where they can become more difficult , but this is ultimately uh forces the king to go back in the corner because now if the king goes to F seven , this is just simply checkmate because the bishop is not gonna get captured , right .
We looked at that before .
So that's a cool checkmate .
So because of that black is obligated to go to H eight .
And again , it's kind of like , ok , where's the windmill , Nelson ?
So if you wanna pause now and see if you can figure out how do we set up a windmill from this position ?
All right .
Well , if you had a chance to do that , so the windmill , the bishop has to deliver the check obviously , and there has to be a rook here somehow , right ?
But we can't put our bishop there or the rook just takes us .
So how do we do that ?
Well , we gotta to lure the rook away .
So we play rook to G eight .
The rook captures and then we can go bishop F six check .
And now you're probably starting to see the pattern .
The rook goes here and you might say , oh , we take it with the rook , right ?
The problem with that is it's black's turn .
We don't get a chance to deliver the checkmate because black says , thank you very much uh checkmate .
So in this case , we had to take with the bishop to create the discover check here , take the night and once the king moves , take the queen and now we're in a winning end game because we have the extra bishop .
So that was a much more complicated one .
Congratulations .
If you did see all the way through that , there was a lot going on there .
So don't feel bad if you missed that one .
Ok .
But I wanted to show you how that windmill idea can show up even in , in positions where it doesn't seem like it's , it's possible .
Ok , let's go to the next position .
Now , the last two positions including this one right here are from famous games .
OK .
This one was from , I believe , Tory versus Lasker .
So Laska was playing as black .
Alaska was one of the , the greatest chess players of his era .
But he's playing black looks like a pretty solid position .
But white does have an attack .
There's a rook , a queen and a bishop and white has a killer move here .
Uh That takes advantage of the windmill tactic .
So if you would like to find what Tori played here , go ahead and pause .
All right .
Well , if you had a chance to do that , the amazing move here was bishop two F six .
Now , why is it such an amazing move ?
Well , primarily because the queen is under attack and is not being defended ?
So he's sacrificing his queen ?
Ok .
So when black takes , why did he do that ?
Well , it's because he wanted to set up the windmill .
Rook takes G7 king has to go in the corner and this is a very common situation , right ?
We've seen this before .
What do you think he did next ?
That's right .
Rook takes F seven check .
Then he went rook to G7 and noticed he can just take everything .
So he comes over here , he takes the bishop , he comes back and he actually decided to not take the pawn .
I think he didn't want to unleash the rook .
And he decided , OK , I've taken as many pieces as I can , the pawn of the bishop .
Now I'll come back to G five and get the queen .
And he , he not only got his queen back , but he also took this pawn and this bishop in the process , right ?
So you could see why it was a very brilliant idea .
And he went on to win this game .
OK ?
So that's one .
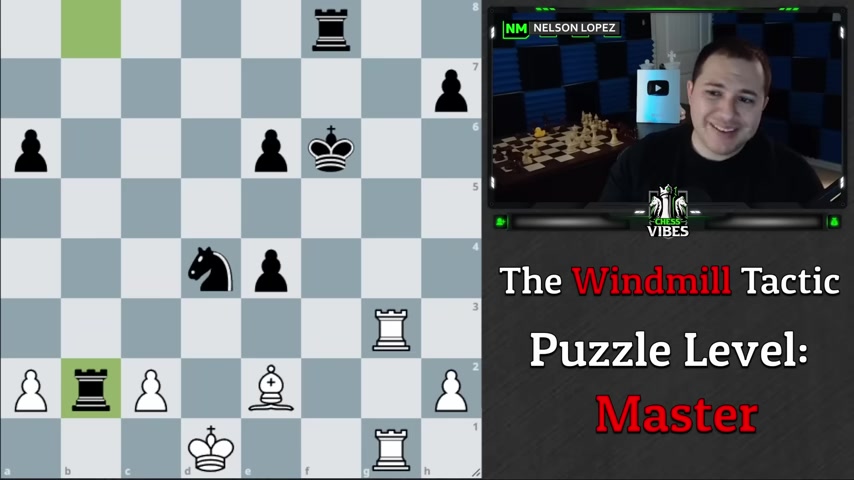
And let's look at one more .
Here we go .
This was a game played by Bobby Fisher .
Um I think it was burn against Fisher .
So uh Bobby Fisher was playing as black and it was black to move .
There's a really nice move , see if you can pause and find this one .
All right , if you had a chance to look at that , maybe you noticed uh when you look at this position , but black's queen is under attack .
And what's amazing about this position is that Bobby Fisher said , I don't really care .
And he played the move bishop to eat six .
He allowed his queen to be captured .
Why did he do that ?
Because after the queen gets captured , he took on C four with check .
Noticed the rook here forces the king to go over and then he played night to eat two check .
And it's kind of a type of windmill , but with a knight instead of a rook , right ?
And it's not even in the corner , it's kind of in a different situation .
But the same idea applies that he can move his night basically wherever he wants to because he has check with the bishop .
Ok .
So he captured here , unleashed the check .
The king went back , he went back and then he went over to C three because why not ?
He's got the time to do it .
He relocated it where he wanted his night to be .
And then he took back this bishop .
OK ?
And it's actually a totally winning position for black .
Um He got the bishop on C four .
He got the bishop on B six .
He got an extra pawn .
So you got two bishops and a pawn for the queen .
But on top of that white's king is in big trouble .
The rook is out of the game , black's pieces are just so awesome that this is a crushing position and he went on to win .
So uh just wanted to show you those , those last couple , you know , games , they do show up in regular games and you can see how from this position here , you might think there's no way in the world a windmill tactic even matters , but that's not true .
And we saw a good example of why uh in , you know , in this game .
So hope you guys learned something and enjoy that .
As always , I'll see you next time .
Stay sharp , play smart and take care .
Are you looking for a way to reach a wider audience and get more views on your videos?
Our innovative video to text transcribing service can help you do just that.
We provide accurate transcriptions of your videos along with visual content that will help you attract new viewers and keep them engaged. Plus, our data analytics and ad campaign tools can help you monetize your content and maximize your revenue.
Let's partner up and take your video content to the next level!
Contact us today to learn more.