https://www.youtube.com/watch?v=kMIIfC6ddHY
How To Create an Online Course Website with WordPress & Tutor LMS (2022)
Welcome back to the Channel Party people .
My name is Darrell Wilson .
Today .
In this video , I'll be showing you guys how to create an online course website or an L MS website to power on the universities or schools with wordpress .
The online course industry is growing .
U DB reported the top 10 instructors make a net worth of $17 million a year .
Global newswire estimates that the online education industry will be worth $319 billion by 2025 making it one of the highest revenue opportunity possible for young entrepreneurs in today's digital era .
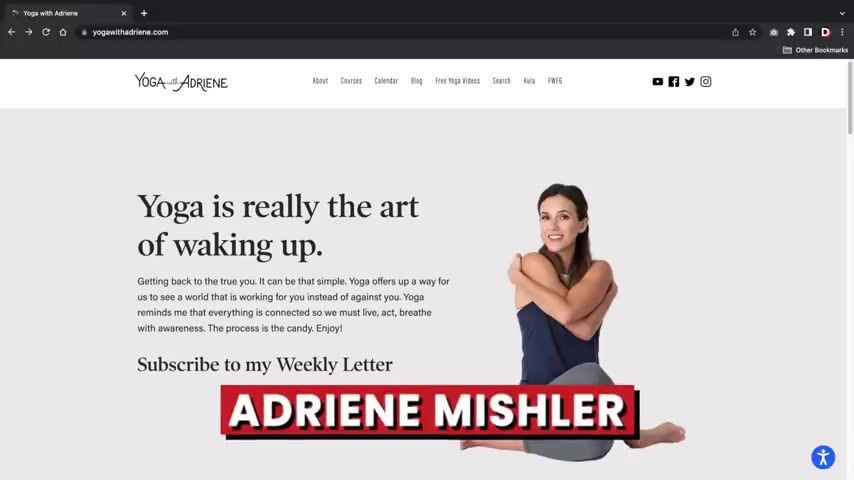
You have access to successful entrepreneurs with a proven track record of success , like how to cook like a professional with Gordon Ramsay , yoga with Adrian who offers a series of yoga courses , Samuel L Jackson , who will teach you how to act in movies and Daniel Negra who will teach you how to play poker like a professional .

Today , many people would rather learn something from these professionals or their favorite influencer and get the secrets to their success versus traditional methods and they're willing to pay for it .
So if you have something you want to teach or offer an online course website is perfect and it's not just online courses .
Many online universities have started to pop up in the country .
Many new schools have decided to dedicate themselves to teach students online only .
For example , K 12 dot com is an online school .
Their programs range from kindergarten , middle school all the way to high school and college preparatory .
They even have a dedicated online course for individuals like private sessions and one on one private tutoring .
There was also the Florida virtual school which offers quality education to elementary middle school and high school students and don't be shy if you're confident in your teaching ability , you can be successful .
Here's some unique online education ideas .
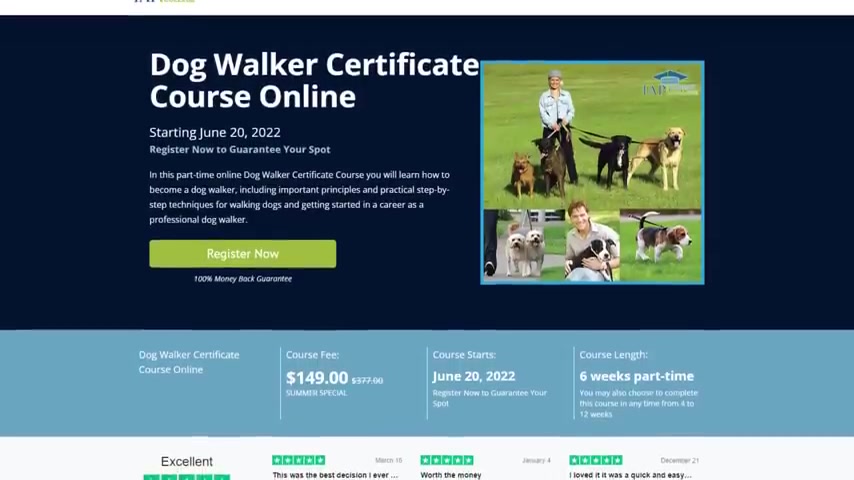
IAP college offers courses and certificates for people who want to learn how to correctly walk their dogs training grounds dot GG offers a variety of courses on how to be a professional gamer .
They offer courses on League of Legends , Super Smash Brothers and Rocket League and Bender dot com where they'll teach you to play the guitar like a professional .
I will also show you how to create sales funnels for your courses to focus on conversions .
Now , we're gonna build your online course website with wordpress using a drag and drop builder .
So even if this is your first time making a website , you'll have no problem in today's digital era .
I think a lot of people would rather learn from successful entrepreneurs or business people or who are already successful in those fields versus going to like a traditional school and learning it that way .
There's virtually no limit on what you can teach others and make money .
At the same time , a lot of schools have also dedicated themselves strictly to teaching online .
So I think you can see a lot of schools moving in that direction .
But first , let me show you guys the websites and let me just show you guys around and show you what we're gonna be making today in this video .
All right .
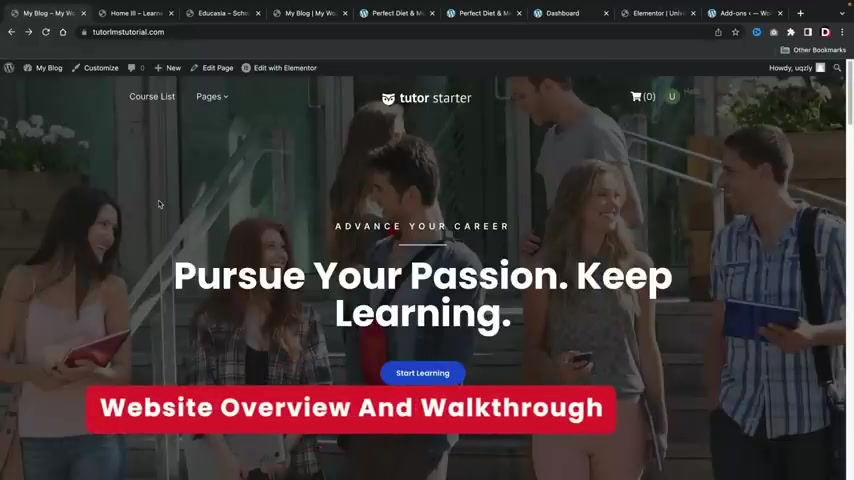
So here's the L MS website that I'll be showing you guys how to make today in this video .
You guys will also get several free starter demo kits that we have created for you guys all for free just for following along in this word press tutorial .
And now we'll talk a little bit more about these table kits a little bit later in this video .
So here we go .
We have a general image about our L MS website and we have this message and also where you just can click on this and go directly to enroll in courses .
Let's go ahead and just take a quick look at this website .
We have some just general , you know , images and just information about our courses like a photography course .
So you guys can be selling anything , right ?
You can have a yoga course , a workout course or you guys can turn this into a full fledged university course website .
If you guys choose to do that , here are our featured courses , right ?
So we have how to lose weight , a perfect diet plan and a nutrition course .
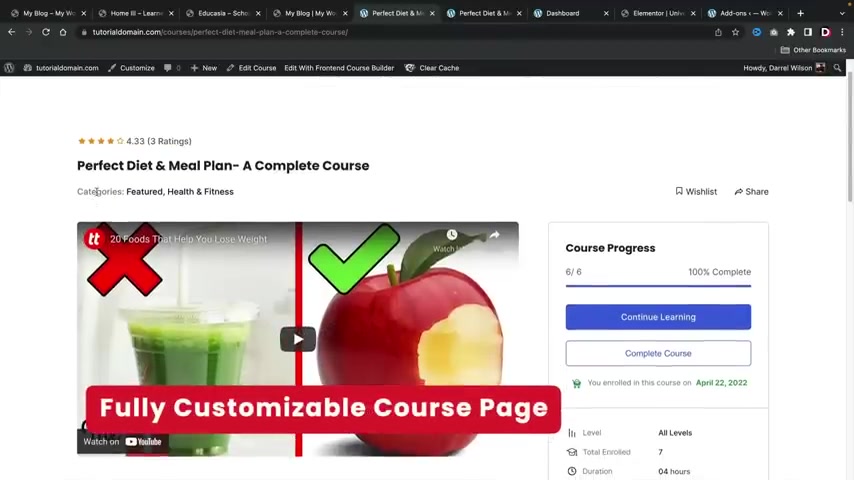
So I'm gonna go ahead and click on one of these courses .
All right .
So here we go .
We have the title of the course .
We have the ratings of the course and we also have categories , right ?
So if you want to create categories such as health and fitness or math or English , you guys can create courses .
I'm sorry , categories for your uh courses as well .
And this would be like an introduction video , right ?
So maybe you want to explain to them what they're gonna learn in this course , you guys can link a youtube video or a Vimeo just explaining what they're going to learn inside of the course .
And if we keep scrolling down here , we have the course information .
This is just a brief little overview about what they will learn in the course or , you know , just a little bit about the course .
We have the curriculum .
So you can uh choose to show the curriculum .
Now , this is optional , you don't have to show this , but if you choose to , you can show the curriculum .
Uh also we have reviews as well .
Now again , reviews are optional .
So you can enable or disable this feature at any time .
And then we also do have questions and answers uh , about the course itself .
All right .
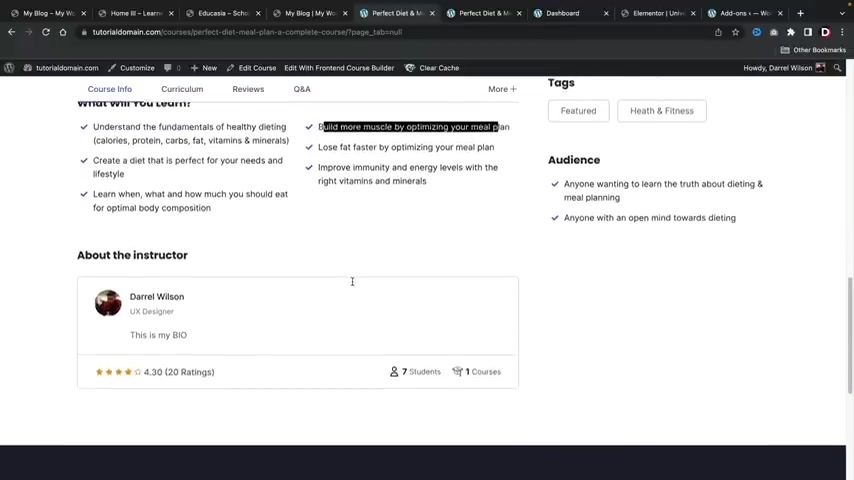
And if we keep scrolling down here , we have a little bit more information about what they will learn in the course .
So , fundamentals of healthy dieting , build more muscle , et cetera .
And then we have the , uh , instructor .
Now , your instructors can also receive ratings .
Uh , you guys can also have more than one instructor teach a course together if they choose to do that , uh , with this website .
And then we have the number of students , the number of courses and a rating for the actual instructor .
And on the right side , we do have a little bit more information .
So we have the audience .
So like who should enroll in this course ?
We have tags .
We have requirements right now .
You guys can also create prerequisites .
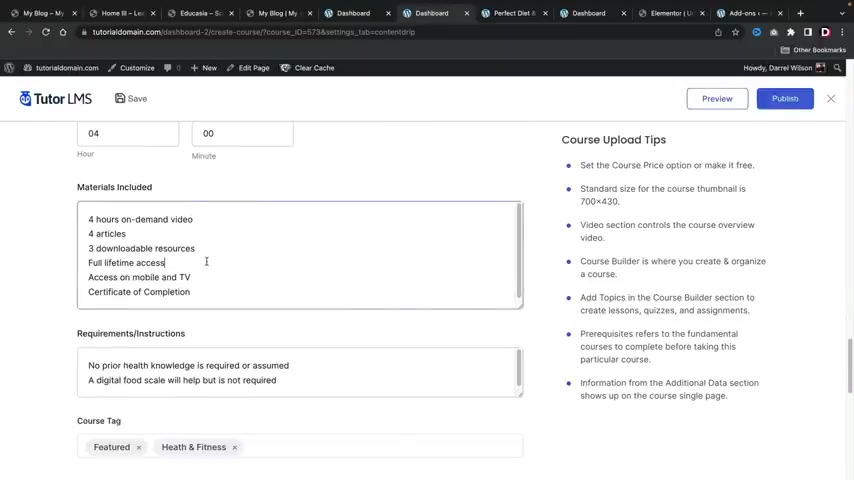
That means you can have people take one course before they take another and I'll talk more about that a little bit later in this video here we have materials uh included .
So like , let's say , for example , they enroll in the course .
You can say , all right , you get this , you get this and , and this and so on and so forth .
And then we have a little bit more information like the level of the course .
So you can tell people this is for beginners , intermediate or advanced and the duration and also , uh last updated .
And if they get a really cool certificate and on the right side , they can go ahead and enroll in the course or if they have completed it , they can complete the course and get their little Q certificates .
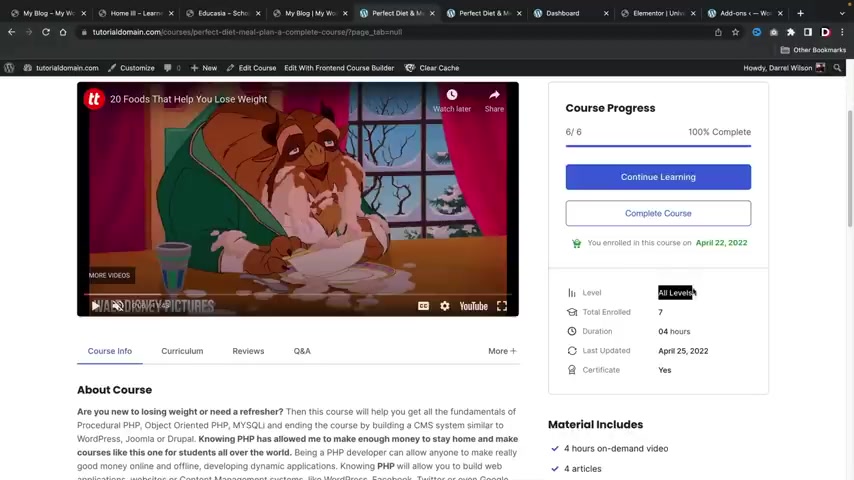
So let's go ahead and first enroll in the course and I'll give you guys a brief overview about how the students will enroll in courses .
All right .
So I am in the first lesson right here on the left side .
Um And right here , I can just click on play so you can actually create uh youtube videos or videos and give them little like lessons and stuff like that if you choose to do that .
And below that here , we also do have a little bit more information like the overview about what's inside the course .
You guys can also allow attachments or you can accept attachments from your students .
So you guys can also assign assignments where users will have to fill out information and give it to you and I'll cover that in the video as well .
Uh So once they have completed this little uh this one lesson , they can actually click on this arrow right here and they can mark it as complete and they will go to the second lesson right here .
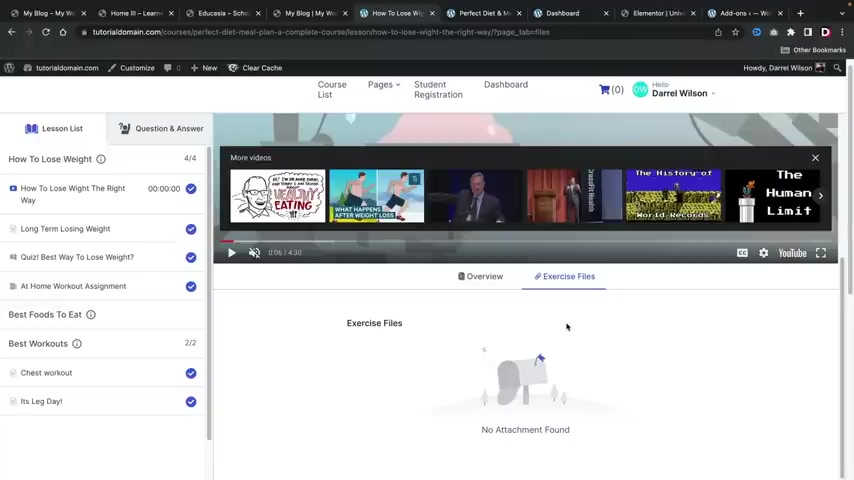
So now we are on long term losing weight .
We have this image right here and then we also have a little overview about that .
So here you can just put more information about the lesson .
You can you know , explain to them uh what to do or you can put whatever you want .
You guys can put images here or videos if you choose to do that .
And uh once that's done , we'll click on the little arrow which brings us to the next lesson , quiz time .
All right , we can have quizzes on our uh L MS website here .
You guys can see .
I did have uh quite a bit of quizzes .
Now , there's a lot of options for quizzes .
You guys can actually uh limit the amount of quizzes attempts users can take , you can have one only or two or three .
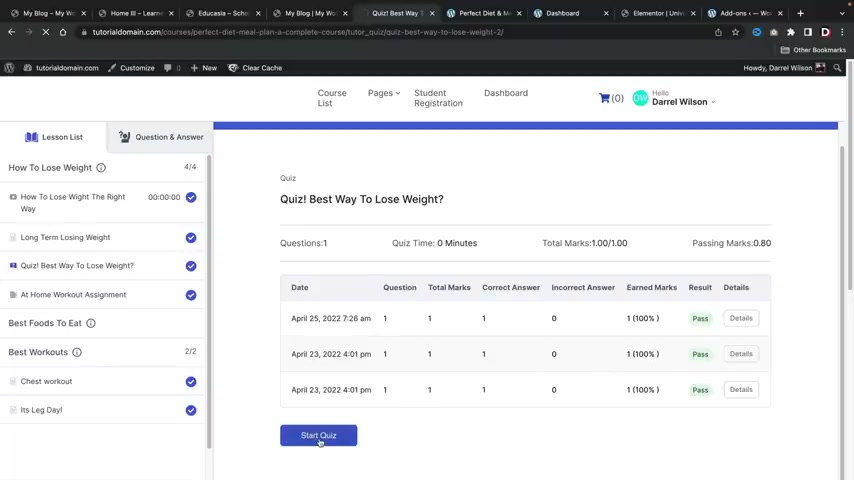
There's a lot of options there .
So I'll cover more of that in the video .
But let's go ahead and click on start quiz here .
I'll go ahead and start a quiz .
Let's do this .
What is the best time to lose weight , uh daytime , right ?
Submit quiz .
All right , it's correct answer .
Ok , cool .
So , uh now that we have uh put in the correct answer , it now tells us that we have passed the actual uh quiz .
Pretty cool .
Let's go ahead and move on to the next section .
So here we actually finished the quiz , right ?
And we have at home workout assignments .
So we can go ahead and submit assignments to the school .
Now , once you guys submit the assignments , it will then be pending for the instructor .
So the instructor will have to look at it .
They will also have to grade it and let them know if they passed or how many points they get , uh , for the actual assignments you guys can also edit your assignment here as well .
And I believe there is an option where you can actually restrict that , uh , from students if you choose to do that for your , uh L MS websites .
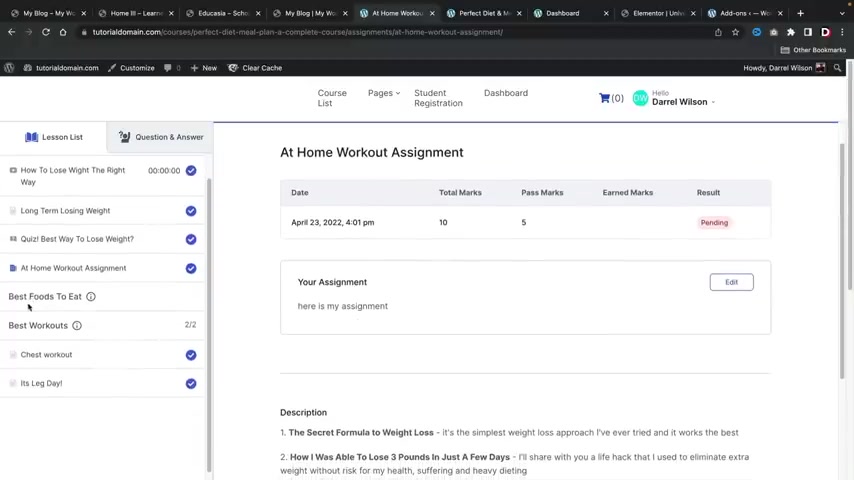
And here would be like the actual like assignment , right ?
Like , uh , tell me about this or tell me about that and they'll have to like write a paper and submit it to you on your course websites .
On the left side right here , we have best foods to eat .
Now , this is just an option right here .
So you can actually just create like some sort of little note for students , you know , it's not necessarily a lesson , but they can hover over this and they can see whatever you want to tell them before they go on to the next lesson .
So maybe here you can put like before you go on , read this and you know , something like that , you know , it's your website , whatever you wanna do , you know , knock yourself out .
But uh we'll go ahead and go to the best workouts and go to chess workout .
So this would be like the next lesson , right ?
So just the same thing , we can have an image , a video , just some information , we can actually uh have attachments or not have attachments here .
I'll click on next and that's pretty much it .
And at this point .
We are 100% done with the course .
All right , awesome .
So this can be like a thank you or like , congratulations for finishing the course or something like that .
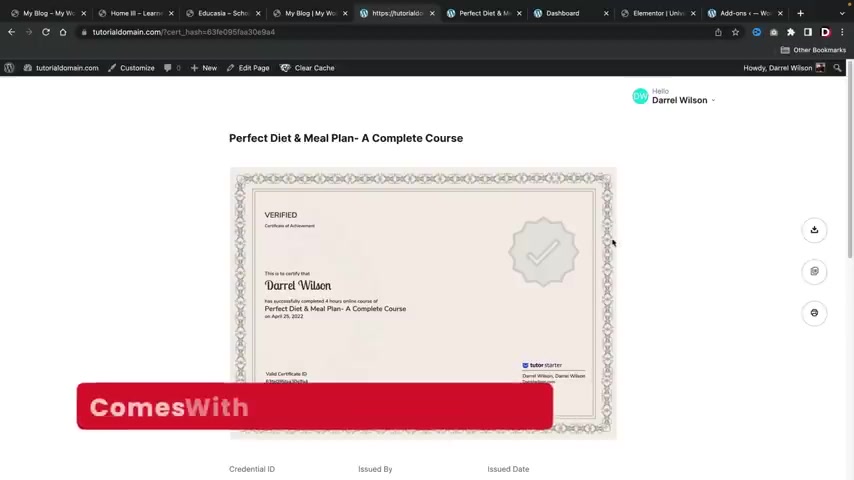
Uh , once the student is done , they can click on the little X arrow and they can view their certificates .
So we have created certificates for all of our students and look at that .
How awesome .
We have this certificate that we have issued to the students saying they have completed the course .
Your students can also download this as AJ pig or a uh PDF .
They can also copy this URL as well or they can print it from their computer .
Now , every students will also have their own personal custom dashboard .
So right here we have this little dashboard , right ?
So this is um this is for the students , they can see their profile enroll courses , uh all this information right here .
But let's first let , go ahead and click on dashboard .
All right .
So this is the students dashboard .
Now , here we have just some general information , right ?
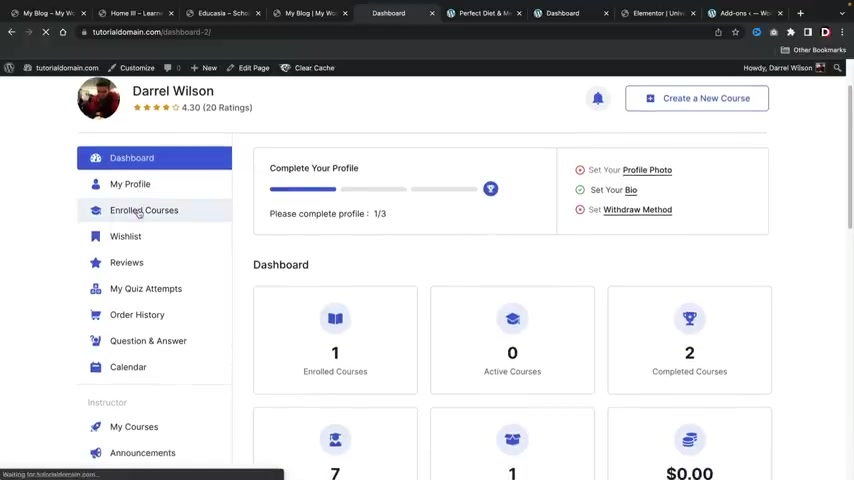
They have the enrolled courses , completed courses , uh the total students and the total courses .
Now , this can also be from an instructor's point of view as well .
So as of right now , I'm acting both as the instructor and the student .
However , instructors and students will both have their own personal custom dashboard where they can access their courses and update them at any time .
But uh , you guys can kind of get an idea here .
So we have like the , the profile enrolled courses .
Now , any student that's enrolled in a course , they can click on enrolled course and they can continue to learn the course or they can pick up where they left off at and if they have completed the course , they can go ahead and download their certificate right here at any time .
Right .
Pretty cool .
Uh , If they have wish listed courses , uh you know , you could have a wish list courses , uh also reviews here as well .
You guys can uh add in , you guys can see your reviews , you can also see your quiz attempts .
So if the student has um attempted some quizzes , uh they can see their attempts here , their order history , their questions and answers their calendar and all this good stuff right here .
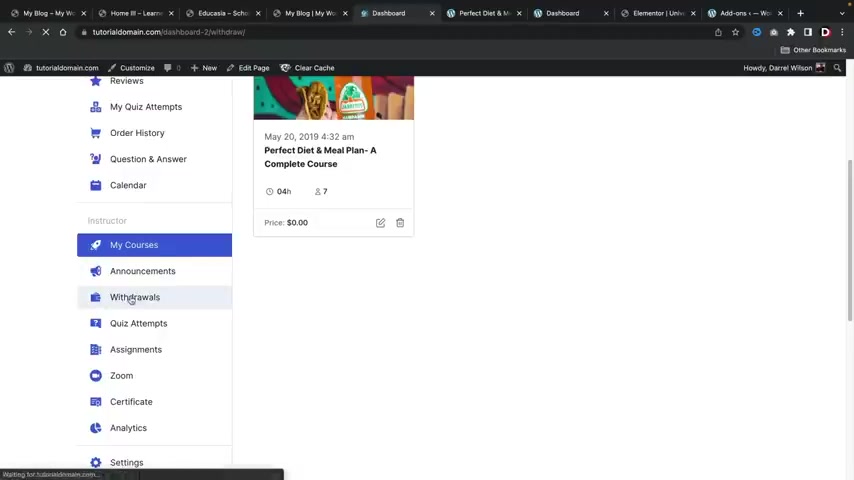
So again , this is from the student's point of view and here we actually have the instructor's point of view as well .
So the instructor can actually update their courses .
If they want to change the price , they can adjust the price for their course .
They can also create announcements for their students .
They can ask for withdrawals .
So once a teacher has uh generated enough money , he can then uh request a withdrawal from you and you can pay the teacher uh right here from the actual uh back end .
Uh Here we have the quiz attempts .
They can see the assignments .
Uh They can also have zoom sessions as well .
I will be covering how to integrate your website with Zoom in this tutorial as well .
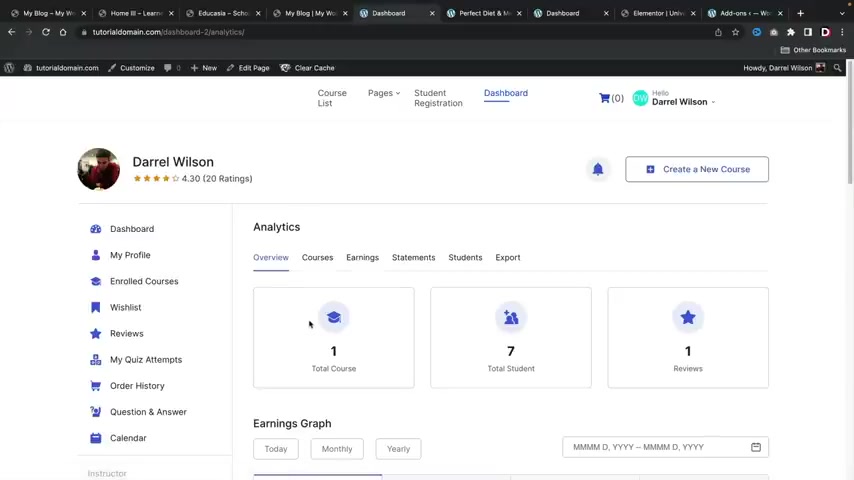
However , I just want to be very upfront that this is a pro feature , but I will walk you guys through on how to integrate Zoom with your L MS websites and then they can adjust their certificate and also see their analytics as an instructor .
So it's a very convenient dashboard .
It works really well for students and also instructors .
And if the instructors want to start a brand new course , they can go ahead right here and click on create a new course .
So now let me go ahead and walk you guys through on how to create a course .
And also if you choose to have instructors create a course , how they can create courses on your L MS website .
Now , first , let's talk about how to create a course , right ?
It's really simple .
Now , this is how you would create a course .
And if you invited other instructors to teach on your website , this is exactly how they would create courses on your website if you choose to have that option .
Uh Right here , we'll do like a , a lose weight course , right ?
And then just give some general description about the actual course , right ?
So just general description .
Now let me go ahead and just show you guys a course that has already completed just to give you guys a better feel of how all this works .
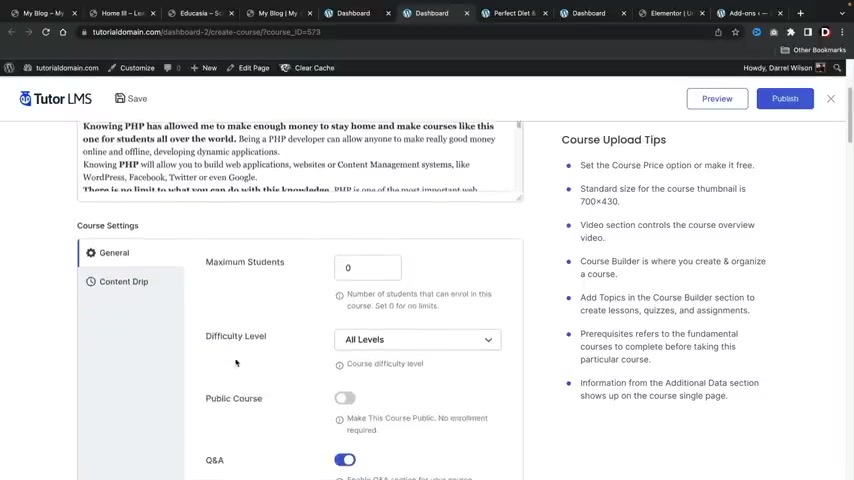
So right here we have this other course and this is the course title , right ?
We have about the course .
We have some general information .
So you can set the difficulty level right here saying beginner uh make this public , meaning anyone , you know , anyone can just take the course , right ?
They don't have to register or nothing .
Uh We also have content drip .
This is basically saying I want to have bits and parts of the courses available .
Uh So if you want to have it available on X days or on certain days or unlock this after prerequisites , we can enable that right here .
Uh We can also choose categories .
We can create a course price right now .
It's free , but we can also charge for this course .
So now the course would be $250 .
I'll show you guys how to integrate several payment gateways as well in this video .
Uh And all those payment gateways are free as well .
I wanna make that very clear .
Uh Here we have the course thumbnail .
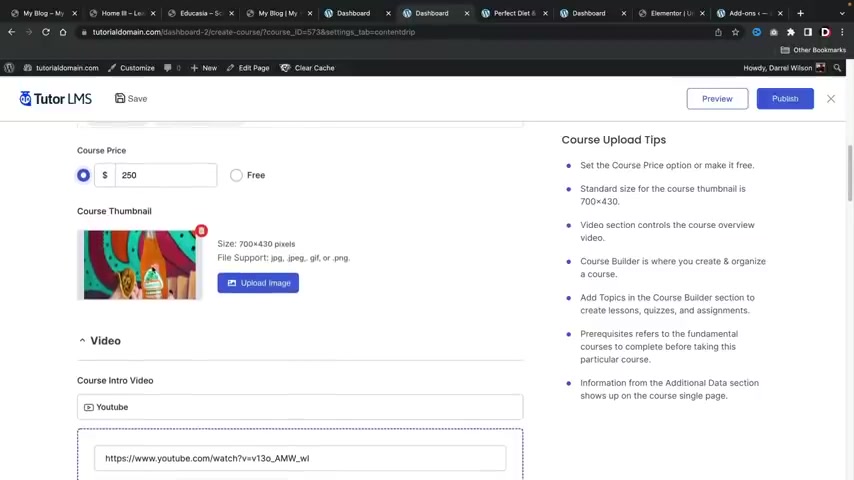
So this is the actual image that represents the course .
We have the course introduction video , which is the video that you first saw when you clicked on the course .
And then here we have the course builder .
It's really simple to , to , to , to do all this .
So let's say for example , you guys wanna add like a new topic right here .
We have one topic and then we have lessons , we have a quiz and then we have an assignment in this topic .
Right .
So I'll just go ahead and click on , add a new topic and this will be foods to avoid , right , foods to avoid .
And then this is about foods to avoid .
Right .
And I'll add this topic and within this topic you can add lessons , quizzes , assignments or live zoom sessions .
So , let's just keep it very basic , right ?
I'll just , you know , put a lesson right here .
So um foods to eat when dieting , right ?
When dieting , I I don't know guys , I'm just , I'm just making this up as I go along and this is demo content , right ?
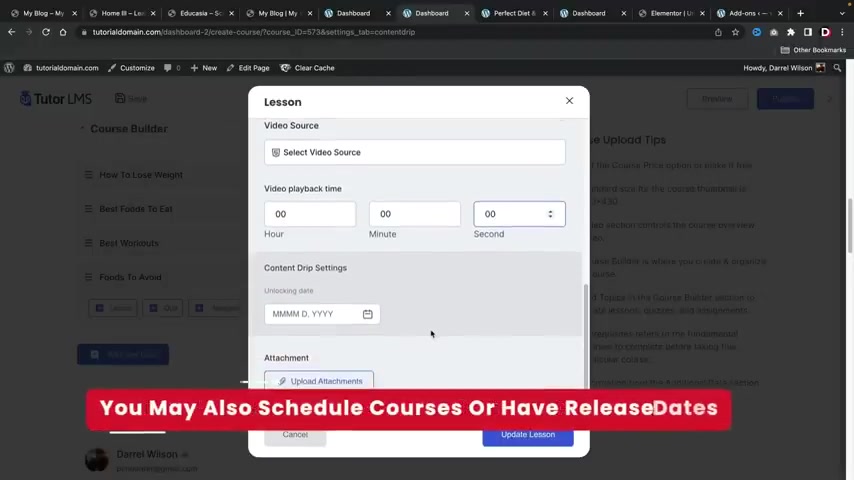
And below that we have the featured image , we have a video .
If you choose to do that , we can also set when we want the video to start , which is really cool .
So let's say for example , you want to link them to a youtube video , but the information is not until like seven or eight minutes later , you guys can actually set the time stamp of when you want that video to start .
If you guys choose to have the content dr settings , uh we can choose to unlock this at a specific dates .
We can enable attachments and also enable course preview , meaning people can have a quick sneak peek at the websites , but later they'll have to pay or enroll in the course and that's pretty much it .
And below that , we have instructors .
Now , this is uh again a pro feature .
So again , this is a free plug in , but there are some bits and parts of this that are in the pro version .
Uh But if you want to have multiple instructors teaching a course , we can add multiple instructors to teach this course .
Here , we can create a live zoom session and we can upload attachments where users can download those attachments .
And then here we have what I will learn the target audience .
Uh How long the course will be the materials included and you guys can add anything you want .
We have the requirements and instructions , tags and also prerequisites .
And below that , we have these really nice certificates which we can pick from .
Now .
What's really cool as well is that I'll also show you guys how to create a custom certificate as well exclusively for your school .
There is a certificate builder and I'll be showing you guys how to use that a little bit later in the video .
And once you guys are done , you'll just click on publish course and that's it .
The course has been published and now students can now enroll in the course .
It's pretty simple , right ?
And here's a quick little overview about this builder .
This builder is called mentor and it's the leading page builder for wordpress and you would just type in whatever you want .
So , welcome to my new school and we can scroll down and on the left side right here , we have elements and you can take these elements and just drag and drop them onto the page .
So for example , I'll take this button , drag it there and I can do that again with this button , I'll put it on top of this image right here .
I can duplicate this and I can also drag and drop it .
And then also if you do have your own images , you can take your images right here and drag it right there and then you can simply upload the image .
So I'll go ahead and choose an image here .
I'll just pick this phone and there it is .
So uh there is the image and as you guys can see , this looks pretty terrible , but not to worry , uh we'll make it look really good .
I'm just demonstrating that this is a dragon drop builder .
So even if this is your first time making a website , you'll have no problem .
So I hope you guys like what you guys saw .
This is a really easy website to make , I'll walk you guys through on how to make it .
We're gonna use free plugins and of course , we do have free sort of templates for you guys that look great .
In fact , this is the latest one , really nice .
You know , we actually hired one of the best designers in the world to give you guys these templates all for free .
And you guys can simply just go ahead and slap these on your website .
You guys can adjust the text , you guys can change the images , you know , to fit your criteria for your L MS websites .
This actually does have several home pages here as well .
So it has home page one , home page two and on page three and all pages are very unique , right ?
So um they're all different .
They're all all the same as well .
So we did put in a lot of work for all these template kits and we do have tons of other pages .
So we do have uh quite a bit of pages for all of you guys .
We have various home pages .
It's gonna be a great tutorial .
So make sure to stick around like this video .
And with that said , let's go ahead and get started and create your L MS website with wordpress .
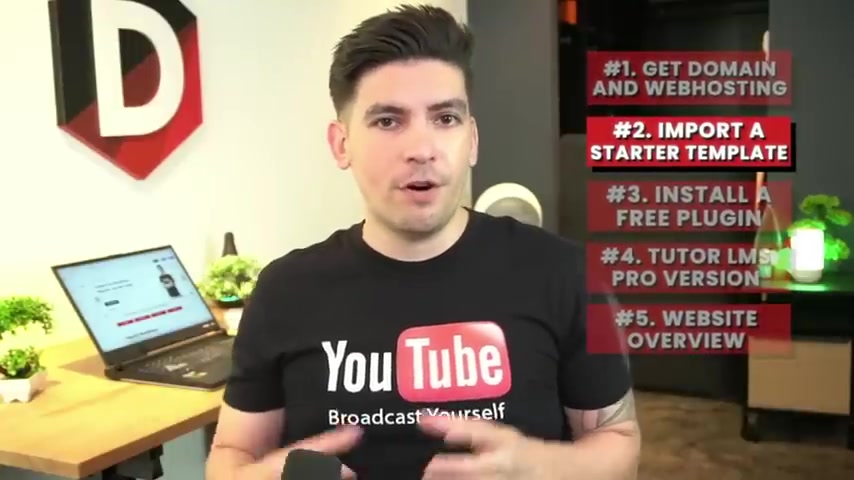
So we are going to build your online course website in five simple steps in step one .
I'll show you how to get your domain and hosting a domain is the web address for your website .
Like my website dot com and web hosting keeps your website online 24 hours a day in step two .
I'll show you how to import a starter template and then design the website .
We will first start out with a starter template and get you more comfortable with the websites .
And then later I'll introduce you to more templates with different niches .
So it doesn't matter what you're trying to sell or offer , there's probably a template for your industry .
In step three , we will install a free online course plug-in .
We will be using a free plug in called tutor L MS .
With this plug in , this will allow you to turn your basic website into an online university or an online course website .
And step four , I'll introduce you to the pro version .
We will be using a free plug in to build our website .
However , the plug in also does offer a pro version in this section .
I'll walk you through on how to fully utilize the plug in and get the most out of your online course websites .
I also do have an exclusive discount that you guys will only find on this youtube channel .
In step five , the website overview .
After you guys get a good understanding of how to design the website and use the plug-in , I'll then show you how to import starter websites and also give you guys an exclusive template from my website .
I'll also give you additional resources and more information about how to manage online courses .
Now , there is a link in the description of this video and this will take you to step one , which is to purchase your domain and web hosting and welcome to name hero dot com .
Now , I'm recommending name here dot com for years and people love it .
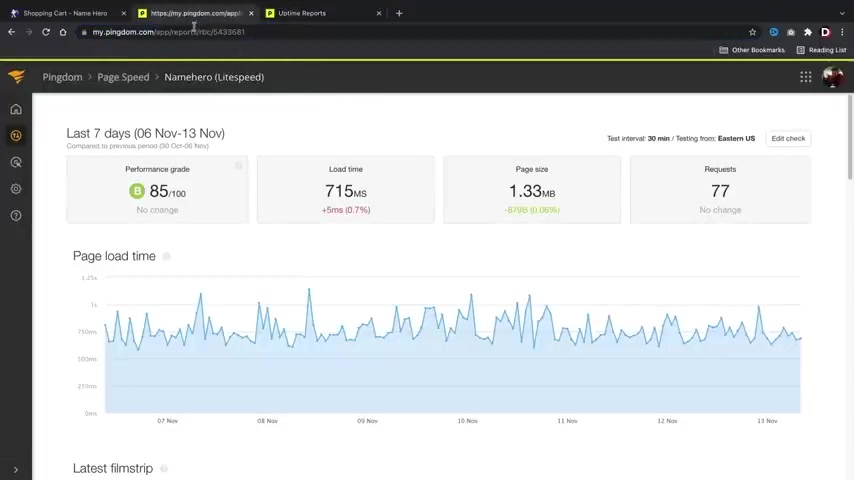
Uh this week alone , I've had zero downtime with name Hero .
So you guys will have a reliable website and also my websites load at under one second with name Hero .
So we do test these servers to make sure that you guys do get the best web hosting possible .
Now , once you guys are here , you'll click on , get started now and then it'll bring you to four different pricing options .
So we have the starter cloud , the plus cloud , the turbo cloud and the business cloud .
Now , I personally recommend the Plus cloud if you guys are just getting started out , like if you're just getting your feet wet for the very first time .
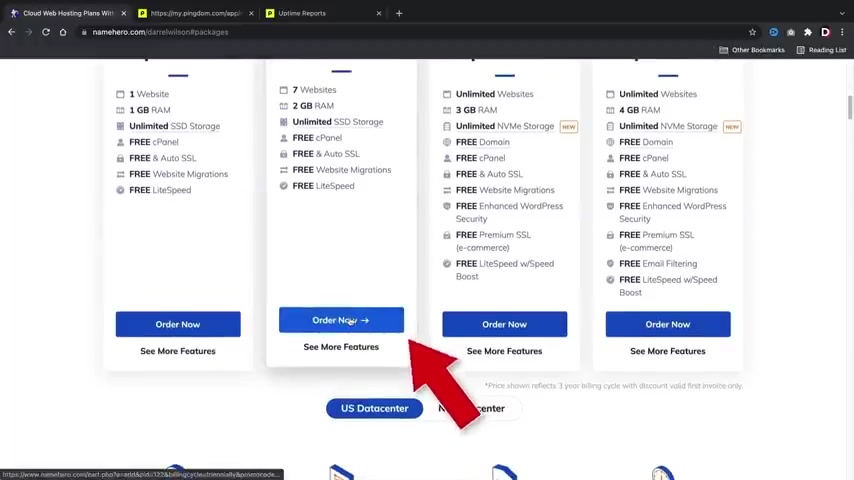
But for those of you who have been using wordpress for a while and you want to upgrade and get some more performance , I would definitely go with the Turbo cloud because with the Turbo cloud , you guys do get the new NVM storage , which does just give you a little bit more performance with your website .
So you'll go ahead and pick a package that works best for you and your budgets .
And then once you guys uh figure your package out , you'll go ahead and click on order now .
All right .
And here you're going to enter in your domain name .
So this is the name of your new website .
So uh portfolio website dot com or you know , my news website dot com or whatever , whatever niche that you're building , you'll go ahead and put it here .
So I'll just put it in tutorial domain one dot com and see if that's available .
All right , cool .
It's available now , I know it takes time to figure out the domain of your website .
So , you know , give it some time , you know , it does take some thought for your new websites .
Uh , once you guys figure it out , you guys will click on continue .
All right , cool .
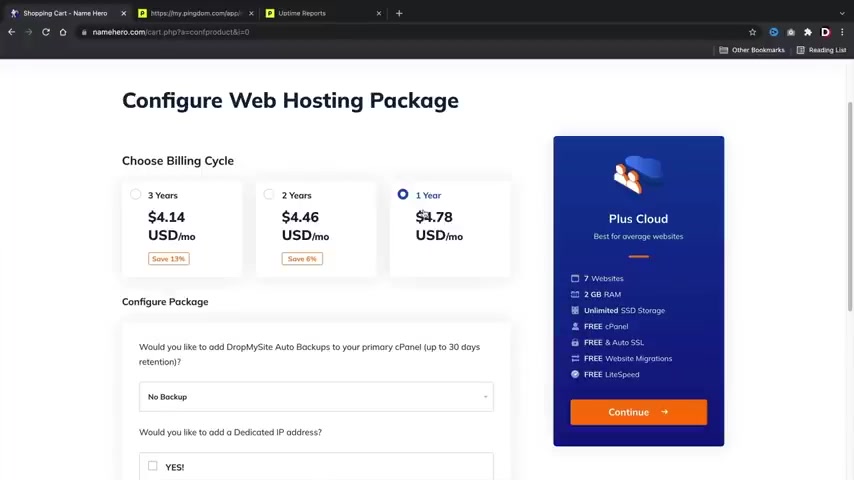
So next we have the billing cycle and we have three years , two years and one year .
Now personally , I'd recommend one year .
You , you guys do get a large discount and this does give you enough time to decide if this is for you or not .
However , if you guys are feeling very confident , I would recommend going with the two or three year plan , you guys do get the uh deal the longer you sign up for .
So , uh it really depends on your budget , but uh once you guys select a billing cycle , we'll scroll down and uh I don't recommend any of these up sells .
Personally , you can do this with free plugins .
So yeah , you guys don't need those and then we do get a free SSL with name hero .
So that's pretty cool .
Uh Once you guys select your billing cycle , we will then click on continue .
All right , next , we have the domain configuration .
Now , I personally recommend the ID protection guys .
This will protect your personal information .
From spammers and people trying to sell you sco packages and Viagra and all sorts of nonsense .
Whenever you guys get those weird emails in your inbox , it's generally because they found your domain online .
So this will actually protect you .
So you don't get spam in your inbox .
So go ahead and click on ID protection and then click on continue and look at that for a year of hosting .
You're paying less than $100 you're paying only 70 bucks .
You guys can also go the cheaper routes and get the cheaper plan if you're on a really tight budget .
But I think this is a great deal for web hosting for the entire year for this specific performance .
So you guys are getting a reliable and a fast server for this price .
So it's definitely worth it .
So uh go ahead and scroll down , just keep scrolling .
Now you're gonna go ahead and fill out your billing information here .
So your first name , your last name , uh additional information you'll put in your password and also a support pin .
So this would be the pin that uh they would use to verify that it's you .
And then also we have uh payment methods .
So you can pay with paypal coin base , which is Cryptocurrency and credit card here .
You'll go ahead and put in your payment details and if you guys do want to get their spam or their emails , they , they actually sent some pretty good emails , guys , I'm not gonna lie .
They have some cool uh promotional offers .
You'll go ahead and check that box and then you'll of course , uh , agree to their terms of service , right ?
And I'm sure you guys are all gonna read uh this here , right ?
You guys are all gonna read this .
I don't think anyone ever reads any of this stuff , but uh yeah , you'll go ahead and uh check the terms of service and once you guys have checked out , I will meet you guys in the customer portal .
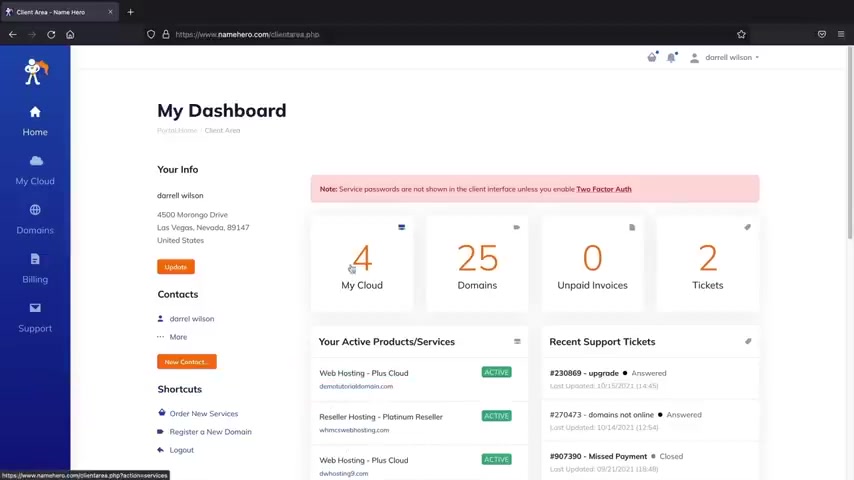
All right , welcome to your new dashboard .
So this is your current dashboard .
As you guys can see , I had many different packages , many domains and I also have tickets with name hero and they really help me out with all of my problems .
So this is just your interface on the left side , you can see your hosting packages .
These are your current domains .
You can always register a new domain , uh also billing .
So if you want to see your payments or you wanna add funds or you wanna adjust your payment method , you can do that here and also the support .
So if you guys run into something weird , I know with websites things just kind of get weird sometimes .
Uh you guys can always open a ticket here and they will help you out with all your problems and they are pretty fast .

I mean , I think maybe under one hour they can help you guys with all your problems .
So once you guys are here , let's go ahead and install wordpress onto our new domain .
You'll first click on my cloud .
Now , here we have hosting packages .
Now , you should probably only have one here .
So just go ahead and click on your hosting package .
And next , we're going to see this log into C panel .
Go ahead and click on login to C panel .
All right , cool .
So now we're going to go ahead and install wordpress onto our domain .
So up here we'll type in wordpress .
Here we go .
We have wordpress manager by Soulus .
We'll click on this .
All right .
And from here we're going to install wordpress .
You guys can see I had many installations of wordpress already , but right here you'll click on install and now we're going to look for the domain that we purchased .
So right here , you have the choose domain section .
So you'll probably see your domain that you purchased .
I'll just go ahead and select this one , but you're going to select the domain that you purchased and for the protocol .
Make sure this is htps , which is the SSL now for Indi directory .
Make sure nothing is here .
All right .
I don't know why that's there by default , but oops , oops , but uh make sure nothing is there because that will install your domain onto like your website dot com slash something and you don't want that there .
Yeah , just don't have that there .
Make sure that's make sure that's empty .
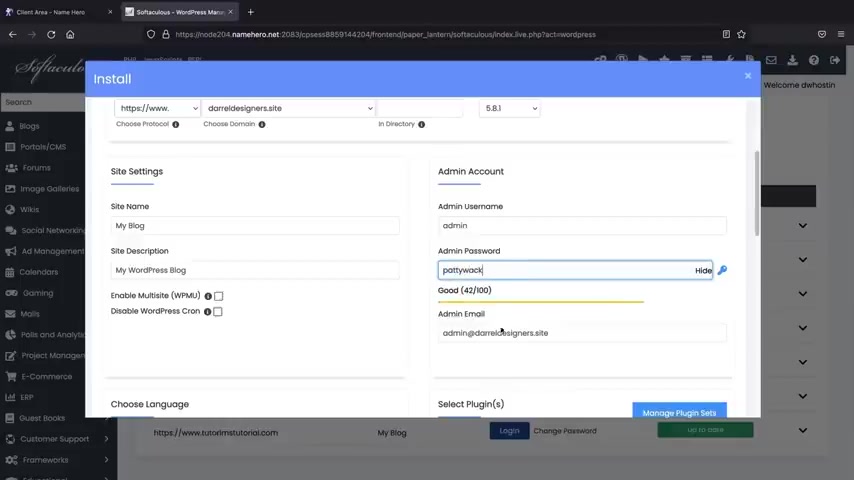
Now for the admin user name , go ahead and give yourself an admin user name and a password and this is what we are going to use to log into the website .
So whenever you want to build your website , you're going to use these login credentials .
So make sure you write these down , I'll just put admin , never put past guys .
Uh Make sure this is something unique .
I'll just put uh Paddy Whack and your admin email .
Make sure that this is an email that you have access to .
Because when you forget your password , they will send this information to your email .
So I'll put in my , my gmail account here , my famous PC Hoarder , which I do get tons of spam .
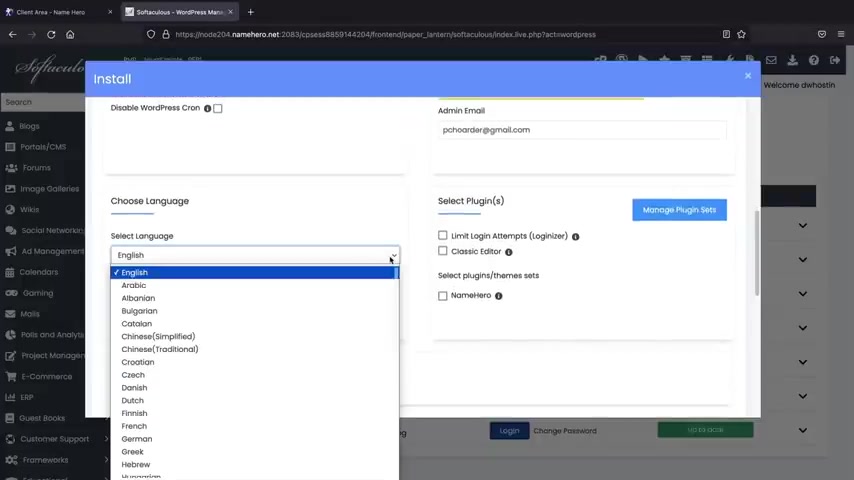
And below that , you can always select your language , we can always adjust the language as well uh inside the wordpress dashboard .
And I'll show you how to do that in just a bit and we're gonna keep scrolling down here to the bottom .
They have these other themes they want us to use , but uh we're not going to use these and right here you'll click on install .
Yeah , they said 3 to 4 minutes .
That was not 3 to 4 minutes right now .
Here we have install wordpress and this is the administrative URL , administrative URL .
So just go ahead and click on this link and this will log you in to your website .
All right .
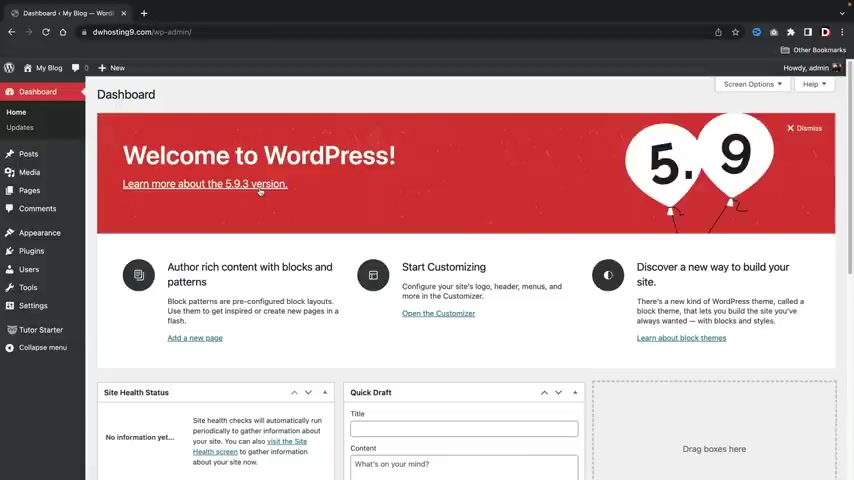
And this is your new wordpress dashboard .
This is where all the magic happens .
Now , if you want to see what your website looks like right now at the top left , you'll click on uh visit sites and this is your new current wordpress website .
So it's using a default wordpress .
The uh not to worry , we're gonna make it look really good .
All right , cool .
So , now that you guys got your domain and hosting , now let's go on to step two , which we are now going to import a starter templates .
So in this part of the video , we're going to import a starter templates , I'll get you guys comfortable with the builder .
I'll show you how to manage your science .
And then after that , I'll show you how to add courses to your website , you guys ready .
Let's get started .
So let's go back to our dashboard here .
Now , before we go ahead and start designing the sciences , I first want to adjust some of the general settings .
So over here we have the users .
Uh Let's go ahead and click on profile .
Now , the first thing is we can change the background color here .
Uh I do like midnights .
I feel like this is a lot easier on the eye and it's easier to see stuff .
But uh there's also modern and there's also sunrise and there's coffee which is really ugly and there's also uh ocean which is just as ugly .
So uh we're gonna go to midnight and now we're gonna scroll down here and this is the email that you guys will , um , put in here that you have access to .
So if you guys do forget your password , uh this is where your wordpress password will be sent to .
So make sure you have access to this specific uh email and then we'll scroll down .
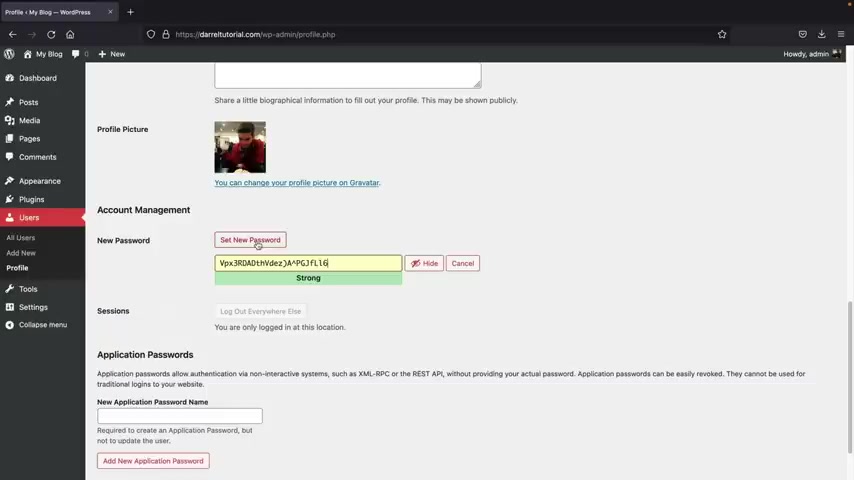
And if you guys do want to change your password over here , you can click on set new password and then you can uh set a new password to log in to your Wordpress websites .
And then once you're done with all that , we will then click on update profile .
All right , cool .
Now , over here we're gonna go to settings and click on general .
Now , I'm just going to introduce some of these general settings really quick .
So if you guys do want to adjust the site language in the back end of your wordpress website over here under site language , you can change this to pretty much any language .
I think they have like every language in the world world .
It's pretty crazy .
I don't even know , I don't even know what , what a lot of these are , you know , and they also have different dialects and stuff like that .
So it's really cool .
Uh So you can go ahead and select your language there .
You can adjust the date format and also the time format if you choose to do that and then once that's done , you'll click on save changes .
All right .
Now , on the left side also under settings , you're gonna see this perm links option , go ahead and click on Perma links .
And for the common settings , you're gonna change this to post name .
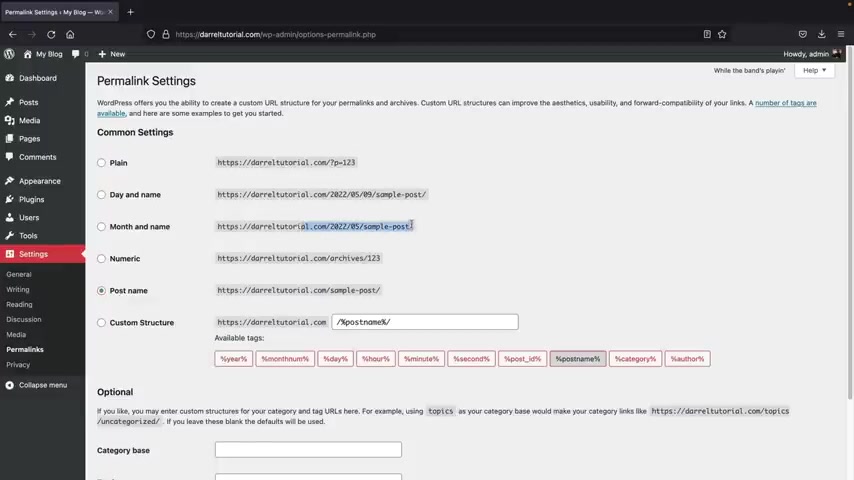
Now , the reason why we do this is because uh when you go to a website , it says like your website dot com slash about us , right or dash contact us .
So this is where uh post name is useful and it's also the correct method for seo purposes .
These other permanent settings are really ugly .
They're really confusing and it's just , it's just unnecessary .
I mean , this one shows the date , like why would you want to show the date , you know ?
So uh all right , let's go ahead and go down here and click on save changes .
All right .
And now let's go back and click on dashboard .
So now let me go ahead and show you guys how you can log in and log out of your wordpress website .
So you can pretty much work on your website from any location .
I'll go ahead and go over here and click on logouts .
I'll then get rid of all this uh Perma link up here and press enter .
So this would be your domain , right ?
So this is your current domain .
You'll go to your domain and then you'll type in dash WP dash admin and then press enter .
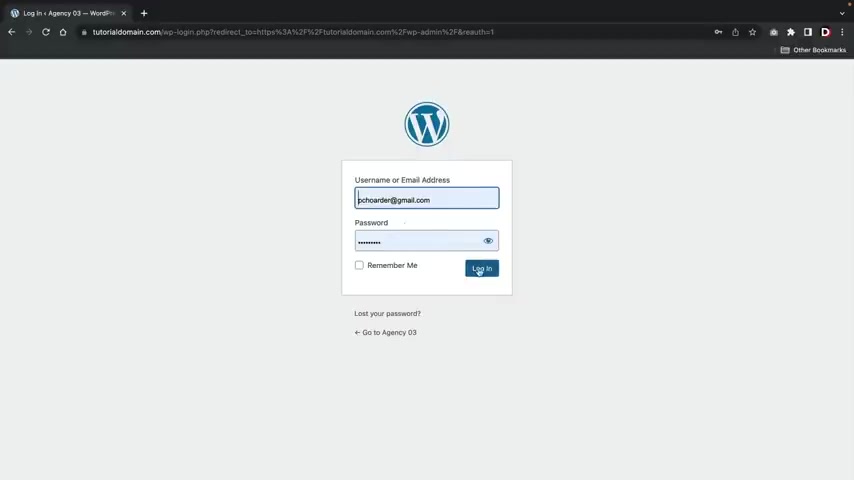
You'll then go ahead and put in your user name or the email that you guys use , sign up with wordpress along with your password and once you enter all that information , you'll then click on log in and that's it .
That's how you guys can log in and log out of your wordpress website .
All right , cool .
So you guys got your domain and hosting and we went through the general settings .
Now , in this next section , I'll be walking you guys through how to uh import a demo website .
And then we'll go ahead and build a website using a drag and drop builder .
You guys ready ?
Let's get started .
All right .
And the next thing that we're gonna do is that we are now going to install a Wordpress theme .
So over here we have appearance and we're gonna click on themes and up here we're gonna click on add new .
Now , before we install a Wordpress theme , I quickly want to explain what a Wordpress theme is and what it does .
First , let's talk about what is a Wordpress theme .
Every website you make with wordpress requires a specific wordpress theme without getting too techie .
A Wordpress theme is a general style and layout of your current website .
Each Wordpress theme has different options and the theme customizer .
The options can range from a header and a footer builder , different blog post layouts , controlling the width of your website , like a block or a full width or specific e-commerce features like product layouts or different shot page layouts .
A wordpress theme generally controls the layout and style of your current wordpress website .
A wordpress theme does not build the website itself , but it's more of an outside shell for the page builders and a starting point to build your wordpress website .
Feel free to check out many of the wordpress themes to find a style that fits for you and your wordpress website .
So wordpress theme generally controls the style and the layout of your website .
So every single theme has different features , right ?
One theme might offer a different menu style .
Another one might offer different animations for certain icons and the list goes on .
Now , all these themes are complete free .
Uh I do also have a video that talks about like the best Wordpress themes .
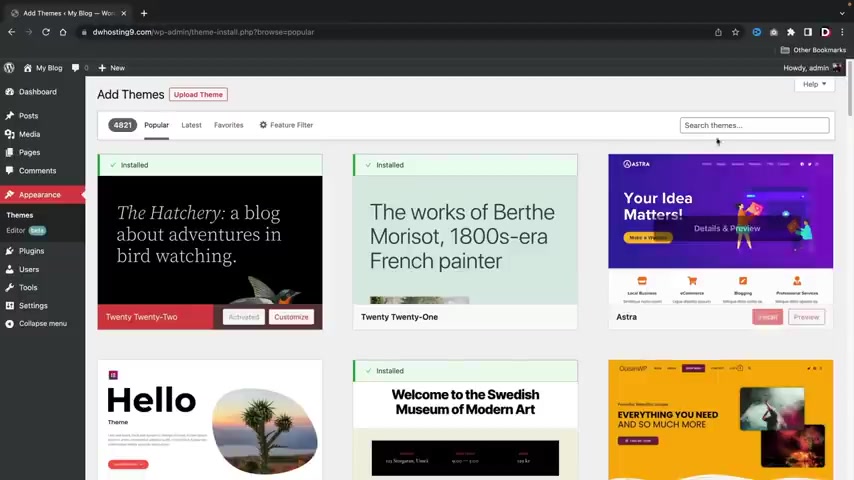
But for this specific website that we're making , we're gonna select a specific theme that's created by the plug-in developer .
So over here under search themes , go ahead and type in tutor tutor , right ?
And we're gonna scroll down here and we are going to select the tutor starter .
So go ahead and click on install and then you'll click on activate .
Now , for those of you who use like another theme that I recommended like Astra or Blocky , you guys can use other themes with this plug-in .
However , this theme automatically imports all of the plugins and the starter demo to make things really easy .
So I'll go ahead and walk you guys through on how to install the demo contents and then I'll show you guys which plugins we're gonna be using .
So it doesn't matter what thing that you're using , you guys can follow along in this video .
All right .
So right here it's saying begin installing plug-in , which is called tutor mate .
This essentially uh allows us to use the demo websites , right ?
So right here we'll click on install and then we'll go to return to required plug-in installer and then we'll click on activate .
All right , cool .
Here , I'll click on , return to the dashboard .
Now , on the left side , you guys are gonna notice that we have this new little icon right here that says tutor starter .
And here we have general and then we have starter websites .
Go ahead and click on starter sites .
All right , here we go .
So we have four different layouts that we can pick from .
We have a single course , an instructor , a marketplace or a university .
So these are just starter demos just to help you guys get started out .
Um But we're gonna select this university one right here .
So right here you'll click on import and now it's gonna ask which preferred Page Buller .
Always select Element or Gutenberg is still not ready yet .
It's really not really not closed yet , but uh here are the required plugins , right ?
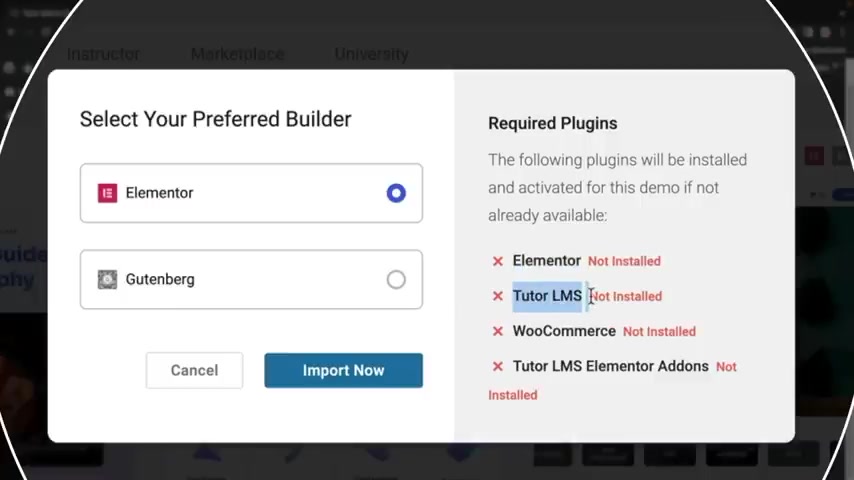
So we have to install the page builder , which is element or tutor L MS which is the actual plug-in that turns this website into an L MS plug-in woocommerce , which allows us to accept payments on our websites and tutor L MS elements or add-ons , which is just a little bit more features and stuff for your website .
I'll walk you guys through on where to find these plugins in the next section .
But for now , just go ahead and click on import now .
All right , cool .
So , just go ahead and wait , like , just wait like a minute guys .
It's , it's , it's uh importing all the demo contents onto your wordpress website .
All right .
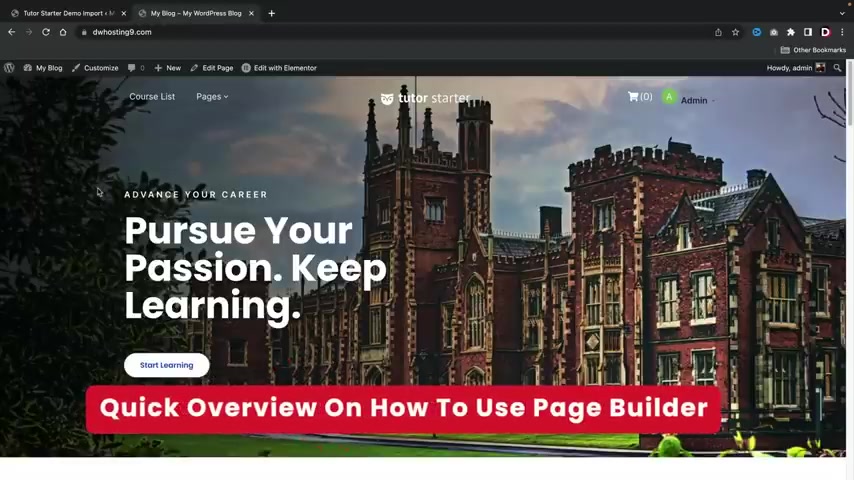
So the import has been successful right here .
I'll click on view your sites and look at that .
We have a new brand new premade website that we have imported with one click and we can go ahead and snoop around here and we can , you know , just make sure everything looks good , right ?
We have our featured courses .
Uh We have just a little bit more demo contents and we have our footer at the end and everything looks great .
All right .
So before I go ahead and talk about the plug-in , let me give you guys a quick 10 minute overview about how to make pages and how to use this page builder .
For those of you who already know you guys can go ahead and get to the next section .
But for my new viewers , let's go ahead and run this through really quick right now whenever you guys want to make changes to your websites right here , you'll click on edit with Element to Element is the plug in that we use to build out our website , right ?
So this is where you can make changes like fonts and colors and all that stuff .
But when you first try to use Element to , it's going to ask you to create a kit .
So right here , go ahead and click on recreate kits .
This is standard for all of the uh new sites with this theme .
Uh But right here , you'll click on recreate kits and then click on save changes .
All right .
Now , one more time , let's go back to uh visit site here and let's click on edit with mentor .
All right .
So this is how the page builder works , right ?
On the left side , we have a bunch of different elements and you can drag and drop these elements onto the actual page , right ?
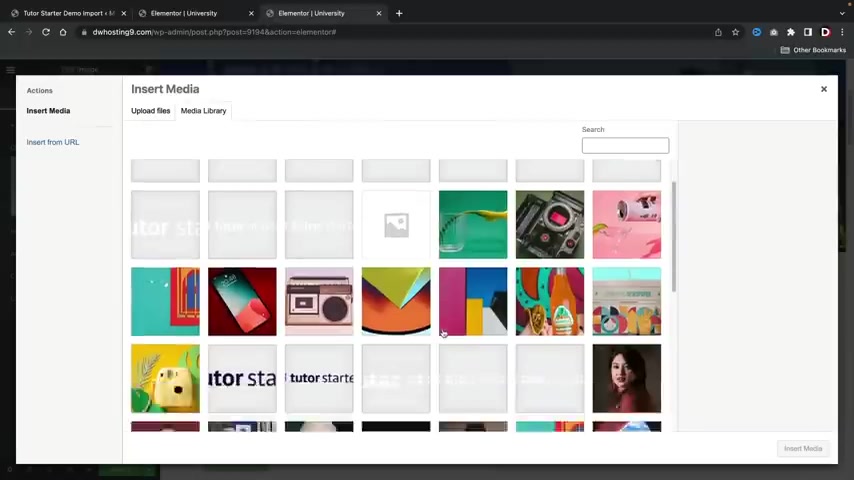
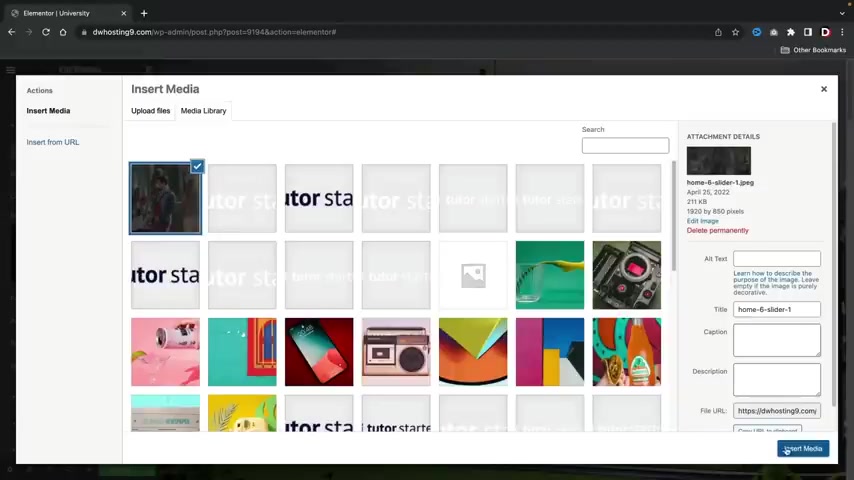
So uh I'll go ahead and scroll up right here and let's say , for example , you want to drag in an image , right ?
So I'll just go ahead and drag and drop an image right here .
And then I will choose the image .
Now , you guys can actually upload your own images right here onto your wordpress websites .
But the demo content does give us a media library and they do give us some sample images that we can use to , you know , just mess around with and stuff like that .
So I'll go ahead and just put in this picture right here and insert media and there is the actual uh you know , there's the image now to get the elements back , we'll click on these little score icons and we can keep dragging and dropping elements , right ?
So maybe you want a button right here , you see where that little blue line is .
We'll just drop it right there .
Now , the content tab for every element controls the actual content within the element .
So this is the text , right ?
So uh by this , we can put the link right , we can change the alignments of the button .
We can change the actual size and also add an icon to that button .
Uh if we choose to do that right ?
So I can put a little bell and now there's this little bell right there right now , the style tab , this controls the actual topography , the tech shadow and the color of the button .
So for example , if I want to change this to something like uh you know , pink or something or whatever I can do that there , also , I can change a topography .
Maybe you are using one topography .
I like to use uh Poppins .
That's my go to fonts , maybe Go Poppins and I do like Poppins bold , I think Poppins bold looks really friendly , right ?
And you guys can also adjust other options right there and stuff like that .
Now the advanced tab essentially controls the space of the actual um button .
You guys can also use motion effects , which gives it a little bit more animation .
So we can do like fade in , right ?

Or we can do sliding down .
I like down .
I'm actually a big fan of that one or rotate in .
Oh , that is really ugly .
Just don't go too crazy with this guys .
All right .
Don't , don't get too crazy .
Your website can look really terrible really fast .
So just uh just calm down , you know , to calm down .
Don't , don't get crazy with all those animations because it'll make you sick if you keep adding those in everywhere , right ?
But uh let's say , for example , you want to add in a new section right here , I'll go ahead and click on this plus and click on this little plus icon here .
We can select specific columns , right ?
So I'll select three columns , right ?
And I'll , I'll click back on these little score icons and I'll dragon elements .
So we have a text editor , right ?
And then here , obviously , you , you can add more text and for the style tab , you guys can adjust the color to topography and the alignment as well .
So maybe you want this like darker right now , let's go ahead and add in some more icons .
So here I'll drag in this button and then maybe I will also drag in this image , right ?
And then we'll put an image of , I don't know someone happy here .
These guys don't look too happy .
Well , she looks a little happy like she , it's like she almost made it , you know , but we'll just add her .
There we go .
So we added in this woman right now , we can also just duplicate this , right ?
So if you don't want to do all this all over again on the right click option .
Oops , right , click .
You do have some more options , right ?
We can duplicate this , we can copy this , but I'll just go ahead and duplicate this section , right ?
And we can duplicate that again , right ?
And I don't want these right now .
So I'll go ahead and right , click and delete these columns over here , right ?
Click and delete these .
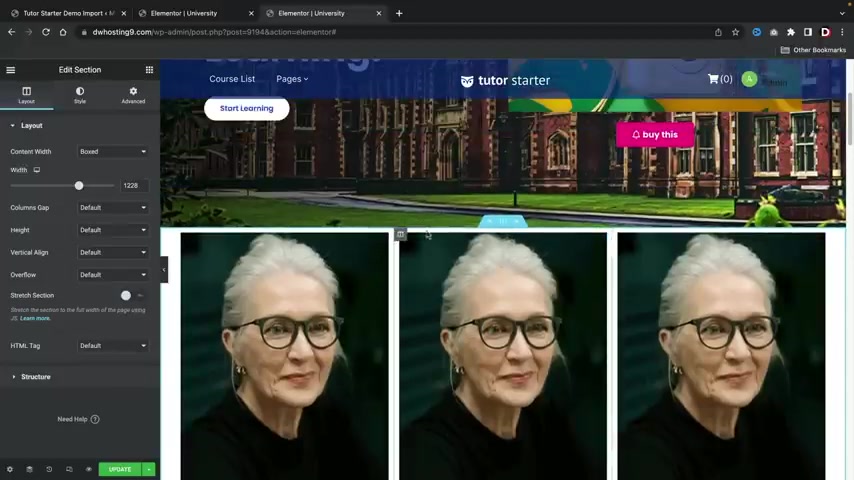
Now let me go and talk to you guys about the advanced options really quick .
So I'm gonna click on these little six dots right here and here .
We can adjust the actual section , right ?
So we can give it more space , right ?
We can make it full width , right ?
Or we can adjust the width , right ?
So we can make this however big we want it to be right ?
Or we can just stretch the section all the way across the screen , right ?
We can just like make it like , you know , all the way to the tips , right ?
But uh I'm just gonna go ahead and uh leave it like that right now , let's say for example , I want to add space , you know , because see how this lady is just too close to this top image right here .
Maybe I want to add just a little space .
So under the advance tab , I'm gonna add padding .
So uncheck this little link right here and I'm gonna add some padding to the top .
You see how we're creating space right there , right ?
Got it .
And I'll put it at that 80 .
And also maybe you want to add padding to the bottom right there , right ?
Or actually that's kind of fine .
But you can see you can add padding to this the bottom right there , right ?
And that looks good .
And once you guys make changes that you guys like on the bottom right here , you'll click on update .
All right .
So now let's talk about how to make pages and then we'll talk about how to assign those to our menu .
So you see , oh , you have pages up here .
This is all created with the demo content .
However , you guys might want to make pages by yourself , right ?
So let's do that up here under plus new .
I'll click on page and this can be something like your uh I don't know your , your uh my instructors page , right ?
My instructors page and then I'll click on a publish and publish next .
I'll click on edit with mentor and this will essentially let me build the page with the actual page builder .
I think I build instructors wrong , whatever .
It's all good .
Uh And here you guys can just go ahead and build your page just the way you did normally like on the home page , right ?
Uh I'll just go ahead and do this really quick with the power of video editing .
All right .
How about that ?
Ok .
So I just kind of made this really quick from scratch .
Uh I'll just go ahead and update this , right ?
So I just made a little quick , little preview of our instructors something very basic .
You know , these buttons are pretty ugly but you guys get the point , right ?
So I have created a new page uh called our instructors .
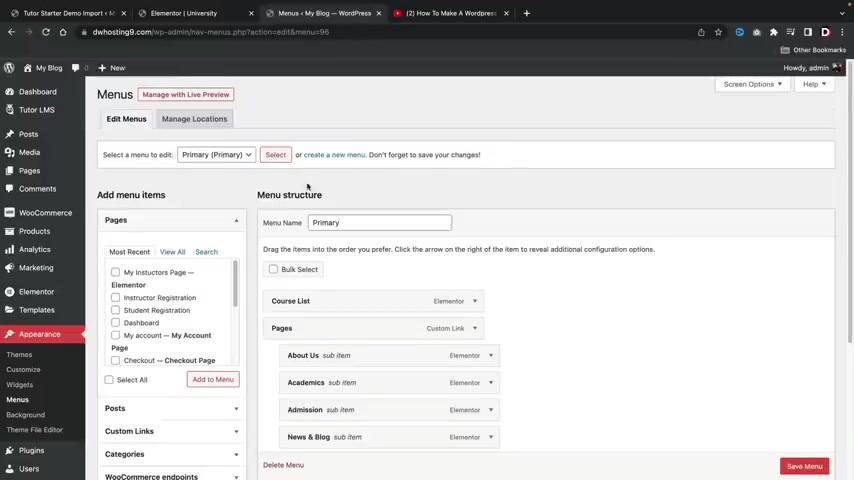
Now , let's go ahead and sign this to our menu .
Let's go ahead and go back to exit a dashboard and here I'll click on this little uh it's supposed to be a wordpress icon .
It looks like it's kind of glitched or bugged out or something like that .
I have no idea what happened there .
Uh Over here under appearance , we'll click on menus .
Now , the tutor L MS plug in it does actually create a footer for us and also a primary menu uh menu for us as well .
So right here , I'll click on primary and click on select .
So the view all section will display all the pages that are created for your specific website .
Uh But right here , I'll click on most recent and this was the actual page that I created .
So I'll just click on add new .
Right .
And there is my instructors page .
So once that's done , I'll go ahead and click on save menu .
All right .
Now let's click on visit sites .
I'll refresh this page and there you go .
We have my instructors page .
You guys can see it's been added to the menu .
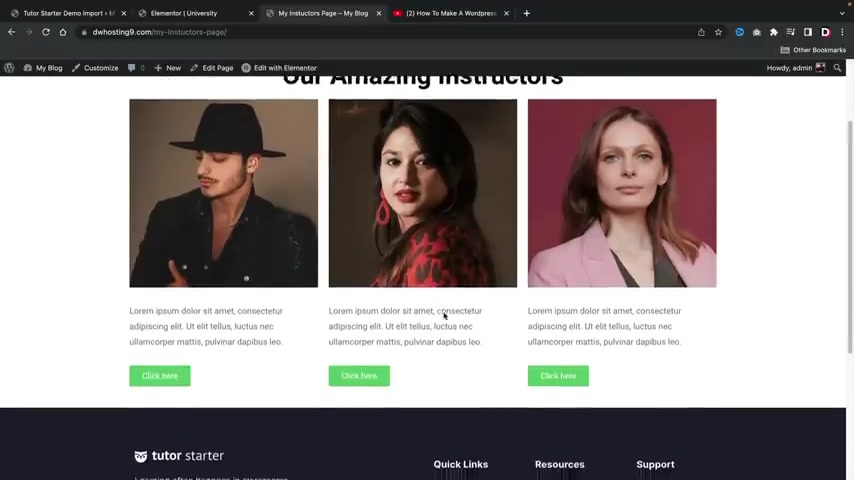
So let's click on my instructors page and then it brings us to the page that we created with all of our instructors .
Right .
Pretty cool .
Now , one more thing , we might want to assign a specific page to be our home page , right ?
So let's do that .
Now , also , I want to add the home page to this specific menu , right ?
You always want to add a home page , right ?
So right here , I'll click on view all and university is what they name the home page for the demo content .
So I'm gonna click on university and add this to the menu , but I don't want this to be called university , right ?
So let's change the name of this page right here .
You'll click this little drop down menu and I'll just call this home , right ?
I just want this to be the home page .
We don't need to , we don't , we don't need to be university , right ?
So I'll click on save menu and now let's go ahead and visit the sites .
All right , cool .
So we have the home page has been added to the menu and also the my instructors page has also been added to the menu .
So that's pretty easy right .
Now , let's say , for example , you created a new home page and you want to assign that home page to be the home page .
Maybe you want the instructor page to be the home page , right ?
So how do you assign the page to go to the first page that visitors are brought to ?
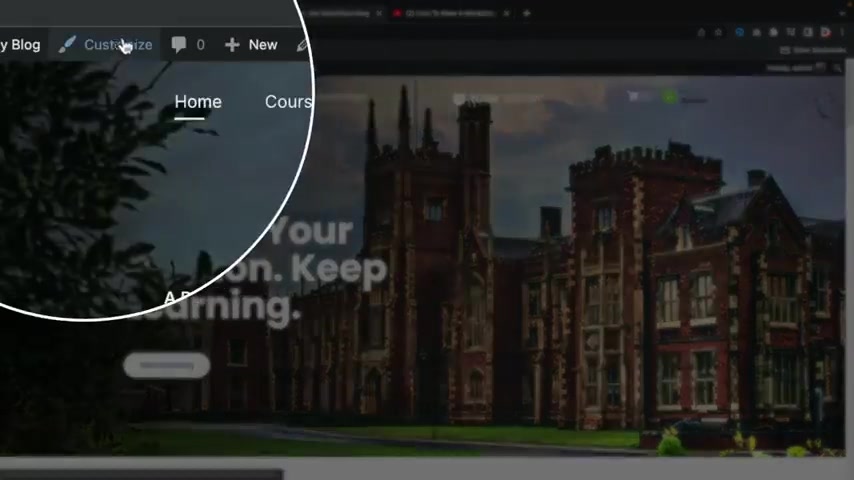
Let me go ahead and show you guys up here .
We'll click on theme customizer .
Now , the theme customizer essentially controls a lot of the header and the footer of your website .
So just a quick little example , uh the starter options panel for like the colors .
This is where you guys can adjust like the colors of the stuff on your menu .
You guys can also change like the layouts if you want it like a box or full width , you guys can also adjust the header here .
They do have various header styles to pick from .
You guys can just click on this and then your header will change accordingly , right ?
But uh I'll just go ahead and leave this as the default .
I don't want to get too uh I don't wanna dive too much into the theme customizer just yet .
But uh here you can also put your logo , right ?
So you can change the logo .
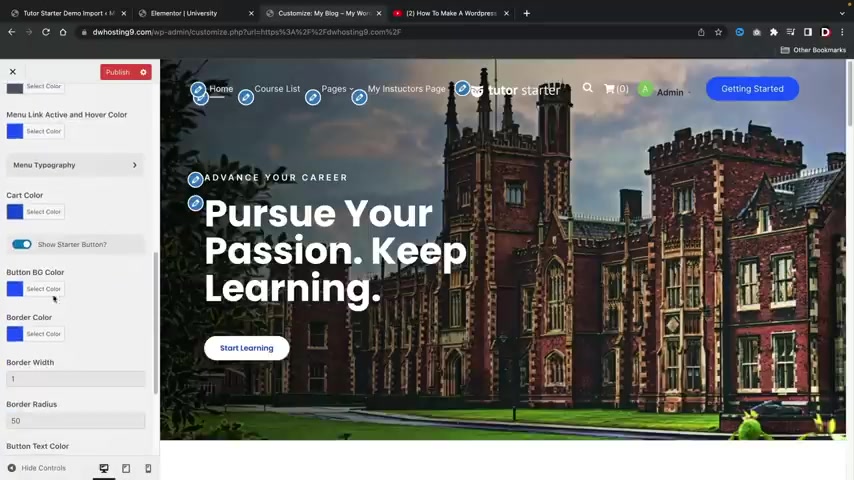
So if you guys have a logo for your uh website , you guys can add the logo there and there's just a lot of other various styling options , you guys can go through like uh for example , the uh cart color or the background color or you guys can even take out that button right there .
So if you don't want that to show , you can just disable that as well .
But uh yeah , so this is where you can style the actual uh menu right here .
Uh on your own free time , feel free to go to the colors , the layouts and also all of this stuff to adjust the websites to your liking .
But I first just want to go ahead and assign the home page as my home page , right ?
So for the home page settings uh here , I'll go ahead and select the actual page , which was , I think it was my instructors page , right ?
So let's say , for example , this , this is what you want to be your home page .
You would just select whatever page you want there , right ?
But I want to go ahead and select the actual uh university , which I did rename homepage uh to be our home page , right ?
So this is the home page that I want .
Uh once you guys select the home page , you will go ahead and click on publish .
All right .
Pretty cool .
I just want to make that very clear .
All right , let's go ahead and exit out of the steam customizer now .
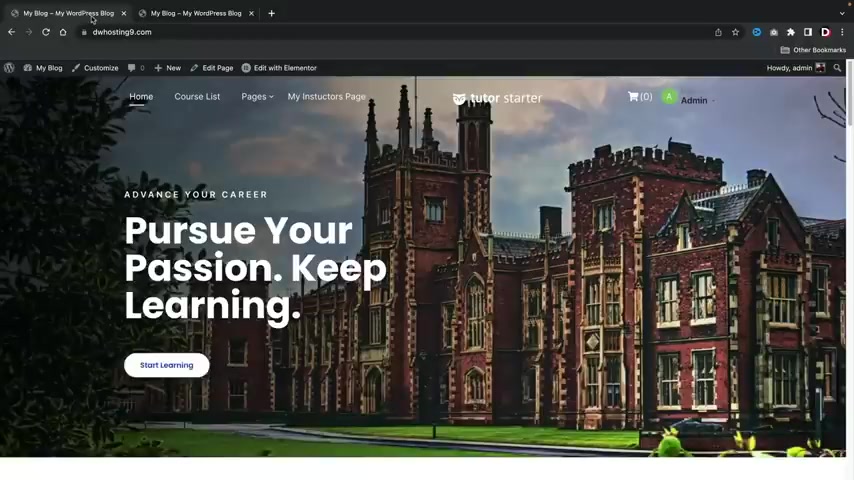
So now really quickly , I want to go ahead and change this home page to the current home page that I showed you guys in the beginning of this video .
It's really simple .
I'll walk you guys through it .
And by the end of this , you guys will be a little bit more professional with mentor .
So right here , let's click on edit with Element to and this is gonna take about like a few seconds .
We're gonna go ahead and delete this box right here , delete that and now I want to center align this right ?
So I'm gonna click on this and on the alignments , I'm going to center this for this text here .
I'm also going to center align this and for this button here , I am also going to center align this .
Now , you guys might also notice here that when I hover over this , this turns blue , I wanna go ahead and change it .
So it's always blue .
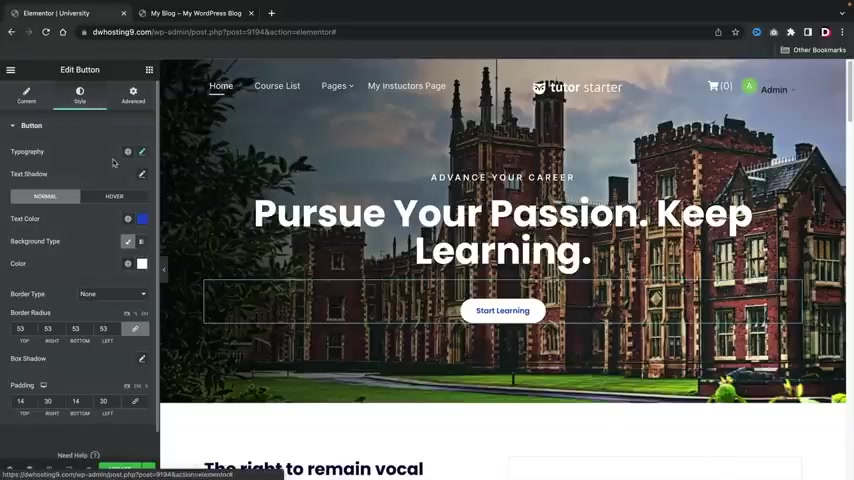
So over here under the style , we'll go ahead and uh under normal the text color .
I want that to be white .
So now you see the text color is white , but now I want to change the background color to something like blue , right ?
So now it's this blue color where it looks just like the actual um color when we hover over it , right ?
So that makes a lot of sense .
Now , also right here , I want to add in this little divider uh module right here .
So let's go back to elements and I'm gonna take this divider module and I'm gonna drag it right there and drop it .
I'm now going to reduce the width of this , but we really can't see it that much to see how it's black .
So let's change this color to whites .
So under the style I'm gonna change this color to whites , right ?
And I also want to make it just a little bit bigger .
So let's just make this like , I don't know , 2.0 or something .
What do you guys think ?
2.0 And for the contents , I wanna make sure this is centered and I want to reduce this just a little bit more .
So that looks a little bit better .
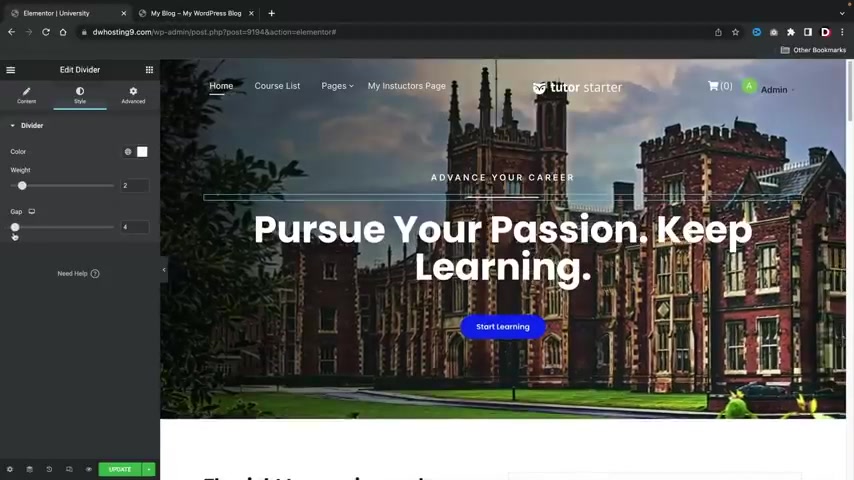
Now , one thing I do want to actually reduce the space , right ?
So to do that , it's really simple , just go ahead and click on the little divider under the style we're now going to reduce the gap .
You see how it's now reducing the gap and there you go .
Now , the last thing that I wanna do is I wanna make this full width , right ?
So you notice here how this is not full width .
However , this one here is full width to do that .
Let's just go ahead and open this up and I wanna right , click on this little background and click on edit section , right ?
So I'm essentially clicking on those little dots up there .
But when you hover over it disappears because that's part of the menu .
And I just wanna make sure that the heights is fit to screen just like that .
Now , all they need to do is change the background image .
So I'm gonna go ahead and edit this section under the style .
Here is the image , right ?
So you can add an image of anything , right ?
You can add an image of yourself of you know of your school .
But I'm gonna go ahead and upload that image that I use for the other website .
All right .
So I went ahead and I uploaded it .
I will also leave this image for you guys in the description of this video and I'll just click on insert media and we're done .
So that was pretty fast , pretty simple .
And we made a really nice looking homepage in about a few seconds .
So that's how I recreated uh that home page from the actual demo .
So now that I showed you guys how to use the actual builder , how to make pages in a menu .
Now let's go ahead and talk about the actual tutor L MS plug in and how to use it .
Pretty simple right after you guys mess around with this builder for just like an hour , you guys will get the hang of it .
It's really simple , you know , like just just mess around with stuff and you'll , you'll get the hang of it .
So now that you guys know how to manage your website at pages and adjust the menu , now let's go ahead and install the free plug in which we are now going to use to uh create courses .
So this is a free plug in , right ?
There is a pro version to this plug in .
However , you can still make an online course website with this free plug in .
So in this part of the video , I'll walk you guys through on how to use it , you guys ready .
Let's get started .
All right .
So let me go ahead and walk you guys through on how to use this plug in .
So first let's go ahead and go to our dashboard .
Now , in case you guys did not install the tutor starter theme .
Let me quickly show you guys where you can install the tutor L MS plug in .
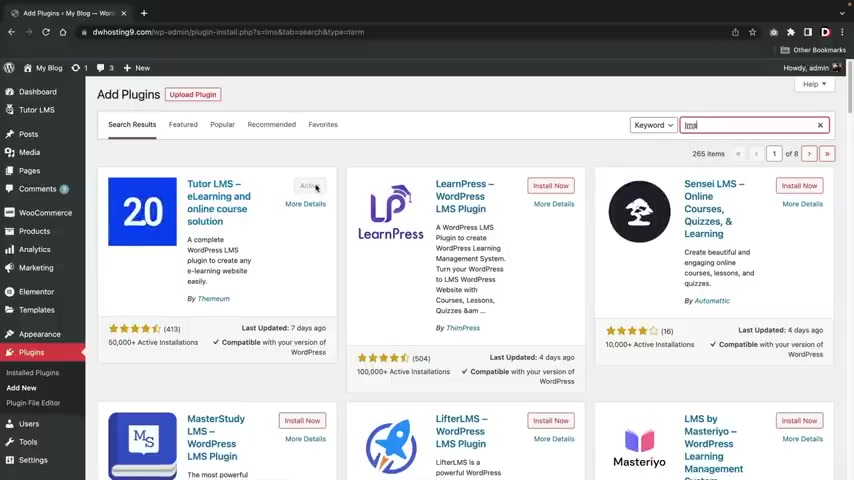
You'll go down over here to plugins and click on add new and under the search plugins .
You'll type in L MS and this is the plug in that you're going to need to install .
It is called tutor L MS E learning and online course solution .
So make sure you install this and also make sure you activate it also , you'll want to make sure that you have the tutor L MS element or add-ons installed as well .
You guys can actually find this right here .
It is called the tutor L MS element or add-ons .
So also make sure to install this and activate it as well .
You cannot find it just simply go over here and type in tutor L MS and it should pop up on like the top three or something like that .
It's , there it is .
Yeah .
So , uh , there it is .
So these are the two that you need to install .
You also need to make sure that you install the Woocommerce plug in .
Uh , over here we're gonna go type in Woocommerce .
This essentially allows you to accept payment gateways and start accepting , uh , you know , credit cards and stuff like that on your website using Woocommerce .
So make sure you also have the Woocommerce plug in installed and then go ahead and activate the Woocommerce plug in .
Once you're done , you guys are ready to go .
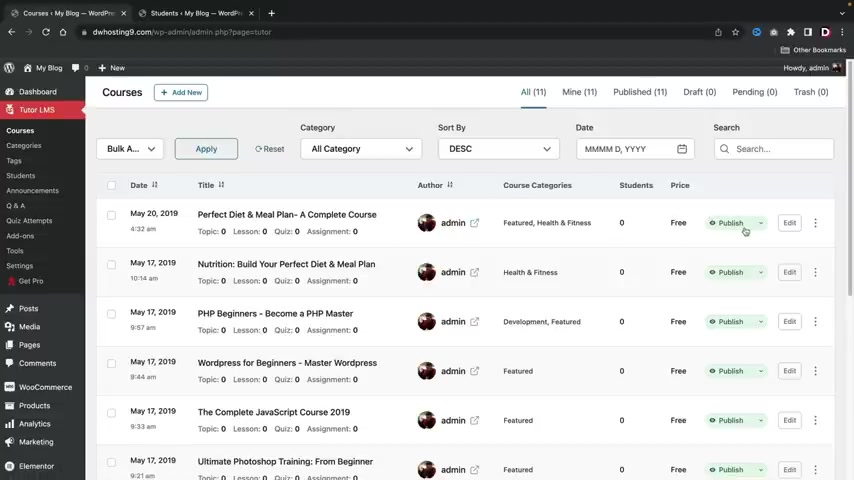
Let's click on dashboard here and then we'll go over here to tutor Ls and then just click on tutor L MS .
This is actually gonna pull up all of the options right here on the right side .
You can see our courses , right ?
So these are the courses that we have created .
This is the author , the course categories , the students , the price .
And also if it's published or not , you can always make these courses private .
Maybe you need to edit something by going over here and clicking on privates or what you guys can do is you can completely delete the course if you want to do that .
So for example , uh this nutrition , build your diet plan .
I'll go ahead and click on these little three dots and I'll just delete the class permanently .
So I'll go ahead and click on .
Yes , I'm sure .
Now , what I'm gonna do here is I'm gonna delete all the courses that this uh plug in has created and I'm only gonna have one course .
So I'm gonna go ahead and delete all these courses really quick .
All right .
So I went ahead and I deleted all of my courses just because it was a lot of info and I want things a little bit more structured and cleaner , right ?
But before we make our course , let's just go ahead and keep going through these settings .
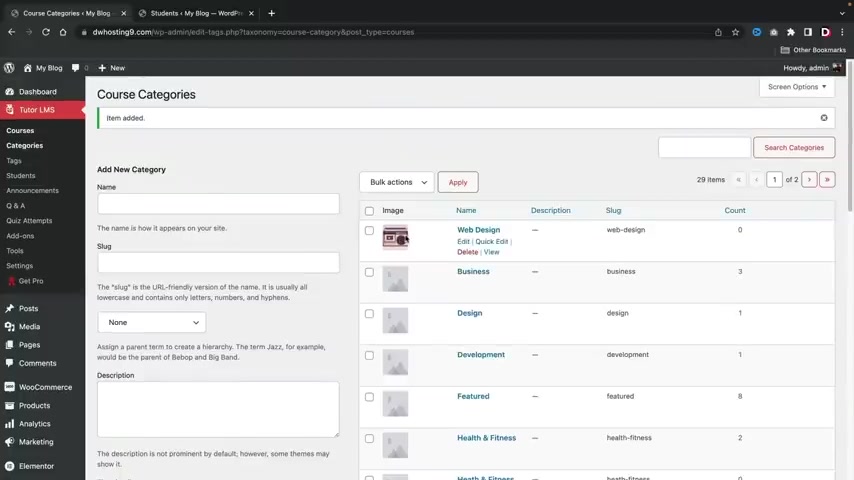
So next , we have categories , right ?
And here you can add categories for your courses .
For example , we have health and fitness , we have marketing , we have uh design business .
But what I'm gonna do here is I'm gonna type in web design , right ?
So essentially I'm saying , I'm creating a web design , a course or something like that .
And right here we have the image .
So you would want to select an image that represents the actual uh category of web design .
I'll just go ahead and grab , uh I don't know what , what we got right here .
All right , we'll just grab in this uh this radio , whatever .
We'll just , we'll just use that , you know .
So web design , we're using the radio .
OK ?
And I'll click on add a new category .
This is actually important because if you decide to show courses based off category , the image will display to help users understand about the category itself .
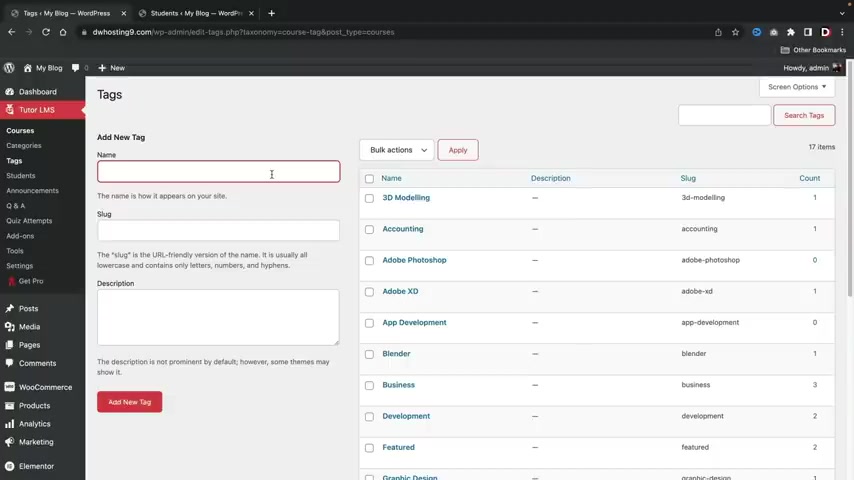
Uh Here we have tags right now , tags are essentially just faster ways on you on ways the students can find the courses if they click on a specific tag and the course has that specific tag , it will display in the results .
So I'll just type in web design and click on , add a new tag .
All right .
So now we have the web design tag here .
We actually have students .
Now let's first go ahead and go over here to my other websites and on this demo website , we do have some students , right ?
So we have the first name , the last name , their email address , their registration dates , the course taken and also details .
You guys can always go ahead and delete students or you can update their info by going to details and updating their info there just in case they might have entered something wrong like their name , believe it or not guys , I've entered my name wrong a few times in college and that's just , you know , that's just that's college problems .
You know , here we have uh announcements and I'll click on add a new announcement .
Now , let's say , for example , you have a specific course that you want to create an announcement for , right ?
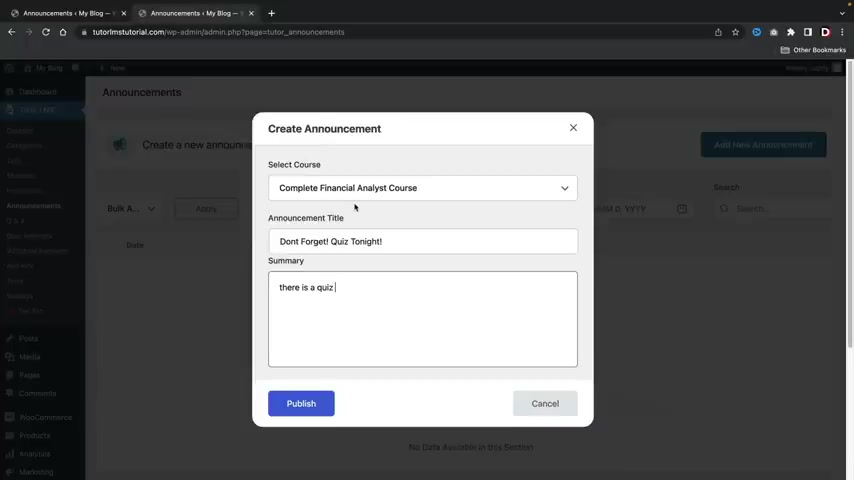
So this will be for like the financial analyst course .
This will be like uh don't forget , don't forget quiz tonight .
And then you know , there is a quiz or something like that .
So the students that are enrolled in this course will see this announcement when they are taking the course and then it'll click on publish and there is the announcements , ok ?
And under the details section , you guys can always update this uh announcements at any time that you choose .
All right , let's go back over here .
Now , we have questions and answers .
If there are questions and answers , uh all the questions and answers will display right here .
Uh quiz attempts .
So whenever a student attempts a course they will be display right here .
Let me give you guys a quick little example of what this will look like .
Here we go .
So we have the info with the course and then we have the questions and also um you know , did they fail ?
And we get more details .
Here is the name of the actual student as well .
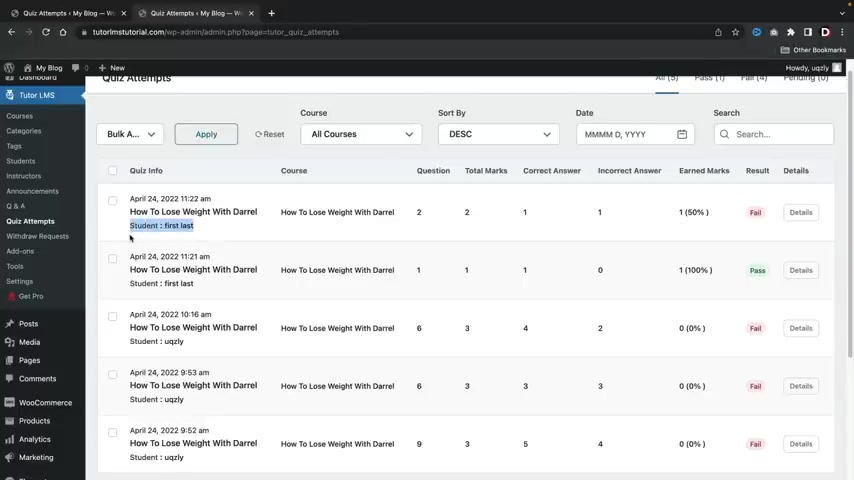
So you guys can adjust the grades or adjust it as necessary .
All right , uh here is add ons , but we'll be talking more about this a little bit later in the video .
Not now .
So don't worry , don't worry , we're not gonna do any of that stuff now .
So uh here we have tools , right ?
And with tools , this is just a um you know , this is just the server settings and this is good just because if there is some sort of problem , a lot of this is due to like maybe server settings and you guys might need to adjust it .
So if you guys do submit a ticket to tutor L MS , they might ask for your server settings where you can view all of it right here .
Import and export .
This is where you guys can import and export your settings , right ?
So once you guys make the courses and the categories and everything , you guys can export that and then import it to a new website .
All right , pretty cool .
And here are the tutor pages .
So here are the actual pages , right ?
So uh for example , if I click on the student registration page , uh and then let's go ahead and preview this really quick .
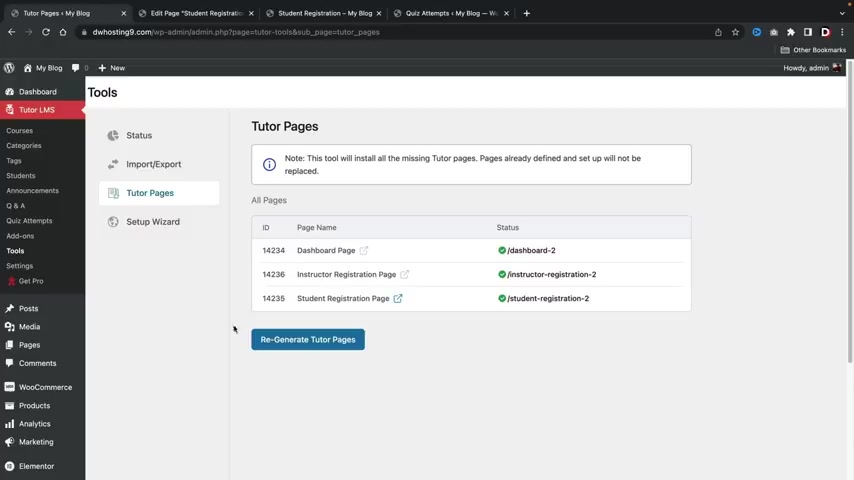
It will just display the actual student registration page .
But since we are already logged in , this is what's actually gonna show students when they're logged in , right ?
So you just need to log out and it would show you the actual registration form , ok ?
So these are just the pages that were propagated automatically when you install the tutor L MS plug in here , we have the setup wizard and why not ?
You know , we'll just do this for fun , you know , we don't have to , but uh you know , they made the set up wizard for us .
Let's just let's just let's just do it , you know , just like like Nike said , let's just do it here .
Let's click on , let's start .
So this is a setup wizard and it's essentially just trying to kind of adjust the settings based off what you answer here .
So who are you making this for ?
Are you making this for yourself or for a marketplace ?
I'll just say for myself for now .
No , no , no , no , I'll do a marketplace .
Why not ?
Let's change it up ?
All right , instructor profile .
This allows instructor profiles to showcase awards and completed courses .
Sure , why not ?
Student profile allows users to have a student profile to showcase their awards and completed lessons .
All right , why not ?
Who cares ?
And this is the Perma link , right ?
So this is where the lesson would actually be displayed here .
I'll click on .
Next .
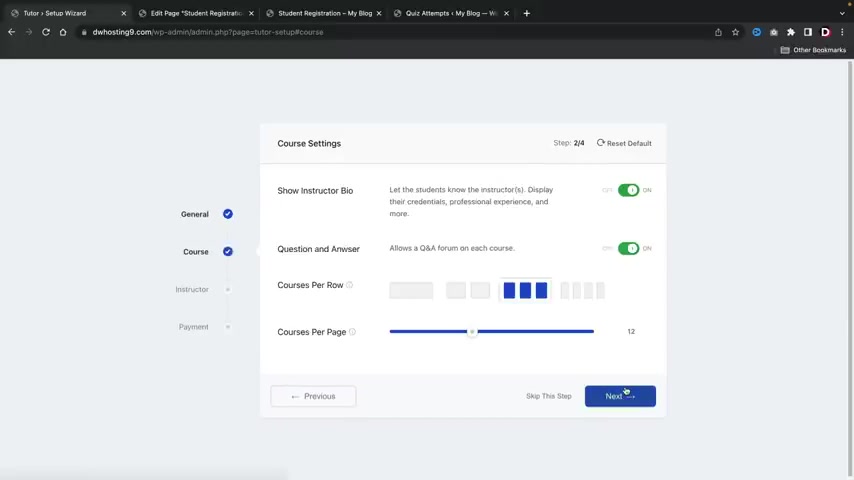
Here we have courses .
Let the students know the instructor displays their credentials experience and more .
So this is the instructor bio .
OK ?
Next , you have the questions and answers .
So this allows question and answers for each course .
Here you have courses per row , which is where the courses will be displayed , like how many courses will be displayed in a specific row .
And then here you have the courses per page , right ?
Let just click on .
Next .
Here you have new sign up , choose between open and closed instructors sign up .
If you're creating a course marketplace , instructors should be open , right ?
So if you are inviting other instructors to teach , then you might want to turn that on .
Obviously .
However , if you are a single school that you don't want anyone to register and it's you only then you want to make sure to turn that off ?
Ok .
Uh earning for instructors .
So do you want to have other instructors to make money ?
Sure , why not ?
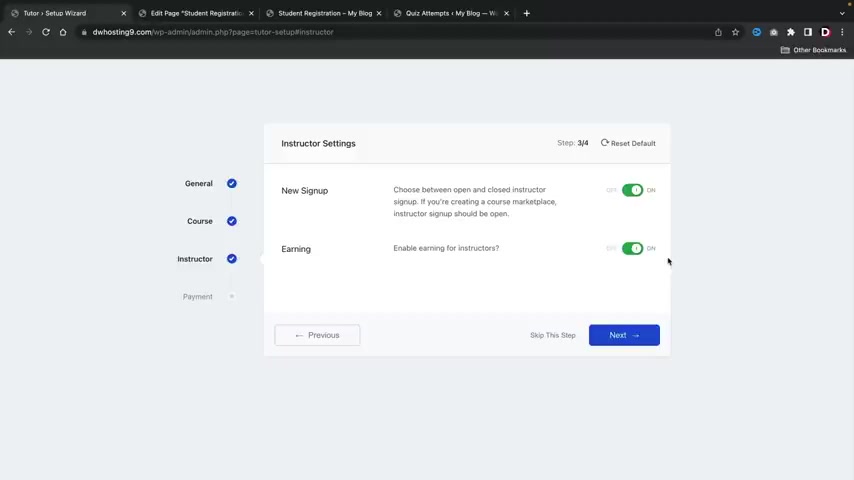
Now , as this is again , this is only for if you want to have a multi marketplace where people are registering and they sell courses on your websites and you are selling those um sorry , and they are selling those courses .
If you want to have a course website where it's only you , then you would have to make sure those are disabled .
Ok , we are we green ?
Are we , are we cool ?
All right , cool .
Here I'll click on next and then we have payments .
So first we have guest checkout allows users to buy and consume content without logging in .
Now , I would not recommend this because if you turn this on and a user buys something and they want a refund , it's gonna be hard to prove that it was them right ?
Because there's no email , there's no name , there's nothing that provides that .
It was that person .
So I would not have that checked because if you are selling courses , you do need to have some information on that student just in case they want a refund .
Here's the commission rate .
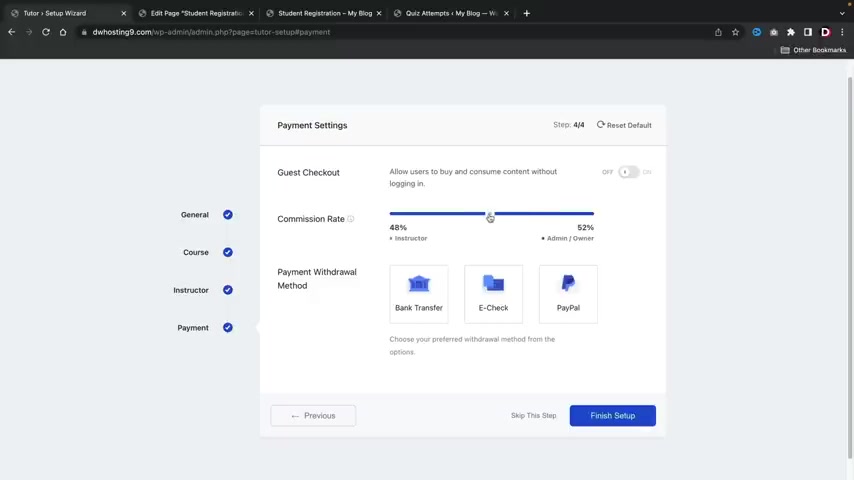
So if users decide to sell courses on your websites , well , how much money do you want as a website owner ?
So , you know what's I want ?
Uh , I want , I want , how much should we pay 25% .
All right .
So we get 25% and they get 75% of the fee .
Right ?
Makes sense .
And the withdrawal method , we have bank transfer e check and paypal .
Now , this is your own thing , right ?
So you would have to go ahead and pay the instructors on your own .
So this would just strictly be up to you .
Uh , but I'll just select paypal and then I'll click on finish setup .
All right .
Now it's like , oh , congratulations .
You are finished but not really guys .
So uh next , let's just click on explore add-ons and let me keep going and talking about the other um the tools right here .
So we finished the tool area , right ?
So we went through all the tool settings .
Now , let's go ahead and click on settings right here and talk about these options right .
Now .
These options are a little bit more important and I do want you guys to select specific options and that will enable some options to display when we are creating a course .
Um These obviously , it really depends on what website you want , like a marketplace and stuff like that .
But uh here we go .
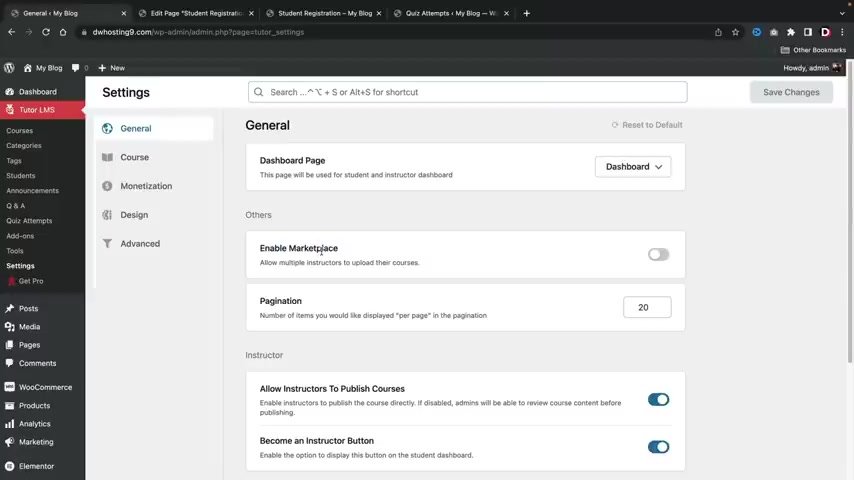
So we have the dashboard page .
This is the page of your actual dashboard for your students enable marketplace page a nation .
Um Now , here we have instructors , so allow instructors to publish courses which we already set and then we have the become an instructor button .
And this is displayed in the student dashboard .
Ok .
So if you decide to have people sell courses , you can have the , um , you know , uh become an instructor button in the student dashboard .
But if you're running a solo website , I would not have that on .
Ok , let's click on course .
Now , these are some really important options right .
Now , what we're first gonna do is , uh , here we have the auto redirected courses .
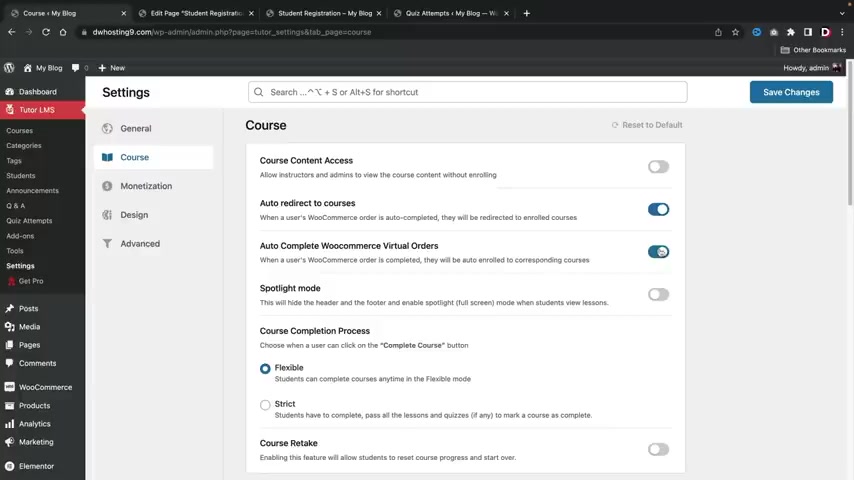
I want you guys to check this box and also this box , what this does is it actually makes it .
So when users purchase courses , they are redirected back to the enrolled course , right ?
I don't want them to go to other parts of the website .
I just want them to go to the course that they paid for .
That makes a lot more sense .
Right ?
And then here we have autocomplete woocommerce virtual orders .
When a user woocommerce orders completes they'll be enrolled to the corresponding courses .
So that means if they buy the course , they will be auto enrolled to that specific course .
Makes sense .
Right here , you have the course completion setting .
Uh We have uh flexible and also strict .
So students can complete courses any time in the flexible mode , which I do like how , however , there's also strict which students have to complete and pass all the lessons and quizzes to mark a a course as complete .
So that means if the student fails , they cannot , um they cannot mark the course as complete because they failed the course .
So let's just take this as flexible .
Do you want students to retake the course ?
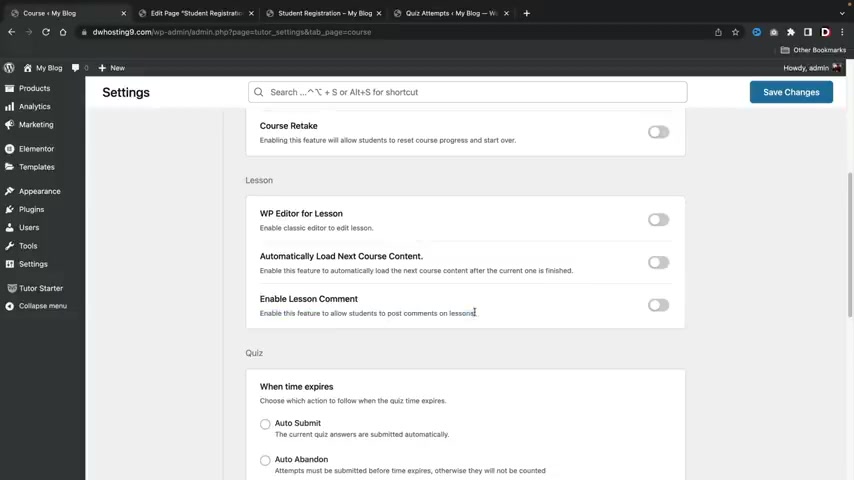
Well , if you do have that checked , if not disable it , now , these are some options that really don't matter too much , like automatically load to the next course contents if they finish and enable lesson comment .
So you can have uh students post comments on lessons that's really up to you .
You know , I , I don't know if we need to have students commenting on our lessons .
Uh Again , I would leave these off personally .
Here .
We have quiz right now .
If you guys do decide to have quizzes , this is where you're going to adjust the settings .
Now , first we have the auto submits , which means the current quiz answers are submitted automatically , right ?
That makes a lot of sense .
And next , we have Auto abandon and this means that if you select a specific timer , the student must finish the quiz within that time frame .
And that just depends on if you want to have timed quiz or not , but I'm gonna leave mine to auto submit for now .
The quiz attempts allowed .
So how many times can a student take a quiz ?

Well , I'm just gonna put like two for now , right ?
That's all I'm gonna put .
Uh actually I'll just put one .
I , I don't know you , it's your guys' school , you know , you guys make the decision and here you have the um final grade calculation .
Now , this really depends .
Right .
So let's say , for example , the student does really good on one attempt and then bat on another .
You're basically saying we'll give you the highest grade .
However , you can also say , no , we'll give you the average grade or the first attempt or the last attempt , I believe when I was going to college , I believe it was only the first attempt .
So when we did have online schools , uh Cal State Northridge , uh it was basically the first attempt that you do .
That's what you get and that's your , that's your score , you know , so that's how it is .
Now for preferred video source .
Uh We're gonna go ahead and select youtube .
This will enable us to add videos on our courses .
This is a very important option .
So once you guys are done with those , go ahead and click on save changes .
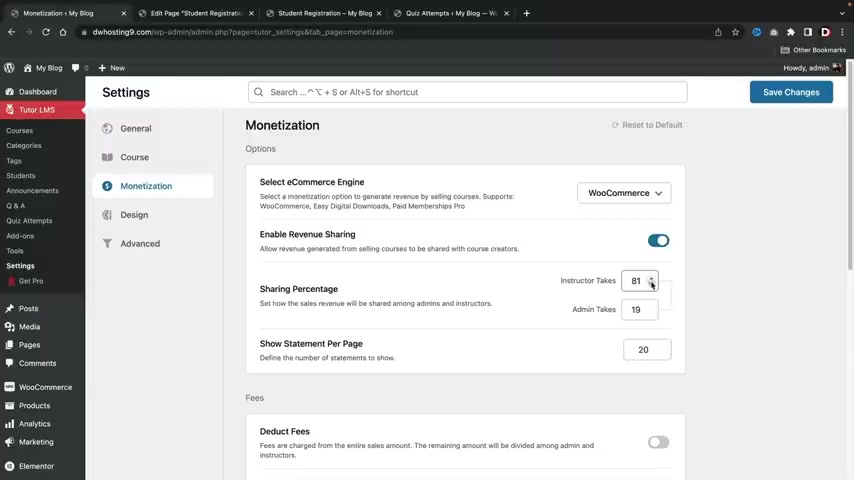
Next , we have monetization .
Now , uh Right here , we have select Ecommerce engine .
You guys do need to select Woocommerce .
This will allow us to sell courses , ok ?
And we'll walk you guys through on products and stuff like that .
But for now , just make sure you select uh Woocommerce .
Now , if you guys also do decide to have a revenue share with the actual instructor on the website , you need to turn that on .
We actually set this on earlier , but it looks like it did not save .
So if that ever happens to you guys just do it again right here .
Right .
So , instructor takes 75% and we get 25% .
Right .
That makes sense .
And here are just some additional fees .
So you guys can , you know , that's something for you guys to do on your own if you guys wanna add fees to your actual courses and then this is the withdrawal amount where users can withdraw .
It looks like my options did not save .
So , I'm glad we actually went through this again .
But uh I selected paypal and uh yeah , that's all that's all set and ready to go .
So once you guys actually select these options , go ahead and click on save changes .
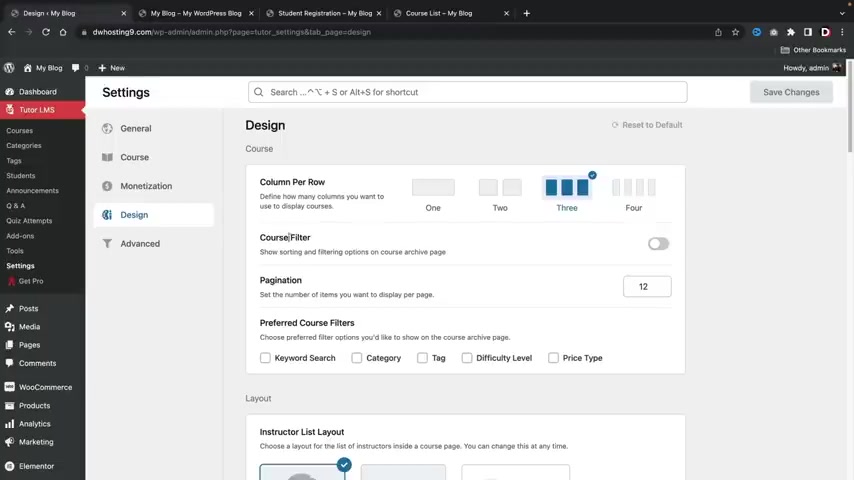
So next , we have the design right ?
And this is referring to the courses .
Now , uh on your course list right here , you're gonna see a list of your courses .
Now , depending on how you want these to look , you would adjust the design of these here .
So if you want to only have two courses per row or three courses , uh you would go ahead and select all the options for that right here .
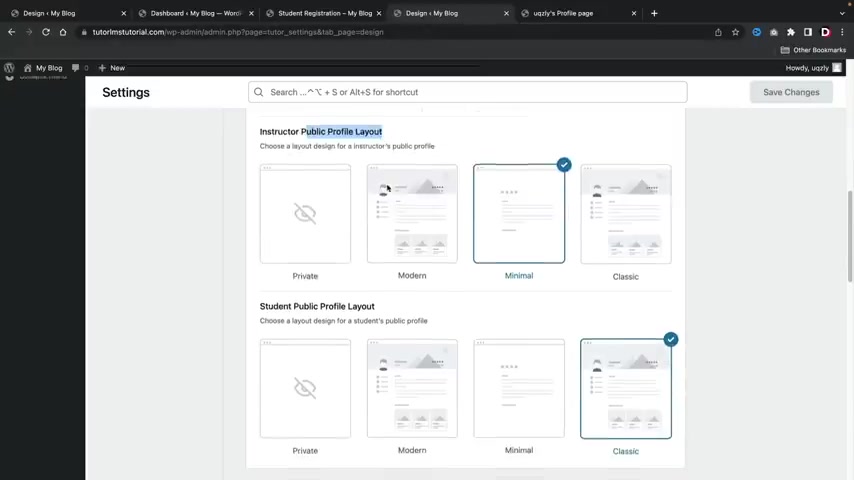
So next , we have the instructor list layouts and this is essentially the layout you can give to your instructor , uh when they click on the instructor inside of the course page , you also do have the uh instructor public profile .
Let me give you guys a quick example .
So I'll go ahead and save changes .
Right here and select modern , I'll go over here and refresh the page and this is an example , right ?
So if the student clicks on a course and they go to the actual instructor page and they click on the instructor , they will then see this specific layout .
So this is what this is referring to .
And if I change this to something like minimal and I go over here and I refresh the page , uh this is where all the settings will be reflected .
OK ?
So it is the public profile of the actual instructor and you can do the same thing right here for the student public profile layout .
So uh for the students , if you choose to have profiles for them , you can display their uh profile in a specific way or you can just make it private where you or people cannot uh see the actual students profile .
And for the course details , this is where you guys can enable or disable specific options , right ?
So let's go ahead and go back to our course page .
So here we go , you know , we have this wish list , this share , we also have reviews , right ?
We can go ahead and disable or enable those as we want .
So I'm gonna go ahead and take out the review , right ?
I don't want the review , I don't want the social share .
I don't want questions and answers and I don't want to see the uh duration , right ?
So I'll go ahead and save those changes and I'll go back to my course and I'll refresh the page and once that's done , you guys can see the reviews disappeared .
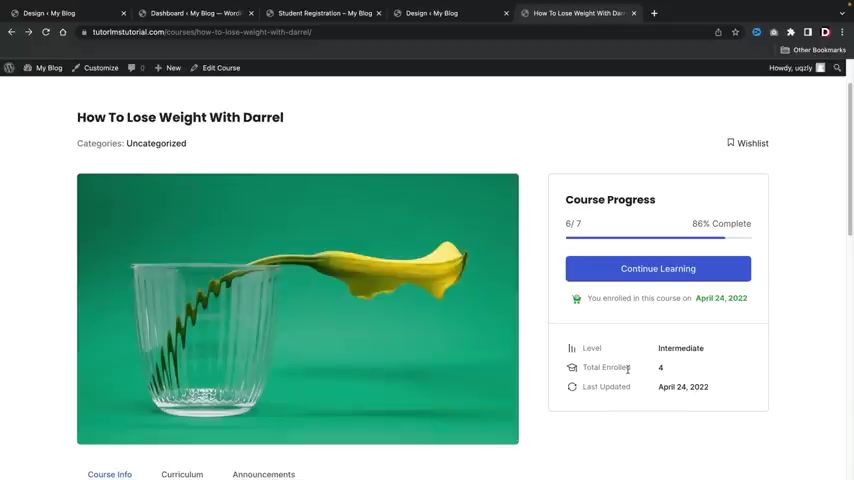
Uh , the share as well disappeared and also some of the options on the course disappeared as well .
All right .
So let's keep going here .
Now , we have some colors as well .
This is where you guys can pick a specific color scheme for your actual courses .
Um You can make custom colors as well by picking like custom and then you can go ahead and select the primary color , the text color , the background color and so on and so forth .
Uh Here you do have a little bit more options if you want to get a little bit more creative .
And then lastly , we have a video player , we can go ahead and use tutor L MS s uh player for youtube if you guys want to check that out .
So let's go ahead and turn that one on and click on save changes .
So now let's go ahead and jump into the last setting , which is the advanced options .
Now , there is one setting that I do want you guys to check that .
I think they should have had checked here by default , which is hiding course products on the shop page .
I don't really want to present our website as a shop .
I want users to uh I want us to present it as an actual uh like a course website .
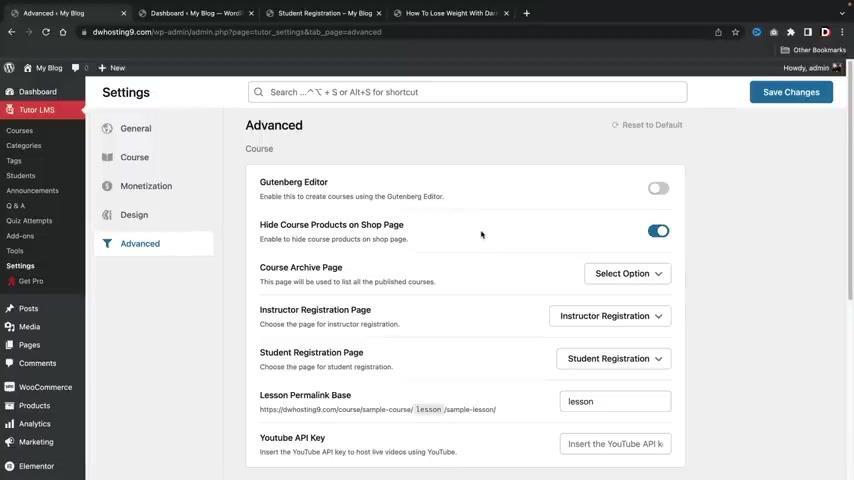
Because if we have a shop page , users can actually see our shop , they can go ahead and look at it like it's some sort of random product website .
I don't like that .
So I want to hide course products on the shop page .
I don't really want a shop page for this website because this is a course website .
It's not really a shop website like Amazon or something like that .
So I want to disable that .
Now , you guys do have these other options where you can take a look at stuff .
Um One thing that's also common is the profile completion .
This is if you want users to actually complete their profile and this is optional .
But uh I have seen a lot of users uh turn this on or off just depending on if you want your students to upload a picture , upload a background and stuff like that , then you would have that checked .
But if not , you can leave that unchecked and once we're all done , we'll click on save changes .
All right .
So we have now completed all of these settings .
Now let's go ahead and jump into how to create a course .
So to create a course , let's go over here and click on courses and let's create our first course .
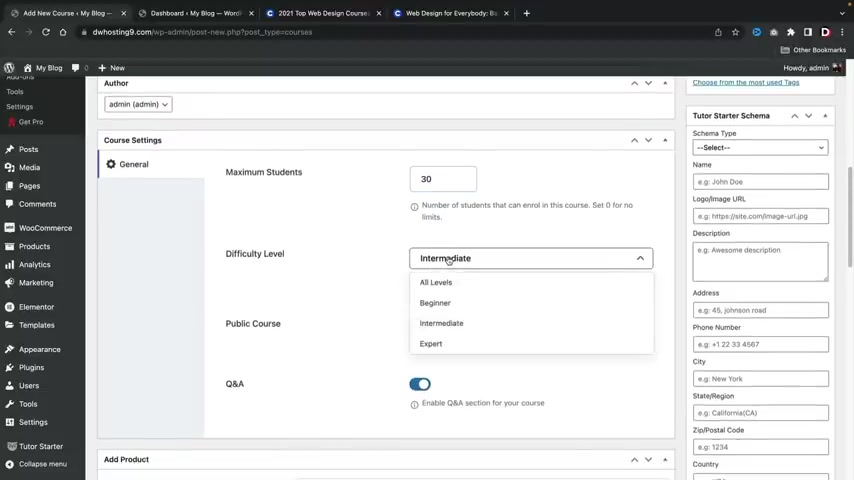
So right here , I'll click on add new .
All right .
So let's go ahead and give our course a name .
So this is the web design course right .
So I'm making a web design course and I'll go ahead and put in some demo content .
There we go .
I just threw in some random demo content .
I'll go ahead and scroll down .
Now , the author , this is the actual , the , the name of the actual uh person who's creating the course .
So if you do have a website with multiple instructors , you just want to make sure that this is the correct author of the actual course .
Now , it's gonna ask us how many students can enroll in the course .
If you select zero , this is unlimited .
But let say , for example , you only want 30 students in the course .
We'll select it to 30 here .
We have the difficulty level .
So how difficult is this ?
Is this all levels , beginner , intermediate or expert ?
I'll just put beginner .
Now , you can select a public course , meaning there is no enrollment .
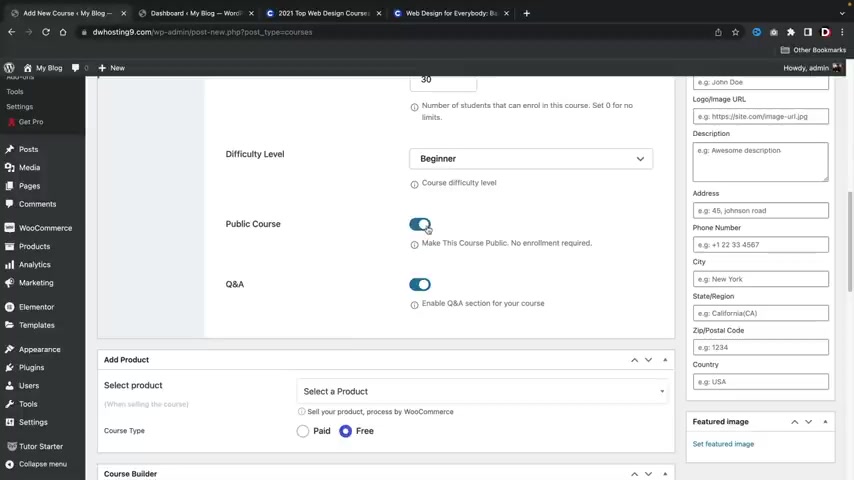
If you guys do have a public course , I would not recommend to have it paid because then , uh if people pay on a public course , you won't have any information about those users .
So , uh it's up to you .
If you want to have public or not public here , we have questions and answers .
Do you want to have questions and answers for your course ?
I'm gonna select yes .
Now , right now , I'm doing a free course in the next section .
I will be creating a paid course .
All right .
But for now , we're just going to select free .
You guys might see these options right here .
Um Don't worry about it .
Uh I'll talk about that in the very next section when we create a paid course .
So now let's talk about the main important part of this course , which is the course builder here .
We have add a new topic .
Now , a topic is essentially the main topic of the course .
So this would be like um intro to uh CS S , right ?
And then we can put like some just brief description about , you know , what they're gonna learn in this specific course right here , click on add a topic .
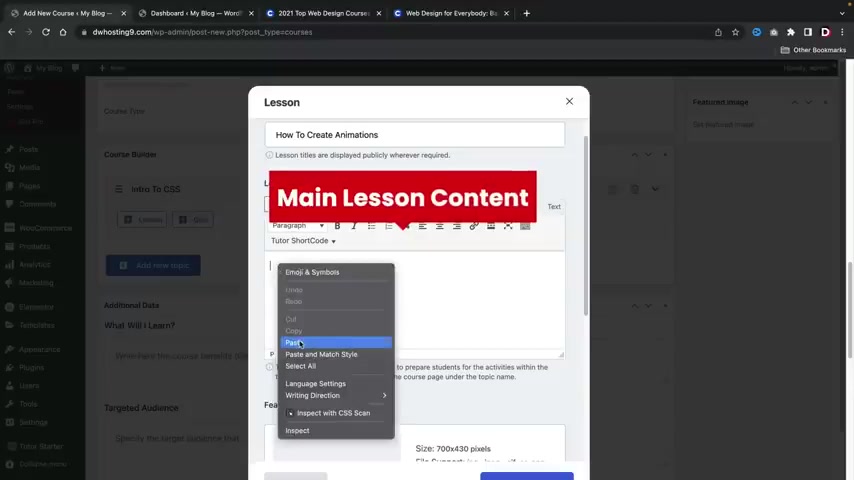
Now , what will they learn in CS S ?
You know , let's talk , let's give some more detail about what they will learn in CS S .
So the first lesson for CS S would be like how to create .
So after you create the lesson name , you'd want to go ahead and put the lesson information right here .
This would be the actual meat of the actual lesson , right ?
So this would be the main purpose of the actual uh lesson .
So you'd want to make sure that this is a very um you know , informative because this is the actual uh information that the lesson is providing here .
Click on added media .
If you guys do want to add in a little bit more images , you guys can click on a media and just add in a little bit more to the actual um here , go ahead and put this thing here to the actual lesson , right ?
And we can make that bigger or smaller , right ?
Bigger , smaller , we can also bold stuff like that .
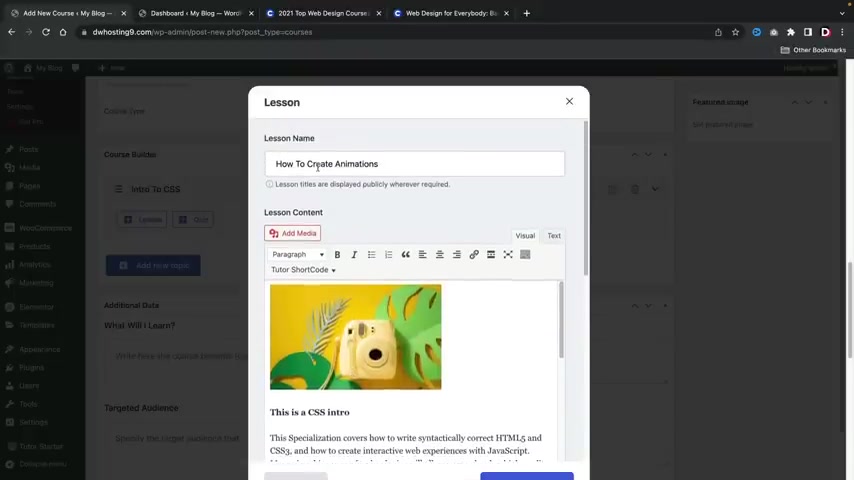
So um you know , here I'll go ahead and put in , this is a CS S intro and then I will bold this , you know , you can do that to create like maybe subcategories and , and then I will go ahead and just , you know , throw in some random demo contents right below that .
So this is the actual lesson , right ?
So how to create animations ?
This would be the actual headline .
This is the actual information about the headline and then we have just some more information about the lesson .
So next we have featured image and I'll go ahead and just upload an image , they recommend 700 by 4 30 .
Um I'll just go ahead and select this girl right here for now and here we have the video source .
Remember earlier how we selected youtube ?
Well , this is why because now we can go ahead and embed a youtube URL .
I'll go ahead and select oop , I'll go ahead and select a youtube video .
All right .
So I went ahead and I pasted in one of my youtube videos and here we can actually select when we want this to play .
Also , if you guys do want to upload attachments , like for example PDF files or something , you guys can go ahead and select those text files or whatever and you can upload those .
So users can have access to those specific attachments .
And once you guys are done , we'll go ahead and click on uh update lesson .
All right .
Congratulations .
So we have now created our main topic which is intro to CS S and within that topic , we are now teaching them the fundamentals of CS .
S .
Let's go ahead and just create one more quick lesson .
So with the power of video editing , I'll go ahead and make another lesson really quick .
All right .
So I went ahead and I made a second lesson , right ?
So we have two lessons in this main topic .
Now , let's say , for example , you want to add a quiz inside of your actual uh topic section .
So right here , let's click on plus quiz and now let's go ahead and make our first quiz .
So what is the name of this quiz ?
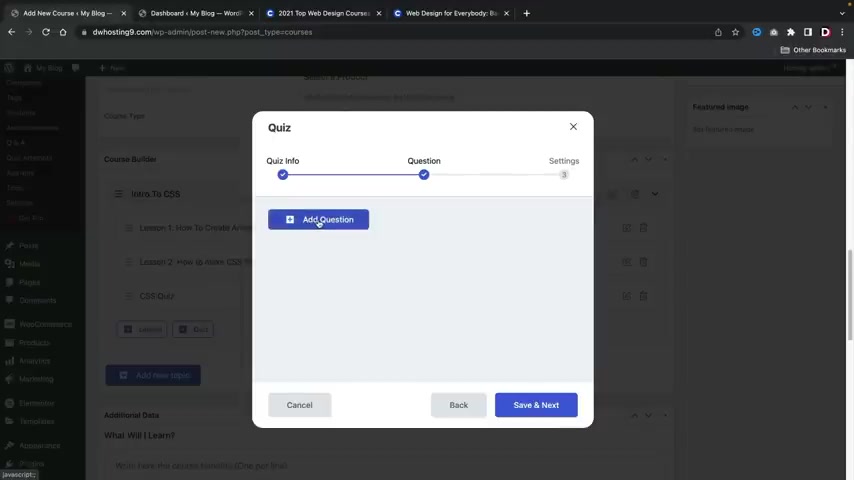
Let's put CS S quiz , let's quiz you on CS S skills and here I'll click on save the next .
So now let's go ahead and add in a question , right ?
Let's click on , add a question and you'll go ahead and put in your question here .
Let's CS S slows down websites and this is gonna be a true and false question .
So I want this to be required .
Now , you can also make this randomized if you choose to do that .
And here is the display points if you want to have a more of a point system on your website .
I would highly recommend to uh put this on .
If you do not care about having a display points , then you would leave that off .
But I'm gonna go ahead and display uh points and then this is your optional description .
You don't have to put anything here .
This is if you want to give them hints or if you want to say something while they're answering the question , but I'll just put in , this is a description just to show you guys where it appears .
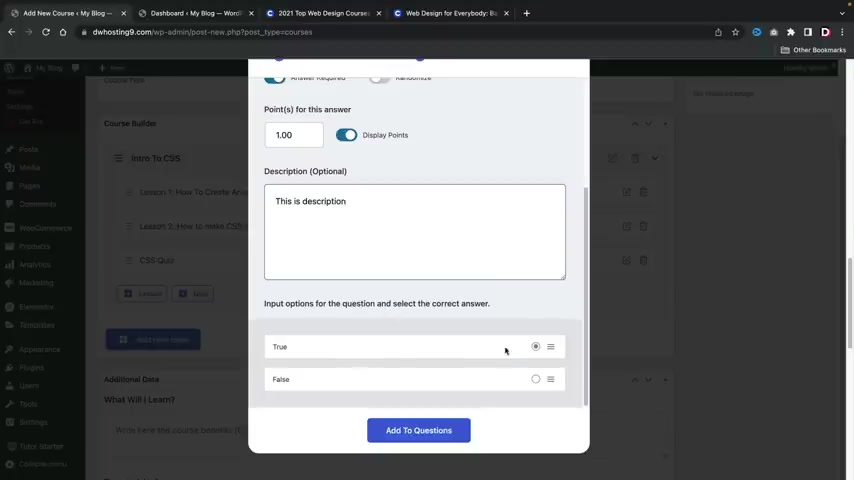
Now , what is the correct answer ?
You can select true or you can select false .
So the fact that CS S can slow down a website , I'm gonna put true here .
It's kind of a stretch , you know , but uh what the hell , why not ?
So I'll go ahead and click on add to questions .
So we have now created our first question now , we can add in more questions , right ?
So let's click on add a question and this will be another question .
What is CS S exactly ?
And I'll make this multiple choice , I'll make the answer required .
I'll display the points and I'll go ahead and add an option .
So instead of true and false , you guys might want to have multiple choice for your quizzes , right ?
And for the answer title , I'm gonna go ahead and put in uh what CS S actually is , right ?
And I'll click on update answer .
So now I have two answers and I'll add in one more and CS S is junk .
All right .
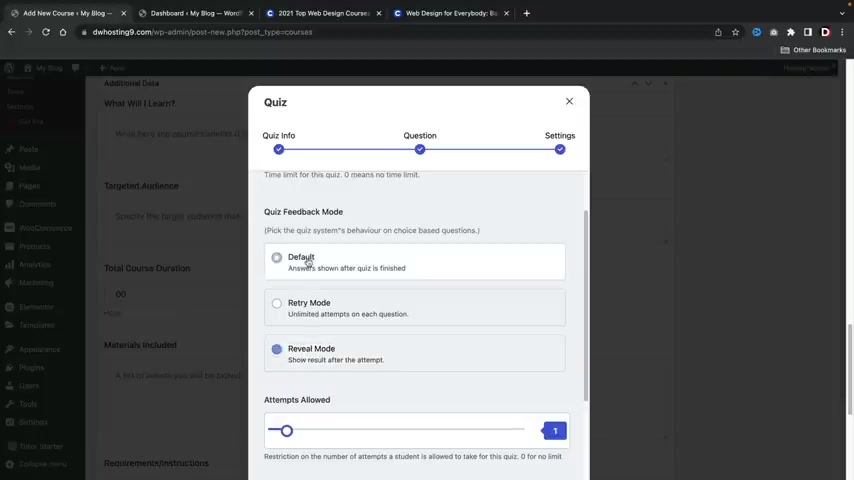
And I'll just click on update answer .
So now I have three different uh selections , right ?
The correct answer is cascading style sheets .
So I'll just go ahead and click on add to questions .
All right .
So I , now I have two questions for my quiz now for , to , to purposes .
I'm just gonna go ahead and leave it there .
There are other uh options you guys can use .
But I think you guys get the point here .
So I'm gonna click on save and next .
And now we have some more information .
We can have a specific time frame for this quiz .
Uh If you do select zero , there is no time limits .
So the next option is quiz feedback mode .
This is basically saying uh do you want to show answers for the quiz if the user answers them correct or not ?
I'm gonna put defaults .
I'm gonna say the answers are shown after the quiz is finished .
You can also um show results after the attempt , which is also pretty popular .
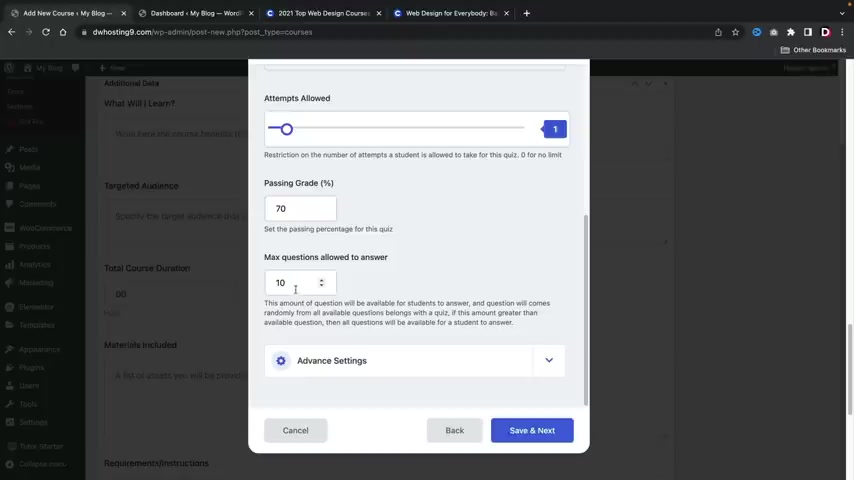
In fact , I think on my uh on my portal for Cal State Northridge , they did have reveal mode , I believe now or you can have retry mode which has unlimited attempts on each question .
How many times can a person take this quiz ?
You can select zero for unlimited and anything else it would be just a specific number , but I'm just gonna put it at one .
Now , what is the passing grade ?
Well , I'm gonna put like uh 70% of the passing grade .
So the next one is called max questions allowed to answer .
Now , this is a very interesting um setting .
This is basically saying if you have a very large quiz , like a 20 question quiz , right ?
But you only want 10 to appear on this specific quiz .
This is used to prevent people from trying to find out the answers because then everyone's given a random question and also some students might have different questions than other students .
So this is kind of like a tricky thing to do if you want to have uh a very large quiz and then randomize 10 questions from that quiz here .

You have the advanced setting , you can have auto quiz starts hide questions , numbers and just some additional information here .
Uh If you guys choose to do that , but I'm gonna go ahead and click on , save it next .
All right .
Awesome .
So here we go .
We have lesson one , lesson two and our CS S quiz .
So that's pretty much it .
But you might want to make a closing lesson .
So for lesson uh three , this will just be more of a closing like things to know going forward , you know , and CS S is this but just remember CS S is good , you know , just to , just to close out the actual topic , you know , just something to just , you know , give it a closing and just , and just to sort of complete the actual topic section right now , let's go ahead and add an , a new topic .
So this would be a new topic , right ?
So , intro to CS S , this will be intro to wordpress and then you would go ahead and put in the topic summary .
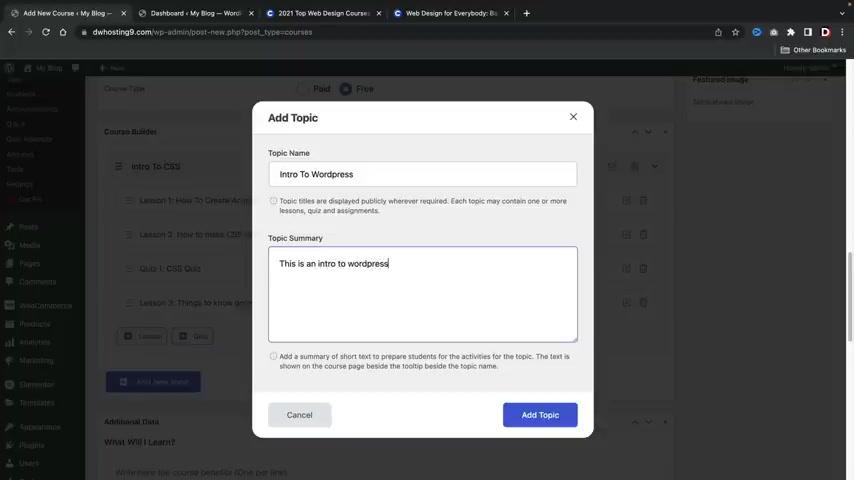
So this is an intro to wordpress and I'll add a topic now .
What about wordpress ?
Well , let's go ahead and add a lesson here .
So uh I'll go ahead and put so intro to plugins right here , I'll go ahead and paste in some content here and I will update the lesson , right ?
And we'll add another one .
This is really easy guys , as you guys can tell , uh this is pretty simple .
So intro to themes , this would just be some more uh contents about uh you know , themes and stuff like that and so on and so forth .
So I think at this point , you guys are understanding what to do here .
Um I'm gonna go ahead and close out this last lesson .
So end and this would be like the end of the actual course , right ?
All right .
So I think at this point , you guys know what to do with the course builder .
I'll go ahead and leave it up to you guys .
Uh We have created uh topics , we've created lessons and also quizzes for our uh course websites .
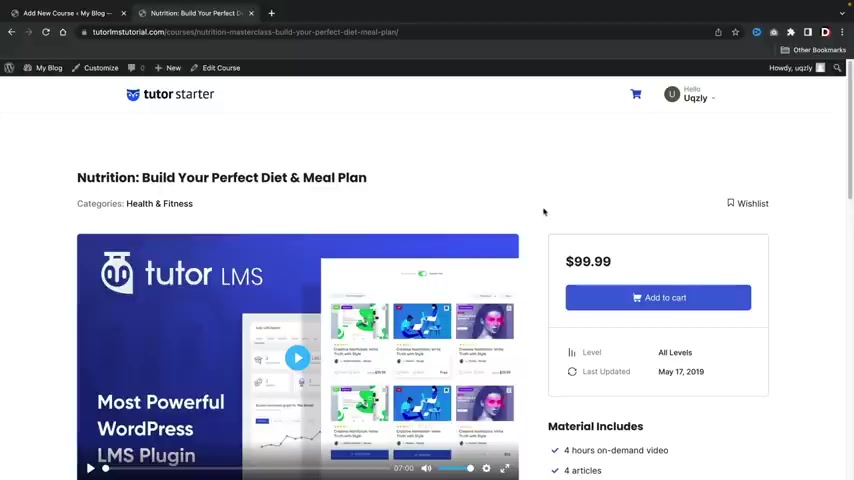
Um You guys can also again leave attachments and downloads and whatever you want on all of those lessons .
Now , here we have additional data .
What will I learn ?
So if you go back to our original course right here , you will see that we have this section where it says like , what would you learn ?
And then we have these checkmarks .
So this is where it's going to appear , it's going to actually appear on the actual course page .
So right here , I'll just put in like uh you know that you'll learn this , you'll learn that stuff like that uh target audience .
So who is going to learn this ?
So over here on the actual right side , we can see that we do have an audience .
So this is where this text will display , I'll just go ahead and copy and paste that there .
Here you have the total course duration .
So how long will this course take on the right side above here ?
Um We actually hit it but it's actually right here .
All right , it's actually right there .
It's just , it's just hidden though .
We actually hit it in the options and materials included .
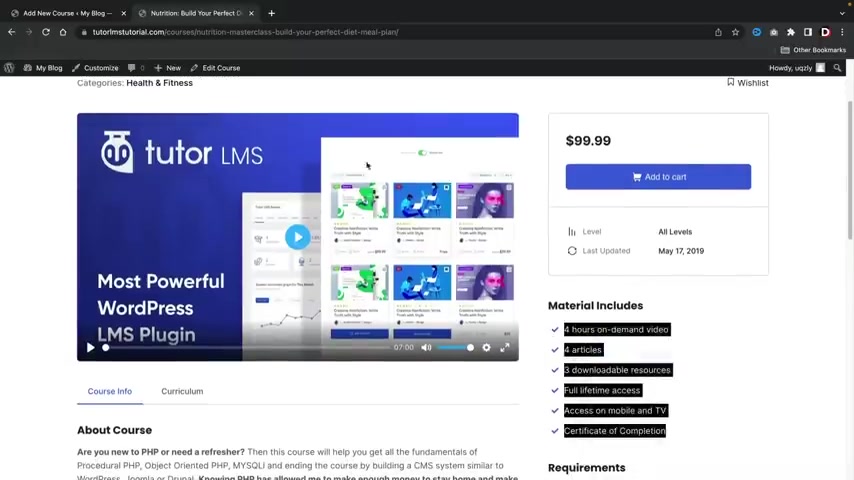
This is basically saying these are the materials included .
So I'm just going to go ahead and copy these and paste those bad boys there , right ?
And for every line you create , it will create a little check mark .
And then here you have the uh requirement instructions right .
And these right here are the requirements .
So just something , you know , you can just put in whatever , just make sure that it's one line because that is a like every line is one checkmark basically .
And then here you have the course intro video .
So whatever video that you want to use to represent the actual introduction of the course , you're gonna paste that URL right there .
All right .
And once that's done , we'll go ahead and scroll up .
So we've essentially entered everything for the course .
Right now , there are some other options on the right side that we do need to cover really quick .
The first thing is course categories .
Do you guys remember when we created a course category for web design ?
I'm gonna go ahead and select web design .
We also have tags , right ?

I want to go ahead and enter web design as a tag here .
You'll see that web design is already there .
So I'm gonna add in web design and click on add .
So now if users click on web design , they will then find our course .
Next , we have the tutor starter schema .
Now , what this is going to do is that this is actually going to display your course with the actual schema markup .
For example , we can see that I entered in this online course , how to lose weight .
And we can see how this course right here has stars and ratings and reviews and it has a lot of information about the actual course .
This is why you'd want to enter that information because then it will reflect on to the actual uh schema markup .
So let's go ahead and select the schema type , which is a course , right ?
And uh it was this web design for beginners and this is an awesome description and the website will just put www dot Darrel wilson dot com .
All right .
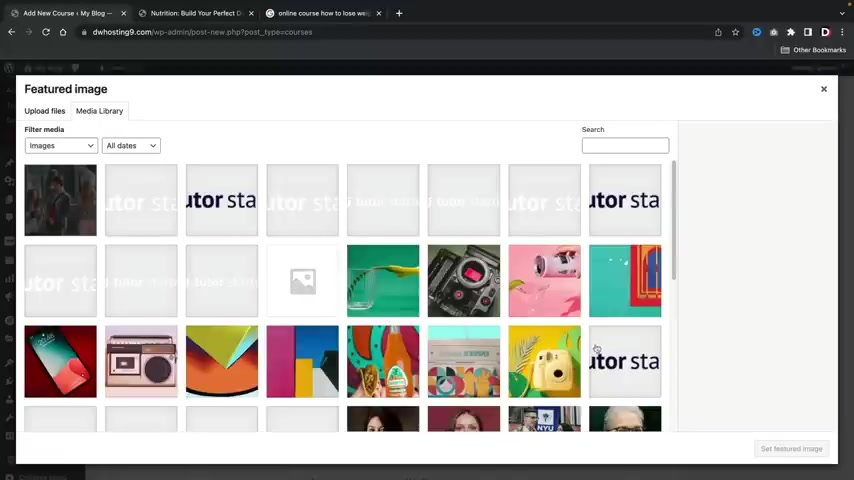
And we're gonna go ahead and select a featured image .
So what is the image that represents this actual course ?
Well , let's go ahead and find one here .
So I'm gonna select this .
Uh I don't even know what this is .
What guys , what is , this is a camera like what , what is that ?
I'm just gonna select that as my featured image , you know that that's it .
So this is the image that represents the actual course .
Now , once you guys are done , let's go ahead and click on publish .
All right .
And now let's go ahead and view the course .
All right , here we go .
Look at this .
We have our web design course .
We have our ratings .
The categories is web design .
If I click on this , it will display all the courses in the web design uh category , right ?
Uh Going back here now , this is a free course .
OK .
So we can uh make this paid and we'll do that in the next section .
Uh We can enroll in the course and here's all the information , right .
We have the materials included , we have the beginner duration , uh , last updated about the course .
Right .
We have the curriculum where users can actually look at stuff .
Now , it's locked at its current time .
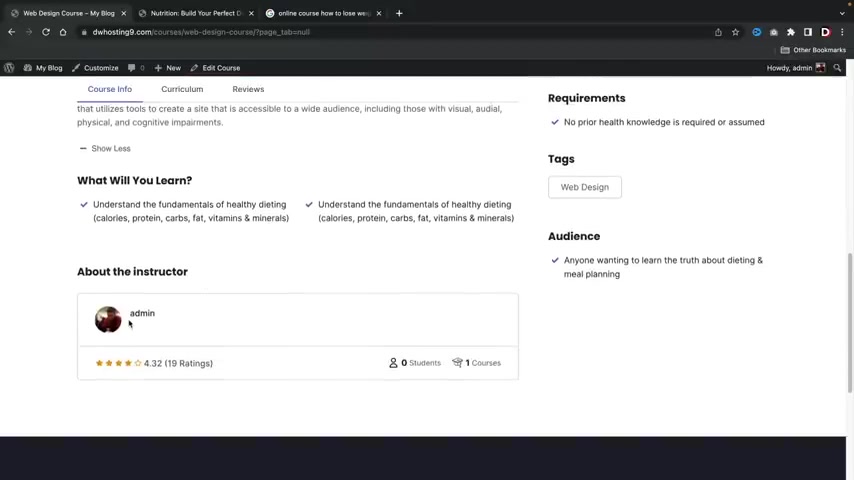
Uh This is due to the content drip , right .
So it's just showing users what's actually in the course .
Here is the reviews .
Here is the instructors , uh , the design , the tags and that's pretty much it .
So , congratulations .
We have now created our first course .
Now let's enroll in the course .
Now let's act as if we are a new person and we want to now enroll in the course .
Let's go ahead and click on enroll course .
All right , and I'll click on start learning .
So this is the actual experience that your users will have when they first enter the course .
So this is the uh video that I entered for my course and you can see that if I play it .
Uh It is now playing uh the youtube video pretty cool , right ?
And it's also using their their tutor video .
So you see here how this is like this is not really youtube , right ?
This is like their little video player .
So it is using like their own exclusive video player , which is pretty cool .
Here is the overview uh remember earlier we entered in the image , this is CS S intro .
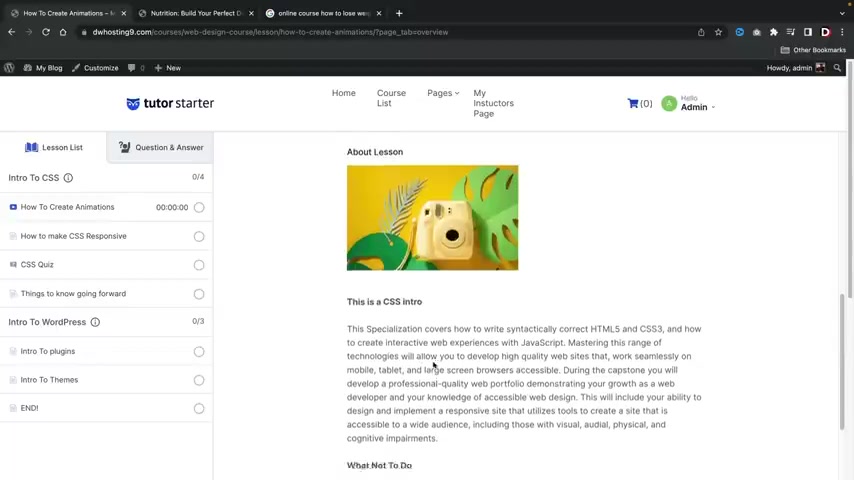
We have all of the information that we've entered in our previous course .
And here is the exercise file .
So if you do want to give users files to download , they can click on a download and then that will download onto their computer .
Now , let's go ahead and say , all right .
Well , I read this lesson .
Let's mark this as completes .
Awesome .
Now let's go to the next lesson .
Really ?
Really , I love this .
It's so easy to navigate .
You know , here we have the overview and here is the actual lesson we are on , right ?
How to make CS S responsive .
So how to make CS S responsive .
I'll say , all right , I read this information .
I checked it .
Let's go to next quiz time .
All right , let's do this here .
I'm gonna go ahead and say , all right , let's start the quiz .
What is CS S exactly ?
Code cascading style sheets or junk ?
Oh , crap .
What should we do here ?
What should we do here guys ?
Let's go ahead and do cascading style sheets .
All right , CS S slows down websites .
Uh True .
Submit the quiz .
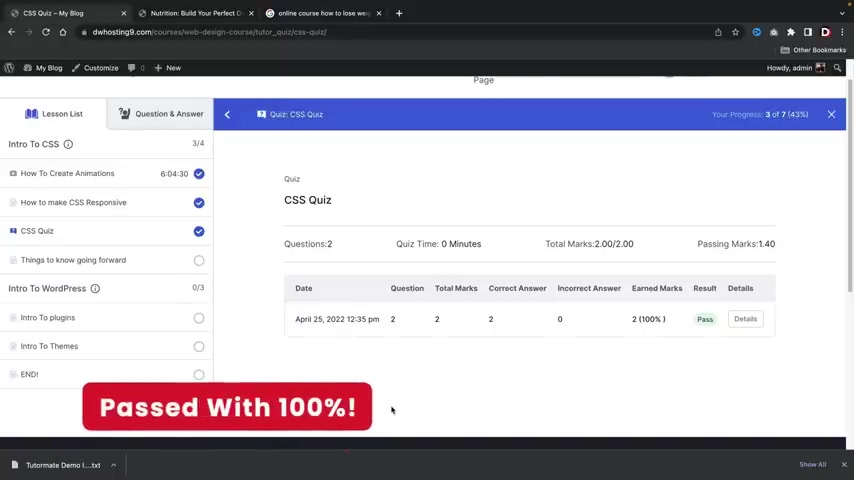
Congratulations .
And I'm gonna go get a beer .
I'm gonna go get a beer .
I'm proud of myself .
I passed the quiz .
I remember my college days like I used to just get scared when I would submit this .
I was so scared and that's like , oh , I got 100% .
I'm a damn professional .
You know , everyone else is a bunch of losers , you know .
So uh awesome .
And we can click on details .
And look at the course .
But uh when users are done with the course , they will then go to the next section .
So things to know going forward , which is just like a closing section .
All right , mark is complete intro to wordpress .
So remember earlier how we have that description about the topic ?
This is just like a little uh section here where um you know , they can just get some notifications or information or whatever .
So now let's go ahead and go to the next section intro to plugins .
All right , here we go .
Now we are on intro to plugins .
We're gonna mark as completes .
We'll click on next .
All right , mark is complete .
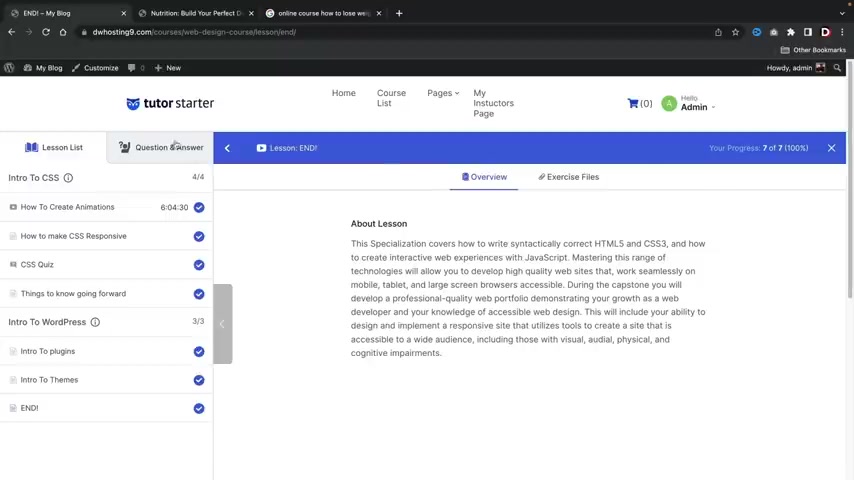
And the last section which is the ending section , uh which is the end mark as complete .
All right guys , congratulations .
We have now finished this course .
Congratulations .
We are 100% finished .
We can also go ahead and ask questions and answers right here .
I'll ask a new question .
Did you like this video ?
Maybe , maybe I should leave this up for you guys .
You guys can be like , you know , you went way too damn fast , man .
You suck , you know , thumbs down , bro , you know , or whatever .
But uh and then someone else can obviously respond by saying like , yes .
All right .
So congratulations .
We have now made a course .
I think at this point you guys know how to create courses .
Now with the tutor L MS plug in .
However , we are not done yet .
Let's say , for example , you guys do want to have a , a paid course , right ?
Uh Let's go ahead and do that .
We're gonna add a paid course and we'll also create coupon codes for this course as well .
Uh Up here , let's go to dashboard .
All right .
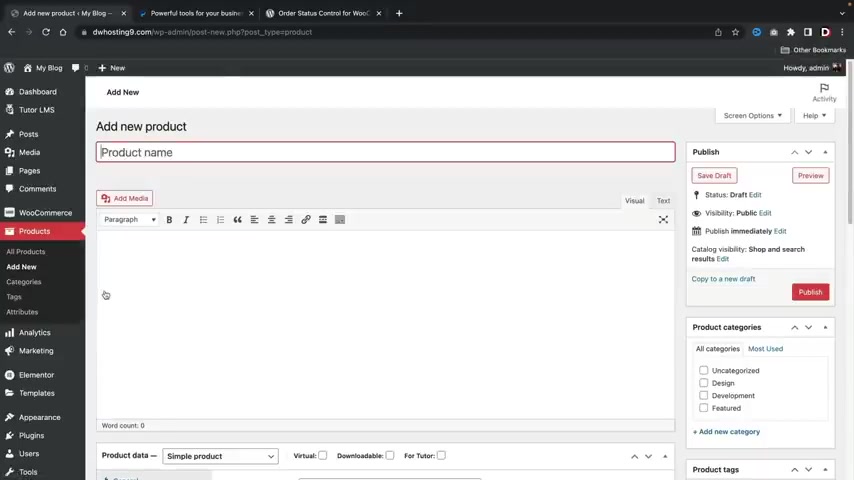
So let's get started first .
Let's go over here to products and we're gonna click on add new products .
Now , guys , I'll be very honest .
The payment check out or the way to add paid courses with this plug in is a little unorthodox , but it still works , right .
The product name is gonna be web design course , right ?
We're not gonna put any description .
OK ?
This is a virtual product and this is for tutor L MS .
How much does this course cost ?
Well , it costs about $100 .
Makes sense right now , I'm gonna click on publish .
All right .
So now that we've created this product , we now need to assign this product to the actual course , which makes it a little interesting over here at a tutor L MS , we're gonna go to courses .
Now , we are going to assign this web design product to this web design course .
So right here you'll see that it says select a product .
I'll go ahead and select the web design course product which does cost $100 .
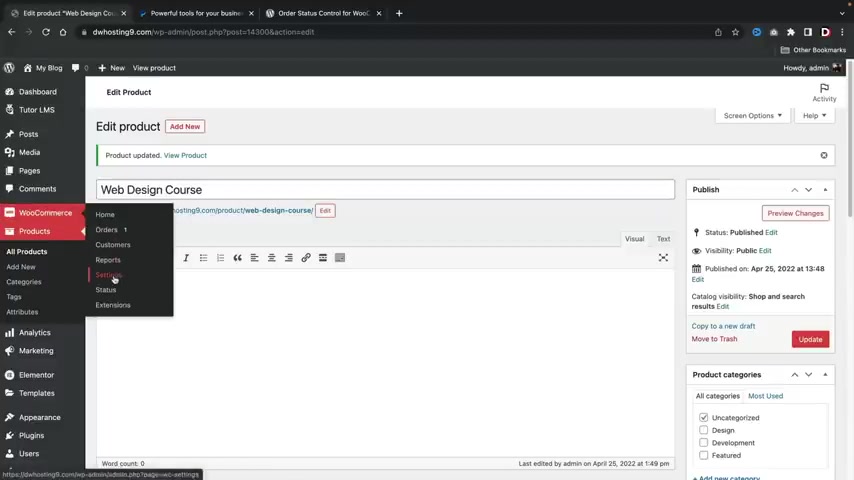
And once I do that , I will then click on updates .
Now , this is required for paid courses .
Ok .
So I just want to make that very clear .
We now need to adjust some other settings and also install a plug-in really quick .
So over here , uh , we have woocommerce , we're gonna go to settings and we're gonna click on accounts and privacy and we're gonna make sure for the account creation that we have this selected and also these two selected as well .
We're then gonna scroll down and click on save changes .
Next , we're going to install two plugins over here under plugins .
We're gonna click on add new and the first thing that we're gonna do is we're gonna type in paypal and we're going to integrate this with paypal so that we can accept credit cards from anywhere around the world .
So right here , we have Woocommerce payment payments .
I'm gonna click on install now and then I'm gonna click on activate .
All right now , it might bring you to like a screen where it wants you to sign up and we don't need to do that .
We're gonna go actually back to add new and there's one more plug in that we need to install over here under search plugins .
We're gonna type in order status control .
All right .
And here's the plug-in that you're going to need to install .
It's called order status for Woocommerce .
Make sure you guys activate this and that's all you have to do .
Just make sure that it's active .
I'll explain why we install this plug in a little bit later .
The next thing we need to do is we need to now connect our website with paypal .
Now , for those of you who are brand new to paypal , paypal is a free service .
It does not cost you guys anything whatsoever .
It allows users to check out with credit cards or pay directly with their uh paypal account .
So users can use credit cards and not even have to log in to uh paypal .
So your customers will not have to even have a paypal account in order for you to accept payments with paypal .
So , so right here , you'll click on sign up and you're gonna make sure that you select a business account .
Uh Once you guys do that , you'll click on next and then you'll just go through the process right here of signing up with paypal .
And once you guys do that , um you guys will be redirected to your paypal dashboard .
Now , I already have another uh paypal account and I'll link it up here in just a bit , but I'm gonna just go ahead and just go back to paypal dot com for now and let's just go back to our uh website .
So let's do that .
Now , we're gonna go over here to , to uh where is it to plugins and click on install plugins .
And now I'm first going to connect uh paypal with our website .
So right here , I'll click on settings .
All right .
So first we want to go ahead and we have this uh checked .
We also want to do advanced credit card processing and you wanna make sure we accept credit cards from all uh networks , right ?
So we're gonna scroll down and then we're gonna click on activate paypal .
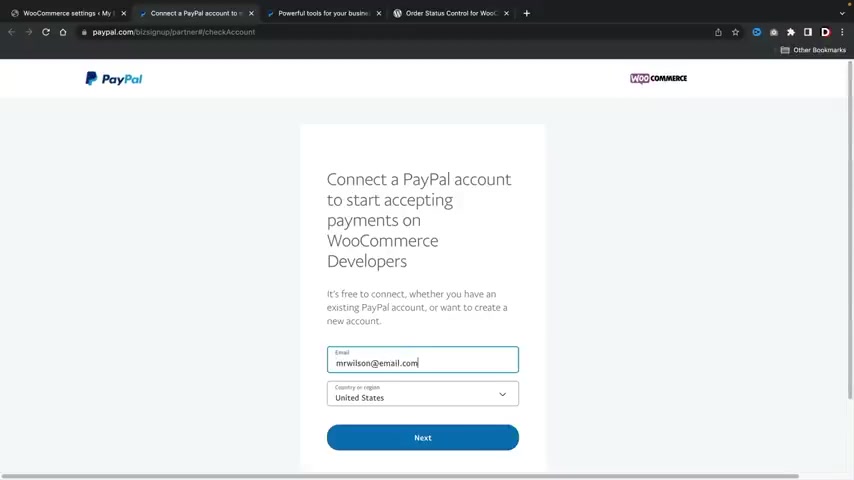
Now , I'll be very honest guys , paypal has made this way easier uh , before this was very difficult to use paypal with , uh with woocommerce .
In fact , you have to hire a developer , but now it's really simple .
So you'll just go ahead and enter in your paypal email , click on next and I'll click on log in .
Now , it's gonna ask us if you want to connect paypal with our Woocommerce developers .
I'm gonna click on agree and connects .
All right .
Now , the next thing we're gonna do is over here under paypal card processing .
We're gonna click on this little tab and we're gonna make sure that this is enabled here as well .
All right .
And once that's done , you'll click on save changes .
All right .
And there's one more setting we need to adjust and that is under the general tab .
So over here under general , we're gonna scroll down and under the order status to complete it , you want to make sure this is select to all orders .
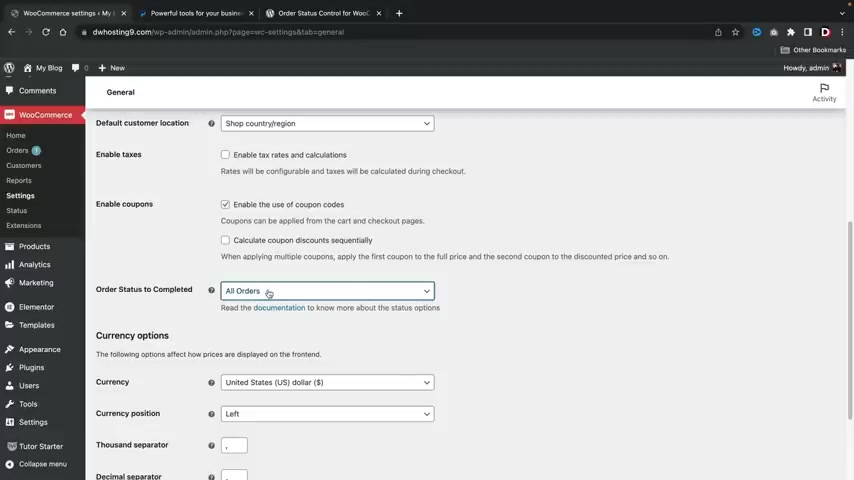
Now , what this does is instead of actually making the course pending until payment is received , this will just automatically approve all of the payments .
So the users will have access to their courses right away .
If you don't have this plug in , that means when the user purchases the course , they will not have access into it until you complete it in the order section .
So right here , just make sure this is selected to all orders and go to save changes .
So let me just go , go over here to orders and just kind of explain what I'm talking about here .
So over here under orders , right , by default , if someone purchases something , it'll say processing until you actually go to the actual order right here and you select completed .
Once you do that , then the user will have access to the course .
However , I do believe it's better to just have these completed automatically .
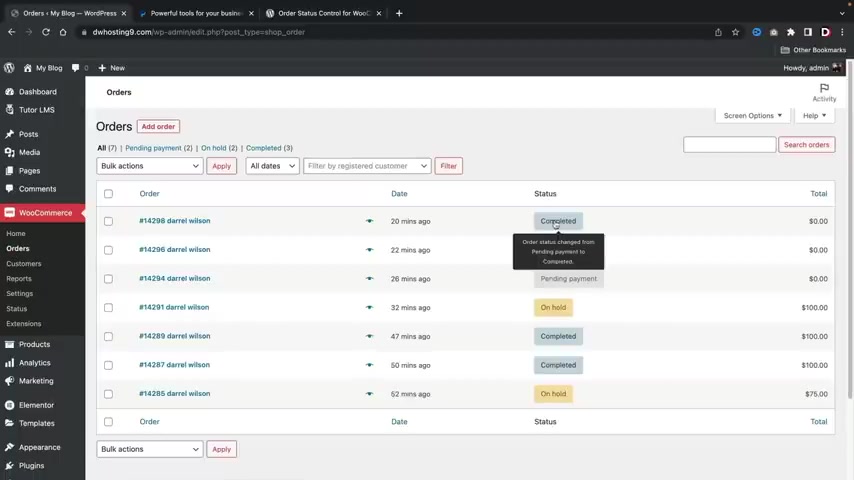
So if the user does pay you , they will have access to the course right away because if they do buy a course for $500 or $1000 and they don't have access to it right away , they're going to be very upset and they're gonna start emailing you and you could lose a customer .
So , uh I highly recommend to have that plug in .
So it'll automatically set all the orders set to complete it .
All right .
So that's why we use uh that plug in .
Now that we've actually adjusted all of these settings , we have our payment gateway set up .
Now , let's go ahead and add in a coupon code .
So maybe you guys want to offer coupon codes for your , uh , customers .
Over here in our marketing , we're gonna go to coupons and we're going to click on , add a coupon .
All right , this is gonna be , uh , Wilson 25 .
Obviously , I've made many coupon codes before just messing around with it .
Uh , over here we're gonna do percentage discounts of 25% .
Right .
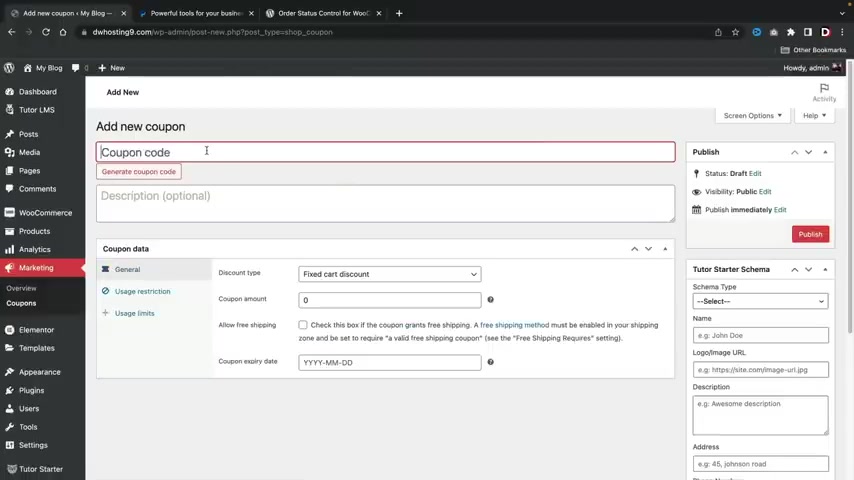
So , if someone , uh , enters the coupon code , Wilson 25 they will then get a 25% discount .
But I'm gonna enter in one more since I'm not gonna use real money , I'm gonna enter in a uh 100% discount code .
So I can just show you guys the check out process .
Here we go .
So now that I've created these coupon codes , let's have a walkthrough of how a customer purchases a course .
All right , cool .
So here we go .
I'm gonna go ahead and uh , I'm a brand new visitor , right ?
And I'm going to go to course list and let's just imagine .
I'm brand new the website , you know , here we go .
We got , uh we got the course right .
So here I'll click on the course and I will uh add this to the carts and I will view the carts and uh here I'll enter in my coupon code of Darrel 25 right ?
So that will give us 25% off the course .
But I have a better coupon code .
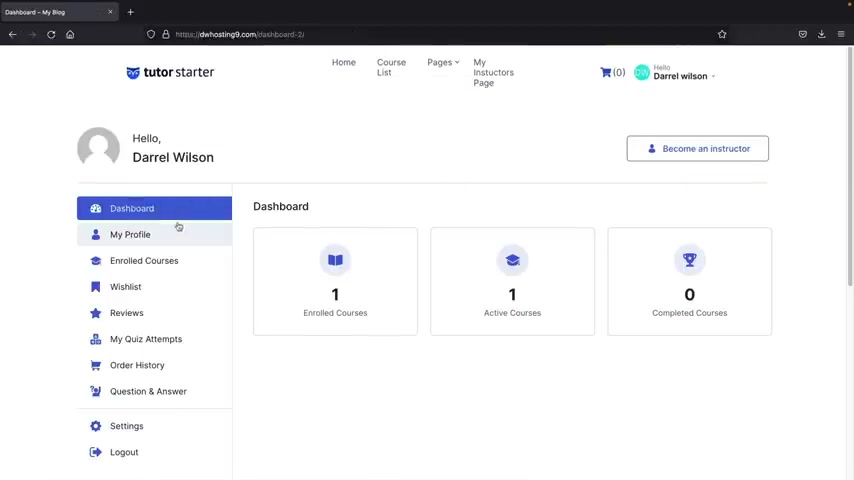
We're gonna enter in Darrel 100 this coupon code uh will give us 100% off .
Right .
And I'm just doing this just for total purposes .
Uh Here , I'll go to proceed to checkout next .
We're gonna enter in our name here .
I'm just gonna enter in some , just random information you guys can see , I'm just throwing in some random stuff here .
Uh So I'll just go ahead and uh put all this stuff in .
I want to create an account .
I have read to the terms of service , right ?
And once we're all done with that , we will then go ahead and click on complete payments .
All right .
Awesome .
So our order has been received right away .
You can see that the portal has been automatically created for our students and the student has access to the course right away .
So if I click on this course , they can then click on start learning and all that good stuff .
Also , let's just go ahead and take a quick look at our dashboard .
So uh the dashboard is created for the user automatically , right ?
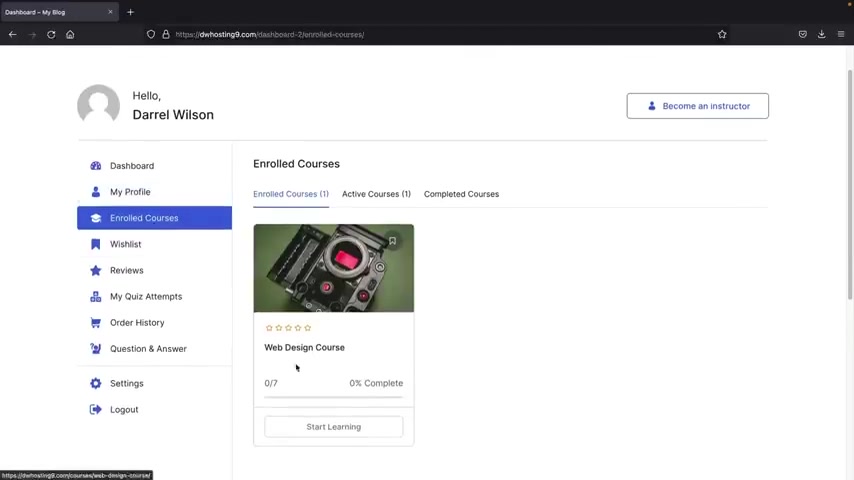
And we have all of this stuff here on the left side where they can go ahead and uh you know , check out their course , they can go to enrolled courses and they can start learning the course .
So let's take a look .
Here we go .
We have the course itself .
Awesome mark just completed .
All right .
So we're gonna go to the next course here or the next lesson Mark is completed .
All right , we're cruising .
Uh , we're gonna skip the quiz here .
You know , we're , we're gonna skip .
Yeah , we , we , we can skip the quiz .
Right .
Mark is completed .
Here we go .
Next lesson Mark has completed .
Pretty cool .
And let's keep going here , Mark is completed and the next one and Mark is completed now , we are only 86% done .
So that means we have to actually take the quiz .
All right , let's do that .
We will start the quiz , CS s slows down the website .
True .
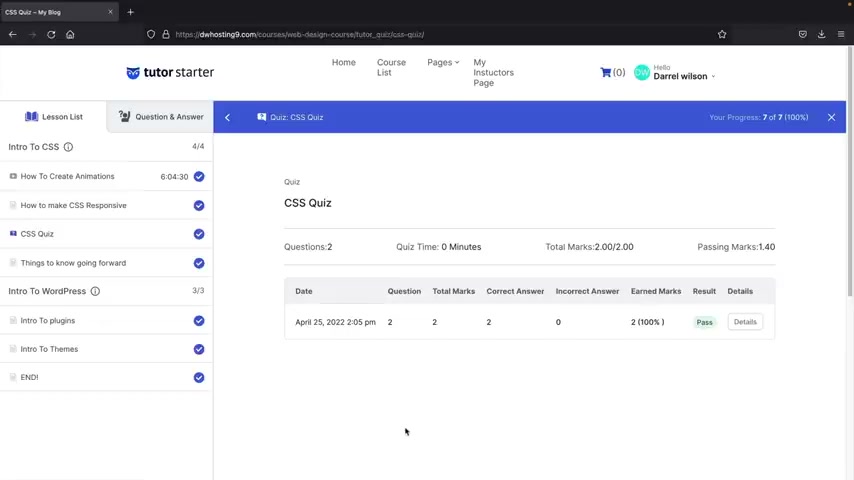
And what is CS S exactly cascading style sheets ?
I will submit the quiz and we are done .
We have passed the quiz .
Congratulations .
Now , the user can go to their dashboard here and under the um enrolled quizzes , they will then see that the quiz is 100% complete and you can go ahead and verify on your end as an admin .
All right .
So that's a basic rundown of the tutor L MS free plug-in .
Now , there is one thing I do want to mention over here under Woocommerce .
You guys can actually see how much money you're making over here under the report section .
Now , this is a pro feature with the tutor L MS plug-in .
However , you guys can actually see how much money you're making right here .
Uh by going over to uh reports and stuff like that .
You can also see the customers as well .
So you can see uh the actual information about the user uh and everything else .
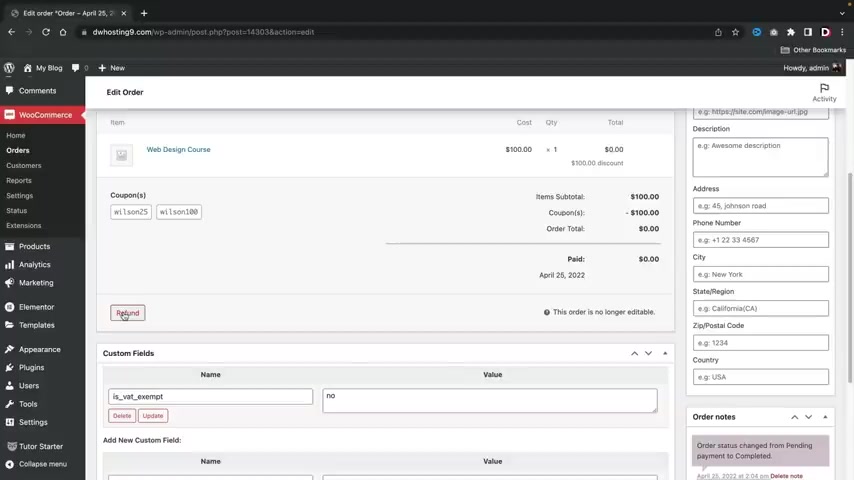
So , uh when you're looking at money and stuff like that and also the users , you might want to look at the woocommerce settings uh over here in the orders as well .
If a user says like , oh my gosh , this isn't working or something , you can always go ahead and view their orders right here .
And uh if the user just says , you know what ?
I don't like you , I want my money back .
You guys can click right here and click on refunds .
And if you have connected this with paypal , it will go ahead and refund them through the API with paypal automatically .
So it's a very convenient process and that's how you guys can kind of um you know , take a look at your reports and your money and all that good stuff with the tutor L MS plug in and woocommerce .
All right .
Well , I hope you guys enjoyed this part of the video .
Make sure to like this video .
Now , on the next step , we are now going to talk about the tutor L MS Pro version .
I'll meet you there .
Ok ?
So before we go any further , I wanna show you guys how to turn your course website into a funnel course website .
For example , let's say you guys are selling one course , right ?
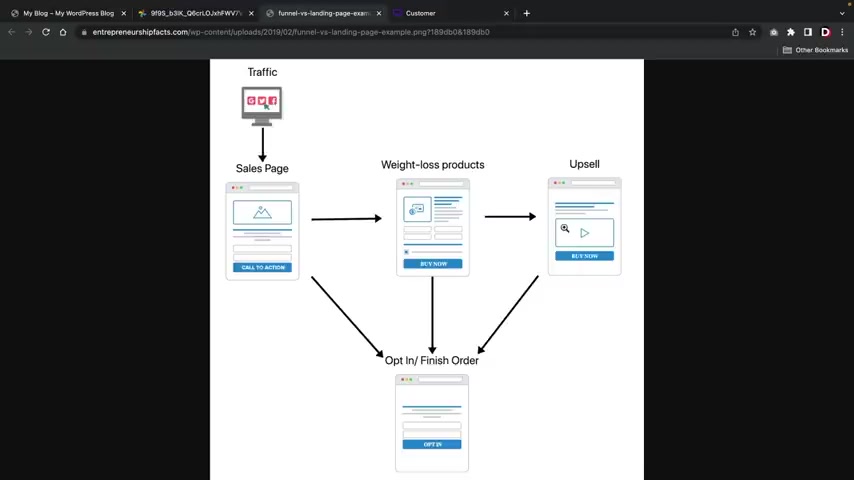
And you want to create a funnel for your traffic , right ?
So your visitors will come to your sales page from the sales page .
They're then taken to the actual product from the product .
You can offer additional up , sells like additional products to buy and then the brought to the thank you page where they'll go ahead and check out and purchase the product .
This is ideal if you want the customer to directly buy something instead of navigating the website and getting lost .
And this is also ideal if you're selling maybe one course , right ?
For example , over here , this is a website that I use for a lot of my projects and you can see here the customer is brought to your main sales page .
This is where you're trying to convince them to buy something from the checkout page , they can purchase it and then they're brought to a thank you page .
I'm sure many of you guys have seen a page that looks like this before , right ?
I mean , from way back when , but a lot of people use these funnels because they work .
So here is like a big video .
We have the title and if they click on this , they can go ahead and purchase the course on the very next page .
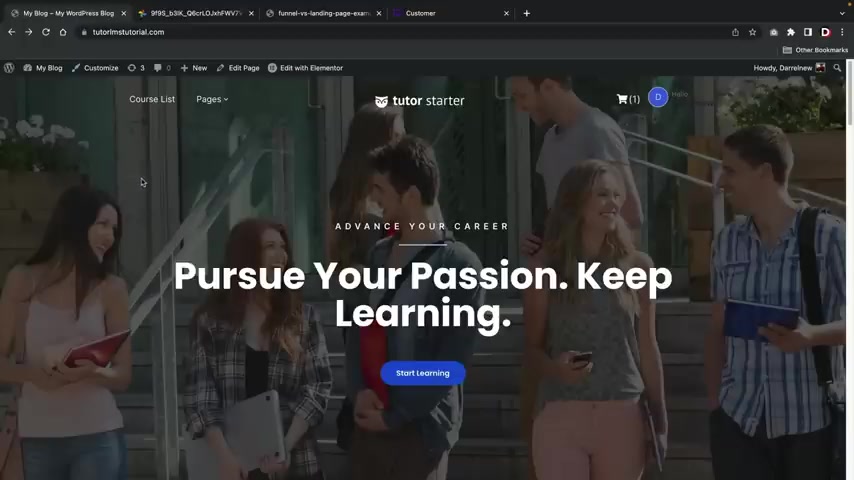
So let me go ahead and walk you guys through on how to create a funnel on your website .
It's really easy to get started .
And if you guys are selling courses , it might be something that you might want to consider because it does help with conversions and we're gonna make this for free using a free plug in .
How about that ?
So , let's go over here to our dashboard and we're going to install a free plug in .
We'll go down to plugins and click on add new .
Now for the search plugins , we're gonna type in Woo Funnels .
This is a really good plug in to create funnels on your websites and this is the plug in right here .
It's called Woo Funnels .
It also comes with tons of templates and it works with all page builders .
So you could be using any page builder and it works really well .
So let's go ahead and click on install now and then we'll click on , activate .
All right , cool .
Now , once you guys install the Wu Funnels plug in , you'll then see Wu Funnels right here .
Go ahead and click on funnels and we're gonna create a new funnel for your websites .
So , the first thing that we have to do is we have to add a funnel .
Now , this also integrates with the Woocommerce payment gateways , ok ?
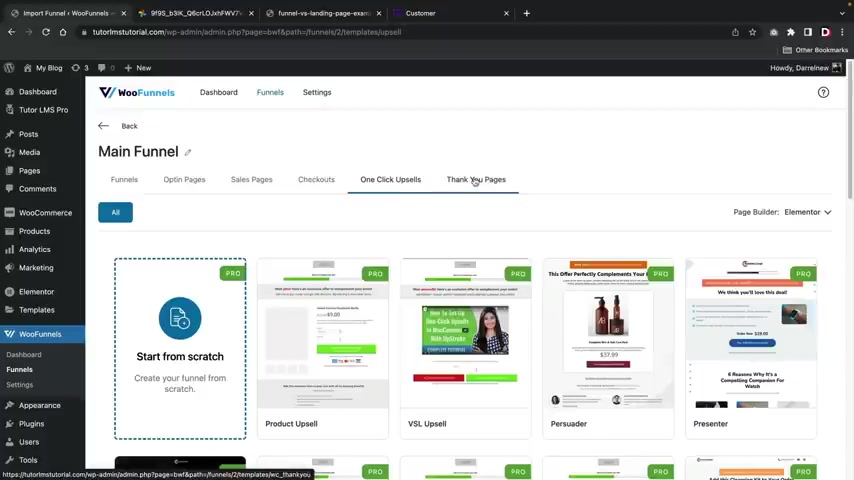
So you don't have to worry about uh creating another payment gateway or anything else .
This integrates with woocommerce .
So we're gonna be using the Woocommerce payment gateways , the ones that we set up earlier .
So right here , I'll click on add a funnel , right ?
And just give your funnel a name , right ?
And you guys can rotate these funnels , you know , you can try various funnels to see what works best and this will be like the main funnel , right ?
The main funnel and I'll click on add .
All right .
So once you guys create a funnel , it'll take you to the main funnel page right here where you guys can see tons of templates , right ?
So they do have a lot of templates that you guys can use .
Um These right here are pro .
So you guys will need to purchase the Pro , but uh we don't need to do that just yet .
So you guys don't need to purchase the pro for this plug in .
Uh Here you have opt in pages , sales pages , checkouts and so on and so forth .
Now , one thing I also do want to mention is the one click up sales is exclusive to the Pro version .
But um the other pages you guys can use in the free version , you guys can also fully design and customize your own page .
So these are pro , however , you guys can make your own .
So you don't have to purchase the Pro .

But let me go ahead and show you guys how to set this all up .
So what I'm gonna do right here is I'm actually just gonna pick from a template and we're just gonna kind of cruise through this .
I'll probably make another video that goes through this all in detail .
But for this video , I'll just give you guys a brief overview about how to use it .
It's really simple .
So right here , I'm gonna import this template , right ?
We have four different steps .
So I'll click on import and here we go .
So we have the sales page , the checkout page and the thank you page very similar to our chart right here , right ?
We have the sales page , the checkout page and the thank you page .
So this is the first page users are brought to , right ?
So right here , I'll click on the three dots and I'll click on edits and we can actually edit this page and I'll walk you guys through on how to edit so you guys can create your own .
So this is the template kit that we're using , right ?
But right here , I'll click on edit templates and we are now going to design this using the page bullet that we used earlier .
So you guys can actually go ahead and recreate your own funnel page .
I mean , you guys can get as customizable as you want .
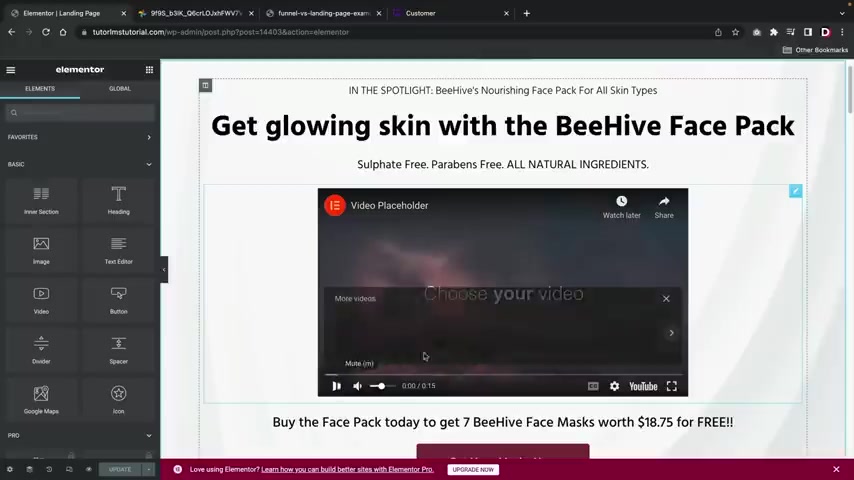
So this would be the first page people are brought to uh when they go to your websites .
So here you guys can obviously change the title .
All right .
And here we have the video placeholder .
Now , one thing I do want to mention is that when you guys do use the video , there's a lot of options , right ?
You have auto play , you have play on mobile .
I would put the mute on as well .
So what happens is when users come to your website , this will auto play yet , it'll also mute .
So there's no sound and then you guys can also hide the youtube information right here with the branding like that .
And then also you can also turn on privacy mode if you choose to do that .
So well , once you guys actually go ahead and design this page , uh you guys can go ahead and bring them to your next page .
Now , one thing I do want to mention if you guys want to go ahead and just get rid of this entire page and start from scratch this button right here .
You'll see this link right here .
All you have to do is copy this .
And let's say , for example , you guys wanna make like a different button or you want to do something else , you know , just go ahead and say , you know , I don't want to use this button .
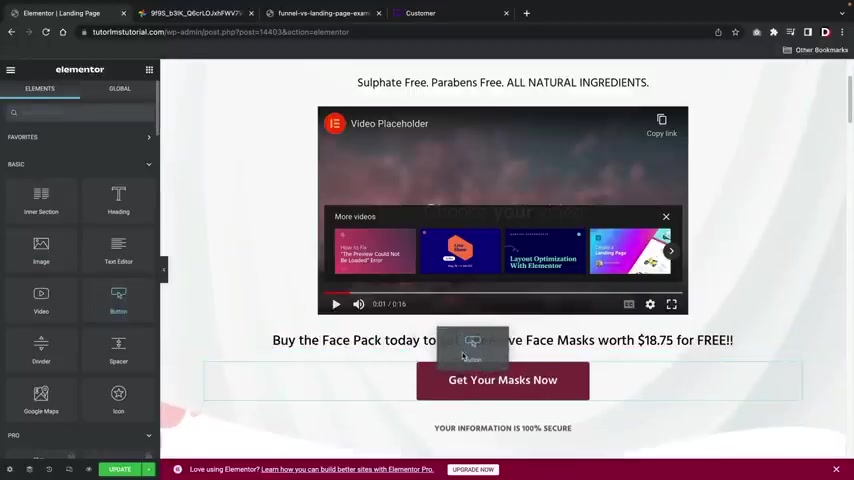
I want to use my own button .
Go ahead and drag it right there and I'll just go ahead and , you know , I'll just delete this as for total purposes and whatever page that you make , you just need to go ahead and paste that link like that .
This enables users to go to the next step of your funnel , right ?
So I'll go ahead and click on update .
So on your own time , you guys can go ahead and create your own funnel .
You guys go ahead and check my website .
I might have funnels for you guys , I might be making them , I'm not sure just yet , but just feel free to check out my website and I probably will have free uh funnel pages for all of you .
But once we go ahead and design this page , I'll click on view page , right ?
And this is the landing page .
You can see that the video plays right away and you just can see what's going on .
They can then go ahead and scroll down right here and click on , click here .
This will then take them to the next step , which is the checkout , right ?
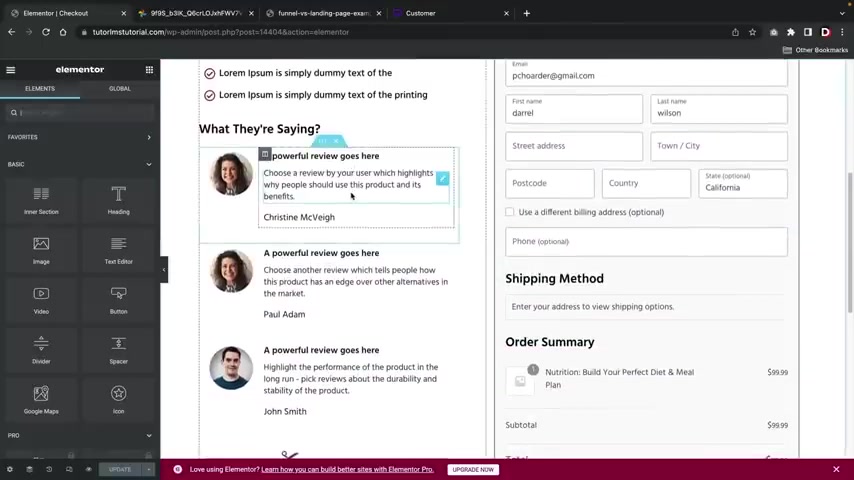
So for example , uh you guys can also edit this page as well and then you guys can also design this page just like you did on any other previous page , right ?
So here you can put in like , oh Jenny Craig or you know , Jenny Craig and she said something really cool about your uh you know , your your products and then we got the , do we have stars or is that only the pro version ?
Yeah , we got the star ratings here .
Hold on .
Yeah , the stars .
There we go .
Yeah , you know , the stars make everything good , you know .
So we'll just go ahead and , and just everyone gets five stars , five stars for everybody , you know .
So this is how you guys can customize this page , right ?
And this is the actual uh checkout form right here .
So here you have the customer information tab and this is where you can uh modify your form if you want a bigger or smaller and so on and so forth or if you want like your first name to be full or something like that , you guys can customize this as well .
And then also the next tab , we have the painting gateways .
This is referring to this section right here where you can just adjust the heading .
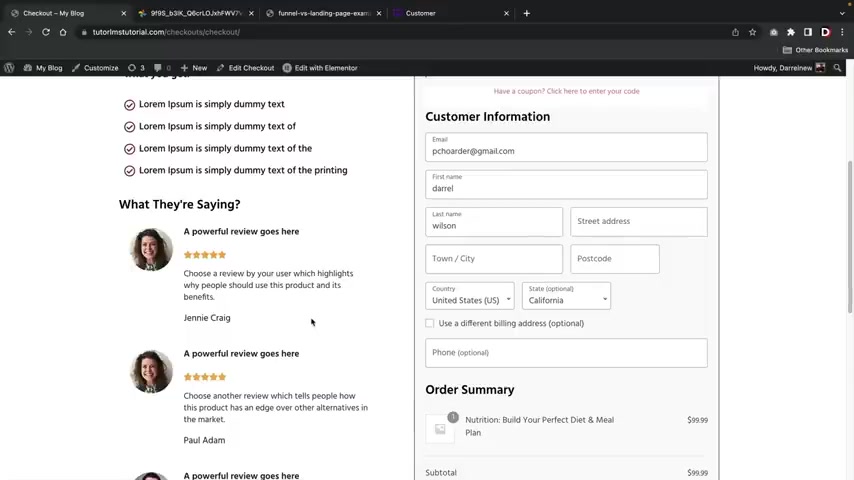
You can also adjust the subheading and then you can change the actual um you know , place order now to uh buy now or something like that .
And then also you can put this text below whatever this is right here , right ?
Text below .
And then this will create text right here below that .
So that's also something that you guys can add .
But uh yeah , you guys can go ahead and customize this checkout form any which way you guys want , but I'll go ahead and click on update here .
All right .
And then I'll view the page .
So now that we have this page right here , we now need to add a product for this page , right ?
Because you can see here how we have this product , but I'll show you guys how to assign your own course , right ?
Remember earlier how we use the product to create the course .
I'll show you guys how to assign that .
So let's go back over here to dashboard .
Now , let's say for example , you guys want to assign a course , to be sold in this funnel , you'll go over here to funnels , right ?
And here is our main funnel , right ?
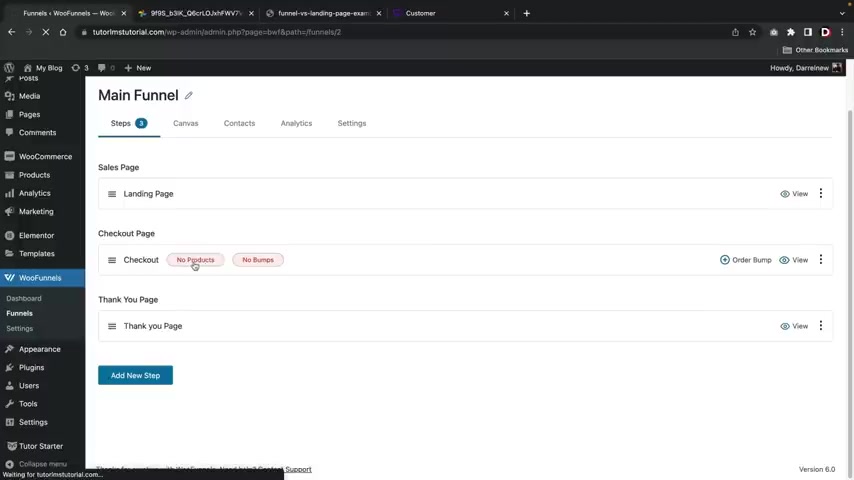
So I'll go ahead and click on the main funnel .
So here we have the landing page , right ?
We customize that and we also customize the checkout here .
We have the no products .
We'll click on this and we'll add a product , right ?
So let's say I want to add a product here .
Well , I'll just put in something like , uh , I think I have one course product .
This is like perfect something .
There we go .
Yeah .
So my meal plan course .
Right .
I'm gonna sell this course .
And I'm gonna add this product to the course or add this product to the funnel .
Right ?
So let's go back over here to the uh , the funnel .
I'll click up here at the funnel and this will bring us back to our main funnel right here .
So now let's say you guys have this funnel and you want to use this on your website .
Let's do that .
So , to assign this to your home page , all you have to do is you'll go over here to settings and you'll click on reading , then you'll see this home page right here .
You'll then go ahead and select the landing page , the one that we created .
So landing page , right ?
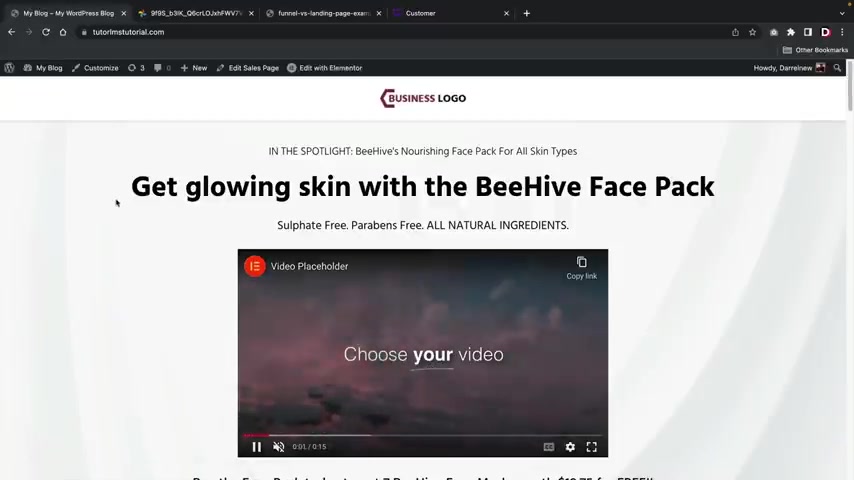
And then I'll click on save changes .
Once that's done , you'll then go ahead and click on visit sites and this is your new landing page .
So we have the landing page here .
They'll click on get here .
This will then take them to the form right here where they can go ahead and put in their information and then they will go ahead and just say I have read to the terms and complete payments and that's it .
Your funnel is complete .
You guys have just made money , so it's really easy to create your funnel right here .
I really do like this .
So if you guys do want this approach on your websites , I highly recommend going with Wu Funnels .
It's a really good funnel builder .
Now , just remember to use your payment gateways in order to integrate this with Wu Funnels , right ?
So I use cash on delivery .
But uh this is obviously a different demo website because I'm using a different plug-in .
So over here , I'll go over to the Woocommerce and go to settings and then over here under the payment section , this is where you're going to enable your payment gateway and this will integrate with funnels .
So earlier that we did talk about uh credit cards and paypal uh Wolf Funnels integrates with all those payment methods here .
I just use cash on delivery , but you'll just want to go ahead and enable the payment gateway that you want .
Woo funnels to work with .
So that's how you guys can create a funnel website or a funnel course websites uh for your website .
So I hope you guys enjoyed this part of the video .
Feel free to check out Wu Funnels and also their other pro version .
I'll probably be making a separate video for that .
I didn't want this video to get too long .
But uh yeah , so now that you guys know how to create funnels , let's go ahead and move on to the next section .
Pretty cool , right ?
So now that you guys know how to manage the website with this course plug in .
Now let's talk about the pro version .
Now , if you guys do decide to upgrade , there is a link below with a coupon code for 25% .
I believe that's in the description below of this video .
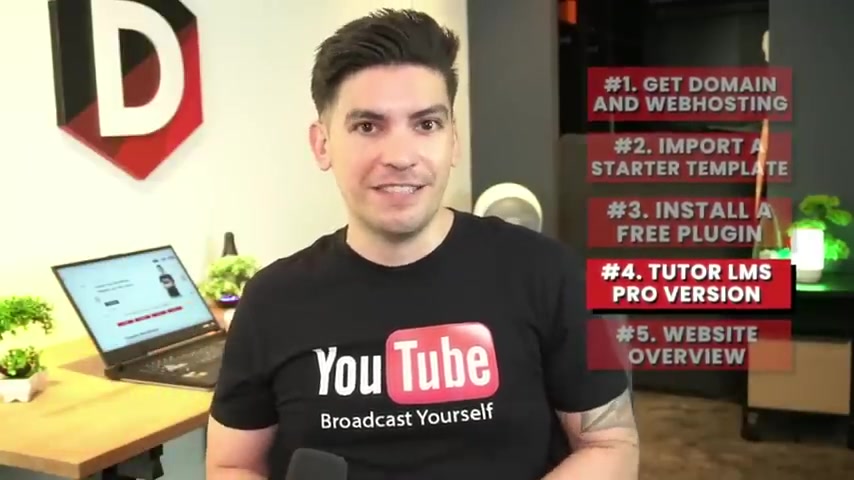
But in this part of the video , I'm gonna walk you guys through all of the pro features and show you like where they're being applied and what they do and how you can extend the power of your online course website using the pro version , you guys ready .
Let's get started .
All right , party people in this part of the video , I'll be showing you guys how to use the tutor L MS pro version .
Now I'll walk you guys through the free version .
However , tutor L MS also does have a pro version and I'm gonna walk you guys through on how to uh use it .
I'm also gonna show you the features and everything and what it comes with .
Now um over here we have the add-ons right .
So with the tutor L MS pro version , you guys do get a lot of additional add-ons .
Like for example , you guys can use their certificate builder , which makes really nice certificates uh for your course or for your school or for whatever you can have subscriptions .
And it has tons of integrations here with , you know , Buddy Press and W PM L where you can uh change the language of your websites to pretty much any language that you choose .
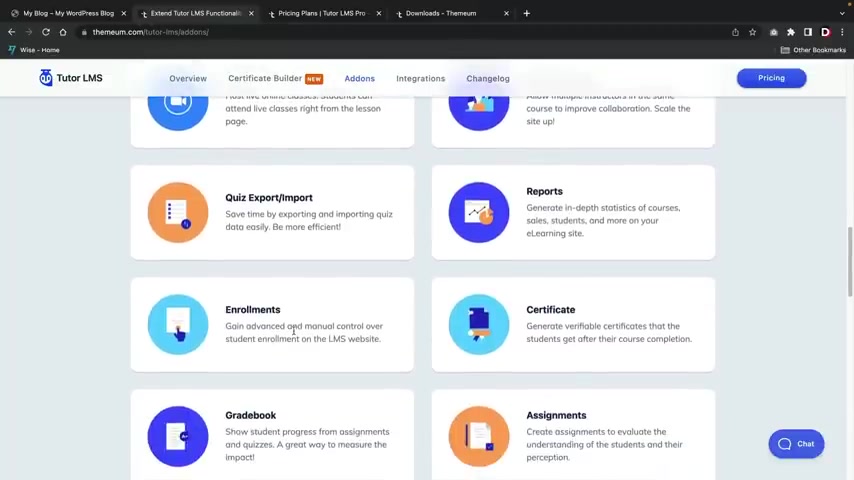
There are some other really cool features in here like Zoom , I'll walk you guys through on how to integrate Zoom in this part of the video .
Also , it does have reports , it has enrollments , a certificates , uh the grade book which I think is actually required if you want to run like a school websites because the grade book will actually show you a list of progress uh for the students .
And I'll show you guys how to use the grade book .
Also , you can create assignments , prerequisites .
Uh You can have customized emails , course attachments , course previews and a lot more .
So uh yeah , you guys do get a lot of features with the two to L MS uh pro version .
Now , if you guys do want to go ahead and purchase it and uh check it out .
There is a link in the description of this video , it'll take you to their pricing page .
So I'll go ahead and explain to you these pricing models and I think these are actually pretty fair when you compare them uh to a lot of the other platforms .
So if you guys do want to go ahead and purchase like just one for your basic website , it's about 100 and $19 .
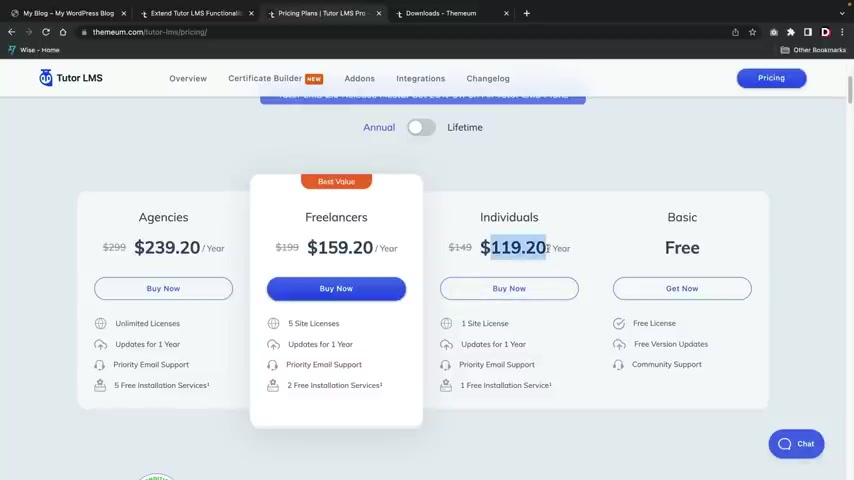
I do also have a discount for you guys that will give you 25% off uh any other plans .
So here we have the individuals , right ?
And this is good for one website and then you have the freelancers , which this is good for five websites .
And then you do have the agency plan , which is good for unlimited websites .
Now , uh , they do also have a lifetime uh plan here .
So if you guys do want to purchase the lifetime plan , you guys can also do that as well .
I find that lifetime plans are probably the most valuable because you only pay once and then you never pay again , which is pretty cool .
Uh So it's the same thing here , right ?
So you have the individuals , right ?
One license , the freelancers , which is five websites and then the agencies , which is unlimited websites .
So what you're gonna do is that you're gonna go ahead and pick a pricing model that works best for you , whether that's annual or lifetime .
So once you guys pick a plan , just go ahead and click on buy now .
All right .
So next , it'll take you to the checkout section .
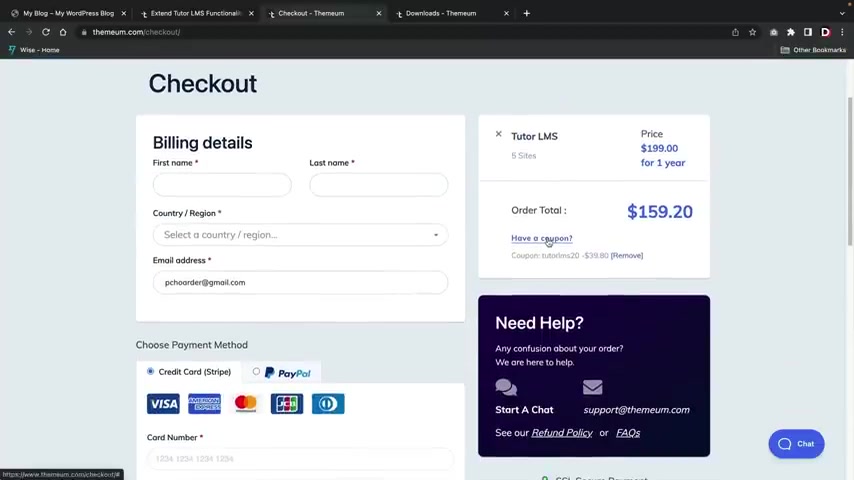
This is where you're going to put in your billing information , like your credit card and all that stuff and you're gonna agree to the terms of service , which I know you're all gonna read , right ?
But uh over here I do have a coupon code .
So where it says have a coupon , you can enter the coupon code .
Darrel 25 .
And this will give you guys an extended discount .
Now at the current time of making this video , they are celebrating their 2.0 version .
So they already have a discount in place .
However , this discount code I'm providing you guys does save you additional money .
So right now it's 1 59 with the sale .
But if you guys do use my code , uh it'll drop it down just a few more dollars , but this will give you 25% off any purchase that you guys have with two to L MS that includes lifetime plans .
So that's where it might actually be beneficial if you guys do want to purchase uh the lifetime plans .
Now go ahead and go through this check out process and once you guys do purchase a tutor LM si will then meet you in your customer portal .
All right , cool .
So this is the customer portal right here .
Uh You can see that I am logged in .
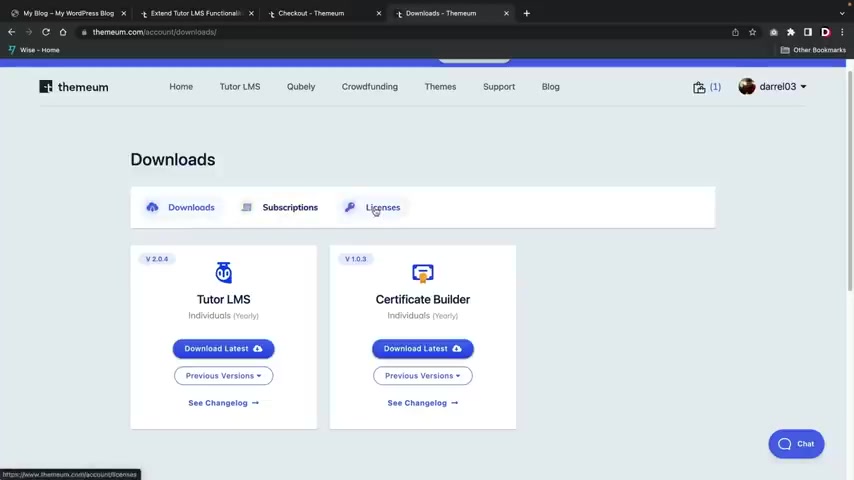
We have our downloads , we have our subscriptions and then we have our licenses .
What you're gonna do here is that you're going to go ahead and download the uh latest version of tutor L MS Pro and then also make sure to download the certificate builder .
So I'll walk you guys through on how to use this .
So I'm gonna go ahead and click on download latest and then also download latest .
Once you guys do that , go over here to licenses and just make sure that you add your website .
So right here , you'll go ahead and add your websites and then that will sync up to your original website with the tutor L MS Pro plug in .
All right , I'm gonna go ahead and close this .
Now .
Let's go back to our website here and I'll show you guys how to upload it .
So let's go over here to my dashboard .
Go to plugins , click on add new and then up here we have upload plug in , choose the file and then I'll go ahead and upload the two to L MS pro plug-in .
I'll go ahead and click on open and then I'll click on install now .
All right .
And then I'll click on activate plug in .
All right .
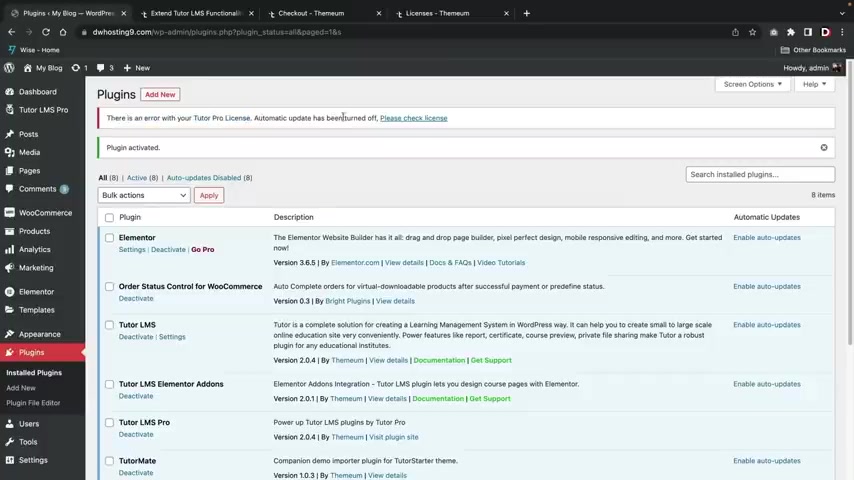
And the first thing that you're gonna see is that there's this error .
It says , uh you need to uh update your license .
So right here , just click on , please check license and this is where you're gonna enter your uh license key .
You guys can get this information uh over here under licenses .
All right , cool .
So my website is now connected with tutor L MS also in your licenses section , make sure to go over here and uh you need to activate the domain .
So just make sure that the domain is active so that uh it syncs up with your current uh websites .
And once you guys do that , uh you will get the green check market and then your website is synced up with tutor L MS .
All right .
So now that we turned on the tutor L MS plug in , now , let's go over here to add ons .
All right .
So this is a list of available add-ons you guys can use .
Uh What I'm gonna do here is I'm gonna turn on all these add-ons and I'm gonna go ahead and walk you guys through a majority of these add-ons .

Um There are some that I'm not gonna talk about like , for example , paid membership pro and other plugins that require additional plugins because some users might not want to use those .
And I'm not going to make this video about , you know , uh paid memberships pro because this video can easily get another 1 to 2 hours long .
But I'm gonna go ahead and turn a majority of these on right here .
So the calendar , the content drip , the enrollment , which they , it's , which they spelled wrong , right ?
It's , it's supposed to be two L's right here , it's enroll and then here it's see that , yeah , just , just tell them , you know , tell them to fix that .
Uh I'll go ahead and turn on the grade book .
I'm not gonna use uh Google classroom integration .
Here .
We have the quiz , import exports uh assignments , certificates , course attachments , course preview emails , multiple instructors .
So what this allows you to do is have multiple instructors teach together on one classroom , which is pretty cool .

Uh Here we have notifications , prerequisites , reports , the Zoom integration , which is pretty cool and then the Woocommerce subscriptions , which is additional plug in that you guys will need to um activate for it to work .
So once you guys turn those on , let's first now go over here to settings .
All right .
So here is the settings tab and uh right away , you guys probably noticed that there's more tabs , right ?
There's grade book , email , notifications and certificates .
Now , before I talk about those tabs , I just want to go ahead and let you guys know that this plug in tends to update quite often and they're constantly adding in new features .
So , uh even though you guys probably didn't see all the options here , like for example , like on the core section , uh just always go back and check for updates because they always add new features , they add new options .
And I think probably in like a month from now or two months from now , they're gonna have a lot more options for uh this section here .
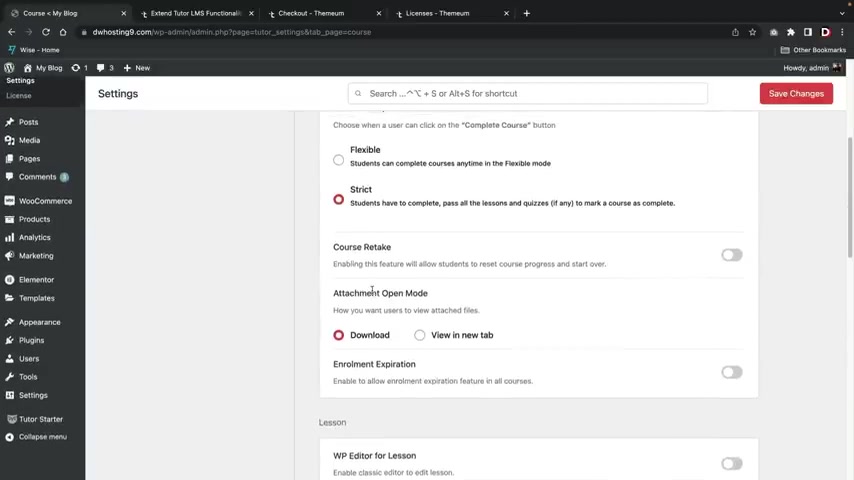
In fact , at the time of making this video for the strict section , I believe uh now what's passing all lessons and quizzes .
But when I first used this plug in , it was only quizzes .
So , uh yeah , you guys will have to go ahead and just take a look at all the options .
And if there are some other options , you guys can just go ahead and take a look at those .
Just always make sure to read the update change log when you guys update the uh plug in .
So here we have the grade book .
Now , uh if you guys do want to run like a school website , we can go ahead and add in the grade book .
What's also really cool is that you guys can use uh points and instead of grades now , universities tend to use points and instead of grades , well , they use the point system , but then they give you a grade at the end , right ?
But they uh essentially give you points for like quizzes and stuff like that .
You guys can also enable the GPA uh GPA scale and then you can also set the GPA scale limits like 4.0 or 5.0 or uh however , you wanna do that , right ?
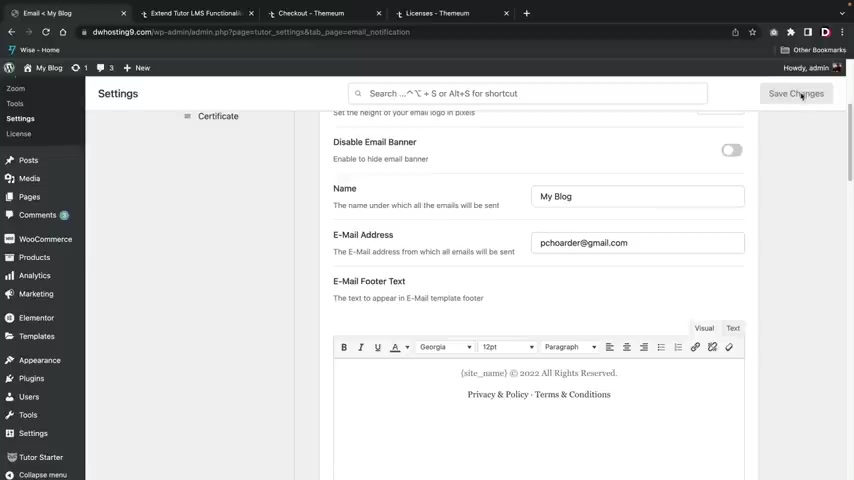
Uh So once you guys select those options , you'll click on save changes .
All right , next , we'll go over here to emails .
Now , if you guys did get like a little notification at the bottom , right ?
That says you need to enter an email , just make sure that the email address , right ?
Here is filled out and this will allow you to save the changes on the page .
I did get this error when I tried to save it .
And uh yeah , you'll have to put in your uh email address right here .
So uh you guys can actually , you know , put the name right .
So this will be like the name of your school , but I'll just put Darryl Wilson , right ?
Darryl , Darryl Wilson .
And then you can go ahead and design the actual footer as well .
And here you have email to students .
So let's say for example , they have enrolled in the course , right ?
This is the email that is sent out to students .
We can edit this email .
So I'll go over here and click on edit and they gave you a really nice preview of what this looks like .
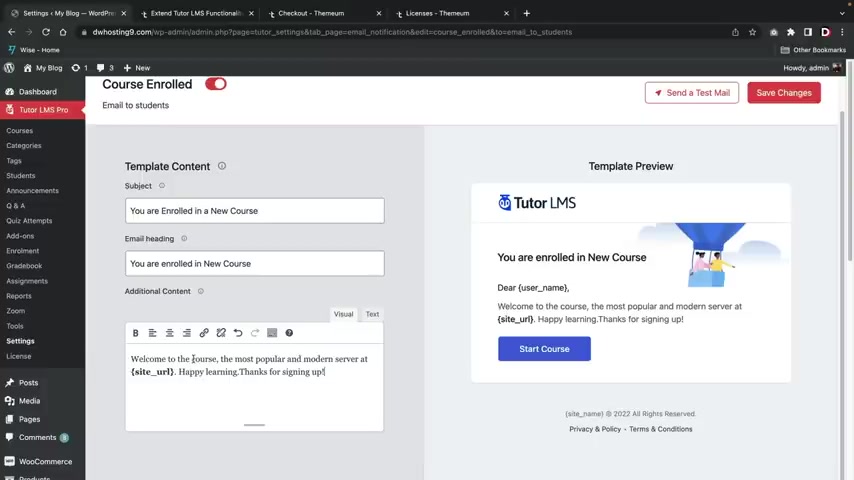
So it says you are now enrolled in the course and then you can go ahead and talk about it right here , like , you know , thanks for signing up and there you go .
So you guys can go ahead and turn on these emails and then you can add your own text here , like welcome to the University of whatever or welcome to our uh get rich quick course , whatever you guys are trying to make , uh you will go ahead and uh fill everything out right there and then once you're done , you'll just click on save changes for any email that you want to customize over here .
Let's go back really quick .
I'll just use their , their tutor starter one right there , right .
And uh if you guys do want to enable more emails to be sent , you can go ahead and turn them on right here .
So for example , if a person completes a quiz , you can give them a notification saying , hey , congratulations , you completed the quiz or congratulations , you completed a course or uh we graded your assignments , go check your grade .
You know , you can go ahead and turn on all these emails .
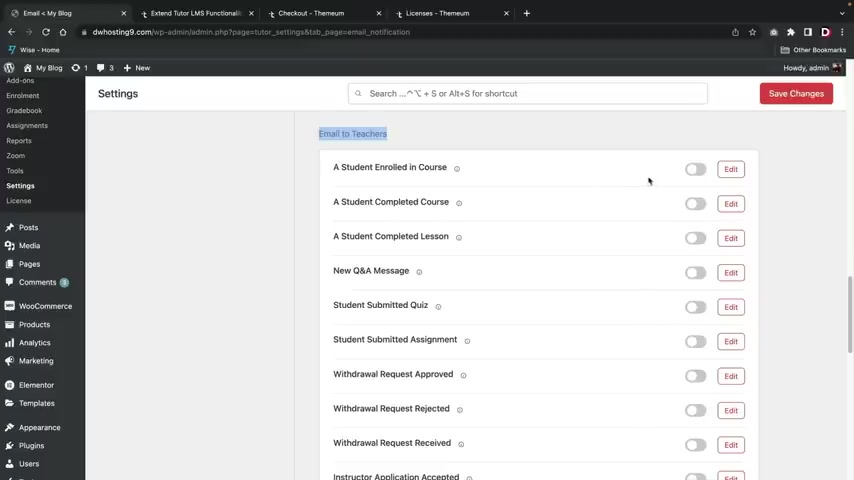
Uh as you wish , you guys can also send these emails to teachers as well .
So let's say , for example , a teacher makes a course on your website .
Uh We can notify the teacher saying , hey , someone enrolled in your course and then over here you'll click on edit and then you can go ahead and you know , modify this as you need .
What's really cool here is that uh the teachers get this like this cool , go to dashboard and also they can see the student , they gonna go check out their profile .
That's really cool .
I , I really do like that option because uh that makes it very uh transparent on who , you know , who signed up and they can go ahead and check right away just to make sure that the student enro enrolled , you know , safely and stuff like that .
So I'll go ahead and turn this on and then I'll click on save changes All right , cool .
Let's go back .
So I think at this point you guys get it right .
So you can go ahead and turn on emails to students , you can turn on emails to teachers and then also emails to admins as well .
And then you also do have some other options here for like and stuff like that .
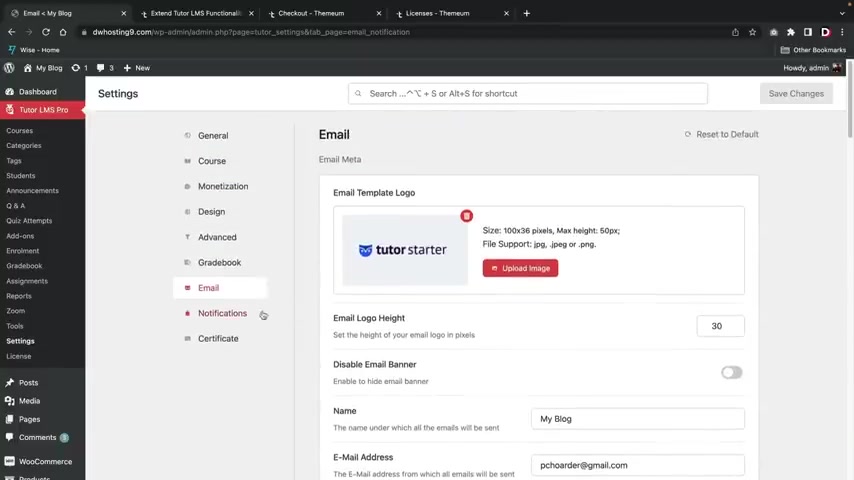
But uh yeah , so that's how you guys can now uh modify the emails that are sent to students and also the teachers .
Next , let's click on notifications .
Now , what's really cool here is that when you first visit the website , there's a little push notification bar that says um you know , do you want to get notifications and people can accept those or they can reject them ?
However , if they decide to actually uh accept them , then you can notify , you know , for a course , course enrollment , right ?
Uh cancel enrollments assignment created , right ?
Or a , you know , new announcement posted .
So what this means is that the user can be on any random websites and uh once you guys actually make changes , it will send push notifications uh to those specific users .
Now , we also do have the on site right here .
This means uh if the user is on the sites , then they will also get notified via push notifications , but this is only if they are on your website .
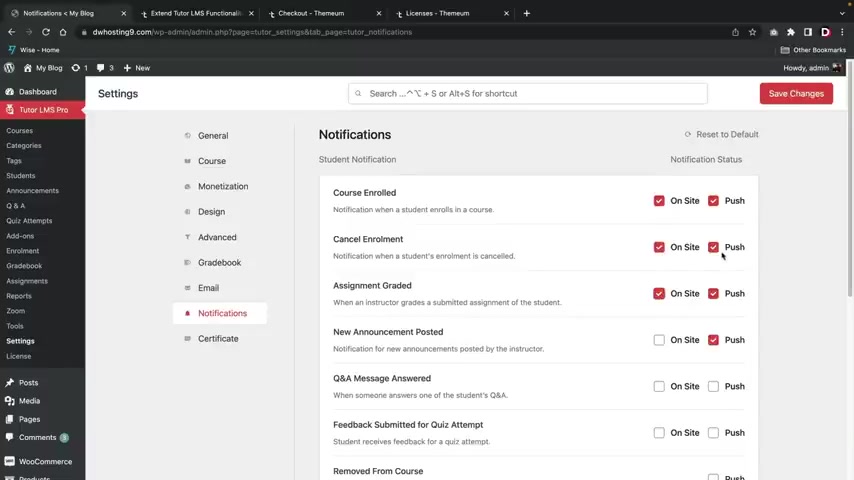
So the push notification refers to if they are anywhere on the internet and they're using the browser and the on site is just referring to , uh , they're actually on your current website at the time .
Right .
So you'll just go ahead and put whatever one , uh , you know , whatever that you want , just be mindful that if you do have tons of push notifications on here that can get very annoying .
And a lot of students , uh , might actually , uh , take off the push notifications .
So just have a few on , you know , don't get too aggressive , don't get too crazy right over here .
Click on save changes .
All right .
And let's go over here and click on certificate .
Now , here we have the authorized name , right ?
So this is like Darrell Wilson and then this is like the patty whack company , right ?
So this is the actual person , right ?
And this is probably the name of the school , right ?
So this is the company name .
You can show the name on certificates , certificate , link in course , completion , email .
Sure .
And then also what's really cool here is that you guys can upload a signature .

So you , if you guys do have like a signature somewhere , you guys can just go ahead and upload it .
I'll just go ahead and just grab something here .
All right , I'm gonna upload file , select the files and I just downloaded something random here .
I have no idea .
All right , I'm just gonna go ahead and use this media and this is my signature .
All right , and I'll click on save changes .
All right , cool .
Now , before I go into the courses section , I also do want to upload the course builder plug in .
Right .
So , over here let's go back to the , uh , where is it ?
The plugins and add new upload plug-in .
Choose the file and then we'll find the certificate builder open and then install now .
All right .
And then I'll activate the plug-in .
All right .
So now let's go ahead and say , all right , if you guys do want your own certificate builder , let me quickly walk you guys through on how to set that up over here .
Let's go back to our settings really quick .
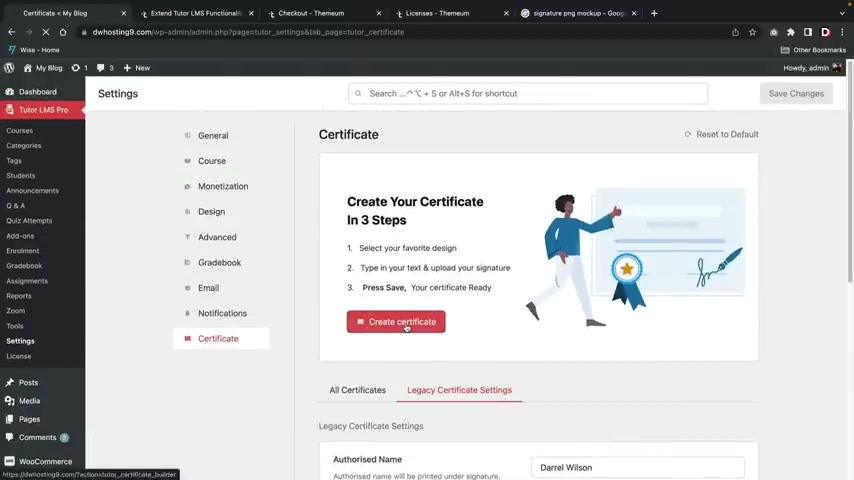
And uh if we go over here to certificates , you will then see that we have more options , right ?
So we have the original settings that we just set .
But if you guys do want to create your own certificates , I'll go ahead and walk you guys through that .
Uh , right now .
So right here , let's click on create a certificate .
Now , what's really cool about tutor L MS is they have tons and tons of templates to work with .
And personally , I'm just gonna go ahead and use a template here and I'll show you guys how to modify it .
You guys can create your own from scratch .
But I feel like this is a lot easier .
And um yeah , once you guys learn how to modify a template , I'm sure you guys can go ahead and create your own and get really customizable and make it look beautiful .
So here we have landscape option and then we also have portrait , right ?
So uh portraits like more for like pictures and then landscape obviously , it's more like horizontal and stuff like that .
So right here , I'll click on use this template .
All right .
And you know , we'll go ahead and say certificate of excellence , this diploma is given to this will be the student's name .
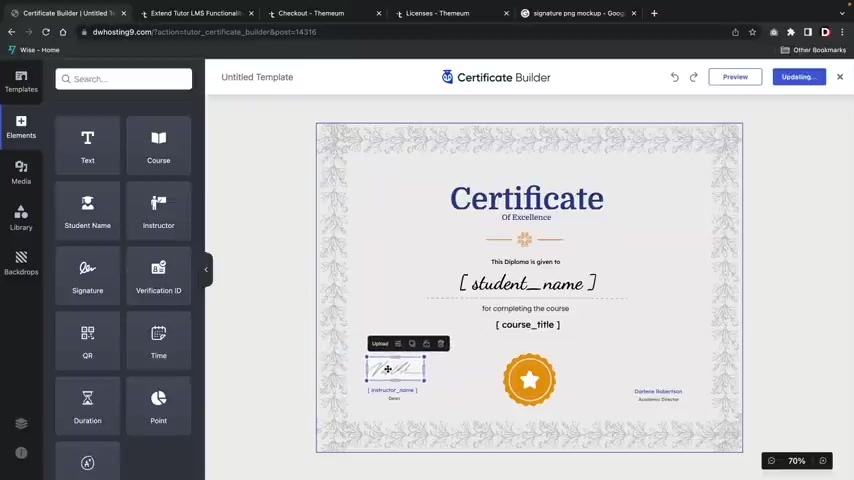
And then here we have the uh you know , the completed course and then the course title and then here you have just some random signature , but we can always replace that .
And then over here we have like another just PNG .
So you guys will need to replace these .
So what I'm gonna do right here is I'm gonna go ahead and delete this one and I'll delete this one .
Remember earlier how we actually use our own signature .
I'm gonna take this signature box here and just drag and drop it right there and you can see how this is already self propagated .
So there's that signature and then there is this signature here as well .
And then if you guys do want a dragon text , just drag it there , you know .
And uh this can be like you are awesome , right ?
Like you are awesome .
All right .
And then we'll go ahead and stretch that out and then we'll move this right there .
OK ?
You guys see how easy that is .
I love this .
I love this .
This is so amazing .
I gotta be honest , if you guys use Learn Dash , their builder is terrible .
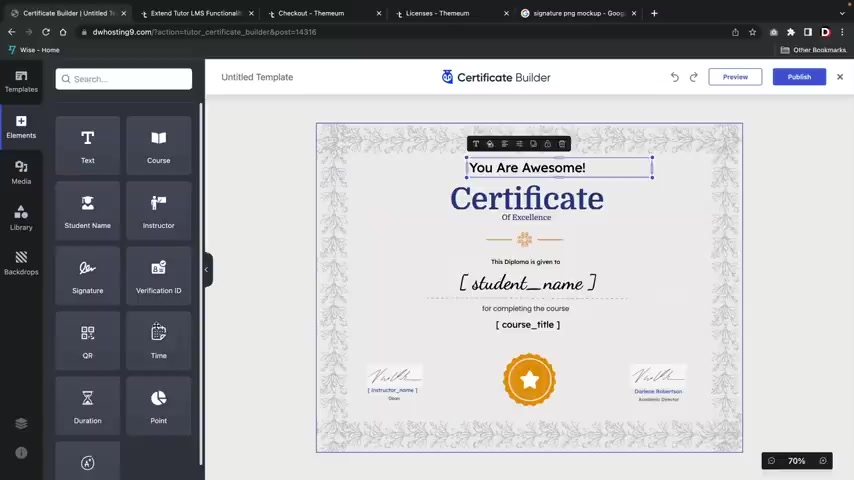
It is like from like 10 years ago , I have no idea where those positive reviews are coming from .
But uh anyways , uh you guys can go ahead and drag and stuff right here like a grade .
This will actually self propagate the student's grade as well .
You know , if they got like ac or something , you might not want to add that in there .
But um you can put in the grade right here , you know , put in their grade and then over here you can put something else like , you know , your current grade , right ?
You can let them know and then you can go ahead and put that right there .
So when the grade is propagated , that will show them the actual grade , right ?
And they do have some other options here , like you can upload media and they do have a really cool integration for Un Splash .
So you guys can actually drag and drop these beautiful pictures from Un splash dot com , which is really cool .
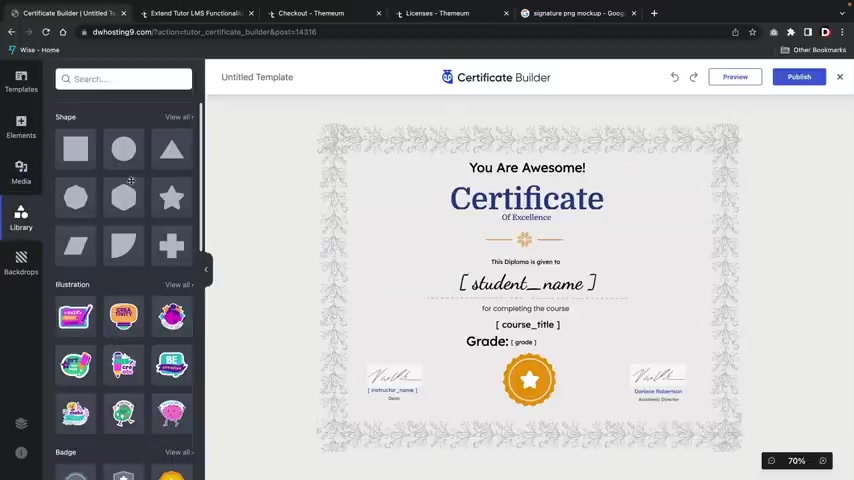
And then here we have a library and this is where you can drag in shapes , illustrations , like really cool illustrations here and make these really , really fun and cute , you know , really , really cute , you know , and then you can uh change the color here as well .
So there is a lot you guys can do with this course Builder .
I really do like it .
And then we also have this backdrop where we can add in like , you know , different backdrops over here .
Uh If we choose to do that right .
I'll go ahead and select , uh , let's see here .
Which one should we like ?
Let's put in , let's put in that one .
All right .
That's , that's , that's the one we're gonna go with .
Um , I'm gonna go ahead and just save this right here .
So once you guys are done modifying your certificates and you feel like it looks great , just click on the publish button .
All right , cool .
And there you go .
So now the certificate has been created and now I'll go ahead and close this and here is the actual certificates .
And if you guys do want to give this a name , just click on the little pencil icon and don't forget under the entitled templates , just put like main certificate , right ?
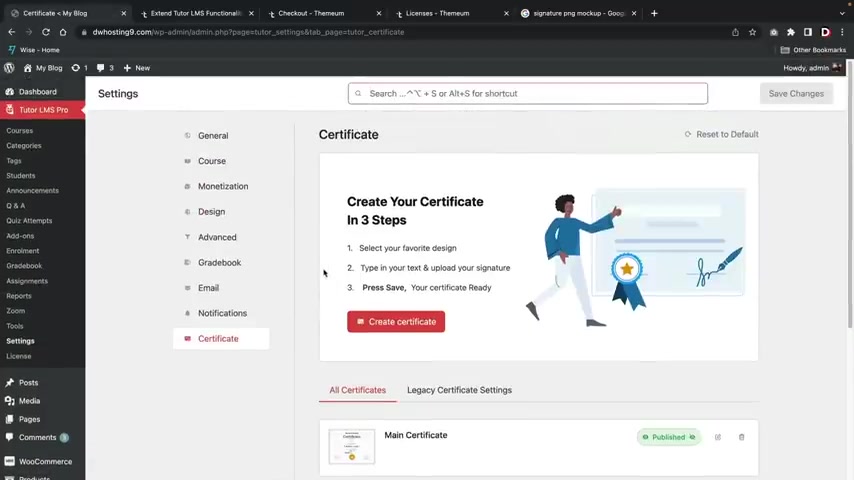
Main certificate and then click on publish .
All right .
Awesome .
So let's go ahead and close this .
Now .
Now we have a beautiful certificate that is awarded to users who finished the course .
So congrats .
So now that we talked about the actual settings and the course uh builder .
Now let's talk about the actual add-ons .
So over here , let's first click on add-ons .
Now , what I'm gonna do over here to demonstrate the features is I'm actually gonna open up a second window and I'll compare each feature and show you where it's being applied .
Now , the very first feature that I wanna show you guys before I go into the add-ons is the new front end course builder .
So here I'll click on course list and I will click on any course .
You now have the option to edit all your courses from the front end , which is a more visual experience , right ?
So here I'll click on edit with front end course builder .
And now we can go ahead and build this uh course from the front end , right ?
So we can go ahead and see exactly what's gonna go on here .
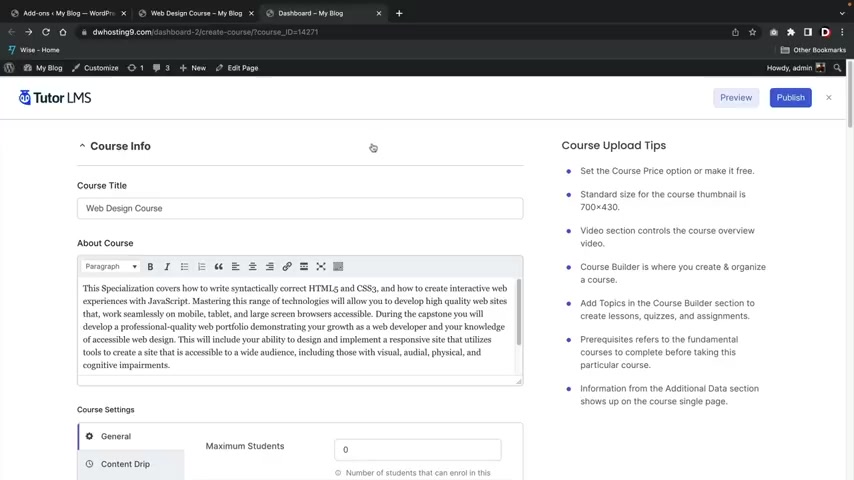
So we can set the category uh the price and uh you know , it's just a more visual approach here and here we have some course upload tips just reminding us about what to do .
But you guys can just go ahead and fill all this out right here and then once you guys are done , you'll then click on publish and you guys can do this for all of your courses .
So right here , I'll go ahead and just click on add a new course .
And let's say , for example , you guys want to make a new course using the front end builder over here .
I'll go to plus new and click on course .
And this will be like intro to javascript or whatever , you know , javascript .
And then I'll click on publish .
I can now click on edit with front end course builder .
And then I can go ahead and build this course from the front end .
You know , it's just a little , it's just a different experience .
You know , I do like this front end builder .
I think it's a lot more simplified and I think it's a lot more easier for , uh , you know , instructors uh to create courses here from the front end .
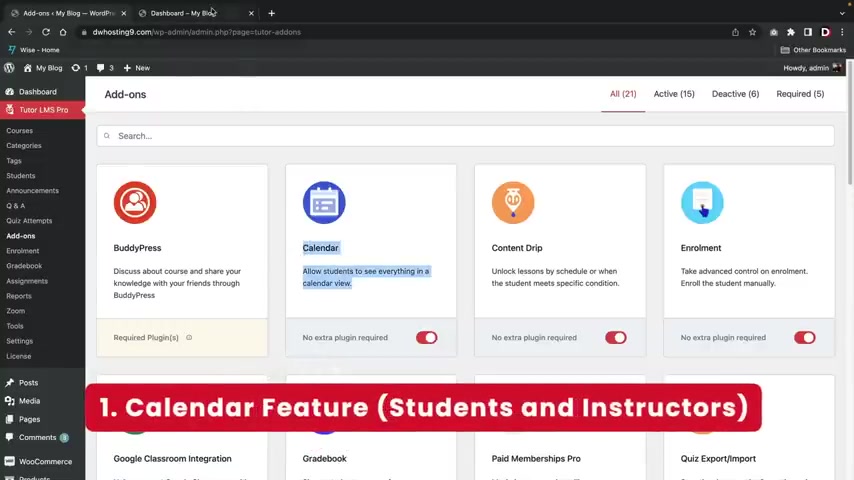
And also remember that yourself and other instructors uh will be allowed to use this front end course builder .
So that's a pretty cool feature .
All right .
So I got my mangoes here , got my fruit .
I got them all energized .
Let's go and walk you guys through these add ons .
Now , the first one is the calendar right now .
This is found in the actual students dashboard over here under calendar .
So if they click on calendar right here , they can actively see uh what courses are coming up when they're assigned or whatever , right .
So they do have a little calendar here that they can use and they can see when there's certain dates or when there's specific deadlines .
The next feature is content trip .
What this allows you to do is unlock lessons by schedule or when the student meets specific conditions and this is found in the edit course section .
So when you are actually building the course , if you scroll down over here to the course settings , you'll then get a new tab right here that says content drip , you guys can choose to enable this .

And with this , does that this actually schedules your course depending on specific conditions .
So let's say , for example , they enrolled in the course , right ?
But the course doesn't start till like it's uh you know , like maybe two weeks from now , maybe three months from now , you know , for universities , uh you can enroll in the course like like a year or something before , like when it's actually uh set .
So here you can schedule the course by date .
You can also schedule it from days from enrollment .
So that means like , hey , you know what , you got to wait at least 10 days uh before we , you know , give you the course or you can say , you know what um I want the course content available subsequently or you can go ahead and say this can only be available if you meet specific prerequisites .
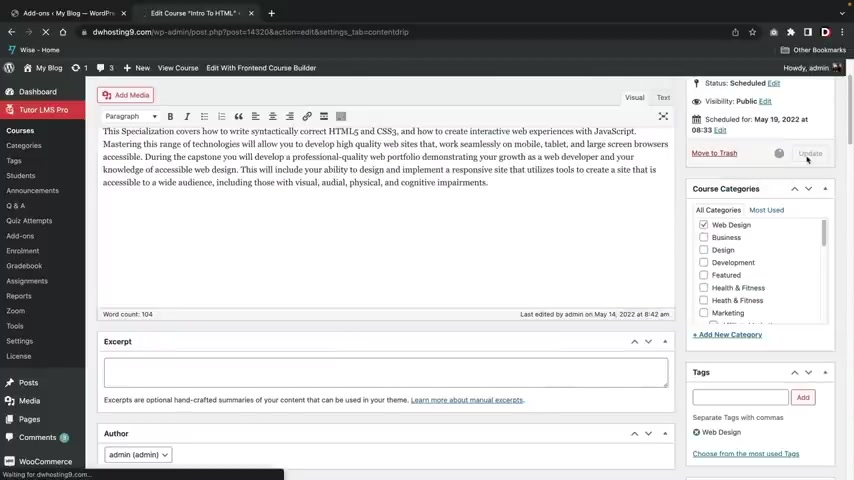
Now , let's say , for example , you guys do wanna schedule a course content by dates uh to do this , you'll click on the course , schedule content by dates , you'll then click on update and then once that's done , you will scroll to the actual course builder .
You will then open up this course builder and then you need to apply the date for every single lesson and quiz and assignments .
I know that can be a little tedious .
Hopefully in the future , they find a better way to do that .
But um that's , that's all we got right .
Now , you know , and it still works just fine .
It's just , it's a little bit more work .
You'll go down over here and for the content drip settings , you will then go ahead and select a date on when this lesson can open .
All right , and then once that's done , you'll then click on update lesson .
So now that specific lesson will only be available until the 30th .
Right ?
So if you guys do decide to uh use the content drip settings for the date , uh that's how you guys can apply it .
And next we have enrollments , enrollment is where you can manually enroll students in the course .
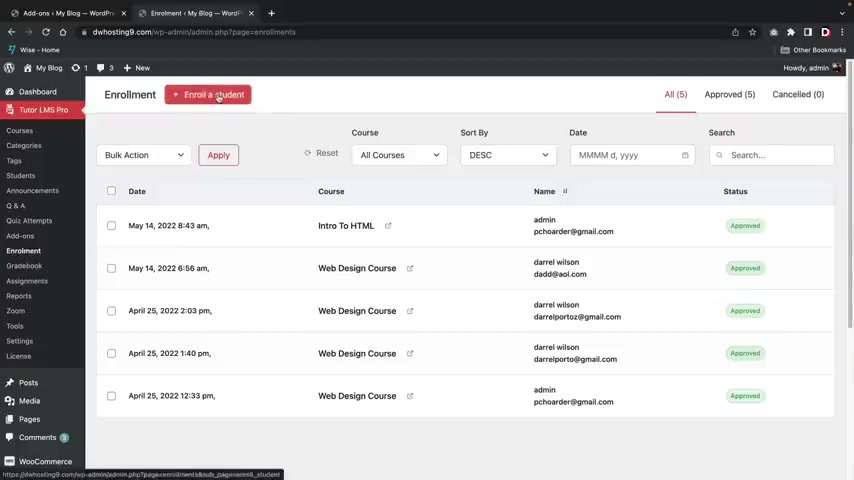
This can be found over here under the enrollment tab and you can just go ahead and assign uh anyone to any course .
So right here , I'll click on enroll a student now , right here .
It's asking for searching a student , right ?
And uh you can actually create your own students in the user section of wordpress .
So right here , you're gonna go down to the um where is it , the users and then just click on add new .
So let's say , for example , you want to buy like your girlfriend or something , right ?
Uh I'll just put like , so first you'll go ahead and make a user name , right ?
So I'll just put in like Rebecca here .
All right .
And then Rebecca at A O dot com and then Rebecca and then Wilson and then you can just go ahead and put it whatever you want .
Uh Here , I'll just generate a password and this will actually send a notification to the user that we have created an account on this website for the role .
We'll just leave it as a subscriber and then click on add new user .
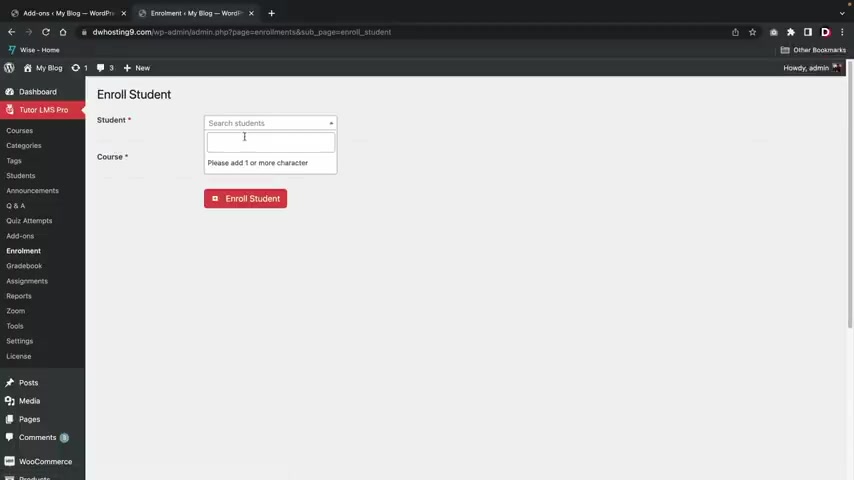
All right .
And once that's done , you will see that Rebecca is now uh there .
So now that we've done that , we'll go back to two L MS , we'll go to enrollment and now we can go ahead and enroll that specific student .
So um enroll a students , search students will type in Rebecca , right ?
Rebecca , Rebecca Wilson , and I'm going to enroll Rebecca in the web design course and then click on enroll student and there you go .
And now Rebecca can go ahead and come to the website and then she can log in using the credentials that Wordpress sends to her .
You guys can always adjust the passwords as well for all these users over here .
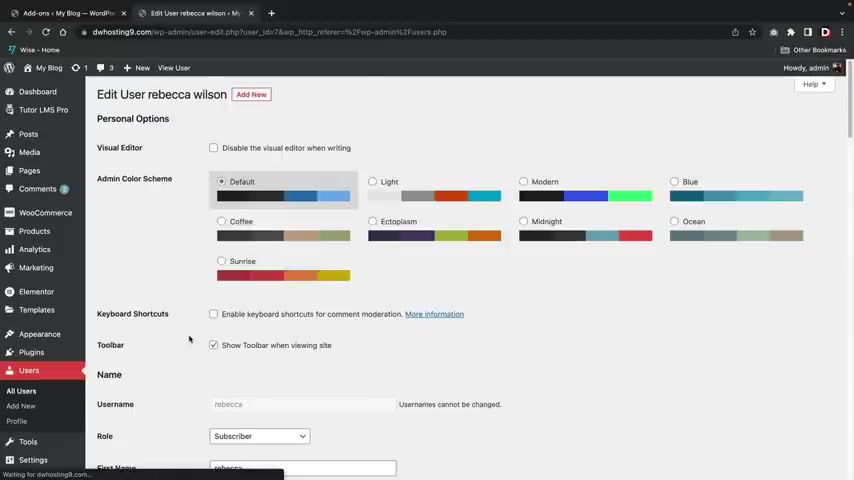
Click on all users and I will um you guys can , you know , first you can , you know , if they forgot their password , just do a password reset that will allow them to change their own password or I'll click on edit and you can go down here and set a new password for Rebecca and then just say , hey , Rebecca , this is your new password .
Uh This is your temporary password and then go ahead and make your own once you log into the account .
Right .
So that's how you guys can enroll students onto your website .
All right .
Next , we have the grade book .
This is actually a pretty important feature .
This shows the student progress from assignments and quizzes .
Uh Over here , let's go over here to tutor L MS and then we'll find the grade book tab .
Now , the first thing that we have to do is that we actually have to import uh data .
So over here under grade settings , uh right now there is no grading system .
So we need to import some .
So right here , I'll click on import sample grade data .
All right .
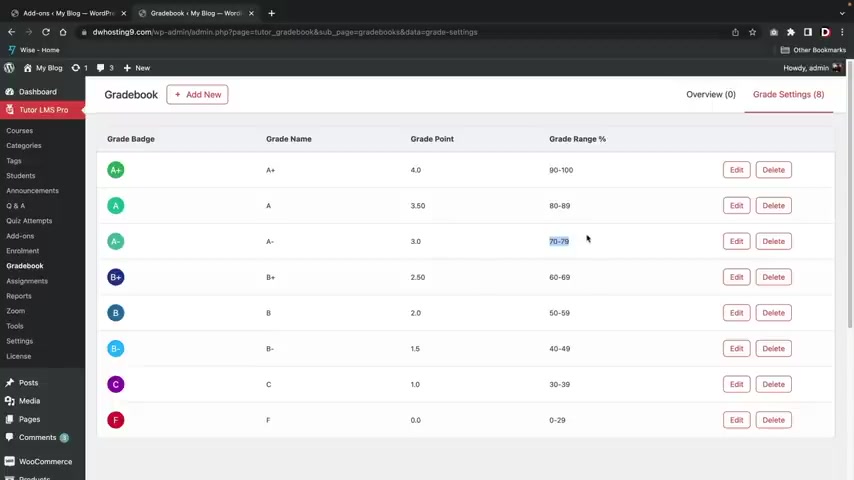
And what that's done , uh what it's done here is that it's actually created a uh a grading curriculum for us .
So , uh for example , 90 to 100 is an A and then we have 80 to 89 is an A and then also a 70 to 79 is also an A , you guys might need to adjust this because these are probably not correct .
This should actually be an A AB ac ad and an F , right ?
So , for example , over here , I'll click on edit and this is A B OK ?
And I'll update the grade .
So you can see here how uh this is now A plus , right ?
But this is A B you know , I'll take that from A plus , you know , it's just an A right .
There we go .
You know what's funny ?
I went to a uh school , it was a private school and 95 to 100 was an a , it was a really hard private school .
Like I'm not gonna lie .
So , uh , here we have , uh , 70 to uh 79 .
All right , I'll update that .
All right .
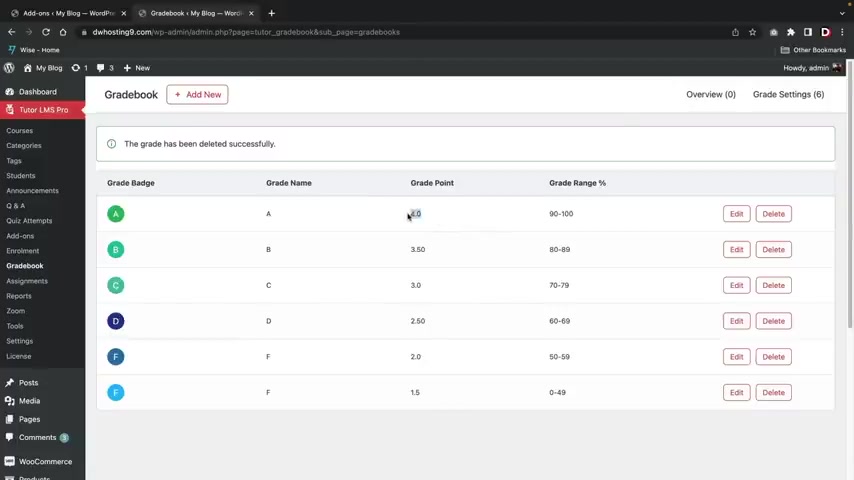
So you guys will need to also adjust the points here , right ?
So we have 433.02 0.5 and then 2.0 personally , I'm not really sure how you want to grade your school , but I'm just going to just keep this very basic , um , if they get a b , uh , that's gonna be three points , right ?
If they get AC , that's gonna be two points , right ?
And then , you know , obviously an F , you know , we'll just give them one point for this , for this F , right .
All right .
And then obviously , uh , I , I don't know if you want to give them something for this one right here , uh , maybe 0.5 or something , you know , they , they have to get some points , right ?
I mean , they actually , they actually attempted the assignment and , you know , I , I don't really know , you know , however you wanna put your grading curriculum , uh , you'll just do it here , right .
So we have an A ab , uh , here we have the D , right ?
The D is also gonna be what , we'll just do one point as well and I'll do 1.5 .
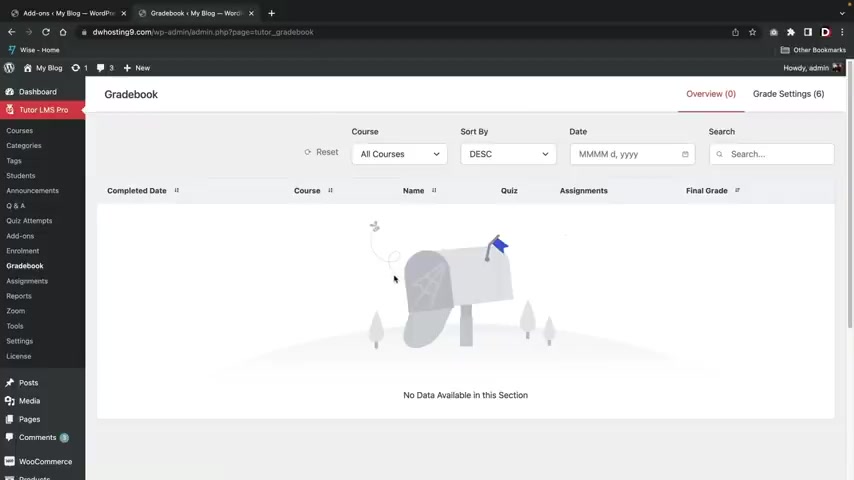
You know , I don't know , you know , here we go 1.5 right ?
Just so this all makes sense .
ABC D and then FF , right ?
So this makes sense .
And A is four points , A B is three points .
AC is two points , ad is 1.5 and then an F is one and then if they get a very low F , then they're just getting like it's like a 0.5 grade point .
right ?
So , um yeah , you guys can go ahead and set this up and um yeah , that's how you guys can have a grade book .
Now over here , click on grade book one more time .
This is where the grades will appear once a student has um , you know , taken a quiz or uh they , you know , you graded assignments , this is where all of the grades will appear uh for your students .
All right .
So just to help you guys out , I made a new account here and I , I decided to take the free course and I got a 50% on my quiz , right ?
I still finished the course , but I did get a 50% .
Now , let's go ahead and take a look at the grade book and see what's happened .
All right .

So here's an example the students failed the course , right ?
Uh He completed the quiz , there was no assignments .
So obviously , uh there was nothing for him to do , right ?
And uh yeah , he got an F because uh obviously he failed the uh course .
So uh this is what the grade book will look like when students start to enroll and take the courses .
So all of the grades will appear right here .
So this is the quiz .
And if they did have assignments , you guys can add grades to those assignments as well .
And then this is the final grade of the actual course .
So that is the grade book also , just remember if you guys do want to see how the student performed on the actual quiz over here under quiz attempts , you can see um the actual full details of what they selected and why they got answers wrong , right ?
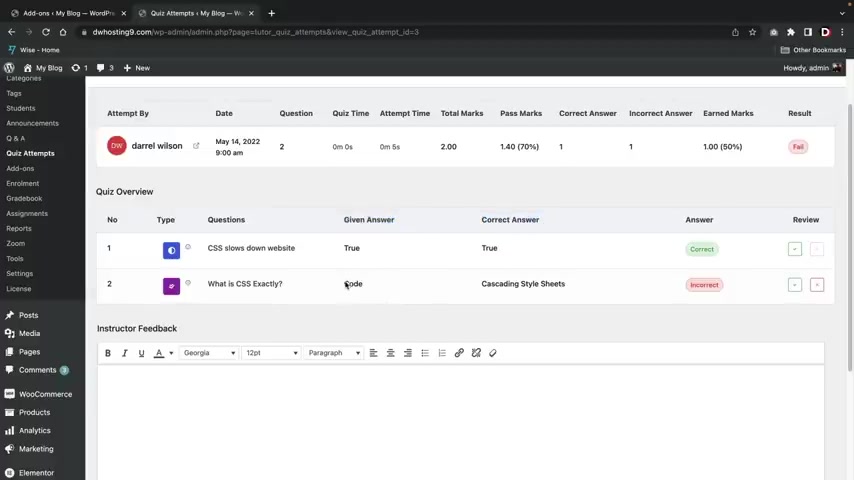
So go over here and click on details and here you can see uh what the students uh you know what , what the question was and you know what the student puts and then also what was the correct answer ?
So the student put code , however , the uh correct answer was cascading style sheets .
So what is CS S they put in code that is incorrect ?
So they got that incorrect .
And uh yeah , so that's how we can uh see what they got wrong on the quiz .
All right .
And the next feature is the quiz exports , imports .
This is a quick one , right ?
So let's say you're building a course .
Uh If you guys do create a quiz , you'll see that there's this little download button and you can download that and then right here , you can actually reimport any quiz .
So this is good if you're building a website from one website and you want to send it to another website , you can click on import quiz and then you can just go ahead and import the quiz uh that you downloaded .
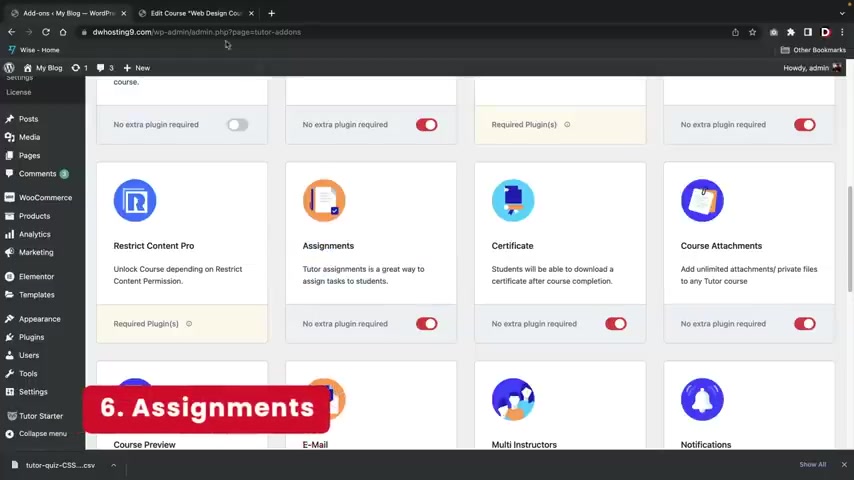
So that is the export import quiz feature .
The next is the assignments .
This is the tutor assignments is a great way to assign tasks to students .
And this is actually pretty uh important because a lot of schools and universities do have assignments , right ?
Not everyone only uses quizzes .
Uh So in the course builder , you'll then see this uh assignment section .
So right here a lot of assignment and this is um tell me how to make a website with wordpress .
This can be like an essay .
This can be pretty much anything , right ?
Like tell me about the United States history .
Tell me about uh the Ottoman Empire , whatever you're gonna talk about , you can go ahead and put all of that here .
It's all right .
So tell me how to make a website with wordpress and then you can give them like a brief summary , right ?
So explain from the basics , right ?
From hosting to wordpress .
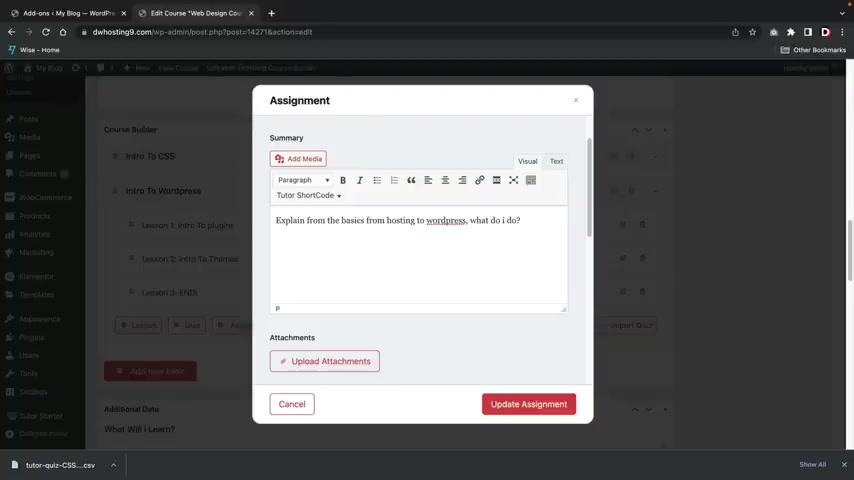
What do , what do I do , you know whatever this is just gonna be the summary .
So this is basically saying the the details , the it's going to uh talk more about the assignments , right ?
And then you can also upload attachments here if you choose to do that .
So let's say , for example , you want to give them a study guide , you can go ahead and upload an attachment here and the students will have access to this attachment .
So let's say , for example , like this is a study guide or you want them to talk about , you know , Christopher Columbus in his , in his journey to the to the aisles or whatever , you can go ahead and upload that attachment there .
You guys can set a time limit if you guys choose to do that .
So , uh you know , I'll just say , yeah , this is uh one weeks , right ?
Or two weeks , whatever .
And this is the maximum points a student can score , right ?
So here I'll put 10 points and the minimum pass point is five , right ?
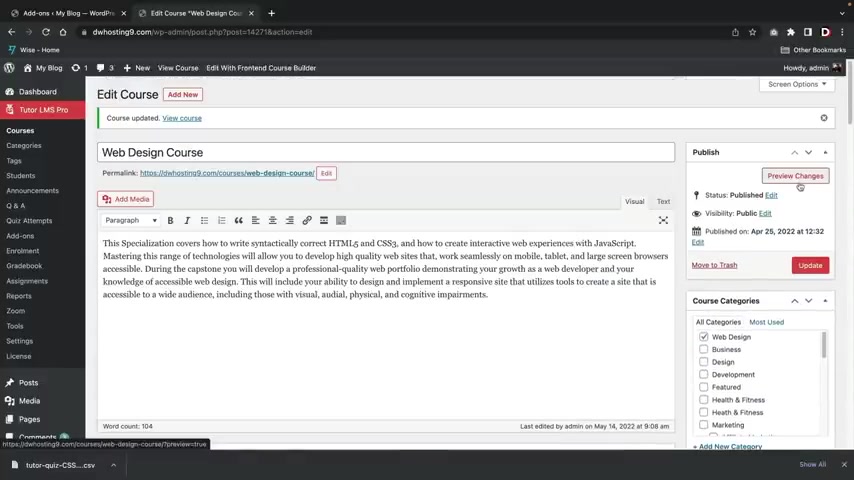
And this is basically saying , allow to upload how many files , well , uh I'll just say one file here and the maximum file size limit this is referring to MB .
OK .
So this is the actual size .
So they cannot upload more than two MB .
They'll have to uh optimize their uh work in order to upload it to our server .
And then once that's done , I'll click on update assignments and then I'll go ahead and click on update .
Now , let's take a look at this from the student's perspective and then I'll show you what happens once they submit it .
All right .
So this is the same student that failed the course .
So sad , you know , but uh all right , uh we have a new little tab here .
Tell me how to make a website with wordpress .
Let's click on this .
So this is the actual assignment .
Tell me how to make a website with wordpress .
Explain from the basics from hosting to wordpress .
What do I do ?
And then this is like an attachment that they can use to download and here I'll click on start assignment , submit .
Now there's a few options , right ?
The student can go ahead and type everything in .
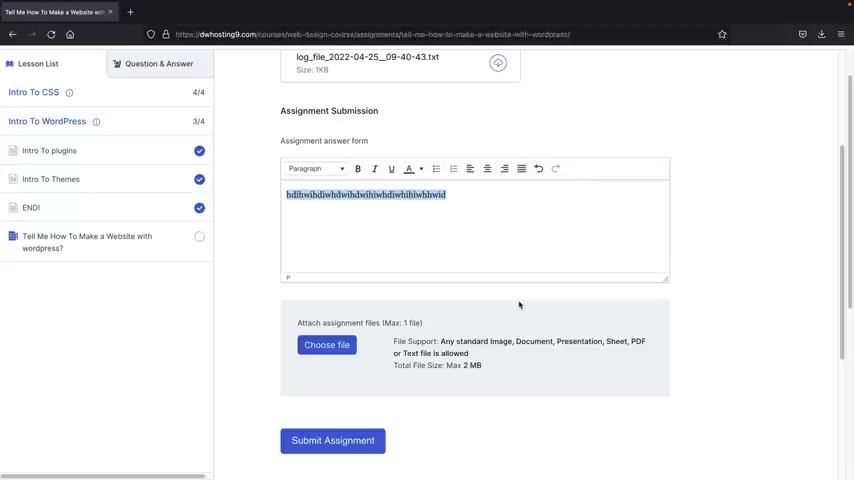
I don't recommend doing that because um personally I have done this before on universities .
And what happens is , let's say , for example , they write a really , really long assignments and something happens to the server or their browser or something happens , everything gets erased .
Uh From a student's perspective , I would like to have the option to load the assignments where we can go ahead and download it and then you can grade it later .
But I'll just give you both examples .
So this is uh how to make a website with wordpress , right ?
And then here I'll go also and choose a file here and I'll just go ahead and uh let me see here .
What should I , what should I use here ?
I'll just use this signature , whatever , I'll open this and then I'm going to submit the assignments below that we have the description here as well .
I think there's , they're both right there .
Yeah .
Is it ?
Oh , no , no , it's not .
It , it's just down there again .
I didn't see that .
I didn't know that .
All right .
So once that's done I'll click on submit assignments .
All right .
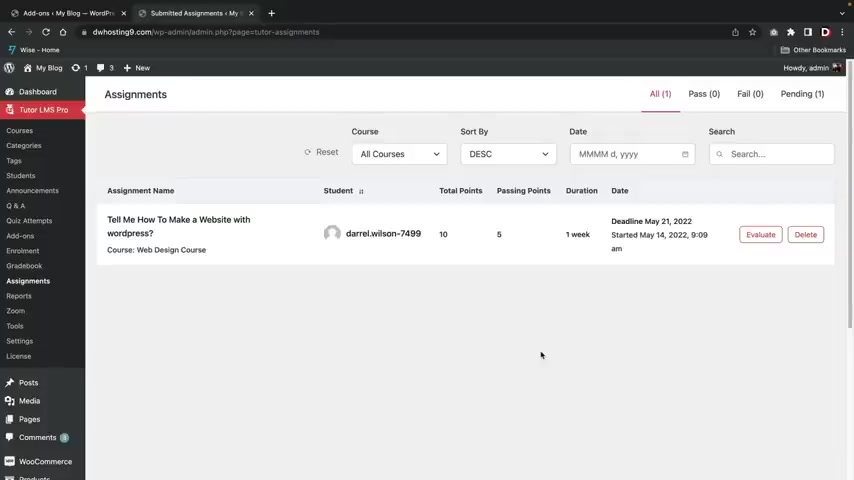
So the student has submitted the assignments and as of right now it's currently pending .
So we'll have to go ahead and wait for the teacher to score it .
Let's go ahead and score it .
All right .
So I'm back on my admin portal and here you can see that we have the assignments , Darrell Wilson .
Uh He submitted the course and here we have to evaluate it .
So let's click on evaluate .
All right .
So this is what the students said .
And also this is the actual assignment file .
Now , I'm gonna say , you know what , Darryl ?
Not bad , you know , we'll give you a seven , you know , we're , we're gonna give you a seven out of 10 and uh next time , talk about plugins and then I'll go ahead and evaluate the submission .
So what that means is I'm giving them a grade now uh for that specific assignments .
And now we can see the student's grade has been adjusted .
So it went from an F to actually ad because the student , I'm sorry , the assignments gave the student a little bit more points .
Uh The student did get ac right ?
Because we gave him a seven out of 10 .
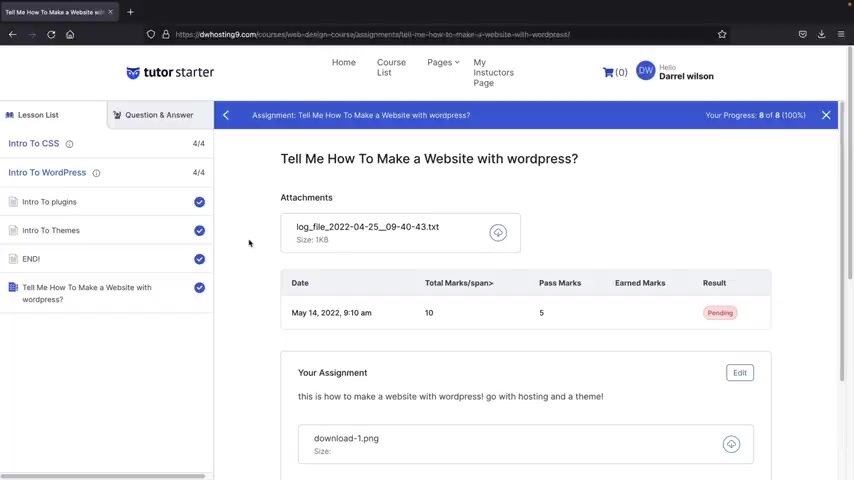
So now the uh the grade has correctly uh been uh adjusted .
So that's how you guys can add assignments to your courses .
And just as a parting gift , let's just go ahead and refresh this page and let's just see what's going on here .
All right .
So the student you can see , uh , has passed , we have the earned marks , the pass mark , which was a five and then we have the instructor notes next time .
Talk about plugins .
So there you go .
The student got feedback from his assignments .
All right , next , we have the certificates and I did show you guys how to build a certificate .
However , on every course , uh there will be a template that you guys can apply at the bottom of the page .
So over here under edit course , I'll scroll down to the bottom and you will now see that we have these certificates uh templates .
So I can just go ahead and use any of these templates .
Uh I'll just go ahead and use this one here .
Now , we also did set this in the settings and if you guys uh do use that , it will override it .
So it's considered a global option .
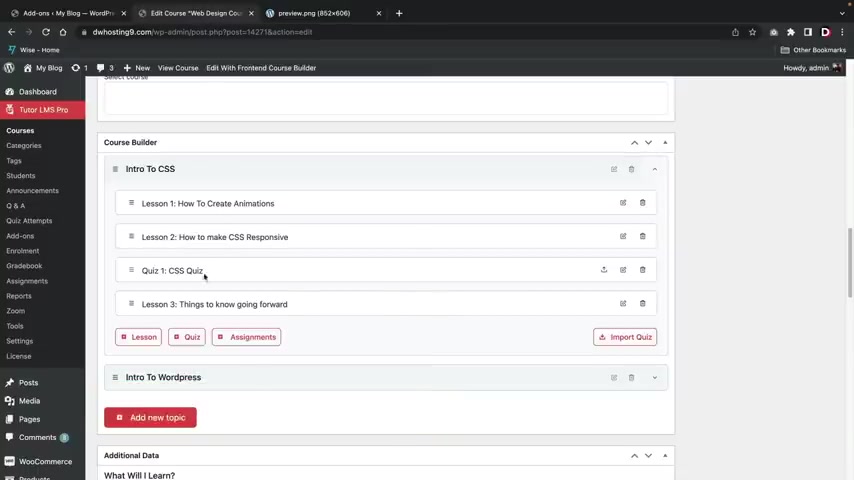
However , uh these right here will also self propagate .
So for example , we can see the student name is always self propagated .
Um The course title , you guys can actually click on preview here and just take a closer look just in case you want to see it .
So , you know , this will be like the student's name , the course and then the instructor and stuff like that .
So you'll go ahead and select a uh template or you guys can just go ahead and use the one that we built using the certificate builder .
All right .
So next , we have course attachments .
This allows you to add unlimited attachments to any course .
And this can be found on any lesson right here .
So uh I'll just click on any lesson , right and click on edit .
And if we scroll down right here , you will then see that we can go ahead and upload attachments .
So this means when a student uh takes this lesson , they will have the option to download any attachment that you upload .
Next , we have course preview .
This will unlock some lessons for students before enrollments .
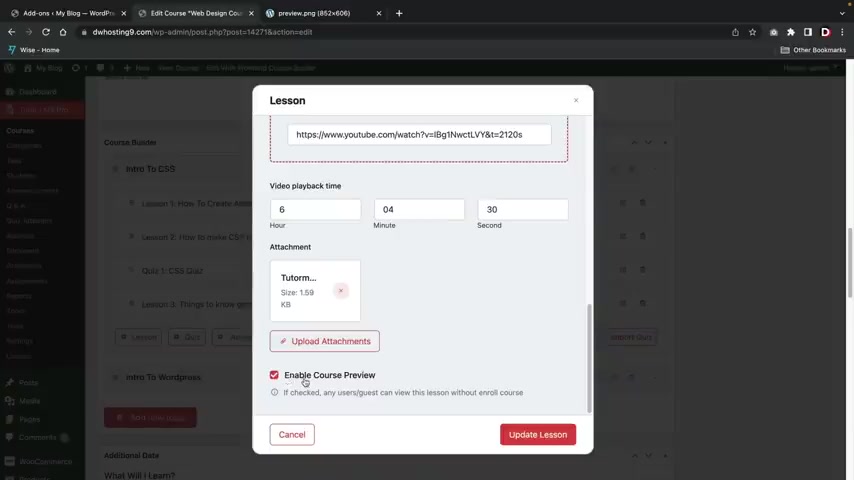
Uh over here , let's go ahead and click on any lesson and at the bottom of the page , you're gonna see this enabled course preview .
Now , if this is checked , the user can go ahead and preview this course , even if this course is paid , right , they can go ahead and take a look and enroll in the course .
Uh just to see like the instructor how he teaches his teaching style .
And also just to see if it's the right fit for him .
Now , a good strategy here uh is to always have this option available for like the first lesson or even the second lesson because that might commit the user to purchase the course .
So for example , if they see this , you know , if they see this course , they're not sure if they want to buy it or not .
They say no , let me just see lesson one .
You know , if I like the teacher and I think he's cool .
Sure , I'll go ahead and buy the course .
So a lot of uh users and instructors uh tends to have this option available for like the first two lessons .
Next , the email section , I already showed you guys the email earlier in the settings tab .
So uh yeah , that is what emails are .
You guys can go ahead and find the emails in the settings options right here and click on email and this is where you guys can go ahead and design and customize or uh even enable specific emails to be sent .
Uh just depending on what you want to do with your website .
So next , we have the multiple instructors .
Now , there's a few things that you guys might need to do in order for this to work properly .
The first thing is you need to have uh two instructors .
So over here under all users , you want to make sure that you have tutor instructor , right ?
So you need , you need to make sure that whatever a person signs up or instructor signs up , that they have the role for tutor instructor .
For example , if you want to change Rebecca over here to a tutor instructor where they can teach on our websites and then we'll scroll down right here and under the role , we will then go ahead and put tutor instructor .
I'll scroll down all the way to the bottom and click on update user .
What this allows Rebecca to do now is that Rebecca can now go ahead and upload uh courses onto our website .
So we go over here to all users and now you'll see that Rebecca is now a tutor instructor .
So now that I've done that I need to make one more option available right here under tutor L MS pro .
I'll go over here to settings and you want to make sure that enabled marketplace is enabled .
This will allow multiple instructors to upload their courses once that's done .
Now , we can go to pretty much any course here .
I'll just click on a web design course .
We'll scroll down to the bottom here all the way to the bottom .
And now you can see instructors .
So we have the admin , but we can also add Rebecca here , right ?
So we can say uh Rebecca is also uh teaching the course as well and save the changes .
All right .
And then we'll scroll up here and click on update .
Now , if you guys decide to do this , you guys will probably need to work out some monetization with the actual instructors because uh I believe as of right now , uh we do have this like a revenue share for monetization .
So I believe like the uh the instructor will take 75% .
So that will be divided into two between those two instructors .
OK .
So uh if you guys do have multiple instructors , just make sure that you have the proper revenue set here .
Just so there's no problems later in the future .
All right , cool .
So let's keep going here .
Next , we have the notifications .
This will essentially turn on notifications on your websites or in their browser .
This can be found in the tutor L MS process settings under notifications .
So I already did talk about this and this is where you can find this feature .
So you guys can go ahead and turn on notifications on either your website or on their browser by selecting the push notification uh check box .
Next , we have the prerequisites .
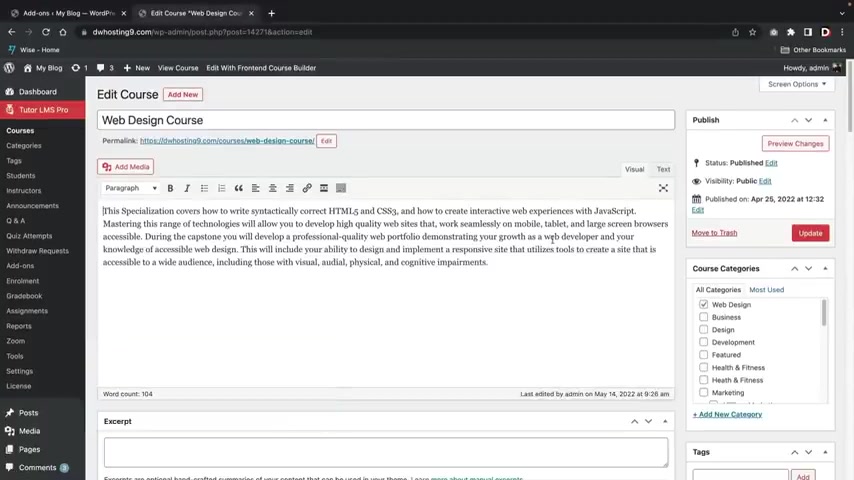
This means the user must complete specific courses before they enroll in other courses .
Uh This can be found in the course tab , right ?
Going down here under the course prerequisites , I can say , you know what ?
You must finish the intro to javascript before you enroll in this course and then I'll click on update .
All right .
So I went to a new browser here and if I scroll down , uh you're gonna see course prerequisites .
It says , please note that this has the following prerequisites which must be completed before it can be accessed .
Uh They're basically saying I have to finish the intro to javascript course and you know , they're given a link here where they can go ahead and enroll in this course before they take the other course .
Because uh it does have prerequisites .
So that's how the prerequisite add-on works .
All right .
And next , we have the reports .
So check your course performance through the tutor report stats .
This can be found under the tutor L MS under reports .
This essentially just gives you stats , right .
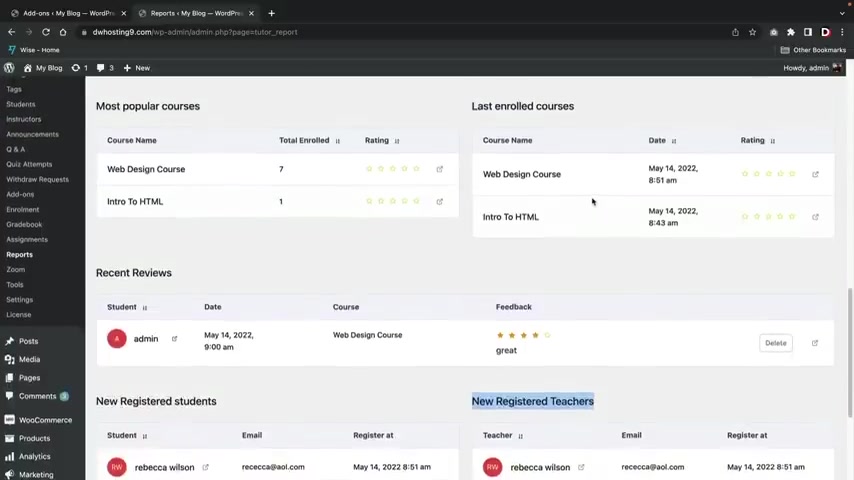
So publish courses , courses , enrolled lessons , quizzes , uh questions , instructors , uh students and so on and so forth .
Here .
You guys can get a little bit more information on these sales .
You can see the most popular courses , the last enrolled courses , you can see the reviews on your school , the new students and then also new teachers that have also registered on your websites over here under courses .
You guys do get a little bit more analytics .
You can see uh the lessons , the assignments , the total students and also how much money that course has made .
Uh the reviews you can see , uh you know , you guys got some reviews , you guys can go ahead and delete bad reviews on your website .
Uh If you feel like , you know , you got trolls and they're just like , you know , just leaving you negative reviews for no reason .
Uh you can , you know , delete that or whatever , you know .
Uh here we have sales so you can see uh all of these sales from your courses here .
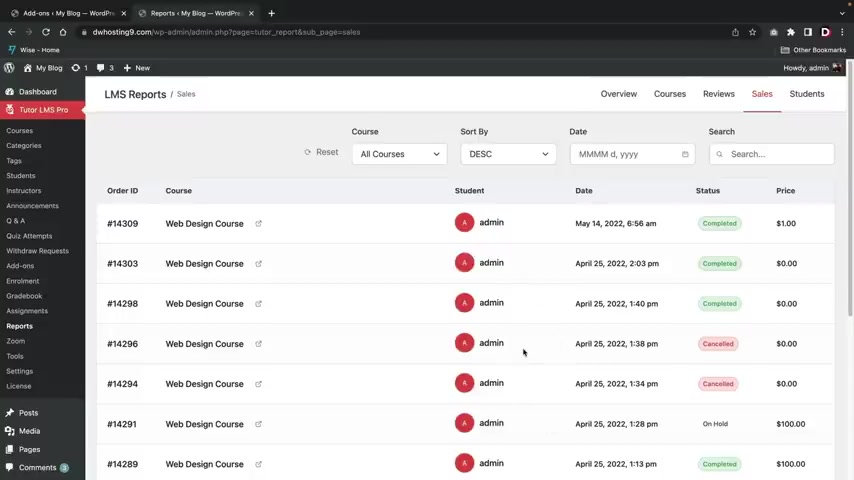
You guys can see , I did do a lot of testing uh for this video .
So I did have to buy a lot of courses to test stuff out .
And then also here you have uh just some uh students where you can take a look at all your students and you can search for them , uh you know , by course whatever you know .
So uh yeah , this is the report section and this is how you can get detailed reports uh for your course websites .
All right .
And the last feature is connect tutor L MS with the Zoom to host live online classes .
Students can attend live classes right from the lesson page .
So before we actually use Zoom , we first need to connect Zoom with our websites .
Uh Up here , we'll go to the tutor L MS Pro and then you'll then see this Zoom uh tab right here .
Now you guys will need to make a Zoom account .
So this is zoom dot com .
And in case you guys don't know , Zoom is a platform where students can connect all from one location it looks like right now their website is having problems or something .

It's a little weird , but a lot of workplaces are also using Zoom .
In fact , a lot of workplaces are now integrating to a a remote location where people can now just work from home using Zoom .
So it's a very popular website .
Uh you guys will need to make an account in order for this to work .
So uh right here , you can , can see that I do have my account uh already created .
So you'll first go ahead and make an account with Zoom .
Right now , we're gonna go ahead and connect Zoom with our website .
Let's go back over here and we need to first enter an API key .
So it says right here , go to the Zoom websites .
All right .
And once you're here , you will go ahead and go to JWT and this is where you're going to generate your API key and also your secret key .
So you're gonna go ahead and put your API key here and also your secret key right here .
So I'll go ahead and click on view here .
Now you guys will have to go ahead and create it .
It probably takes like one minute , right ?
You just go ahead and enter in some credentials and stuff like that .
And here is my API key .
All right , I'll go ahead and copy this .
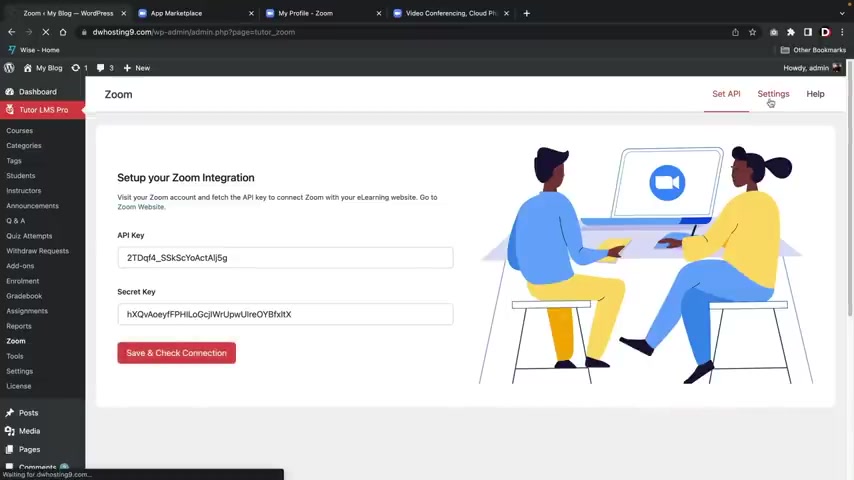
Go over here , paste my API key in there , right ?
And then I'll go ahead and also copy my API secrets and then I'll also paste that there .
I will click on save and check connection .
All right , cool .
So now you can see that our website is now integrated with Zoom and uh over here settings .
Uh You do have some options uh here , you can join before host .
Uh I'll go ahead and turn that on uh mute participants and you do have some other really cool options here for uh zoom .
You know , I think this wasn't an update .
I don't even remember this being here .
So , uh yeah , if you want to mute people , that's also pretty cool .
Like you got some kids who are really loud and obnoxious , you can just go ahead and mute them .
So now that I've done that , let's go over here to the um courses section and now let's go click on a course .
All right , I will then scroll down over here and we'll go ahead and just open up any one of these little uh lessons .
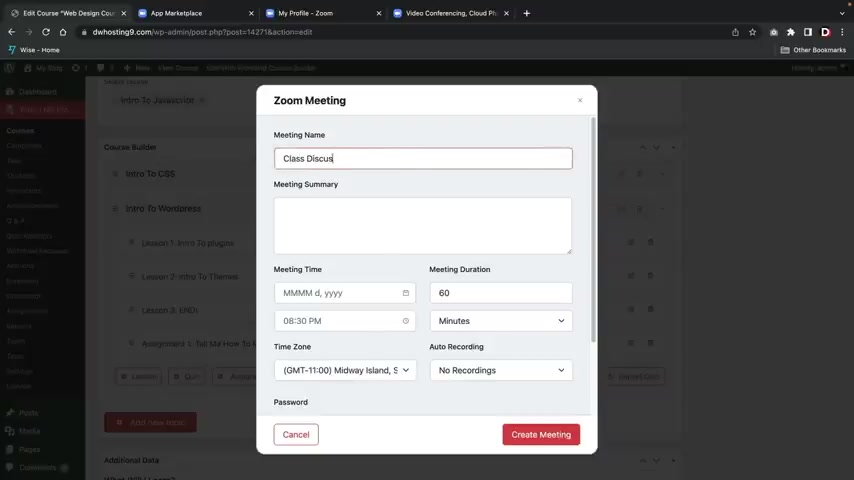
And now you're gonna see this option right here that says zoom live session .
So let's click on Zoom live session and this is gonna be like class discussion , right ?
Class discussion and this is a class discussion .
The meeting time is , uh we'll just put today , you know , today .
And uh today right now , you know , we'll put , you know , we'll put right now here .
See the 14th here .
Let's see here .
We got the 14th , right ?
It's about 4 40 .
So I'll do here at four dots 40 PM and this is about 60 minutes long .
All right .
My time zone here , GMT plus seven , right ?
You'll go ahead and select your time zone .
All right .
And you can select a password if you choose to or not .
Uh Once you guys are done with that , you'll then click on create meeting here .
I'll go ahead and enter a password .
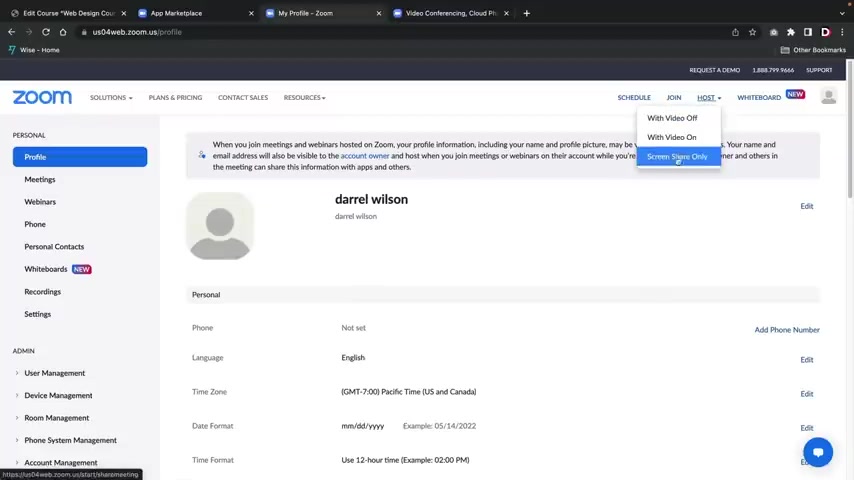
So I'll just put uh Patty and then I'll click on create meeting and then I'll click on update .
All right .
So now I'm gonna go back to my account right here and go to host and then I'll do screen share only .
Uh Would you like to start this meeting class discussion ?
I'll click on start .
So Zoom already knows that we have classes that are already supposed to be uh launched .
Uh Here , I'll just click on open zoom dot us first .
I'll go ahead and share my screen and uh I'll just create like a , a whiteboard , you know , whatever we'll use the Zoom features here .
And uh this will be like , hello , you know , or whatever , you know .
All right .
So I am now the students and I'm gonna say , all right .
So let's go ahead now and enroll in the class discussion .
So here you can see that this has already started .
So I'll click on join in browser .
All right .
So now I'm gonna join the meeting and my name is Robert , right ?
So let's say the student is Robert and here I'll click on join and there you go .
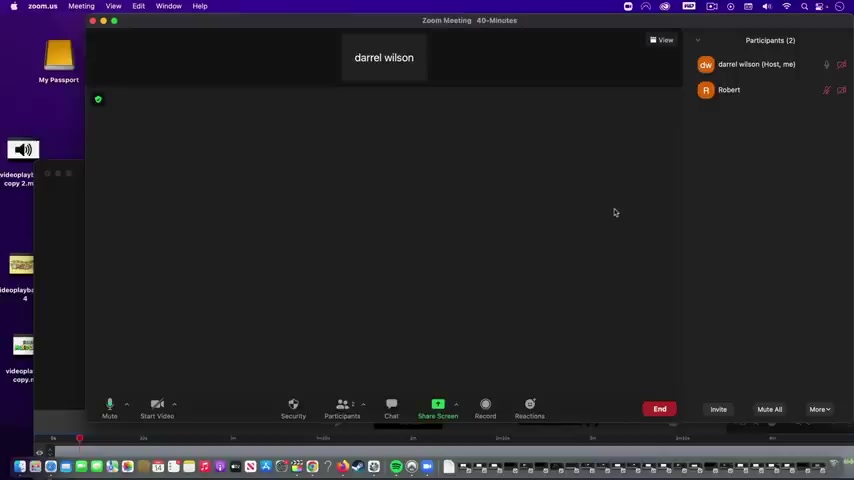
So now we can see the uh student is now viewing Darryl's uh screen .
So that's how you guys can uh create a Zoom meeting .
So I did get a little bit of reverb .
So I decided to take it down but you can see that uh Darryl is in here and also Robert are both in here .
And now I can share the screen to uh you know , pretty much anything , right .
I can , you know , share my screen , I can create a whiteboard and all the students in here uh will be able to see exactly what I'm doing .
So that's how you guys can integrate zoom onto your online course website .
Welcome back party people .
So at this point , you guys are like Pros with wordpress and you guys also know how to use the Tudor L MS pro plug in .
So congratulations .
Now , before I let you guys go , I just want to make one more section that talks about the act of selling courses .
Uh what to include how to keep it structured and also things to avoid , right ?
Because I think a lot of people they jump to those third party websites right away and that's not where you want to go , man .
And I'll talk about why in this part of the video .
All right .
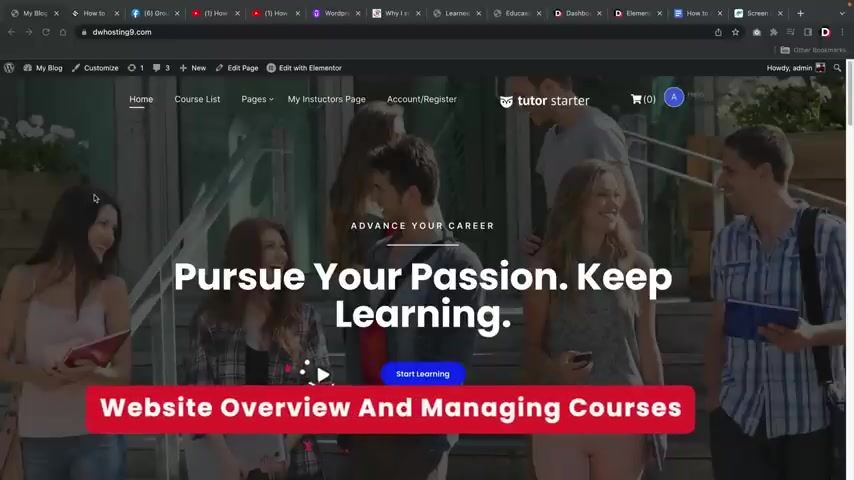
So let's get started , right , guys , in this part of the video , I'll be explaining how to manage and sell your online courses .
I'll be talking about the pros and cons .
I'll also give you guys my personal experience selling online courses and things to avoid .
I'll also be showing you guys template kits and also free templates that we have made exclusively for you guys for just watching this video .
Now , the first thing that we want to talk about is uh the courses itself .
Now , I found this article by Lauren rules dot com , which is actually pretty helpful .
The first thing that you guys want to do is decide on a course topic .
So , uh you guys don't want to create a course where you're mentioning various other topics .
You just want to focus on one topic and be dedicated to that specific topic .
The next thing that you guys want to do is research your course subject .
Obviously , you guys are probably knowledgeable about this stuff .
So you just want to make sure that uh you guys , you know , research what you're actually talking about because I have seen course creators make courses on things .
They have no idea what they're talking about and that's like a , it's like an epidemic .
It's almost a problem that I've seen , especially on youtube .
And then , you know , you can outline your course .
I actually do this for my videos .
If you guys actually go to any one of my videos , you can see here how everything is structured , right ?
Number one , we get hosting .
Number two , we install wordpress .
Number three general settings , you want to create that step by step outline .
So users feel very short structured and they also think that you're a better instructor .
When I first started selling all my courses guys , it was a disaster .
I was all over the place .
I was just randomly teaching stuff everywhere and it looked very unstructured and people thought I was a nube .
So you want to avoid that ?
Right ?
It looks like right here they went from 3 to 2 , but that's OK .
No problem setting your goals , objectives .
So as you do this , what do you want from this ?
You know , what is your goal ?
How much money do you wanna make ?
How many students do you want to enroll in the course ?
Just set something , you know , like for the first year , I want 100 students , you know , just something very basic , you know , but just set , set a milestone , right ?
And the next thing we have is creating the content .
So just make sure that uh you guys create valuable content , that's something that you would read , right ?
So for example , if I go to any of these videos here , I want people to watch it , right ?
And if I were to create a video that I myself would not watch , then the content is not good enough .
So I'm just saying to you uh make something that you would want to read yourself , right ?
And don't use your old content guys .
I have seen creators do that as well to do that because they're lazy , right ?
In all my videos , I'm very um you know , we we go in detail and do different topics .
I don't just rehash all of the same material because that's lazy and people will catch on to that .
Here we go , how to price your online course .
Now , uh this is a very uh debated topic , right ?
And there's pretty much two methods here and they actually mentioned this and I do want to talk about this .
The first one is a free course .
Now , how do you make money with a free course ?
Right ?
Well , number one , you guys would make money through affiliate commissions .
For example , here I'm offering this course on how to create a social media website with wordpress .
And they have to purchase Buddy Boss , which is a wordpress theme .
If they go over here and they click on the Buddy Boss link right here and they decide to make action and purchase the actual product .
I will then receive a commission of this product .
I think I get around 30% of whatever this products worth .
So for example , if I go over here to pricing and a person buys one of these , I get 30% of their sale , that is how a free uh course can generate income .
That is my current approach , right ?
There are people who sell uh paid courses on this topic , but my approach is I want to give it for free and I hope that they uh you know that I get commissions from it , which I , I do , you know , I , I see it all the time .
So that is one approach , but I wouldn't recommend that if you're not doing it on youtube because I also make money through youtube ads .
So I would only use the free method if you are offering courses only on youtube .
But you guys obviously made a course website .
So the free method would probably not be the best solution for you guys .
And I recommend this one right here .
The basic one off payments .
This is the best one to go with because a user purchases , the course they get access to it and the transaction is done , right ?
And when you guys create an a one time payment , you always want to have groups , right ?
You want to have like a Facebook group and you want to have a group or community where people can come together and talk about uh the topic .
The worst thing is when you don't have a personal connection to your audience because the thing is once you guys actually create a Facebook group here , you can sell them more courses and you can offer more products , right ?
So you want to build that community base , but you also want to maintain that personal connection with your audience because now the worst thing is just selling a course and disappearing and then everyone thinks you were a scammer , right ?
This is a very common thing .
So uh just be mindful about that , right ?
And over here we have the subscriptions .
I do not recommend subscriptions .
I think this is a terrible model .
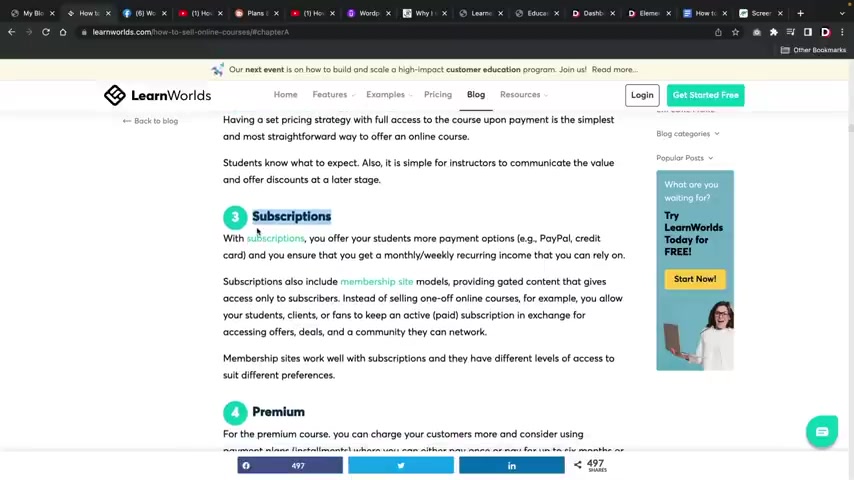
I have seen two people on youtube do this and it has backfired tremendously .
The reason why this does not work is because if a person offers a subscription and they do not add anything into the course later , the people feel like they have been scammed , right ?
So , uh I feel like this is a very bad way to sell online courses , right ?
Also for the one off payments , I did mention that you guys can create like a Facebook group here for your community .
However , I also do have this video , you know , on how to create a social media website where you can have people join your community .
And there are a lot of big influencers and big companies like that actually use the same software and have watched this video .
So it's like a little mini Facebook , right ?
It's a little mini Facebook where you have uh people that are posting liking , you have followers .
Uh You have members right here .
Uh People can like , people can add others to the group , they can even create their own groups .
I think this is very good for course creators .
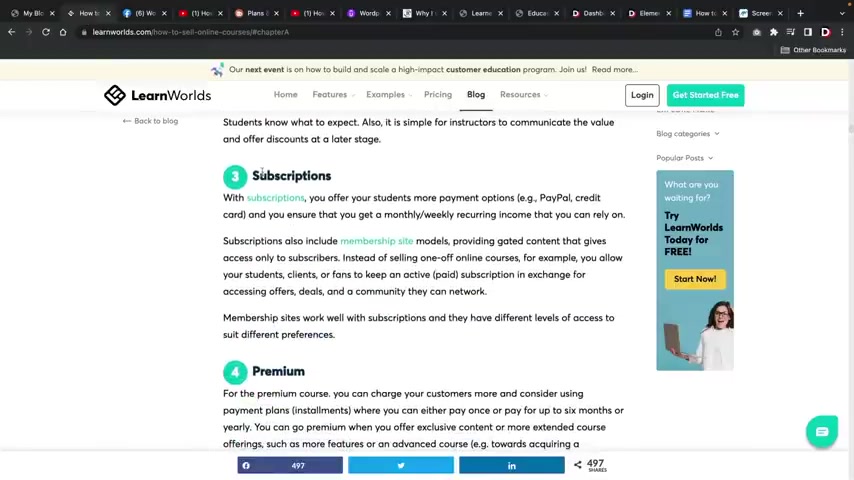
Uh You can also even , you know , sell your products inside of your community website .
So , uh yeah , if you guys do want to check this out , uh This is a great video that goes hand in hand with course creators .
All right .
And we talked about subscriptions , do not do that , do not do uh whatever premium , I guess that's just a one time payment , do not offer installments .
Ok , guys do not offer installments .
I don't recommend it .
I feel like it's a quick way to get uh charged back and where people just don't pay for the course .
Right .
That's my opinion on that .
And let's go ahead over here a successful online course page which you guys already have because you guys can easily uh just link people to your course page and you guys do have a really nice course page .
In fact , they are actually using almost the same structure as , as we are using right here .
Now , I do want to mention that selling courses on your website is way more profitable and lucrative than going to other third party websites and selling your courses .
I myself have had the same experience and I want to walk you guys through because this guy also had the same experience I did .
For example , if you guys go to U DB dot com , you guys can sell courses and they make it really easy to sell courses , right ?
But the thing is you're probably thinking to yourself , this guy made a lot of money , right ?
98,000 students .
Uh the course was 100 and $30 .
Uh It's only $16 still .
He's made a lot of money .
Not really .
So what Udemy does here is they actually uh take off your original course price that you listed , they dictate the price and guess what if they actually found the course through uy dot com , the instructor only gets 50% of this $16 .
However , it gets worse if they found an ad that redirected them to this course , you as a creator would only get 25% of this $16 which to me is total BS because they have all this at the course at 100 $30 .
You to me then drastically reduces the price and then you only get 25% of this price if someone found it through ads .
So it looks like this guy right here , Roy A whatever his name is , he actually had the same experience like I did , for example , when 100% of the revenue share on students that instructors bring to you to be .
So this course right here would only get the full revenue of $16 if the creator gave this student a link that directly brought them here and they immediately registered , which is really not likely , right ?
And if a person found the course through ude dot com , just in their search engine , they the course creator only gets 50% right ?
So they would get 50% of this $16 right ?
And if they found it through an ad , uh they would only get 25% .
And the worst part is is once they actually find the course with these really cheap prices , the students expect support and updates , right ?
They expect support , they expect you to interact and help them .
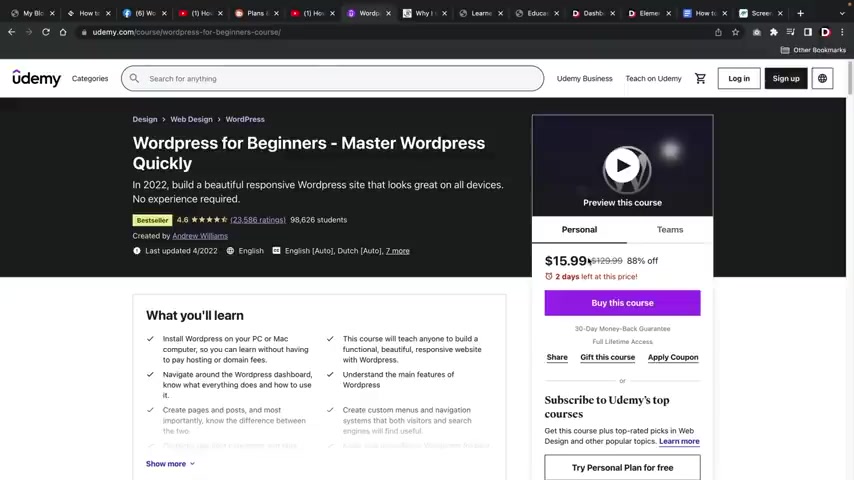
And that's actually part of the U rules is you have to engage with your students and who the hell wants to engage with their students .
When they're getting 25% of $16 .
It doesn't make any sense .
So I would highly recommend to teach courses on your own website where you have full control and you get all of the revenue rights .
So that's my personal experience selling on other websites .
You me is not the only one .
There are other few websites that I've sold on and I feel like selling on your own website is the best solution .
Next , I want to talk to you guys about my templates .
So here we have the learning template , right ?
And we have various pages , right ?
We have home page one , we have home page two and also we have home page three .
We also do have other various pages , right ?
We have like the uh about us uh coming soon the landing success story student registration .
We have tons of pages for you guys uh that you guys can import .
We also do have the educ layout where we also do offer uh various home pages as well .
We have home page one , home page two and also home page three where students can or you guys can use these layouts on your websites and these are like the full shebang , right ?
Because every page is different .
Uh we have created this specifically for you guys and they look , they look really nice .
I gotta be honest .
Uh I paid about $2000 just for these layouts to be honest .
So I just wanted something very good for you guys .
Now , in this video , I'm not gonna be showing you guys how to upload it .
Uh However , these products are available on my website .
If you guys go over here to view layouts , uh you guys will go to the elementary templates and then the template will be available .
However , at the current time of making this video , it's hidden because I don't want people to go and uh you know , go and add it to the cards because uh it's exclusive for this video , right ?
So this is the template kits .
I'll also put the other one in the shop .
Now , you guys might be asking yourself , well , how do I use this ?
Right ?
Uh Here we have instructions and on this page right here , we're going to have product description .
So all you guys would have to do right here is actually click on the product description .
It will show you exactly what you guys need to do .
Uh step by step in order to import the entire kits .
Uh One thing uh one thing to mention , you guys will need element or elements or pro tutor L MS and the tutor L MS elements are add ons , right ?
We also do have a video that shows you in detail , how to upload these templates and we will leave all of this in the product description .
I will also make a second follow up video uh showing you guys how to import both of these templates , right ?
But at the current time , I'm not gonna have it right now just because I don't want people to add them uh to their carts and use them , right ?
So uh I'm just going to put these in the description for you guys .
And by the time you're watching this , it will be all filled out and ready to go .
So , no problem .
Lastly , I want to talk about a theme that you guys can use to get more templates .
So obviously , my templates are the best , right ?

I mean , my templates are amazing .
I I gotta be honest guys , like my designer is like the best out there , you know .
Well , me and my designer , you know , I we we go hand in hand on this and we uh go back and forth on these designs .
However , you guys can also use the Astro theme .
The Astro theme also does have tons of templates that you guys can use .
We started with tutor starter .
You guys can keep tutor starter , no problem .
However , the Astro theme also does have tons of templates that you guys can use for your uh online university or your course websites .
So just to give you guys an example I have now activated the Astra theme .
I went over here to the Astra options and I'm gonna click on install importer plug in now .
Uh with Astra , I gotta be honest , people only use Astra really for their templates .
I mean , that's really why people use it .
I mean , all the themes today are the same thing right here .
I'll click on build your website now , I'll choose mentor , I'll refresh this page because I don't know why .
But it's always like that .
It's weird and uh they have tons of , of websites right here , right ?
So we have personal sites uh like , you know , online health coach , they have , you know , all these different layouts you guys can pick from and there is quite a bit so you guys can go ahead and go through this list .
Also .
There is a community one , right ?
So for like preschool , uh let's talk about university , right ?
Let's see .
They have , they have some , they have some free ones , a free one , another free one , check out another one here , kindergarten .
Uh check that one out .
Well , it looks like all these are pro , right ?
But uh if you guys do want to upgrade to the pro , uh I'll leave a link below to purchase the pro version .
But they , they do also have just regular like layouts that you guys can use .
That's if you guys don't want to use mine or the one that came with the tutor starter .
Uh This is also a really good resource on where to get some more templates for your websites .
But alright guys , that's pretty much it for this part of the video .
Feel free to let me know how this video was .
If there's anything else I can do to help you guys get started with your course website .
Also let me know in the comments below if you guys do want to join my Facebook group .
Uh We have a group here with around 10,000 members and I do give out tons of freebies .
In fact , over here , I actually did give out uh more uh demo layouts for the devi theme .
So that's also pretty cool .
People are really excited about that .
Obviously , you can tell there's like almost 200 likes on over here .
So , uh yeah , but uh again , thank you guys so much for watching this video .
If you guys have any questions for me , again , let me know in the comments below .
Uh Feedback is always welcome .
So if I did really good , let me know if I needed improvement .
Also , let me know and until then I'll see you guys later .
Congratulations guys on your L MS slash course website .
You know , I don't really know what you want to say because you can make a course website , but you can also make a whole university uh website with this plug in as well .
So , uh you guys saw the whole video , I'm like saying both because it's the same thing , right ?
But uh let me know how I did guys , you know , uh was this a good video ?
Let me know in the comments below .
I feel like today online courses and online education is evolving and a lot of people would rather learn something from their favorite influencer or they just want to take a , a school online where they can learn by themselves .
Maybe they have like social anxiety and they just want to , you know , have uh attend an online school and I think that's where a lot of the online education is going in the future .
So uh yeah , make sure you guys like this video .
Leave me a really nice comment below and until then I will see all of you party people in the next video guys take care .
Are you looking for a way to reach a wider audience and get more views on your videos?
Our innovative video to text transcribing service can help you do just that.
We provide accurate transcriptions of your videos along with visual content that will help you attract new viewers and keep them engaged. Plus, our data analytics and ad campaign tools can help you monetize your content and maximize your revenue.
Let's partner up and take your video content to the next level!
Contact us today to learn more.