https://www.youtube.com/watch?v=ozSE7Wrdb1o
2023-06-14 18:22:27
How to Quickly Remove Internal Weld Seams from Steel Tubing
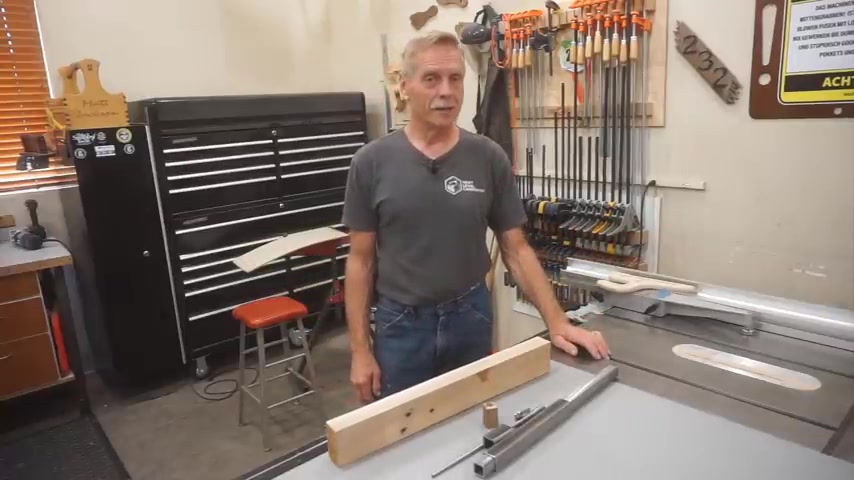
Well , hello there and thanks for checking out next level carpentry .
You know , I'm really excited about doing this video because I want to reveal two things to you .
And the first thing that I want to announce is that this video is a prequel to the long awaited out feed roller stand video that I've promised .
What I'll show you is one aspect of that build and I want to show it to you as a standalone process because its use and application goes far beyond what will be shown in this single roller stand build video .
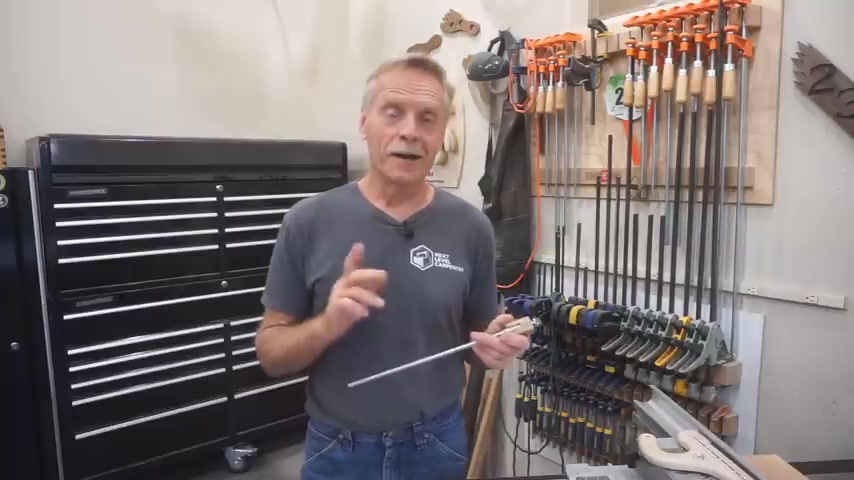
And the second thing I'll show you is resolution of the little teaser I put in at the end of the end of the end of the last video where I gave you a shot of this cool tool .
Regardless of some of the comments I got on that video .
This has nothing to do with alien space probes , but it has everything to do with metal fabrication in general and the roller stand build video in particular .
And what you're seeing here being revealed to the world of makers everywhere .
For the first time ever is a tool that I've named that seems impossible .
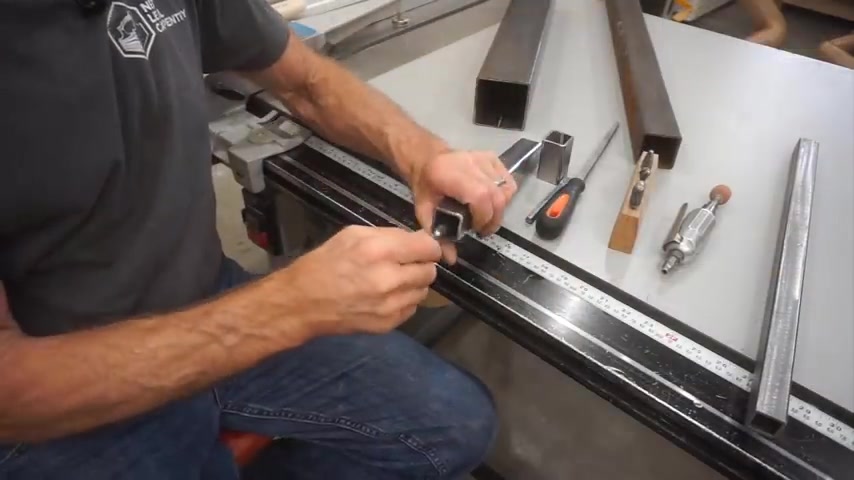
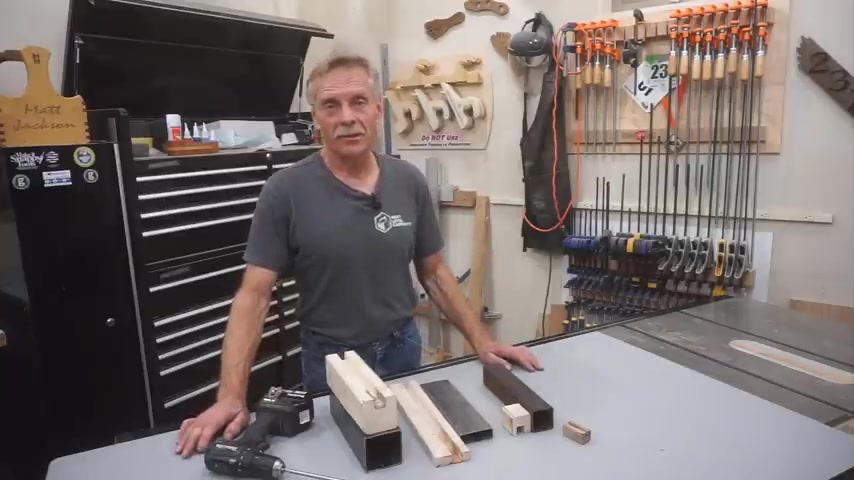
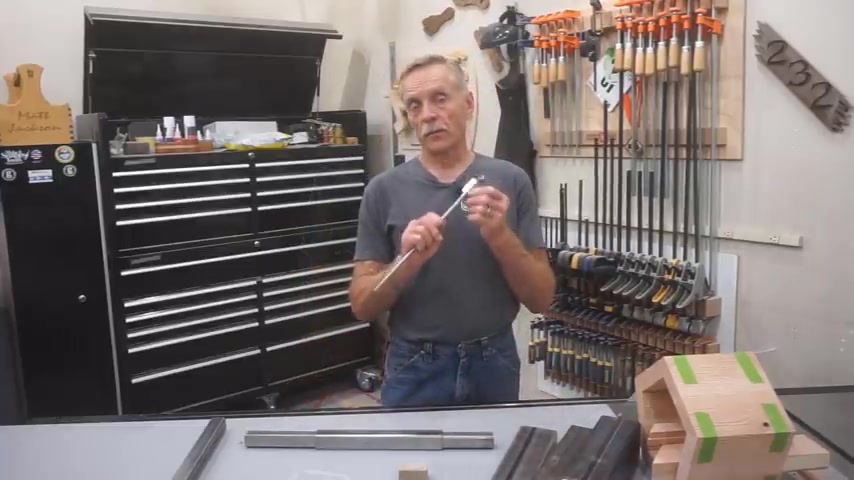
Internal weld seam removing tool I invented and created this tool to quickly cut out the internal weld seam from the inside of square steel tubing .
So the two closely fitting pieces will sleeve together like this .
This one is the first one ever created and I'll show you in a few minutes exactly how you can make one just like it out of wood .
This version works great but make sure you watch the video to the end to see a new and approved version 2.0 build out of build aluminum with a CNC that looks amazing and works as good as it looks .
Version 2.0 is designed to be adaptable to any size square tube , inch and a quarter O D or bigger for a one size fit all versatility .
How cool is that ?
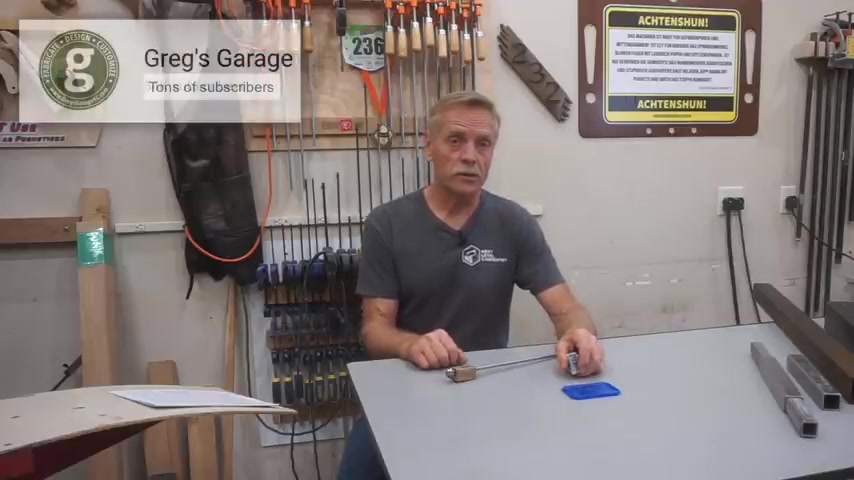
I take credit for inventing and making version 1.0 , but credit for version 2.0 goes to Greg Porter of Greg's Garage , his channels on youtube and he's responsible for most of the improved finish and features of this version 2.0 .
And I'll introduce you to Greg later in the video when we talk more about this amazing little tool and I'll link to a video Greg did for his channel where he shows his ample CNC milling shops while making this new and improved version .
We'll also give you some exciting information about a preorder arrangement we've put together if you can't or don't want to make one like we're going to show you .
So stay tuned for that .
And now I'm going to give you some background information .
So you understand the problem that this tool solves and why it matters and you can skip ahead to the time stamps shown here .
If you want to jump right into the build part , watch the tool in action or if you just can't wait to meet Greg .
If you're still with me , I'll start by explaining that when something like these roller stands are being manufactured , the various materials and components are specified for each individual part .
So everything works together as designed , adjustable parts that need to have a slip fit .
Like this height adjustment can be mass produced with accurate challenges .
So they function properly and the pieces that slip fit together like this for telescoping action are said to sleeve together in order for two pieces to sleeve together , snug enough to be stable but loose enough to slip smoothly without sticking during adjustments .
The inside dimension of the outer piece and the outside dimension of the inner piece have to fit properly seems simple enough , right ?
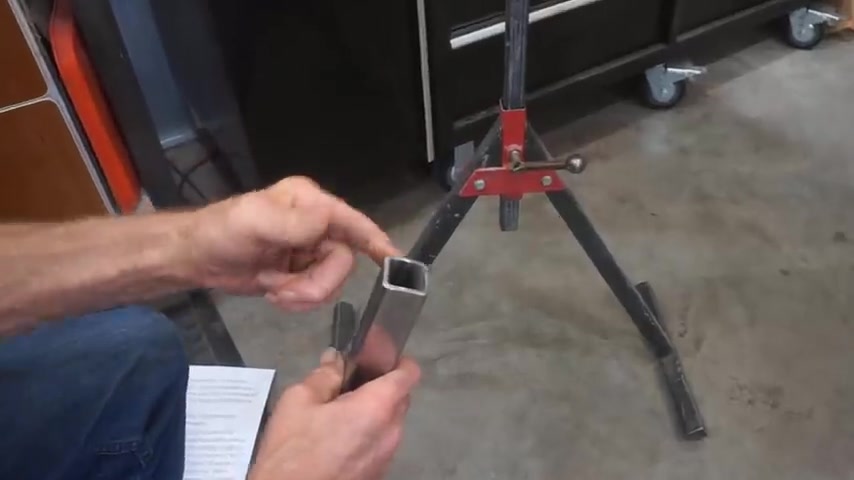
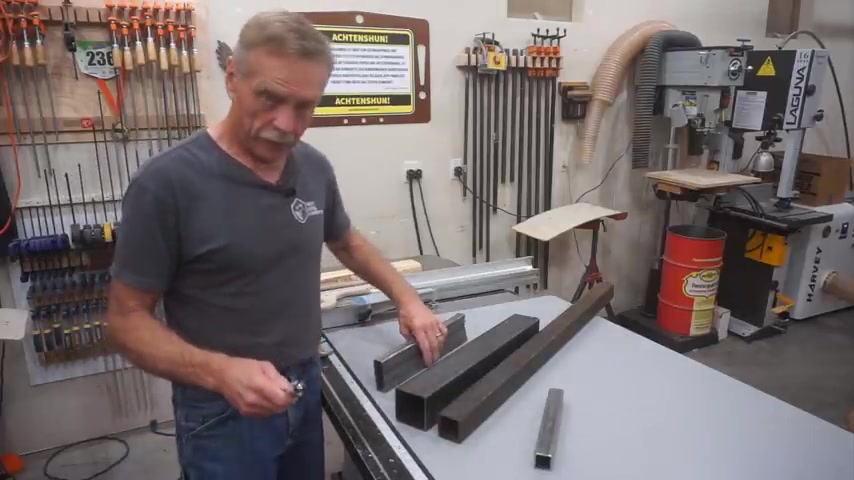
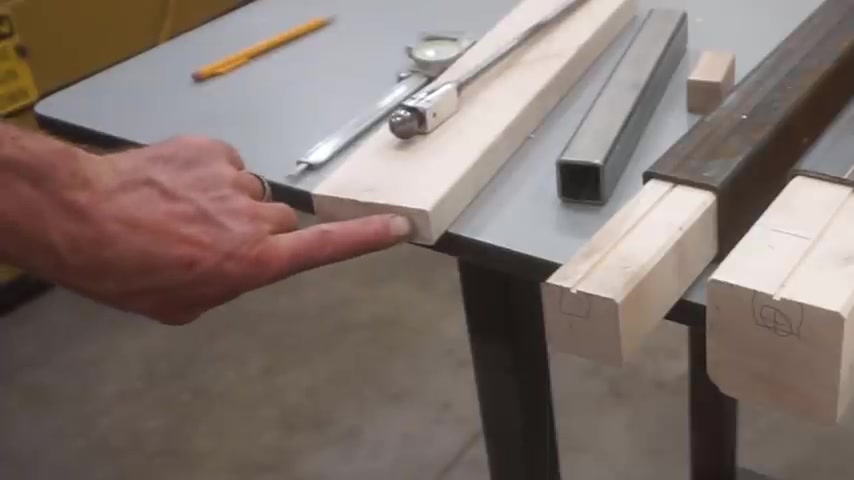
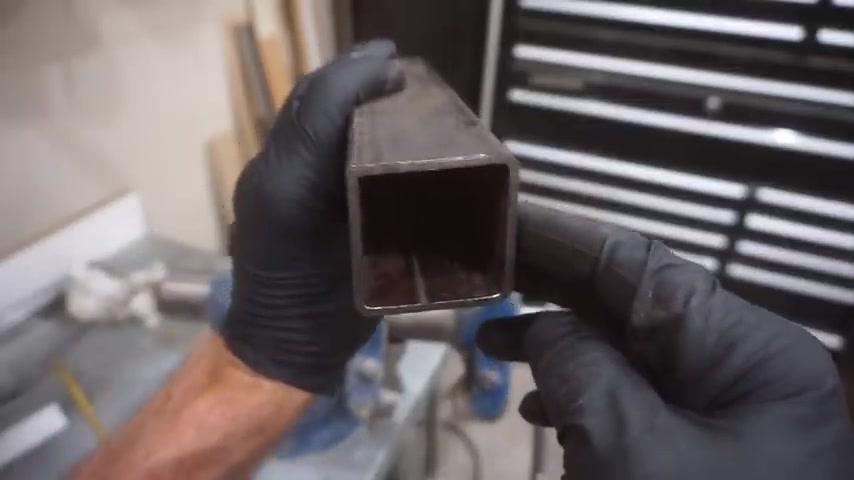
But as you might suspect it isn't and any maker that attempts to find two pieces that sleeve together like this quickly realizes there's a problem the material I use for these out feed roller stands is an inch and a quarter O D square tube with nominal eight inch thick walls , which should have an internal dimension of one inch square .
Right .
Right .
Theoretically , a piece of one inch square O D tubing should slip inside for a sleeve fit right again , not so fast .
The problem you run into is that while the inside dimension of the tube is just slightly over one inch square , there's an internal weld seam to deal with .
You can see that the smaller tube does indeed fit nicely inside the larger tube , but the weld seem protrudes just enough that the two pieces don't have a sleeve fit with each other .
And that's because the weld effectively reduces the clear inside dimension to one inch by 15 16 , which is clearly too small to fit and is a deal breaker .
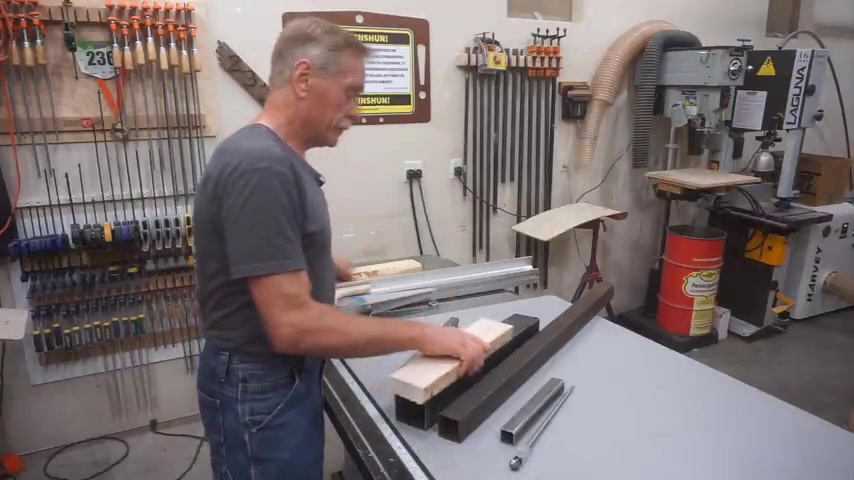
When makers run into this problem , they usually figure how tough can it be said about filing chiseling or grinding to remove the weld .
It's not impossible to do a short piece or two up to a few inches long , but results are slow , frustrating at best , anything longer than three inches or so , becomes exponentially problematic .
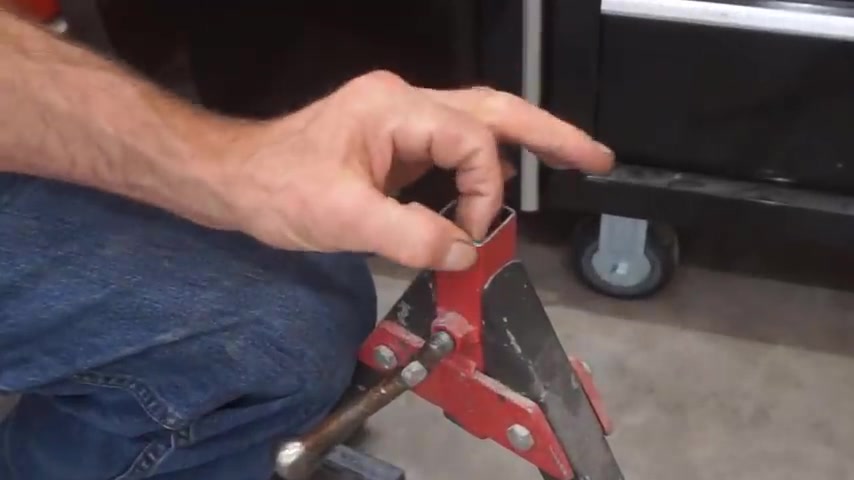
The most common work around for the problem is to use an outer tube with a thinner wall thickness so that the resulting inside size measuring from the weld is a bit over one inch by one in the 16 inches .
These dimensions allow the pieces to sleeve , but it's a sloppy fit like this .
You can see that's what I did on my original version 1.0 outfit roller stands and you can see the wobble and the height adjustment here .
I've been working on this dilemma for a few months now trying to come up with a practical way to remove that stubborn internal weld for a better slee fit for the upcoming version 2.0 roller stand build video series .
A quick youtube search for videos that show how to remove that internal weld brings up a few doable but rather crude methods for getting the job done .
I'll add links to these alternate methods in the video description for you .
If you're curious , the first method is to just grind a groove in one face of the internal tube so that it clears the weld inside the outer tube .
If I were recommending this groove method , which I'm not , I would first mark the weld location on the outside of the outer tube and then transfer that weld location , mark to one face of the smaller inner tube .
Then I would notch a block of scrap wood so that its offset edge lines up with the groove that I want to make in the outside face of the smaller tube .
And then I'd clamp the tube to the block and use the edge of that block of wood as a guide for an eight inch cut off wheel in an angle grinder to quickly grind a groove of the right depth in the right location for this method .
After grinding I run a file over the face and the rough ground edges to remove the little micro burs on there .
And then you can see that I get a functional but crude slee fit of these two pieces .
It works , but I don't like it because it limits the two tubes to one orientation .
Plus it's not a next level solution in my humble opinion .
And if the inner tube is flipped end for end the groove , no longer lines with the weld and the sleeve fit doesn't work that way .
Either .
Another method I found involves making a custom ground piece of tool steel and then basically driving it down through the outer tube with a hammer to scrape away or broach the weld to remove it again , it's functional but both a crude approach and a crude end result .
The third approach I found was using a similar piece of steel , but with it connected to a piece of all thread that when turned with an impact wrench gets drawn through the tube again , relying on a scraping action to remove a non centered weld .
This method would be difficult to achieve on a small size tube like this because the weld seem is centered in one face of the tubing causing clearance issues .
There's links to these videos in the video description .
So you can see the technique I'm crudely trying to demonstrate here .
So for a cleaner , faster and repeatable process that is capable of removing weld from tubes of any length , whether the weld seem centered or not .
I figured a grinding or cutting action would be required .
True as that is , it's doable with short pieces of tubing because you can reach in and grind out the weld from both ends and it's not pretty , but it is doable , know about you .
But the way my mind works is that once I get a conundrum like this stuck in my head , it's difficult to let it rest until I come up with a solution that I'm happy with .
After some pondering , what first came to mind is this set of solid carbide birds which are capable of cutting weld but are difficult to keep in position for the cutting action required .
Light bulb .
Moment was when the idea of using bearings to hold the cutter in position within a snug fitting block of wood could solve the problem .
It took a bit of detailed designing to refine the apparatus for functionality .
But I think you'll agree when you see this in operation that it's an elegant solution for this age old problem .
I made my sea impossible version 1.0 specifically for the inch and a quarter O D square tube with its nominal eight inch thick walls that I use for the roller stand height adjustment tube .
I realized that it would take a carbide bird with a larger diameter than the half inch size .
I already had to make the required 1 37 inch oversized cut to remove the internal weld cleanly and completely .
An online search led me to this three quarter inch diameter , solid carbide Bald Bur with its long shank that had all the specs needed for the seems impossible to , to work a bit extension or two or three like this are needed for long pieces of tubing and the diameter of the connecting end determines the outside diameter of bearings needed to hold the spinning burr .
So I chose one from my router bit accessory kit with an ID of one quarter inch and an O D of 5/8 of an inch .
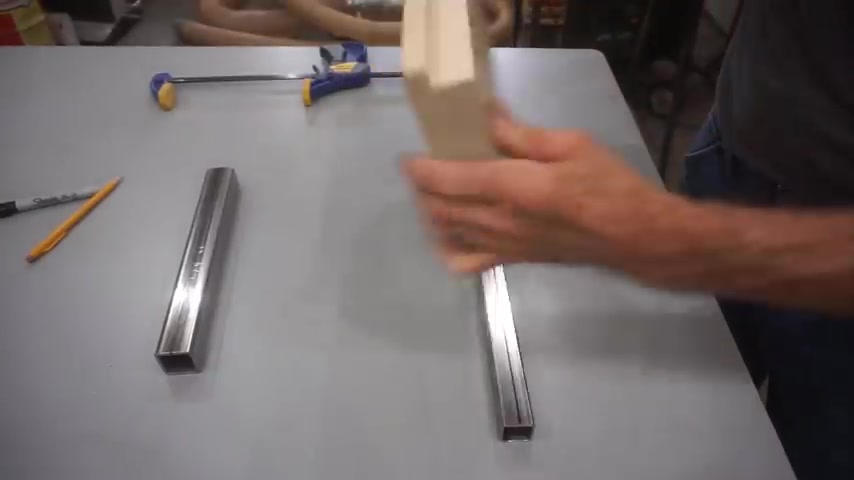
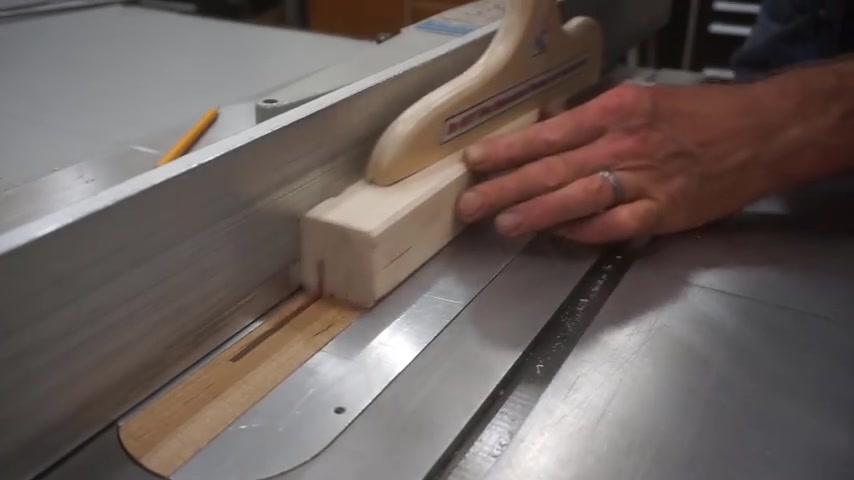
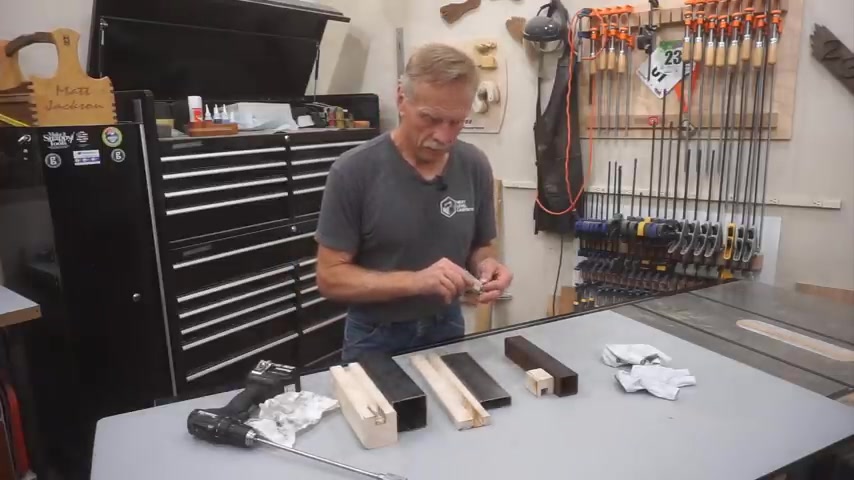
Once I had the initial concept and all the required components , it was just a matter of making a block with the right dimensions for the whole concept to work with all that background in mind , it's time to start making .
So let's I planned to use solid brass for my prototype but couldn't find any locally .
So I started with a block of maple .
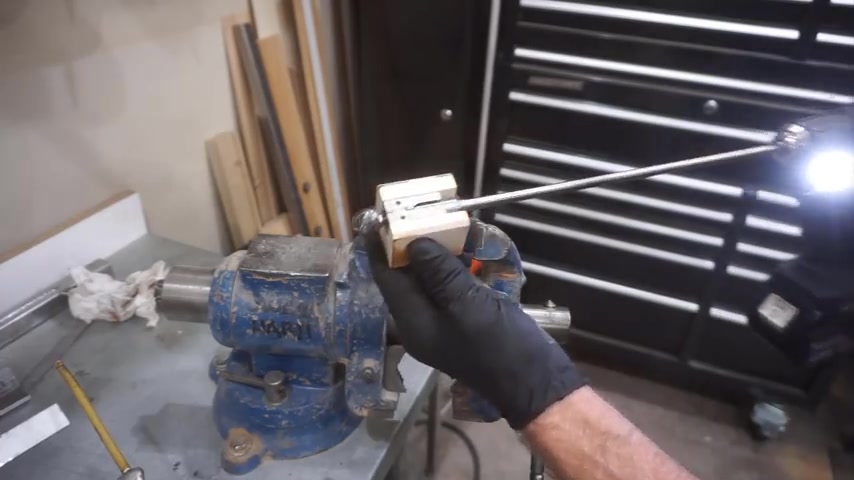
Instead I straightened , ripped and thickness , playing the block until I got a snug but not tight fit on the inside of the inch and a quarter O D square tubing .
Next , I rounded the corners off the block using an eight inch round over bit to allow clearance for the rounded inside corners of the square tube .
Yes .
Next , they cut a piece two inches long that needs to be laid out for a series of concentric tolls to make sure I remove the entire weld seam .
And then some , I want to end up cutting one 32nd of an inch out of the inside wall of the square tube in the process of cutting the weld away .
The burr is three quarter inch O D which is 6/8 of an inch , which is 12 , 16 of an inch , which is 24 30 seconds of an inch in diameter or 12 , 30 seconds of an inch radius .

So for a 132nd inch deep cut , it needs to be centered in the width of the end of my maple block and just 11 30 seconds from one edge which will leave one 32nd of an inch protruding coming up with a dimension .
That way is like one commenter said , going around my elbow to get to my thumb .
So if you didn't follow the process , I'm marking this one 32nd of an inch , less than 3/8 of an inch from the edge of the block .
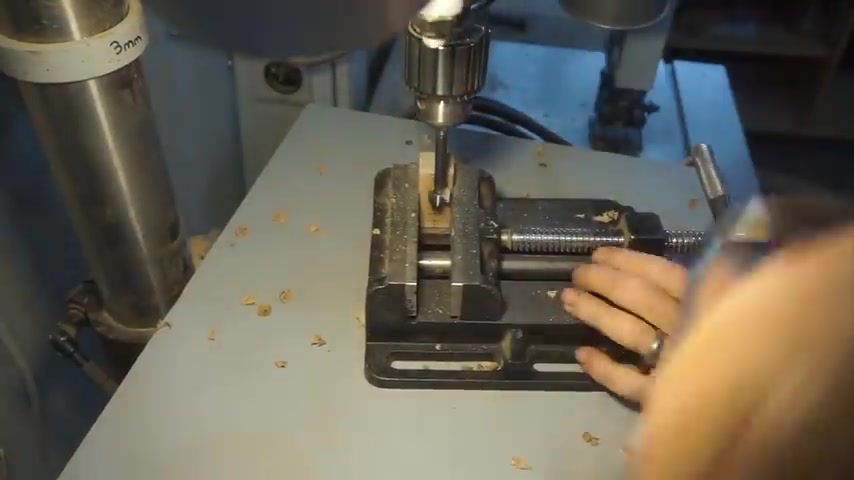
And I find it much easier to locate these holes on the drill press .
When I drive the tip of this needle point deco pro scratch all into the cross hair marks on the end grain of this wooden block .
After carefully marking the center on both ends of the maple block , I go to the drill press and I drill a 58 inch diameter hole one quarter inch deep from one end of the block and another 58 inch diameter hole , 1.5 inches deep from the other end of the block .
These two opposing holes leave a quarter inch thick wood web to separate the bearings which holds everything together .
During use .
The accuracy of laying this out on wood and drilling it with a drill press from two different directions leaves a lot to be desired .
But it is all accurate enough to work for the sale .
But it's also inaccurate enough to explain the reason why I contacted Greg of Greg's garage to do this professionally with a CNC .
Next , using the center of one of the 58 inch holes as a guide .
I chase it through with a 964 inch bit for the Burr's shank to pass through that slight amount of extra diameter .
Just assures clearance for the shank of the Burr .
I believe I misspoke earlier .
I'll use a 17 64 inch drill bit to chase through the 58 inch holes for clearance for the Burr shaft .
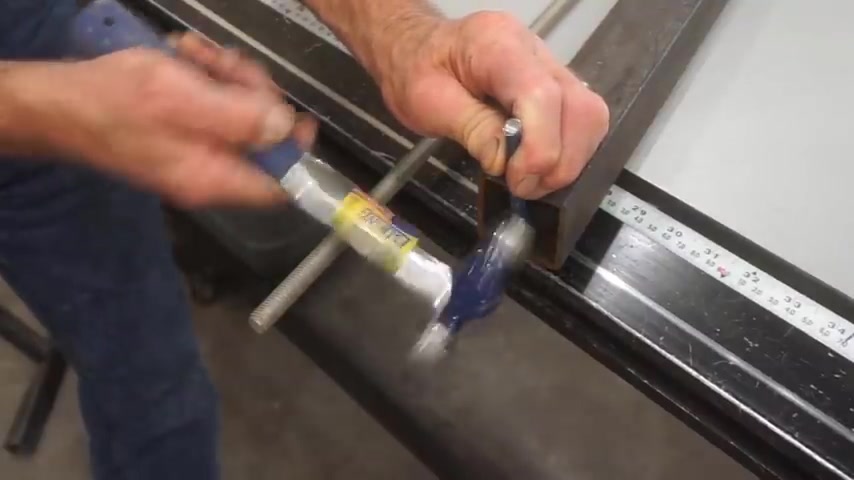
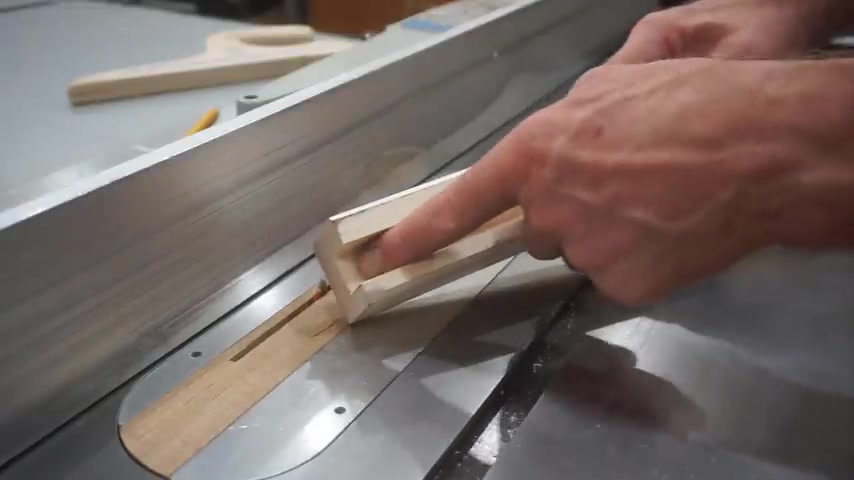
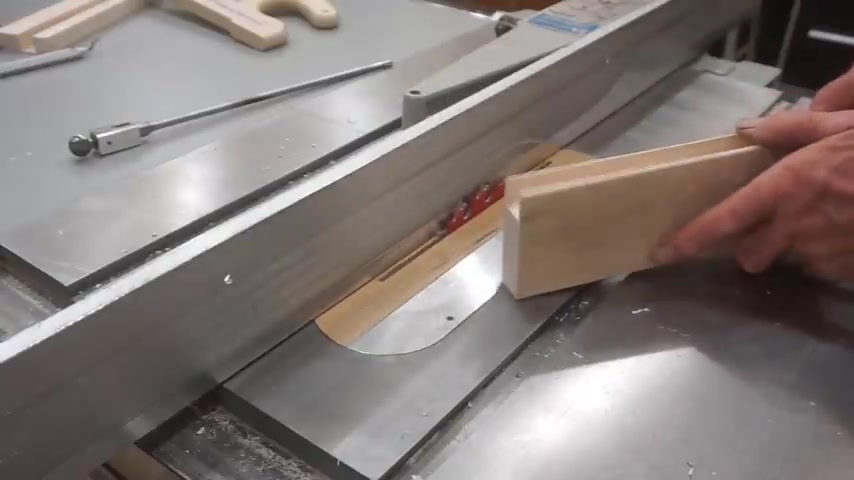
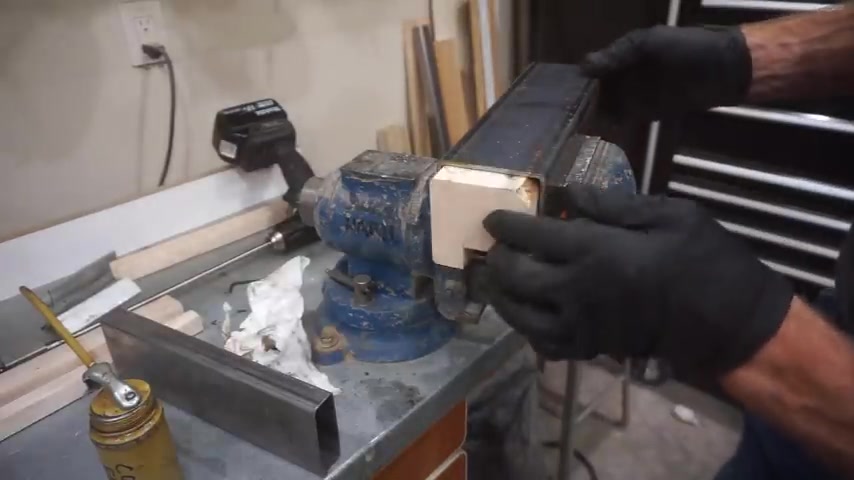
Finally , I run the seam impossible block over the table saw blade to center up a 1 16 inch deep 3 30 seconds inch wide mini data through the face of the block to allow clearance for the weld because the block passes through the tube before the weld is cut off .
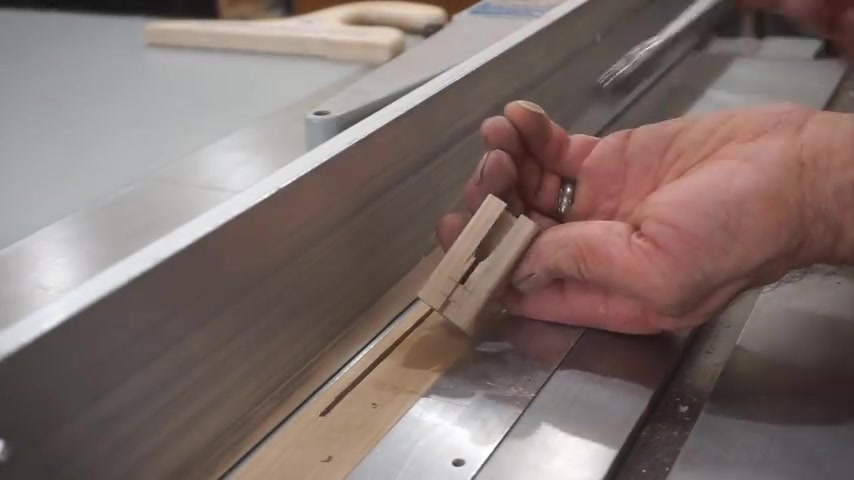
And the last thing I need to do is widen the slot on the bit extension side of the block to provide access to the rent that's required to tighten the bit extension screws .
And I clean up the end of that access slot with a little rat tail file to make it look professional .
It ain't no C N C but hey , it's gonna work great .
There it is then seems impossible .
Version 1.0 , serial number 0002 .
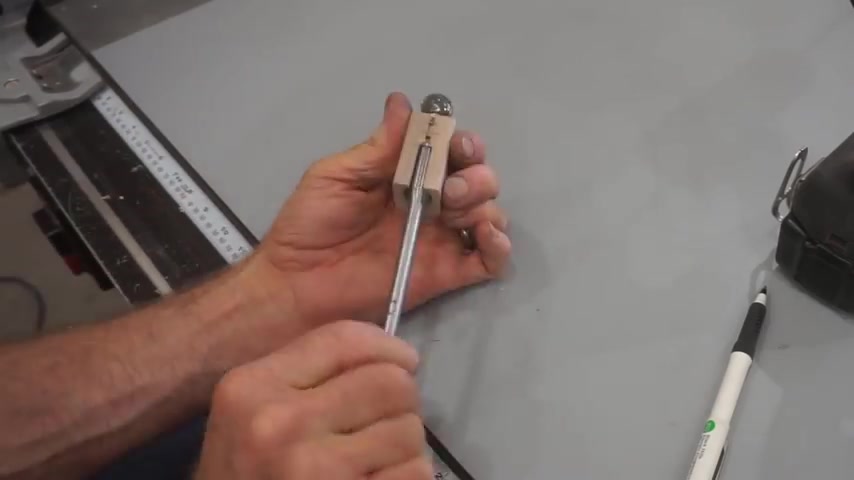
Now , I just push a bearing into each end of the block until it hits that small dividing web .
Push the bur shaft in from the short end , slip , the extension over the shank from the other end and tighten the set screws .
And if you have alignment issues like I'm having here just carefully run a quarter inch drill bit through the center holes of the two bearings to get everything to line up all hunky dory .
And that's yet another argument for the value of CNC machining for making this instead of a drill press in a cabinet shop , you might have to grind a smidge off the set screws so they don't stick out so far that the extension won't turn in the block .
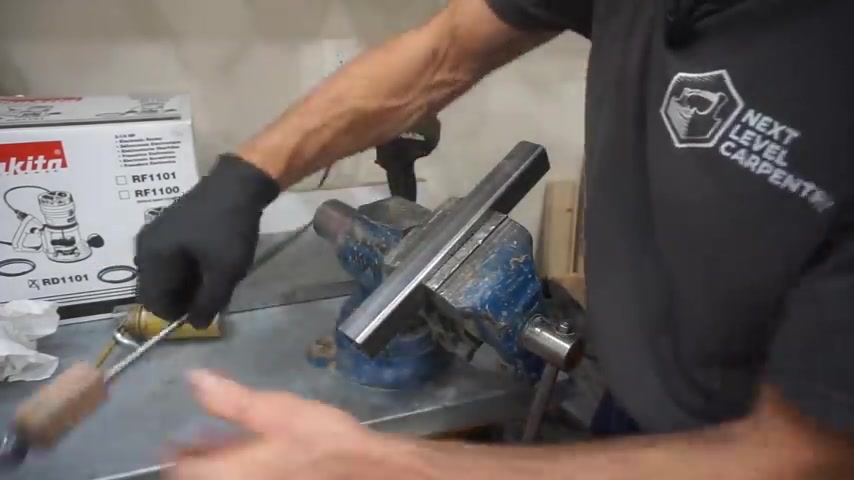
All I did was just fire up the drill and let the rotation of the extension rub away a little bit of wood that it needs for clearance .
And a quick word of advice from experience , clamp your seeds , impossible block in a vice before you spin it for the first time so that the spinning screwheads don't cause the block to blow out and leave you starting over and you can see that the spinning action of the bit extension in the block wears away a little bit of wood that rubbing on those set screw heads giving it nice clearance for smoother operation .
The last touch I'll put on this little block before putting it to use is give it a heavy coat of paste wax which will help it slide a little better inside the tube .
I think that's everything you need to know to make your very own version .
1.0 seems impossible .
Internal welds seem removing tool .
And now I'm gonna show you what it looks like in action .
Oh Yeah .

When everything is laid out accurately and done correctly , the cutting face of the Burr extends at one 32nd of an inch beyond the cutting face of the seems impossible block .
It's hard to see in the camera here .
But this rolling action on the work surface shows that the cutting face of the Burr is indeed extending beyond the face of the block .
If the burr would spin free above the work surface top at this point , you won't get the over cutting action desired for a smoother slee fit of the tube .
And this is the key feature of the sea impossible tool that it cuts the entire weld away plus a little bit more by leaving a nice clean machine finish on the inside of the tube for its entire length to use the seam .
Impossible .
Just clamp your piece of square tubing in a vice at a downward angle .
This helps clear chips as they're cut and prevent jamming next orient the slot with the weld and slip the extension through the tube and chuck a drill to it .
I'd like to add a few drops of karl to the burr to reduce heat and extend its useful life .
Run the drill at a slow to medium speed while pulling the tool through the tube , blow out loose chips as you go if necessary and add more oil if you needed because the cut is made as the tool is being pulled .
When the block comes out the far end of the tube , reverse the tube and reverse the cutter to finish up the last little bit of weld seam by pulling the tool through in the opposite direction .
When you're done cutting the weld out of a tube , push your rag or towel through the tube with a stick to remove straight and stubborn particles .
Assuming the bit and bearing holes are drilled accurately .
One pass through a tube is all that's needed for a flawless sleeve fit .
Think that's faster , better and easier than pounding or pulling a blunt force to through to scrape the weld off .
Yeah , me too .
As good as the version 1.0 seems impossible .
Tool is at removing internal welds .
It just gets better with version 2.0 looking close at this version 2.0 .
You can see the same configuration C N C milled into a three quarter by three quarter chunk of aluminum .

The one I have here is an early prototype that has all the final features of the version 2.0 .
But the production models will have the the orange anodized finish .
You see on these sweet layout squares .
And by the way , the C N C machine layout squares are already made and for sale through Greg's Garage website , and you can check those out through the same links in the video description .
I'll have more on that in a minute , but I'm going to push pause here for a second and say that if you like the original content you're seeing here in this video , I'll ask that you consider subscribing to next level carpentry .
If you haven't already , it's free , you know , and as a subscriber , you'll be notified each time a new video like this is uploaded so that you could be one of the first ones to see it after it rolls out .
If you think this video is punch worthy , go ahead and punch that thumbs up button while you're at it so that the quants or there at youtube know that I'm not asleep at the switch over here on the next level carpentry channel .
There's a link to Amazon in the video description and that takes you to a list of most of the tools and supplies that you would need to build a seems impossible tool of your own .
As an influencer , Amazon pays small ad fees to next level carpentry that help offset the cost of video production here on the channel .
So I always appreciate it .
A lot of the tools and stuff that you see here are available locally .
So just use the Amazon as a last resort if you can't find it locally or you're on lockdown and unable to get out and shop like you normally would as always , there's a link to T spring in the video description in case you want to sport one of these next level carry T shirts .
This one's got my favorite saying on it .
And you can also get stickers posters and signs from around the shop through that link and those sales help support video production here at the channel too .
So I appreciate that as well .
And even though no Staron CG products were used in the making of this video , I don't want you to miss out on the exclusive 15% off discount code that next level carpentry viewers get just by watching videos here on the channel .
So follow the link in the video description below and enter special offer code N L C at check out from the Staron website and you can score that discount on any of the great glue products that they have for sale there .
They're great products .
It's a great company and I think that's a pretty great deal .
So check it out and now let's get back to the video where you learn all about the benefits and features of the version 2.0 seems impossible block and how to make one of your own or how to get one if you're interested .
So let's go .
The key feature of the seems impossible .
Version 2.0 is that it's adaptable because the main part of the tool is made out of metal .
It has really tight tolerances so that virtually anything that this tool can fit inside .
Uh It can , you can cut the weld seam out of it naturally .
The bigger the tube , the simpler that is and it can even work on a rectangular piece like this provided this tool fits inside that profile .
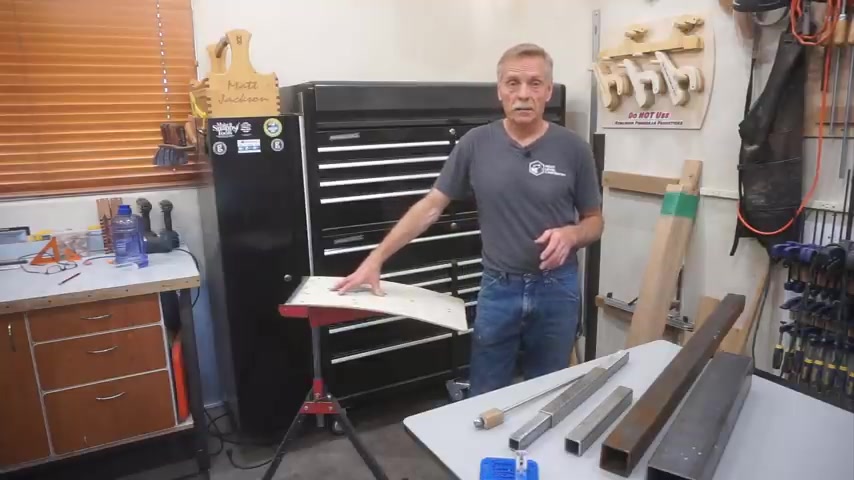
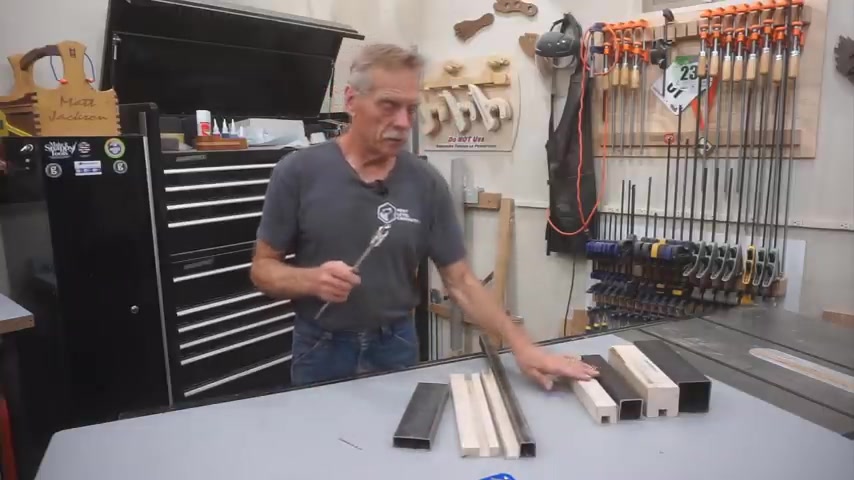
And the way it accomplishes that universal design is by making a sleeve or a jacket to go around the metal that makes up the difference in the space between the size of the metal block and the size of the tube that you're removing the weld from jacket can be made out of any number of things .
The high density plastic is probably the best for a long run of this if you have to do a lot of parts .
But for these , it's simple to make that jacket out of a piece of wood .
I've got a couple of scraps here that I'll make jackets for , for these and my advice when making a jacket because the pieces are so thin and so small is to start very big .
So your fingers are clear out of the way until the very last part .
I'm not going to go through the details again here , but I use the same joining ripping and thickness planning process to get the blanks down to size for the bigger profiles .
I'll just make the blank fit for the smaller profile .
I'll add one extra step because the pieces end up so delicate and small and I don't want to get my pinkies in that close to the blade when making those parts .
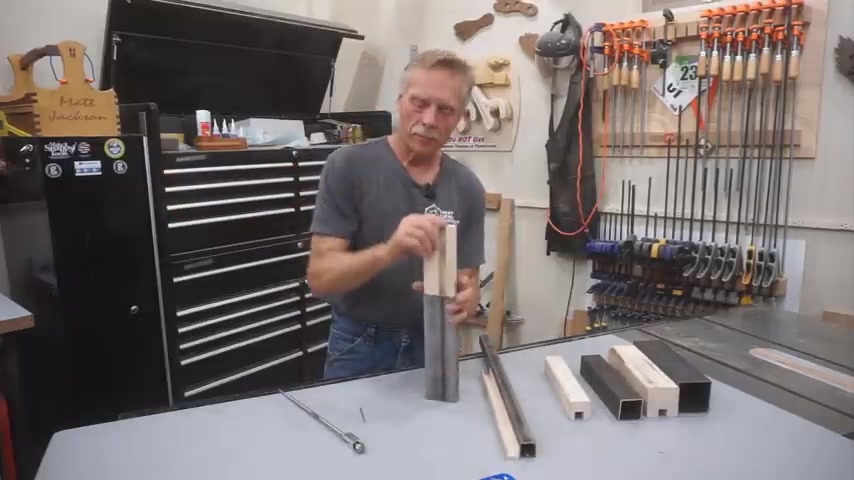
After a few minutes of milling , I've now got a block of maple that fits snugly inside each one of these tubes .
I put that micro data in one face of each of these blocks to clear the weld seam .
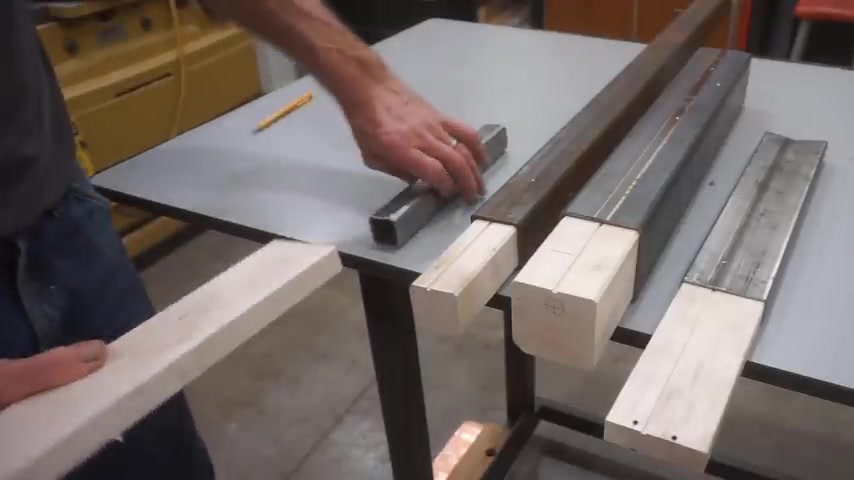
So you can see these slipping in and out of their respective tubes .
You can easily imagine that at this stage to build a version 1.0 seems impossible block .
It would just be a matter of cutting a two inch piece of the block and locating and drilling the same holes as the one done previously in the video .
The exception with these blocks at this stage is that the blank I made for making a jacket for the seems impossible .
Version 2.0 for the inch and a quarter square tube is much larger than necessary .
For the finished jacket that I'll make .
In this process , I leave the block oversized intentionally as a safety factor for milling the three quarter by three quarter data in one edge of the block for the smaller tube , the milled CNC block of the version 2.0 seems impossible .
Tool is exactly three quarters of an inch square .
So all that's involved in making these jackets is to plow a three quarter by three quarter data in the edge of the block where the weld seam notch is centering the data up on the weld seam so that the tool cuts the weld out as it's pulled through the tube .
Again , the exception is the inch and a quarter square tube where I am milling the data in the edge of the block instead of one of the faces , that's just a technical difference .
But as you'll see doing it this way , makes the whole process safer .
Obviously , all of these datas are the same depth .
So I'll put a mark three quarters of an inch up on the face of one of these blocks and use that to set the blade height and lock it in .
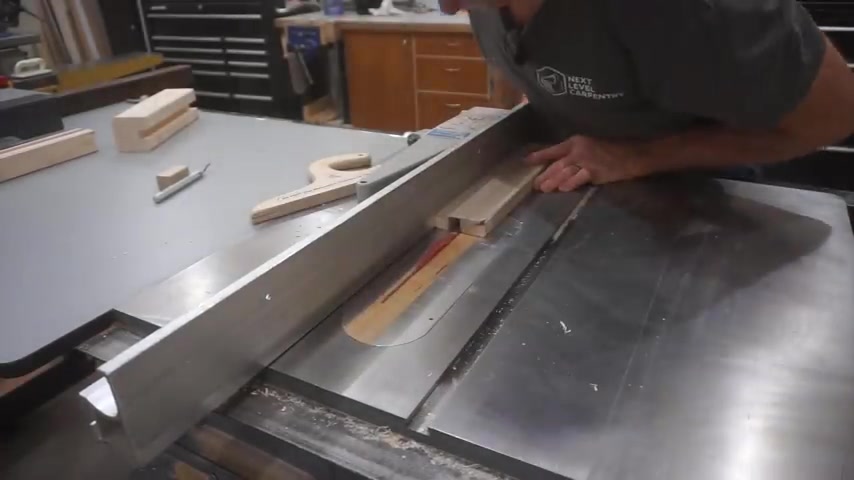
Data are typically made with a data blade stack or a data blade set .
But for these datas , I'm just using an eight inch curve , flat type grind ripping blade .
And the reason is is because these blocks are relatively small and it takes a fair amount of pushing force for plowing the whole three quarter inch data in one pass .
So I'm gaining a large measure of safety and sacrificing only a small bit of time .
So the trade off is well worth it .
I use a rule to center up the three quarter inch data in the face of the block where there's a slot for the weld clearance .
I want this data to be snug fitting on the seems impossible block .
So I'll start a little bit shy on the width of the data and then dial it in with a test fit of the actual block .
And now let's see if the camera can stay in focus as I make six successive cuts , an eight inch wide , three quarters of an inch deep to plow the three quarter by three quarter data I'm after .
And as I'm making these cuts , I'm mindful of the fact that it's the two outside cuts that matter most because of their location .
And if I make seven passes instead of six , that's not going to be a problem .
And there's nothing to get anxious about here because as long as the slot is snug , it doesn't matter if it's so precisely set up over that weld slot , I'm sure it could vary by a 16 th of an inch one way or the other and still cut the whole weld out .
So I'm not stressing about that part .
Looks like I've got about another 16th of an inch to go .
This mark looks lined up .
Well , that one's got a little room to go .
So I'll widen the data this way .
How's that for a guest folks that will do nicely , I may have this groove just ever so slightly too deep , but it would be very simple to add a thin piece of paper for a shim in the top to hold the block in place if necessary .
And with the rotation test , you can see that that slot is too deep because the bit spins freely above the top instead of digging into the top as I turn it , I lowered the blade exactly three frog hairs before locating and plowing the da in the other blocks .
And by making that small height adjustment , I'm able to get the perfect fit that I'm after for this block and I won't need a shim to make it work .
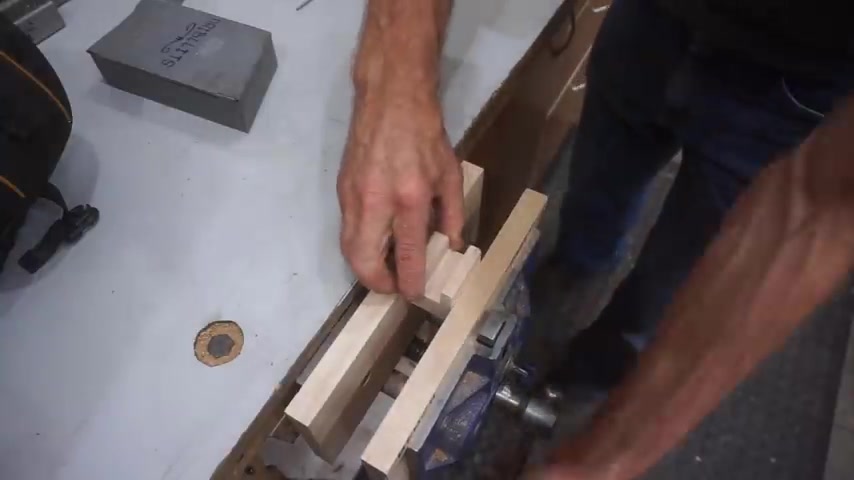
The jacket for the rectangular tube is a little tricky because the block is only 78 of an inch thick .
So it gets a little fragile .
We're making the data and I've got to pay special attention to the height of the blade coming out the back of the block because an oversight , there is just an accident waiting to happen .
I made this slot ever so slightly wide .
But as you'll see the screws that hold the seam impossible into the jacket , compensate for that without any trouble .
As you can see by the jacket profile that I've sketched in on the end of this block , this jacket is more data than jacket , which is why I left it in this bigger piece of wood .
I've got a big piece to hang on to while cutting the data do .
And then I can much more safely rip the jacket free of this bigger block than I can plowing a day in a small block to start off with .
And because the data is centered in the of this block , because the weld is centered in the face of the tube , I can just flip the block end for end and set the fence half as many times to center up the data in the edge of the block .
And I got a good fit on that .
It's slightly loose , but that's ok .
The screws will hold it tight in place .
And because the sides of this jacket are so skinny , they're barely an eighth of an inch .
Having a zero clearance throat insert plate on the table makes this all a lot more possible because that zero clearance insert keeps that skinny leg of the jacket from dropping down in next to the blade and getting hung up while I'm making these successive cuts .
And now to rip this jacket from the bigger block safely , I'll double check that the whole jacket blank is parallel and then cut the jacket off and scrap , leaving the solid piece of lumber between the blade and the fence .
In other videos , I've talked about the importance of sequence in mill work , carpentry and working in the shop .
And this is a perfect example .
It's outside the box thinking to cut the piece as scrap .
But in this case , it makes the whole thing workable , smart and safe and it's easy at this stage to run that eight inch round over bit along the corners to finish up this jacket .
And as they say , in real estate , it's all about location , location , location .
Well , in work , it's often about sequence , sequence , sequence drilled and tapped holes in , it seems impossible to block , allow for attaching it to the jacket that corresponds to the size of tubing you're working on .
Uh There's two holes that go from the top to the bottom , they go all the way through and there's ones that go in through the side as well .
Those are drilled and tapped .
And the idea is to attach the tool to about a two inch long piece of jacket material for removing the weld .
But because the tool is so new , um we're still developing best practices .
And I've noticed with um the fact that it's pretty easy to make these jackets in long pieces that I suspect that it would be just as easy to use the tool by sliding the jacket in full length and then just pulling the tool through that jacket rather than attach the jacket to the tool time will tell if that's a good idea or not .
But for now , I'm going to go ahead and attach this to this two by two jacket just to show you how that procedure works .
And in case I forget to mention it , the screw holes are tapped for an 8 32 thread .
And I've got a selection of different lengths here depending on how far through the jacket .
I choose to go with those screws here .
As we can tell the length of the jacket really doesn't matter .
But we suspect that about two inches long is the sweet spot .
Once the jacket is cut , just clamp it in a vice slip , the seems impossible block into the jacket and then chase through the two holes with an eight inch drill bit .
This locates the holes on the other side of the block when the screws are driven in .
Once the holes are piloted , choose a screw length that works good with the thickness of the jacket you're working with and then give it a depth mark for a counter bore .
So the screwheads can clear in this case where the jacket material is thick , the counter bore holes diameter isn't all that crucial , but the depth is kind of important .
So pay attention to that .
Next .
Remove the tool from the jacket and chase through the piloted holes with a larger bit so that the screws shank clears .
I'm using an 11 64 inch bit for this one .
The socket head cap screws I have have a three 32nd inch hex head drive in them .
And I'll use a T handle wrench to attach the block to the jack .
And now the jacket is firmly attached to the sea impossible block .
And there's really nothing new or surprising here using a seam impossible tool for removing a weld .
I just checked the piece of tube in the vice line up the tool , add , cutting oil and give it a go .
And I have to pay attention to the weld location because in this size tube , the weld is off center .
So I have to make sure the groove in the block and the cutter line up accordingly .
And I'm not sure if you can see it , but I didn't get as much over cut on this tube as I'm looking for .
And I also don't know if that's important because it depends on how tight of a slee fit you get with a smaller size tube .
I did a second pass on this two by two tubing and I put a little up pressure on the drill to put a little down pressure on the cutter .
And that little adjustment gave me the one 32nd of an inch overt .
I was after in the first place because the weld seam is offset .
I can't just pull the tool in from the other end to remove the little bit of weld at the other end of the tube like I did with the smaller tubing but that could be ground out if it was necessary .
And I'm sure you could achieve the same thing by adding shims between the block and the jacket .
But that would make it harder to pull through the tube .
So maybe this is a better solution .
And I think time and experience will tell for the sake of experimentation and curiosity .
I'll try to cut the weld seam out of the rectangular block by using a stationary jacket and pulling the seems impossible tool through it .
I'm kind of thinking that this might be the go to method for relatively short pieces of tube just because it saves the trouble of piloting counter boring and screwing the jacket to the block .
And I quickly learned that got to make sure that the extension is firmly chucked to the cutter or it will come off in the process .
I'm getting some remarkable cutting action there .
So this idea has merit .
I think it's just cool to see that whole weld seam piled up in the bottom of the jacket as a little pile of shavings .
And it looks like an added benefit of pulling the tool through the jacket allows the cut to be made all the way out the back end of the tube to save an extra step of grinding there at the end .
And I guess that leaves just one more example , which is the three by three tube .
So let's see how this works with the stationary jacket method .
This jacket fits a little sloppy in that tube .
So the results might not be quite as good .
Let's see .
And I'll just turn the tube over so you can kind of see this in action and it makes it a little easier to add oil to the cutter just like that 1 10 inch long internal weld seam , reduced to shavings , easy peasy .
Well , I got to say I am completely satisfied with the performance of the seems impossible to tool .
Having the bearings firmly set in a piece of metal rather than having them bouncing around a little bit in a block of maple is definitely worth the extra effort to get that done .
I really like having a jacket that's the length of the tube and just pulling the tool through the jacket , saves the messing around with pilot holes .
But for repetitive work , the movable jacket is a good idea .
This could be made out of that high density plastic , possibly if you found yourself in a situation where you needed to do this numerous times a day or a week , that might be a better solution .
But with all that done , you get a pretty good idea of what the seems impossible is capable of and the features of the sea .
Impossible too .
I'm not really sure how this will all fit into the video , but at the beginning , I promised that I would introduce you to Greg Porter of Greg's garage on youtube , I first met Greg .
He commented on a couple of live premiere videos , made a couple of comments on some videos at next level , carpentry .
I went and checked out Greg's garage , his channel on youtube , which is just one small portion of the world that is Greg Porter .
He's an amazingly talented guy and just an all around good guy .
And I want you to meet him .
I'm excited to introduce you to him .
And I will tell you right now though that when you're done with this video , you got to go check out Greg's garage .
Uh The first video he has like his title video is called the bleep that welders say and it's got welder jargon in there , but it's tastefully done and it is flat out hilarious if you know anything about the world of welding , even if you don't , you get an idea of some of the cut up that those guys can come up with .
So I got to go check that out on Greg's garage .
But with no further ado , I want to introduce you to my new friend Greg Porter .
Greg is an architect and runs a youtube channel .
He's a musician .
He's ac N C machinist , all that kind of stuff .
And it's been a pleasure to work with him on this project .
So I asked Greg if he would add a few comments , say a few words about our project and he won't ask you to , but I'll ask you to check out his channel , check out his world .
There's a lot going on there .
It's pretty great .
So I'm done .
Next level carpentry audience meet Mr Greg Porter of Greg's garage .
Hey Greg .
Hey Matt .
And hello to the next level carpentry nation .
Thanks for uh popping into the video here .
Thanks for having me .
It's been an absolute blast working on this project with you .
It's always so much fun to combine metal working and machining and woodworking and see what pops out the other side .
I appreciate y'all you've done for me and for this project , it's been my pleasure .
Matt working through multiple design iterations to arrive at a solution that actually does something is my favorite thing to do and you've been such a wonderful teammate through the whole process .
Thanks for sharing a few words with myself and the audience here .
Thanks Matt and to the next level carpentry audience .
I hope you enjoy the videos now that you've met Greg .
I'll tell you that you can watch the live premiere of his video showing the C N C process for making it seems impossible to block on his Greg's garage channel on youtube .
Just follow the link in the video description below and it will take you to that video naturally .
These sequential live premiere videos are a one time event , but you can also follow that link to watch his video that shows the fascinating CNC process for making that little block .
The precision and accuracy of a CNC machine in action is always amazing to me .
I'm excited to announce that there's also a link to Greg's web store in the video description or you can buy it seems impossible tool of your own .

If you don't want to make one either out of aluminum or wood on that web page , the tool is available either as a complete set up like this with everything you need to start removing internal World Seas or you can buy it as just a bare tool if you want to provide your own burr and extension and the other hardware because this video is produced on a specific date and time .
Always refer to that web page for current information for pricing availability , etcetera for the seems impossible tool because information there will reflect any changes that occur over time since neither Gregor myself have any idea what the demand or response for this tool is going to be based on this release of this video .
We thought that a pre sale arrangement was the best way to go forward .
Details of that are on Greg's web store page .
But basically that pre sale is going to run from August 22 through September 7th 2020 .
We set the introductory pricing at 40 bucks for the bare tool and 150 bucks for the complete set .
Just as you see it here .
It's all ready to use as long as you provide a few drops of coin a to make it run more smoothly and last a little bit longer as you might suspect pricing and availability of the tool after the pre sale is subject to change without notice , but we don't expect it to fluctuate significantly from the pre sale pricing arrangements .
I want to wrap up the video with a shout out to the patrons of next level carpentry listed here .
Everyone on this list goes above and beyond to help support production of videos like this with content that's completely unique to youtube .
And they do that by signing up as patrons through Patreon .

If you're motivated to see your name on a list like this in future videos , just follow the link in the video description below and sign up as a patron at whatever level you're comfortable with as patrons to the next level carpentry channel .
You'll have access to a growing library of patron only videos that I'm assembling there and you have access to them just by becoming a patron .
I recently uploaded episode number seven of the Master Joiner series where I showed how to make precision bevels on a joiner .
And this little mock up here is the result of that video project .
And along with other episodes in that series , you'll learn how to get your joiner to perform at the next level .
So if you're interested , uh go ahead and follow that link and check it out as always , I really appreciate the extra support of this group of now .
I've got to quit gathering on so you can jump over to Greg's Garage channel on youtube to see the live premiere of the video that he did showing the amazing C N C process for making this seems impossible tool .
So as always , until next time , thanks for watching .
Are you wondering how to go about planning ?
Perfect parts for a Pentagon on a joiner .
That seems impossible too .
Partnership
Are you looking for a way to reach a wider audience and get more views on your videos?
Our innovative video to text transcribing service can help you do just that.
We provide accurate transcriptions of your videos along with visual content that will help you attract new viewers and keep them engaged. Plus, our data analytics and ad campaign tools can help you monetize your content and maximize your revenue.
Let's partner up and take your video content to the next level!
Contact us today to learn more.