https://www.youtube.com/watch?v=8IsZEOyPVQY
2023-06-14 18:17:02
EP. 4 - THE KITCHEN _ DIY SCHOOL BUS TINY HOUSE CONVERSION _ MODERN BUILDS
Hey everybody .
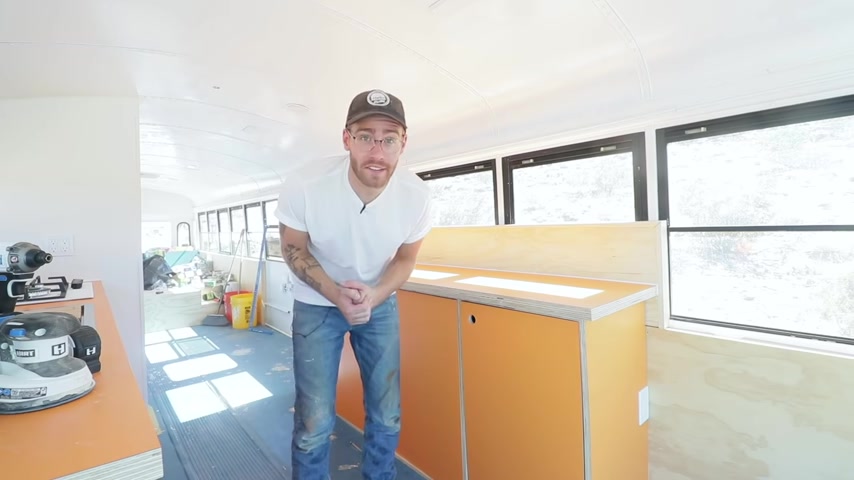
My name is Mike Montgomery and welcome to episode four of my school bus to Tiny House conversion series .
And in today's video , I'm gonna be building out this big super functional , super orange kitchen and I can't wait to get started on modern builds .
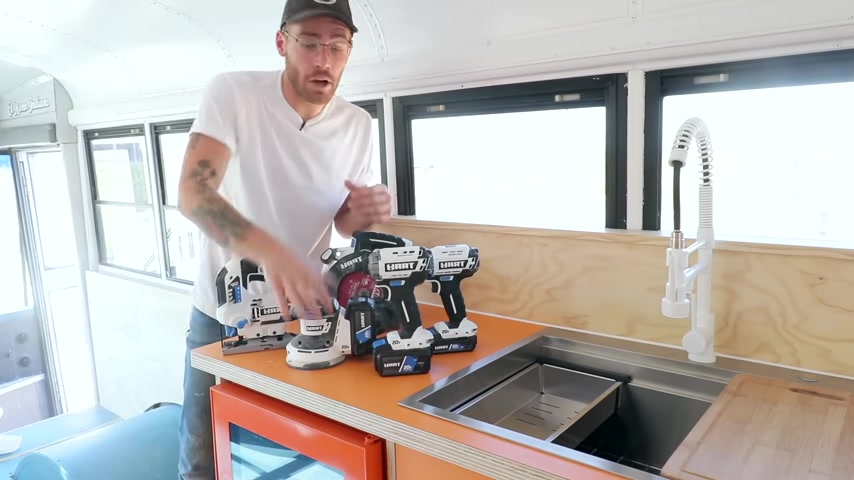
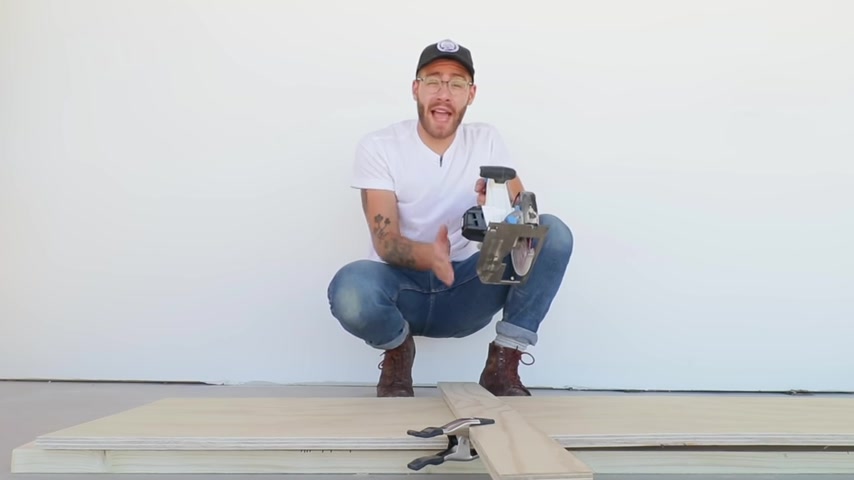
Couldn't be more excited or proud to announce that today's video is gonna be sponsored by heart tools and I'm gonna be testing out their new 20 volt line of lithium ion cordless power tools .
You guys know , I love limited tools projects and I really like to keep my tool palette simple and that's what I'm doing for this kitchen build .
I'll be using their cordless circular saw and jigsaw to do all of my cutting on this project .
I'll also be testing their 20 volt brush list impact driver drill combo as well as their cordless random orbit center that I really love .
Now , I'll be talking about these tools later on in the video and of course , you're going to see them throughout the project as I'm building .
But here at the beginning of the video , I just wanted to give hart tools a big .
Thank you for making this project possible .
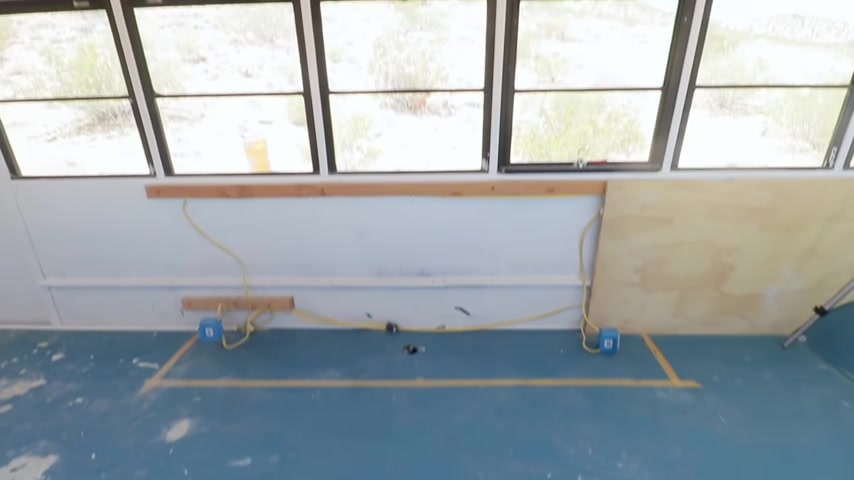
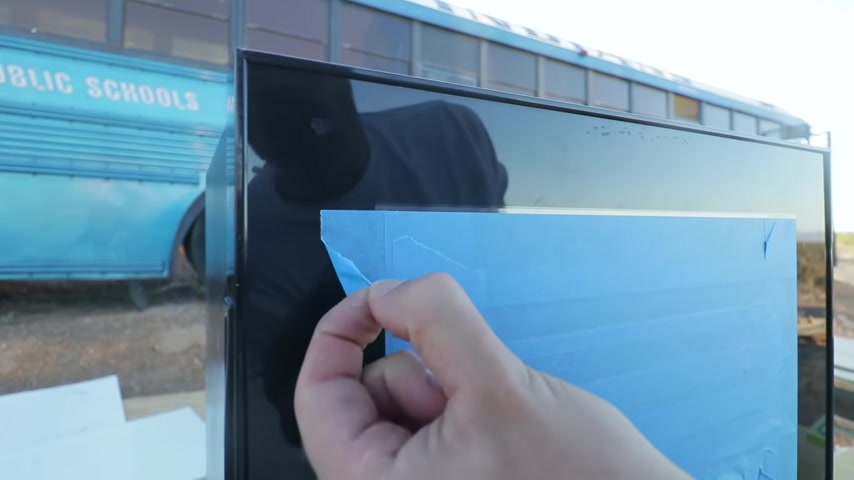
The last time we were in this space was in episode one , when we did all this rough and plumbing and electrical .
In that episode , we also laid out these masking tape lines where I'm gonna want my cabinets to go .
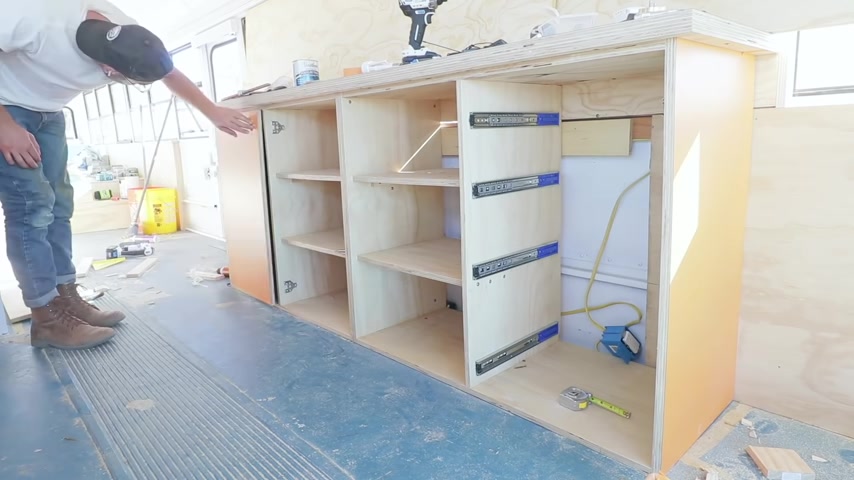
The wide set of cabinets on this wall are going to house all of my appliances while the narrow set on the opposite wall are just for utility .
So let's head back to make a ranch to start building these cabinets just like on the rest of the bus .
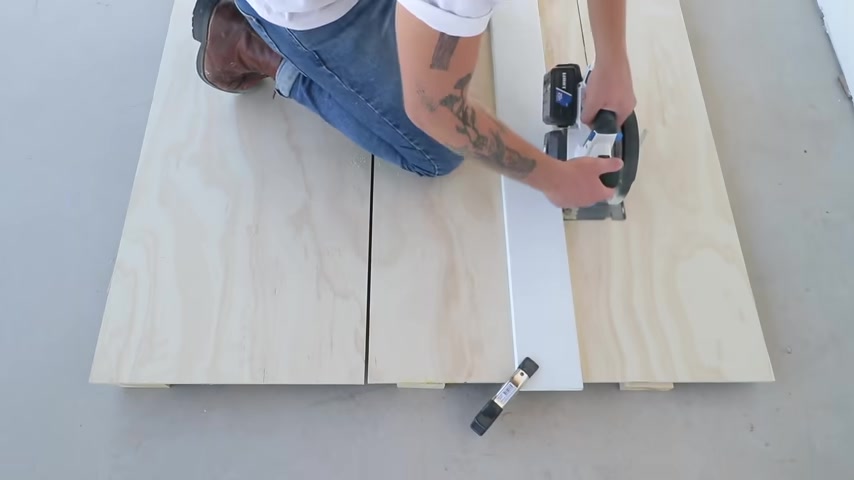
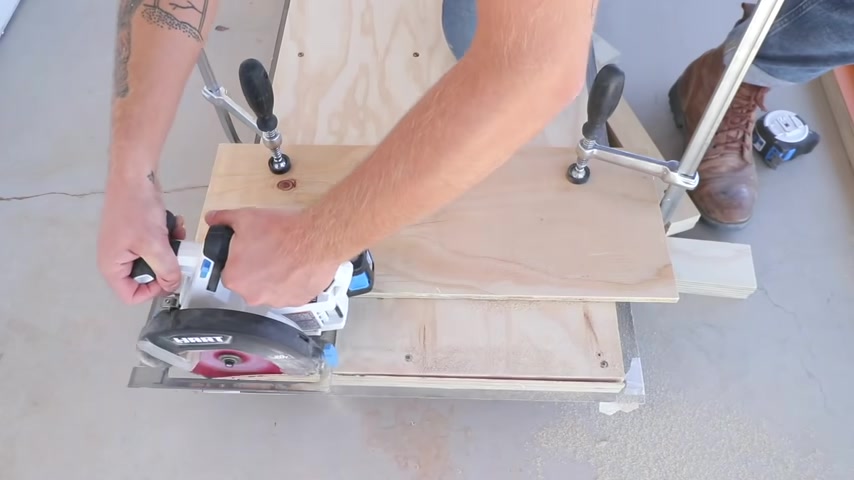
I'm using three quarter inch radiata pine plywood to build my cabinets .
After I had my straight edge in place , I replaced the 24 tooth construction blade that comes with the heart circular saw with a 60 tooth finish blade .
This is gonna give me really clean cuts on both the plywood and the laminate .
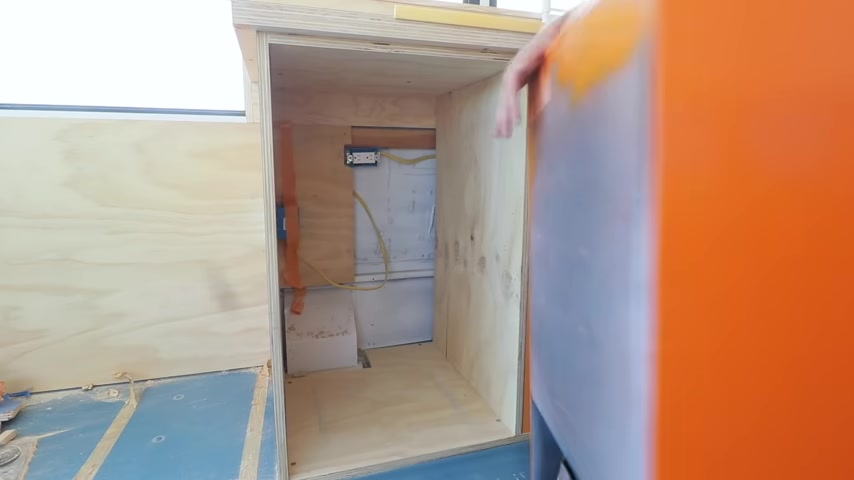
Later on this first set of cabinets that I'm building is going to house the refrigerator , the sink and the stove , and they're gonna be 22 inches deep .
If you're interested in some basic plans and dimensions , I'll be releasing those in the future for anybody interested in building something similar .
But once I had all of my pieces cut , I got some right angle clamps and I glued and screwed my cabinets together .
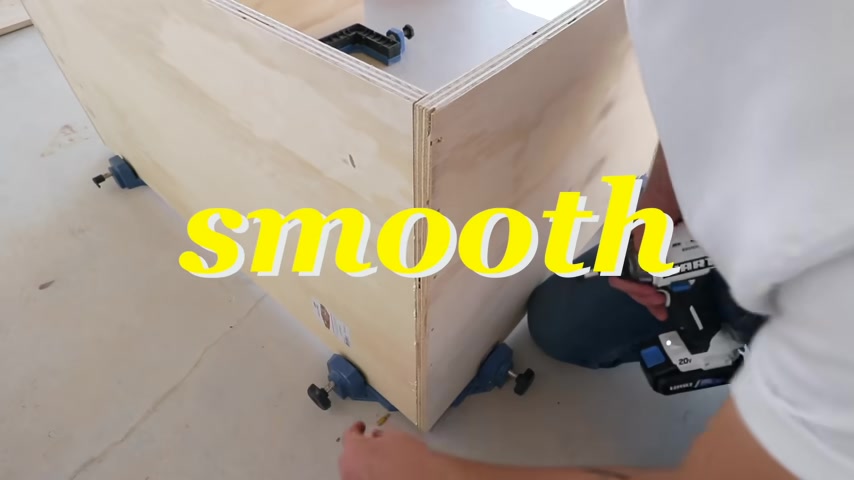
Whenever I'm connecting three quarter inch plywood , I like using these inch and a quarter trim head screws because of their shape .
You don't have to drill pilot holes before screwing your pieces together .
And this just saves time and is really convenient .
Standard kitchen counters are 34 inches tall and I've got inch and a half thick countertops .
So my two outside pieces are 32 a half inches tall .
While my middle dividers are 31 inches tall to take into account the tops and bottoms of the cases .
Oh , and I should mention I built these in two pieces that way I can actually fit them through the bus door .
I repeated the exact same assembly structures for the narrow set of cabinets .
The only difference here is I ripped my pieces down to 18 inches wide instead of 22 .

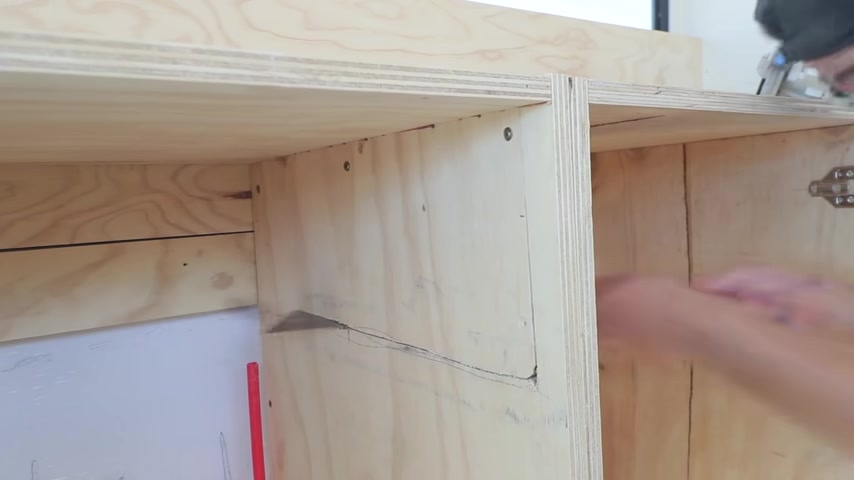
At this point in time , both sets of cabinets are identical , but now it's time to start customizing with shelves and drawers , installing these shelves and dividers added a lot of structural integrity to the cabinets and they were really easy to make .
I just cut down some scrap plywood into these shelf supports that I glued and screwed into the sides of the cabinet .
Then I was able to install my shelves and screw the shelves to those brackets for a really strong hold .
And as you can tell my plywood had a little bit of warp to it .
So I used some long f clamps to tighten everything down before I screwed it together .
The thing that's really cool about this is once you screw everything down and remove the clamps , the plywood stays true .
So this just keeps making everything more square and more secure .
So the cabinets look great .
I love them .
And the next thing we need to do is build some drawer boxes that are gonna go in a couple of those cases .
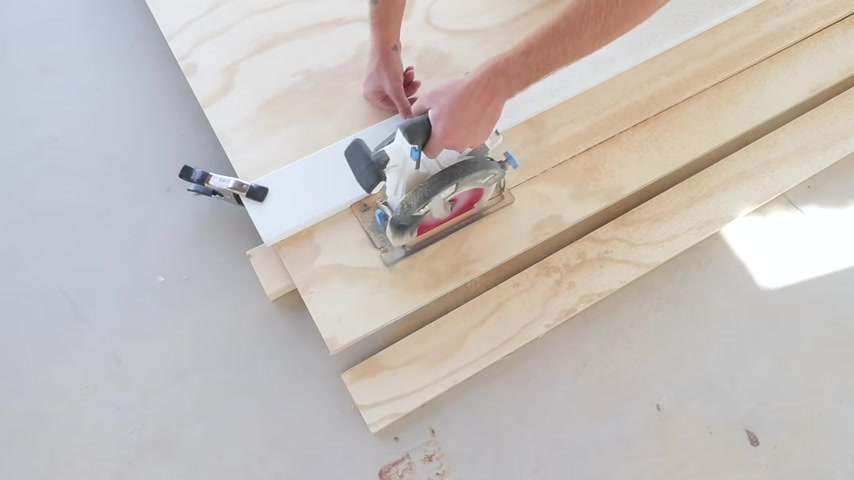
So here you see me using the circular saw in a straight edge to break down plywood into four inch wide strips .
These are gonna be used as the walls of the drawers and I need quite a few pieces because I'm building eight drawers total .
I think quite a few people are a little nervous about batch cutting with the circular saw .
But one thing I do to get quick , consistent results is use a 12 inch speed square to make sure that I've got good clean cuts .
I glued and screwed my drawer boxes together similar to how I did earlier and I made sure that the front pieces of the drawer box are full width .
That way I don't have visible plywood lines on either side doing this just looks better , but it also makes the math easier allowing for the half inch space on either side of the drawer , for the drawer slides .
And with that , I had the outside frame of my first four boxes in the second set of draw boxes are gonna go in the shallower cabinet .
These are only 16 inches deep while the larger ones are 18 inches deep .
I got a sheet of half inch plywood as the bottom of the drawer boxes .
And yes , I went overkill with the wood for this .
Normally , the sides of drawer cabinets are about a half inch thick and the bottoms are closer to a quarter .
But I had a lot of three quarter inch plywood left over from making the cabinets .
And I thought I might as well make good use of it .
And since I was careful making sure to cut these pieces square , I was able to use them to make sure that my cabinets ultimately were as square as possible .
Then I could install my drawer slides .
It made sense to me to have the bottom drawers in the kitchen to be more spaced out than the ones at the top which will hold silverware and utensils .
So I gradually reduced the spacing as the drawers went up to save material .
I'm going to be using as much of the scrap that I have left over to make these door panels as possible .
In fact , I already cut this piece down to width .
And before I do any cross cutting , I wanted to share a quick circular saw tip .
If you are breaking down a lot of materials with this tool , whenever you're cutting , using a straight edge with your circular saw , you want to make sure and measure the distance from the edge of your bed to the actual blade .
And on this saw , it's exactly four inches from the edge of blade to the edge of the table .
So this basically makes it to where I just need to measure four inches less than what I'm actually wanting to cut .
And I will have a very precise straight board .
If the board I'm trying to keep is not on the right side of the blade , but instead on the left side of the blade , I will also be taking the thickness or the curve of the blade with the cut , which would make all of my cuts too short by the thickness of the blade , which is about 1/16 to an eighth of an inch .
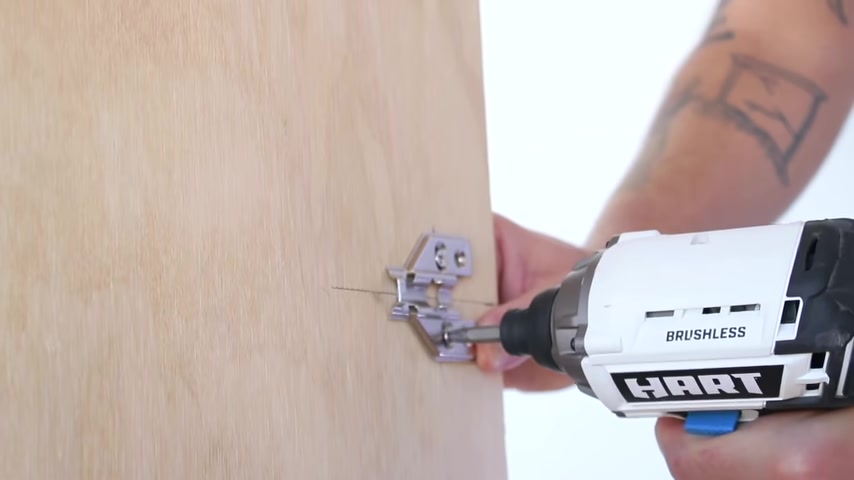
After that , I use this for center bit jig with the drill to create recesses for the inset European style hinges that I'm gonna be using links to all of the tools , materials and supplies that I've used for this project will be linked down in the description I liked these soft close hinges that I used .
They're not as expensive as bloom or other name brand hardware that I've used and don't have quite as much adjust ability , but I had a really good experience with them and they were adjustable enough that I got good results .
So obviously , I'm gonna have some more adjusting to do on the doors , but I'm gonna save that for the final install once everything is as square as I'm gonna get it .
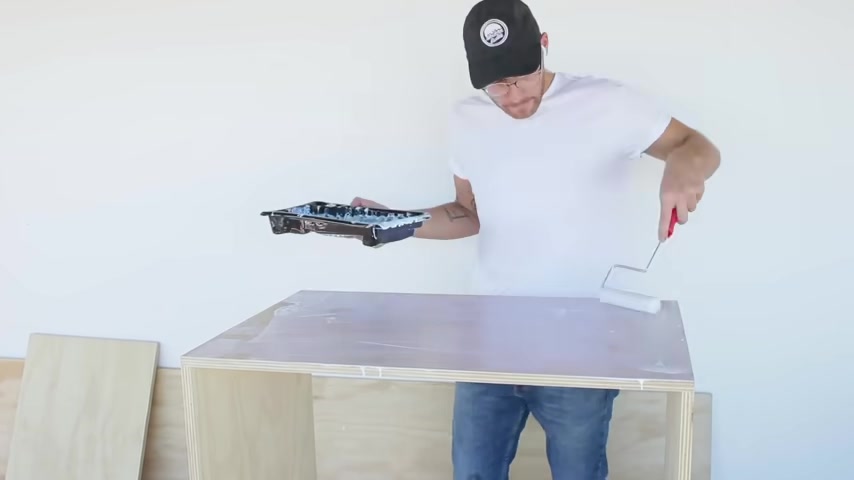
My next step though is to install laminate on all of these doors and the outside faces of all of these cabinets .
Fortunately , I forgot to turn my microphone on for this unboxing segment .
But this is where I unrolled my laminate sheets for the first time .
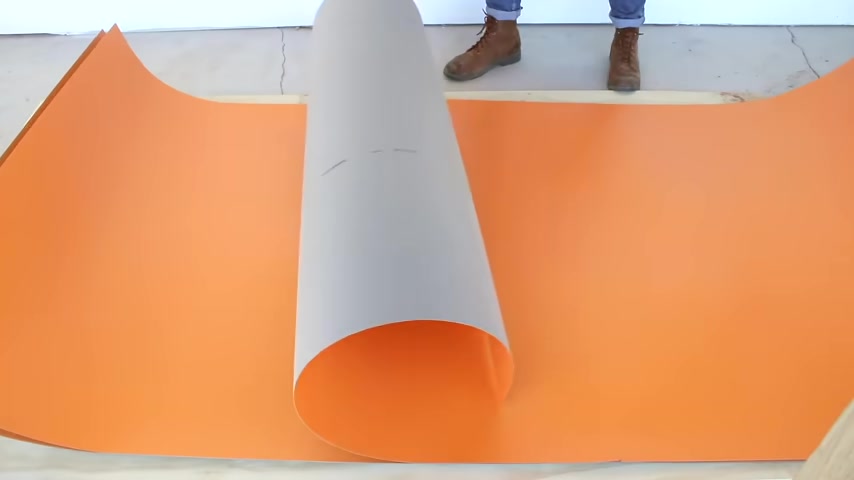
And I was so excited when I saw the color , this is a super classic orange that would look good in vintage or modern aesthetics and it cut really cleanly with this 60 tooth blade that I installed .
I was a little nervous that I would have trouble lining up the laminate to the plywood substrate .
So I cut my pieces almost an inch and a half oversized .
In reality , about three quarters of an inch clearance should be plenty .
Rubber , cement or contact cement is the adhesive that you want to use for applying the laminate .
If it's going on a non porous substrate , you can get by with one coat .
But if it's going on a porous substrate , like plywood or MD F , you want to make sure and apply two coats , letting it dry between coats , you'll know both pieces are dry when they're no longer tacky to the touch .
But when you stick the two pieces together , they bond permanently and instantly it's really cool .

Then you'll use what's called a seam roller or AJ roller to work from the center out to remove any air bubbles and that's one down .
All right .
So that was way easier than I thought .
And I am so happy about it .
So I'm gonna go ahead and get the rest of these doors done and then we can move on to putting laminate on the outside faces of the cabinets .
Now , this is one instance where I can definitely say I spoke too soon .
I went into this a little bit confident and tried just laying the laminate right down onto the plywood and I misaligned it .
And as you can see , totally messed this piece up .
Like I mentioned earlier , contact cement is not forgiving .
So I had to remake this piece .
And this time I used wood blocks to raise the laminate off the surface of the plywood .
So it gave me some time to line everything up and then lower the laminate onto the plywood in a controlled way .
No , I knew that this was the right way to do it from the jump , but I went into it a little overconfident and definitely paid for it because I had to remake the laminate piece and the drawer live and learn though I used the same technique to apply the laminate on the outside faces of the cabinets and it worked great to trim the edges .
I'm going to use what's called a flush trim bit on a trim router .
The bit has a ball bearing underneath the cutting edge which references the edge of the plywood that we're attaching the laminate onto .
As the name implies , it trims it flush to the edge of whatever the reference surface is and it's a really clean way of trimming this laminate .
This is sort of standard practice and what you see recommended most of the time online .
But later in this video , I'll show you how to do this process with only a circular saw .
And after that , I got my first chance to try out the new heart 20 volt , cordless Random Orbit Sander .
I loaded it up with 100 and 50 grit , sandpaper and cleaned up the edges of the doors and all of the plywood faces .
I really enjoyed using the sander .
It was very ergonomic and it gave me great results and prepped these doors for finish .
If you've been watching Modern builds for a while , then you'll know that I've been on this integrated door handles kick instead of adding hardware on the outside face of the cabinet doors , I prefer cutting a shape into them that acts as the handle .
And in this case , I just use the same inch and a half for a bit that I used to create the hinge recesses earlier .
And now I'd like to give a big thanks to heart tools .
The sponsor of today's episode .
When heart tools reached out to see if I was interested in partnering with them on a project .
The answer was obviously yes , they just released this new line of 20 volt lithium ion cordless power tools and they look awesome .
This white and blue aesthetic is the perfect match for the modern builds look .
And I was really excited to see just how well they performed , especially considering their price .

These tools along with the rest hearts lineup are available both in store and online at Walmart and they're a really great budget friendly option .
And they've also got a 40 volt cordless line of outdoor power tools as well .
For my first time using heart tools .
I wanted to use these five tools specifically .
They're what I recommend to people whenever they're starting building for the first time .
The first tool is a circular saw .
Now , this is the most important tool for cutting wood .
I've used this to break down all of my plywood and solid wood , my cabinets and it's performed great even though this has a 6.5 inch blade , I was able to cut through two pieces of three quarter inch plywood easily using a straight edge .
And that's really awesome .
The second tool that I always recommend is a jigsaw .
There's a couple of things I really like about this tool .
One , you can change the setting depending on what type of material you're going through .
It also has variable speed in case you're trying to cut in a slow controlled way or you can crank it up if you're trying to get more added to your cut .
I opted for the slightly more expensive brush list drill and driver combo .

Since I use these tools so often as you've already seen , these tools are pretty rugged .
I've dropped them off of this work bench a couple of times on accident while I've been building and they've held up great .
The last tool I'm gonna feature is the Random Orbit Sander , which is really convenient not to have a cord in your way .
The position of the first hand grip really is great .
It says ergonomic and comfort as any other standard that I've used .
It also feels really controlled .
I've had some standards that really try and run away from you unless you put a lot of downward pressure .
But this one seems to really stay centered and focused .
Well , throughout the video , you are going to continue to see me put these tools to the test .
And if you're interested in learning more about heart tools lineup of 20 volt power tools and 40 volt outdoor tools , I'll be sure to leave links down in the description .
So thanks again to heart tools now back to the build .
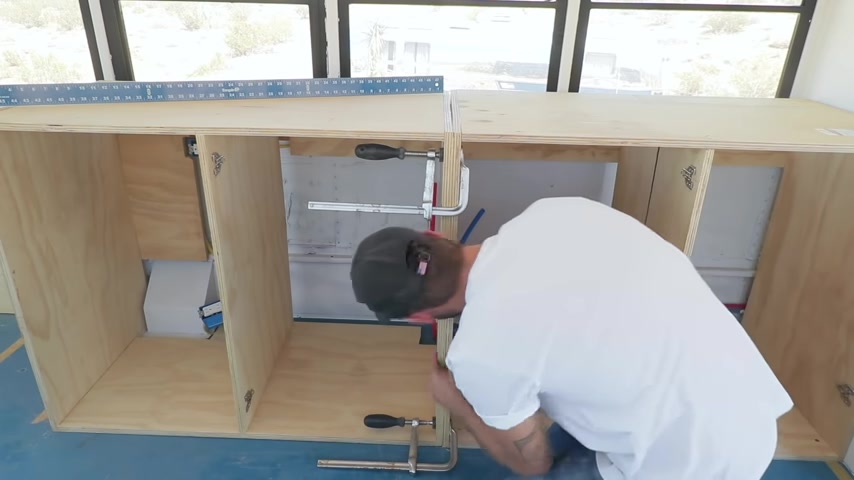
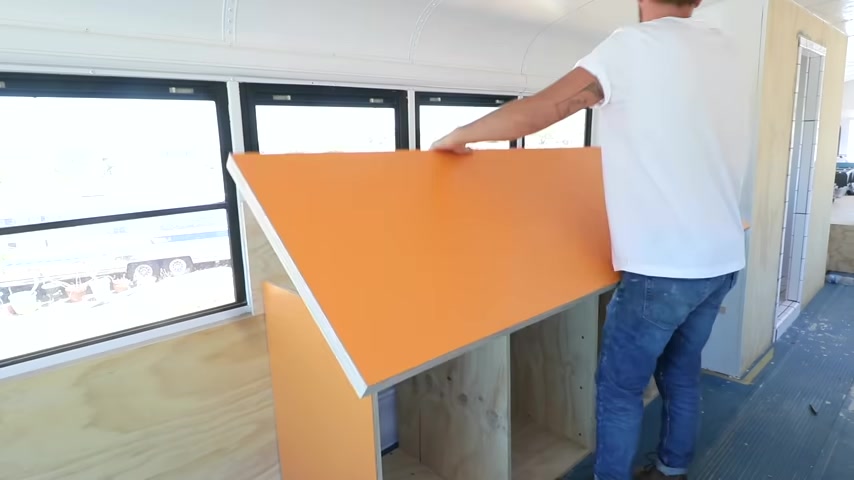
So it was cabinet delivery day and I was really eager to see how these cabinets looked in the bus .
Of course , I knew that they looked good , but I was curious how the orange looked in the bus with the rest of the colors that I've already established .
I had to make some quick alterations with the jigsaw to make sure that the cabinet fit around the existing plumbing and bus components .
But that didn't take much time at all just to be safe I used an all purpose jigsaw blade that can cut through wood and metal .
And I was thankful I did because I hit one of those trim head screws that we used earlier .
This piece of the bus , I had to work around shields the gas nozzle where you fill up your fuel .
But on the other side , the cabinets had nothing in their way .
So I was able to just install those quick and easy .
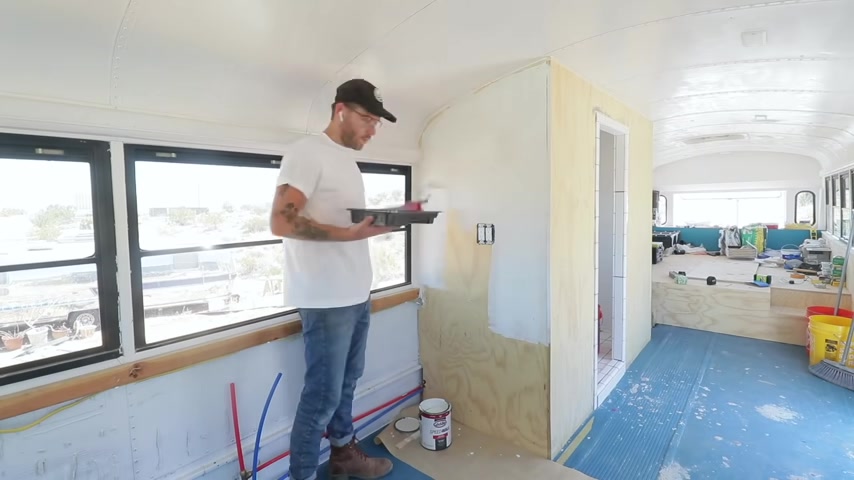
I added a couple of coats of white paint to the outside bathroom wall facing the kitchen .
I just figured I didn't need any more wood tone since I've got so much going on with the half walls and the cabinets .
I installed this quick three quarter inch spacer so that the cabinets had a positive stop .
That's the same distance from the wall as the plywood half walls that I've already installed .
Then I could put my cabinets in place and screw them down permanently .
I mentioned earlier that these cabinets had a little bit of bow , especially on the cabinets that don't have a lot of shelves , but once again , I clamped and screwed my pieces together to help them stay straight .
I cut another piece of pine plywood down that I'm gonna be using as a backsplash along with this one by two frame that you see attached to the bus .
I used construction adhesive to attach the frame to the walls of the bus and screws to attach the plywood to the frame .
But really this was such a tight friction fit that it was snug before I used any fasteners .
Whoa , perfect .
So at this point in the project , things are moving great .
And my next step is to build the countertops for either side of the kitchen .
I'm gonna be using the same orange laminate that I used on the cabinets for a really cool countertop laminate is super durable and great for this application .
In fact , I made an entire video just on making laminate counters if you're interested in an in depth tutorial .
But the steps are similar to what we did on the countertops already .
I made the blinks for the counters out of the same three quarter inch radiator pine plywood that we've been using and apply two coats of contact cement to the laminate and the plywood blank , applying the laminate to the counters was a little bit more stressful just because it was such a large piece and I didn't want to mess up .
So I made sure to make double layered rizor blocks out of three quarter inch plywood .
That way , I had plenty of spacing between the plywood and the laminate before I decided to lay it down permanently and then use that seam roller to knock out any air bubbles .
Next , I applied masking tape on all of the edges that I'm gonna be cutting with the circular saw and I could trim my countertop to its final length and width .
At first , I was cutting the entire countertop in one pass .
But on these long cuts , I found it was easier to do it in two cuts .
This gave me cleaner results than the trim router .
But I still followed it up with 100 and 50 grit sand paper .
I also used this opportunity to round over the corners of the laminate which are really sharp .
Then I could apply a couple of coats of water based polyurethane to the edges .
That's it exactly how I wanted it to the edge of the backslash .
And the counters are even after checking the fit of the first countertop , I did the same to the second and went ahead and installed it in place .
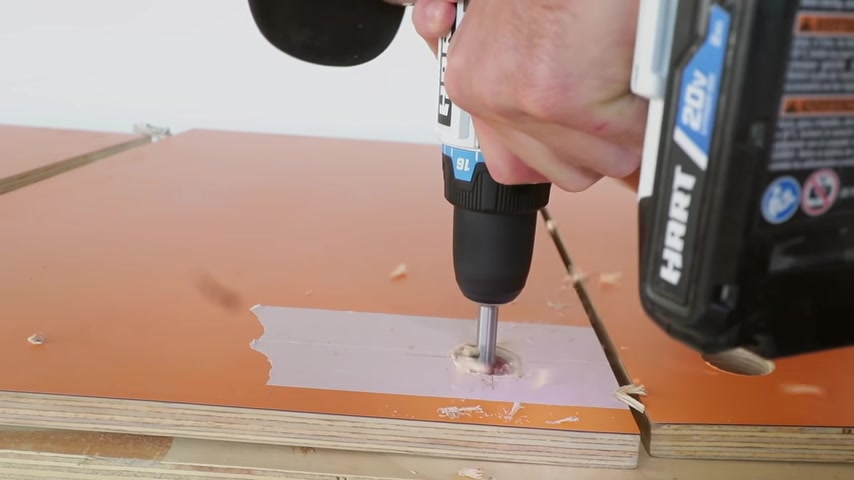
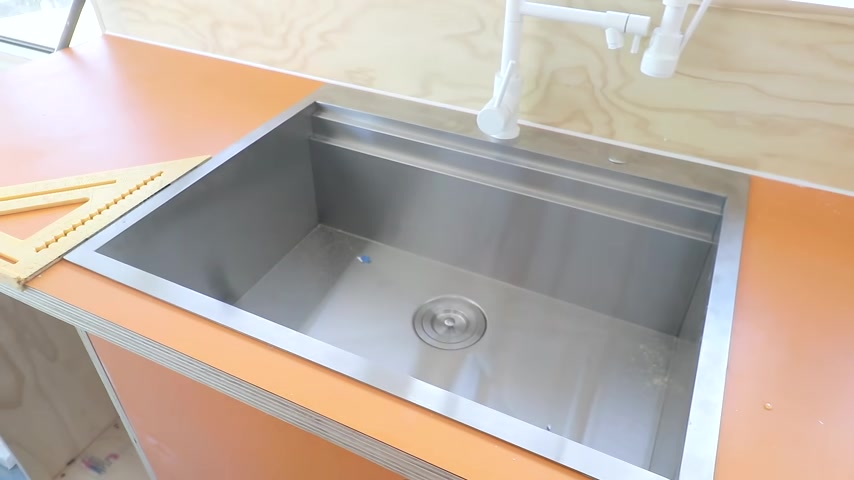
The white countertops though are gonna need some holes cut into it both for the sink and for the stove going in on this side of the kitchen , the sink that I'm using and most sinks will come with a cutting template that you can use to trace the outline of the hole you'll need to make for the sink .
You have , I used masking tape anywhere that I was cutting like earlier and I used a high tooth count blade in my jigsaw to make sure that I didn't get too much chip out after I double checked to make sure that everything fit into the holes that I just made .
I used a marker to trace those lines onto the actual cabinet boxes then I used both the jigsaw and the Japanese pulla to trim away any material that was in the way .
In hindsight , it would have been a little easier to cut these pieces while I still had access before permanently installing my cabinets .
But hey , this wasn't too big of a deal .
And after one final test fit , I could see that the stove and the sink fit .
Awesome .
And it's gonna be a super functional mini kitchen .
I'm using some select pine , one by fours and one by threes to trim out the back splash .
And I'm using this contour gauge to make sure that I'm able to describe and cut the trim so that it goes around the vertical partitions in the bus .
I've used this tool quite a bit throughout the bus series and it's so useful whenever you're trying to mark and cut odd shapes .
I glued and screwed the top piece of trim to the plywood backsplash .
And I made sure that it had am end on it .
That way I could wrap the trim all the way around the side for a super clean look after I did this , the one by two frame behind the backsplash is completely invisible .
And then I applied a couple of coats of water based polyurethane to the back splash in any of the cabinets that still needed it .
After that cured , I used some silicon sealant to cover the transition between the countertops and the back splash for clean look .
Now I used white because it's gonna match a lot of the accessories .
But normally you would try and use a color that blends in with the counter or the back splash really quickly .
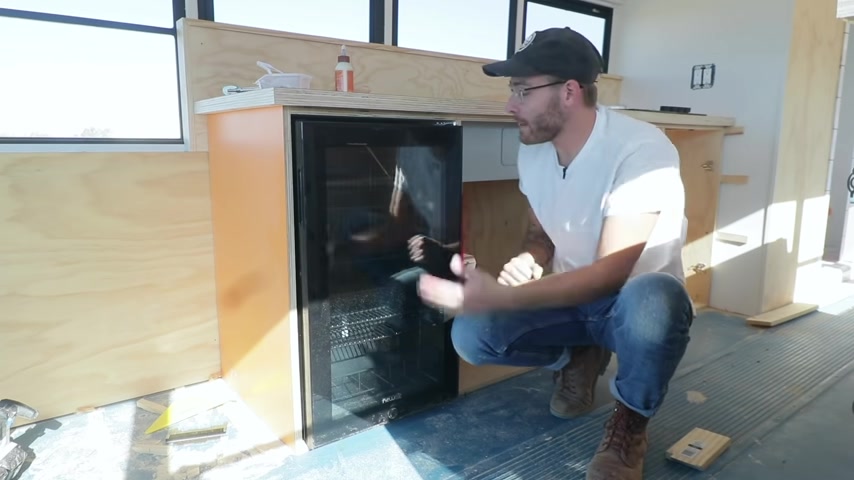
Sorry for the harsh lighting , but I could not be more excited with the fit and the look of this fridge .
Of course , I don't love that .
It's completely black just because the rest of this space is so light and bright .
But I do love the fact that it's got this viewing window built into the door .
So what I'm planning on doing is painting this whole fridge orange to match all the laminate that I've used .
The first thing I'm gonna do is mask off this viewing window that way I can still have it .
And I was just careful to make sure that I had really clean corners everywhere that the masking tape met itself .
I used a straight edge and a razor blade and this was perfect .
After that , I applied a coat of clear spray paint that way .
If I had any bleed in my masking tape , it would bleed clear and then seal itself before I painted primer and orange over that .
As always , it's best to do multiple light coats with spray paint and I'm holding the can closer than I normally would right here .
And that's just because I was dealing with quite a bit of wind the day that I was painting regardless .
I think I applied four coats total .
I decided to paint the stove for the same reason that I'm painting the fridge and I went with this white high heat paint from rustoleum .
It's actually made to paint outdoor grills and barbecues .
So it's really durable and it should be perfect for this project .
I let the paint on the fridge and the stove dry overnight and they look great today .
But before I can install them , I've got a few things I need to take care of .
First , I needed to double check that all of my doors fit nicely and were adjusted properly so that the spacing was good between the doors and the rest of the frame .
I did have a tiny bit of warping in the doors .
And from what I read that actually came from applying laminate to only one side of the doors .
If I learn that for best results , it's typical to apply laminate to both sides .
But my warping wasn't too bad .
So I just went with it .
After that , I marked and cut holes for the outlets on the outside facing walls of the cabinets .
Once again , this is probably one of those things that I should have done before installing the cabinets , nailed it .
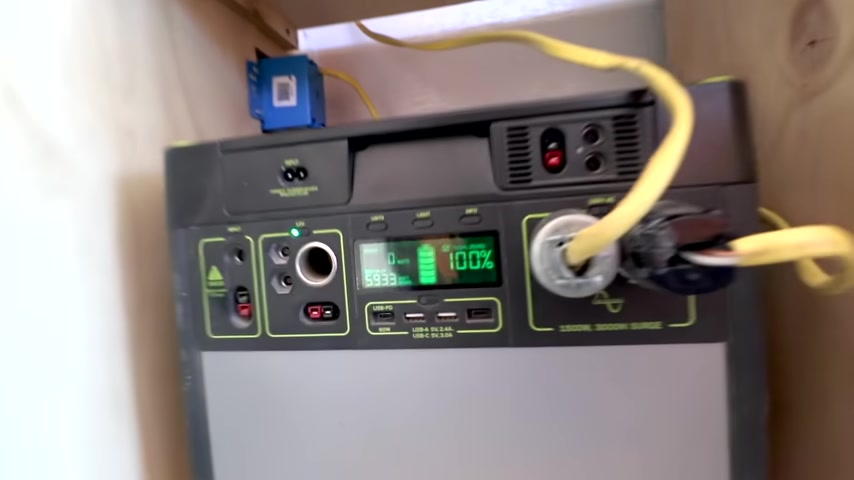
I was happy that those plug installs went smoothly and once they were complete , I could finally put my goal zero in place .
This is where it's gonna live and this is the power station for the whole bus .
Eventually I'll have a really good permanent mount for it .
But after I got that done , I moved to installing the refrigerator , I was careful not to mess up any of the paint .
And once I had it in place , I shimmed it and secured it .
Well , I also cleaned up this overspray with a little bit of mineral spirits .
With those steps completed , I could move to the final install of both the sink and the stove .
First , I ran a beat of construction adhesive around the perimeter of the holes that we cut .
Then I dropped the sink in and installed the mounts on the underside of the sink that came with the box .
I made sure to have a couple of squares around and I made sure to measure all of my reference corners and points so that everything lined up as square as possible .
And now I'm not trying to take credit .
But how much cooler is this stove now that it's white compared to that black glass finish before so excited the faucet that I went with matches that stove perfectly and really rounds out the whole aesthetic for this kitchen .
Now , before I give you the afters , let's take a trip back to what this kitchen looked like before .
So I had rough in plumbing and rough in electrical complete , but really it was a blank canvas ready for a full kitchen build out .
I wanted to make sure that we did something to complement the blue floors .
But let's just go ahead and check out these afters .
So right now , I would like to just give a huge shout out to Laminate , who knew that they could create such an awesome finish and be so easy to apply .
I'm really grateful that I finally took the chance to try this stuff out .

Overall , this kitchen has so much space and I don't even mean that it's big for a tiny house or a school bus project .
It's just a big kitchen , but really the functionality of this space is what's so exciting .
Of course , it would have been cool to get an exact color match on the fridge to the laminate .
But I'm excited with how this looks .
The storage underneath here in the cabinets is so great .
I have no idea how I'm even gonna fill all of it up in this far cabinet .
I'm planning on putting a propane tank that's gonna run this stovetop that way .
It's really accessible and easy to swap out whenever I need to .
I'll have a separate propane tank that'll run the hot water heater down in the under stove compartment .
But I think the coolest part of this side of the kitchen is the sink in the faucet .
I always love getting unique fixtures for a space and this faucet is just that the commercial style sprayer is awesome and this white finish is ridiculous .
It looks so clean .
The stainless steel basin sink on its own is great and super functional , but it comes with all of these added accessories that are awesome for a compact kitchen .
And I plan for this other side of the kitchen to be a lot more of a utility space .
We've got a ton of countertops for food , prep , mixing whatever you wanna do .
This cabinet on the end is our power station for the bus .
It's what houses the goal zero , Yeti 3000 , which is the power hub for the whole bus .
The switches and plugs that we wired in episode one of this series come down and they plug into the Gold Zero .
And from there , the goal zero can either charge from the solar panels or straight from a household circuit in extension cord .
I'm also a big fan of this wooden backsplash .
I think it's really fun and I love the way that it's scribed into all of the joints of the windows .
Plus how awesome is it that we can actually raise and lower the windows here in the kitchen ?
I also wanted to make sure we had plenty of plugs because these outlets are also going to be feeding the living room area .
So we've got these outward facing plugs on each side of the cabinets , but we've also got some on the inside , both here and here for plugging in any appliances that we need .
So I really hope you guys enjoyed this episode and are enjoying this school Bus transformation .
I'll have a link down in the description to the full playlist if you're interested in starting from episode one .
And don't forget if you're not already following me on Instagram , you should be , you can find me at modern builds .
I'm posting there almost every day .
I want to give one more huge .
Thanks for all the support on this series .
Don't forget to leave a comment and let me know what you think .
And if you enjoy the video , if you could leave a like , that would be awesome .
It just lets youtube know that this is a good video and they should suggest it to other people .
And finally , if you're not already make sure and click the subscribe button down below and we will see you next time on Modern Builds .
Bye everybody .
Partnership
Are you looking for a way to reach a wider audience and get more views on your videos?
Our innovative video to text transcribing service can help you do just that.
We provide accurate transcriptions of your videos along with visual content that will help you attract new viewers and keep them engaged. Plus, our data analytics and ad campaign tools can help you monetize your content and maximize your revenue.
Let's partner up and take your video content to the next level!
Contact us today to learn more.