https://www.youtube.com/watch?v=ihpMaCtZeMY
2023-06-14 18:14:30
How to put up coving

Coving comes in a wide range of styles and is a really nice detail to add to a room .
It's stylish and covers those unsightly settlement cracks that can appear between the wall and the ceiling coving materials include paper face , gypsum , polyurethane and polystyrene .
We're gonna show you how easy it is using this lightweight super cove .
The first job is to mark a pencil line on the wall and ceiling where the edges of the coving need to be when it's fixed .
Follow the manufacturer's instructions for this coving .
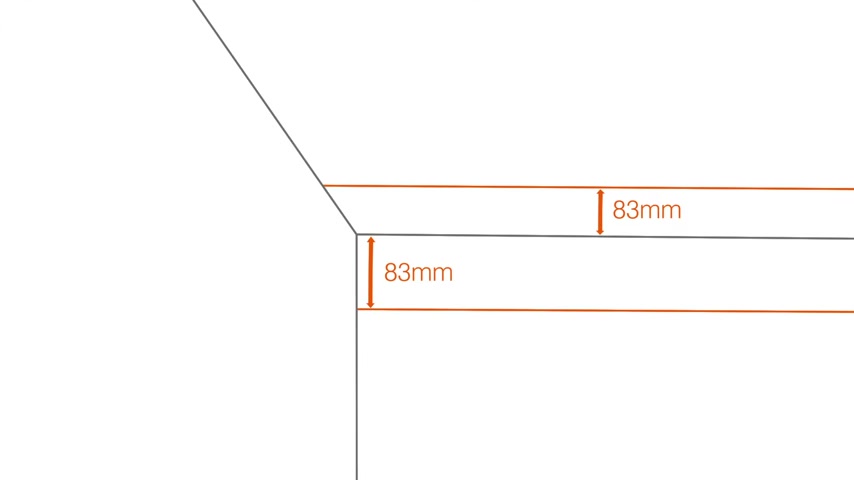
We need to measure 83 millimeters down from the ceiling and 83 millimeters out from the wall , make marks around the room at intervals of about a meter and then use a straight edge to join up the marks so that you have a continuous line around the walls and on the ceiling .
If your walls or ceilings have a dip or bump , you'll need to adjust the position of the pencil lines .
Never attempt to fix the coving to fit the contour of a wall or ceiling , fix it straight and level and fill in any gaps .
Afterwards .
Next check that the marked area is free from dust , grease and loose material , clean or scrape the air as necessary .
It's also worth scoring the wall where the coven will be fixed to give a better key for the adhesive .
If the surface is dusty or very porous , prime it with diluted P VA adhesive and allow it to dry before fixing the coving .
That's the prep work done .
Before we fix the coving , we need to cut the ends ready to form the joints at the corners .
Your room shape will determine what type of corner joints you need to form .
If your room is rectangular , you'll only have internal corners .
If you have an L shaped room or your room has an alcove or chimney breast , you'll have internal and external corners to deal with either way , internal or external .
A mit A joint will be required .
So let's have a look at how to cut miters .
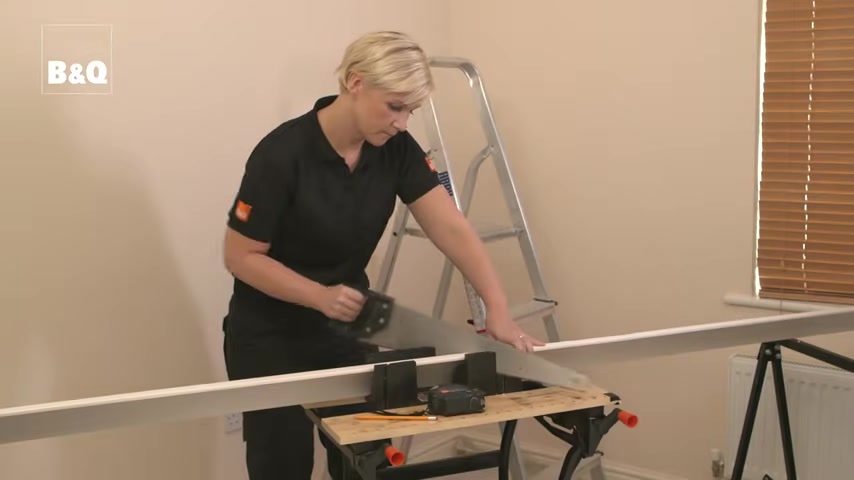
The easiest way to get a good quality joint is to use a Mitter box .
Make sure that you put the coving in the Mitter box the right way round and cut it in the right direction .
Once a coving is measured and marked up , it's cut to using a fine tooth panel saw , hold the coving securely with your non cutting hand and make a cut to using a firm positive saw movement .
Don't try to cut too quickly .
If you're cutting a long length , make sure you support the length of coving as you make your cut , try a couple of practice cuts first , it's better to make any mistakes before you cut the length of COVID that needs to be fixed .
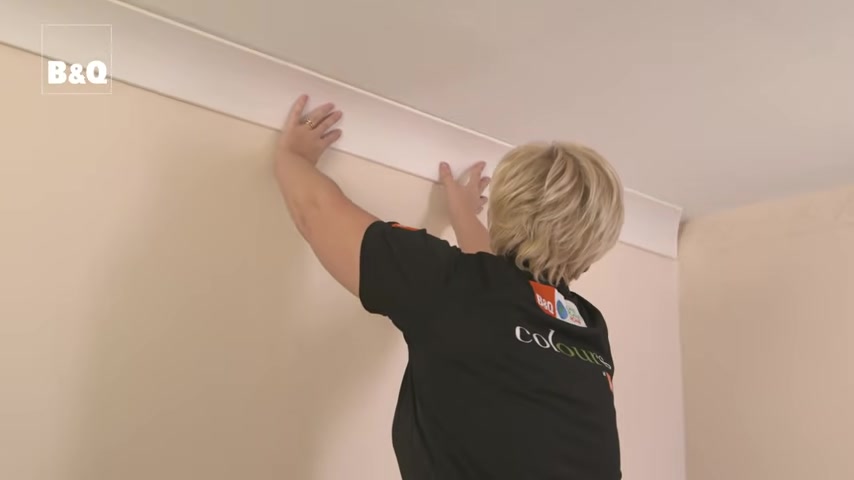
Once you have cut the first piece , offer it up to where it will be fixed and check that it fits .
If it needs trimming , put it back in the box or if it's only a small amount , use a utility knife with a sharp blade .
Once you're happy with the fit , apply adhesive to both edges of the coving , apply enough coving adhesive so that it will squeeze out from the edges when the coving is pushed into position .
Now , using the pencil lines that we marked earlier position , the coving and work along its length gently pushing it into place .
If there are any gaps , squeeze in some coving adhesive and wipe off any surplus as you go using a slightly dampened cloth or sponge .
Now measure and cut the second piece in the same way , then apply the coving adhesive to both edges and to the end of the coving on each side of the mito joint and finally position and fix using the same process as before .
While Jill gets on with the rest of this room .
Let's have a quick look at the options for joining two lengths of coving together .
End to end .
One option is a butt joint where each piece of coving is cut square and buttered together .
The other is an end to end Mitter joint , this is formed using the mita box .

But instead of making two internal or external joint cuts , one side of the joint has an internal cut and the other has an external cut , an end to end my joint is sometimes preferred because if the direction of the cut is positioned away from the normal line of sight , the joint is normally less noticeable than a but joint and that's it .
All you need to do now is wait 24 hours and then it's ready for decorating for more ideas and know how visit diy dot com .
Partnership
Are you looking for a way to reach a wider audience and get more views on your videos?
Our innovative video to text transcribing service can help you do just that.
We provide accurate transcriptions of your videos along with visual content that will help you attract new viewers and keep them engaged. Plus, our data analytics and ad campaign tools can help you monetize your content and maximize your revenue.
Let's partner up and take your video content to the next level!
Contact us today to learn more.