https://www.youtube.com/watch?v=Mn6ts60MJ3I
2023-06-14 18:13:34
How To Smoke A Pork Butt for Beginners _ First Time Pulled Pork On A Smoker
Special thanks to the Ridge Wallet for sponsoring this video .
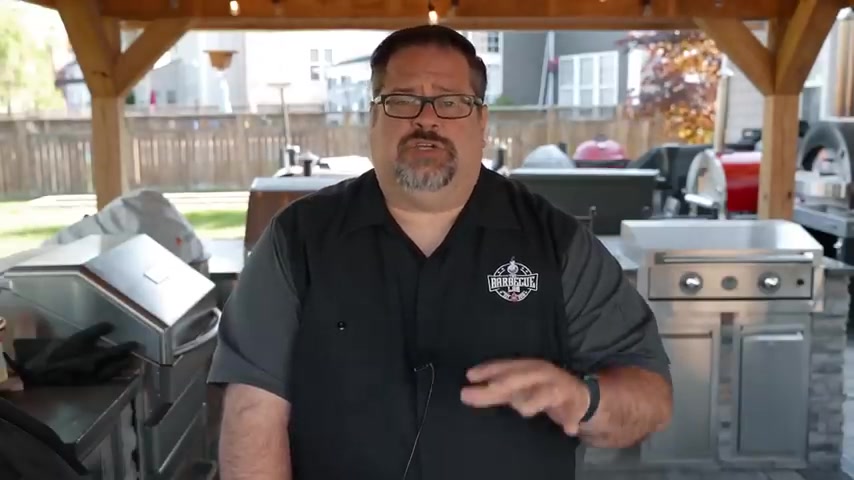
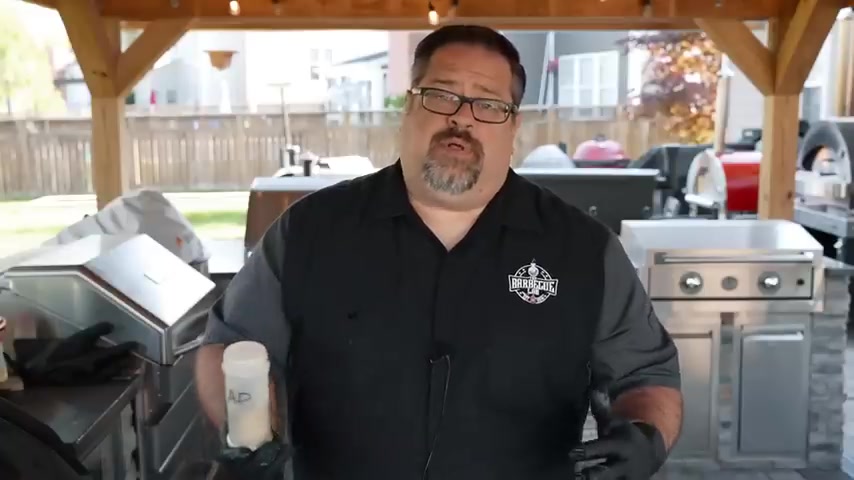
Hey , welcome back to the barbecue lab .
My name is David Gafford and today I'm gonna answer a question .
I've been getting all week this week , which is how do I cook a bone in Boston .
But or how do I actually make a pork shoulder ?
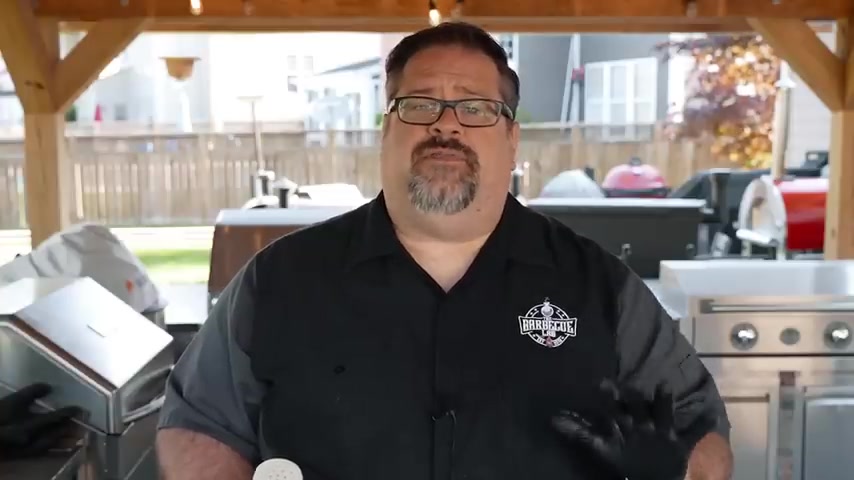
That's what we're gonna tack today and we're gonna tackle what I would consider the beginner's recipe if you've never smoked anything before .
And you're saying I want to get into barbecue .
This is the absolute first recipe that I suggest you trying .
So if you know someone who's new to barbecue , this is the perfect share for them and I'm gonna walk you through it every step of the way coming up .
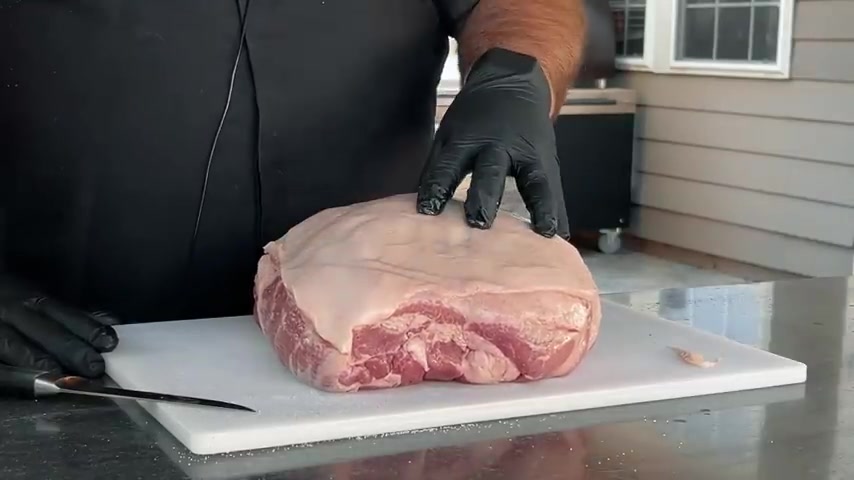
So this is a Boston butt or this is a pork shoulder .
The question is , what's the difference between the two ?
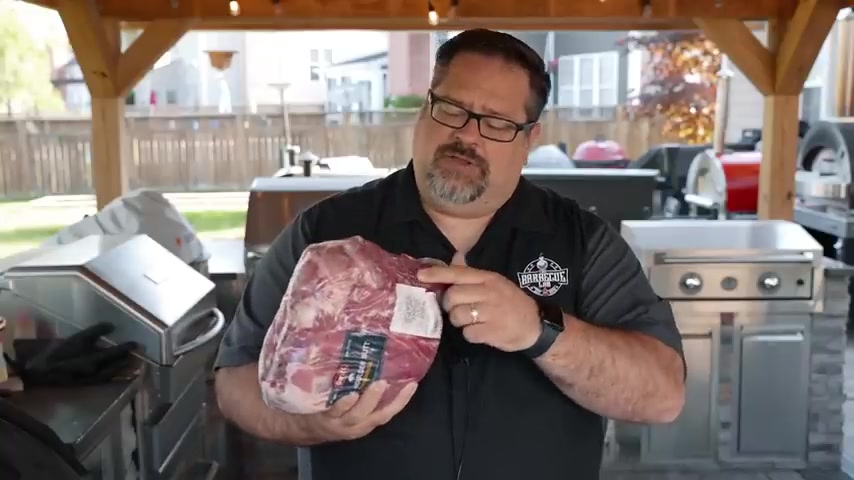
Well , they're kind of synonymous in barbecue .
We're really talking about the shoulder of the pig and this has a bone inside .
You can actually see and feel the bone .
If I put this right here , you can kind of see it for this camera .
Put it down here .
There's a bone right there .
This is a Boston butt with a bone inside .
Now , you can do this with a boneless Boston butt .
But the problem you run into is that as you cut through and get that bone out , you have little pieces of the pork butt that are gonna kind of hang off .
You have to tie it up so that the little parts don't fall off and dry out as you go through a bone in butt is the way to go .
So that's what we're gonna start with here .
Now , I picked this up our local Gordon Food services .
You can get this at Sam's Club .
You can get these at your local grocery store .
They're very prevalent , but this is one of the easiest cuts of meat to make in barbecue .
And so today I wanna show you how I recommend people do it when they're just starting out .
So the prep for this is actually super , super simple .

All we need to do is we need to take this , but out of the bag , we need to go ahead and once we get it out of the bag , we're not going to wash it off .
We're not going to clean it off .
We're not going to do anything to it .
We're going to check for anything that we need to go ahead and trim off in case there's any things that are hanging off or really , really massive amounts of fat on the outside but we're pretty much going to let this thing run as it is .
And for our rub , we're going to use a simple salt and pepper recipe and it's gonna be delicious .
It's gonna look fantastic .
And I know you're gonna love it .
So we're using the simplest recipe that I love to use .
And even though it's simple , it's still one of the most delicious .
So don't let the simplicity of just three ingredients , throw you on this .
This is an absolute winner and I want you to try it .
So all we're gonna do is we're gonna go ahead and take equal parts of salt and pepper .
Now , you can use different meshes of ground ground pepper .
There's 16 mesh , there's all different types of how finely ground you can get your pepper .
But this right here we're just using a bottle that we got at our local Sam's Club or uh Gordon's food service of ground pepper .
So we're gonna use ground pepper and here we have salt .
There's multiple different types of salt .
There's kosher salt , there's fine sea salt , there's pink Himalayan salt .
Today .
We're just using your garden variety Kosher Salt .
So all we're gonna do is mix those in a bottle of a shaker .
Now , this is just a spice bottle that I have left over from a spice that I finished up .
It doesn't matter what you it doesn't matter what kind of bottle you have .
But my suggestion is you get one that has this a little bit of a lid that's gonna help you shake this out instead of pour this out .
So you can use any bottle for this .
You can even just use your hand , dip it in and Sprinkle it on .
I like this because I feel like I get to eat more even coat as we're putting it on .
So I'm just gonna go ahead and take our pepper and our salt and I'm gonna awkwardly put it in here because I know this is not gonna go as , as I would hope .
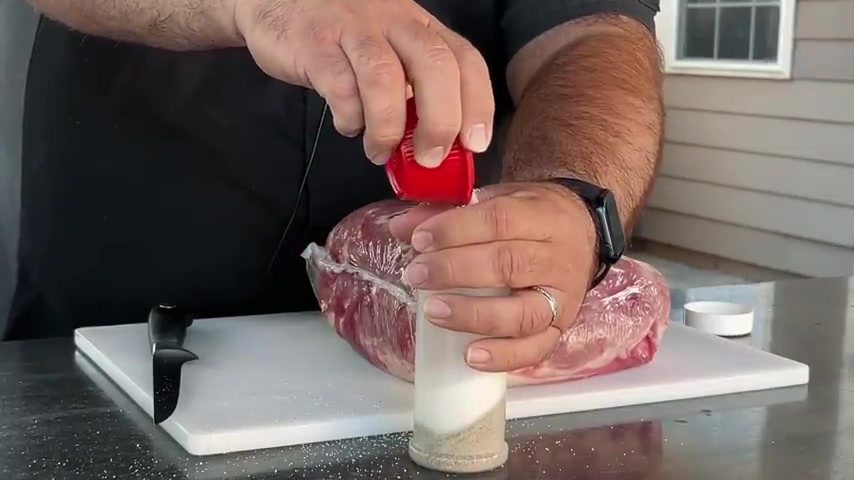
But let's go ahead and give it a shot pepper .
I promised awkwardly and I delivered .
There we go .
So I'm gonna go ahead and put the shaker lid on top , get that on , put the lid on and we'll shake that up and there we have a 50 50 salt and pepper blend .
So that's our seasoning for today .
All we need to do now is go ahead and take this butt out of the packaging .
Now , if you look at this , but here this is about a £9 pork butt .
Pick this up for about a dollar 99 a pound at our local Gordon's , you know , you could probably find them in the Midwest for on sale as low as 99 cents a pound or all the way up to 2 52 99 a pound .
Uh This was about a buck 99 a pound for what we picked up here and is going to produce probably 5 to £6 of pulled pork when it's all set and done .
By the time we pull any of the extra , uh , cartilage bone and fat out of the final meat .
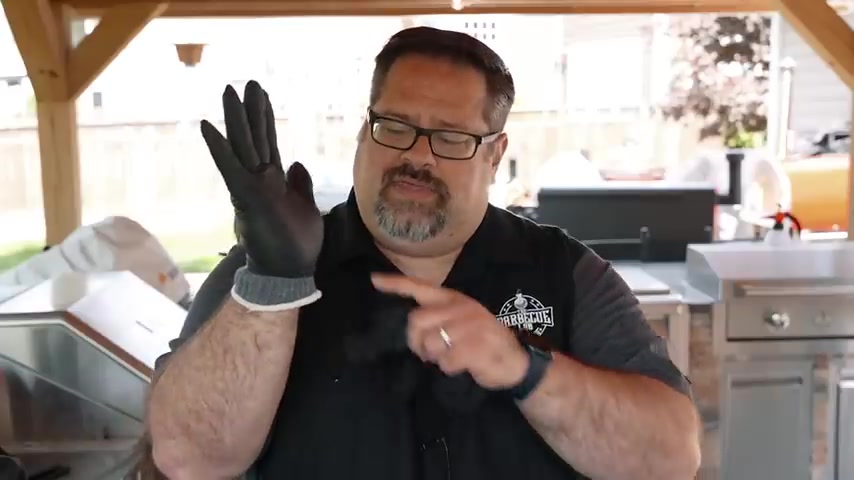
Now , one of the things I really recommend when you're going to take a butt out of a package and you're gonna start working with raw meat is I really like nitro gloves .
Nitro gloves are food safe , but these are the kind of gloves that you might see .
Uh someone like a mechanic use , you might see someone in the food service industry use them .
Uh We'll be sure to put a link in the , in the description below for you , but I like nitro gloves because it can keep my hands clean and I'm not spreading uh raw pork juice on every surface that I touch for the next , uh you know , five minutes after I'm done and all I'm gonna do is I'm gonna go ahead and cut open the package .
I'm trying to get it open without taking all of the liquid out and pouring it all over my cutting board .
So the way I like to do that is I'll keep the liquid here in the bottom and I'll just take the pork butt kind of shimming it out like that .
There .
I have my liquid and juice goes in the garbage can , right .
So this is your pork butt or your pork shoulder or your Boston butt .
This is what we're talking about here .
So if you look on the outside , you're gonna see some things like there's some fat , we probably don't need that .
The rest of this looks looking pretty good .
This is called our fat cap on top of the Boston butt .
This fat cap is just the exterior layer of fat in between the muscle and the skin .
Now , the skin's been taken off of this .
This is just the fat cap on the top and you can , you can trim this fat cap down if you want to , you could take your knife and just very slowly start shaving away and take that fat cap off something like this and you could just shave that fat cap down if you want to .
Now today I told you that we're gonna do an easy Boston butt or a Boston butt for beginners and my whole thing would be , don't worry about trimming your Boston butt .
This is gonna be totally fine .
You're gonna be able to cook this , any of this that won't render , you'll just pull aside when you pull this .
Don't even worry about that fat cap .
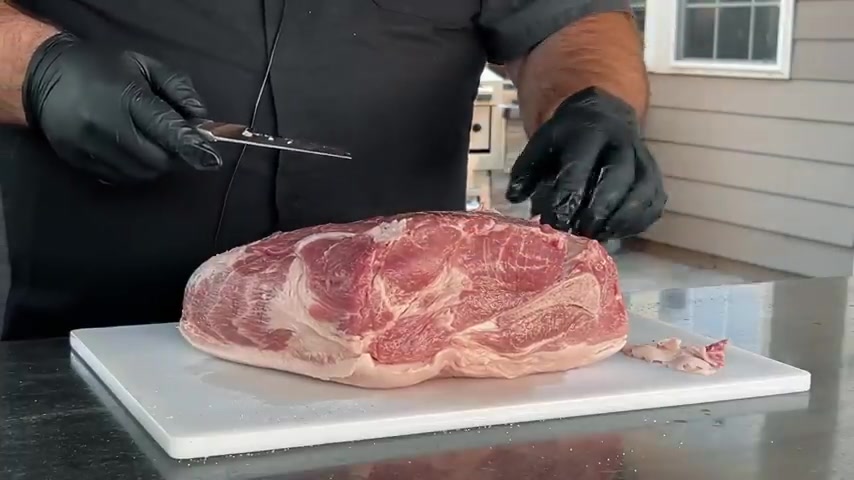
If you turn this over and you start looking at it , we have to see if there's anything that's kind of hanging off that might not survive a cook .
This right here is kind of hanging off .
So I might just go ahead and go in here trim that out .
Same thing here .
This is kind of hanging off .
So I'm gonna trim this out and you might ask , what kind of knife am I using ?
This is just a boning knife .
This happens to be a woos off boning knife .
We've got a woos off collection that we've been building for about 18 years in the kitchen and this is what I have today .
So I'm gonna go ahead and trim off any of these little pieces that are just going to burn up and not be good .
But that is what I'm looking for is an even surface across the top with nothing kind of hanging out or sticking up .
So I hardly trimmed anything off .
This is all that we trimmed off of this entire £9 pork butt .
All we need to do now is put on our spice blend .
Now you might see a lot of people who say , oh yeah , we need to put a binder on here .
Let's use mustard or let's use hot sauce or Worcestershire sauce or Worcestershire , Worcestershire sauce .
Worcestershire Worcester .
Sure , sure .
W sauce .
But you could use any type of binder that you want .
This pork butt has enough moisture in it that I don't need a binder to be able to put my rub on and have it stick .
So I have my 50 50 blend of salt and pepper here .
I'm just gonna take the lid off and all I wanna do is put a good heavy coat .
Remember this is £9 of pork .
Think about how much seasoning you need to season £9 of pork if it wasn't in just a big roast like this .
I like to go a little higher with my shaker than the pork roast because I don't like to go ahead and shake down here .
It gets it too fine , it gets , it too concentrated .
I like to shake above and give myself a little bit of a rainfall of seasoning here like this .
So if you look , I'm giving myself probably what , 456 inches in between .
And I'm just gonna go ahead and get one side , I'll go ahead and get the other side and we want to get a seasoning on all of this pork all the way around .
Ok .
Last side .
Ok .
Now we're talking about the fat cap and the meat side .
Now , there's a lot of people who ask the question .
Do you cook a pork butt fat cap up or fat cap down ?
Well , it really depends on what you're going for when you're cooking .
If you think about it , the fat cap is really an insulated layer that's going to give you a layer of protection between your meat and the fire .
So if your fire is coming from below , you might want to consider having your fat cap on the bottom to insulate it and to keep it protected from that fire that's coming below .
So you don't nuke the meat that's on the bottom .
Another way of looking at it is if you put your fat cap on the top , the fire is gonna come from below .
And any of that fat cap that's going to render is going to lubricate and moisturize the meat as it runs down the meat on the sides .
Now , all of this fat cap is not going to render though some of it will not , all of it will because this is pretty hard fat .
So the question is really up to you .
Are you going to run it fat side up or fat side down ?
Today ?
We're going to run this on a pellet grill because pellet grills are becoming super prevalent in the outdoor cooking world .
And there's a lot of people who have one on their back porch and they're saying , I want to learn how to use that .
Today , we're going to show you how we run a pork butt in our outdoor kitchen , but we're actually doing it as a part of a test where we're testing the top five pellet grills under $599 here in the United States .
So as a part of that test , we're cooking five pork butts with this exact same recipe on five different cooking units that you see behind me .
And if you want to check out that video , we'll put it right up here in the card or we'll leave it in the description .
So we're gonna go ahead and put the fat cap down for this cook because pellet grills , there's a burn cup in the bottom and the fire is coming up from below .
We're gonna use the fat cap to protect our meat on this cook .
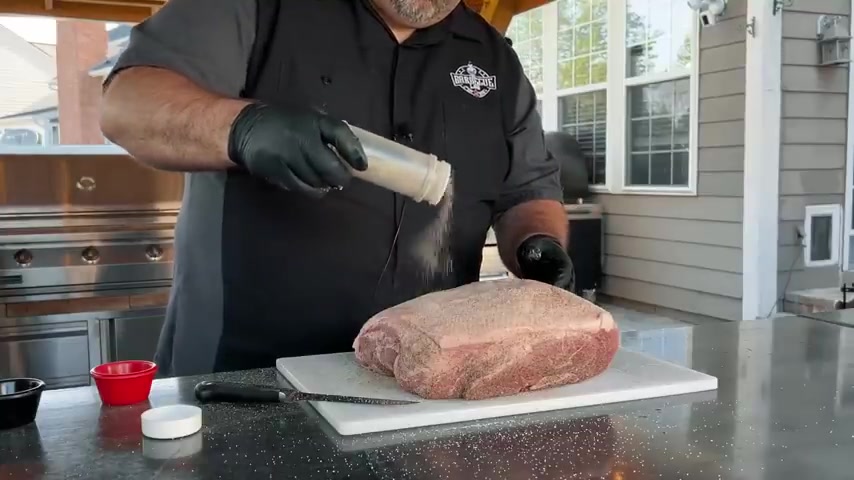
So I'm just go ahead and finish with the salt and pepper on the fat cap here and you can see we're getting a pretty even coverage of that salt and pepper .
Then we're gonna go ahead and go to the side that we're gonna put up on the grill and this is gonna be our presentation side .
So this is the side everybody's gonna look at and see .
We want to get a good healthy layer here and with that good layer , we have a seasoned pork butt that's ready for the grill .
Now , a lot of people might ask , ok , well , how come this isn't gonna look like a barbecue pork butt or why is this gonna have the red color ?
I'm used to seeing it's gonna have that color , but it's gonna come from just salt and pepper and it's really fantastic .
So I can't wait to show you what this looks like .
So let's go ahead and get our grill fired up and we'll put this on the grill and show you what this is gonna do over the next 8 to 10 hours while we cook it at 250 degrees .
All right here we are This is the life smart 2000 B pellet grill .
It's one of the ones that we're testing as a part of this test .
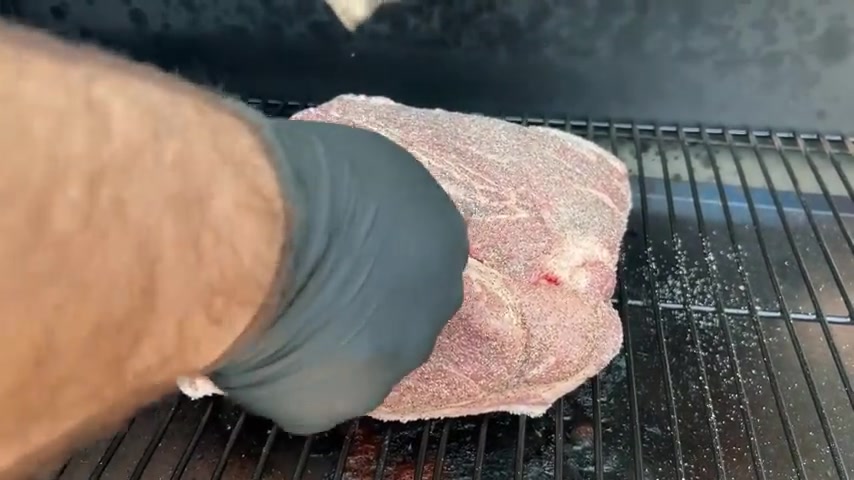
We're gonna take our pork butt .
We're gonna put it center great with the fat cap down just like this .
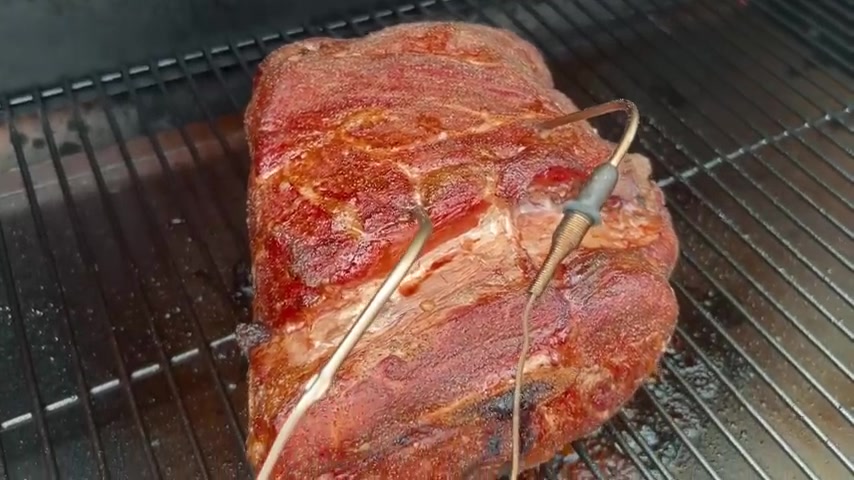
And I'm gonna go ahead and take my thermometer from the Life Smart grill .
I'm gonna go ahead and put it in the meat .
I'm gonna go ahead and take my thermo works signals thermometer .
I'm gonna stick that in the meat as well .
Have a great temp probe here .
We should be able to monitor how this meat is doing all the way through the cook .
All we have to do now is shut the lid and let this thing do its magic and we're going to let it run at 250 degrees for probably the first three hours before we even touch it or even check it .
This thing is going to go and it's going to be delicious with Father's Day .
Fast approaching .
Here's a gift idea that I know I would love .
It's called the Ridge Wallet and it comes in over 30 styles and colors including this black Damascus version , which looks just like my favorite kitchen knives with this beautiful wave pattern in the metal .
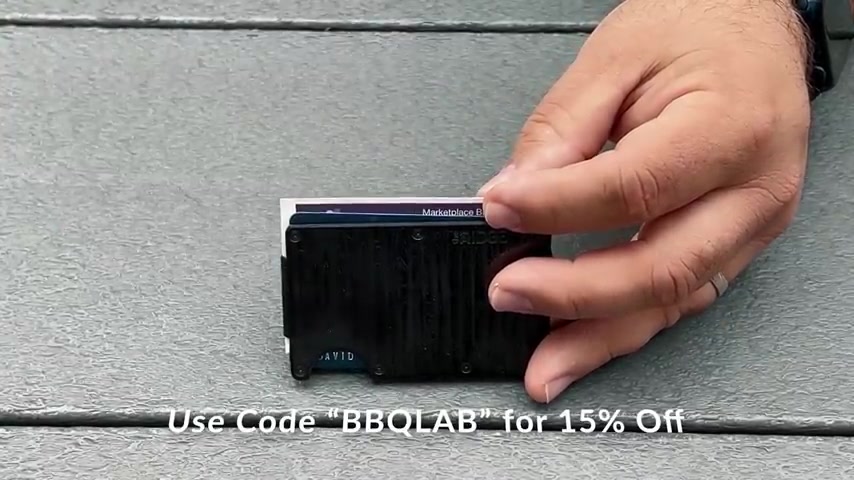
They even have the coolest bolt action pens like this one in gun metal .
Now , if you're struggling to find the perfect gift for dad , use the code B B Q L A B at ridge dot com and get 15% off your purchase total and make sure that your dad is going to be thrilled when he opens your gift this year .
You can even let dad test drive one of the wallets for 45 days .
And if he's not fully in love with it , you can send it back for a full refund .
It holds up to 12 cards plus cash .
So get him the gift that you know , he's going to love .
All right , here we are the three hour mark with this pork butt .
And so we haven't touched it for three hours .
It's gone into the grill .
It's just sat there and take it on smoke for three hours .
We haven't opened the lid .
I haven't done anything but monitor the temperature of the grill to make sure it's staying at 2 50 .
So , really , all I wanna do now is I wanna open the lid and I wanna see if the outside of the pork butt is starting to dry out , if it looks like it needs a little bit of moisture .
And if it does , I have this nice little pressure sprayer that I just have water in .
All it is , is water .
You could mix it with apple cider vinegar , you could mix it with all different types of things .
But this is a simple pork butt .
We're just gonna use water is gonna do all that we need .
So we're going to spray the outside , but we're first going to see if the bark is adhered to the meat yet .
So we're gonna use a simple rub test on our finger to see if the bark comes off .
And other than that , we're gonna make sure it's moisturized , put back on the pit , close the door and let it go for another hour .
All right , there's our pork butt .
Let's see how the rub is .
See , it's not really coming off on my finger and just a smidge , but it's starting to dry out here on the top .
So I wanna go ahead and give that a little hit of moisture and all I'm gonna do , spray it down a little bit of water .
Sure .
I get all the sides , then I'm gonna take the lid , put it back down and we're going to let that go and that's all we have to do .
So , remember this is after three hours , you could go 3 , 3.5 hours .
No big deal .
But now I'm gonna start checking in on it about once every 45 minutes to an hour , but I'm not going to open the door except for when I check to see if it's dry and if it needs another spray .
So we're going to check in here at about one more hour and we'll see how the outside of the pork butt is doing and whether it needs any more moisture before we get ready to wrap this pork butt to accelerate the process .
Right .
So our pork butts , our pork shoulders have been on the grill for about 4.5 hours .
We have opened the grill to spritz them after three hours after four hours .
And it's time to go ahead and start taking them off of the grill and putting them in the wrap .
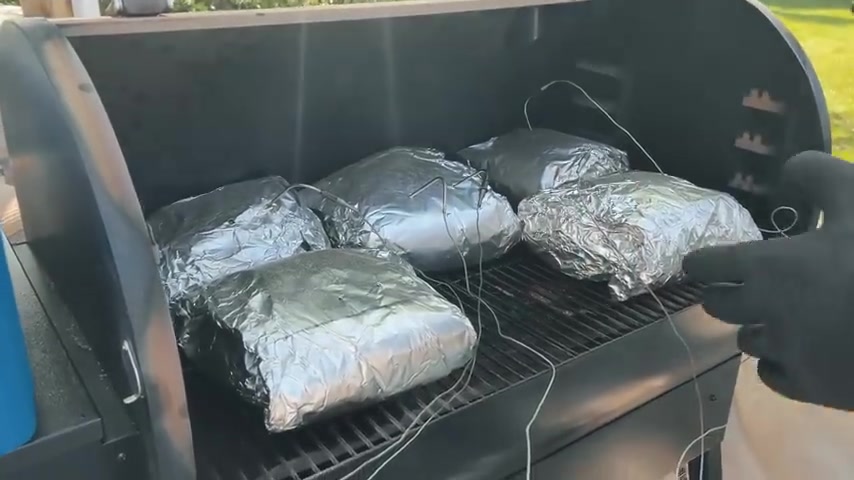
All right , we're gonna wrap these butts up in aluminum foil .
Now , why ?
Aluminum foil ?
Why not butcher paper ?
Well , because if this is your first time smoking , you wanna go ahead and wrap in foil .
This is the most foolproof method .
I know that's gonna help you make sure you get these butts done and to the table in time for you to eat .
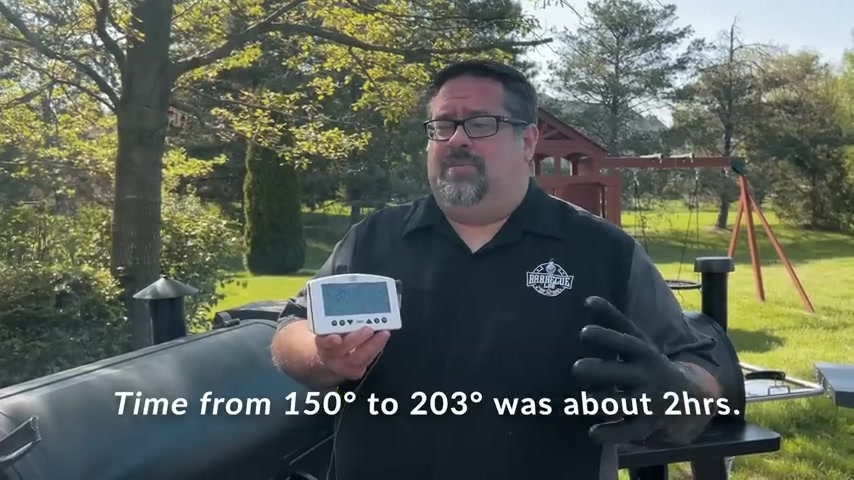
Now , the whole point of wrapping these in foil is to go ahead and help that collagen break down inside the butt and go ahead and help that fat to render what we're gonna do is we're going to expedite the process of getting from 150 degrees to just over 200 degrees .
Because what we want to do is we want to try to hit right between 202 oh three with this pork butt .
That's usually almost the perfect pulling temperature .
We're going to verify that in a little bit , but that's what the goal is that we're going to achieve here .
So before I go grab that pork shoulder off of the grill , first thing I need is some hand protection .
I need to make sure that my hand can take a hot pork butt off the grill and transfer it to something .
There's a couple of different ways to do that .
My favorite way is with a glove that is an insulating glove .
It's just a cotton glove liner and a nitro glove and they look like this when you have them on the whole point is I have the insulation from a cotton glove liner and I have the Nitrol protection so that when I'm done handling pork butts and working with this , I just take the nitro off and I don't have to wash my hands or anything fantastic solution .
So if you're interested in either of these , I'll put links in the description below so you can find them .
But we buy our nitros by the 100 in a box and we buy our cotton glove liners by say 10 or 12 packs to make sure we have them everywhere .
We're barbecuing or cooking outside .
So I'm gonna go ahead and put these on and then we will see you over at the grill as we pull one of the butts off to put it in foil .
Let's show you what the pork butt looks like inside the grill when we hit 150 internal and then we can get a chance to get it out and get it wrapped .
Now , remember this is just salt and pepper on the outside of this pork butt .
So that color is coming from the smoke , the salt and the pepper and that is it .
I'm gonna go ahead and take this temperature probe out that goes with the life smart , this temperature probe here that goes with the thermal work signals .
I'm gonna take the butt out , set it in there .
Now , we can take this over and wrap it .
All right .
So we have our pork butt ready to go into the wrap .
What I wanna do is I wanna put this close to the edge of the wrap here so we can bring the sides in , fold them over and then roll the pork butt into a nice little package .
So we're gonna go ahead and start with the pork butt here , pull it out , get the microphone cable out of the way and I'm gonna go ahead and bringing in these sheets of aluminum foil up around the side like so and bring this side up around the side like so then I'm gonna go ahead and take this back part and I'm gonna fold it up just like this and now that we have this bent over .
So it's actually the way we want it to go .
All I have to do is take this and fold it all the way over .
Now , one of the thing is see this , that is liquid gold right there .
So I don't wanna skip on that .
I wanna make sure I put that in the , in the wrap because that is liquid love .
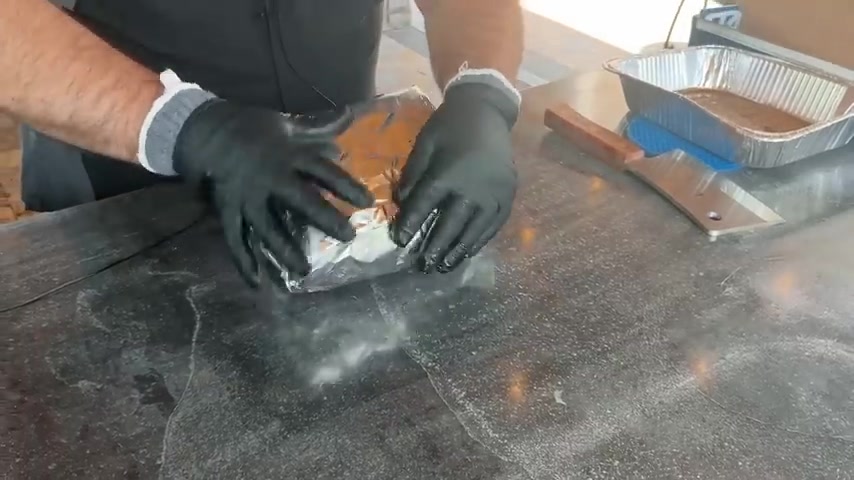
We wanna make sure we got that and I'm gonna go ahead and take this , bend it over right here .
Let the wrap come around side and there we go .
Nice little wrapped pork butt ready to go back on the pit .
So that's really what it takes to get that thing wrapped up .
We're gonna take it , put it right back on the pit stick our probes back in so we can monitor the temperature .
And when this thing gets to about 200 degrees or so , that's when we're gonna go ahead and start probing it with a thermo works thermo pin or an instant re theme to see if it's done and ready to rest .
So that's what's next .
Let's get this back on the pit .
All right , here we are , we are at 204 degrees internal for this pork butt .
203 degrees is what our target was .
But it took us time to get outside and get back in front of the camera .
We went up another degrees , but 203 is our point where we want to check the internal on this pork button .
So I'm gonna open this grill and you're gonna notice that this pork butt has multiplied because we're running that test of five different pork butts .
Once they actually got to the wrap point , it didn't matter if we kept them all on or not .
So they're all on one grill now .
But you can see that this one right here is running two oh four .
And so we're gonna go ahead and check it out .
Come on in .
So here are our pork butts .
The one that is connected to this one is right here .
I'm gonna pull out the probe and I'm gonna take this and I'm gonna put it right into this cooler and see if I can do it without breaking through the outside of the foil , losing all my juice , got a little bit of juice coming out there .
All right .
There we go .
Now , what we wanna do is we wanna get inside here and see how this probes .
So we're gonna check with an instant re thermometer if it probes tender or not .
So I have my thermoph fan right here and I'm ready to go ahead and check this to see how it probes .
It should probe super , super easy with very little resistance .
And if we get in here through the aluminum foil that goes in and out really easily , look at that .
Just hardly any resistance at all .
Let's try another area , hardly any resistance at all .
Now , I could go ahead and unwrap this completely and I could go through and I could check it not through the foil and I could check it without that .
But I know through after doing hundreds of pork butts that this one's done if you're second guessing yourself .
And you're thinking , man , I want to make sure this is done .
Go ahead and unwrap it and then take your probe , stick it in and make sure it's nice and tender .
And then we want to let it rest .
As soon as we know that it's done , the whole thing that we've done all of this work for is we want to let it rest and we want that meat to re absorb some of those juices back into the meat .
As opposed to staying outside of the meat , the rest time is going to do that .
That's why I put it in this cooler .
Now , this cooler is perfect because I wanna go ahead and eliminate drafts and wind .
I wanna just have a nice place for it to settle down and gain that moisture back into the meat .
So I'm gonna put the top on this cooler and I'm gonna let it rest for a minimum of 60 minutes .
Now , some of you are thinking that I'm absolutely crazy .
60 minutes .
Yeah , we want at least 60 minutes for those juices to go back into that pork butt .
Now , if I , if I have the time I'll even go two hours , I'll go 120 minutes and it's even better .
Now , you might be thinking , well , what about the pork ?
Won't it be too cool ?
Won't it be cold ?
I guarantee you when you open this package after two hours it's still gonna be steaming hot .
Ok ?
Now , if you're going to hold it for a long time , you don't want it to continue to cook , you can let all the steam off of this by opening up the package , letting it cool down for three or four or five minutes and then putting it in the cooler .
That way you can guarantee it's not going to continue to cook .
I'm OK with it being fully wrapped like this , putting it in the cooler .
I know it's just going to reabsorb those juices .
It's gonna be delicious .
So that's what we're gonna do .
That's what's next .
We're gonna let this thing rest and then we'll come back and show you the pay off when it's completely done .
All right .
So we have rested this pork only about an hour .
I'd love to get two hours in today .
We can't , we have friends coming over for dinner and they are already here .
So it's time to get going on this .
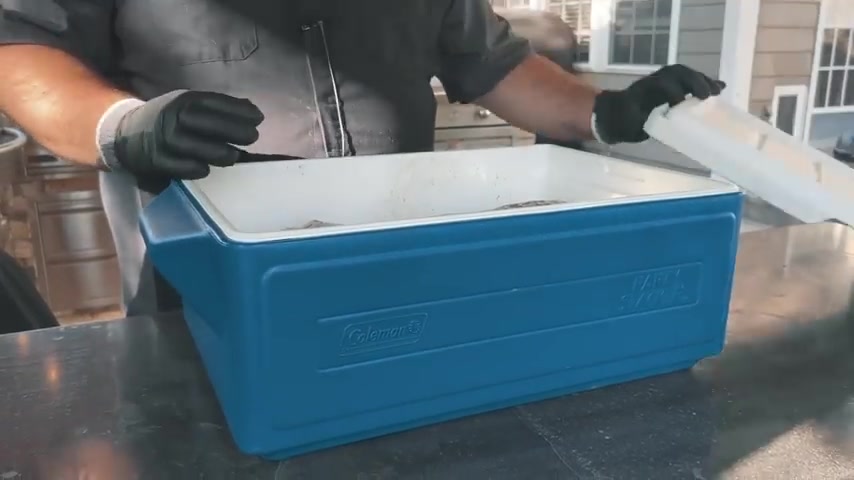
But here we have the party cooler that is resting our pork butt .
So , what I want to do is show you what a rest in a cooler looks like .
If I take this off and you look here at the pork butt itself , it's just rested pork butt .
It's just sitting here resting in its cooler .
That's about it .
But what I wanna do now is I want to go ahead and get this unwrapped , find the end , pull that up and for those of you who are wondering like , will it still be hot ?
Check out that steam ?
Can you see that steam there ?
That's after an hour resting with no , no heat added to it ?
It's still hotter than hot .
So take a check at that pork butt there .
Now , remember this rub is just salt , pepper and smoke .
That's the color we get from salt , pepper and smoke on this .
No sugars , no paprika .
None of the other colorants that you might see in the popular barbecue ribs that are on the market .
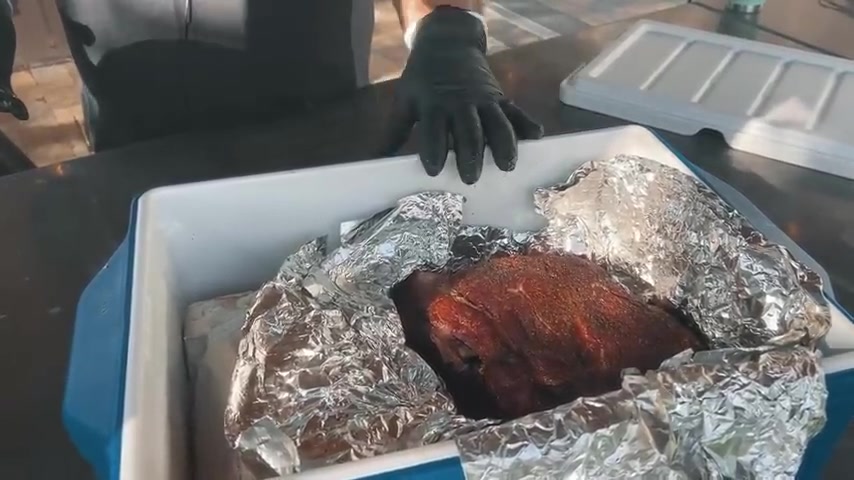
Um This is just salt pepper and smoke guys .
Uh It's a great color , encourage you to use something .
Just a super simple as salt and pepper .
If you really want to know if your pork butt is done , all you need to do is pull out the built in thermometer .
Malcolm Reed from how to barbecue , right ?
Brilliant guy .
He says , you know , just check the thermometer on those things .
They come with the thermometer and he's 100% right ?
So you just grab this pork , you just grab this bone right here and you pull the bone out .
That bone comes out clean .
That means your pork butt is done .
Now , there's 45 different ways you can pull a pork butt .
I've seen people throw it in a , in a paint bucket and use a paint stir to pull the whole thing in about five seconds .
Me , I like to be a little bit more selective on how I pull a pork butt .
But really what it comes down to is just getting in there and grabbing a hunk of meat off and saying I want this and there's some fat in here .
I'll pull that out before I serve it .
But look at that pork butt .

That thing is as tender as can be juicy tender .
There's that piece of the bark on it .
It's gonna be so good .
That's the piece I wanna try right there .
So bark piece .
Hm .
Melt in your mouth tender .
That's so good .
So if you look here , you can even see the smoke ring on this piece of pork .
You can see that pink smoke ring on the outside .
So we even do have a nice smoke ring from a pellet grill of all of all sources .
So can you pull pork on your own ?
Can you make a pork butt that is super tender and fall apart just like this ?
Yes , you can 100% .
Is it hot ?
Absolutely .
I've got to put it back down .
It's too hot .
So dynamite .
Pork butt .
Super super easy .
If you try this , leave us a comment down below and let us know how it went .
If there's some question that you're saying , man , I really wish you would answer this question .
Put it down below in the comments .
I'd be happy to answer for you because our whole goal here is we want to equip you as backyard chefs so that you feel confident and comfortable in your own backyard , using the equipment that you have to invite others over to be able to make sure that you are entertaining others .
Because I firmly believe so does Melissa , we're 100% better together , even though COVID wants us to be apart , we're even two years past COVID now .
It's still around .
But I think we've kind of got it ingrained in our psyches that maybe we need to be apart from each other .
I completely disagree .
I would love to see us get together , get together around food .
So if you enjoy having people over and you enjoy outdoor cooking , this is the channel for you .
Make sure you hit that subscribe button before you take off .
We'd love to have you around the new recipes , gear reviews and techniques that are coming your way .
And if you're on social media , we're here on Instagram , we're on Twitter , we're on Facebook and we just registered to Tik Tok .
I'm telling you there's nothing there yet , but there will be soon .
We've got some content we're gonna shoot .
So we'd love to have you join us on those channels and I can't wait to see you next time here in the barbecue lab where our whole goal is to equip you to be able to entertain others with confidence .
Thanks for joining us .
Partnership
Are you looking for a way to reach a wider audience and get more views on your videos?
Our innovative video to text transcribing service can help you do just that.
We provide accurate transcriptions of your videos along with visual content that will help you attract new viewers and keep them engaged. Plus, our data analytics and ad campaign tools can help you monetize your content and maximize your revenue.
Let's partner up and take your video content to the next level!
Contact us today to learn more.