https://www.youtube.com/watch?v=ThRhMLnw3nY
DIY - How to Make a Doll Roller Coaster _ EXTREME CRAFT
What's up y'all today ?
We are going to try something a little different .
We are going to attempt to make something that resembles kind of a roller coaster .
What ?
Yeah , I'm thinking this might be a little ambitious , but we're gonna try it anyway and I'm take some artistic liberties and cut a few corners .
So , yeah , this is kind of what I had in mind .
Please forgive my horrible sketching here .
But I don't think we're gonna make it actually this large because I can't even fit this on my craft table .
So we're gonna cut a few corners and take off the ends and just make it in two separate parts .
So one goes straight across , then we'll pretend like there's a curve there and then the other has the hills or whatnot in the back .
So I'm thinking something a little bit more like this .
A hill and then a straight piece of track .
Yeah .
And for our little carts , I'm thinking they'll look a little bit like that .
So , yeah , let's get started .
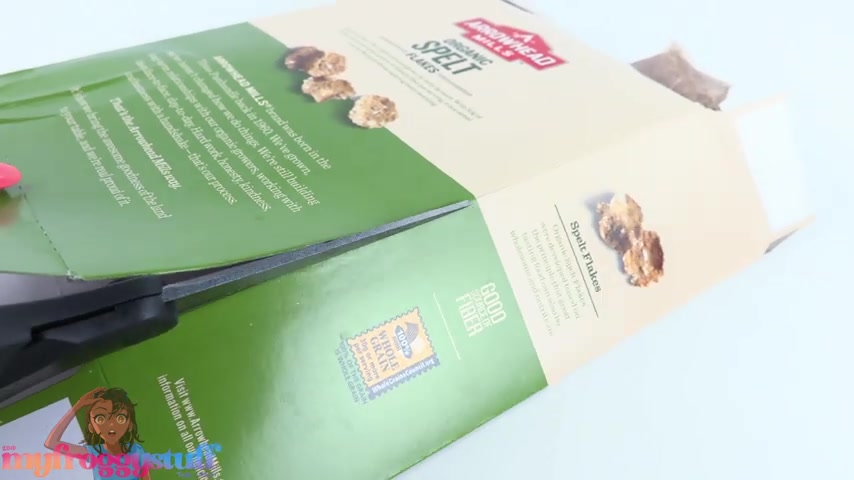
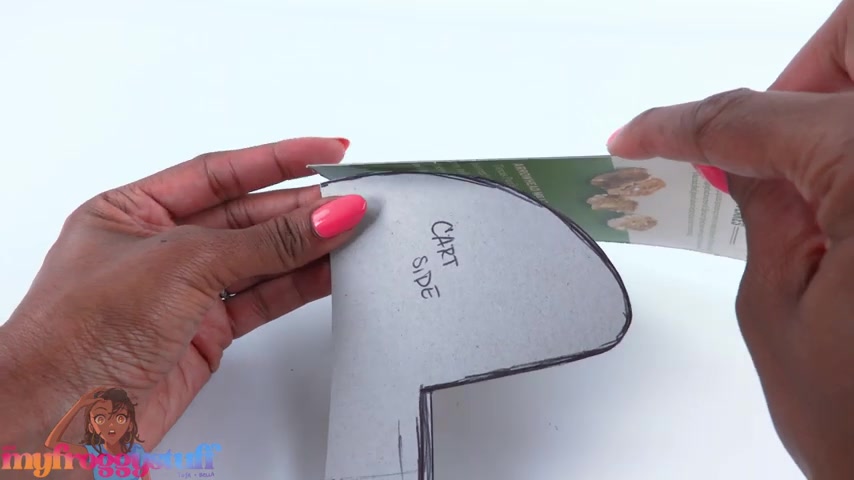
I'm using recycled paperboard to make the carts cut open the box so we can lay it flat .
Now , I'm sacrificing one box .
Just so we can make a template place a doll onto the box for size .
So when sitting , it's right about there .
I think we're gonna have them a little higher up .
So it takes up a little bit less space .
So if her legs were stretched out , we would need it to be at least down to there .
But if she was sitting and her legs are bent , we could shave off probably about a good inch .
Yeah , let's do that .
This is about 6.5 inches .
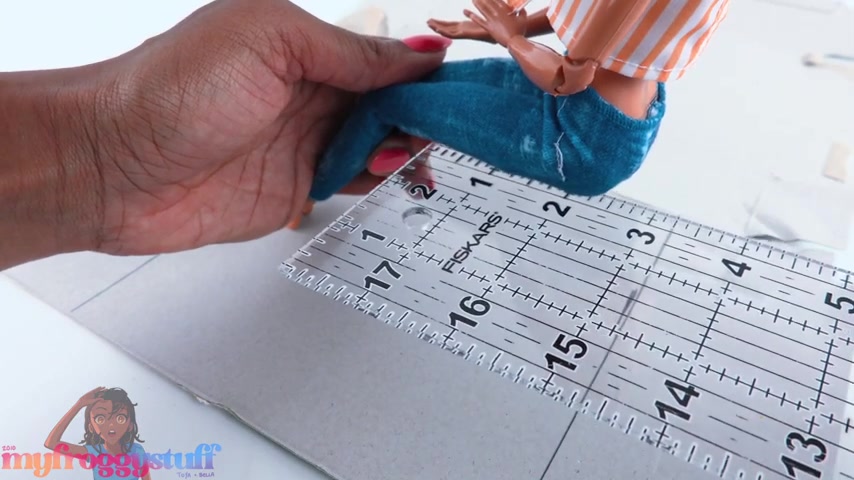
We will need about 2.5 inches for the seat .
So let's mark that and a little over two inches for the width of the doll .
So if you want to have two dolls sitting side by side , let's go with 4.5 inches , make that four and a quarter .
So I end up with a rectangle that is 6.5 inches by four and a quarter and we're gonna have a seat that is 2.5 inches .
I'm using a paper cutter to clean up my lines and I made the seat two and a quarter inches because we need the space .
Sorry about changing the measurements , but we're trying to feel our way through this .
So we end up with 6.5 , 4 and a quarter and two and a quarter .
Yeah , for the side , I place my pattern at the bottom of another piece of paperboard .
Mark where the seat is gonna go and the end and I just need to know where that back line is gonna be .
So let's go ahead and draw that on .
Then we'll place the doll on top , have her legs bent and I guess the sea can go right about there .
So this is gonna be a pretty tall little cart and the end of the seat will be right there .
Move the doll , let's sketch out our design .
So I'm thinking it's gonna go up and kind of curve , then we can bring it down that way the dolls can step into the cart , take it over and then go back up .
Yeah , that looks about right .
Let's clean that up and then cut it out , cut a piece for the back , the seat and a piece for the front .
So about what is that right there ?
Yeah .
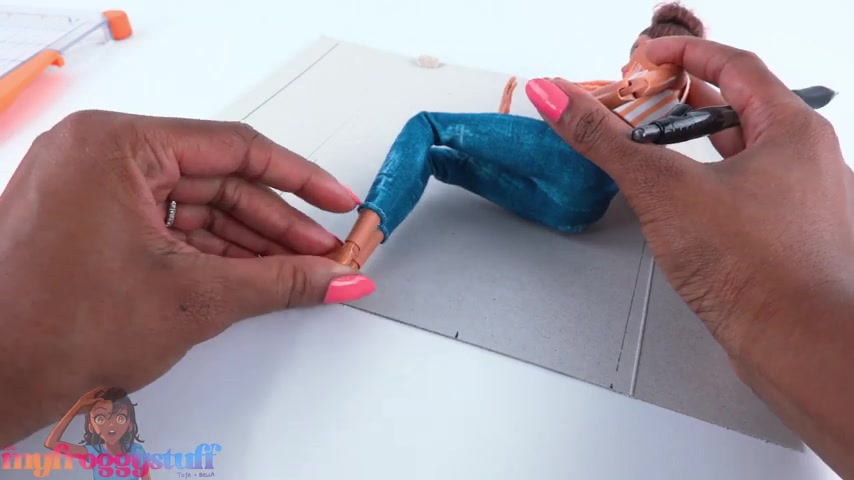
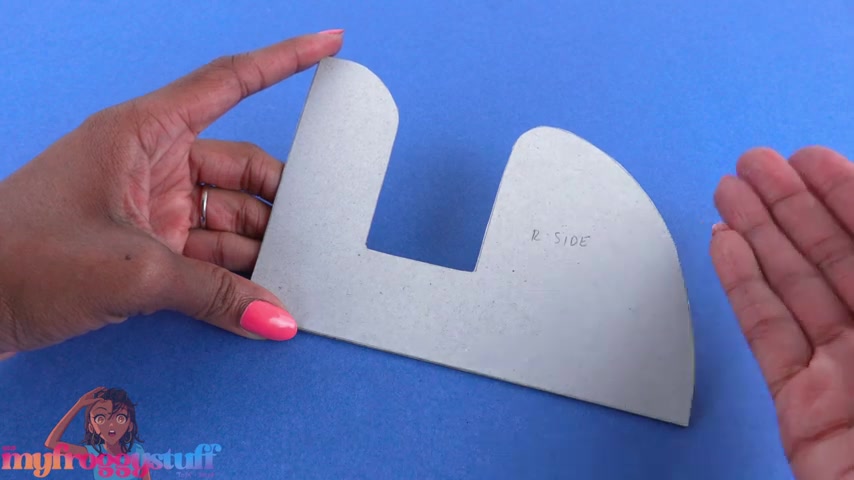
Now that we have all of our pieces , let's trace them onto paperboard , be sure to flip the pattern upside down to do the other side of the cart .
So you get two mirror images , make several , cut them out .
I cut four for each side and we're gonna stack and glue these together , making sure we can see the paperboard on both sides .
I'm using a glue stick to glue the layers together to make a pretty thick piece of board .
Now , this is only four layers .
If you want yours to be a little sturdier , you would just add more layers .
However , the thicker these get , it does start to mess with the measurements for some of the other parts .
So you might find yourself trimming off stuff .
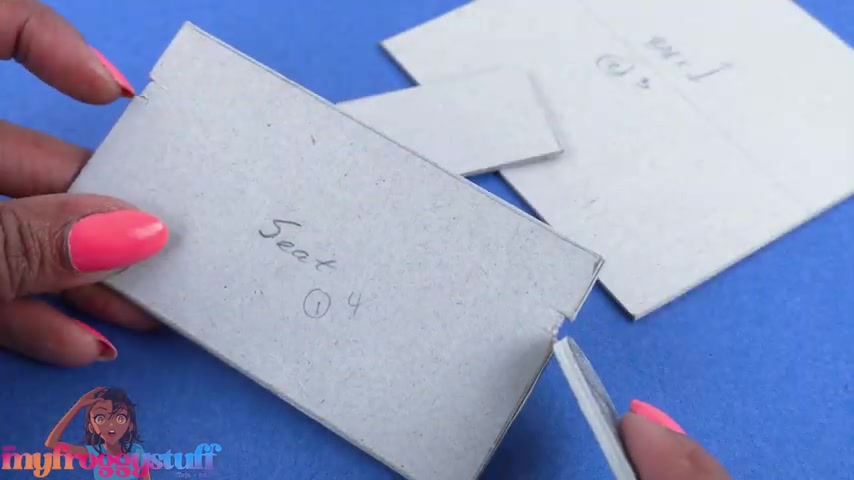
Later , we are going to need two of those four layers for the bottom .
I'm doing three layers for the back six for the seat and I cut one for the front .
However , I think I might have to resize this one because of the thickness of the sides .
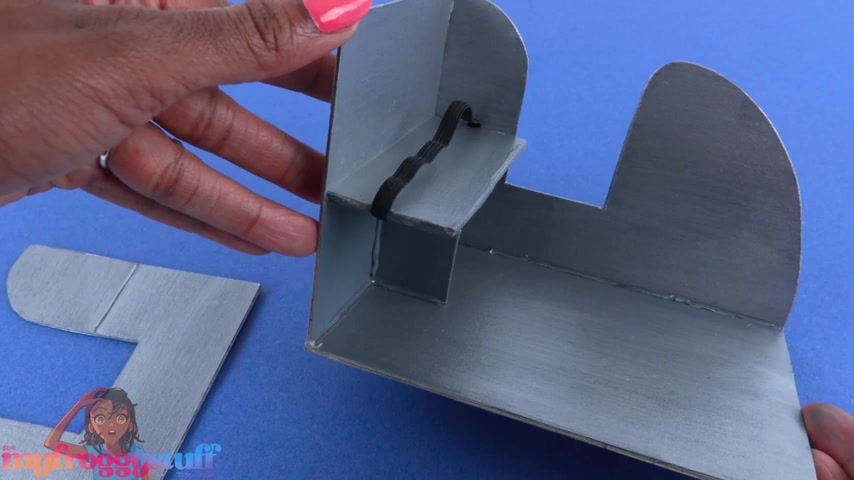
So we'll just have to see once we start gluing everything together , sand , any rough edges smooth on the back joy line where the seat needs to go place the seat right under the line measure underneath , then cut a small piece of paperboard , stack a few layers to go underneath .
That's going to give us a little more support for that seat .
And you know what , we might need seat belts or something to hold the dolls in place .
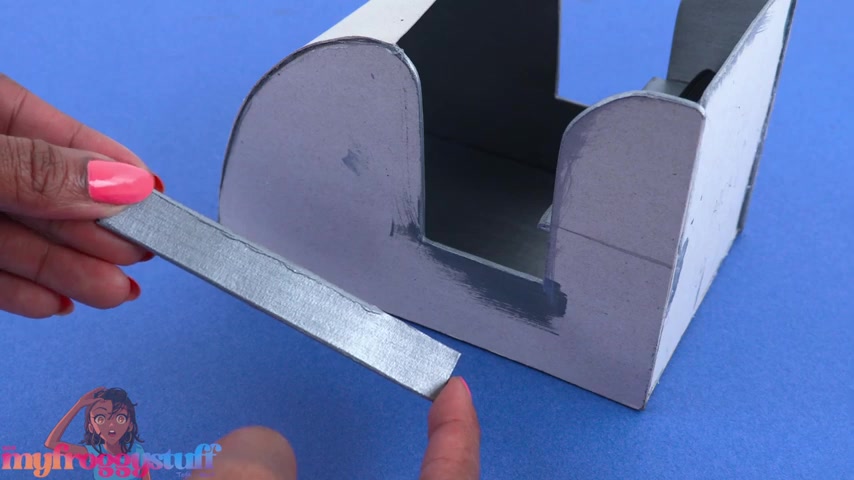
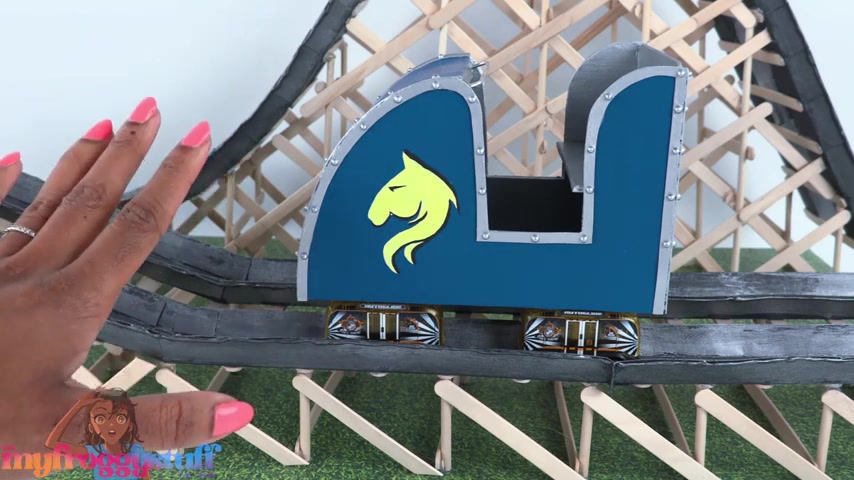
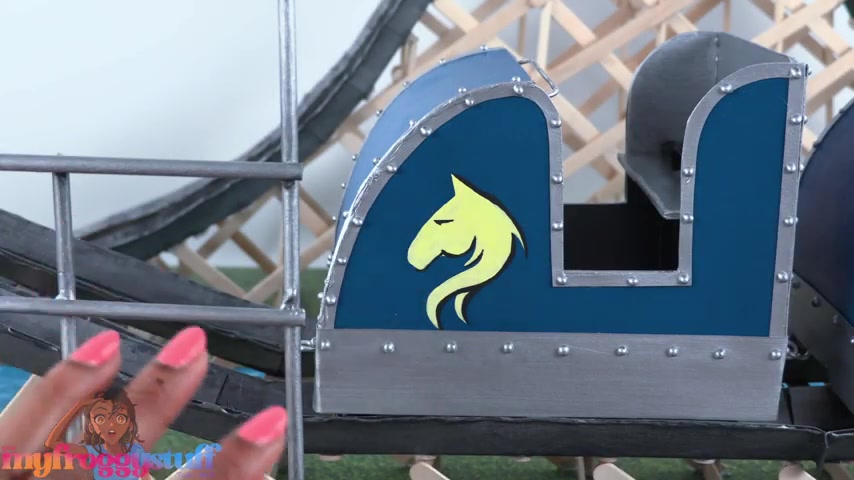
I cut two little notches on the sides so we can glue on some elastic paint , the seat glue it to the back with the smaller piece underneath paint .
It let's brush it with a little silver paint .
The inside of the other pieces measure and cut a piece of elastic and then we're going to glue it right on those little notches , then glue the back and the seat onto the bottom glue on the sides .
Hm The seat actually sticks out a lot and we might have some trouble getting the dolls in and out of the cart .
So I'm thinking we're gonna trim this down by like that much .
It's probably about a little over half an inch .
I trimmed it and touched up the paint .
It's a very short seat now , a little over 1.5 inches , but it's still enough for the dolls to sit on and we should be able to get them into the cart .
Glue on the other side .
Here is the piece we cut for the front .
And yeah , we're gonna have to re cut that because of the thickness from the sides .
So I measure it and it looks like exactly 4.5 inches .
I cut a new piece of paperboard .
I paint it the other side and I'm just going to glue this onto the front .
The front is a little soft here .
So I take the piece we cut from the seat , trim it down a little cut , a piece of aluminum wire that's a little longer fold over the ends , push it onto the paperboard so we can make some holes to push the wire through , bend the wire on the other side and secure the ends with glue to make a handle , paint the outside , then glue the handle in place on paperboard , sketch out a few more details , cut them out .
I made a little stencil so we can put a little horse on the side .
I really hope this works .
Ah , not bad .
Use a paintbrush to go back and clean up the lines giving me school mascot vibes .
But we're gonna keep going .
Let's add some silver paperboard trim .
Let's add a few drops of hot glue .
Touch up the paint and try to fill in any cracks and crevices .
Not the neat job right through here , but hopefully it won't be too noticeable .
Now , we just need to give our car some wheels .
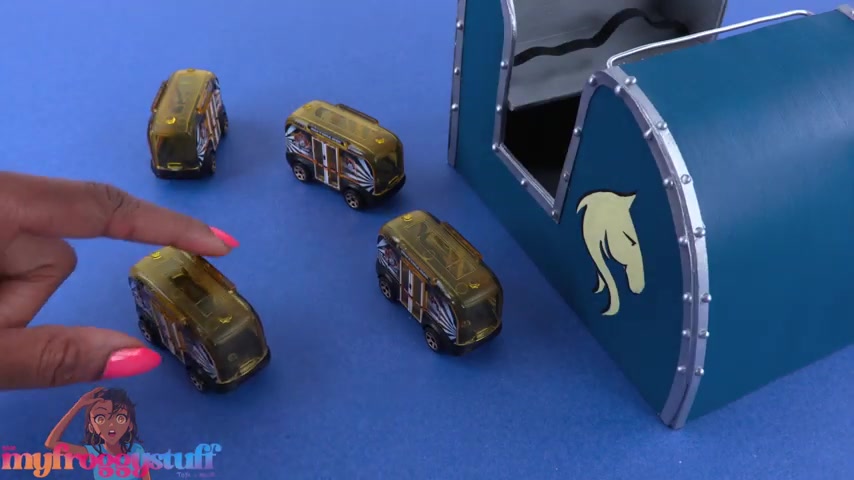
I have four little die cast cars .
I think these are by Matchbox .
They are all the same size .
We are going to use these on the bottom of our cart so it can roll .
But first , we might want to make the track .
So we know where to place the cars .
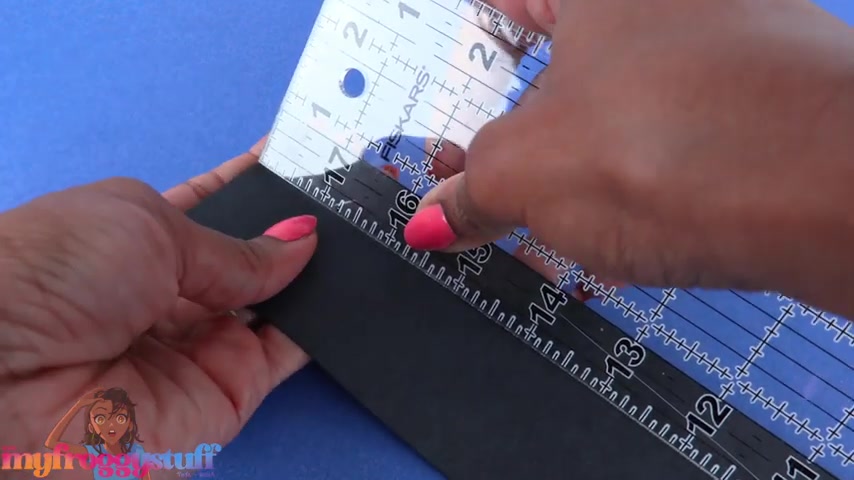
I'm going to use black poster board and cut 2.5 inch strips .
These measurements are just specific to this car .
If your car is shorter , you're gonna make a smaller strip on the sides .
I fold them over three quarters of an inch .
Hm .
Let's make it a little less than three quarter inches so I can get a little more space .
Now , let's see if the car can pass freely and it can .
So yay make a second one .
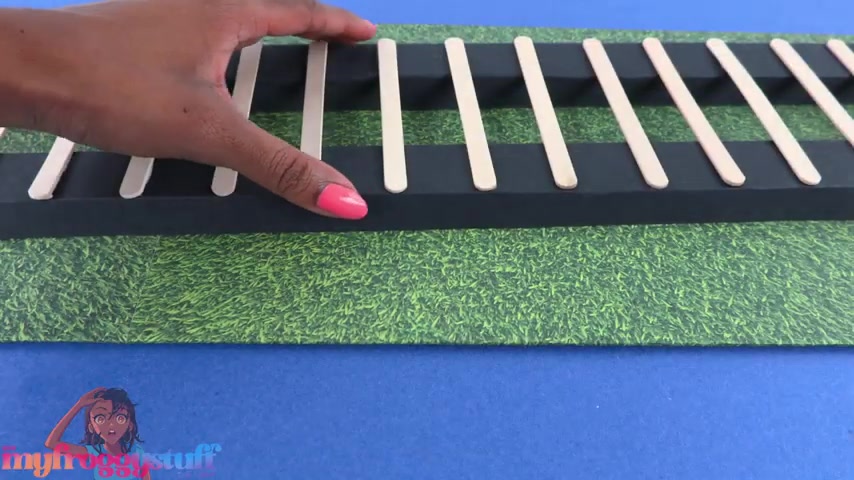
I'm going to glue them together using popsicle sticks .
I glued one popsicle stick at each end so that I can make sure everything stays pretty straight .
I left a little bit of space on one side so we can extend it by making small cuts at the corners , fold them out , repeat on the extension , then overlap them and glue together , then trim it .
So it looks like we just glued two beams together .
This is now measuring about 36 inches .
I don't think we can get a lot larger than that because like where are we going to store it ?
Continue gluing on popsicle sticks .
I have some cardboard here .
It's a tri fold that I picked up at Target .
It's 36 by 48 inches .
So it's pretty large .
Let's cut off one of the side panels .
Cut the side is about 12 inches .
I'm trimming off three , cover it with scrapbook paper .
So we have a board to build our track on .
It's still drying a little , I'm going to cut wooden dowels .
I cut them into two inch pieces , then begin gluing them on .
I'm using hot glue to attach the wooden dowels .
I just add a nice little drop on the popsicle sticks .
Then place the end of the wooden dowel in it , give it a little turn .
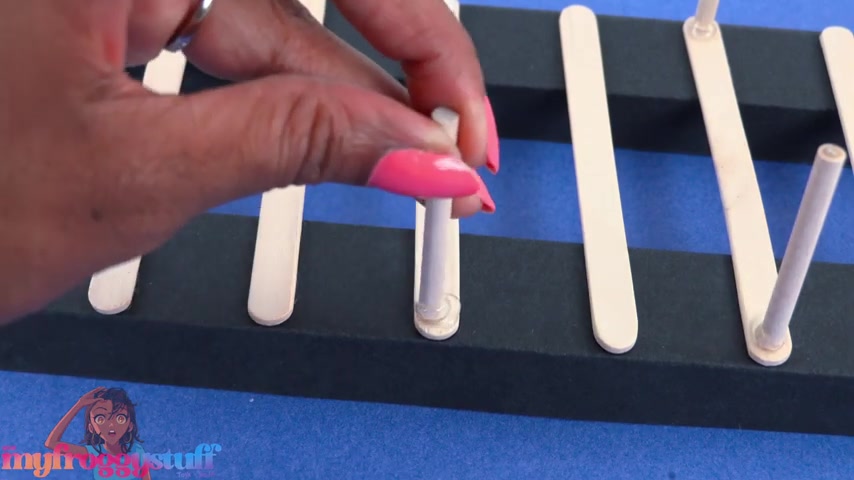
So to get the glue on the sides and then hold it up and allow it to dry .
Then let's increase the wooden dowels to three inches , then four inches , five inches , then six and seven .
And I did the last three at seven .
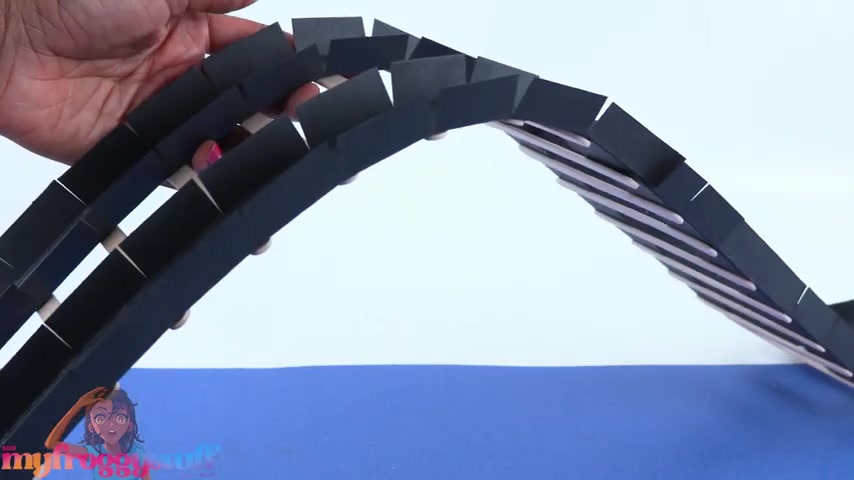
So we can see a nice little slope there .
However , in order to see that nice curve , we're gonna have to make a few cuts to relieve the tension .
I'm just making as many cuts as I need so that we can get a nice smooth bend .
However , now my poles are all slanted rather than standing straight up .
So we're gonna have to make a few adjustments there .
Begin gluing the other end of the wooden dols onto the poster board and now they are pretty much straight .
I had to detach them a little bit at the top and then just rege it .
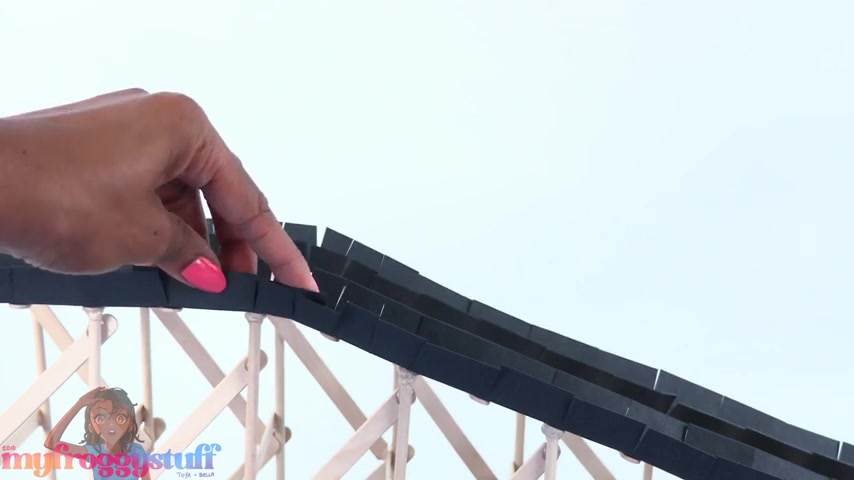
But yeah , that works .
I'm not sure how sturdy this is .
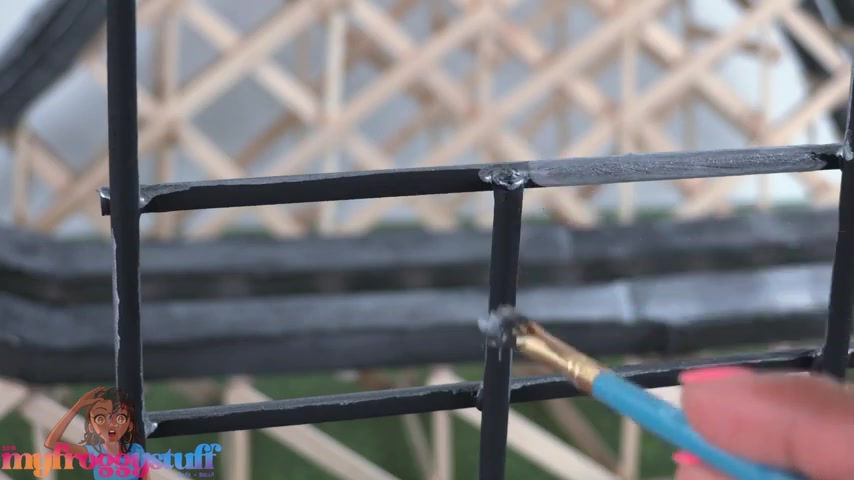
It actually feels pretty sturdy , but we're gonna reinforce it and glue popsicle sticks going across and along the sides right now .
That feels pretty solid .
It's totally not going anywhere .
Let's do something about these little cuts .
I cut thin chips of paper and we're just gonna glue them behind it .
This is a little on the tedious side .
So you've been warned , let's use one of our cars to do a little test run and make sure it can go all the way through .
Oh , yeah , it works .
Ok .
Now , let's build another one .
I made another track .
This one is even longer , make another board this time .
Let's try it a little different and go ahead and make all of those little cuts so that it's flexible so we can get an idea of what shape we want to do .
Yeah , something like that would be nice .
I put the first track in front so we can get a nice picture .
This is a 12 inch wooden dowel .
I'm gonna add a few more behind it and I'm adding some popsicle sticks at the bottom .
Now , for that extra support , I take two more wooden dowels .
Let's take off three quarters of an inch .
Then glue it in place .
Hm .
I might need to lower this one just a little , I cut off three quarter inches just like this one .
Then glue this back in place , add popsicle sticks for support , fill in the gaps .
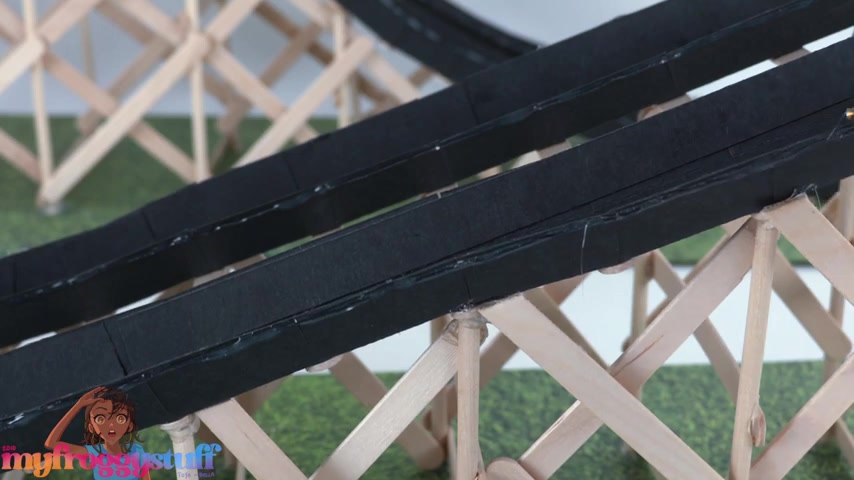
Then I added a line of hot glue along the edge just to make sure everything stays in place .
Then I brush all of the black with a little bit of silver so we can pretend that it's like metal and our track is done .
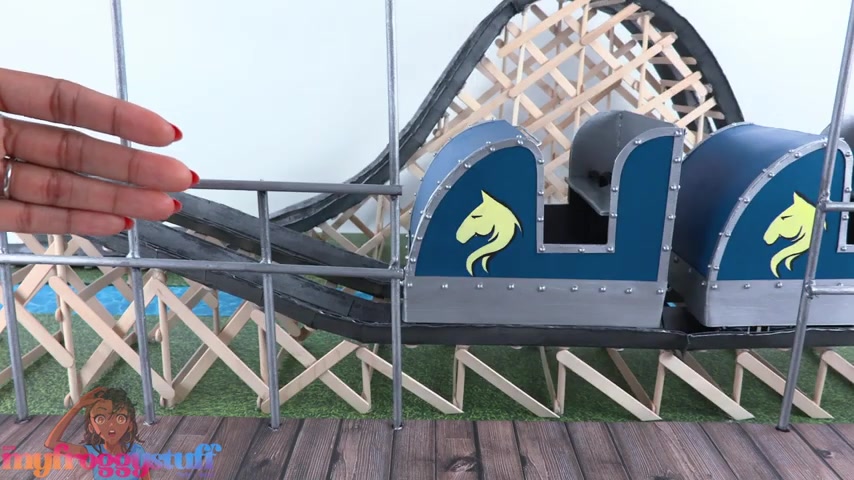
This is not a complete roller coaster .
We have two different tracks showing us two different parts of the roller coaster , but they don't actually connect if you want yours to connect , you can totally do that .
I'm just doing it this way for a little space saver and I can move it around .
However , I want to create different scenes .
Here is our little roller coaster cart or a car and we need to glue on our wheels .
I place the cars on the track , then glue the cart on top .
I just used hot glue and then set it on top and now they're attached yay , but I am not loving how I can see the cars underneath .
I cut a strip of white posterboard , paint , it glue the strip around the bottom , cut a small notch from the front and the back so it can clear the tracks , add a few more drops of glue and touch up the paint , bend wire to make a little loop that we can glue to the front and make another one to be a hook in the back so the cars can be connected and they can go along the roller coaster .
It works .
Ok .
So now let's add a few finishing touches .
I use leftover cardboard from the tri fold , cut along rectangle and glue strips underneath to make a platform cover it with paper cut , a few wooden dowels in half , make holes on the platform and glue the wooden dowels in place .
And let's add a few full size wooden dowels as well .
Add a few wooden dowels going across , paint it .
I did a black base coat followed by silver to add a little color .
I cut paper into one inch strips , cut them down to five inches .
Fold the paper in half .
Apply glue , wrap it around one of the wooden dowels , cut a triangle from the end , then give the paper a little bend before it dries to make a flag blowing in the wind .
Totally starting to get those roller coaster vibes .
I covered one of those thin strips we cut earlier with a water scrapbook paper to make it look like there's a little bit of a water feature in the center .
So now we have four layers .
We have our deck , we have the first track water and our second track which is giving us some cool layers .
And since everything comes apart , it makes it a little easier to store .
Now , we need a name for our roller coaster on Instagram .
We asked you all for some ideas .
I wanted a horse theme and you all came up with some great ideas .
The Wild Sea Biscuit , love that trail Blazer Derby coaster .
I love the idea of Wild Mustang .
And then we could use one of our briar horses from Briar Fest on a sign .
But after I painted the cards , I was getting some Renaissance Festival vibes , you know , like jousting and all that .
So we're going to head in that direction .
I cut leftover cardboard in two inch and a half strips , then cut them down to 14 inches glue four together to make a square column , make two of those cover them with paper .
Let's add a stone to the bottom .
Add a little wood trim , glue all of the boxes together , then glue them onto another piece of covered cardboard .
I want to change the top a little .
So let's add this wood scrap of paper on the top .
Then I made a quick little printable that I am going to trim down a little .
I even cut out a few little notches so it looks like torn paper .
And we're gonna just glue that right on top .
Add a few pins to look like nails , cut out our printable flags .
Glue them onto the columns .
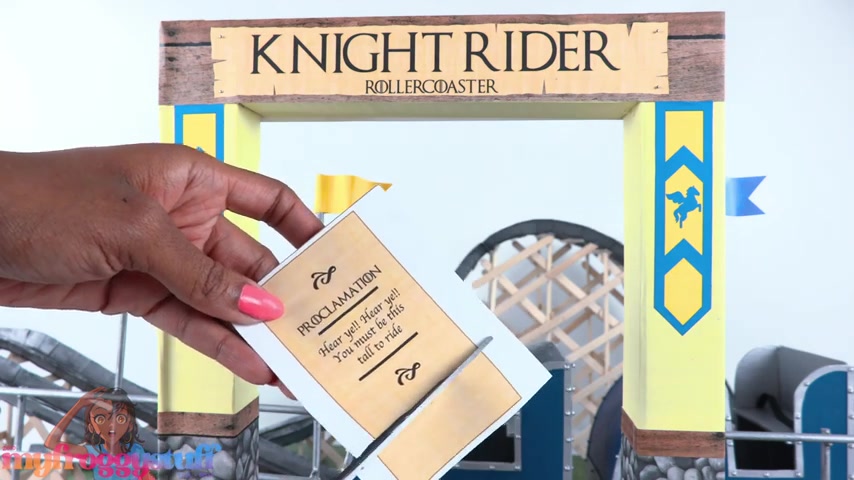
Cut out the little sign that says how tall you have to be to ride the ride .
Glue it onto some paperboard that's been covered with scrapbook paper , then glue it onto the wall .
Add a little more railing out to the side .
Glue a briar horse right on top .
I made another thin strip of covered cardboard .
I added a few bushes and more flags to give us more flags on the other side of the roller coaster to finish our night rider roller coaster .
I think I want to change my briar horse to a black one .
But now we have another horse themed amusement park ride for our dolls .
It's a pretty nice size .
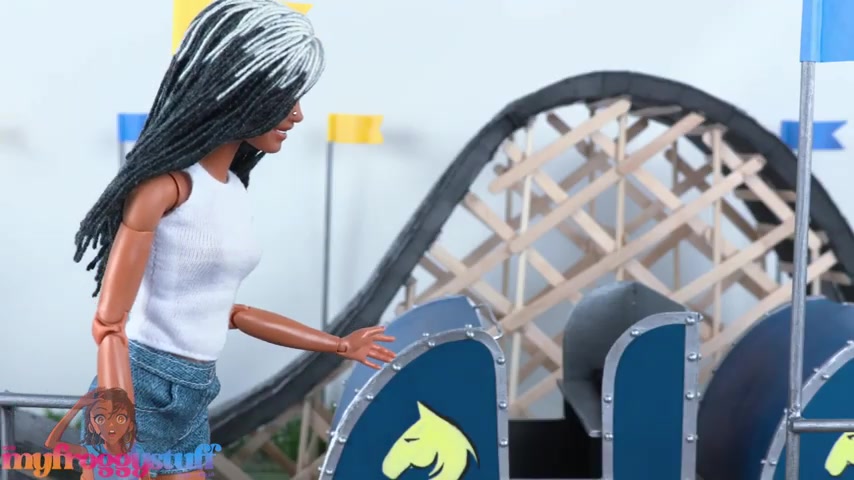
The dolls can stand around and wait in line .
We can move things out of the way to make it easier to play .
There's a seat belt because you know , safety first , we can fit two dolls in the cart and we can fit a kindle in there too .
I'm using a little bit of clear filament .
I put it through the hook on the front then pull it to make the roller coaster go .
All right , I'm done .
Ok .
So it's not the smoothest roller coaster , but it's a great project for this summer .
Thank you for joining us while we made a roller coaster for our adults .
Like , comment , share and subscribe .
Don't forget to ring the bell and follow us on Instagram at my froggy stuff and the frog vlog and we will see you next time .
Are you looking for a way to reach a wider audience and get more views on your videos?
Our innovative video to text transcribing service can help you do just that.
We provide accurate transcriptions of your videos along with visual content that will help you attract new viewers and keep them engaged. Plus, our data analytics and ad campaign tools can help you monetize your content and maximize your revenue.
Let's partner up and take your video content to the next level!
Contact us today to learn more.