
https://youtu.be/5CwFz5eR0Rk
Business Flow - Consulting Services _ Odoo Getting Started
Hello , everyone .
This business flow is about a digital marketing consultancy firm called Marcu , located in San Francisco .
They serve the Bay Area and their mission is to combine creativity and technical expertise to create result driven experiences for their customers .
Project management is at the heart of their business core .
This includes keeping track of working times in addition to eventual extra costs .
Here we see a summary of the applications and processes that Marcu follows in ODU .
So let's start with the basics projects .
I'm gonna jump directly to the project application and here we're gonna have a dashboard overview of all of the projects that we have .
All right .
So I can prioritize some projects by clicking on the star .
I can also color code projects and I can see how many tasks that I have in each project .
So let's go to this uh project right here .
All right .
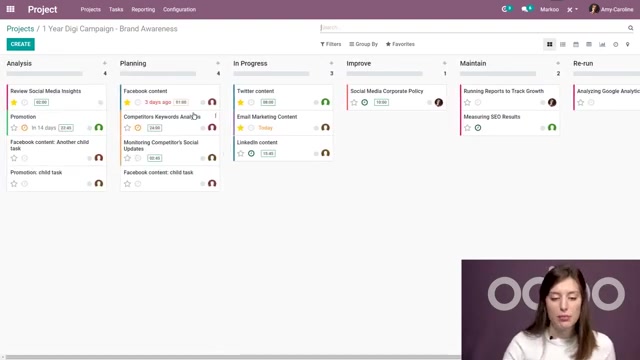
As you can see , I have many tasks that are assigned to different people or they aren't assigned at all as you'll see in this one .
All right .
And I have different stages as well and I can easily transition a task from one stage to the next , simply by dragging and dropping .
All right , just like that , I also can manage a lot of other things from here .
So I can look at all of the scheduled activities that I have for the different tasks .
For example , I have one due today uh on this task here .
So I can click on that .
I can mark it as done um directly from this view by clicking on the check .
I can write myself some feedback and mark is done or I can click on done and schedule the next one .
Let's go ahead and just mark this one as done .
If I want to schedule another one , I just have to click on the clock and schedule an activity .
So let's schedule a call that will be due uh today .
All right .
And I'm gonna say that we need to call the responsible of this task .
I can add a description to this as well and I can schedule .
All right there .
We see we have a scheduled activity for today .
I can also see uh when I have some deadlines .
So I have one that's due today , one that was three days ago and one here that's in 14 days .
All right , I also see the time left I have on each task .
So for example , here I just have an hour left .
So let's go ahead and look at this one .
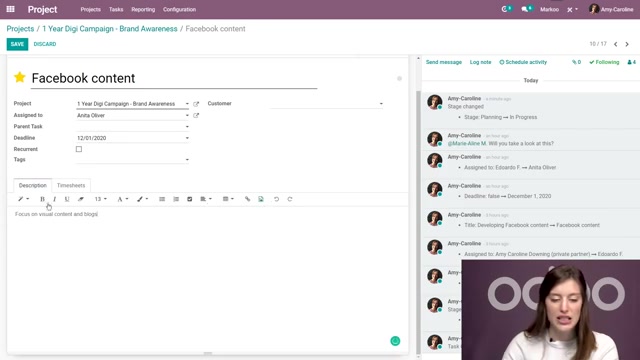
All right , on this task , I can click on edit and I can change the description .
So here I have focused on visual content and I can say , and blogs , I can also modify this in different ways by using these options here .
All right , I'm also going to be able to see all of the time sheets that have been recorded on this task .
So I see that different employees have been working on this task and recording their time .
And so I can see the hours that have been spent and that remaining hours .
So that's the the time that we saw in the overview .
So how much time remains based on how many hours we have initially planned ?
So this task is almost complete .
We have um that 88% completion .
All right , and we do that see that deadline here .
So this task is overdue .

So let's go ahead and see how we can communicate with our employees .
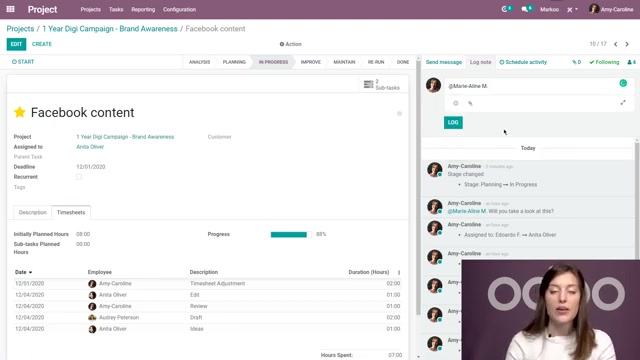
Well , first of all , we can send everyone a message who is following this task .
So I see all of my followers on the right by sending a message here or I can log a note for myself or I can ping someone and someone specifically , like if I just want to send a message to her rather than everyone following this task , will you please check this ?
And then we can log , I will also be able to chat with someone right away super easily simply by clicking on their icon .
So here someone who will see uh my image .
They'll see that I'm available because of the blue dot And they'll be able to start chatting with me in live time , which is very nice .
We have some additional options as well on the task , we can edit this task and we can make it a child of another task and we can create sub tasks for this as well .
This will just help with our task organization .
So here I see that I already have two child tasks and I can create a new one by clicking on create .
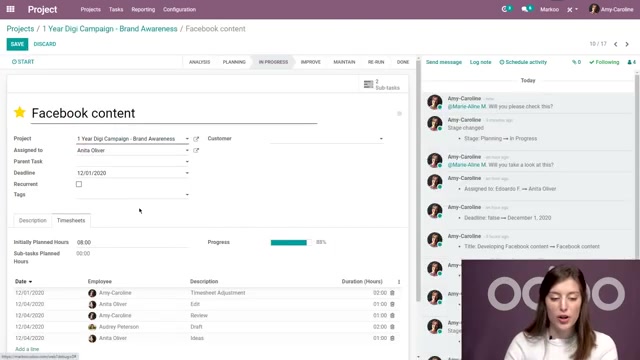
And I'll be able to see these child tasks from that main caan view .
I can also say if a task is recurrent or not .
So I can click on this recurrent option and then we're going to have a new recurrence tab and I'll say how often this should be repeated .
So every one day , week , month or year , um I can of course change this number .
I can add a specific day .
I can say this will go on forever .
I can add an end date .
But if I don't have a specific end date , I can also add a number of repetitions .
So this will happen five times and I'll be able to check out the next occurrences .
And when I save this , I will have a new smart button so I can manage that as well .
So it's very easy to uh manage all of your tasks and to communicate with your employees using the project application .
But now consultants uh consultancy firms , they usually start the process with a quotation and a contract .
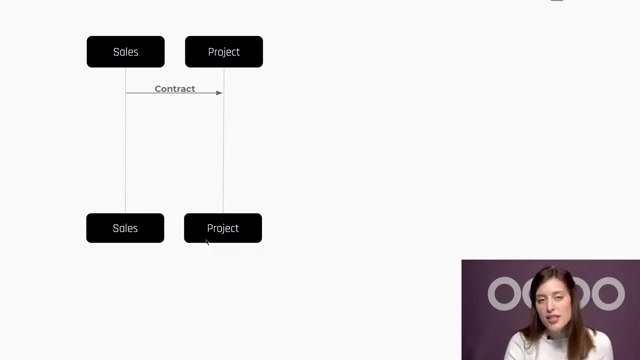
The quotation covers an estimation of the costs and the contract encompasses the scope of the project , including the payment terms .
And this is what market does they choose to have a project and tasks automatically created for them whenever a sales order is confirmed in ODU .
So let's jump to o do again and we're gonna go to sales and create a quotation this time .
So let's click on create .
I'm first gonna choose my customer and then I'm gonna start adding some products .
So let's um add our digital strategist and the first step is analysis .
So I'm gonna change the description here and I expect this to take five days .
I'm changing that unit of measure .
All right , let's add another one for planning and I expect this to take five days as well .
All right .

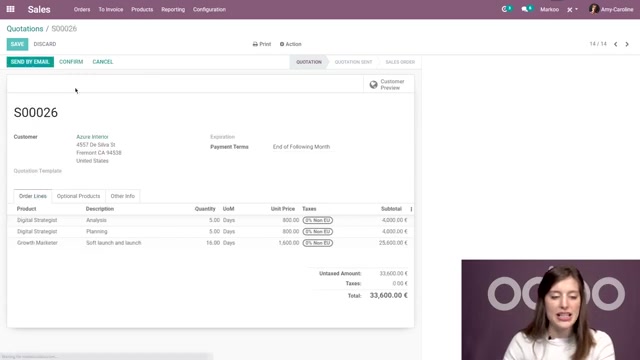
And then we're gonna have a growth marketer who's gonna work on the soft launch and launch .
Ok .
So I expect this to take 16 days and save .
Now , I can send this um to my customer and they'll be able to receive it and approve it and they can either confirm the quotation uh with an electronic signature on the customer portal or I can go ahead and do that myself by clicking on the com confirm button .
Then the project and its tasks are automatically created .
So let's jump back to the project application .
All right .
And I'm gonna say that a new , a new project , excuse me has been created with that sales order reference .
So let's go ahead and click there .
All right , I have the three tasks .
Of course , I can see the customer and the title of the task will be the description that I set on the O line .
So here that we can go ahead and start editing some things .
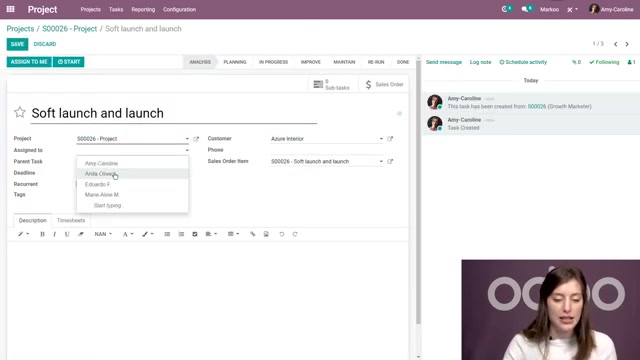
So first of all , um I can assign my tasks to different people .
So let's say Anita here .
All right .
And for planning , we're gonna go ahead and assign Eduard though , but I'm actually gonna record some time on this task uh because I already started looking at it and I wanna be sure that we're paid for that time that I spent .
So first look , let's say this took two hours .
All right , I see the hours spent the remaining hours and those that were initially planned .
Now , you'll remember that I set the unit of measure as days on the sales order , but that's converted to hours here um on the task and that will take into consideration the working calendar as well .
So if I only work eight hours a day and I have uh a sales order line that should take one day , that will be eight hours on the task .
All right , and we can also move the stage .
So let's go ahead um and move this to planning .
All right .

And we're gonna go to the next one as well .
And I'm going to assign this to myself simply by clicking on , assigned to me .
So I don't have to go to the edit mode for that .
And rather than manually registering that time sheet , I'm going to use the timer .
So I'm gonna click on start here at the top .
Some time will go by and then when I'm ready to stop , I can click on the stop button .
I also have a pause option as you can see and I can add the description .
So we'll see that the time was rounded up because I have a minimum time uh configured , but I'm gonna leave it like that .
Um And it'll be the first look here too .
I'm gonna go ahead and save that .
Of course , we can always click on edit and modify the time sheet after that .
All right .
So that's really nice .
This is how um employees can register their time manually here on the task .
But let's see how that time is encoded on the sales order .
So I don't have to go back to the sales application in order to look at the sales order .

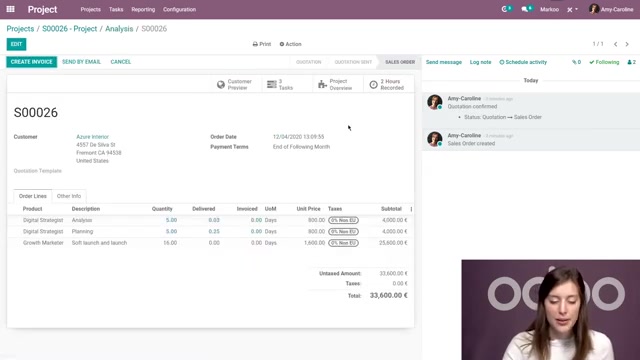
I can simply click on this smart button here directly from the task , which is really great .
All right , and I'm gonna see that some time has been delivered .
So not at all the complete time , but we have recorded some time and we'll be able to see that on the .
So and those lines are in blue , meaning that we do have some delivered items .
Thus , we have um some time that can be invoiced .
Now , we just saw how Marre employees can easily record the time they spend on tasks as I said before .
But since many people usually manage multiple tasks at once , it can become difficult to make sure hours are being recorded correctly for each project .
It can also be hard to ensure that employees aren't overloaded .
So to take care of that , everyone at marker takes a closer and wider look at the recorded times at the end of each day through the time sheets , application .
All right .
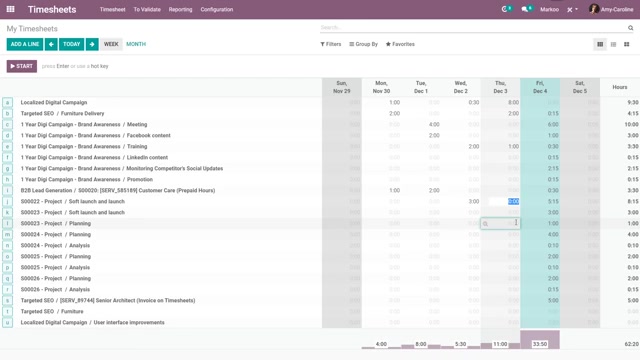
So we're gonna jump to time sheets and here I can go ahead um and start modifying my time quickly .
So I can go ahead and say one hour spent here , two here , three here and so on .
So I can register time this way and we will see the total at the bottom and it will change um as I add time .
All right .
And we also have a shortcut as well .
So if I just want to jump to this page and I want to start recording some time easily , all I have to do is click on , let's say project O and then click on o on the keyboard and then the timer has started and I can describe my activity .
All right , I can let the time go by and to stop it , I can just click on enter on my keyboard .
All right , if I don't know which project I would like to record time for .
So let's imagine .
I just pick up the phone and I don't know what client it is , but I do want to record that time .
I can just click on enter and then we start talking and I say , oh OK , this is for project T and I click on T .
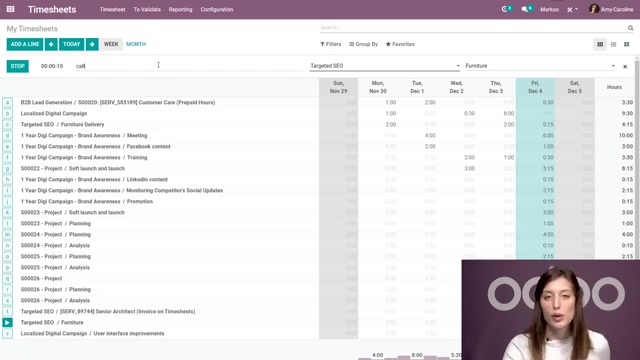
All right , you're gonna see that this is being recorded for Project T and we'll say call again here in the description and all of that information will be recorded .
So this is just a really great way for the employees to manage all of their time .
Um to be sure that they aren't overloaded and to be sure that they're recording their time sheets correctly .
Now , some companies add additional costs to their invoices and that could be for uh a number of different reasons such as transport or accommodations .
Now , we manage this with ODU expenses application and Marco employees , for example , have expense have the expenses app installed on their smartphones , which makes their lives super easy when they need to submit an expense for an on site visit that they made .
All they have to do is take a picture of the receipt and ODO will scan and extract the information from it automatically .
So let me show you what that will look like .

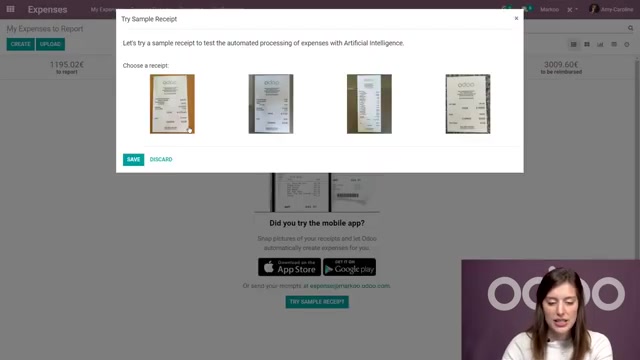
So here we're gonna be able to test and I'm gonna click on try a sample receipt .
Ok ?
Is gonna give me some sample receipts .
I'll click on the receipt and with that picture , uh all of the information is going to be added here .
So we have our product um I have external training .
Um , we have the total and everything is ready just like that .
So that's a really convenient tool .
Um , we can also create expenses manually .
So I'm gonna do that now .
Um I'm gonna say transportation , ok ?
Then I'm gonna go ahead and add the product .
All right .
And here I have paid uh by the employee who we need to reimburse and I'm going to add my customer to re invoice , ok ?
So I'm gonna say that this expense um should be re invoiced to um Azure interior related to this sales order .
So I wanna be sure that I add it there .
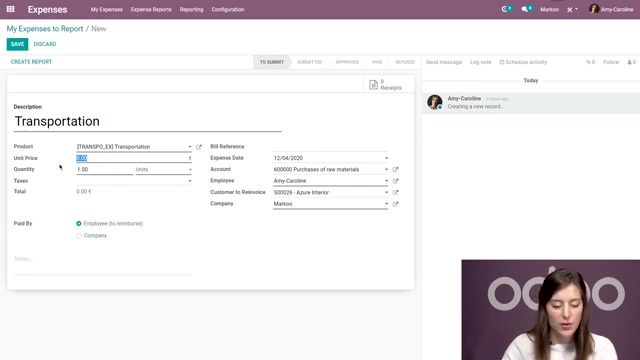
All right , let's go ahead um and add the cost as well .
So let's say €100 .
All right , we have that total .
We can save .
Then we can also attach the receipt which is uh usually required and then the accounting team can take care of it .
So let's say it's been approved .
All right , then we're ready to post the journal entries and we can register the payment and pay our employee .
All right .
So that flow is entirely done .
Now , once the project is finished , Marco invoices , the customer with the exact hours spent on the tasks plus those expenses like the one that we just registered and this is gonna be automatically encoded on the sales order .
So let's go to sales , we're gonna go to our sales order .
All right , and we have everything that's ready to be invoiced now .
So of course , we haven't delivered all of the time that we have recorded on the .
So , but we do have some things that can be invoiced .
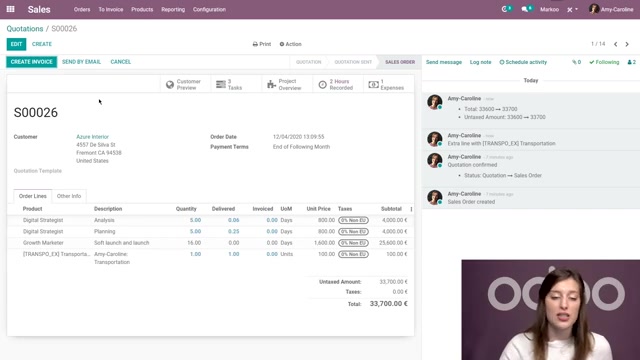
So if we're ready to invoice , we can click on create invoice here .
But some companies would rather invoice customers at different times like at the end of each month .
Uh So we can do that in batches .
So I'm gonna click on to invoice .
I'm gonna look at our orders to invoice .
OK ?
I have a few here .
So I'm gonna go ahead and select all of them .
Then I'll go to action and create invoices .
I can even select a time period if I would like to .
So let's go ahead and click on create and view invoice .
All right .
And then I'm gonna click on the invoice for Azure interior here .
OK ?
I have everything recorded .
So everything that was available um to invoice and then we can go ahead and send this .
Let's see if I clicked on the correct one .
OK ?
We're gonna go to Azure interior .
All right , here is the correct um invoice that I have .
Um And then I can go ahead and confirm this .
All right .

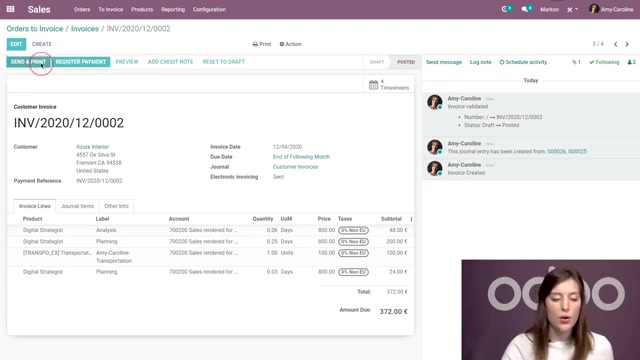
And I can send it to the customer so I can either send it by email or I can and we will need an email address for them , um , or we can print it .
So if we want a hard copy or if we want to mail it ourselves to the customer , but we can also send by post using O and we'll be able to see which address we will use and how many stamps that will take .
All right .
But let's just send it by email for now .
They will receive the invoice , then we can register the payment and so on .
And with that , the flow is complete in just a few minutes , we saw exactly how market works quickly , easily and more efficiently with ODU .
So let's do a quick recap .
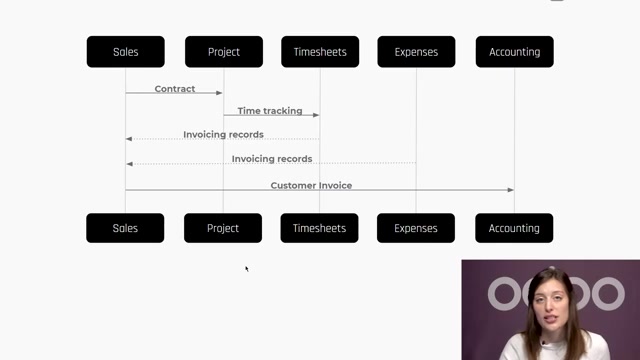
They first create an so with the estimation of the hours for each task , once the so is confirmed , a specific project and tasks are automatically created at that point , they can start working to make sure that they recorded the exact time and how much time they spent on each task , which is then automatically encoded in the sales order as well as the expenses involved on the project .
Once the project is completed , the accounting department issues the invoice and continues the payment follow up .
So it's pretty simple .
So how is this flow possible in ?
Well , let's start with the configuration of your services .
So I'm gonna go to our products and I'm gonna look at our uh digital strategist .
So here I have this uh product set up as a service and that way it will create tasks instead of uh a delivery order .
All right .
So we have our product type set of service and I'm gonna click on edit so that we can see all of the options .
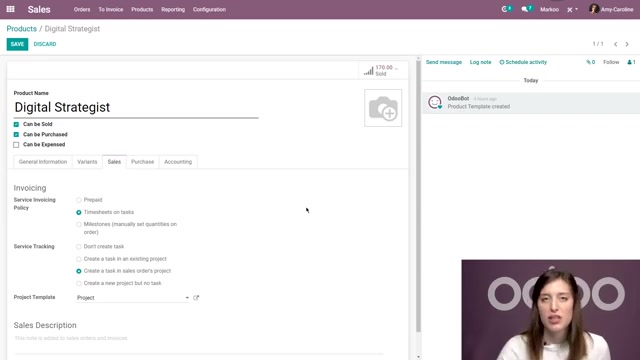
And I also have the invoicing policy set to time sheets on tasks .
All right , because we're invoicing what has been time sheeted as we saw .
And I also create a task in the sales orders project , which is created based on a project template that I chose .
So here I have my templates .
I created that from the project application here .
I have project and I'm gonna click on the edit .
I'm I'm gonna click on edit for the settings of the project itself .
Um So of course , we can add a description , we have other settings .
So I have time sheets activated .
Um And that time sheets , timer that I showed you .
I also have um the billable option activated as well .
So I can invoice that time to the customers and then I will have an invoicing tab added .
So here I have to a unique customer um and the project rate set .
All right .
And we also have set up some expenses uh products as well .
So if I go to expenses , configuration expense products .

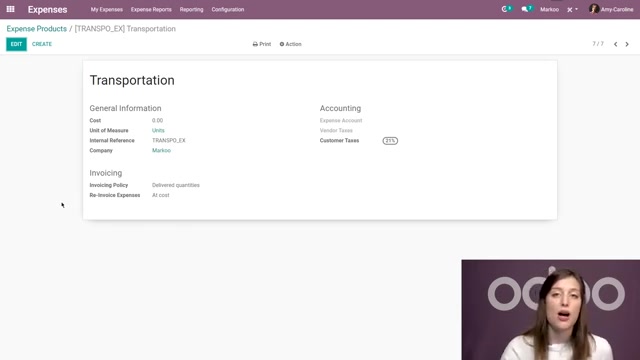
All right , I'm gonna go to transportation .
And here I have a product um that I invoice at the delivered quantities .
And uh we also re invoice the expense at cost .
So this is how marker chooses to work .
But they could just as easily choose to re invoice that expense based on a sales price , setting a fixed price in uh the sales price .
All right .
So let me click on that and then we'll have the sales price if we choose that option .
Ok .
Now we just saw how different companies can easily communicate with uh one another different departments , sorry , different companies uh as well as how efficient project management can be done with ODU .
And all of this was incredibly easy .
Thanks to Odus unbeatable integration to know more about these applications and others .
Make sure to check out the rest of our e-learning videos .
Are you looking for a way to reach a wider audience and get more views on your videos?
Our innovative video to text transcribing service can help you do just that.
We provide accurate transcriptions of your videos along with visual content that will help you attract new viewers and keep them engaged. Plus, our data analytics and ad campaign tools can help you monetize your content and maximize your revenue.
Let's partner up and take your video content to the next level!
Contact us today to learn more.