
https://m.youtube.com/watch?v=BFC16uM15Cgp
2023-11-24 11:45:34
Serverless Web Application on AWS [S3, Lambda, SQS, DynamoDB and API Gateway]
Hi guys .
In this lesson , we're going to deploy a simple Web application that uses a http api .
So let's have a look at what we're going to create .
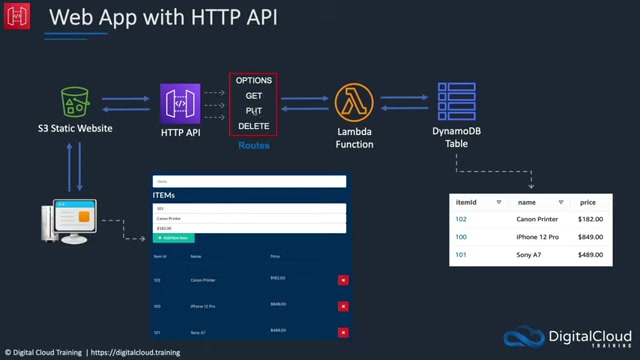
Visually , we're going to deploy an http API that's going to have some routes which will be things like options and get and put and delete for various different paths .
So the routes are similar to the methods that we have in the rest .
API will then have a lambda function and a dynamo DB table .
And in front of all of this , we have an Amazon s free static website .
So then we're going to connect from our machines using a Web browser to the static website , and it's going to have some client side code running .
It's going to actually have a form in which we can enter information and submit it to the A P .
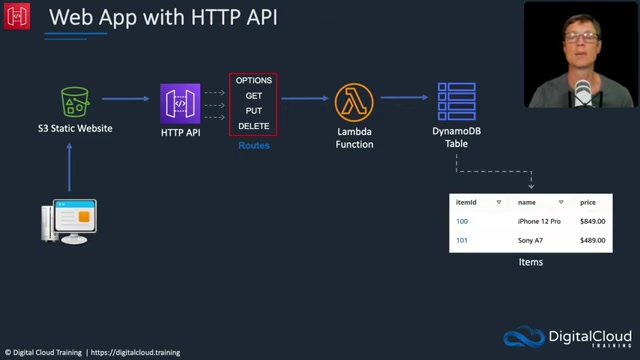
The website will then talk to the public endpoint of the http API and via the API .
It will then be integrated to the Lambda function and then the Dynamo DB table .
So the request information gets passed through to Lambda processed by Lambda and Dynamodb will then store the results in a table , and what this application will do is very simply , just add some products to our database .
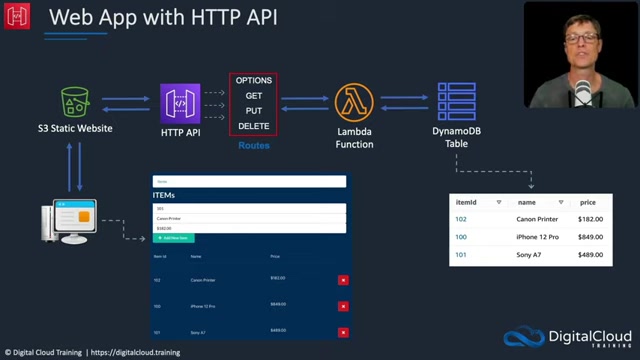
This could be a way for a store owner to actually add new items to their database .
The form that's generated will also be populated with information from the table , so it will always be returned back and viewable on the form .
As you can see at the bottom here , you can then add new items , and when you submit them , they get added to the table and then added to the Web form as well .
So that's what we're going to create now .
We're going to use cloud formation for deploying the http API , the Lambda Function and the Dynamo DB table .
So cloud formation deploys infrastructure using code .
We're going to cover it in a lot more detail later in the course .
For now , you can just follow my instructions .
It will deploy those services , but we still need to go in and configure the http API .
We need to add the routes we need to configure the integration and so on .
We also have to create our static website on S3 separately , and we need to compile some code and then deploy that code to the static website .
So that's what we're going to do .
Let's head over and start building this out .
In your course download , you'll find a folder called Api Gateway .
In there you'll have the deploy instructions dot MD , so you should open that , and there's also a code dot zip .
You need to unzip that file , which is normally a case of double clicking it , and then you'll have a code directory .
You'll need to also open a command prompt and change to the code directory .
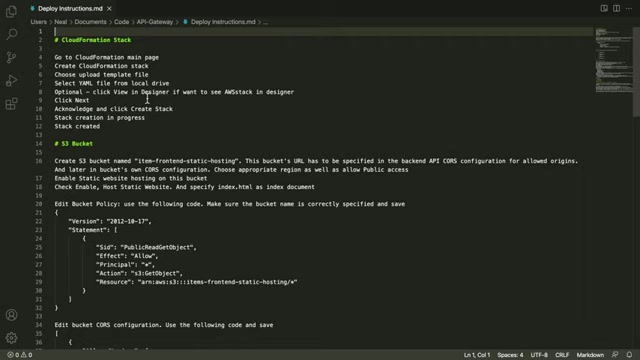
I've opened my deployment instructions in visual studio code , and as you can see , the first thing to do is to create the cloud formation stack in the management console .
I'm going to go to services , come down to management and governance , and you'll find cloud formation in cloud formation .
We're going to create what's called a stack .
We have a template file , and that file defines the infrastructure .
We're going to create a template source .
We're going to choose , upload a template file , choose the file in the API Gateway folder .
In the course download , you'll find the code directory that we unzipped earlier .
Double click on that and you'll find this yaml template file .
Select that file .
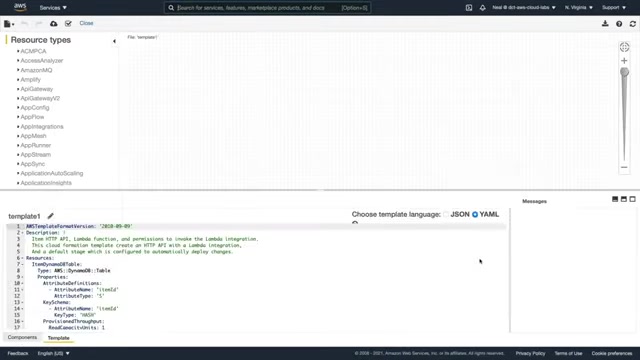
Choose upload that's been uploaded and you can choose view in designer , and this will give you a visual representation of what's going to be created .
You usually have to move around and zoom in a little bit to see this , but what we can see here is we've got a dynamo DB table .
We've got a Lambda function .
There's an invoked permission for the Lambda function .
We've got a roll and we've got the API as well .
The item API and all that is defined in this yaml code here , so we don't need to change anything there .
What we can do is choose this little cloud icon with a tick mark in it that says , Create Stack .
So choose the create stack button and that brings us back .
Let's click on next .
We'll give our stack a name .
Mine is going to be called Web app .
Click on next .
You need to scroll down to the bottom , choose next again , scroll down to the bottom , and this time you have to make sure that you check this box to acknowledge that cloud formation is going to create .
I am resources .
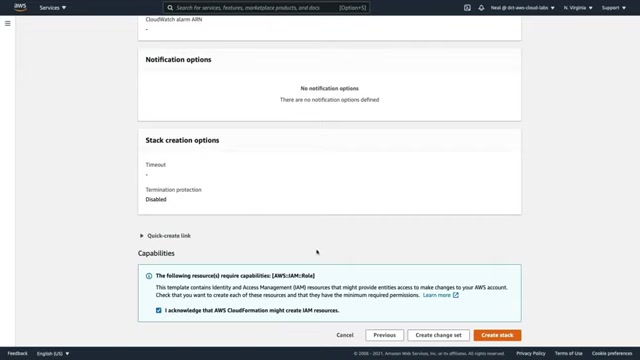
Now I've flicked through all the options there .
I don't want to teach you cloud formation .
At this point , we're just going to use it .
And later in the course , you're going to learn about some of those options we just bypassed .
So let's choose .
Create Stack .
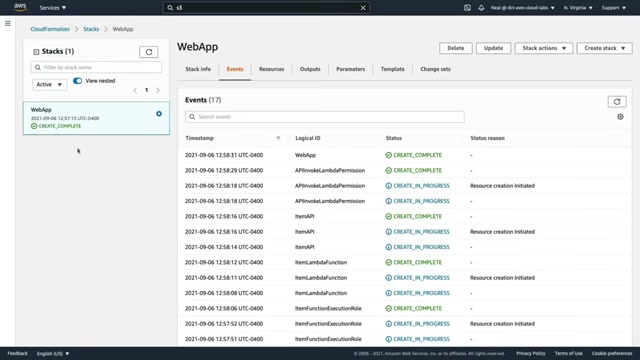
You can now see that the create is in progress , and if you click on refresh , you'll see what's happening .
So we've got the item dynamo db Table , which is being created , and that's complete .
And now we can see the item function execution role being created , and it will only take a couple of minutes for all of this to complete .
And just a minute or so later , we have a crate complete for the entire stack , so everything should be created .
The next thing we need to do is create an S3 bucket .
Now you can call it whatever you want , but I'm going to suggest just following my instructions here , I'm going to call my front end website Dash and then some random code to make sure it's unique in S3 .
I'm going to create a bucket .
I'm going to paste in that name and then add a few random characters , so that should be unique .
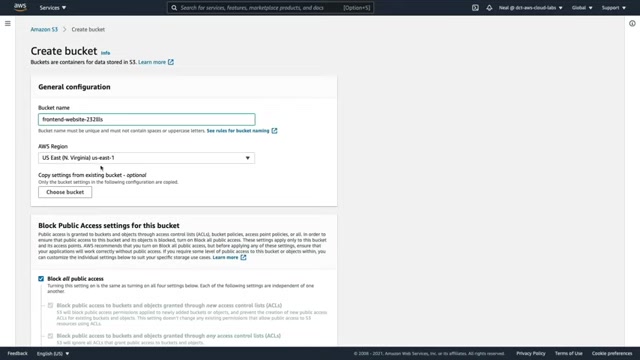
Now you do need to deploy this in the AWS region US east North Virginia , which should be the same region that you've created your stack in .
So let's scroll down now and I'm going to create the bucket .
My bucket has been created , so I'm going to choose the bucket name , go to properties .
We're going to scroll to the bottom click Edit under static website hosting enable .
And then we're going to specify index dot html as the document and then simply scroll down and save .
We then need to add a bucket policy .
So let's go to permissions .
We need to disable the blocking of public access , so I'm going to save changes on that change and confirm .
Then we can scroll down to bucket policy , click on edit , come back to our file and we're going to copy this bucket policy .
I'm going to paste this in .
I'm then going to copy my bucket a R n and put that over the top here , making sure that I still have the trailing slash and the star .
That's important , so make sure you copy your a R N and your A R finishes with slash star , and we can save that bucket policy .
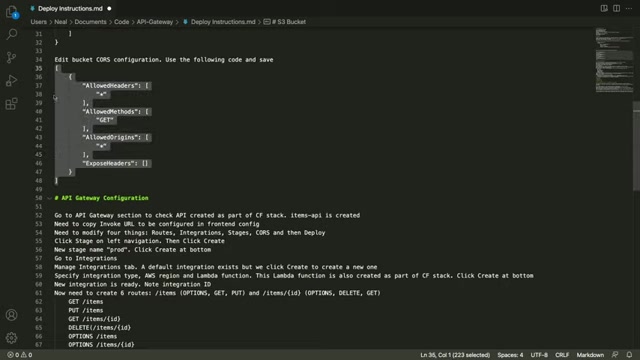
We then need to update the cause configuration , the cross origin resource sharing .
So we scroll down to cause click on edit and then we copy all of this code and we don't need to change anything here .
Make sure you get the hard brackets at the top and the bottom paste that in and save changes .
So we now have a bucket policy , and that's going to allow get objects .
So it's essentially allowing the public read of the objects within the bucket .
The cause policy will allow any headers , the get method and any origin .
Now let's come back to our file and see what's next .
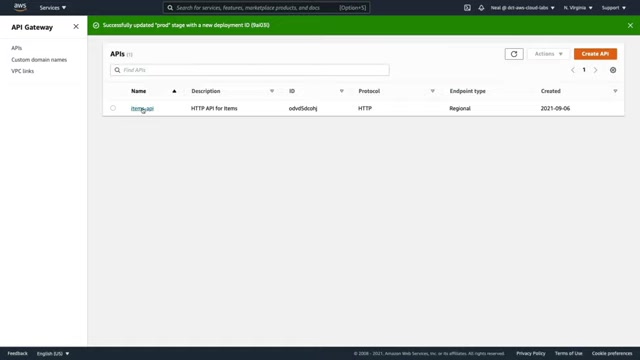
So now we need to go to API Gateway and we're going to configure API Gateway .
I've opened the API Gateway console , and here's the API that was created by cloud formation .
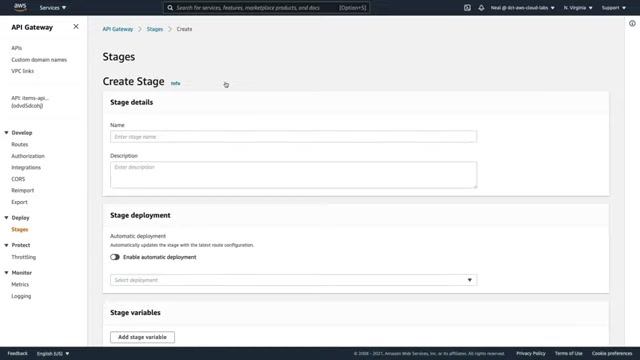
If I choose that on the left hand side here under stages , we're going to create a stage and the stage is going to be called prod .
We can scroll down and then create so we don't need to make any other changes .
Then , on the left hand side .
We're going to go to integrations and we're going to click on manage integrations and there's already an integration here .
But let's create a new one .
This integration is going to be for our lambda function , so we choose Lambda Function in US East one , and we're going to choose the Web app item Lambda Function here .
Scroll down .
Leave all these selections as defaults and click on Create .
Now take a note of the integration ID .
I'm going to copy mine , so I remember it and paste it in my file .
Next , we need to create the routes .
So let's click on routes create and then we need to create different routes for different methods in the file .
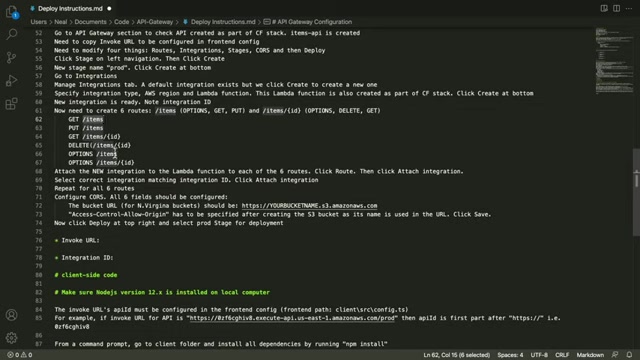
As you can see here , we have get for slash items put for slash items and options for slash items , so I'm going to do those first .
So I'm going to choose get paste in what I just copied , slash items , create again , choose put paste in slash items , create a third time and choose options and again put in slash items and create .
So your screen should look exactly like this back in the file the next one is slash item slash and then this parameter with the curly braces and ID that's going to be for get delete and options .
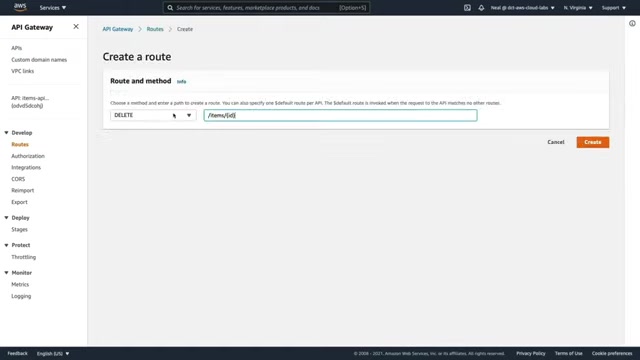
So let's choose , create , select , get paste in slash item slash brackets ID and create , choose create again we're going to choose , delete and then options .
So again , your screen should look the same as mine .
Make sure that you have the correct routes with the various methods inside of them .
We then select each one of these , choose , attach integration and choose an existing integration .
And you want to choose the one which you just created a moment ago .
So I know mine .
Is this first one here beginning with 92 n .
So I'm going to attach that integration .
Do the same for each of these Exactly the same for each of these routes and the same under slash id .
So finally , your screen should look like this back in the file name .
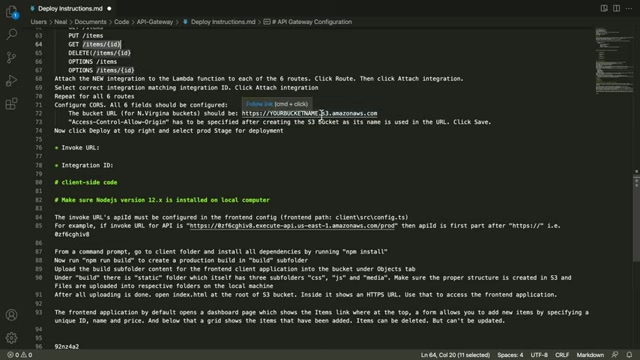
The next thing we need to do is configure cores in the API .
So what we need to do is configure various fields .
Now the bucket URL for North Virginia should be in this format .
Https coon slash slash bucket name dot S3 dot amazon AWS dot com .
It's a different format for other regions , which is why I'm suggesting that you do stick to the North Virginia region so you can follow me closely .
So I'm going to paste my bucket name in here , and then I can copy this entire URL and back in API Gateway .
Let's choose cause configure under access control , allow origin .
We're going to add that URL the headers .
We're gonna choose star and hit answer for access control .
Allow methods again .
It's going to be a star and then a star for access control , expose headers for Max Control age .
We can choose 96 400 allow access control , allow credentials and then click on save .
So again , your screen should look very much like this .
Except you've got your own bucket name in the URL for the access control .
Allow origin .
We can now deploy our API to the stage so we choose the stage name , prod and deploy to stage , and that's been successfully deployed .
We should take a note of our invoke URL .
You can always find that by going up to your API , just clicking on it and you'll find the invoke URL for your stage here .
So I'm going to copy this one and paste that into my file here .
Now , the last step is the client side code .
Now we do need to have Node j s version 12 installed on our computers and the node package manager .
Now , I have included a link attached to this lesson to a page where you can download and install those components .
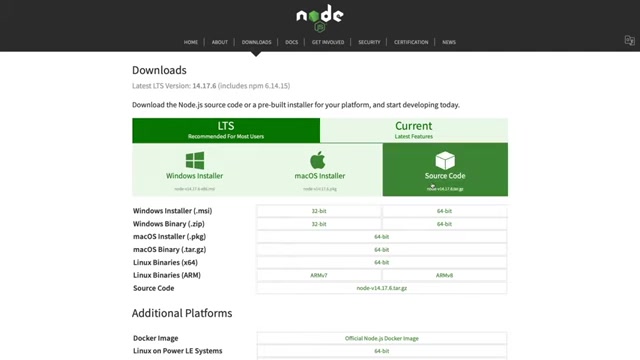
So this page here , you can find a windows installer or a Mac OS installer or also the source code .
And you can also get the binaries for Linux as well .
So download the correct installer for your operating system and install NPM and no Js back in my file .
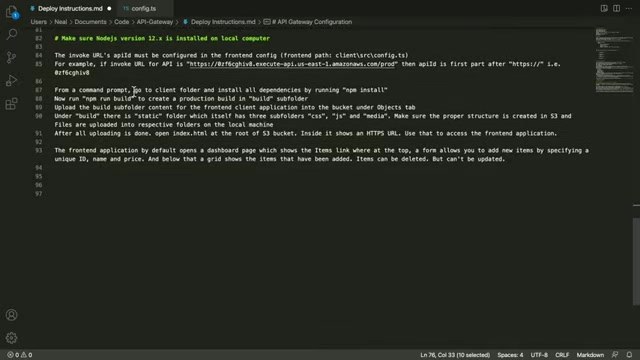
The first thing I need to do is actually update this file config dot t s .
It's in the client folder , then source config dot t s .
And what we need to do is copy the invoke URLs api ID .
So that's this portion I've highlighted here after the slash , slash and before the dot So copy that in the code directory , I'm going to go into clients source and config dot t s .
We then need to add our API d .
So just remove this code , making sure you leave these two tick marks either side paste it in and that's it .
Now , just save that file .
Now , you may have noticed we do have a region code here .
So again , you should be in the US east one region .
So that file has been saved back in my deployment instructions .
The next thing we have to do is go to a command prompt and change to the client folder .
So I'm on a command prompt in my a p gateway directory .
I'm going to change directory to code and in here I'm going to change directory to clients and then we need to run n PM , install and hit enter .
And that should just take a few seconds to complete .
Mine's complete .
And I've just cleared the screen .
I'm now gonna run n PM , run , build and hit answer .
And again , that should just take a few seconds to complete .
So then we'll have a build directory with our compiled code in it .
Mine's complete .
So again , I'm going to clear the screen and then just run l s so I can show you that I have the build directory , and if we change to the build directory , we can see that we have various files .
Now .
What we need to do is upload those to our S3 bucket .
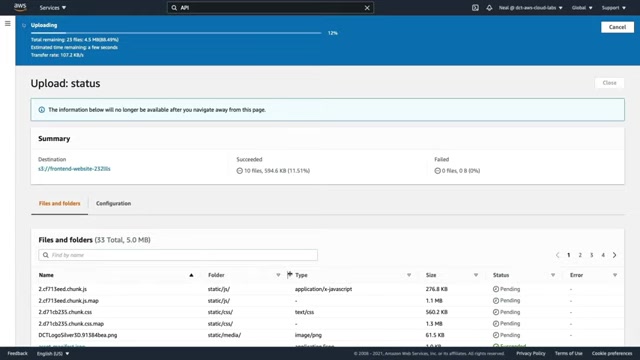
So back in my S3 buckets here under objects , I'm literally going to select everything inside the build directory and then just drag it over to S3 .
Now we can upload , and it should upload all of those files .
And they should be in the same structure as they were in the file system within the build directory That's done .
So let's close out of there .
And what you should see now is all of your objects in your bucket in exactly the same structure as they were in the build folder .
So , for example , the static folder here should then have some additional folders underneath it , so make sure that your objects are in that structure .
Let's come back up a level click on index dot html and choose object URL .
So copy that to your clipboard .
This is the URL for the Web application in a new browser window .
I'm going to paste that in , and I get this Web form .
If I click on items .

We can see that we don't have any items at this stage .
So let's add something .
Let's choose Item 100 .
It's going to be a phone and the price is going to be $900 .
So let's add that item and you can see it gets added in .
Do the same again one oh , one computer .
And maybe this is 2000 and add a new item .
So now we can see that we're adding things to the database now .
Of course , I'm just showing them on a form .
So let's go to Dynamodb and make sure that they really are there .
So I've opened the Dynamodb console , and if we go to tables , we can see that we have the all items table .
If we click on items , choose all items and it's going to return the items from the table and we can see the two items we just added are there .
If we then go ahead and delete an item , then that should be removed from the database as well .
So if we come back now , expand all items , choose scan , run and now the item gets removed .
So back looking at our diagram .
What we've done is we use cloud formation to deploy an http api , a lambda function and a dynamodb table .
We created a static website and compiled some code for it and we configured our http api to integrate with the Lambda function .
Now , the Lambda Function already had the code to talk to the dynamodb table , so it processed the requests that we sent through to it .
And that's when we were adding things to the table by creating new items in our web form .
So that's it for this lesson .
I hope you enjoyed that .
And I hope that was a useful lesson in helping you to understand api gateway and how to create a functional application .
Now , if you want to remove your infrastructure , the simplest thing to do is to go back into cloud formation and delete your stack .
So back in cloud formation here , you can simply select your stack and choose delete , delete stack , and it's actually gonna remove all of that for you .
So do that once you're ready .
Once you finish playing around and that will remove the API gateway , the Lambda function and the dynamo DB table , you can then remove the bucket yourself manually .
Original video
Partnership
Are you looking for a way to reach a wider audience and get more views on your videos?
Our innovative video to text transcribing service can help you do just that.
We provide accurate transcriptions of your videos along with visual content that will help you attract new viewers and keep them engaged. Plus, our data analytics and ad campaign tools can help you monetize your content and maximize your revenue.
Let's partner up and take your video content to the next level!
Contact us today to learn more.