https://youtu.be/I-jxKgBPp1A
Portrait Magic - Retain Faces in MidJourney Rendering

Hello .
In this video , we're going to work on the portraits inside the mid journey and specifically take a photo reference , keep it all characteristic of face and creating the portraits inside the mid journey with the different settings .
Example , right here , we heard some steam kind of backdrop replacement .
You'll notice they're all same change a little bit playing on my hair , changing this color also change some little bit outfits as well .
We'll try to also push as far as we can until face become less recognizable .
So we see what ranges we need to stay with and of course work more on the backgrounds and change colors and outfits as well as we go in cologne .
And of course , our main goal be sure they are person face portraits will resemble the original image as closest as possible to start work on the project .
We need our original photo that we're going to reference .
That E I will be trained and use it because me journey utilize Discord .
So we're going to use as well right on the bottom in the chart , you'll notice you have a plus symbol , click on the plus and select upload file .
Navigate to the file or portraits .
You want to use it and select after selection , we show you press enter that will show this image was uploaded to your on your server .
Best way to verify this if you go and click on the image and it will open in a preview and this is actually what we needed because we need to open one image , open on preview , right .
Click on the windows says copy image address on a Mac .
I think it just copy images and this is how will go to reference .
So let's go ahead and do .
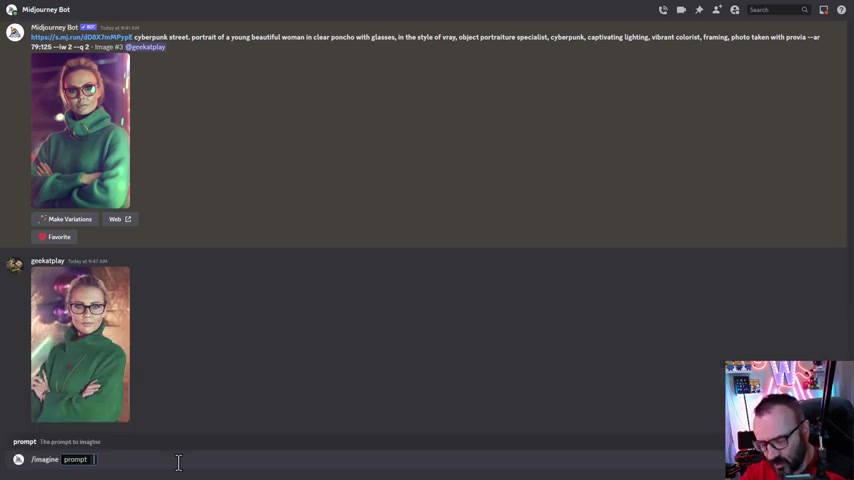
Next we go to imagine and in a prompt , we paste the path to our image .
This is the simplest things we can do .
And next we're going to type you can type for example .
Um So next , what I want to do is actually preserve our ratio and because I don't know at yet what is full the correct ratio of this image I will just says , OK , let's do portraits for this and we will set two by three .
This this simplest way we can create image reference um portraits reference to our image that we uploaded .
And here we heard our first render .
If we can render it does somewhat resemble some elements , but we lost our glasses , we lost some options and this is OK for the basic but you notice it is not come closer to what we wanted .
So we have other options .
We can apply it .
We can actually tell me journey how closer we want to resemble to the image .
So what I'm going to do is copy this line that we have it right here and I'm going to paste this below .
Next , what I want to do is tell me journey how much of the image I want to affect how weight of the image importance of the image .
So for this , we'll go to type space dash dash IW and this is stands for image weight .
And then next , usually you type any image weight and it can be from 0.1 up to two .
But I will utilize another options because I want to see how the all image weights will affect .
I'm going to open curly brace and type 0.1 .
This is the lowest image weight can be comma we type 0.5 comma one , comma 1.5 comma two .
So what is happening here ?
I'll tell my journey ran the same things for me but render first time with image weight 0.1 next time , 0.5 .
Next with image weight one .
It's what we have right here by default , it's one next 1.5 and two .
So it just will give me five different options and I can see how much image weight is important to be my portrait closer to what I wanted .
So let's go ahead press enter and you'll notice right here .
Should come and ask if I want to the process five right here says you imagine you have five prompts on your template .
Let's go ahead and click .
Yes .
So it will start processing five jobs next time you notice it is a three started because I'm on a standard and two more in the queue .
So I will go ahead and wait slightly um until it's all completed and we'll go and review them .
OK ?
We're gonna complete it .
Let's view our result .
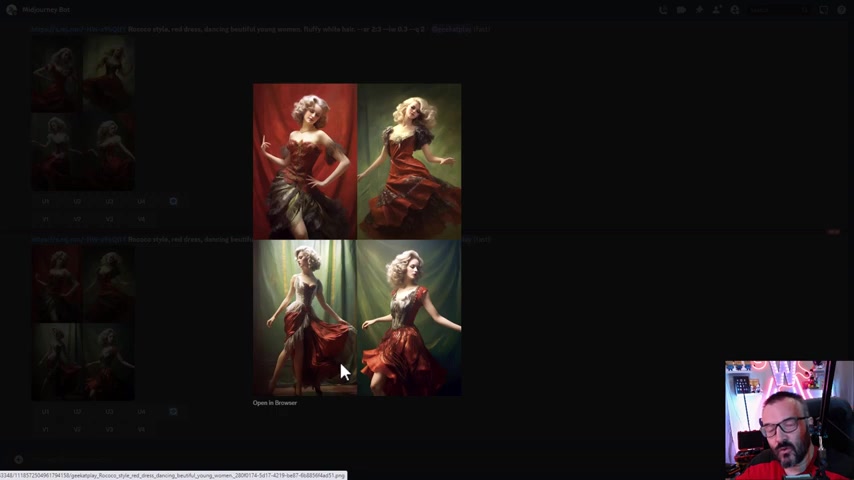
The first we're going with a 0.1 .
It's uh the and I can see it is hardly resembled at all .
Only we know it is the female with uh portraits about her body up to waist and also take us rock color red dress .
So , but it does not even come closer to our original portraits if we're going and step to 0.5 this is a little bit better because we have some pauses a little bit closer resemble .
But again , the porches face not even close to what we have in original .
When we're going with weight one , you'll notice .
Now we start having glasses because to recognize some of the image a little bit more closer to what we have in original , but it's still a little bit away from what we wanted .
And when we cross this one point uh weight one , now it's definitely image more influence .
So right here , we can see definitely number one facial .
It's very close .
And so it's the number three , actually , they're all somewhat closer except number two , a little bit more far away .
But general , they are much closer .
I will say almost is working for as a portrait based on this face .
And when we're using the maximum two , you can see this is very closed .
Uh the portraits are sampled very well .
The problem is when we're using number two , for example , as the weight weighted two , then we start having more heavy influence of them portraits for of the image , for example , right here , even we specify a red dress with does have a red outfit , but it's also have a green outfit .
It does try to compensate with putting like red background , but it is image weight , it's more heavier .
So you have less flexibility and this is where you come with fine tuning , how well you will go um how much details you want to keep it and how much details you want to lose .

But again , this is just our start point because we're going to work on this and add a little bit more .
So till we jump on other things , let me point like for example , right here we have a 0.1 image and in some cases , it's hard to see why do you want to use the image in this case ?
But um let me give you one of the very good example , not as we have a health body shot and female .
So it does reference pauses in everything .
Example , right here , I have an image , full body shot .
And for example , I want to create the image with a full body of the girl dancing or other things .
In this case , for my A I , this is will be a reference .
It's what I want , I want a full body shot .
And I know some uh people was asking me how you can create a full body shot because it's a cut off , maybe a feet or other things .
So this is a way to do it .
So let's go ahead and I will say copy image address for this .
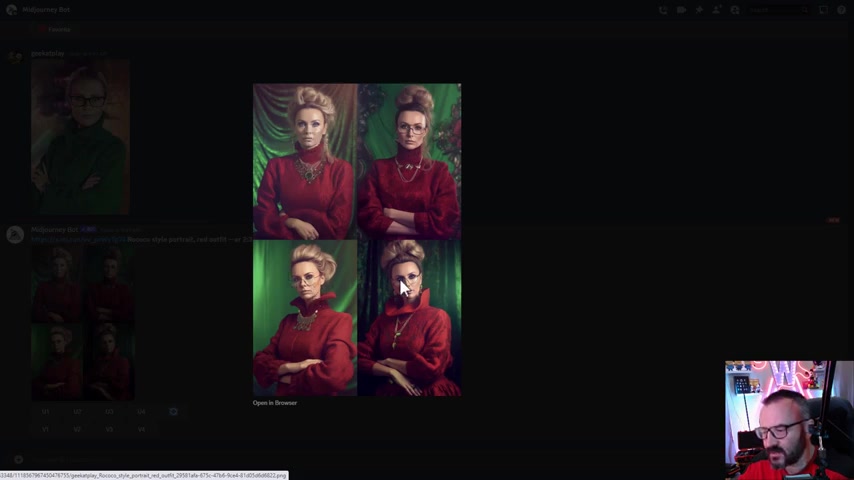
And we're going to imagine we'll pace this image next .
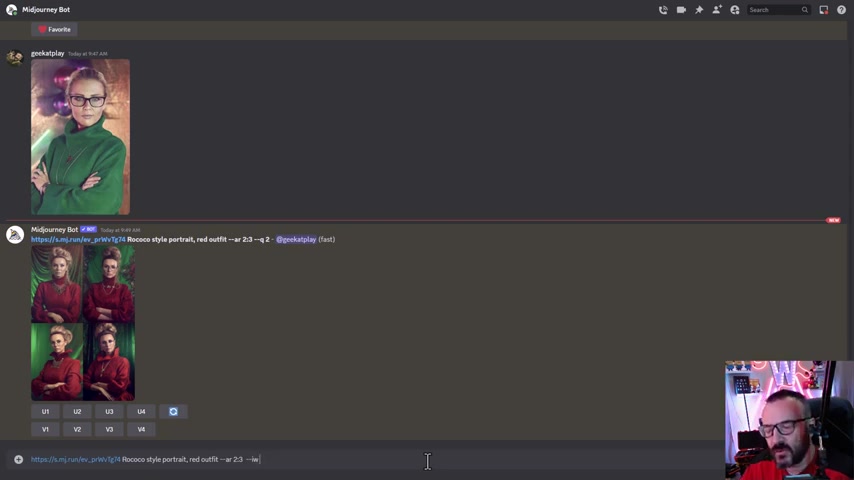
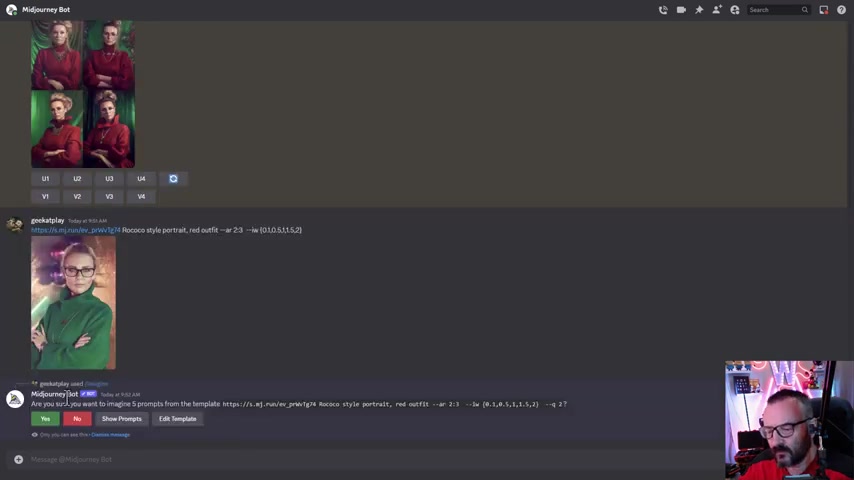
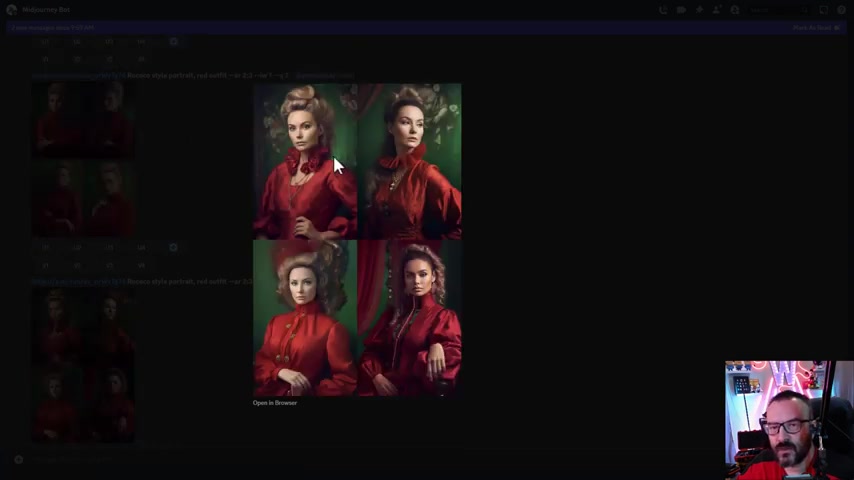
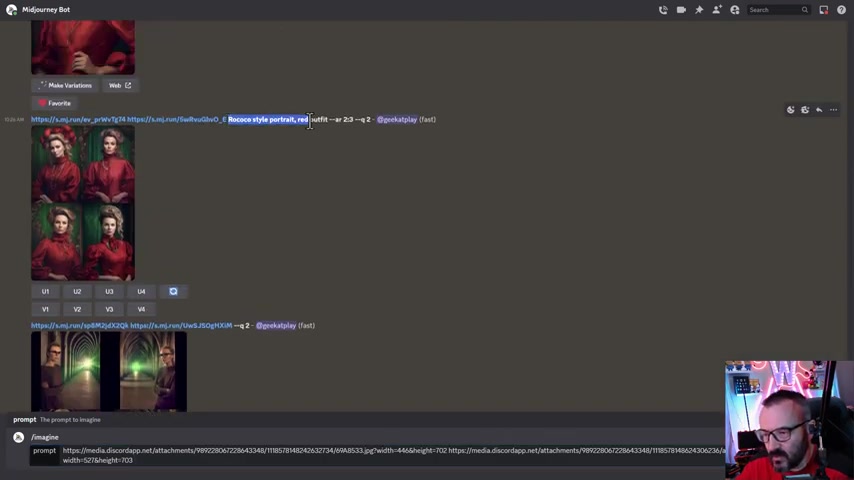
Let's go say Rococo style .
So we'll just describe what we wanna hear and remember what we wanted .
We want A R two by three just in this portraits and we want image weight 0.1 .
OK .
So right here render we can look and notice this is 0.1 .
We have a full body almost shot also position of the hands and this is the lowest effect of the image and we can expand more , we can increase more weights , for example , right here , a little bit higher .
And you can see we start having better semble as well a little bit the leak of the light .
And of course , the more we're going , the better it is um influence of the image .
So you don't necessarily need to have it all have influence if you don't really worried about the facial expressions .
But this is also provide you additional options to create .
For example , let's say I'm going here and I like uh some of the style let's go with this one .
So I will like this image and I'm going to upscale this and now I want to use it to actually blend these images .
And we come to another step of our techniques , blending images in blending images .
We can take two different images and combine them together .
Let a I decide for this .
So this is what kind of relatively new at journey , but it does help us to create portraits .
But if we want to work with the portraits here , we need to pay attention to kind of tricky situations .
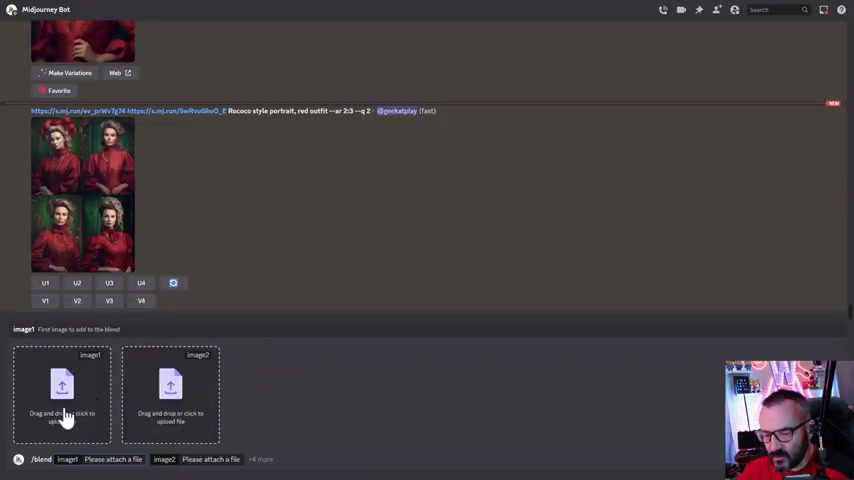
So for example , let me show you and we're going to use the blend for this mode .
It will ask for several images .
So you can go up to I think six images .
When it's selection , we need go drag and drop or click and upload our images .
And I'm just going to select two of those images .
We have it and let's press enter .
And now if we look on our blending result , it does not resemble the original portraits because it's took two images and combine them together .
We do have a girl with wearing glasses like in three , but the facial somewhat resemble .
But again , the hair and other things is definitely took from the other image .
What I found out it's better on a blending work if you have a just a portraits and separate different background .
So here is example , let's do two different images .
Again , we'll use the blend mode by the way , you can have it way more if you just select and you can add more images , but we'll just use it to and we'll have it one as a portrait and another one separate as the backdrop , not as on our backdrop .
We don't have it any person .
So A I does not have any reference to the what person it look .
So it's definitely will take only from first one and now we can just go ahead and press enter so it start processing and after the process is finished , you can see right here , we have it same portraits , the person is same as in the and just apply to this background that we have .
So it's actually does a very good job .
It my limitations with this um descriptions because I need to provide what background I wanted .
And after merging , which is not bad because you can actually create background inside the mid journey , specifically what you wanted and reference later this in your um blend mode with the portrait you wanted .
Again , the portrait that you will blend notice is still wear green coat .
So we are green sweater .
So we need to change this and another nice options inside the journey that we don't necessarily need to use a blend mode .
We can also take two images and blend and kind of merging them together .
OK ?
So here's the example , I have one portraits and I'm going to copy image errors on this .
We'll go , I imagine we'll paste the first image .
We'll go open another image , copy this image address space , paste this image address .
Next we want to put description in a blending again , it's work very good .
It's very interesting .
But here we can also put a description where the one wanted and I'm just go and copy this description including a spec ratio .
So we can go ahead and paste in .
OK ?
I think right now we're ready to go ahead and render .
OK .
So right here and you notice we do put it together but we have a problem when this image does not resemble we can overcome this much easier if we just also apply some weights to this .
So for example , right here with image weight two and you can see we have quite a bit closer .
Now we have it our background and we have it our image with the model .
So this way we actually can work .

But you notice the prompt , it's have a big portion playing in what we're creating inside the mid journey .
It's one excellent options to help us see what is on our image , to work on our prompt .
And this is what describe ?
So let's go ahead said describe and now notice we have one image that we need to upload to let mid journey analyze this .
And I'm going to use an image of our model and we'll go enter not just as a description , it's given us information .
The reason is why I like to use a description of one .
It's provide for us information .
It's how the mid journey is seeing this specific .
So if we want to have something closer , it will respond as well .
We have our aspect ratio here .
So let's have just example , I'm copying just only the prompt first prompt .
And by the way , you have four different prompts and they not as going from more accurate to more kind of uh flexible , but you can try either .
And if we just type this prompt and give it to us and process , let's see how closer it may get to our description of the image .
We have not , we don't put any image reference inside .
It's just purely the description .
And right here we heard from our description .
So now we can go and actually utilize both of them description and text .
So let me go ahead right there .
We'll click on our image , copy image address or go down below .
Let's go click imagine we'll paste our um text next .
I'm going to copy the prompt , we have it and we base the prompt as well here .
So at this time , uh we should have our image in the very close to the prompt .
We could actually just even say image weight 1.5 to be sure we have it as close as is possible between image uploading description prompt and us weight on the image .
OK .
So right here we have our image and you can see the facial that example very close .
I mean the pause is everything .
This is in a way we can now modify .
So what I like to do , we'll go copy of this prompt including our the image reference .
We'll go to type imagine we can paste here and inside the string I can modify .
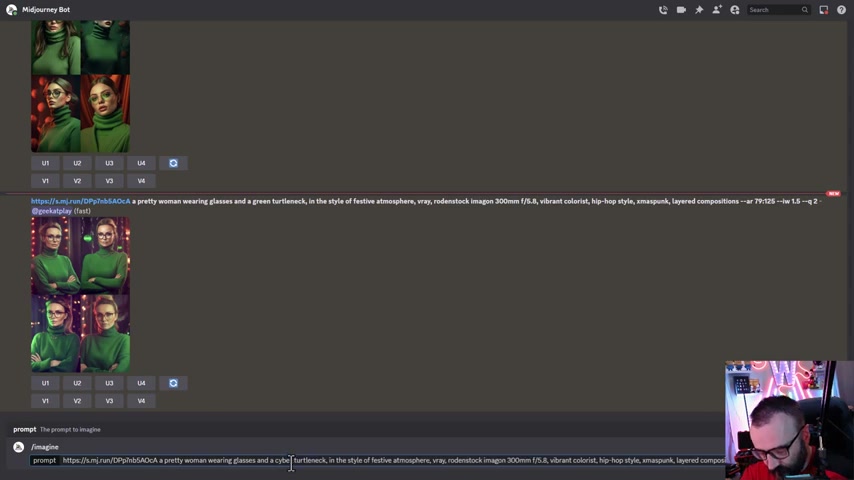
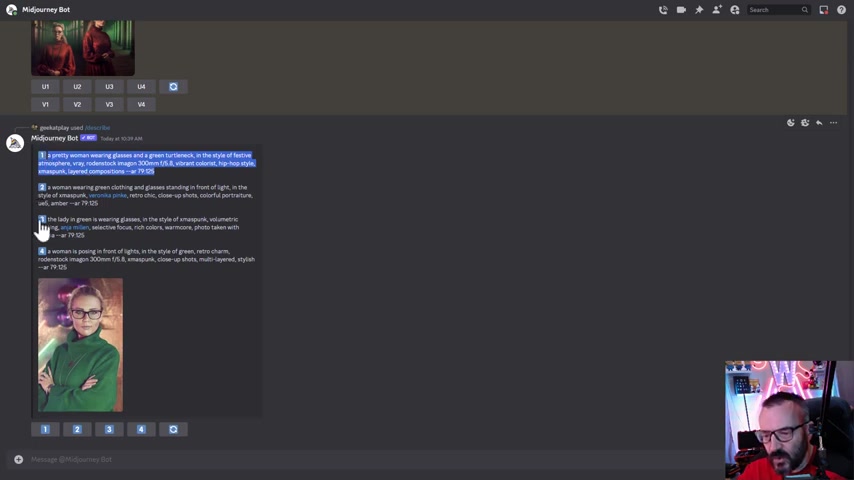
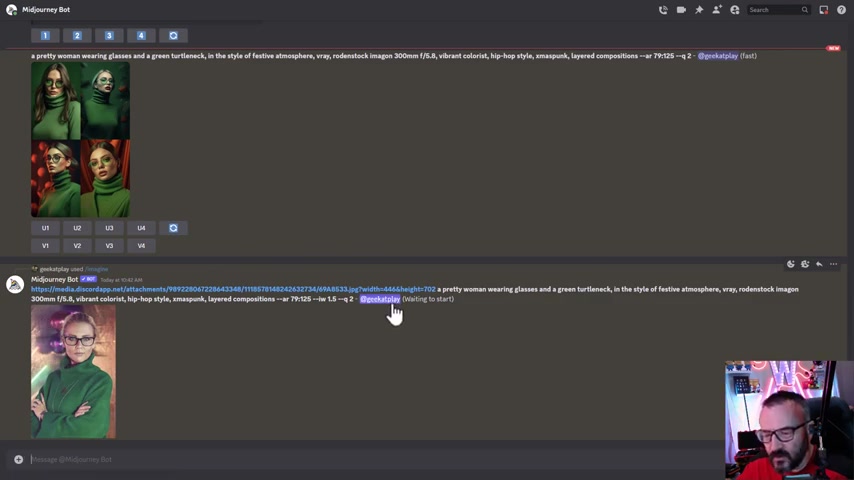
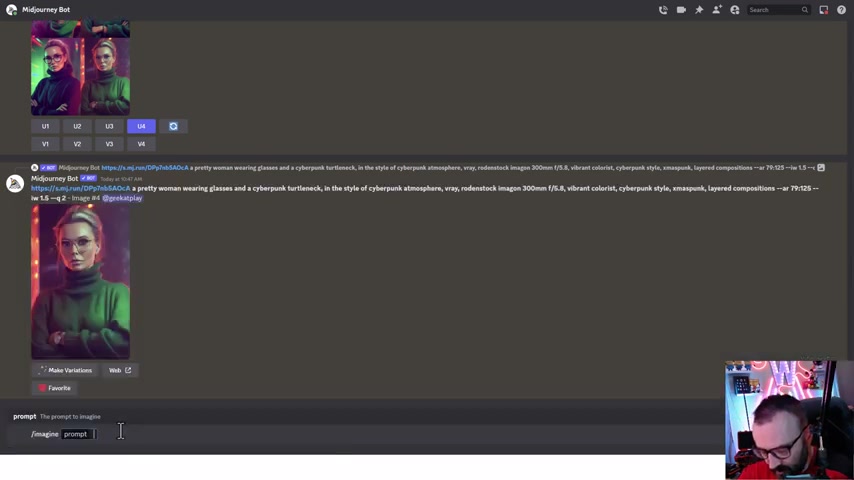
For example , wearing glass grass and let's switch cyberpunk , turtleneck in a style of the festive or let's go have again cyberpunk .
We just cyberpunk as much as we can .
OK ?
You'll notice we have all this information .
Don't like hip hop style .
Let's go put it cyberpunk .
But I think uh it should get message I already three times , put it cyber , hopefully it is there .
So now we can modify and we'll see what has come up again 1.5 that should work fine .
And right here we have our image .
It's much different style .
I like it .
But look at this , his facial very close on our portrait .
And I remember we did before we done some images overlay ended with us like cyberpunk .
We can do this as well here .
For example , if I like this , I can go upscale my image that I like it and we can merge that with another image as well to apply even extra steps .
And uh so in this case , we can go ahead , let's go type imagine .
OK .
And we're going to take our image that we used before this one .
We'll copy this image again .
We'll take our source .
Let's go paste our source here and now we'll take this image they're creating , we can copy this image address a little paste here .
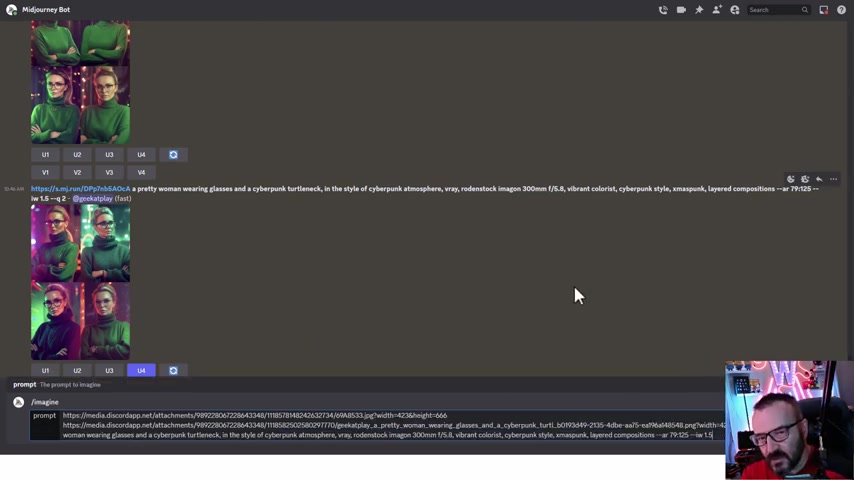
And we'll take now this line that we have copy and we can paste .
So what we've done with this , we say utilize these two images but even more important .
Put it on an image so we get our portraits even closer , but we still have it keeping all changes that we wanted .
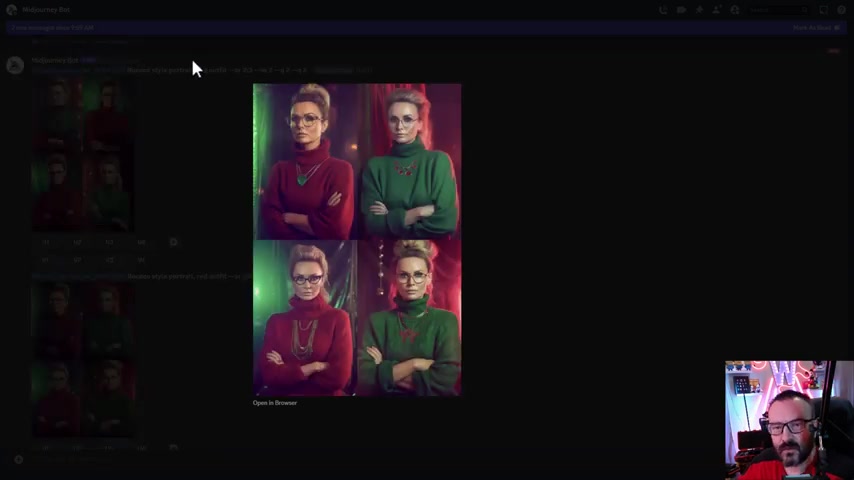
So let's just in case per woman wearing glasses , cyber punk outfit and style of the rain .
So I'm changing slightly , we can do this one and maybe you know what ?
Let's go .
Just put it for fun red outfit .
We will see what it has come up with .
OK .
And right here we have our combination .
Notice how it's a replace background , the portraits or right or that this one for example , look very good , very close except we have Brookly a bit on our hands .
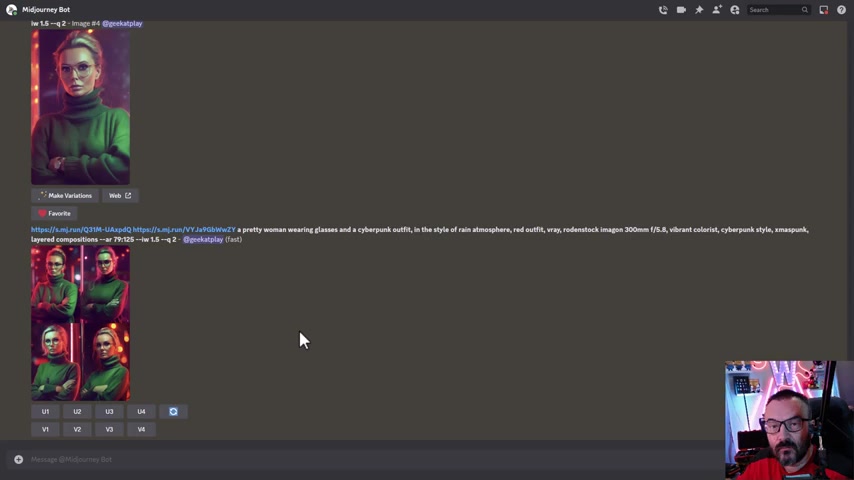
This one also look very nice .
So you notice how we start adding more and more layering to create the portrait .
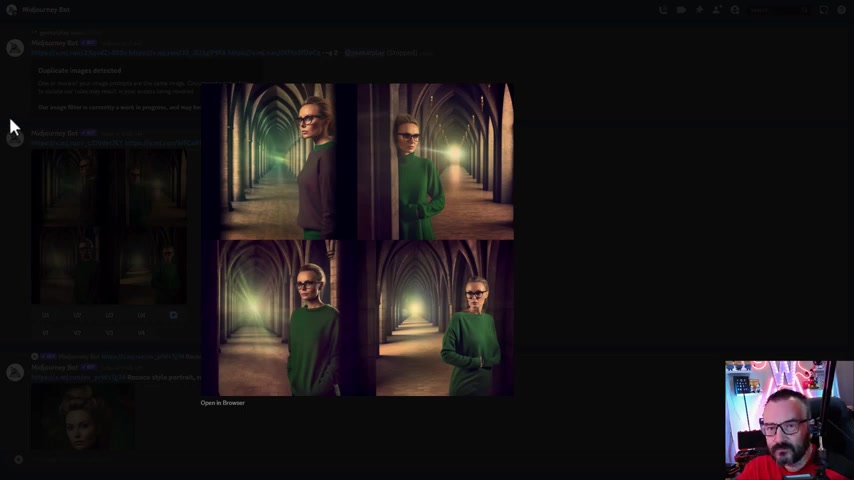
So now we'll look on these different techniques .
Let's take them to get it and put it and create the portraits of the um model in different environments .
We want it .
So right here , first , remember we'll start with uploading our image and I uploaded to different , I also uploaded background what we're going to use .
So right here is our original image .
Next step .
What I want as preparation step .
Actually , I want to go describe OK .
And as described , we're going to select same image .
So we receive the descriptions of the image that we currently have .
After this , we're going to start combining .
First , we'll go to imagine and we'll take a portrait of the moment that we want uh copies or copy address , we go paste this address inside .
Next , we're going to take their descriptions , copy and paste and sometimes description change .
For example , right here , somehow they figure out it to .
So it kind of very fun for me .
But I want to change some of the stuff .
For example , a young woman wearing glasses and elegance sweater .
So we'll leave this .
But maybe in elegance Twitter , we switch to elegant red rain coat .
So we'll just switch a little bit here in the style of Emer and bronze .
This is actually our background .
We can switch this to the coloring they wanted .
But I think let's leave it right here .
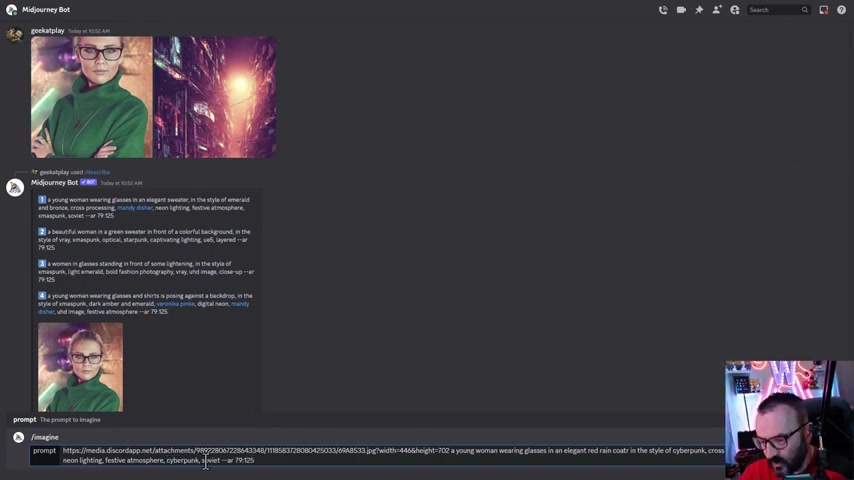
Maybe , you know , in of cyberpunk because I'm going to So what I'm going to use cross processing many t-shirts neon lining .
We leave this and instead Christmas punk , I don't know what Christmas punk , we have it cyber punk .
OK .
And instead of Soviet , let's go to .
So when we're done with this also , we set our image , we , and again , for the image we , I'm not sure which one I'm going .
So I'm going to 1.21 0.5 and two .
So we're going to see all three different weights .
And usually I do this just to be sure I have it right uh selection because sometimes it's very hard to say and it's easy doing one pass to see what you have .
OK .
Let's go ahead , press enter on this and yes , I do want to have three different versions .
OK ?
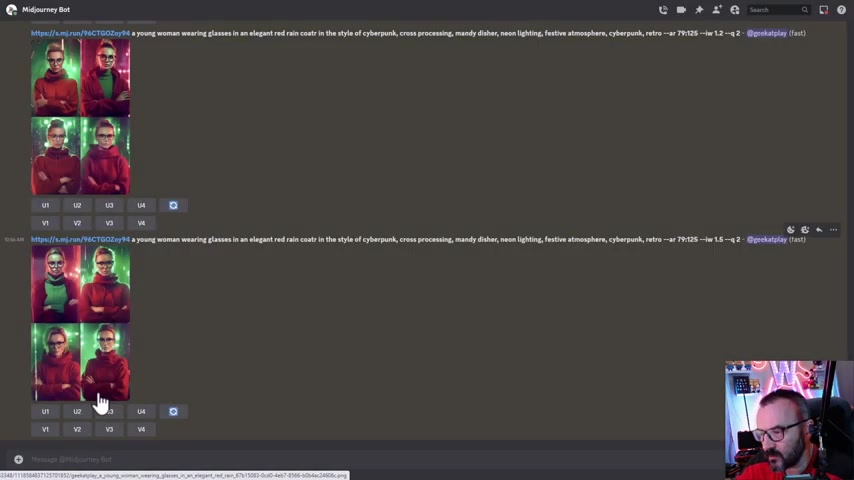
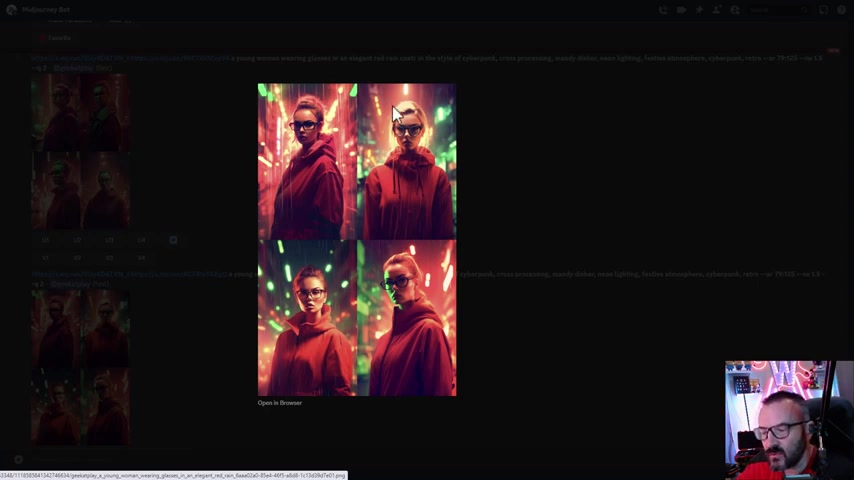
So right here is render , let's preview .
This is our number two and you can see we have it green .
Let's go down and find right ones .
This is a little bit better rain .
I like the rain code .
This is actually looking very close and most important our portraits is getting quite a bit closer in this case .
Next , it's kind of important you need to select one that you like it resembles .
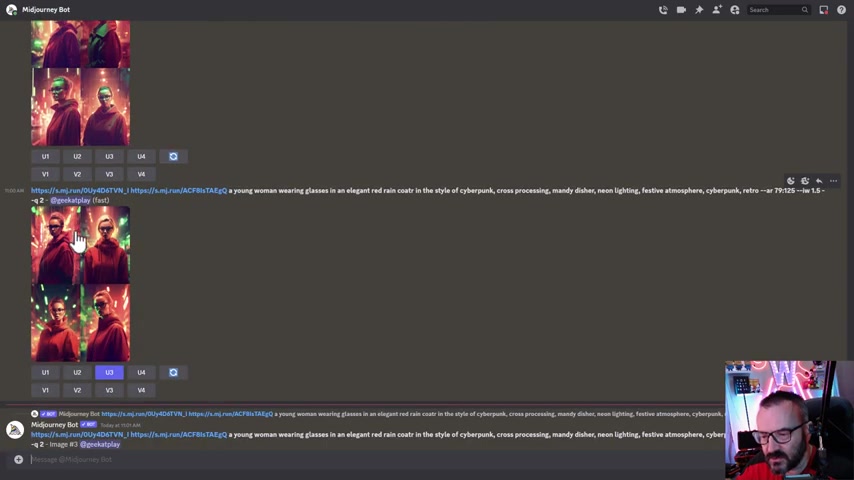
I'm going with this red one , number two , we go upscale that and we're going to actually merge a couple more times .
So I'm going to take a copy of this Cyber punk kind of background .
So I'm going to put that one here .
And next , I'm just take from this and copy all the way up to here , space and paste it .
So this should help us to kind of create more interesting type of the backdrop .
So what I did right here by accidently I grabbed the original image .
It's not what I wanted .

So let's go ahead again , copy this image right here .
We copy that one .
OK ?
So we go to piece have a background .
I want actually copy this .
So I need to go copy this image address .
OK .
We'll go paste here and then I wanna actually copy this string because otherwise I just copy original image that I don't need it .
OK .
Right here .
And let's render oh just in case as the this one process , we also will see what's happening if we just have the original image .
And OK .
So right here our image it's completed .
This is one that did it with the first .
This is actually kind of interesting except the face does not necessarily look very good .
And this is another the problem when we start merging with another background , we start losing a little bit more of the originality uh well original faces and what's happening , we can always emphasize a little bit more .
For example , if I like this background and image and everything , we can kind of blend more and more with original photo .
So again example , we're gonna take again this first one , we copy image that we already have it and now we'll have it like another protest .
So it's almost you developing and you overlay over and over with the different images as you need it .
So again , we'll copy this one .
Now , I'm going to take and copy this image , remember it's covered background , but it's also have a little bit closer with what I wanted .
And we're going to copy this pot and paste in here .
So let's go ahead .
This is will be our another pass .
So we have it , let's look what we have so far .
We have our original pass with portrait .
After we select portraits , we have it pass with portraits and background .
And now because to render , we have a path of the merge background with render portrait with our original .
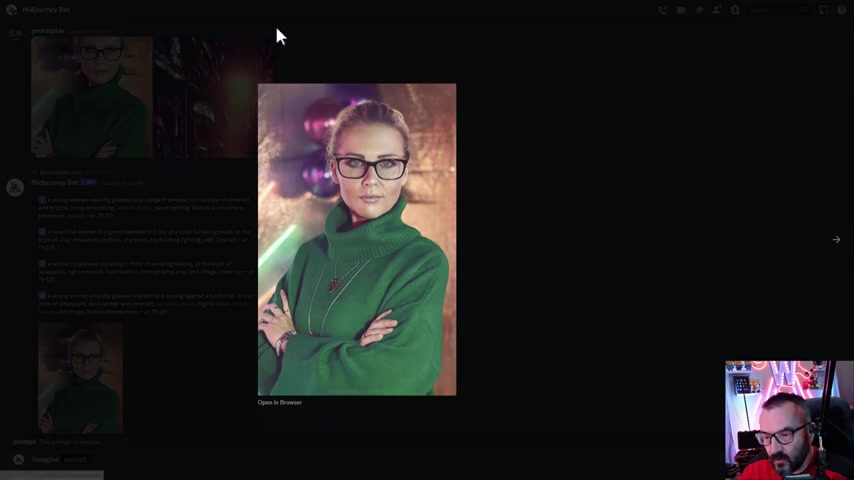
And here we have a render and if you look , this is very nice .
This is one that resemble very good our original forest some a little bit different and it's possibly a lighting .
But if you go position of the head , nose and eyes , it does work very , very good .
So let me upscale those two ones .
And here's a I said this is actually a resemble , this is a resemble very good and not as we change everything , we'll just keep it on the face and put it in a different environment , different lighting .
Thank you for watching this video .
Are you looking for a way to reach a wider audience and get more views on your videos?
Our innovative video to text transcribing service can help you do just that.
We provide accurate transcriptions of your videos along with visual content that will help you attract new viewers and keep them engaged. Plus, our data analytics and ad campaign tools can help you monetize your content and maximize your revenue.
Let's partner up and take your video content to the next level!
Contact us today to learn more.