https://www.youtube.com/watch?v=6XH7j3YQZIE
How to Build your E-commerce Mobile App from Scratch (No Coding) - Android & IOS App

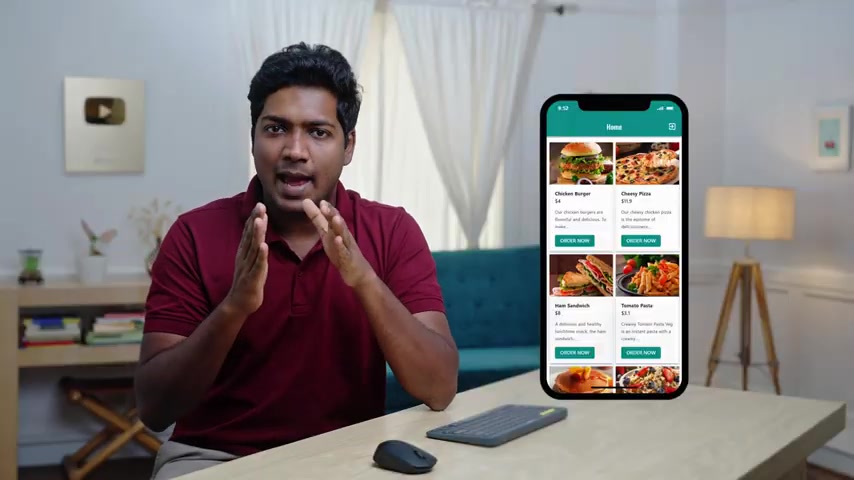
Hi guys today , we're going to see how you can create an e-commerce mobile app from scratch .
So after watching this video , you'll be able to create a mobile app like this without any coding .
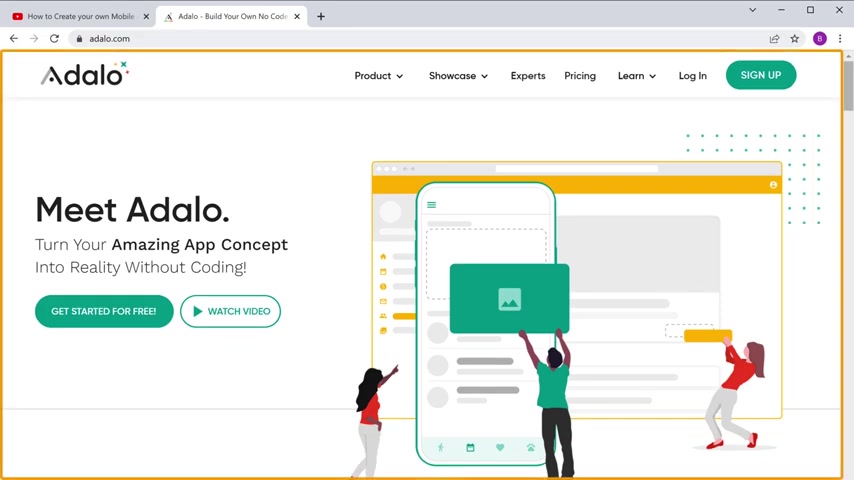
So to create an app , we're going to use a platform called A which lets you build different kinds of apps in this video .
We'll be creating an e-commerce app like this where you can add your products and anyone who's visiting your app can order your products just by clicking here .
Now , if the vita fills up his details and makes the payment , the order will be placed and when someone places the order , you will receive a mail in your inbox with the order details like this .
Ok .
Next , you will also see how you can customize your app to any style you want .
Now , the app which we are going to create is a native app which means it's faster loading and doesn't have a delay time like a web browser .
And the best part is you'll be able to publish your app on both plays Store and App store and you can also update your app whenever you want .
Ok .
Creating an app for your business is very important to reach more customers and it will also help you stand out from your computers and build your brand image .
Now , before we move on to the video , I've got a message for you .
Now , this video is not sponsored , but it is supported by those of you guys who have purchased our courses and I already made website templates in make a WP you can learn more about it by clicking the links in the description .
OK ?
So let's get started now to create a mobile app .
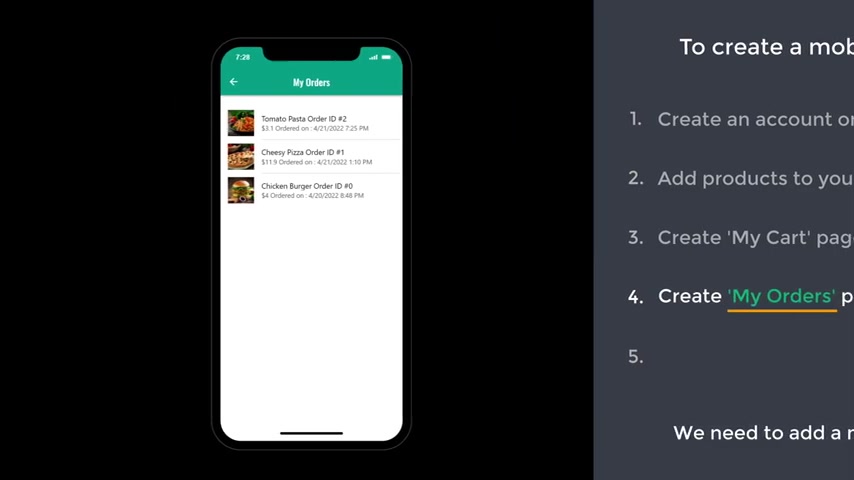
We are going to do five steps .
The first step is to create an account on a , this is the site which is going to help us create a mobile app .
So to create an account , just click the link below this video and it'll take you to the site .
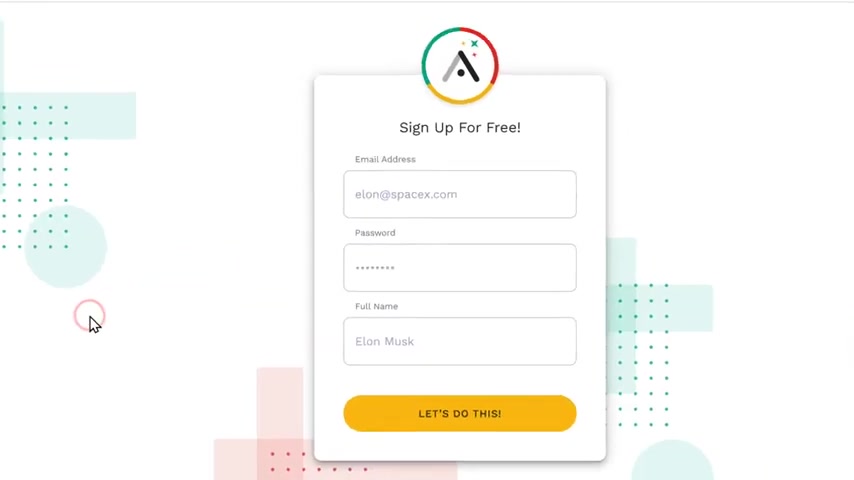
No click , get started , fill up these details , then click here .
OK ?
Next , you need to select what type of app you want to create as I want to create a mobile app .
I'm going to select this click next and here you will find ready made app templates which you can use to create your app as we are going to create the app from scratch .
Let's select this click next .
Now give a name for it up here .
I'm going to enter food dial and if you want , you can change the art color from here .
We'll see how you can do that later in this video and finally click create .
OK .
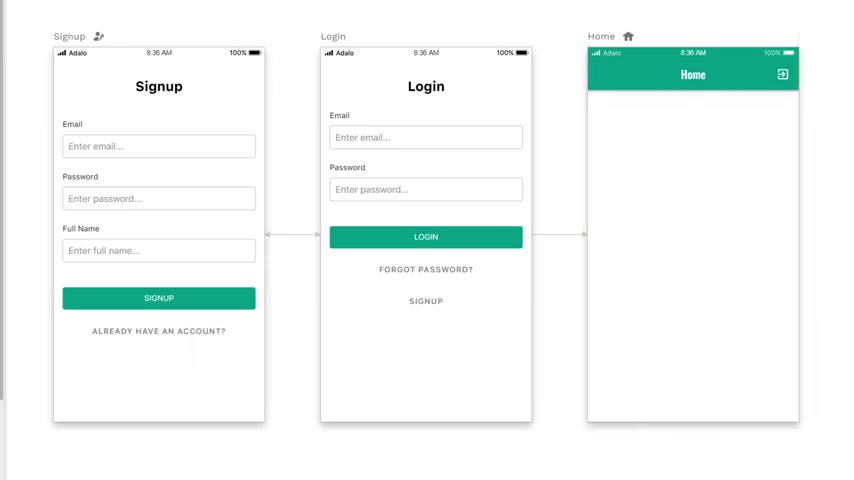
So now we have successfully created an account on a log and here you can see that by default , the sign up page , log in page and the home page is created .
So once you've created your account now in the home page , you can display the products which you are going to sell on your app .
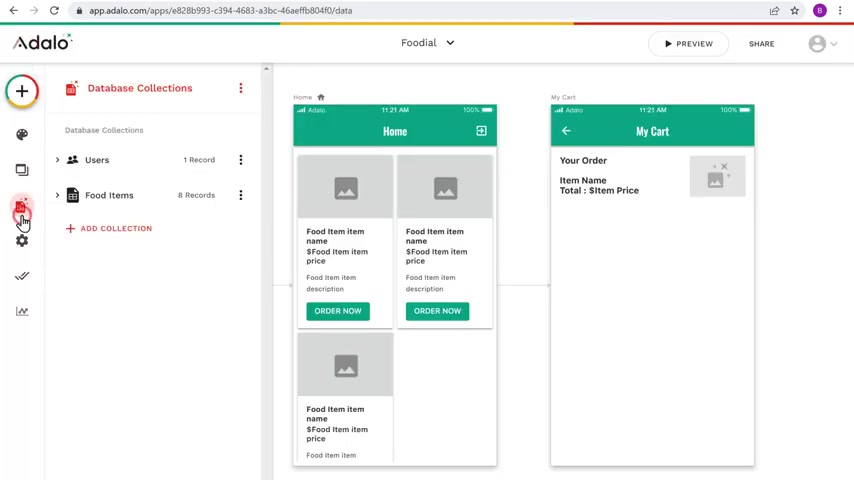
So to do that , let's go to step two , which is to create our products to create our products .
We're going to open a collection .
A collection is nothing but your product information .
Like your product name , product price , product description , etcetera .
So once you open a collection , it look like this and here you can create your products .
OK ?
So to open the collection , just click here and click add collection .
Now here enter a name for your collection as I'm going to create a food app , I'm going to enter food items , click add and a collection will be added here .
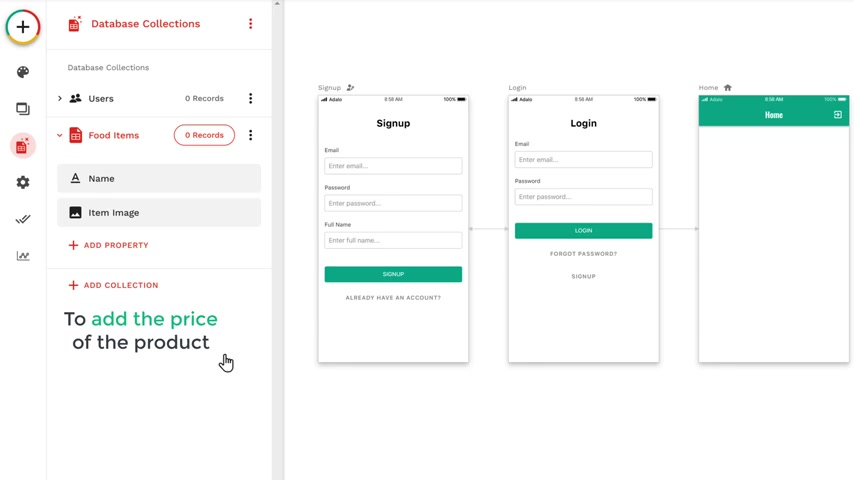
So to open a collection , let's add a product information that is the product name , product price and the product description .
As you can see here , the name field has been created by default .
So let's add the other fields we want click add property .
Now to add the product image , just click image , they enter the name as the item image and click save .
Now to add the price of the product like we did before .
Let's click at property , then click number , enter item price and click soon .
Ok .
Now , in the same way , you can add all the other properties and all these details about your products will be stored under the collection , food items .
Once you've added the fields , click records .
And as you can see , we have now opened a collection .
So now we can go ahead and create our products to do that .
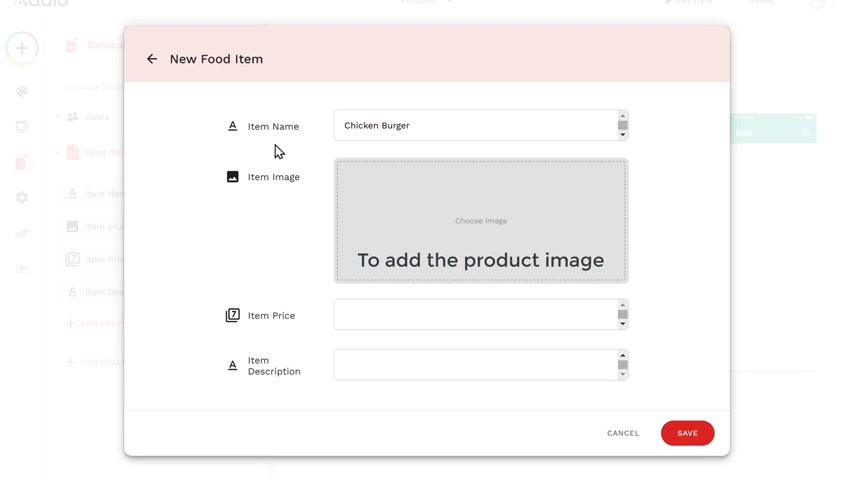
Click , add food item and here enter the product name .
Now to add the product image , click here , select the image you want to add , I'm going to select this click open .
And as you can see the image has been added , no vintage prize , then enter the description about your product and then click save and your product will be created .
Now in the same way you can create all the other products .
OK ?
So now we successfully created our products and click done once you've created the products .
Next , let's go to step three , which is to display these products on our home page .
So to display these products , first , we need to select a layout in which we can display the products .
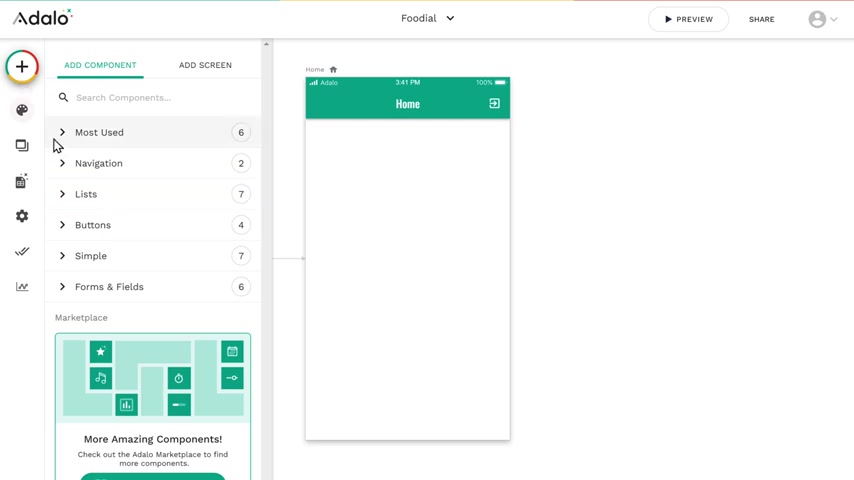
So to select it , just click this icon , then go to lists and here you can see different types of layouts in which you can add your products .
You can choose any layout you want .
I'm going to select this .
So just drag this and drop it here .
And we've got a layout for our products .
As you can see , the layout is blank by default .
So to display our products here , just click here and you can see we've got the food items collection , which we created before .
So let's select food items .
And as soon as you select food items here , you can see that the title has been changed to food item name .
So now a food item name will be displayed here .
Ok .
The answer of this text , let's say you want to display the price of your food item here to do that .
Click subtitle .
Now enter your currency symbol first .
So let's open a new tab and search for the currency symbol you want .
I'm going to search for dollar symbol .
Now just copy the symbol , go back to this tab , then paste it here now to display the price of the food item .
Click here and select item price and now the product place will be displayed next to display the description about your food item .
So like this , now remove this text , then click here and select the item description .
Now our products will be added to the home page once you're done next .
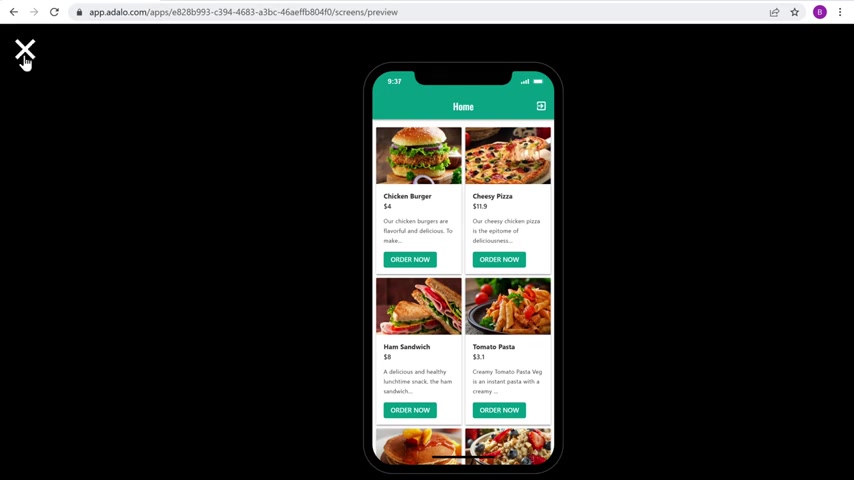
Let's see the preview of our home page .
So click preview .
Now as soon as you open the app , it'll ask you to create an account .

So let's fill up these details and click sign up here .
You can see that we have got the products on our home page , which we added .
So Now , we have successfully added the products to our home page once you've done that .
Now , how will your customers buy the products from your app ?
So to let your customers to order your products , we need to add an order now button like this .
Let's close this and enable the first button option here .
You can enter any name you want for your button .
I'm going to enter order .
Now .
Now , if we click preview , you can see that the button has been added .
Ok ?
Once you've added the button , now if the customer clicks on the zero now button , you want to take them to the cart page like this where you can display the order details which your customer has ordered .
And can I have the details of your customer's address and add a payment option like this ?
So next , let's go to step four where we can see how we can create a my card page like this .
So to create it first , you need to add a new page to do that .
Let's close this no and click add screen .
Now here , select the screen you want .
I'm going to select this .
Not here .
Enter the name for your piece .
I'm going to enter my card and then click create as you can see the my card page has been added .
Ok , once you've added it .
So next , let's see how you can link this button with the my card page to do that .
Just click the button , then click first button .
Now scroll down and click add action , then go to link here .
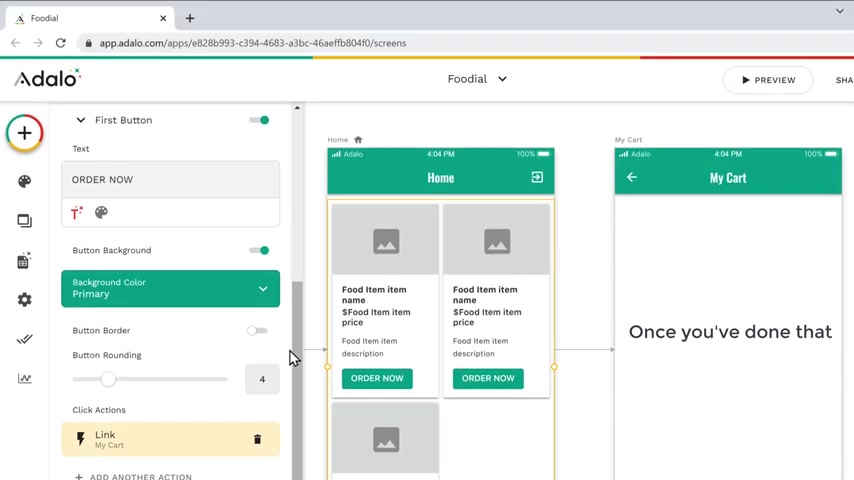
You can see the my card page we created .
So just click on it and the my card page will be linked to the button .
Ok ?
Once you've done that now to add the order details like this , click here and drag the sticks element and drop it here .
Now to display the order details like this .
First let's type your order and to get the food item name , just click here , then go to current food items , then click item name and the product name will be displayed here .
Now to get the food item price type the message you want .
So like we did before paste the currency symbol here .
Now click here , then go to current food items and click item price .

Now to add the full item image , click here and drag this element and drop it here or you can reset the image by dragging here to get the food item image .
Click here guru database , then go to current food item , click item image and the full item image will be added .
Ok ?
Once you're done now to see how it works , click preview and click order .
Now on any product , you can see that we have got the details of the order to be selected .
OK ?
Now to get the customer address to deliver the food item , we are going to add a form like this .
So to do that , first , we need to create a property to store the address details of the customer so that when the customer completes their payment , the address will be saved under the property .
So to create the property , just click here here , you can see that the user's collection is already there .
And when a user signs up on your app , it gets stored in this collection .
So we need to add the address property inside this collection .
So click users and then click add properly .
Now click next .
Now here , enter address and click save .
Once you've created the property , let's add the address form .
First , let's add a heading like this .
Just click here , drag this element and orbit here .
No and enter the text you want .
I'm going to enter your address not to add the add address form .
Click here and click forms and fields .
You can use these options to create your form .
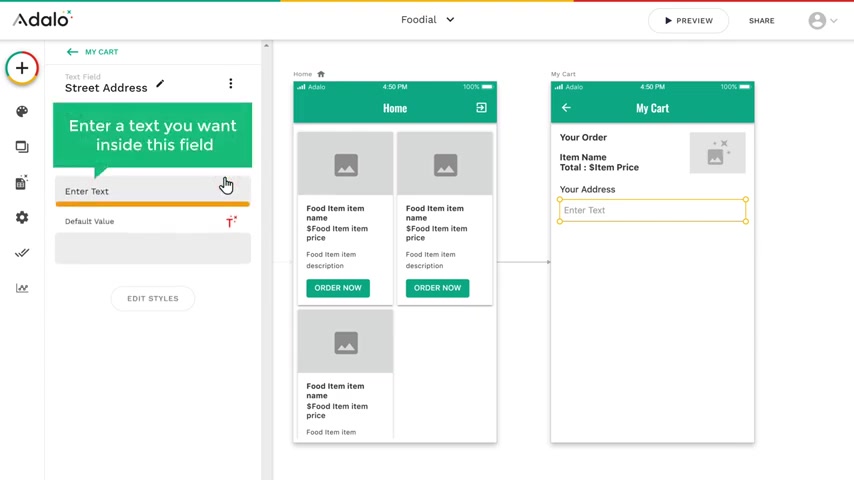
Now drag this text , input element and drop it here .
Now go here , click this pencil icon , then give a name for this field and click done .
No .
Enter a text you want inside this field .
I'm going to enter street address now to add another field here .
Let's click this field .
Press control C and then click until B and a new field will be created .
So just drag this and drop it below and like we did before change the field name here , then click done .
Now to enter the text inside the field , click here and enter the text you want inside this box in the same way you can add other fields .
Ok ?
So now we have added the address form to check it .
Let's click preview .
And if you click order now on any product , you can see that we have got the address form once you're done .
Now , in order to allow your customers to make payment on your app , when they purchase a product , you need to set up a payment method .
Now we are going to use Tribe , which is a popular payment method .
Next , let's see how you can type payment to your mobile app .
So to do that , first , you need to create an account on Stripe .
Once you create a Stripe account , you'll be able to receive payments directly to your bank account when someone purchases a product from your app .
So to create a type account , let's open a new tab and search for stripe dot com and it will take you to this type website not to create an account .
Just click , start now , then fill out these details and click create account .
So now we have successfully created a Stripe account .
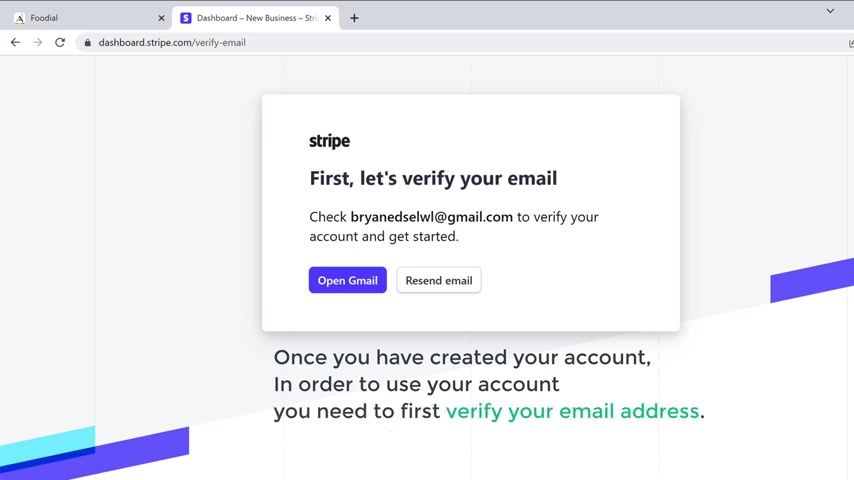
Once you have created your account , in order to use your account , you need to first verify your email address .
So to verify your email address , you need to click the verification link which was sent to your email .
So to do that just click open gmail .
Now , this is the inbox of the email which you've entered while creating a stripe account .
So once you go to your inbox , you can see that we have got a verification link .
So let's open it and click , verify .
And as you can see , we have successfully verified our email address .
Once you verify your email .
Now , in order to receive payments from this account , you need to activate this type account .
So to activate the account , let's click , activate here .
I enter your details and click continue , then enter your business details .
So just click here and industry type as my app is based on food .
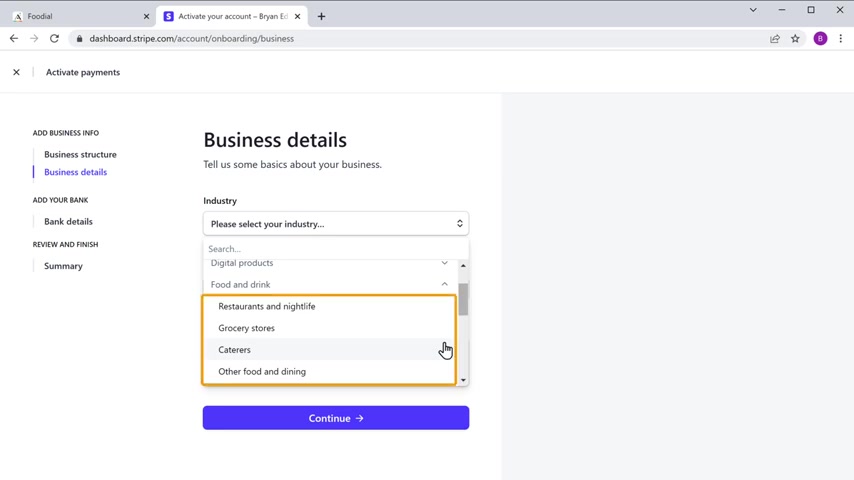
I'm gonna click food and drink .
So select the one you want .
I'm going to select this .
Now , here you can enter the website link or your app link .
I'm going to enter my app link to get it .
Let's go back to Glier , click settings and then click domains .
Now here you can see that we have got the app link .
So let's copy this and go back to the tab and based it here .
Now here enter a description about your product .
Once you're done , click continue , then click here .
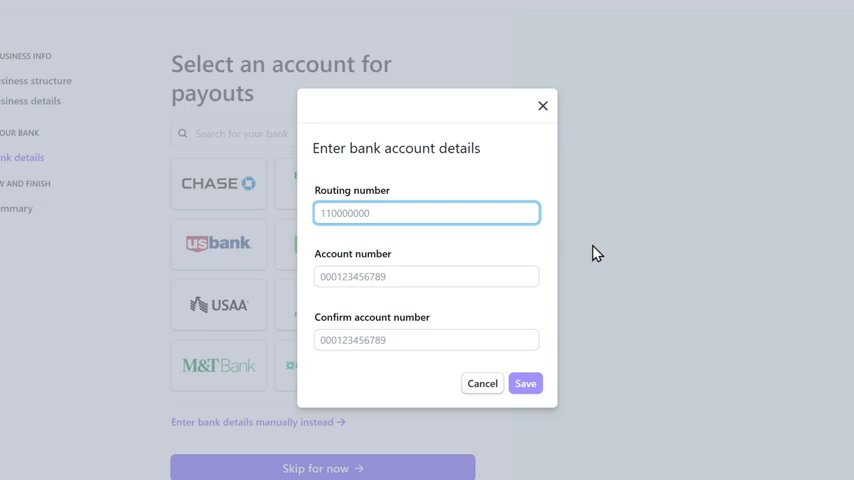
So here you need to enter your bank details or you want to receive your payments and click save .
So now when someone purchases your product , that money will be sent to this bank account .
Once you've entered these details , click continue and click submit .
So now we have successfully activated a stripe account .
Once you have activated your Stripe account .
Next , you need to install Stripe on a .
So to install it , let's go back to a and click explore marketplace and you will get this tab not here .
Search for stripe .
As you can see , we have got the payment option now to install it .
Let's click install .
And as you can see , Stripe has been installed .
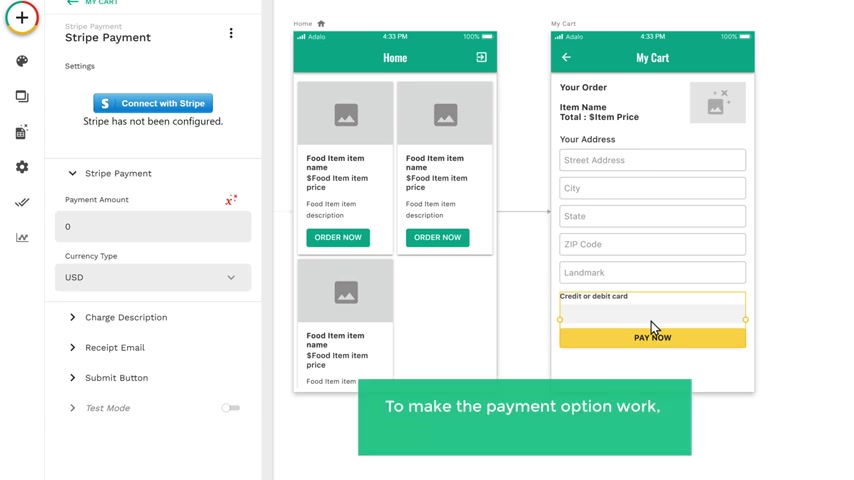
Once you've installed , stripe , click done next , we need to add the payment option to the my card page .
So to add that click install now , drag the payment option and upper here .
Once you've added the stripe payment option to make the payment option work , we need to connect Stripe with app to do that .
Let's connect with stripe and it'll take you to this page now , click connect and if we go to this tab and click refresh , you can see that stripe is active .
Ok .
So now we have successfully connected stripe with a once you do that .
Now to make the payment option work , we need to get the product price and the address details of the customers only .
If we get these details , your customers will be able to make the payment on your app .
First .
Let's get the product price .
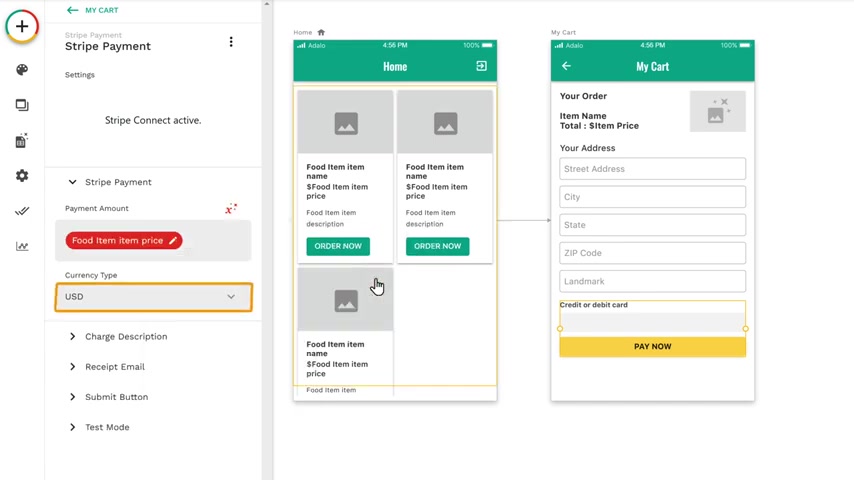
Just click here , then go to current food item and click item price .
Now , click here and select the currency you want .
I'm going to leave it as us D ok .
Once the customer makes the payment and if you want to send an email copy to your customers about the order details , let's click receipt , email , take you then go to log in users and click email .
Once you're done next , you need to update these address fields .
So to do that , click submit button , click add action , then go to update and click logged in users here .
You can see the address property we created now to store the address details .
You need to add these form fields into this address property .
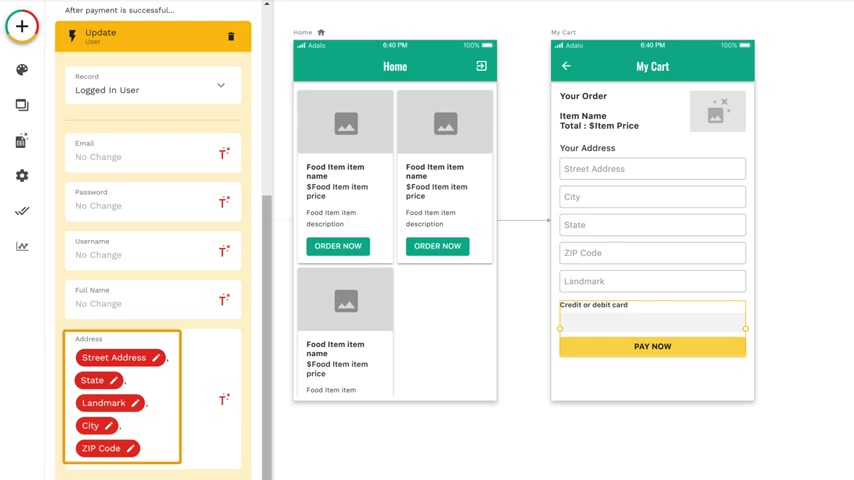
So just click here , then go to other components , select street address and it will be added here .
Make sure you use a comma after each field .
In the same way , you can add other fields once you've done that click done .
Ok .
Now your customer can make the payment on your app and then place an order .
Once your customer makes the payment and places an order on our app , how will they get the order details ?
Now to get the order details like this first , we need to create a collection on our app .
Once we create a collection , when someone makes orders on your app , their order details will be collected .
So that after the purchase , we can display the order details like this .
Ok .
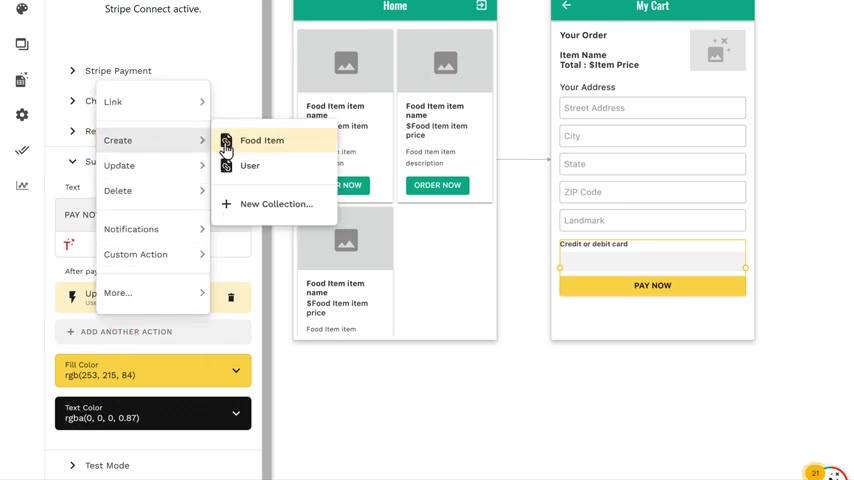
So to create a collection , let's go here and click , add another action , then go to create click new collection and then give the name for the collection here .
I'm going to enter order receipt .
Once you've created the collection .
Next , we need to get the order ID and the food item name under this collection .
So just click here and enter the order ID , order ID is the unique number that gets generated for each order placed by the customer .
Ok .
Next , you need to set a relation between the food item and the customer .
So let's look at property and then go to a relationship , click food items .
Now , if you want a single food item to be ordered by the customer , let's select this option and click done .
Once you've done that .
Next , do you need to create a relationship between the user and the orders you receive ?
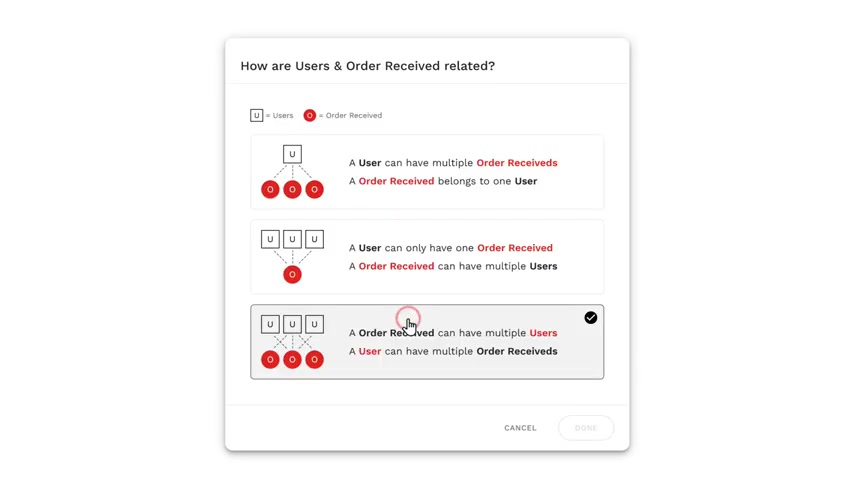
So click at property , then go to relationship and click users .
Now , when a customer orders multiple times from your app , you need to set that all the order belongs to the same person , not select this option and click done and click create .
So if we have not created the collection for the order received details , now to get the order details of your customer , we need to link the collection .
We just created to our app to do that .
First , let's add the order ready here .
Just click here , then go to order received , click out and now the order ID will be displayed in numbers , then click here and select current food item .
Now as I want my products to be purchased only by logged in users , click here and select logged in users and click done .
Ok .
So now we have successfully created on my card page .
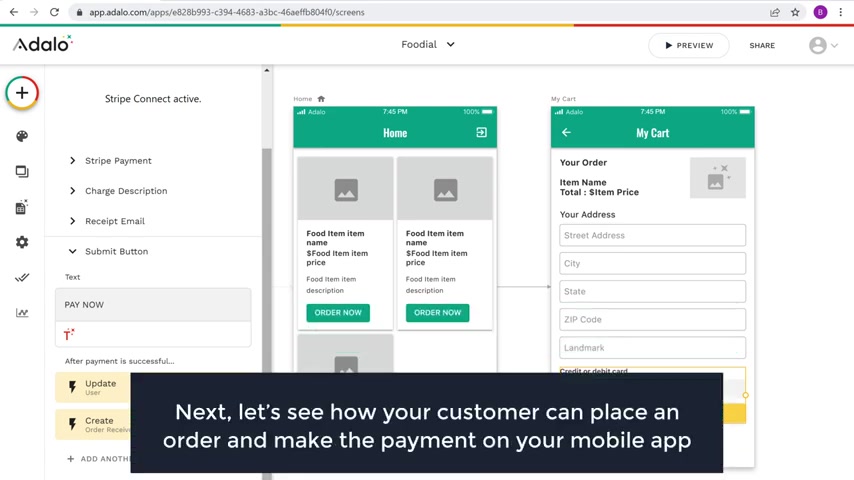
Next , let's see how your customer can place an order and make the payment on your mobile app to check that click preview and click order .
Now , then it'll take you to this my card page and here you can see that we have got a food item name and it's price with currency .
No , enter your address , then enter your card details .
And as you can see the payment has been made .
Ok ?
This is how your customer can order an item and make payment on your app .
Once your customer purchases an item and makes the payment on your app .
What if you want to display a ?
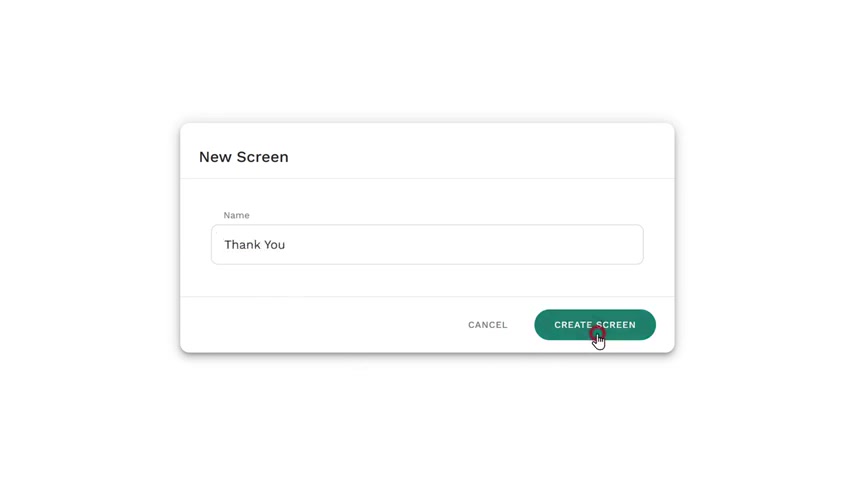
Thank you page like this .
So to create it , click add screen , not like this and here enter the name for your page .
I'm going to enter .
Thank you and then click create as you can see the page has been added .
Ok ?
Once you've added the page , now let's say you want to add an image like this .
So just drag this image element and drop it here , then click here , click upload and then click choose image .
Now drag and drop the image you want .
As you can see the image has been added now like we did before you can reduce the size of the image by just dragging here .
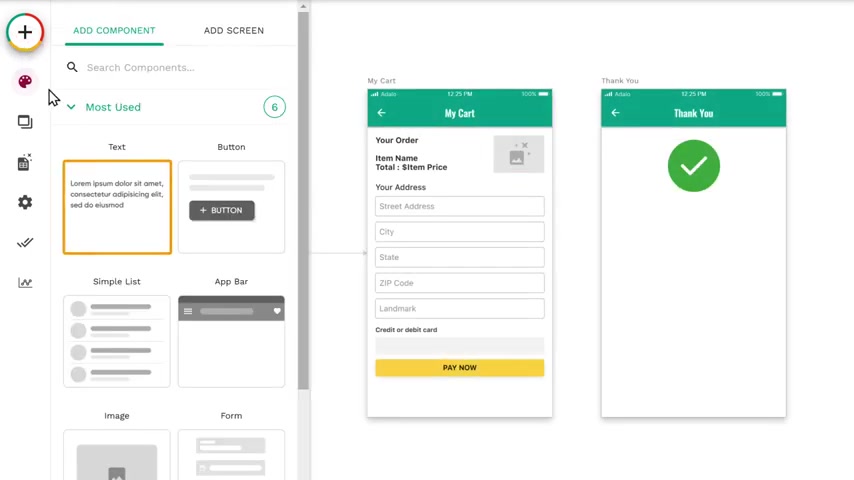
Now let's add a thank you message here , click here and drag this element and drop it here and enter the message you want .
Now , if you want to make this text bold , just click here , then click here and select the one you want .
I'm going to select this and you can increase the size of the text by clicking here .
Then you can align the text from here .
Once you're done next , you need to link this .
Thank you page with the pay now button so that when someone makes the payment , it will take them to this .
Thank you page .
So to link it , click here , click the submit button now scroll down , click here , then go to link here .
You can see the thank you page we created .
So just click on it and the thank you page will be linked to the button .
Ok ?
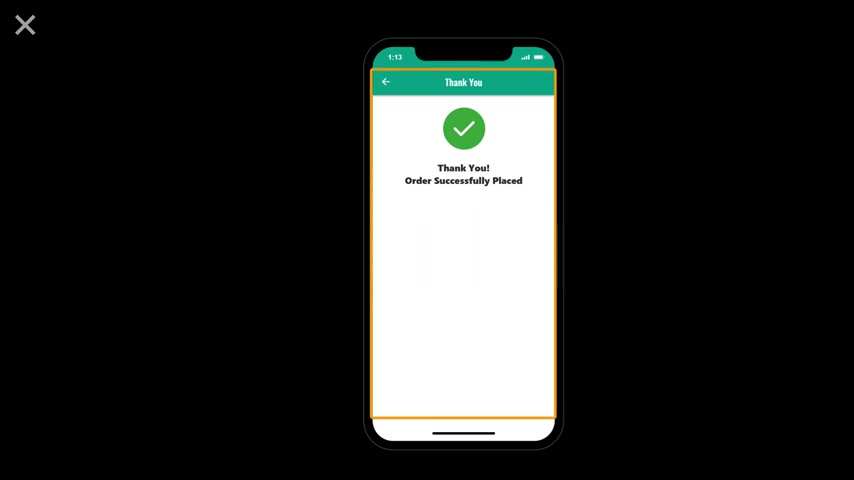
So let's see how it works .
Click review and click on it now and click pay .
Now here you can see that we have got the thank you page .
Ok .
Once you've created the thank you page .
In the previous step , we saw how to create a collection to get the order details of the customer .
So once you place an order , how can you show the order details to your customer now to display the details on your app like this .
Let's go to step four , which is to create a my orders page .
So to create it , we need to add a new page .
So just click here and click , add screen here , select the screen you want .
I'm going to select this and here enter a name for your page .
I'm going to enter my orders and then click create as you can see the page has been added .
Ok .
Once you've added the page , now let's display the order details now to display the order details to the customer .
Let's click here , just drag this element and drop it here .
Now click here and it all I received .
As I want to display the order details only to the log in user .
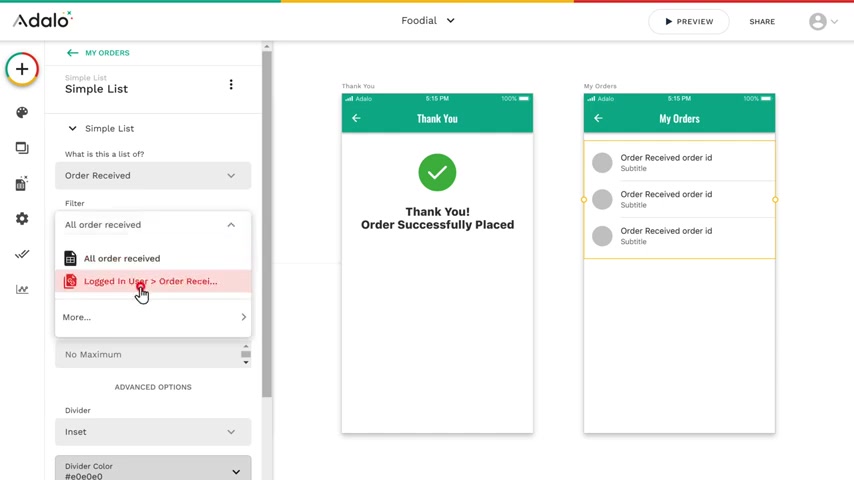
Let's click here and select this once you're done .
Now to display the name of the food item here , just scroll down , click title , click here , then go to food items and click item name .
Now the product name will be displayed automatically for every order .
Then click here and type the order id .
Now to display the product price , click here and enter the currency symbol .
Now to get the price of the food item , click here , then go to food items , click item price and the amount will be displayed in dollars .
Ok ?
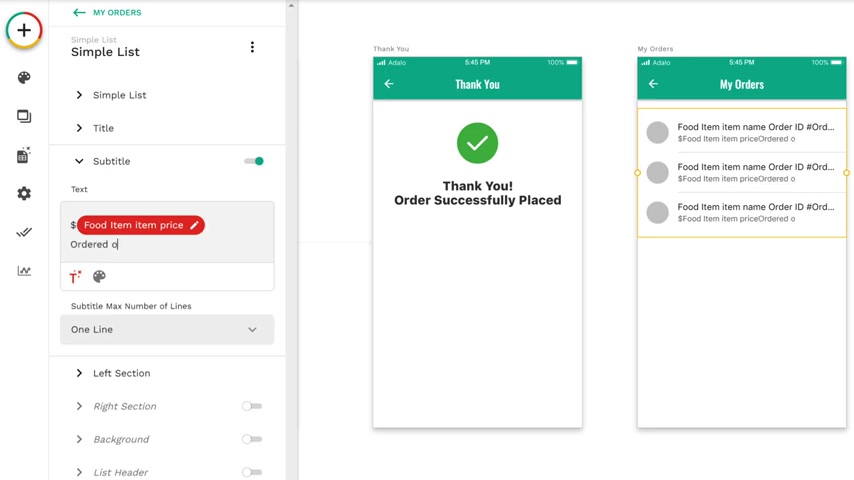
Once you're done now , if you want to display the order date and time like this , click here and enter , ordered on , then click here and select create a date .
Now to select the date format , click here , then click here and select the format you want .
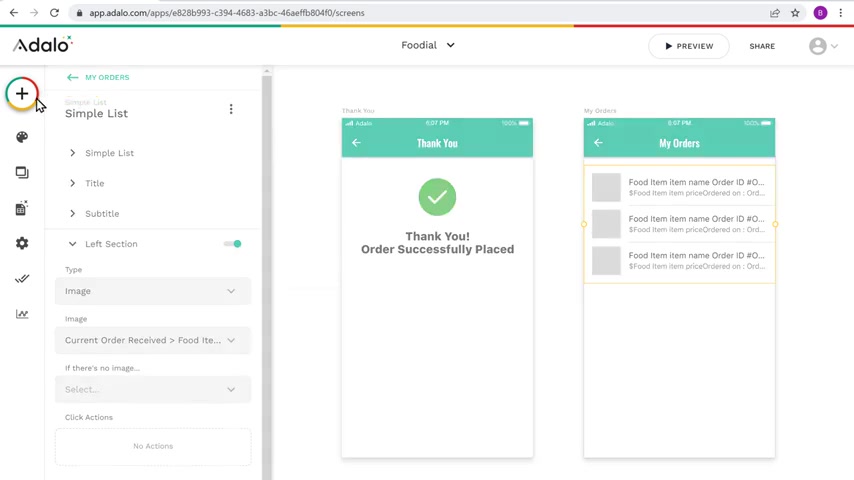
I'm going to select this now to add the food image .
Let's click here and and then click image , no gli here , go to database and then go to food items and click item image .
OK ?
Once you've created the order page , so let's say you want to link this my order page with the thank you page by adding a button like this .
So that when someone clicks on this button , it will take them to the my orders page .
So to link it , just click here and drag this button element and drop it here .
Now to change this button name , just remove this text and enter the text you want .
I'm going to enter my orders now to link this my order page with the thank you page .
Just click here , then go to link here .
You can see the mayor space that we created .
So just click on it and the order page will be linked to the button .
Ok ?
Now check the preview of it , just click preview and click order now on any product .
And you can see that we have got a thank you page .
And if you click on this button , you can see that we have got the details of the order which has the item image , its name , order id , its price and the order date .
So now we have successfully created the order at this page .
Ok .
Once a customer places an order on your app , how will you send an email to your customers about the order details .
Next , let's see how you can send an email to your customers to do that .
We are going to do three steps .
The first step is to create an account on ZAP here , this is the website which is going to help you send an email to your customers .
So to create an account , let's go to a new tab and search for ZP dot com .
Now press enter and it will take you to the site .
We get started here , enter your details to create an account or you can sign up at one of these options .
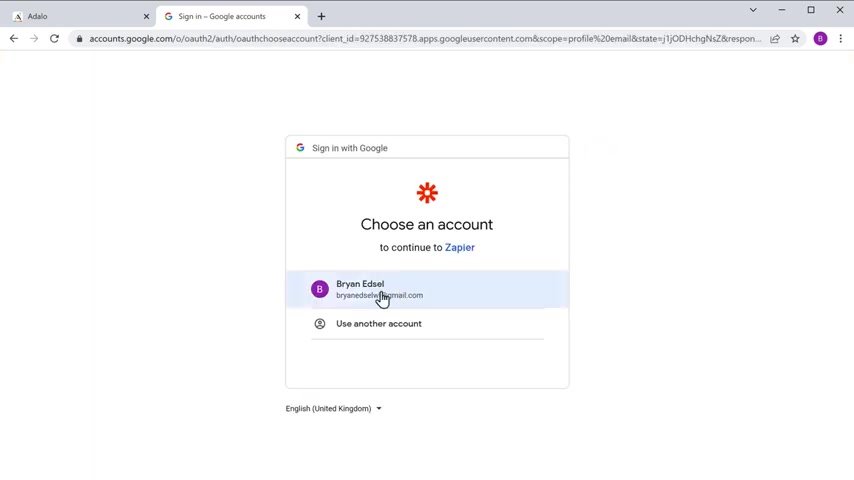
I'm going to use my Google account .
So let's click sign up at Google , then select your account .
Ok .
So now we have our account on Zao once you've created your account .
Next , let's go to step two which is decline the app with gmail .
So we connected , let's fill up these details , click here and type alo then click on it now to send email to our customers .
Click here , enter gmail and then click on it .
Now here you need to select when you want to send emails to your customers .
I want to send emails to my customers whenever I receive a new order .
So just click here and select new record , then click here and select send email once you're done .
Click try it .
Ok .
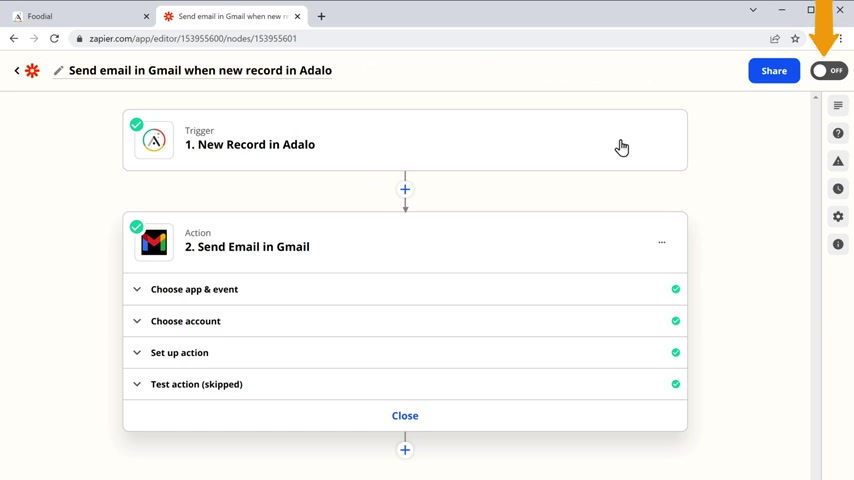
So now we have connected the app with gmail .
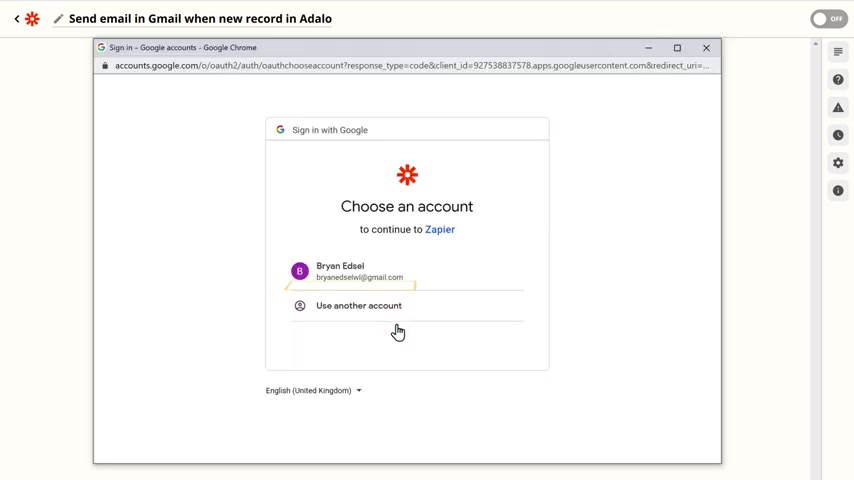
Next let's go to step three , which is to connect Zaia with your Rada account .
So connected , click sign into a and here you need to enter the log in details of your account .
Now click sign in then click allow and then please continue .
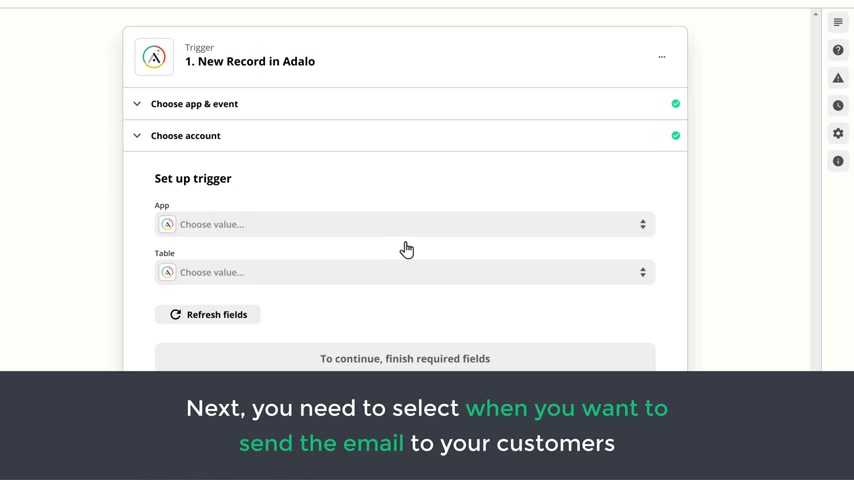
Ok , we have now successfully connected a ZAP your account with the once you connect it next , you need to select when you want to send the email to your customers .
So just click here and select your app name not and select when you want to send the email to your customers .
As I want to send the email to my customers after they place an order .
I'm going to select the order receipt collection , which we created before .
This means Zaia will get the order details from this collection and now click continue .
Ok .
Now let's check how it works .
So if we click test trigger here , you can see that we have got the order details which we placed earlier .
Now click continue and again , click continue .
Ok .
Now here you need to select the Gmail account from which you want to send emails to your customers .
So just click here and select your account or if you want to send email from another account , click use another account and select the account you want .
I'm going to select this and click allow and then click continue .
Ok , once you've selected your Gmail account , next , you need to select your mail content .
First , you need to select to whom you want to send your email as we want to send an email to our customers .
Let's click here and select user email .
If you want to receive a copy of the email which is sent to your customers , click here and enter your email ID .
Now click here and select the mail account from which you want to send the email .
I'm going to select this one and then enter your app name here .
I'm going to enter food dial .
Now , here you need to enter the subject of the email .
I'm going to enter that .
And next , let's create a body of the email .
Now type the message you want .
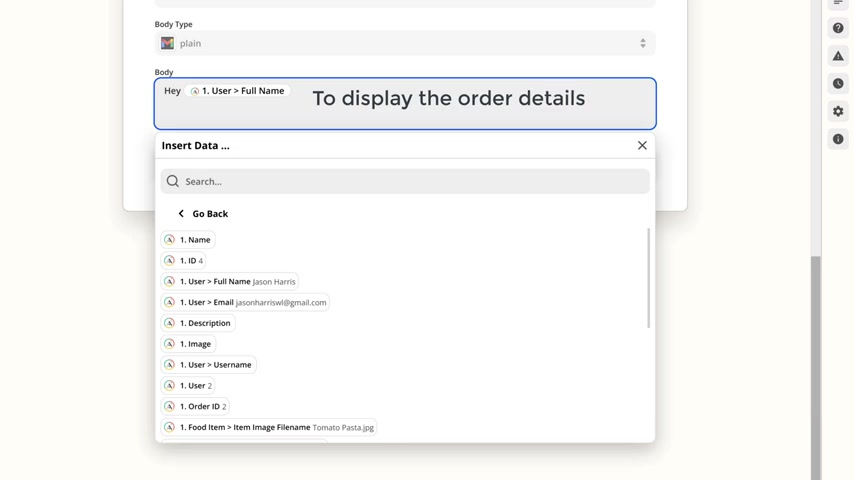
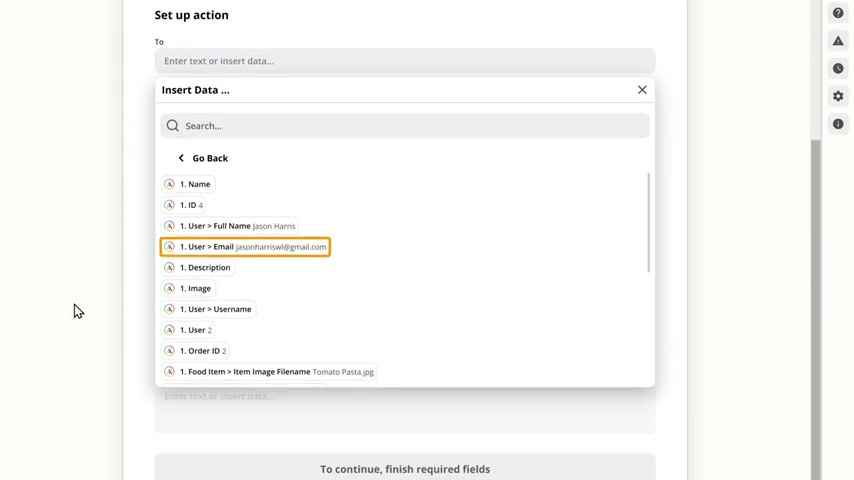
Let's type hey , and to display the customer name , just select user now to display the order details , let's enter a message and to get the order id type , order id , then scroll down select order id and then to get the food item , name , type , order item and select food item .
And now the food item name will be displayed .
Ok ?
In the same way you can enter all the other details like the item price and the address .
Once you're done , click continue and here you can see the details which we entered earlier .
So have a look at these details .
Now , if you want to send a test email , you can click test and continue , I'm gonna skip it .
And once you've set up the email , not start sending emails to your customers , just enable this option .
Ok .
Now you will be able to send emails to your customers to check that .
Let's go back to a click preview .
Now let's try to place an order on our app .
So click order now on any of the product and it'll take them to this order page .
Now , here they need to fill up these details , then enter the payment details .
And if may know the order will be placed on a ok .
Once the customer places an order , now if they go to the inbox , you can see that they have got an email .
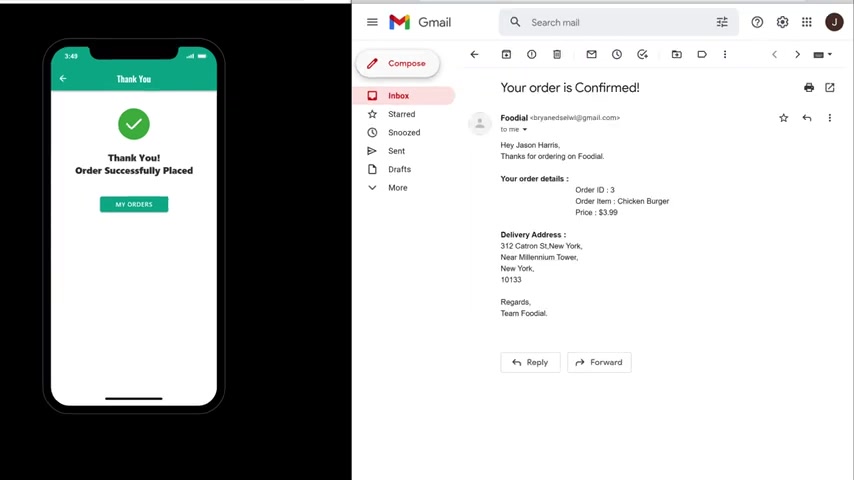
Now , if they open it , you can see that they've got all the details of the order .
Ok .
As soon as someone places an order on your app .
Now if you go to our inbox , you can see that we have received an email and if you open it , you can see all the details about the order your customer has made .
So this is so you can send emails to your customers when they place an order on your app .
Ok .
So let's say you want to add a navigation bar to your app like this .
How can you do that ?
So to add the navigation bar , let's go back to a and click navigation .
Now drag this element and up here as you can see the navigation bar has been added .
Now , each item in the navigation bar is represented as tabs here .
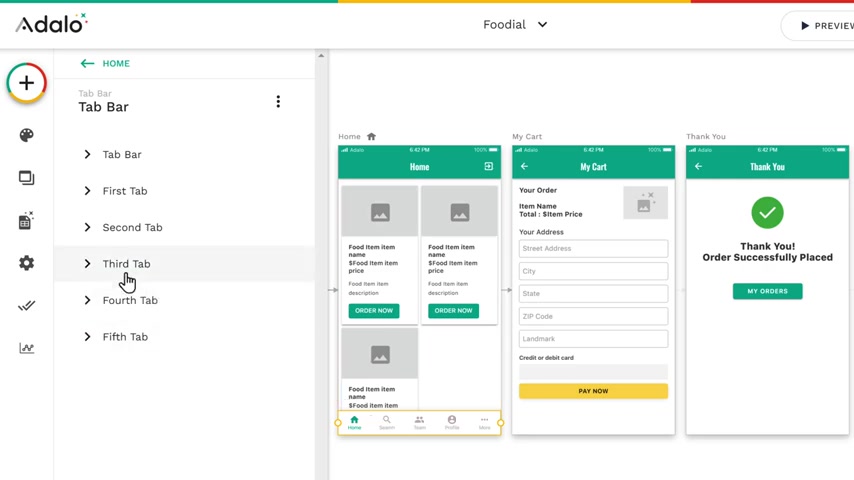
So let's say you want to remove any of the tabs just click on the tab and disable the option .
I'm going to remove these tabs .
So let's click here and disable this option .
As you can see , the tab has been removed in the same way you can remove the other tabs you want once you're done .
Now , let's say you want to change the icon of this tab .
So just click on the tab and the movie's icon now to add your own icon , click here and you will need different types of icons which you can add to your navigation bar .
Now search for the icon you want .
I'm going to search for shop and then select this .
Now to change the name of this .
Dab .
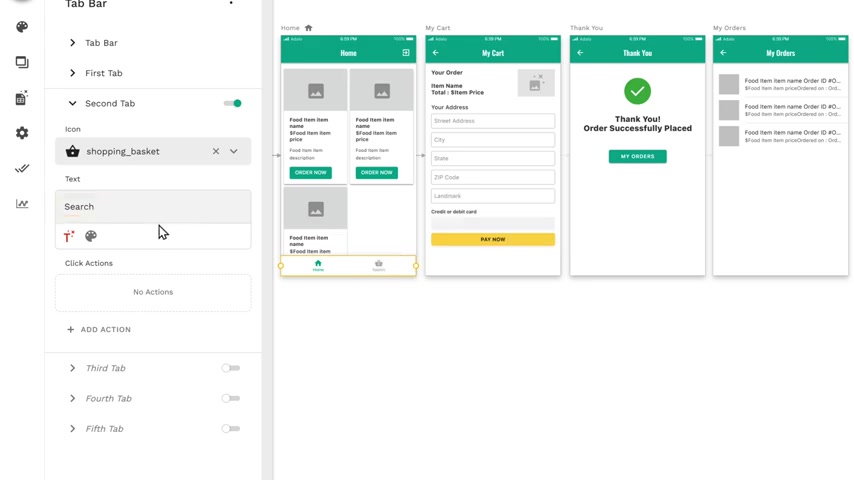
Let's remove this and enter the name you want .
I'm going to enter my orders .
Ok ?
Once you've done that , now , if someone clicks on this , my order tab , you want to take your customer to the my order page .
So to do that , you need to link this tab with the My orders page .
So let's click add action .
Now go to the link and click my orders .
So now we have linked to order tab with my order page .
Ok .
Once you've done that now to add the navigation bar to this page , just click on the navigation bar and press control C and control V and the copy of the navigation bar will be created .
We just drag and drop the navigation bar here as you can see the navigation bar has been added in the same way you can add the navigation bar to this page .
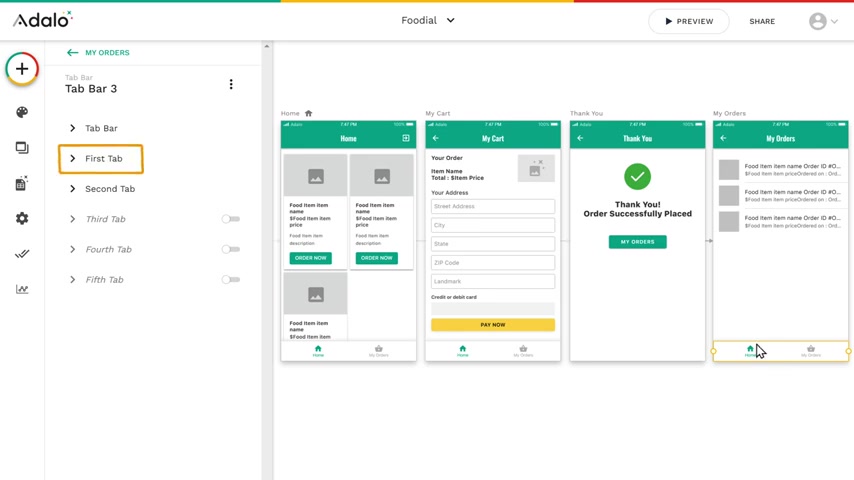
Ok .
We need to link this home tab so that when someone clicks here , it'll take them to the home page to do that .
Click here and click , add action , then go to link and click home .
So now when someone clicks on this home tab , it will take them to the home page .
Ok .
Now when a customer reaches the my orders page , we need the orders tab to be active to do that .
Click here , then click here , select the second tab and then the majority tab will be active .
By default , the home tab will be active .
Ok ?
Once you've added the navigation bar , next , let's see how it works , click preview .
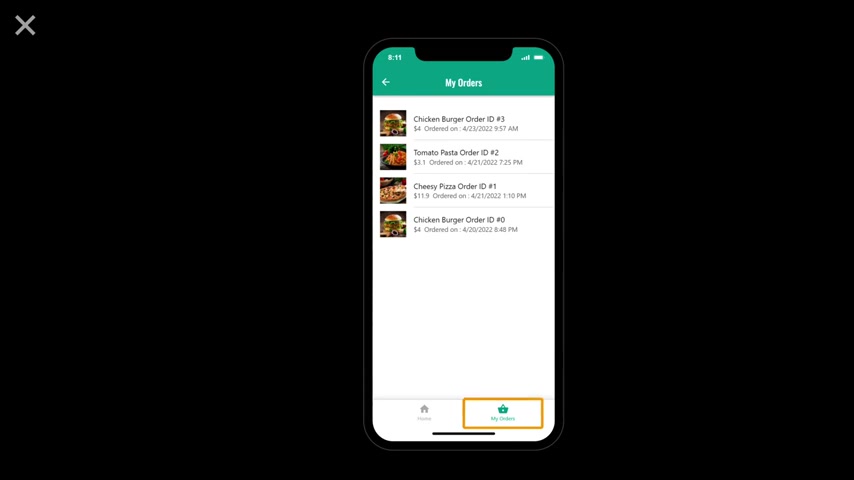
And now if you click on this my order tab , you can see that it takes us to the mayo screen so you can see that the tab has been active .
Ok ?
This is how you can add the navigation bar to your app .
Next , let's see how you can change the appearance of your app and make it look more attractive to do that .
Just click here .
So let's say you want to change the color of your app .
So just click here and change the color of the app from here .
Now , if you're not sure which color you want to choose for your app , you can get help from a website called Kahan dot co to find different colors for your app .
So let's open a new tab and search for Kala Hunt dot co .
You can see that we have got different colors which you can choose from .
You can pick any color you want for the app .
But let's say you want to pick this color .
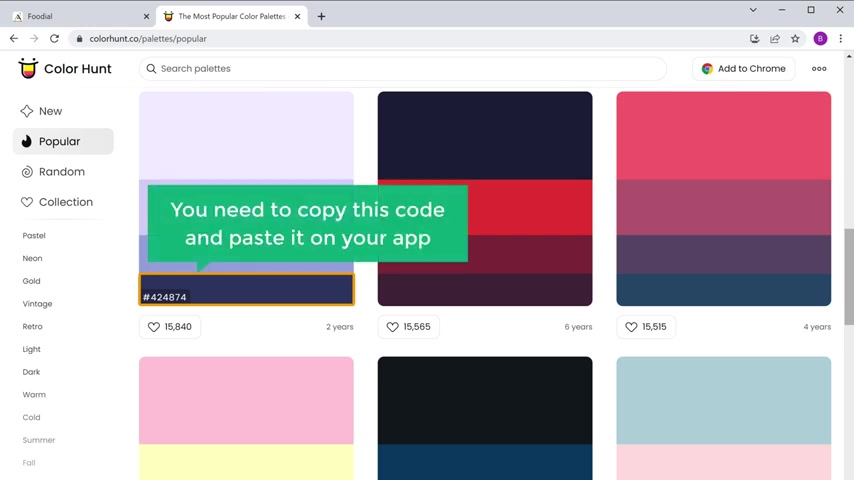
So just go here and you will get the color code now to get the color code , you need to copy this code and base it on your app .
So let's click here to copy .
So go back to the upload tab , then base the code here .
And as you can see , the color of the app has been changed , now change the phone style click font , then click here and select the font you want .
I'm going to select this one and as you can see the font has been changed , this is how you can change the appearance of your app .
So now we have successfully created a mobile lab .
So that's it guys .
Now , you know how you can create an app from scratch and we have seen how a customer places an order on your side and how to send an email to your customers and you can publish this app online and anyone can purchase the product from your app .
Now , if you want to know how to publish your app on the Play Store , you can check out our course on a download .
In this course .
We have covered advanced features like adding a welcome screen like this to your app .
When the customer logins and you can add a menu site bar like this .
Then you can also allow your customers to purchase multiple products on your app .
You can also allow your customers to select the quantity of the product like this .
And we will also see how you can add a delivery stamp for the delivered products like this .
Now , if you're interested in adding all these features to your app , you can check out our download course by clicking here .
And if you have an e-commerce website and you want to convert your e-commerce site into a mobile app , you can watch this video .
Ok .
Also make sure you hit the subscribe button to see more videos from us .
So thanks for watching .
I'll see you in the next video .
Take care .
Bye bye .
Are you looking for a way to reach a wider audience and get more views on your videos?
Our innovative video to text transcribing service can help you do just that.
We provide accurate transcriptions of your videos along with visual content that will help you attract new viewers and keep them engaged. Plus, our data analytics and ad campaign tools can help you monetize your content and maximize your revenue.
Let's partner up and take your video content to the next level!
Contact us today to learn more.