https://www.youtube.com/watch?v=ll9UJgLX7kg
How to Make Website with WordPress _ Step-by-Step Beginner's Guide 2021
In this video , I'm gonna show you how to make a website step by step .
And we're going to be doing this in just 10 simple steps .
We're going to be using an awesome dragon drop page builder plug in that allows you to have 100% customization over your website and it's super easy to use .
So whether you're inspired by apple dot com or Nike or Disney , you can use what you learn in this step by step tutorial to create any design that you can imagine .
And I designed this tutorial for complete .
So you don't need to have any previous experience making websites or need to know any coding in order to make a beautiful and fully functional website .
And I'll show you how to easily make your site 100% mobile desktop and tablet responsive because nowadays , half of all internet browsing is done on a mobile phone too .
So it's important to make sure that your website looks and functions perfectly on both a computer and a mobile view .
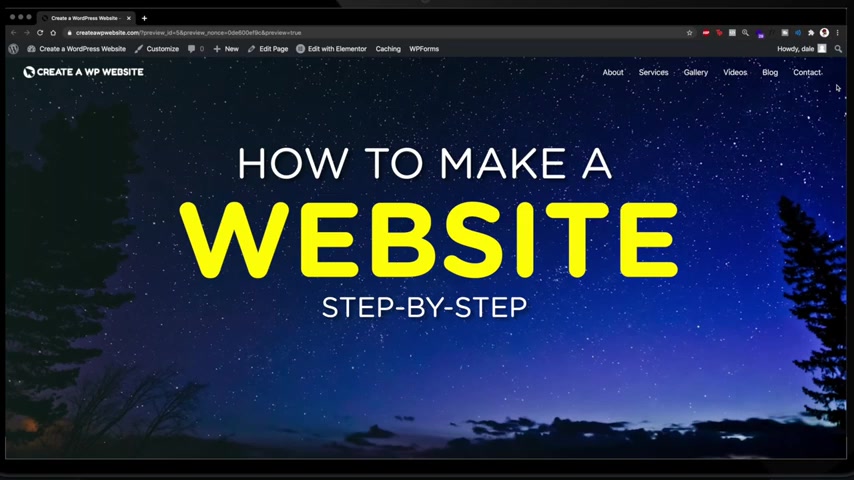
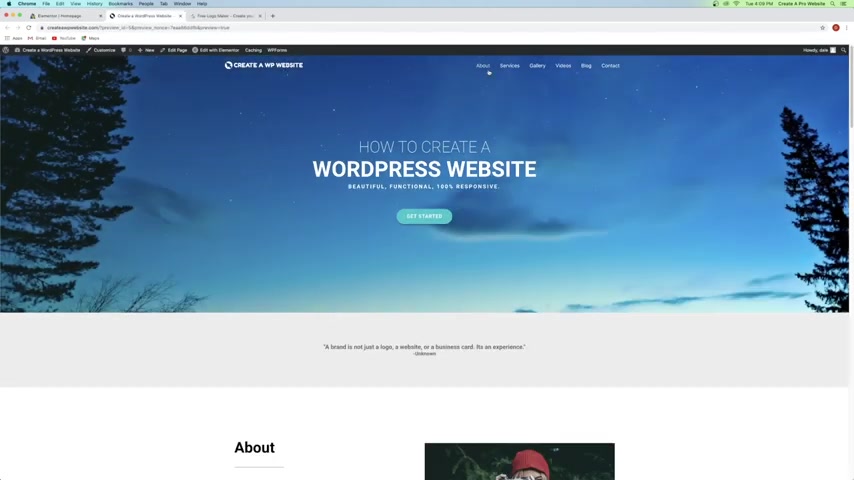
The website .
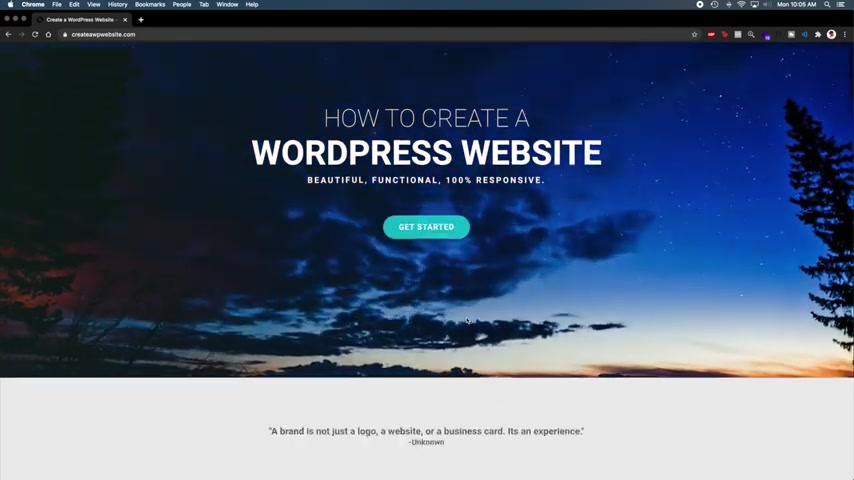
I'm going to show you how to make in this video video features a hero section at the top with a video background , but you can also just use a photo if you prefer .
It also has a heading and a call to action button .
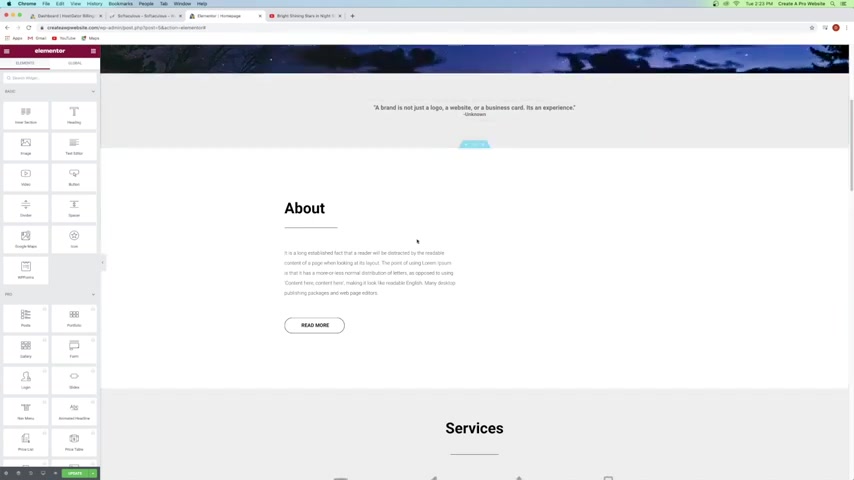
It has an about section for you or your company .
It also has a services section with clickable icons .
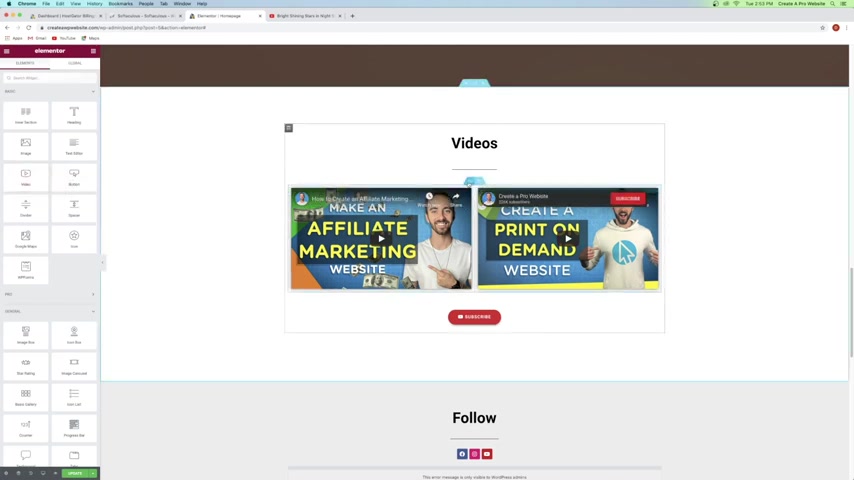
It also has both a gallery and a video section , but you can customize these to anything that you want to show off .
It has a section to hook up your Instagram feed , a blog section and a contact form at the bottom .
Even show you how to create a logo for your website completely for free , using an online software and it can be done in less than two minutes .
So here's a quick overview of the steps that we're going to be walking through in this tutorial .
Number one , I'll show you how to get a custom domain name for your website , which costs about $5 .
And we'll also need to get web hosting .

Web hosting is basically just renting space on a server somewhere that's connected to the internet so that you can fill that server with all the media , your website such as pictures , videos , themes , plugins , and everything that you want to put on your site so that you can publish it live .
Web hosting costs anywhere from 3 to $7 a month , depending on the plan that you choose , which I'll walk you through now .
Yes , there is such a thing as a free website out there , but they have a lot of downsides and limitations and I don't recommend them like you will not own your own website or your domain name .
So you won't get to choose a custom domain .
You also can't upload new themes to customize your site .
You'll be stuck to the very limited options that they have .
You can't upload plugins to increase the functionality of your website .
You can't monetize your website with ads to make money with it and your site could be deleted at any point because you don't technically own it .
This is why I highly recommend getting web hosting .
Next .
We'll be installing wordpress , which is a free software that we're going to use to set up our website , which is why you don't see ads for it like wick and squarespace and any other design platforms .
Wordpress is free and it's by far the most popular website building platform and it powers more than 30% of all websites on the entire internet .
It's used by companies like Forbes , Sony GM , the Rolling Stones and much more .
And wordpress is an open source software , meaning that there's hundreds of developers working on it every day to make it better and better .
And again , it's completely free .
Next , I'll show you how to install a theme to help determine the overall style and functionality of your site .
Then I'll show you how to install plugins like the dragon jot page builder plug in .
And then I'll show you how to use it to customize your website .
However , you want as well as how to create a contact form , how to customize your header and create a navigation menu , how to create new pages , how to create blog posts and finally how to edit your site for mobile and tablet view .
OK .
So if you're ready , let's get started .
Step number one is to get your domain name and web hosting to get a domain and web hosting .
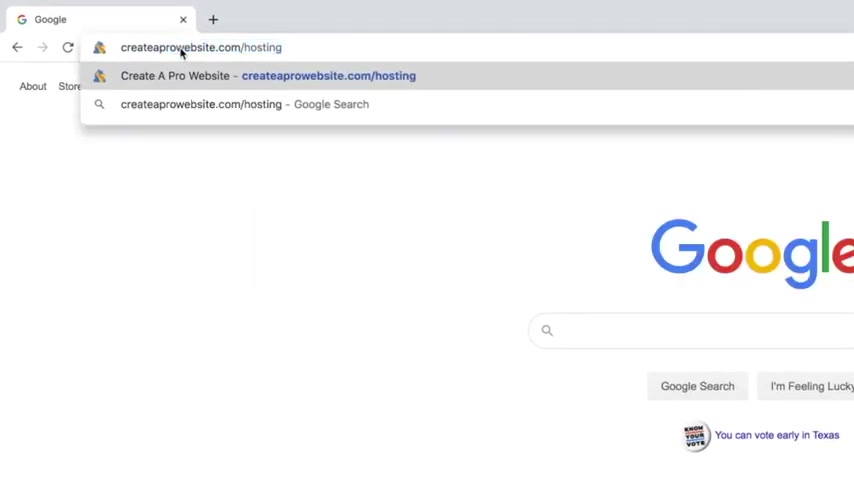
Just click on the very first link in the description or go to create a pro website dot com slash hosting .
And this is a special cob branded landing page that I have with host gator dot com .
Host gator is where I host all of my websites because they're fast affordable and reliable and they have 24 7 customer support in case anything were to happen to your website .
And by using that link , you can get a huge discount on your hosting here at Creative Pro website , which I'll explain in a minute .
So we've got a few different plans here .
We've got the hatchling baby and business .
Now we're gonna go with the hatchling , which is also what they recommend .
It's just a single domain .
It's got a free SSL .
Now , if you start making money with your website , then you can always upgrade later to the baby or the business plan which gets you unlimited domains .
And with the business plan , you get a lot more bells and whistles .
But if you're just getting started out , the hatchling plan is more than enough .
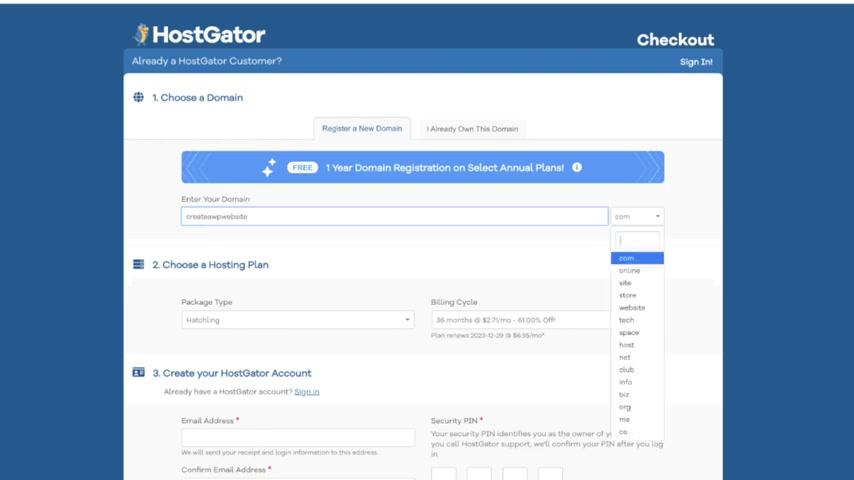
So we're gonna go ahead and click on buy now and here is where you can register your own custom domain name .
And if you already have a domain , you can always just click on this tab right here and hook it up , but we're going to get a new one .
So I'm going to type in a domain name that I want like create a wordpress website dot com and you can see here in green that it is available and if not , it'll come up in red and you'll just have to look for a different one .
So this one's available and it's also got things like dot club dot site dot net , all these different ones here .
But I highly recommend sticking with the dot com if you can because it's definitely the most professional looking .
So I'm gonna stick with that one and I'm just going to scroll down and make sure that domain privacy protection is enabled .
And I highly highly recommend keeping this checked because otherwise your personal information , like your email and your phone number are going to be public and then solicitors will be able to call you and try to spam you with things for your website and try to build your site for you and all this stuff .
It's super annoying .
I made the mistake on my very first website not getting it and I really wish I had .
So I'm gonna go ahead and leave that checked which host gator provides for you for your security .
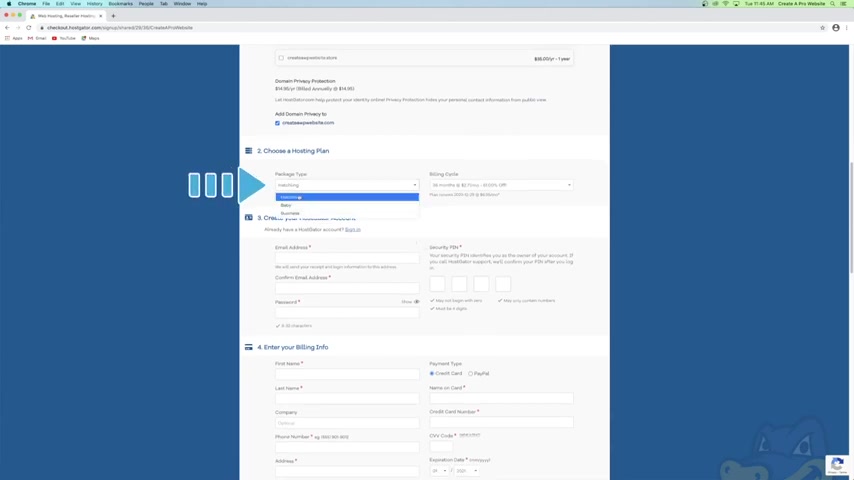
So then we can just scroll down and make sure that your package type says hatchling or whichever one that you chose .
And then you can choose your billing cycle .
So this is automatically set to 36 months , which is gonna give you the biggest discount that's going to be 61% off if you use the link in the description or went to create a pro website dot com slash hosting .
Now , you've also got a few other options here and my recommendation is to do the 12 months because you're buying your domain name for 12 months .
Anyway , that's the shortest term that you can get it for .
So you might as well get your hosting for 12 months as well and give this website a full year's try and it's still gonna be 55% off , which is awesome .
Now , if you're just getting started and you're like , you know what , I'm not really totally sure .
I just kind of want to dip my toe in the water .
You can always just do the one month and that's still gonna be 30% off , which is only $7 a month .
So for now , I'll just go ahead and choose that one .
But I do recommend a higher billing cycle like 12 or 36 months , which you will be paying for upfront , but it saves you a lot more money in the long run .
So now I'm just going to scroll down and create a host gator account .
So I'll just put in an email and then just put in a security pin and then we're just gonna scroll down here and you can put in your billing info and you can use either a credit card or paypal .
So I'm gonna do a credit card real quick and then just scroll down to the add additional services section .
And here we're actually going to uncheck all of these boxes .
So the site lock essentials and back up your hard work and everything else because I have videos on my channel that show you how to do all these things for free and I'll put a link to them in the description as well .
Under helpful videos .
I have a video on how to get a professional email like you at your domain name dot com .
I've got videos on how to secure your website , how to back up your website .
So you don't need to include these .
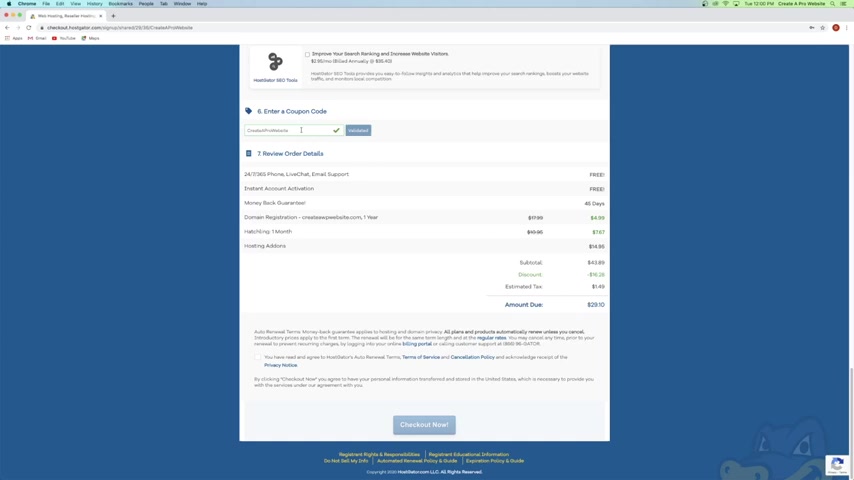
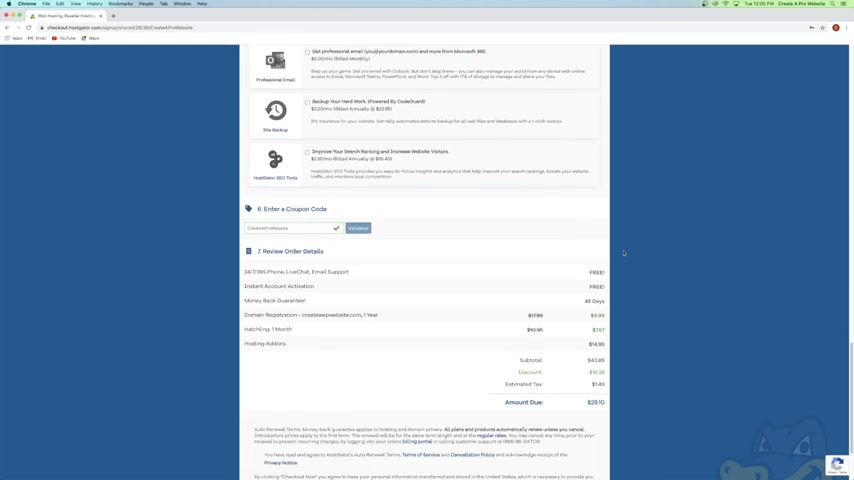
So now we're just going to scroll down and make sure that your coupon code says create a pro website , which it does and this is my affiliate link .
So I do receive a commission whenever you use it .
But it also just helps fund these free youtube tutorials that I'm able to put out and it saves you a lot of money on your hosting and domain .
So it's a win-win for both .
But if you don't want to use it , that's totally ok .
But I guarantee it's gonna be the best discount that you're gonna find anywhere on the internet because I worked it out special with Host Gator myself .
So you can see that our domain name went from $18 down to just $5 and our one month of hosting went from $11 down to just 7 67 .
And again , if you went for the 12 months or the 36 months , that's gonna be an even bigger discount .
But again , you are paying for it upfront and then the add ons is just your domain privacy protection , which is a one time cost for the year .
So at just $29 that is not bad at all .
So now , all you have to do is agree to the terms and then click check out now .
Cool .
So now host gate is setting up your account .
So just give that a minute .
And once you're brought here , all you have to do is just click on the X .
We're not really going to fill out all these questions .
So we're just gonna x this out and skip it as well as this page .
We're also just going to click on the X here as well .
And here we are inside of our host gator dashboard which you can see .
We've got our hosting over here as well as our domain name right here .
So now step number two is to install wordpress .
Again , Wordpress is the free software that we're going to be using to actually set up our site and go live with it .
So to do that , just click on install wordpress right here and then just click on install .
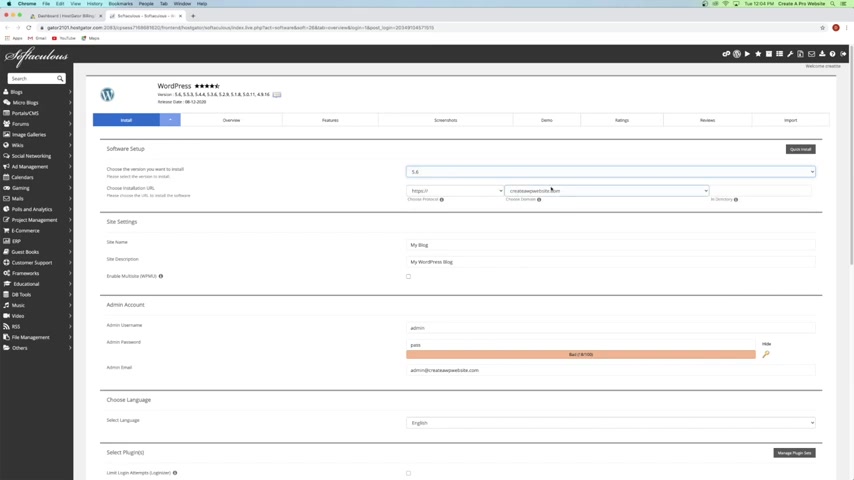
Now from here , just make sure that you have the latest version of wordpress , which we do and then just make sure that you've got your URL here and then just come down here and you can give your website a title .
So I'm going to just delete the default one and put in a new one and then a state description and you can always change these later if you want to .
So they don't have to be perfect right now and then just scroll down here and you can create an admin account .
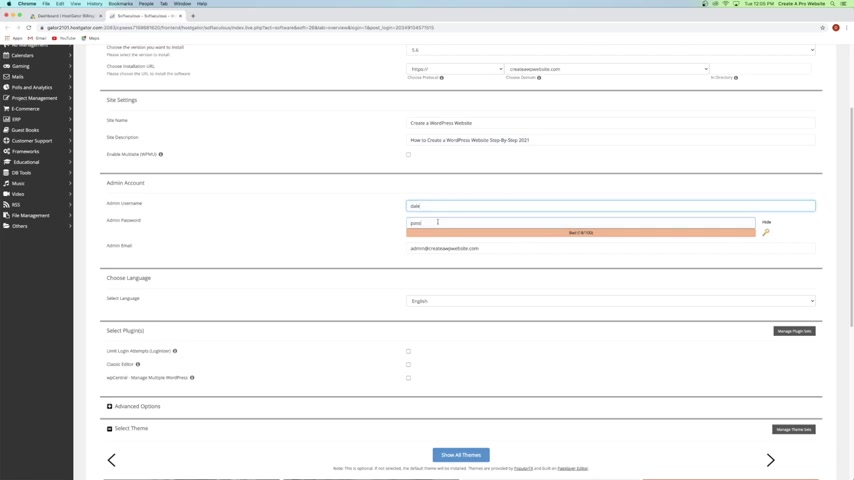
So I'm just going to delete admin and just put in my first name and then just create a password .
And this is going to be the password that you use to sign into your website any time that you want to edit it .
And then the admin email , go ahead and replace that with the same email that you used to sign up for host gator with .
And then you can just select your language here and then we can just skip all the rest of this and click on install .
Cool .
So now wordpress is installing .
So just give that a second .
Awesome .
So , Wordpress was successfully installed .
Now , you've got this URL here , which is just your domain name dot com forward slash WP dash admin .
And this is the URL that you're gonna use to sign into your website any time that you want to edit it or make any sort of changes .
So you can either click on this here or you can just go up to a new tab and type it in and it's always forward slash WP dash admin after your domain name .
And if you're brought to a page that looks like this or maybe it says that the site is not secure or basically anything other than the wordpress login page , which looks like this .
Then that just means that your site has to propagate .
And what that means is that host gator now has to send out this new domain name that you registered across the entire world to let all the servers in the world know that hey , this new domain name now exists and this process can take anywhere from 30 minutes to an hour .
And usually for me , it honestly only takes about 10 minutes , but it can take up to 24 hours .
So don't panic if you can't log in right away , just every 10 minutes come back and refresh the page and see if you can get to the wordpress login page .
So we're gonna give this a few minutes and I'll see you in a sec .
Ok .
So here we are at the wordpress login for our website .
So I'm gonna go ahead and type in my admin name as well as my password and then just click log in and here we are inside of the wordpress dashboard .
Congratulations for making it this far .
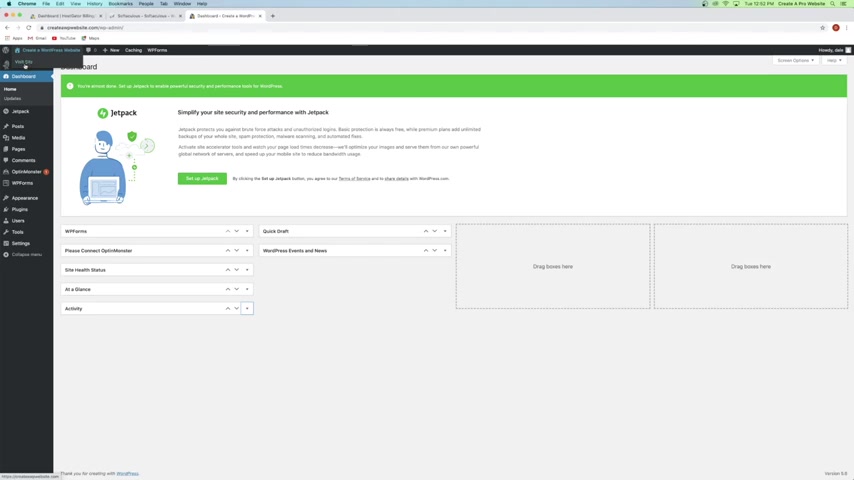
So , what we're gonna do first is just clean this up a little bit and make it a little less daunting .
So just go ahead and click on the X or the arrow on everything that you see just to kind of clean this up a little bit and have a nice environment to work with .
So wordpress is pretty simple .
Everything that you need to do with your website is going to be over here in this left hand menu and I'm gonna be walking you through all of this as we move through the tutorial .
So we can move on to step number three , which is to activate a new theme .
So the theme is going to determine the overall style of your website , like the header and the footer .
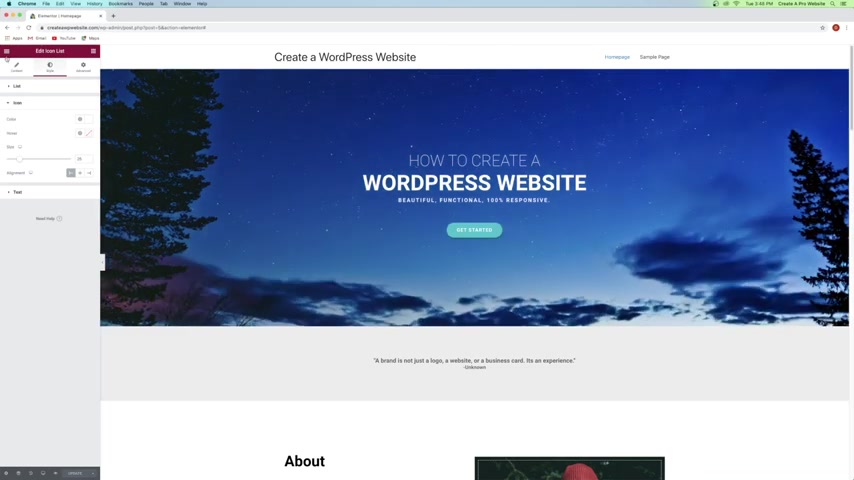
So if we currently go to our website now by going up to our website name and going to visit site , which I'll just do in a new tab , you can see that our website has the default theme which looks real ugly .
It does not look like a good website .
So what we're gonna do is change the theme first and we're gonna be using a theme called Astra .
So I'm gonna go ahead and close that and just going over here to appearance and then go to themes and Astra is the best theme that I have ever found .
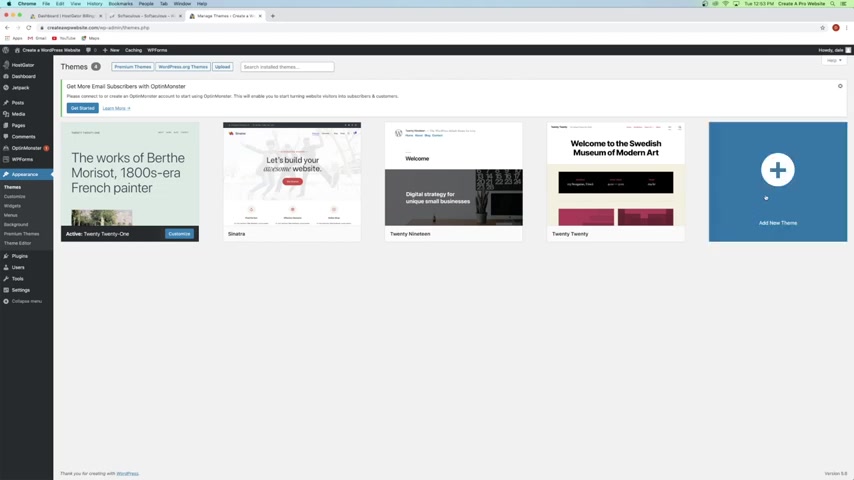
I've tried tons of free themes and premium themes and found that Astra is by far my favorite and it's used by tons of people .
So we're gonna go ahead and click , add new theme and then just go up to the search bar , appear at the top right and type in Astra and then you'll see Astra right here .
So just go ahead and click on install and then click , activate .
Ok .
So now if I just go up to our site again and go to visit site in a new tab , you can see that the style has changed .
So now we've got this white and light gray sort of style to it and it looks a lot more clean .
Now , obviously , it doesn't quite look like the website in the final for this video .
So let's go ahead and keep moving .
So , what we're going to do is move on to step four , which is to activate plugins .
So let's just go ahead and close out of this tab and go back to wordpress and we're going to be getting a few different plugins .
And the first one is going to be the drag and drop page builder that we're going to use to actually build .
And customize our website .
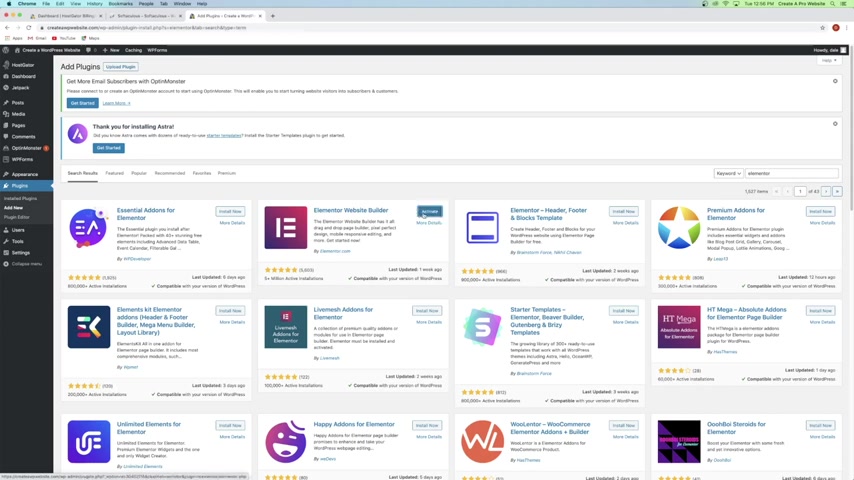
So let's go ahead and go over to plugins and go to add new and then just go over to the search bar and type in mentor and then you can see Element or website builder right here .
It's got 5 million active installations , five stars and it was updated just a week ago .
So you know that it's constantly being updated to make sure it's performing at its best .
It's a great plug in .
So we're gonna go ahead and click on install now and then click , activate .
Cool .
And now the next plug in we're going to get is some essential add-ons for element to which is basically going to be some extra free tools that you can use with element to , to get even further customization .
So let's just go back to plugins and then go back to add new and then again , just go up to the top right , search bar and type in or again and then you'll see essential add-ons for mentor right here .
So just go ahead and click on install now and then click , activate .

And then one last plug in we're going to be getting is a plug in that allows you to put your Instagram feed on your website , which we're going to be touching on later in the tutorial .
But we need to get the plug in now .
So we're going to go back over to plugins and go back over to add new and then just go over to the search bar and type in Instagram and then you'll see smash balloon , social photo feed right here .
It has 1 million active installations .
It's a great plug in .
So we're gonna go ahead and click on install now and then click activate and now we can move on to step number five , which is to customize your website .
So now we're going to be dragging and dropping using mentor to create our website .
So what we're going to do first is actually create a home page page .
So let me show you first , we're just gonna go over to pages and go to add new and then you can just click the X on this box and then on the title , we'll just type in home page which isn't going to be visible anyway .
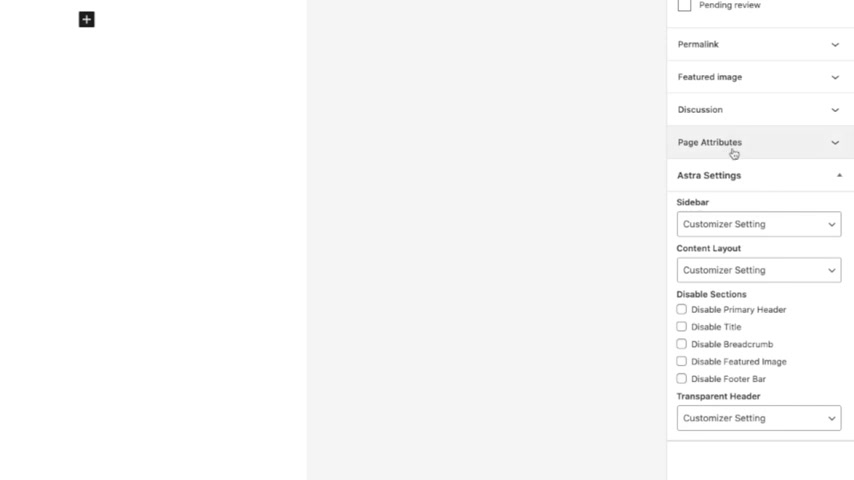
And then over here you'll see a little tab that says page attributes , just go ahead and open that and under template , we're going to change this to element or full width , which is very important .
So you want to make sure that you do that and then just go ahead and click on publish and then publish again .
So now just go back over to the wordpress symbol up here .
And now what we need to do is tell our theme , which is astra to use this home page as the actual home page .
So it's a little confusing .
But let me show you we're just going to go up to our website and go to visit site and then we're just going to click on customize and then we're just going to go down to home page settings .
And by the way , this is the customizer for your theme , which is Astra .
And I'll be touching a little bit more on this later , but you really won't need to use this too much .
So , we're going to go over to home page settings and then we're going to change it to a static page underneath your home page displays .
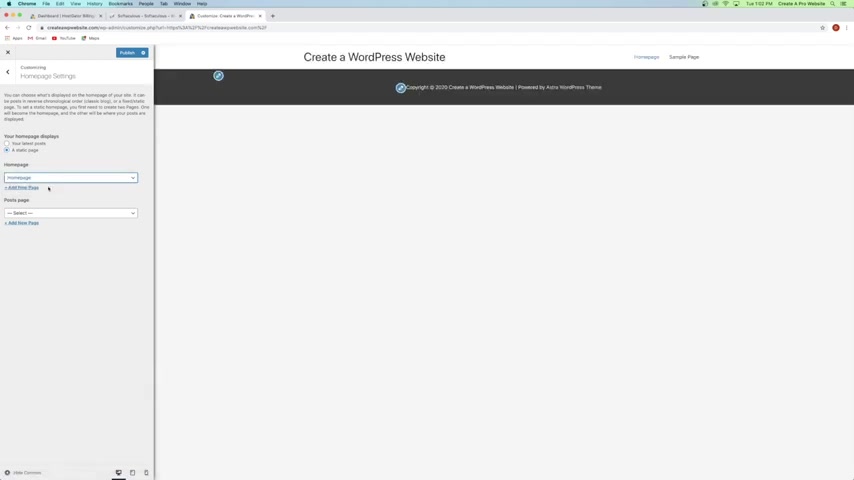
And then on your home page , we're just gonna select homepage , which is the one that we just created .
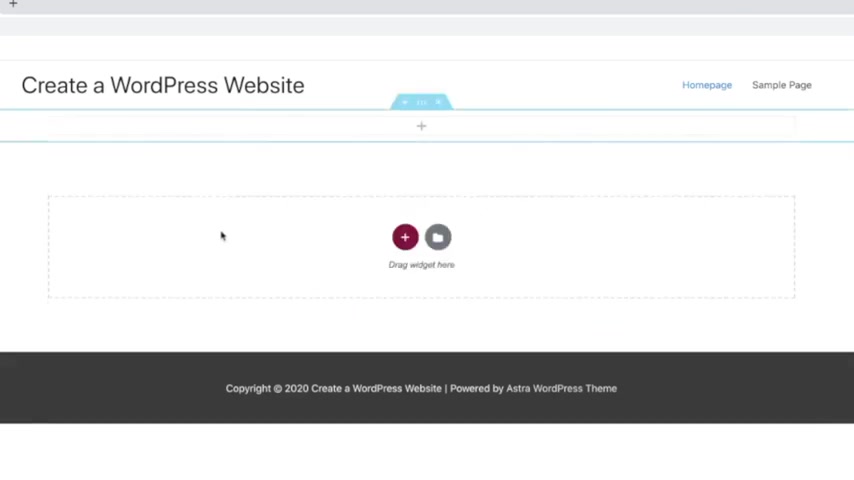
And then there we go , it gives us a nice blank home page .
So this is your footer and then this is your header .
And what we're going to be doing is putting our actual website in between these and then that footer is going to move all the way to the bottom .
So let's just go ahead and click on publish and then just click on the X and now just go ahead and click on edit page and then we're gonna go ahead and click on edit with mentor .
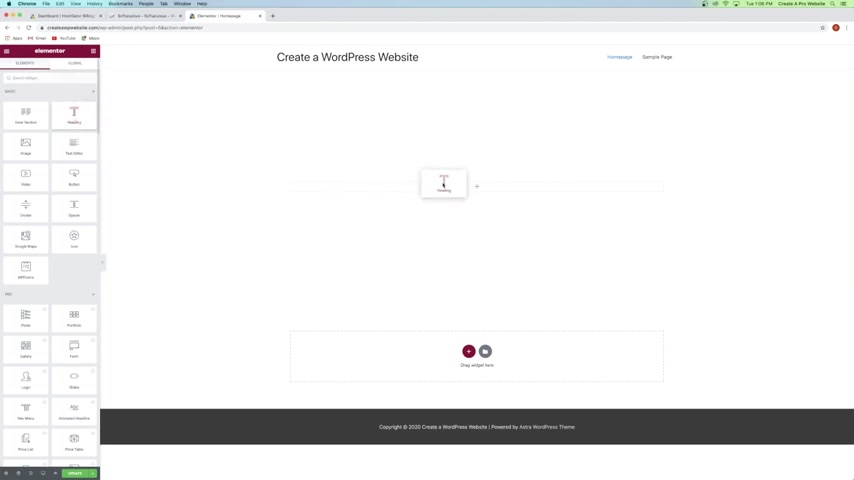
And here we are inside of the element or page builder and everything that you need to edit your website is going to be over here on the left and these are widgets that you can just drag and drop into your website .
So first I'm going to show you how to create a whole hero section from scratch using mentor .
And then what I've done to make things a lot faster and simpler for you is I've provided a template that I built myself that's fully responsive to desktop tablet and mobile .
And it's a beautiful site and I've included it in the description .
But first , you need to know how to actually use mentor .
So how it works is you can just click on this plus button and it's going to ask you to select your column structure .
So you can do one big column , you can do two or a bunch at a time and you can space them differently .
Now , what we're going to be doing is just doing this normal one column .
So I'm gonna go ahead and click on that and that just created a new section , which is this blue box here .
Now , it's really thin .
So what we want to do is give it some more height .
So to do that , just go over to the left here and you'll see height , we're going to change that from default to minimum height .
And then you can just drag the slider up or down and you can make it a bigger or smaller section .
So you can see that the section is in blue here .
And then we've got the column , which is this gray dotted line inside of here and you can have multiple columns in here .
So what you could do is just right click on here and then click duplicate and that's going to create two columns now , but we only want to use one .
So once you have a column , you can then drag widgets inside of it .
So if I wanted to drag some text like a heading text , I could just click and drag and I can just drag it into this box , which is going to be indicated by a blue line of where you want to place it .
And then I can just let go .
And there's my text and you can edit the text by simply triple clicking right on the screen and you can change it here or you can change it over here in this box as well .
And what we're gonna do is just align this text in the center with that button right there .
And if you want to edit the font and the color of the text and everything else , you can just click on the style tab and you can do all of that here .
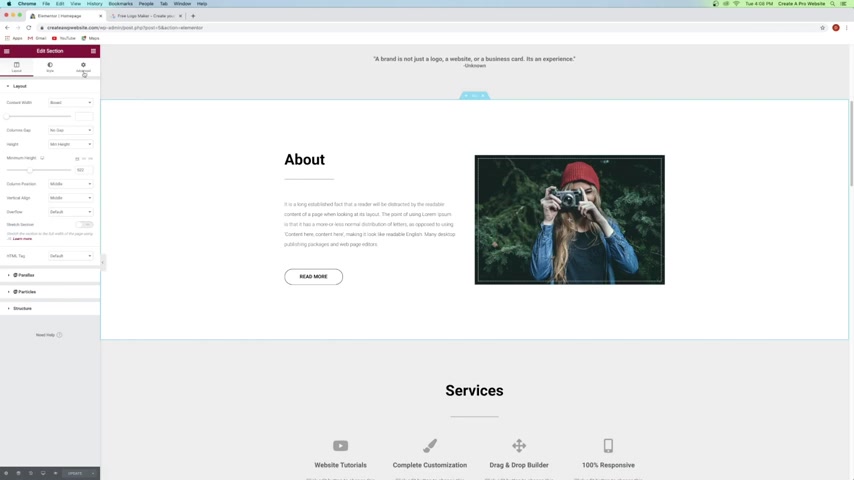
Now , I'm going to be getting to this in just a second because first , what we want to do is actually put in a background so that we can actually see that text because we're going to make this text white and we're going to put it on a background .
So to put in a background , you can just click on the little six dots which is for this section and then you can see that our menu here changes to edit section again .
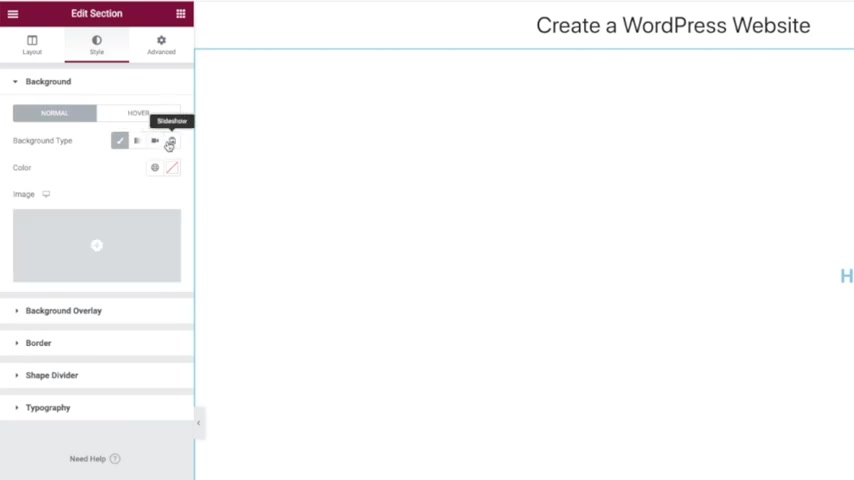
And what we want to do is go over to style and then underneath background , you can just click on the classic button which is a little paintbrush and you can put in an image and you can also do a gradient or a video or a slide show if you want to .
So if you want to put in an image , you can just click on choose image and then just go over to select files and this will allow you to drag some from your computer .
So I'll just go over to some images which all of these images are provided in the description if you want to follow along with me .
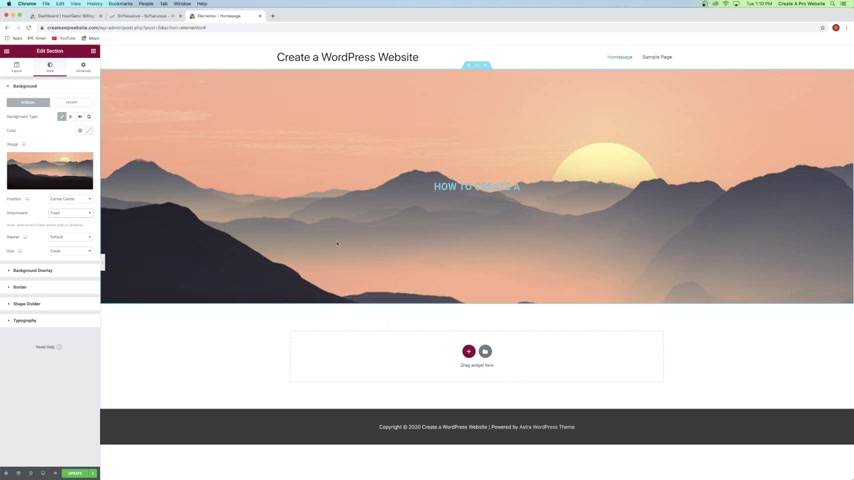
So I'll just grab one of these just for now just to show you and then just click on open and that's going to upload that image .
And you can see this image is about 1500 by 1000 pixels , which is a pretty good size for a hero image .
You don't want to have images that are too big like 3000 or 5000 pixels because then your website is going to take too long to load and it's not going to look very good .
And Google search does not really like websites that take a long time to load .
So the faster your website is the better .
So using images around this size are perfect .
So now just go ahead and click on insert media and that's going to put that image in which is all wonky .
So let's go ahead and fix that .
So underneath position , we'll just change this to center , center .
And then for the size , we're going to come down here and go to cover just like that .
And then you can also go to attachment .
So if we were to scroll on our website , this image would scroll with it .
But if you want the image to stay in place and kind of have a parallax effect where the rest of the website moves , but the image stays in place , you can just change that over to fixed .
But I need to add more content to the website to show you how that works .
So the next thing we can do is add a background overlay .
So I'm gonna go ahead and click on background overlay , which is this tab right here and then we're going to click on classic and I'm just gonna add a black color to it .
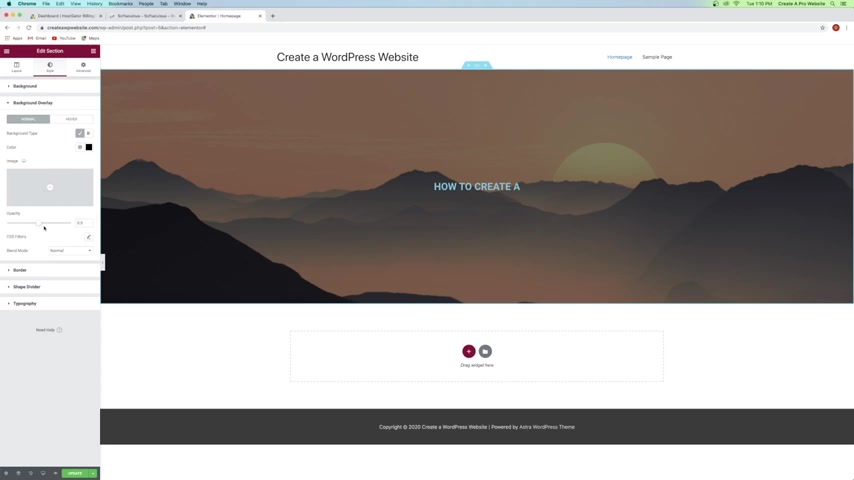
So I'm gonna go to color here and then just drag over to black and it's gonna add a dark overlay on top , which you can change how much of it you want by dragging the slider up or down .
So I'm gonna do somewhere around a 0.5 just like that .
And I'm also going to go back over to layout and I'm gonna change the minimum height to be a bit bigger , maybe something more like that .
And now you can see that parallax effect whenever I scroll , the image stays in place .
So now let's go ahead and change the style of our text .
So I'm just going to go ahead and click on this widget here , which is the little pencil icon for the text widget .
And I'm going to change the text color by going over to text color and I'll just change this to white just like that .
And then you can go over to typography and you can change the font family here .
So the automatic one is Roboto not really sure how to say it , but you can just click on that and you've got all sorts of Google fonts in here .
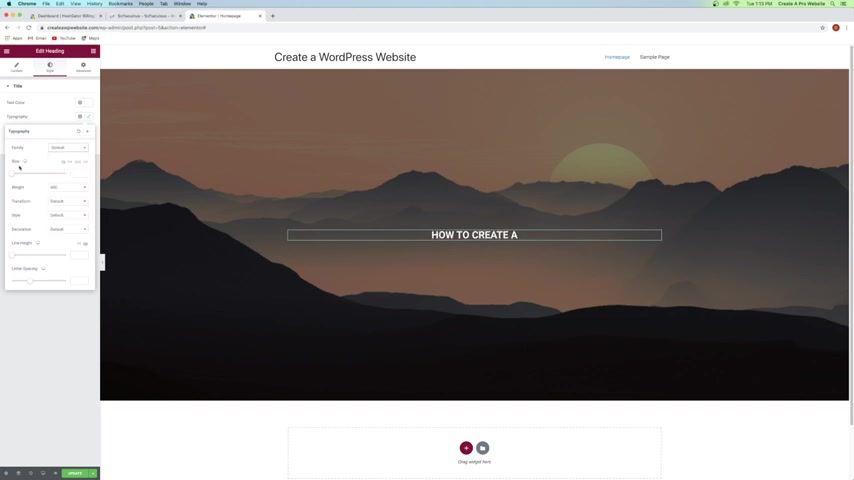
If you scroll down and give them a second , they'll all upload and then you can just change them to whatever you want .
So if I were to click on this one , it changes the text there , but I'm going to go back to the default .
So I'm going to go all the way up and just click on default and then you can change the size by just dragging the size slider up or down .
You can change the weight so I could do something like a 200 that's gonna make it a lot thinner or maybe a 300 .
I think that looks pretty good .
And then a few other settings like line height and letter spacing .
So you can drag this up and make it really wide or really scrunch together .
And if you want to undo anything , you can just click on command Z if you're on a Mac or control Z if you're on a PC .
So now what I'm going to do is actually duplicate this text .
So I'm going to go over to this little widget here and just duplicate .
And then for this bottom one , I'm going to change the text over here to wordpress website .

And then I'm gonna go over to style and then go over to typography and I'm just gonna change the weight over to default and then I'm just gonna bring it up .
Now , the next thing we can do is add a button in here .
So to do that , just go over to the little Rubik's Cubic and symbol up here .
And then we're just gonna go down to button and just drag that in just like that .
And then you can change the text that's on the button by going over to text right here and then you can add a button link .
So what you want to do is just delete that little hashtag and then you can put in any URL that you want that button to go to whenever somebody clicks on it .
But for now , I'm just gonna go ahead and leave it blank because I'm going to show you a little bit more about buttons later , you can change the alignment of the button So I'm going to put it in the center .
You can change the size from small to extra large , whatever you want to do .
But I think small looks pretty good and you can add an icon .
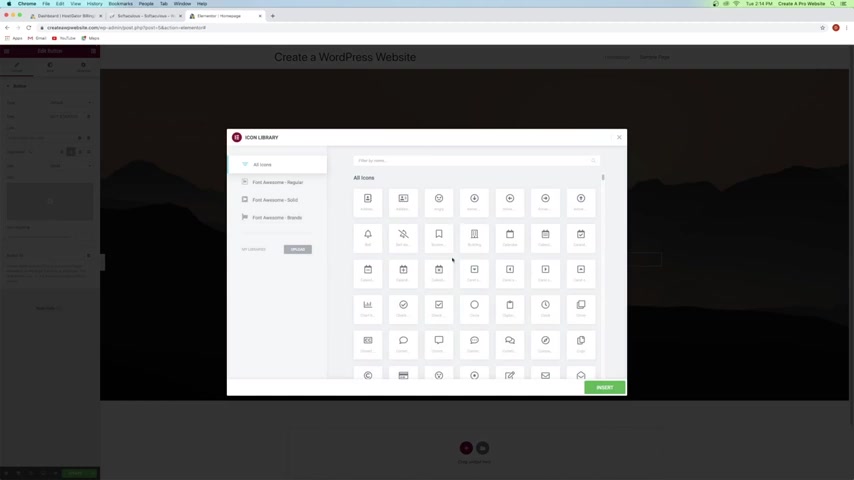
So if you go to icon library , you can look for any symbol that you want .
So you can search up here or you can just pick one from the list down here .
So I could just pick like a little arrow and then just insert that , that's gonna put that in right there and you can decide whether you want it before or after .
But I'm not going to do an icon .
So I'm gonna go ahead and just click on the little trash can and delete that .
And next , we'll go over to style and we'll change how the button looks and functions .
So for normal , you can see we've got normal and hover we're on the normal tab right now so we can change the text color .
So we'll make sure that that's white and then we'll go over to background color and I'll just change that to like a blue .
I kind of want something that's gonna stand out amongst everything else .
So what I wouldn't want to do is do something like orange because that's gonna blend in a little bit more with the background and you want your button to really stand out because this is gonna be your call to action button .
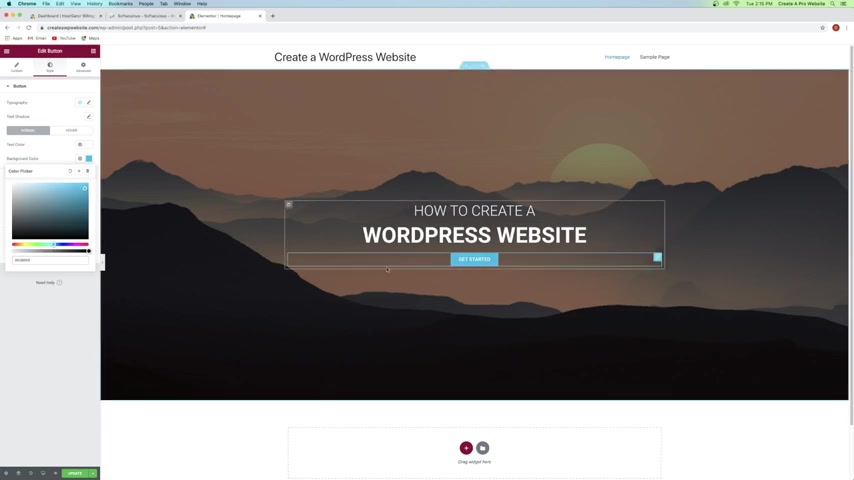
It's gonna be the most important thing .
So this button up here at the top is gonna be more important than any other button on your website .
So if you're selling a product or you want people to go to a certain page to read something , you're gonna want to put that here .
So now we'll just go over here and you can add a border to your button as well if you go to border type and change it to solid and then we just give it a little bit of width .
So we'll just click up on that .
You can see we've got now this border around our button , but I don't really want to do a border .
So I'm gonna go ahead and get rid of this and just go back to none .
But what I am gonna do is go over to border radius and I'm gonna bring this up to somewhere around like a 40 and that's gonna make this pill looking button .
It's a little bit more circular , which I really like .
And then you can also add a shadow to it by clicking on box shadow and you can see it just add a little bit of shadow behind there , which you can change how that works .
You can put it more to the left or the right or you can do vertical .
So I'm gonna do a little bit of vertical .
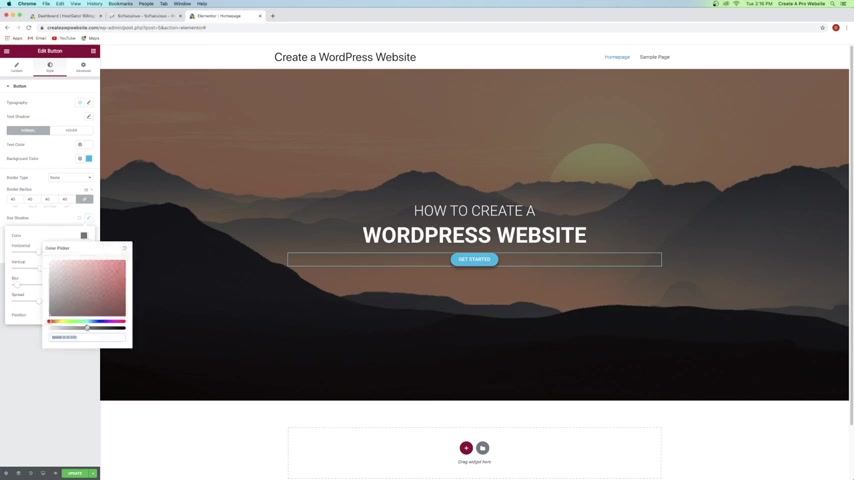
And then I'm gonna go over here to the color .
I'm gonna bring this slider at the bottom down just a little bit because I think it's just a little bit too dark and I wanna lighten that up and now I'm going to add some spacing because right now this button is really pushed up against our text .
And a general rule of thumb for design is things that are grouped together , should stay together and things that are not , should have space between them .
So these two texts can stay kind of right on top of each other .
But we want to add some space between the text and the button .
So just go over to advanced and then you'll see padding right here .
Make sure that this little button is checked to link the values together and we're just going to add some padding around that button .
Maybe just something like that like a 30 .
Actually , let's go a little bit more , maybe like a 45 .
And we'll just go back over to style and make sure that our hover is now working because right now when we hover over this button , it doesn't change .
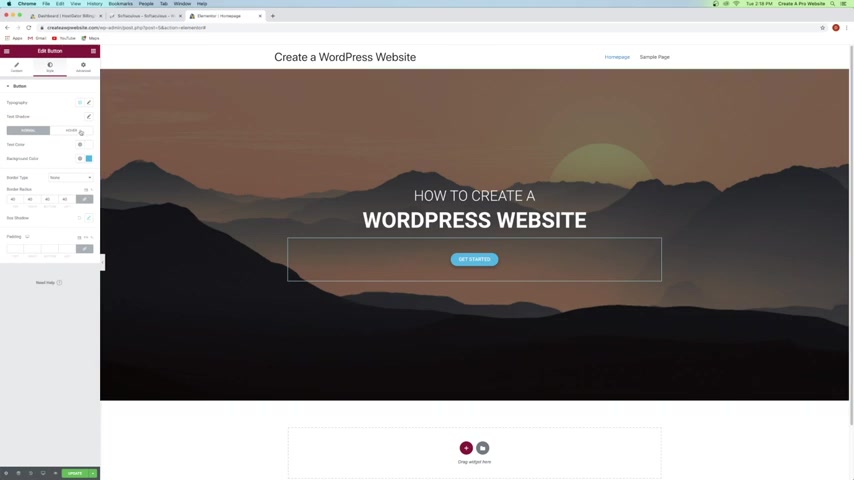
So it doesn't really tell your viewer or your visitor to your site that this button is really working .
So let's go over to hover and then we'll just change the background color to be a little bit of a darker blue .
So I'm gonna go with something more like that and then change the text color to white .
And then for the hover animation , I'm also going to change that .
So I'm gonna put grow and you can see when I hover over , it grows a little bit and it gets a little bit darker .
So it kind of indicates that you can touch this button , which I really like .
And there's tons of animations in here and they do get a little crazy .
So I recommend sticking with something a little bit more simple , like grow or shrink .
So I'm gonna stick with grow and now with the background , like I said , you can also do a video .
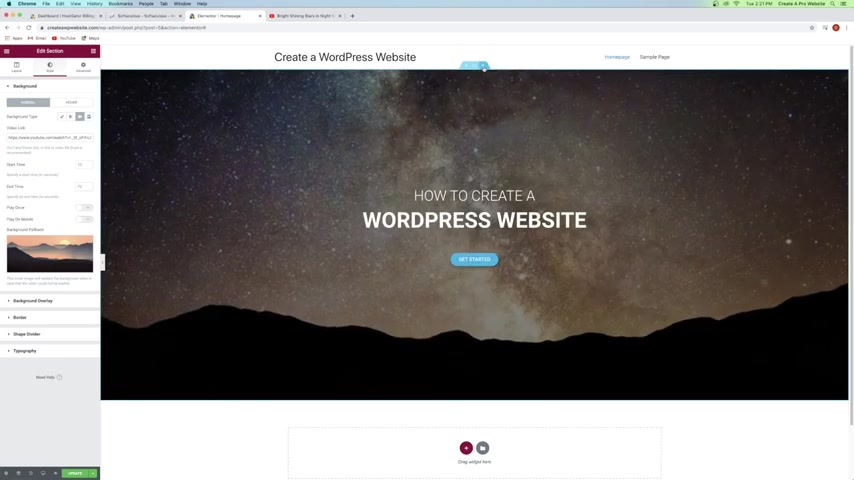
So if I just go up here and click on the six dots to edit this whole section and I go back over to style and I click on video .
I can now put in a youtube link .
So I'm gonna go ahead and go over to youtube and find a good video .
So I'll type in something like night time lapse and then we can just pick any one of these videos that we want .
So I'll just go ahead and grab one down here like this one and I'm just going to grab the URL right here and then I'm gonna go back over to mentor and just paste that in and there we go .
Now you've got a moving video background and you can change the start time and the end time in case there's some text in the beginning that you need to skip past things like that .
And then you also want to put in a background fallback .
So if I go to choose image , I'll just put in this as a fallback .
So if for some reason somebody's computer or their phone or tablet isn't going to load that video , it will just resort to this image which will still look really good .
And that in a nutshell is how to use element or to drag and drop and build a website from scratch .
Now , like I said , I made this a lot easier for you by building a template website .
Like I showed you in the beginning that you can instantly download in the description .
So let's go ahead and put that in .
So what I'm going to do is just click on the X and delete all of our hard work .
I know it sucks to see it go , but don't worry , it's going to come back .
So in order to put in a template , we're just going to go ahead and click on this button right here , which is add template .
And then I'm just going to go to this little symbol right here , which is to import a template and then go to select file and then I'm just going to go to where that template is .
So we've got create a pro website homepage 2021 which again is an instant download in the description .
And I'm just gonna click on open and then you can see that here .
So now I'm just going to click on insert and we're going to import the document settings .
We're going to say yes .
And now you can see that we've got our whole template in here .
So if I scroll down , we've got a little section for a quote , we've got an about section which you can put an image in here , which I'll show you .
We've got our services a gallery which I'll show you how to put images in videos .
Section .
A follow section where I'll show you how to hook up your Instagram feed with that plug in that we got earlier , a blog and a contact section which I'll show you how to create a contact form .
But generally you have the whole skeleton of the website built with this template and all you have to do is fill it with your media .
So first , what I want to do is actually fix this text a little bit .
So what I'm going to do is just click on this middle text here and I'm going to go over to advanced and I'm just going to edit the margins a little bit .
So I'm going to increase the margins to give it a little bit more space just like that .
I think that looks a lot better .
So generally this whole curro section up here is already built .
So like I said , you can change this button and put in whatever URL you want .
So you just click on the button and then you can put in any link here that you want .
Now , I'm not really going to link to anything , but again , this is going to be your most important call to action .
So now we can go down and edit our little quote section if we want .
And that's as simple as just clicking and then you can change the text right here .
And again , you can change the style of the text like I showed you earlier .
So I'm not going to touch this one much , but you can also change the background .
So I've got this light gray and the white which goes again to light gray .
So if you wanted to edit that , you can just click on these six dots for this section and then just go over the style and then just change this gray color to whatever you want .
But I think the gray looks pretty good .
It's really clean looking .
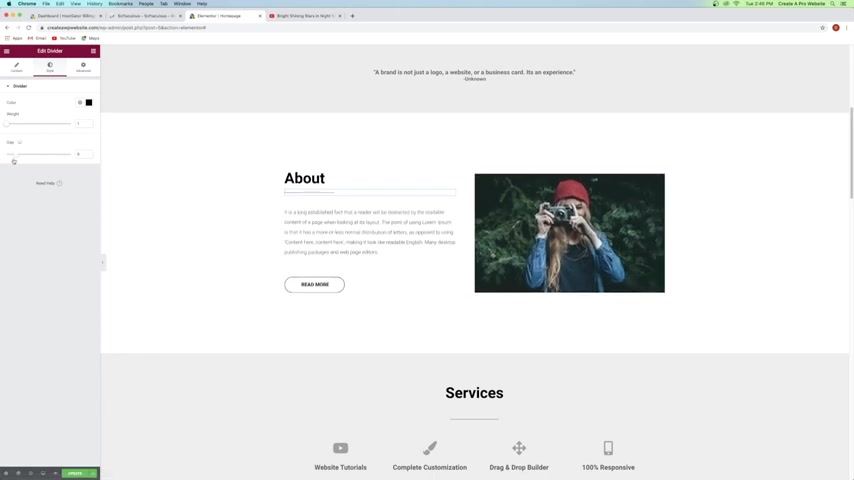
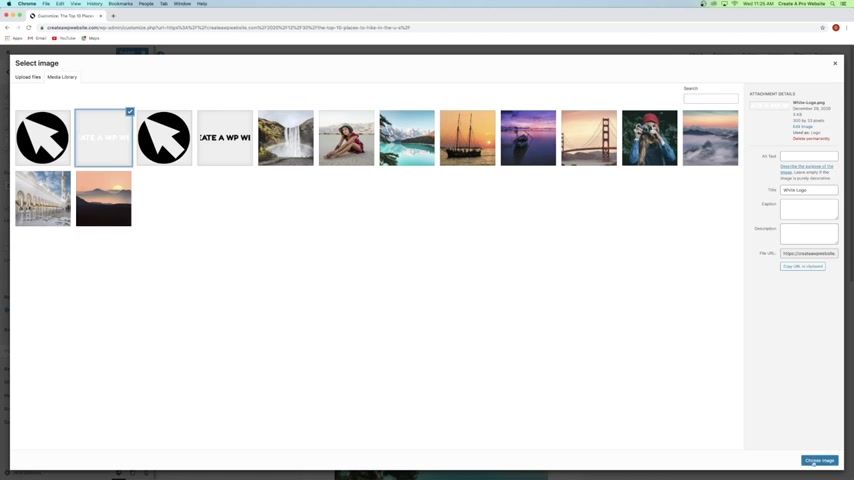
So I'm just gonna leave it and for the about section , what we want to do is add an image in here and to put in an image , what we're gonna do is just click on this column right here , which is this little widget .
And then we're just gonna go over to style and then underneath background , we're gonna go to classic and then we're gonna put in an image .
So I'm gonna go to upload files , select files and we can actually drag in all of our images at once .
So I'm going to shift click and get all of these images except for the one that we already got , we can actually upload all these at once .
So I'll just say open and now all of our images are in our media library .
So I'm going to grab this one of this girl and then just insert media .
But obviously , what you're going to want to do is put in an image of yourself .
And if for some reason , the image doesn't come out looking right right away , just go over to the size and make sure that you change it to cover and you can change this text here .
If you want , you could maybe do about me or something like that and you can edit this text as well .
And this is a spacer widget , uh sorry , a divider widget with some space around it .
So you can change the width of how long you want that line to be .
I think it looks pretty good being short and then you can also go over to style and then you can change the gap .
So you've got the gap in between the text .
But I think what it had was pretty good .
And again , I showed you how to edit text and buttons .
So I'm really not going to tap into these too much .
So we can just go ahead and scroll down to our services section .
So these are little icons .
So if you click on these it's an icon box and it's got an icon , a title and description with some text and you can put in your link here .
So you can change the icon if you want by just going to the icon library and selecting whatever icon you want .
I found that one just by clicking on youtube up in the search bar and then you can grab this one or that one or whatever symbol that you want to use .
So whatever your services are , it's gonna just depend and then you can change the title up here .
So this says website tutorials , you can change it to say whatever you want as well as this .
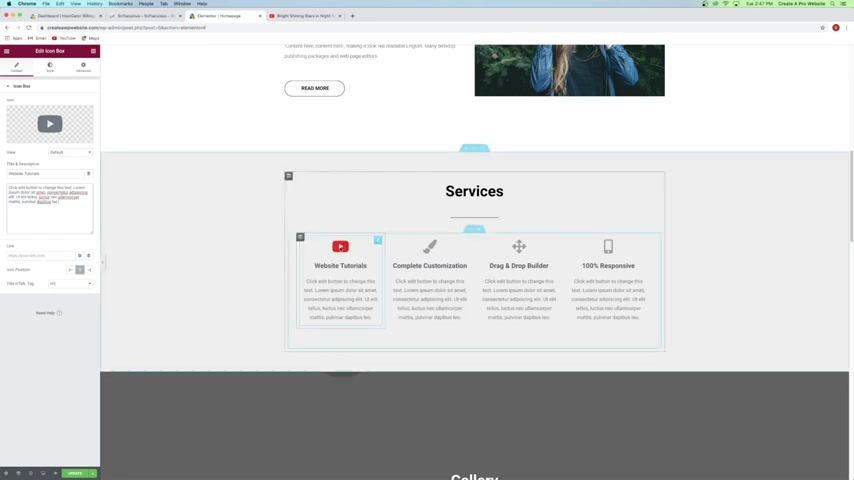
I've just got some dummy text in here right now and then you can put in a link so that whenever you hover over it and click on it , it will take them to that link and that could be a link to another page on your website or maybe someone else's website or maybe a portfolio of your work on your website .
It really just depends whatever you want to do .
And I've got all these to hover with different colors on them and to do that , you just go over to style and then you can just go over to hover and then you can change that color here .
You've got the animation here as well as the spacing and the size of the icon .
So you can make the icon a lot bigger whenever you hover over it or if you just go over to normal , you can change the size of the icon here .
But I kind of like them pretty small .
I think they look a lot cleaner like that .
And you can also rotate them .
And again , if you want to make any of these sections bigger or taller , just click on the section with the six dots up here and then you can just change the minimum height .
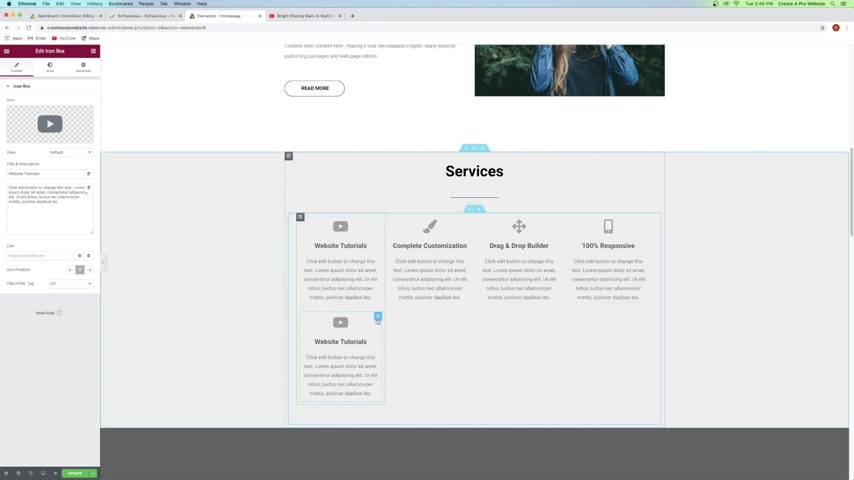
And what I recommend is once you've got one looking , the way that you want , you can just duplicate it and then just drag it into each one of these .
And then you would just want to change the title and the icon and things like that .
But once you've got the general style of one , it helps to just duplicate and edit them instead of starting from scratch on each single one .
So let's just keep on moving down .
So we've got our gallery .
So let's go ahead and put in some photos here .
So I'm just going to go up to the Rubik's cube looking symbol here , make sure that we're on our widgets and we are going to add in a gallery .
So let's just go ahead and scroll down and we'll close out of this pro section right here because these are all locked .
This is for Element or pro which you pay for , but we're on the free version .
So I'm just gonna scroll down and I'm gonna drag in a basic gallery right here and just put that underneath and then we can go over here and add some pictures to it .
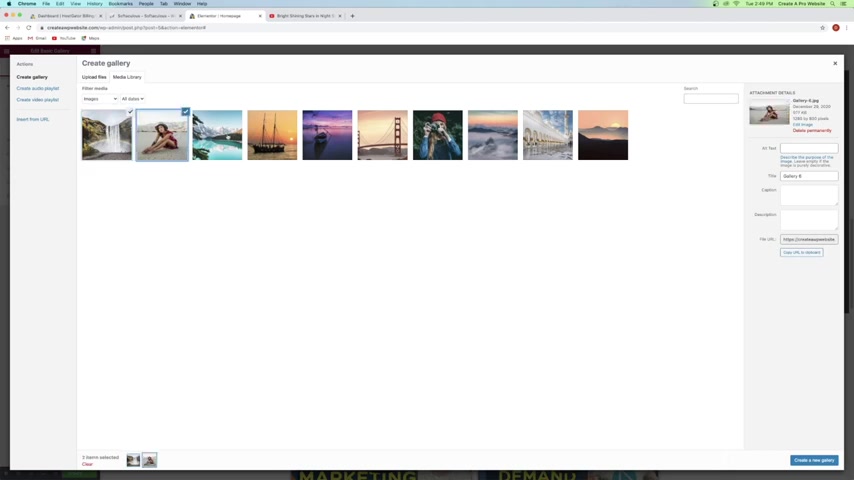
So let's go ahead and click on that and we're just gonna grab all of the galleries .
We've got gallery 6587 .
I don't know why these are all out of order and gallery one .
So we should have eight gallery images .
So once you've got all of those selected , we're just going to say , create a new gallery and then you can reorder these however you want .
So you can just click and drag them around and move them around in any which way that you want .
So then once you're done , you can just say insert gallery and then we're going to go over to image size , we're gonna change this to large just like that and then you can change the amount of columns .
So right now we've got four columns , you could make them bigger and do two and that's going to be more like this , which also looks really good .
Just depends on what you want to do .
I think four columns looks pretty good .
So I'm gonna go ahead and leave that the way that it is .
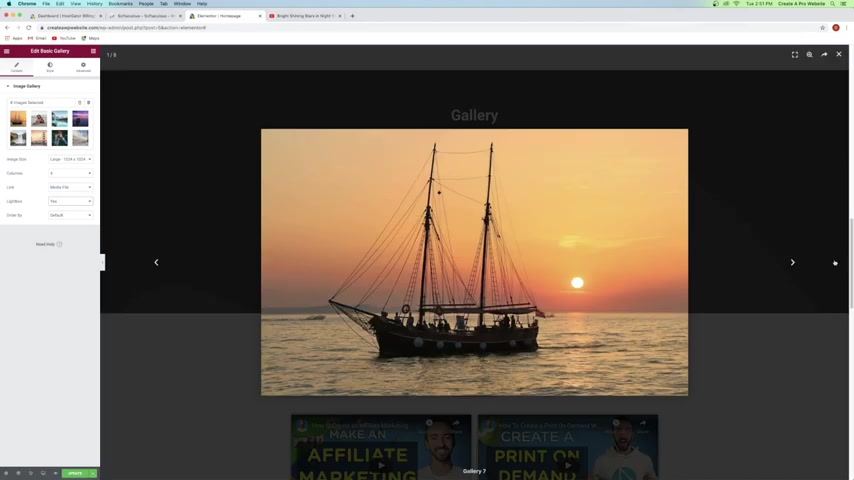
And then underneath light box , we're gonna go to Yes , that way whenever somebody clicks on an image , it comes up in this awesome light box where they can scroll through all of your images , which is really cool .
So once you've got your gallery set up , let's go ahead and add an image in the back .
So we'll just click on the six dots for this section and then go over to style and then go over to choose an image and we'll just grab this mountain right here and say insert media .
There we go .
That looks pretty good .
And then we can also go over the layout and we'll just make this a little bit bigger .
And this also has a black overlay on top .
So if you want , you can just go over to style and go over to background overlay and then you can change that color or how much .
So right now it's at a 0.6 which I think looks pretty good , the darker , the better with this gallery .
So we'll just do something like that , then we'll scroll down and edit our video section .
So if you want to replace these videos , just go ahead and click on one and then you would just change the link right here .
And this is just a youtube link , which is really simple .
Then you've got some options down here like auto play , you can mute them things like that .
But I'm gonna go ahead and leave the player controls on and not auto play so that people have the option to click on it if they want to .
And this is just a simple video widget .
So if I go over to the Rubik's cube , we can symbol here .
It's just this video widget right here and these are within an intersection .
So this right here is called an intersection .
And it's basically another set of sections and columns that you can put inside of a main column .
So right now we've got the section up here , we've got a big column which goes around and then we've got an intersection with its own individual columns as well .
And this is because if you tried to put videos in this column here , so if I go over to the little Rubik's cube symbol and drag in a video just within this column , it's gonna cover the entire column and it's gonna be really big and a little bit annoying to be honest .
And then if you duplicate it , it's just going to duplicate on top of itself , which is why you want to use this intersection .
So you can put two videos next to each other .
So I'll go ahead and delete these .
I just kind of wanted to show you how that little intersection works .
We've got a little button down here for subscribe .
If you want to replace that right now .
I've just got the youtube Creator Pro website in here and then you can change the text to whatever you want .
We'll scroll down here and we've got our follow section where we will hook up our Instagram feed .
So right now you can see that it says error no connected account .
And if we click on this widget , it's just a little short code widget .
So it says Instagram feed within these little brackets .
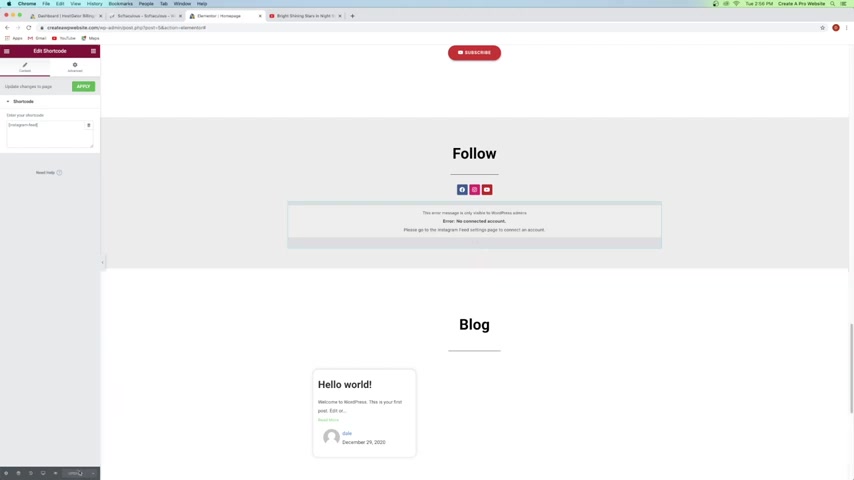
So you want to make sure that you just leave that .
And what we're going to do is go hook up our Instagram feed through wordpress dashboard .
So what we're going to do is click on update to save our work , which you should do as often as possible because if not , you might lose your work and that's super frustrating .
So always make sure that you're clicking on update .
Ok ?
So now we're gonna go up to the little hamburger symbol right here and then go to exit to dashboard and I'm gonna go ahead and clean up some of these tabs up here just to make sure that we're just working on this one page .
And now I'll just go to the little wordpress symbol and then we're going to come down here to Instagram feed , which you'd have if you downloaded the plug in earlier in this tutorial .
So we're going to go to Instagram feed and just click on that and then we're just gonna click on connect an Instagram account and it's a personal account .
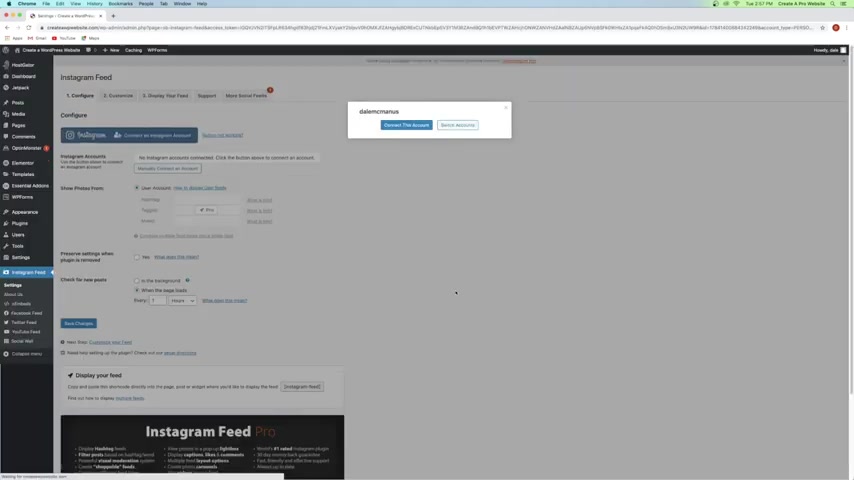
So I'm just going to say connect and then I'll just log in and I'm just going to say continue and then we'll just click on connect this account .
Cool .
So now it says successfully connected and it shows up in green and if for some reason , you can't get that to work .
You can just click on a button not working right here .
And then you can just click here to get your Instagram access token and user id .
And this is really simple .
So you just click on that and then say connect and I'm already logged in .
But if not just go ahead and log in and then click on continue and then it's gonna give you this little access token .
So what you want to do is just copy this token and then just go back over here to wordpress and then you can just say manually connect an account and then you would just want to put in that little access token right there and then it just wants your user ID .
So I'll just go over here to user ID and then I'll just put that in and then just say connect this accountant , which mine's already hooked up .
So it's just gonna re highlight in green and then just click on save changes .
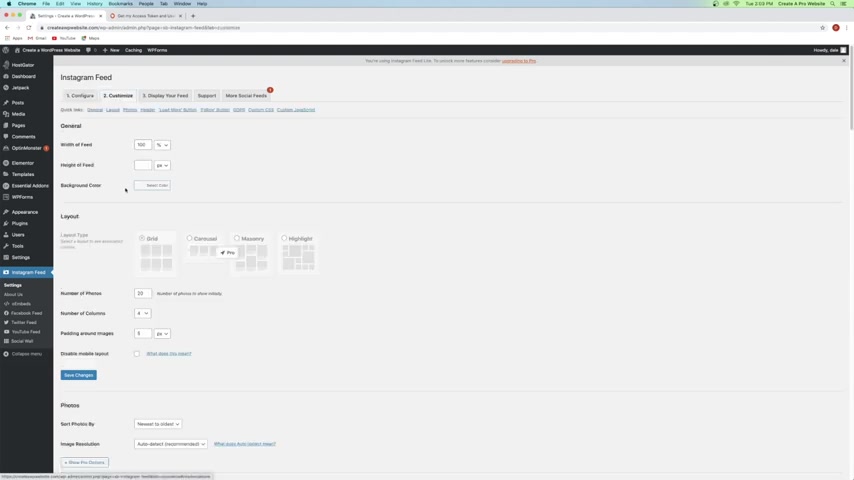
And then we're just gonna go over to customize right here and here is where you can alter the layout of the Instagram feed .
So you've got a number of columns which is automatically set to four , which I think looks pretty good .
So I'll go ahead and leave that .
But what we're gonna do is change number of photos to eight because I think 20 is a little bit too many .
And what we're also going to do is just disable the mobile layout and I'll show you a little bit about what that looks like a little bit later .
So then we're just gonna click save changes .
And then if you just go over to display your feed , you can see that it says copy and paste the following short code , which is just Instagram feed .
But we've already got that already .
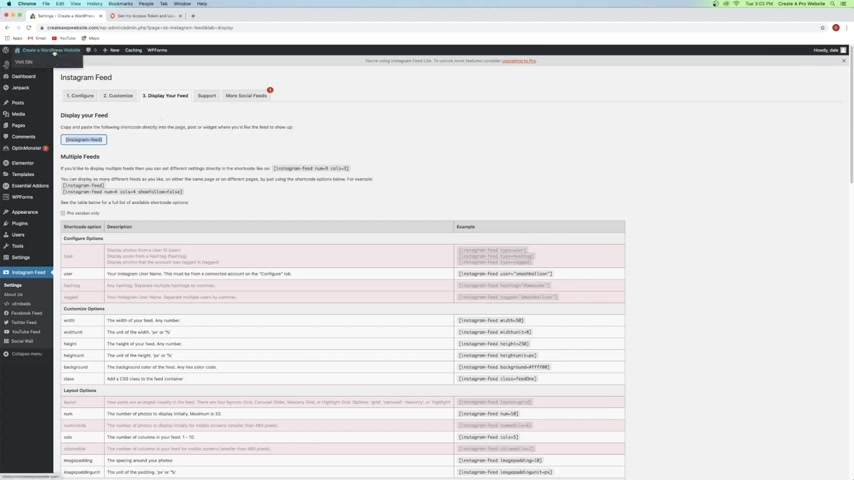
So I'm not going to go ahead and copy that .
We've got that in the template that I gave you already .
So once that's done , we'll just go over to our website , click on visit site and then we'll just go over to edit with mentor and we'll just scroll down and it looks like we also have an image issue here .
So if you see this , it's just an image widget , you can just go ahead and delete that and then it will just show the image underneath for your about section .
It might just be because of the template uploading for whatever reason .
So anyway , we scroll down to our Instagram section here and it's not going to show up here in the editing window .
But what we can do is just click on update and then we'll just click on preview changes right here with a little eyeball and we'll just scroll down .
And now you can see my Instagram is now showing up in here and you've got little buttons here like load more and that's just gonna load another eight images .
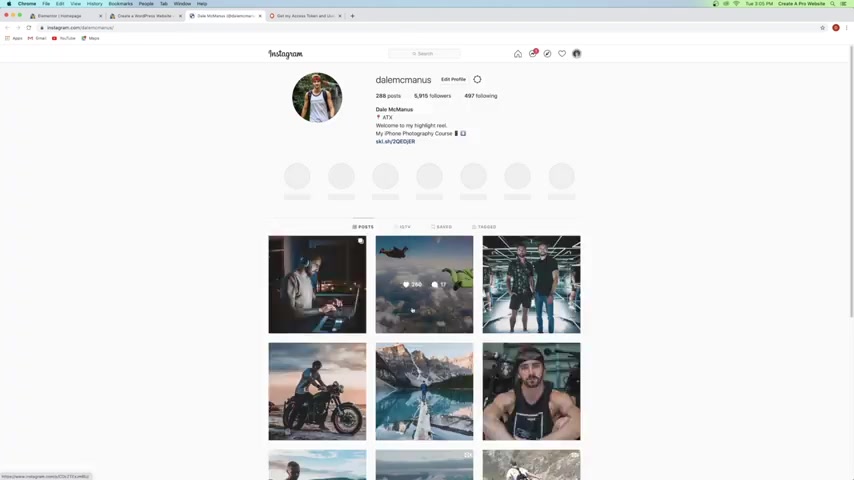
We've got a follow button here which will be taken to my Instagram , which is pretty cool and it opens up in a new tab which is pretty cool and it looks like it's all working so we can just close out of this window here .
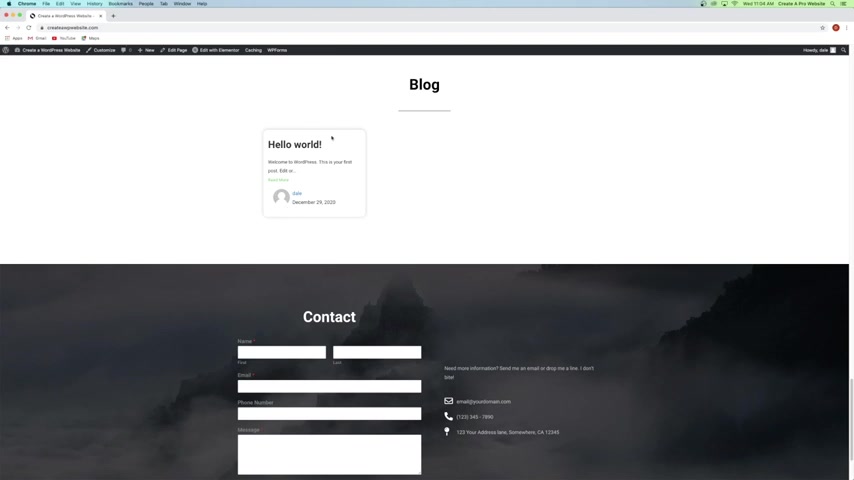
And now what we're gonna do is actually skip the blog section for now and we'll come back to it and we're gonna move on to step number six , which is to create a contact form .
So , as you can see here , we've got this widget here .
If we were to click on it , it's a WP forms , widget and there's no form selected because we have to go create one first .
So what we're gonna do is just click on the little hamburger looking symbol and then go to exit to dashboard and then just click on the little word press symbol up at the top left and then just go down to WP forms and we're going to go to add new and you should automatically have WP forms with wordpress .
So we never actually had to install a plug-in because it comes standard .
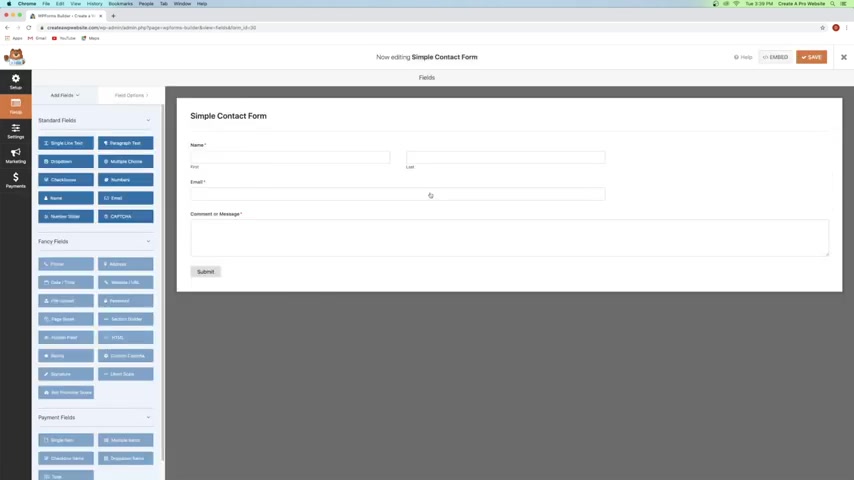
So what we're gonna do is we're gonna click on simple contact form because you might as well start with a few fields in there instead of just starting with a blank form .
So we're gonna say , create a simple contact form .
And here is where you can add different fields .
So right now , we've got name , email and message .
And if you wanted , you could do something like numbers and click on that .
And these are all fields that you can add to your contact form .
And all of these are pro version ones .
But really all of these is more than enough .
So when you click on numbers , it adds it down here .
And if you want , you can reorder by just clicking and dragging just like that and you can edit each one of these fields .
So let's say I wanted this to just say message instead of comment or message , I can just go ahead and click on it and then you can change the label right here .
So I'll just delete that part just so it says message and you can see that this field goes all the way from the left side of the form to the right side and we want these to match as well .

So what we're gonna do is first go over the numbers and we'll change the label to something like a phone number just like that .
And we're gonna go to advanced options and then just go over to field size and change that to large .
And now that field goes all the way from the left to the right side .
And this is going to be important for how it actually looks on your website .
So we're going to go to email and do the same thing , go to advanced options , field size , we're gonna change that to large and then same with name .
We're gonna click on name .
Go to advanced options field size will change the large just like that .
And you can change the name of your contact form by just simply clicking up here .
And I'm just gonna say something like Dale's contact form , but nobody's really gonna see that .
So it's totally fine and you can change the submit button text here .
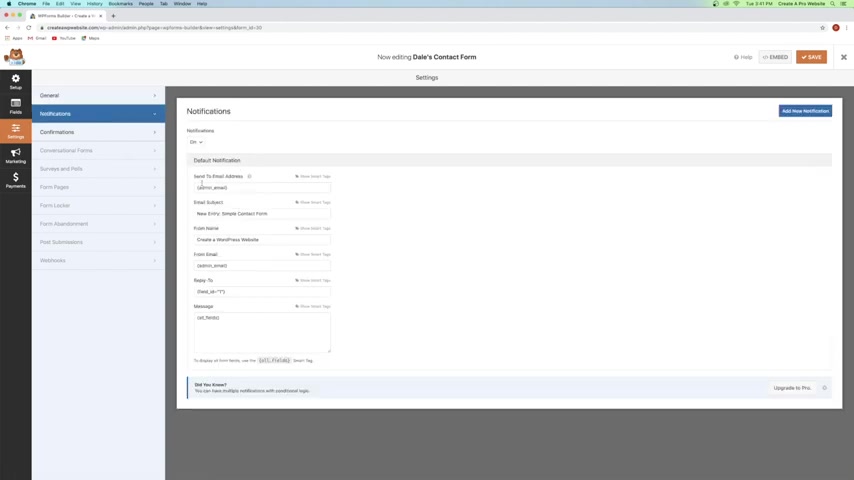
So you can say something like send , but I'm going to leave it as submit and then we're gonna go over to notifications and here is where the emails are actually going to be sent to .
So it's automatically got this little short code that says admin email and this is going to be the same email that you use to sign up for wordpress with .
So if this is the email that you want to use , you can just go ahead and leave that .
But if you want , you could also just delete it and type in whatever email address that you want these to send to or if you want to go to multiple , you can just add a comma and then type in another email address just like that .
And then this is gonna be how it shows up in your inbox .
It's gonna say a new entry from it will just say Dale's contact form or whatever your name is and then this is your website and then it's going to have their information here , like their message and their email and everything like that .
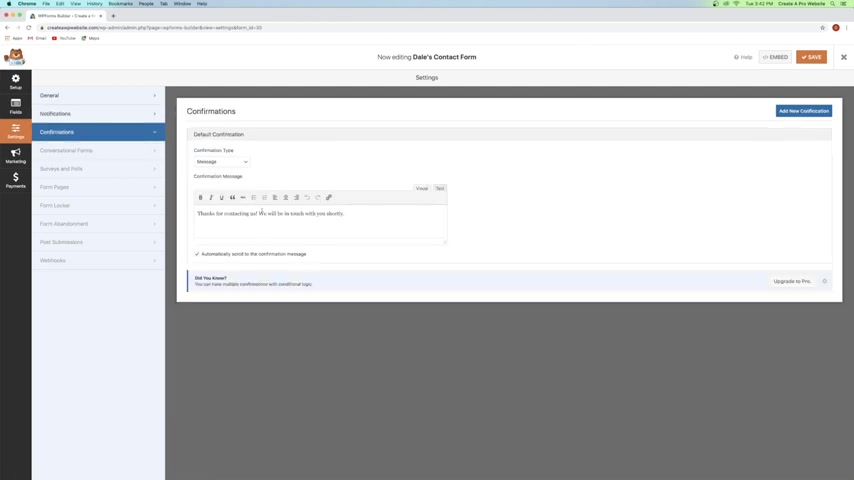
So we can go ahead and leave that and then just go over to confirmations and this is the confirmation message that shows up whenever they hit send .
So this one just says , thanks for contacting us .
We'll be in touch with you shortly .
You can change that to say whatever you want or you can go to a whole different page on your website or you can go to an entirely different URL and then you can just put in the URL right here .
But I think the little message is perfect .
So I'm gonna leave that .
So now I'm just gonna click on save and then just click on the X .
Now , you can see we've got Dale's contact form right here and you can see we've got a little short code here as well , but we don't even need to use that because we've got a widget or we can just select it .
So we're gonna go back to our website and go to visit site and then we're just going to click on edit with mentor and then we're just gonna scroll down and we're just gonna click on this widget here and we're gonna go here to select form .
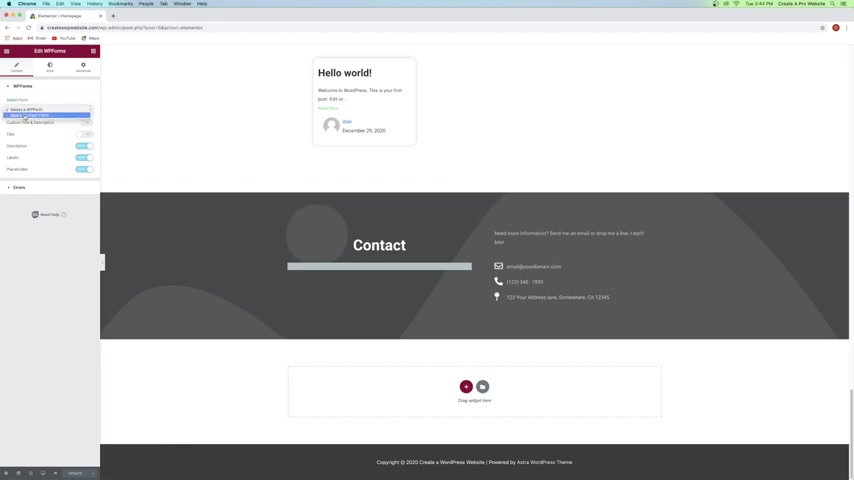
We're just gonna say Dale's contact form or whatever your name is in your contact form and then that's gonna put in our contact form right here , which is looking really nice and you can decide whether you want to show the title description labels , things like that with these buttons here .
And you can also go over to style and then you can change the form background color .
If you wanted to add a background to it , the max width , you can really just alter everything about your form in here .
Like the labels , you can click on that and change the text color and the typography of these labels right here and get really in detail and even the submit button , if you just click on that , you can change the background color of the submit button , but I kind of like it as blue .
So I'm just gonna go ahead and leave it and then as well as the hover color .
So you can click on hover and then it just goes to kind of a dark blue , which I think looks pretty good .
But again , you can change that here as well .
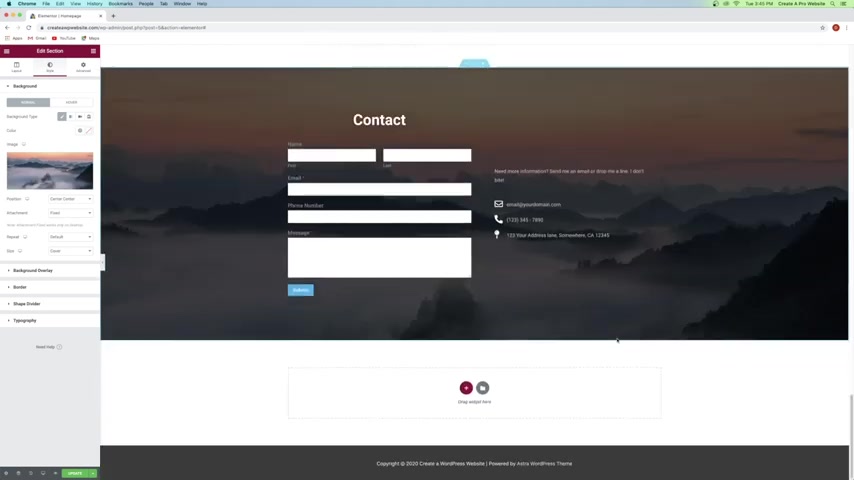
So now what we want to do is add a background to this .
So I'm going to click on the little six dots and then I'm gonna add a background .
So I'm gonna go over to style and then just go to choose image and then I'm just gonna grab this image right here and then say insert media and that's going to put our image in there , which is automatically set to parallax , which looks really nice .
And then you can also edit this information over here .
So this is as simple as just clicking and you can replace the text right over here or this right here .
If you click on this widget , it's just a little icon list .
So we've got email , phone number and address and to edit these , all you have to do is just open it up and then you can just replace this text right here .
And then you've also got an icon , which I've showed you how to get into the icon library and choose new icons .
So you can replace these icons if you want to as well as go over to style .
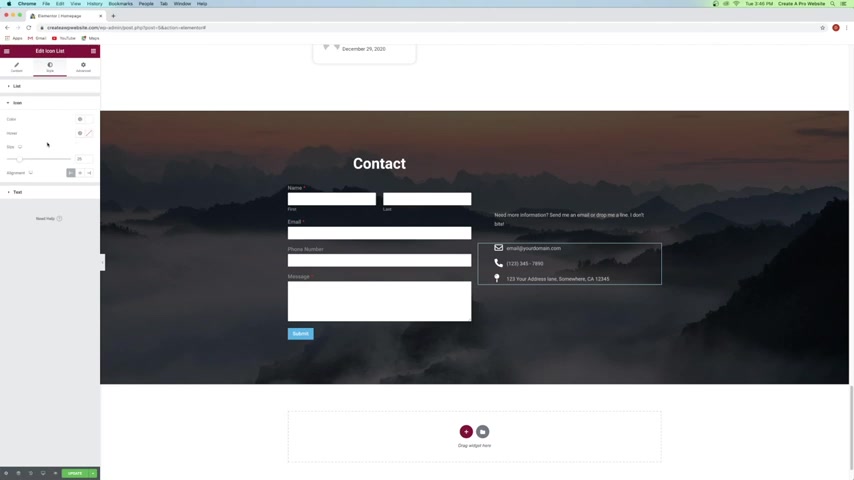
And then you can decide how you want the icons to look by clicking on icon and you can change the size and the color and everything else .
But I think the way that they look just as white and kind of small looks pretty good .
So I'm gonna go ahead and leave that and then just click on update and you always want to make sure that you send a test email , which we can do later .
But if the test email doesn't show up in your inbox for whatever reason , always check your spam folder and make sure that you mark it as not spam .
That way anything else will come through as not spam and will actually show up in your inbox .
Ok ?
So now we can move on to step number seven , which is to customize your header .
So if we just go up to our header right now , you can see that it is pretty plain and boring .
We've just got our site title here and just home page and sample page .
So we're going to want to actually create a navigation menu in here , put a logo in here and make it look a lot better and we're going to change the color and make it more of a transparent header .
So to do that , just save your work and then just click on the little hamburger symbol right here and then just go to exit to dashboard and then just go to the little wordpress symbol and then just go over to your site and click on visit site again and then just click on customize .
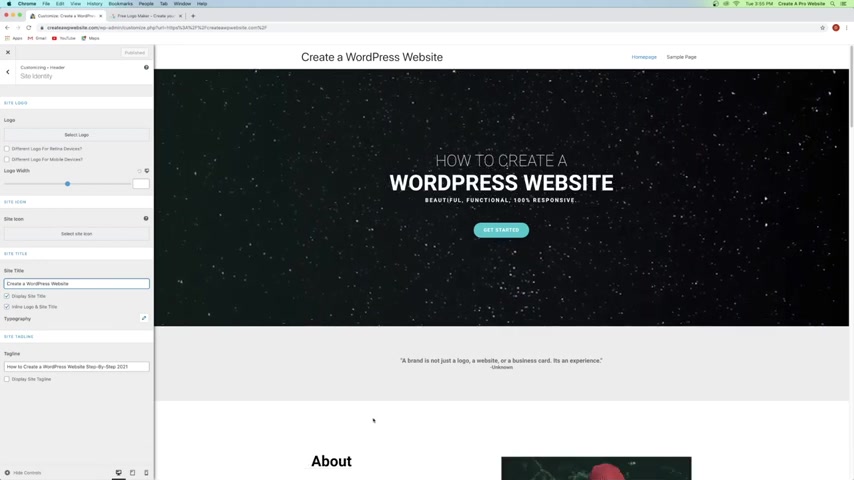
So first , what we're going to do is create a new logo because this really doesn't look very good .
So what you can do is hover over this and just click on the little pencil icon and that's gonna take you to where you can put in a new logo .
So what we need to do is actually make one first .
So I'm just going to go up to a new tab and we're gonna type in logo maker without the E dot com .
And we can just X out of this little tutorial and this is a really easy to use free online software .
So what you can do is actually search for graphics up here in this little search bar .
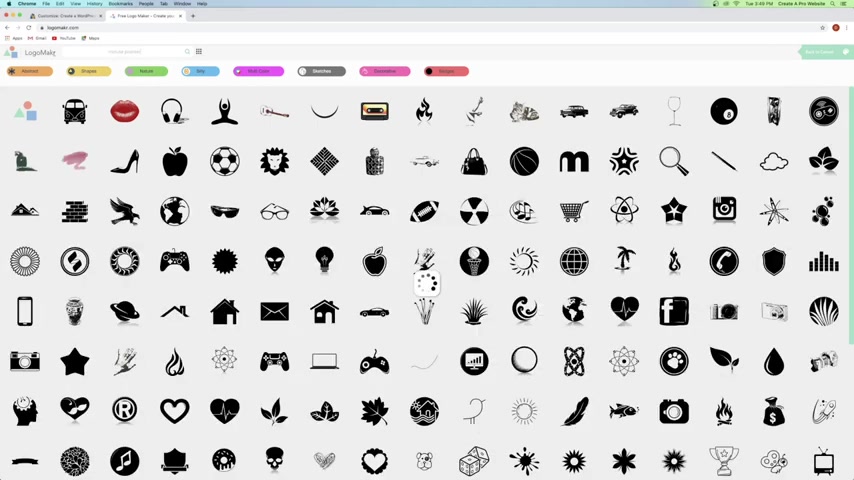
So let's say I wanted something like a mouse pointer because this is for a website .
It's got tons of images that you can just scroll through forever and there are just millions of them .
So you can choose any one of these that you want for free .
And you can actually combine multiple icons to make your own custom one .
It's really cool .
So what I'm gonna do is maybe grab one like this and then once you select it , you can scale it up by just dragging it from the corner and you can move it around by just clicking and dragging .
And then you can also change the color over here .
So what we can do is just select a hue on this outside wheel and then you can select how much color you actually want in it .
Do you want it dark or white or somewhere in between ?
Now , what I'm gonna do is go with a white , but I can't really see what I'm doing if I do white , but it's gonna look best to have white on this background because I'm gonna make this header transparent and we're going to want a white logo against this video right here .
So we're gonna go back here and just make it black for now just so we can see what we're doing .
And what we want to do is add text .
So I'm gonna click on the little T for text and now , you can just type in whatever you want and then you can just scale this up and then we're just going to drag this over a little bit and you can select any font that you want .
So you can come up here to the font category .
And right now we're in simple and modern .
You've got fun and funky decorative 3d .
These all have tons of fonts within them .
So if I went to fun and funky , I could go over here to Font family and then I could choose any one of these fonts that I want , which they all look really crazy .
Now , I'm not gonna do something like that .
I'm gonna go with something more like simple and modern and then I'm gonna choose a font in here .
I'm gonna go with something like this and I'll just scale that up a little bit more and I'm gonna bring this icon down a little bit and just make sure that it just sits right next to that icon just like that .
I'll just scale this down just a bit more .
And then I'm also going to make this black so I can see what I'm doing and I think that looks pretty good .
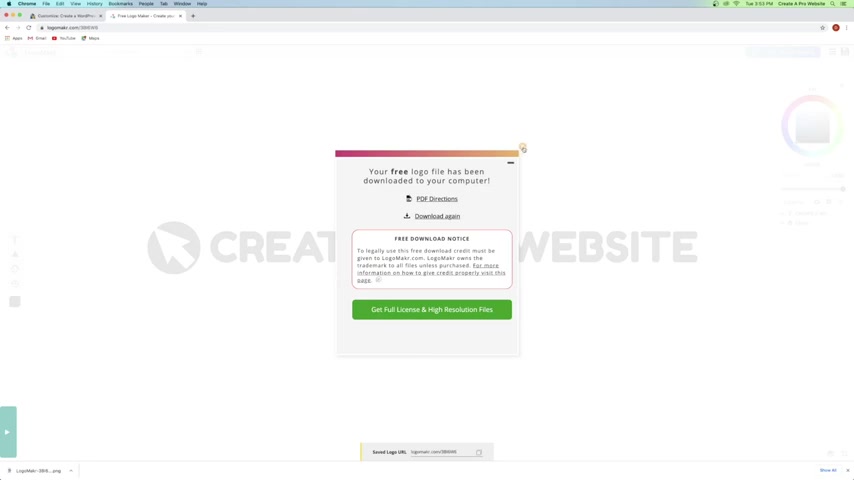
So what I'm going to do is save this logo .
So I'm going to go over to the save logo button up here at the top , right .
And it's going to ask , hey , do you want to buy the high resolution file for $19 .
You can if you want to .
But you can also just say no thanks .
I'll download the low resolution file and they just ask you to credit them for the logo maker software .
So I'm going to say no thanks .
Download the low resolution file and that's free .
And the lo res file is plenty enough to work for a website .
You really don't want a very , very high quality logo because again , high quality images will slow down your website .
So I'm gonna go ahead and click on the X and you can see that that hit my downloads right here .
Now , we actually do want a white one .
So what I'm gonna do is click and drag a box around both of these .
And then I'm going to change this to white just like that .
And then again , it clicks save logo and then no , thanks .
I'll download the low resolution file and that just hit my downloads as well .
Now , what we're also going to need is a site icon which is going to be this little symbol up here on the browser window .
So this one's got a little gator , this one's got these little shapes .
We're going to create our own for our little browser tab .
So to do that , I'm just going to click on the text and we are just going to delete it and I'm gonna grab my symbol here and make that black and I'm just going to click and drag up to make it nice and big and then just drag it towards the center .
Now , if you have a logo that's not quite a square , what you wanna do is click over here on a crop and then just make sure that you alter this box to be a square .
So you want it to be something like 800 pixels or 900 pixels by 900 pixels or at least somewhere close 8 27 by 8 28 is a pretty good size .
It's a dang near a perfect square .
So once you do that , then you can grab your logo and put it in the center .
But you want to make sure that your entire logo is fitting within that square .
So now I'm just going to click on the apply crop and again , you can just click on your logo and alter it .
So if it was too big , you can bring it down , just make sure that it is in the center .
So I think that looks pretty good right there .
So once you've got that , just click on save logo right here and then again .
No , thanks .
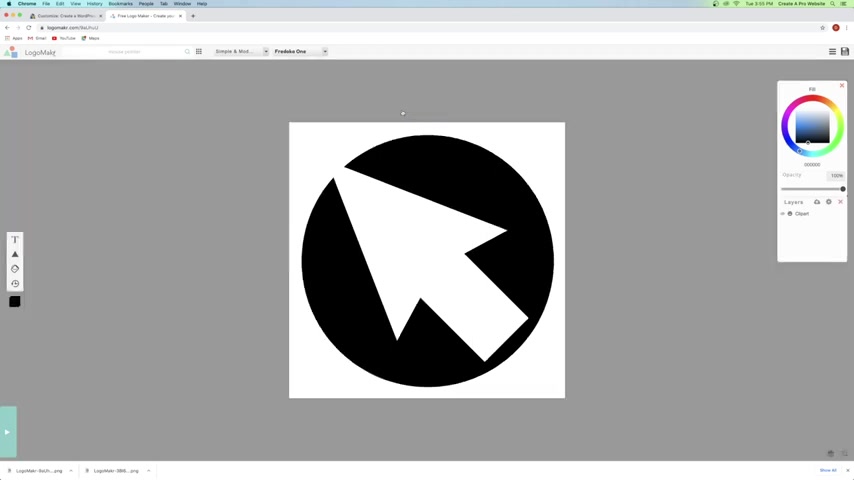
Download the low resolution file and now we can go put these on our website .
We'll just go back over to wordpress and I'm just gonna cancel a lot of these downloads down here and we'll just click on select logo and then we'll just go over to upload files , select files and then I'm just going to go over to the logos which again come with the instant download link in the description if you're following along with me and I am just going to grab the black one for now so that you can see it and just click on open and then just say select and then we're just gonna click on skip cropping because we don't want to crop this cool .
So now that's gonna put that in here .
So now we just need to get rid of this title and then we can alter the size of this one .
So if you want to alter the size , you can just click on logo with right here and you can bring that up or down .
But I think smaller is usually better .
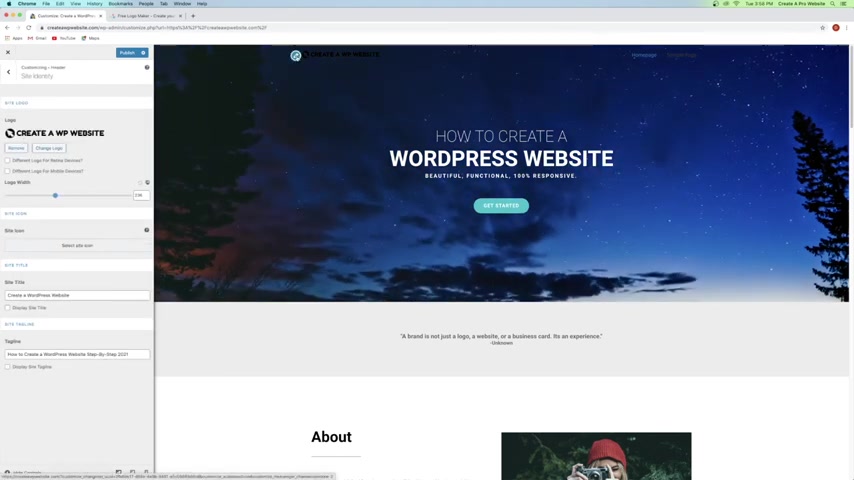
So I'm gonna go with something like that and then we're also going to come down here to display site title and we're just going to uncheck that and then that's going to get rid of our site title .
So now we've got our logo in there , which is looking a lot better .
Now , what we want to do is make this a transparent header .
So let's go ahead and do that .
So I'm just gonna click on the back button and then we're just gonna go down to transparent header and then we're going to click on enable uncomplete site and then there we go , that's going to put in a transparent header .
Now , the black against the transparent header doesn't really look as good .
So we're going to put the white logo in there .
So we're gonna go back over to this little pencil and that's going to bring us over to our logo and we're just going to click on change logo and we're gonna upload the white one and we're also going to upload our site icon as well .
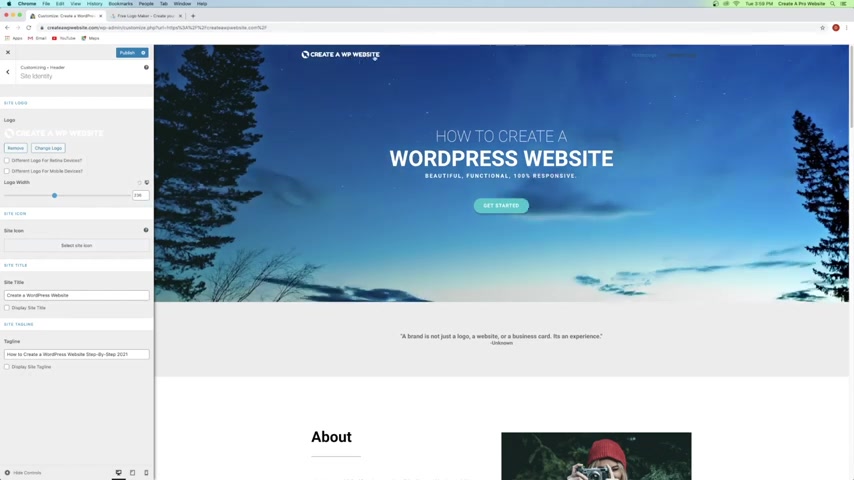
So I'm gonna click on open on both of those and then with the white logo selected , I'll just say select , skip cropping and then there we go , that's going to put our white logo in there , which looks a lot better .
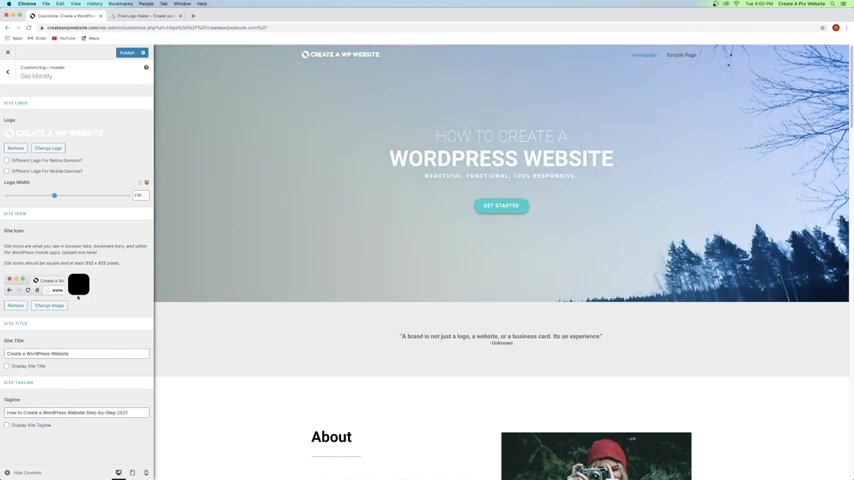
Then we can also add a site icon , which is again this little symbol up here on the browser window .
So we'll just select site icon and we'll grab that one and then say , select and you can see a little preview of what it's gonna look like right here .
We'll just say crop image and there we go .
Now , you can see that we've got our site icon right up there , which looks great .
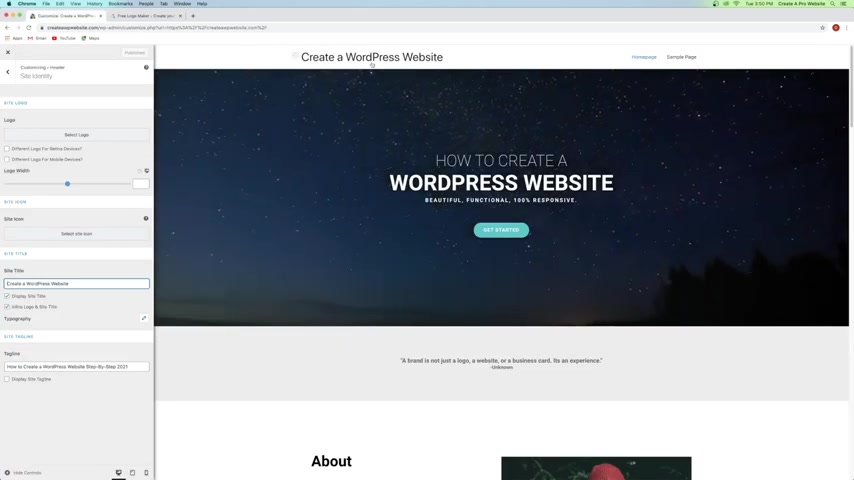
And then if you come down here , you can also change your site title and your tagline .
And these are kind of important for Google search because you want to have a keyword in here that has something to do with your website that a lot of people would be searching on Google and you want to put it in your tag line as well .
So I have create a Wordpress website and in the tagline , I also have how to create a wordpress website .
So I've got the tag line right here and this is going to be good for Google search because then people type in how to create a Wordpress website .
And hopefully my site will show up .
Now , there's lots of competition around those keywords .
I'm not going to get too deep into seo in this video , but make sure that your site title looks good and as well as your tagline looks really attractive as well .
OK ?
So now I'll just go ahead and click on the back arrow and then we'll just go back over to transparent header .
And then the next thing that we want to do is actually edit this menu right here .
So right now , it just says home page and sample page , which really doesn't do a whole lot for our visitors .
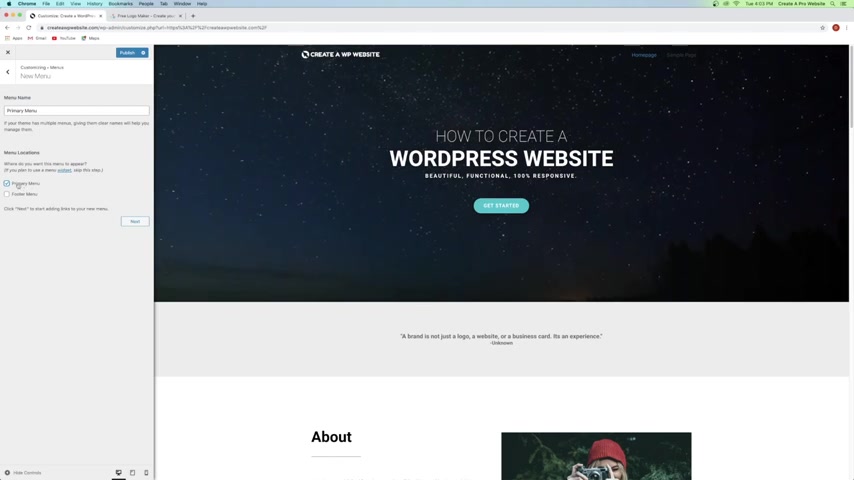
So what we're gonna do is just click on the back button .
We're gonna go down to menus and then we're just going to create a new menu and we're just going to call this primary menu and then we're just gonna say primary menu right here , which is going to be this area up here .
And you can also put it in the footer as well if you want to .
But for now , we're just gonna stick with primary menu and say next and then here is where you can add items to it .
So just go ahead and click on add items and automatically it's going to have the pages window open , which we only have home page and sample page .
And I will show you how to create new pages here in just a minute .
But for now , we're actually going to close pages and we're going to use custom links .
Now , you can also do blog posts , categories , tags , things like that .
But for now we're going to do custom links and here is where you can create a jump button , which I'll show you how it works in just a minute .
So first we're going to create some jump buttons .
So we'll say something like about and underneath the URL , we're gonna say hashtag about just like that .
And this hashtag is going to allow us to jump down to the about section so that when somebody clicks on it , the whole screen just jumps down to that section .
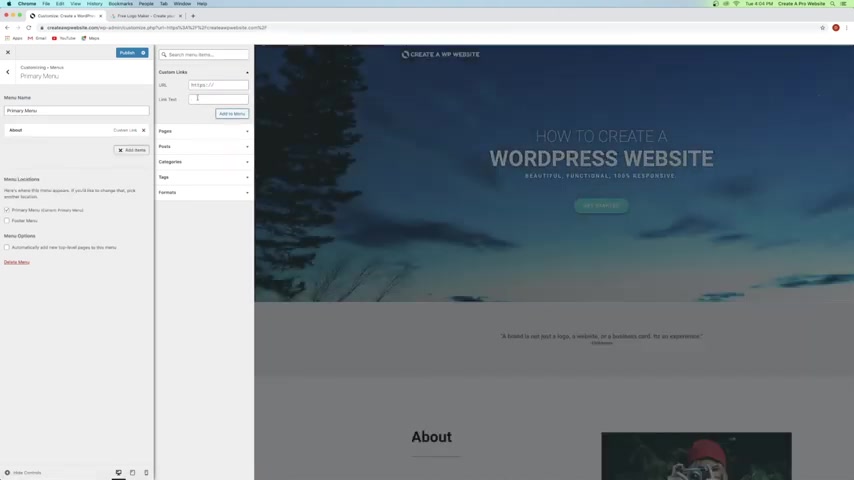
So we'll just say add to menu and we'll also do services and we'll do hashtag services add to menu .
And we're also gonna do gallery and then hashtag gallery add the menu .
We'll do videos , hashtag videos .
And if you have different sections , you can use different uh link , text and different hashtags here .
But just make sure that whatever you choose we put in later whenever we put in these anchors , which I'll show you in a minute .
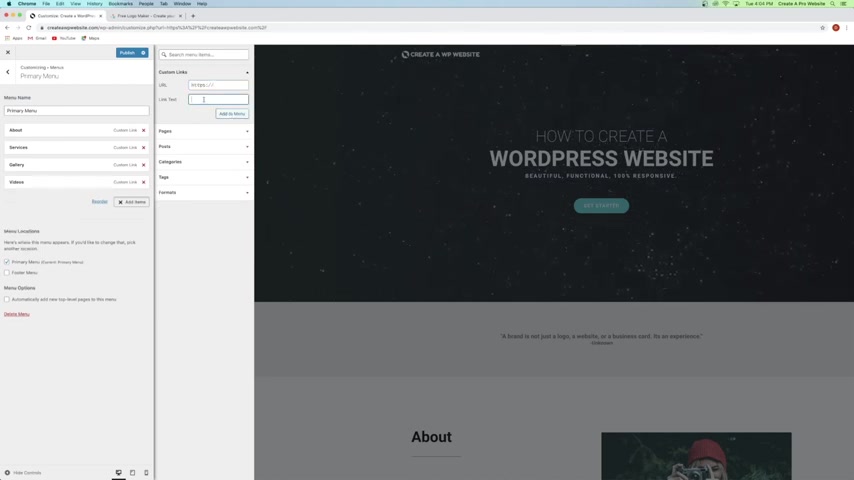
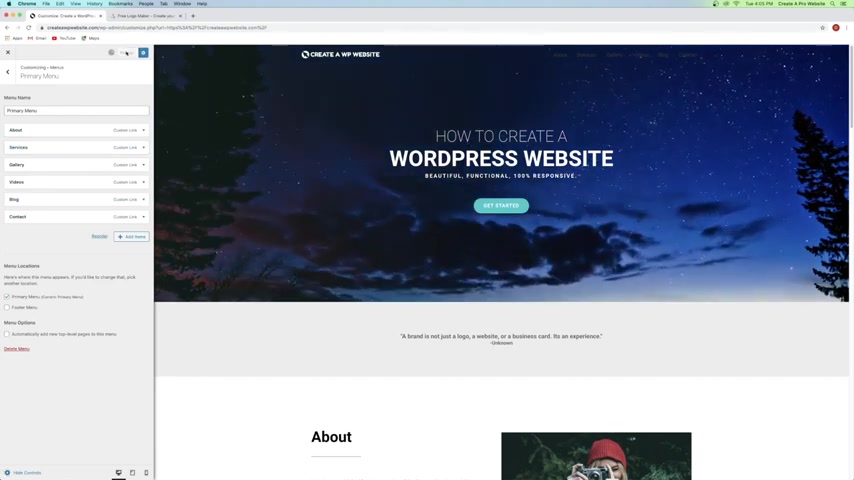
So just remember which of these hashtags that you're using So we're gonna say add to menu also do blog and we'll do hashtag blog add to menu and we'll also do contact and then hashtag contact and then add to menu .
Cool .
So now if we just click on hide controls , you can see that we've got all of these little items up here in our menu , which is looking a lot better .
Now , the only problem is that when it gets dark , they kind of blend in which doesn't really look very good .
So we need to go ahead and fix that as well .
So we're just gonna open this back up and then we're just going to click on publish to save our work and then just click on the back arrow and then back arrow again and then just come down to a header and then we're just gonna go over to a transparent header and then we're just gonna come down here to menu and we're just going to change the link text color .
So we're just going to alter this to be white just like that .
And now that's gonna show up a lot better .
So once you're done , just click publish and now I'll show you how to make these jump buttons actually hook up to these sections so that whenever you click on it , it jumps down because right now it doesn't do anything .
So let's go ahead and click on the X and then we'll just go to edit with mentor So first what we're gonna do is just come down here to the about section and we're gonna click on the little six dots for this section and then we're just going to go over to advanced .
And from here we're gonna create a CS S ID .
So what we're gonna do is just say about and you don't want to put in the hashtag the hashtag is to be able to jump down to it .
But this is the actual ID .
So we're just going to call this about and we'll do services .
So we'll just do the six dots go over to advanced CS S ID .
Make sure it says services , which it does are ready .
I automatically put that in and we'll just check all the rest of these six dots , advanced CS S ID , make sure it says gallery and so on and just make sure that the rest all have the right names on them that you used in your menu .
And once you do that , just go ahead and click on update and then we can just preview changes and now our menu should be working .
So if I click on about , it jumps down to about services , it's also working gallery and so on .
You get the idea .
But now we have jump buttons up here in our menu , which is awesome .
So let's just go ahead and click on the X and we can also close out of logo maker as well .
And we're gonna do one more thing with the header .
So I'm just gonna go ahead and click on the little hamburger symbol and go to exit the dashboard and then just go back to the little wordpress symbol and then we'll just go back over to our site and click on visit site and we're going to do customized one more time and then just go down to header and then just go over to primary hitter .
And from here underneath width , you can change this from content width to full width .
And then that's gonna put your logo all the way to the left and your menu , all the way to the right .
And it really just depends on which style you like more .
But I think this one looks pretty good .
So I'm gonna go ahead and leave it and then you can just click on publish and then just click on the X and now we can move on to our next step , which is step number eight , how to create a blog post .
So as you can see , we've really only got this one blog post here and it's just the basic one that comes with wordpress whenever you install it and activate a new theme .
So we're going to go ahead and make another one so I can show you how to do that .
So just go back over to the dashboard up here at the top left and then to create a new blog post , just go down to posts and then go to add new and then you can give it a title and then you can just click enter and start typing out your blog post .
Now , I'm just going to put in some dummy text for now and we're using the basic wordpress editor for this .
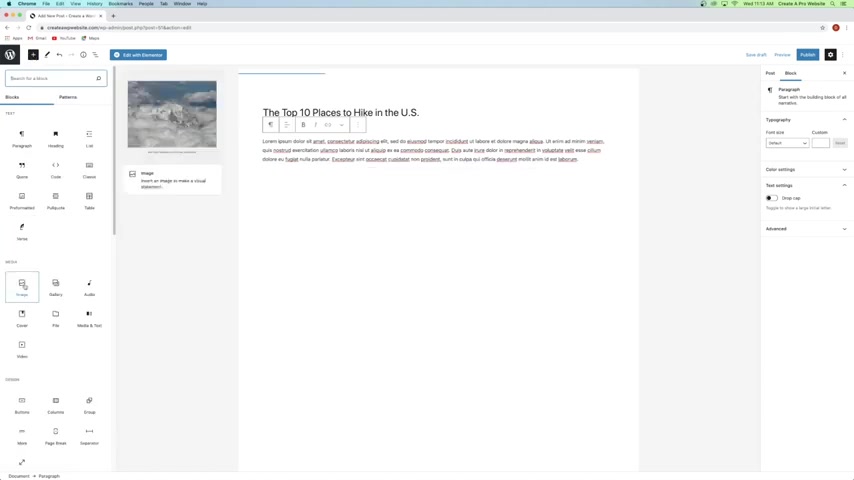
So if you want to add pictures or any sort of widget in here , kind of like element or you can just do that with the little plus button up here and just add a block .
So let's say that I want to add an image , I'll just come down here to media and click on image .
And then I can just go to my media library and just choose an image and just say select and then you can just keep on typing .
So here's where I'd want to put maybe the number 10 place .
So number 10 and I'll just make one up and then we'd want to transform this into heading text .
So you can just click on this button right here , just transform this to a heading and there we go .
Then you'd hit enter and then you'd want to write a little bit about Arches National Park and then put in another photo and basically write out your blog post on this page with the basic wordpress editor .
And then you can come over here to post and here is where you can put in tags about your blog post , you can add it to different categories and basically create a whole catalog listing of different blog posts so that these will be easily searched in Google .
So you want to make sure that you do have all the right tags for things like that .
But if you're not into blogging , it's OK to go ahead and skip this step .
But the next thing that we're going to do is add a featured image .
So I'm just going to click on featured image and then just say set , featured image and then I'll just grab another image and then we'll just click on publish and then publish again .
And then we can just come down here to view post and there you go there , you can check out your blog post and this will be automatically added to your home page .
So whenever you go back to your home page , it will show up in the blog section .
So we'll just scroll down and here you can see it in the blog section .
Now , this one's got an image .
I'd want to add an image to this one and maybe create a few more blog posts so that we have a whole row of them here .
But I'm not going to bore you with that .
I'll go ahead and do that real quick .
OK ?
So I went ahead and made a few more blog posts .
Now , the only problem that happens whenever you create new blog posts is that if I were to click on one of these , you can see that my header , my logo is really just blending into the background and you can't actually read any of these buttons .
So I'm gonna show you how to fix that real quick .
We're just going to click on customize and then we're just gonna go down to header and then transparent header and then we're just gonna click on disable on posts .
And then that way we've got a white header that comes up and we can now see our buttons , but our logo is still blending in .
So what we need to do is just click on different logo for transparent header right here .
And then we're just gonna set that logo .
So we're gonna click on select image and we're going to set the white one again because this is the logo for the transparent header , which is on the home page .
So we want the white one on there .
And then what we want to do is click up here on this little blue pencil , which is next to our white logo and we want to change our main logo to the black .
So we're just going to say change logo , click on black , say select skip cropping .
And then that way our black logo shows up here .
And then if I were to click on it to go back to the home page , it changes to the white logo on the transparent header which looks really nice .
So we can always get back to the home page any time we're on a new post .
So just go ahead and click on publish and then click on the X and now we can move on to step number nine , which is how to create a new page .
So creating a new page is very similar to creating a new blog post , except you might want to create a whole new page for your about section .

You want to have a lot more information about you or more information about your services and things like that .
So I do want to show you how to create a new page just in case you want to do that .
So we're just going to go back over to the dashboard and then we're just going to go down to pages and go to add new and just like the blog posts , you can write a new page here with the basic wordpress editor very easily .
And then again , you can just type and add a bunch of information about yourself .
You can add pictures about yourself and whatever you want to do .
So let's say I want to add a block for a picture .
I'm going to go down to image and add that in and I'll go to my media library and I'll just grab an image of this girl , just pretend that this is her website .
And then you just want to write more information about yourself or if it's your services , you can list out your services on a page like this with the basic wordpress editor or what you can do is actually edit with mentor .
So what we could do is just delete all of this and we can actually keep the title , but we're gonna go to edit with mentor .
But before you do that , you're gonna want to change the template over here from default template to element or full width and this is under page attributes .
You definitely want to make sure that you do that .
So you have a clean slate to work with and build a new page with mentor .
So once you do that , just click publish and then publish again and then we're just gonna click on edit with mentor .
And here you have a clean slate to build your about page .
So again , you can just click on the plus button and create a new column structure and build it exactly like I showed you how to use mentor in the beginning .
Now , there's a cool thing that you can do .
If you click on the little template button here , you can use whole different pages or blocks to pre build your website .
So if you wanted , you could click on one of these and see what it looks like .
And you can import this entire template and just replace all the media and create an about page like this .
Now , this isn't a very good about page .
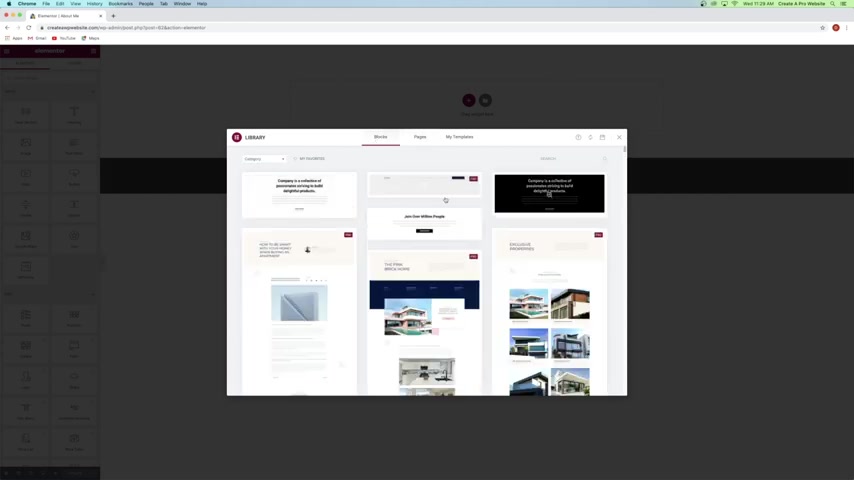
But what you can do is go back to the library and then just go over to blocks and then you can just import these separate blocks on top of each other .
So if you wanted , you could just go over to category and you could go to about and find a , a bunch of blocks that all work for an about page , which is really cool .
And if any of them have a little pro sticker on them , that just means that they're for the pro version of mentor .
But all of these in the about section are all free and you can go through all these different sections and find blocks with a certain layout that you really like .
So I can just click on this one right here and I could be like , OK , I'll just change this text here to say about and then I'll just add images of myself here and some text about myself here .
So this one will work really well .
So I'll just click on insert and then all you have to do is just click on get started and then you just put in an email and you can actually create an account here .
If you don't already have one , it takes two seconds , but I already have one .
So I'm just going to put in my email and then from here , you can just say connect your template library .
Now I'm going to uncheck become a super contributor and then just say connect and it's as easy as that , it now imported that whole block in here so that all I have to do is just replace this text and then I can replace the images and write some information about myself .
And you can import as many of these blocks as you want to and just build out pages like this using mentor .
And then whenever you're done , you would just click on update and save your work .
So now let's just go on back to the home page .
So I'm gonna click on the little hamburger symbol and go to exit to dashboard and then just click on the little wordpress symbol , then just go up to your website and go to visit site .
And now we can move on to step number 10 , which is edit for mobile and tablet .
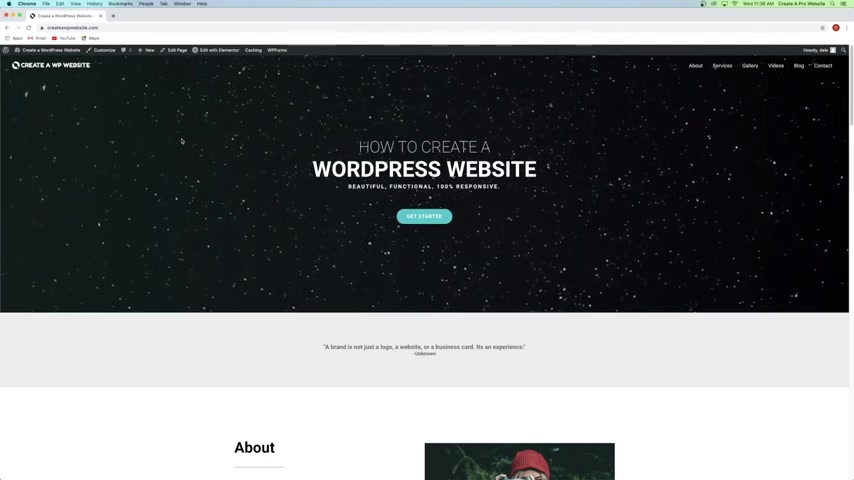
So making sure that your website looks great on tablet , mobile and desktop is really important because nowadays , more than 52% of all online searches are actually done on a mobile phone , but it's almost even .
So you want to make sure that your website looks great across any device .
So what we're gonna do is just click on edit with mentor .
And then if you want to edit for mobile , just come down here to this little responsive mode symbol .
It looks like a little computer and click on that .
And we'll just go ahead and start with mobile and it's gonna give you this little mobile phone looking simulation and as you can see things look a little broken .
So what we're gonna do is fix those on mobile and then it's not going to change them on desktop , which is exactly what we want .
So I'll show you here .
First thing that we want to edit here is the spacing and then we're going to mess with the text .
So we've got a lot of empty space up here and down here .
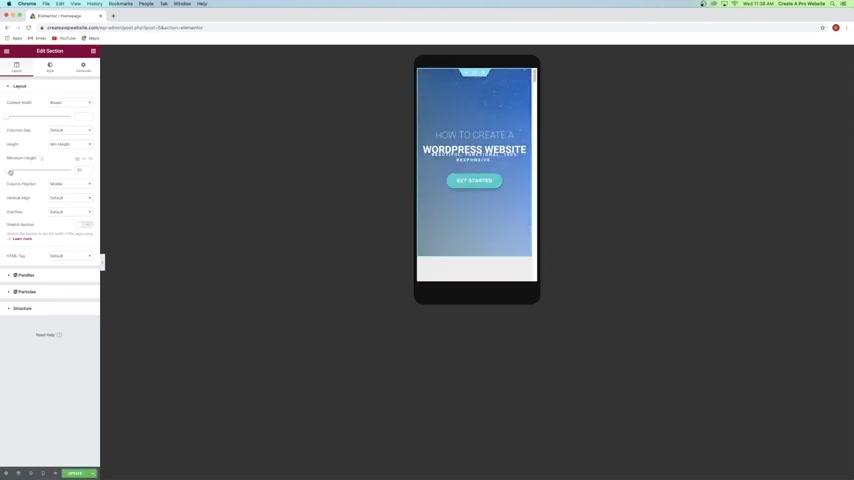
So what we're going to do is just click on these six dots for this section and then underneath the layout , we've got our minimum height .
We're just going to go ahead and change that and we'll just do maybe something like that like 2 68 just so it covers most of the screen maybe a little bit more .
And then whenever you change that here , you can see that we've got a little mobile symbol which is a little phone .
And if it's got that symbol on whatever device that you're on , it means you're only changing it on that device .
So if you did content with it wouldn't be the same because there isn't any mobile symbol .
But if it's got that symbol , it's ok to do it on just this device and it won't change anything else on the other devices .
So the next thing that we're going to do is mess with our text a little bit .
So I'm just going to go ahead and click on this wordpress website , text and then I'll go over to advanced and I'll just mess with the margins a little bit .
So I'm just gonna bring these down a bit just like that .
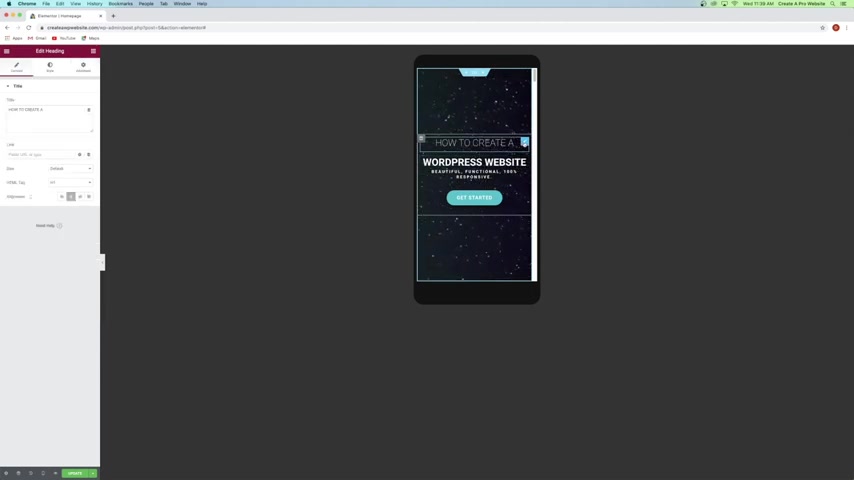
And then I'll do the same with the how to create a text right here .
I'll go ahead and click on that , go over to advanced and then again , I'll just mess with the margins a little bit so that everything fits right on top of each other like that .
And it might actually give a little bit of space to this text as well .
So I'll just click on that , go over to advanced and then this one , we can actually just edit the padding a little bit just like that .
So that is looking a lot better .
And now if I go back over to the desktop mode , so if I go down here to responsive , go over to desktop , you can see that everything still looks great on desktop .
So I'm gonna go back to mobile and just make sure everything else is looking .
OK ?
I think I saw a mistake here with our image .
So if you've got this issue here with your image , what we're gonna do is just go on over to the little Rubik's cube looking symbol and then we're just going to go over to spacer .
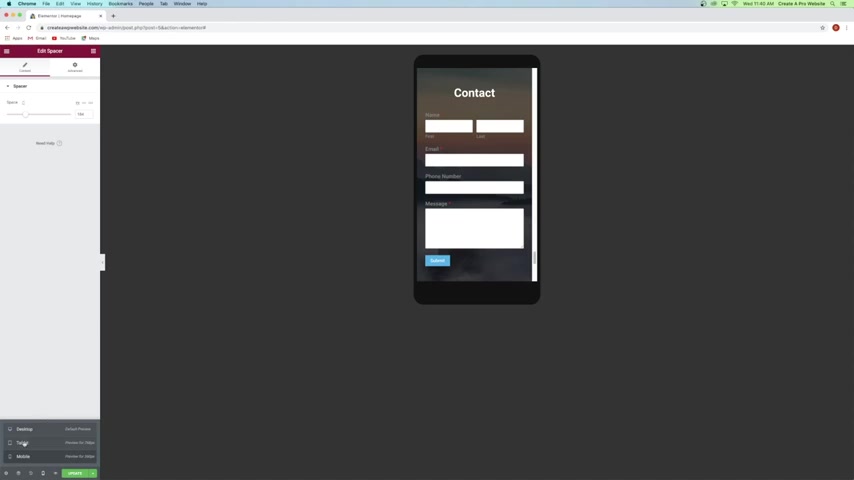
We're just gonna drag that spacer in right there and it'll just increase that space just like that .
And then again , just go back over to desktop mode and just make sure that everything still looks good , which it does cool .
So again , we'll go back to mobile double check .
Everything else is looking OK , which it looks like it is awesome .
So everything is looking great .
Now I'll just check on tablet and so you can see our header image is looking pretty good .
But this image here is kind of messed up here as well .
So let's just go ahead and fix that .
We'll just click on the spacer and again , we'll go over to space and you can see we've got the little tablet symbol .
So we're only messing with this on tablet and we'll just bring a little bit more of that image in just like that .
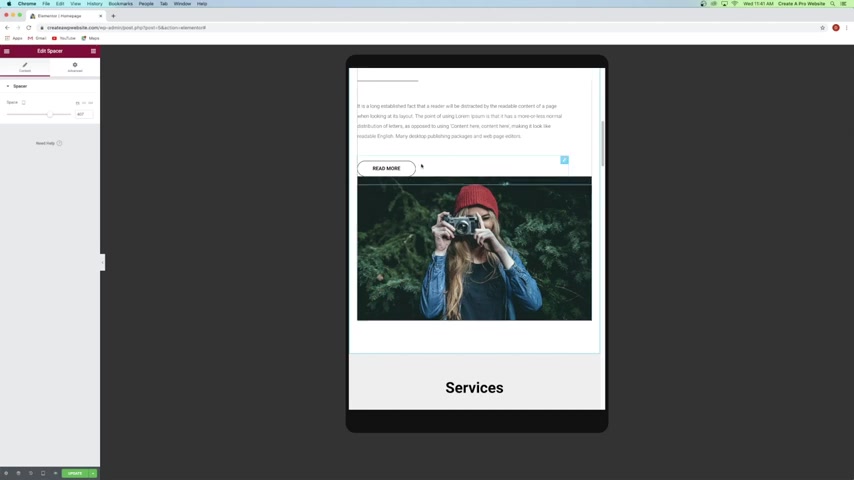
This looks pretty good and we want to add some space between this button and this section down here .
So let's just go ahead and click on this button , go over to advanced and then we're just going to add some padding on the bottom of that button .
So what we're gonna do is just unlink these values with this little button right here .
We're only gonna add some padding on the bottom just like that .
There we go , it's looking a lot better .
I'll just double check the rest .
And again , your Instagram is not going to show up on the edit mode , but it will whenever you preview your site .
So everything else is looking pretty good .
So we can just go ahead and click on update and then now let's just go ahead and click on preview changes and take a look at our site .
So we've got a beautiful site here with our logo .
We've got a working navigation menu up here .
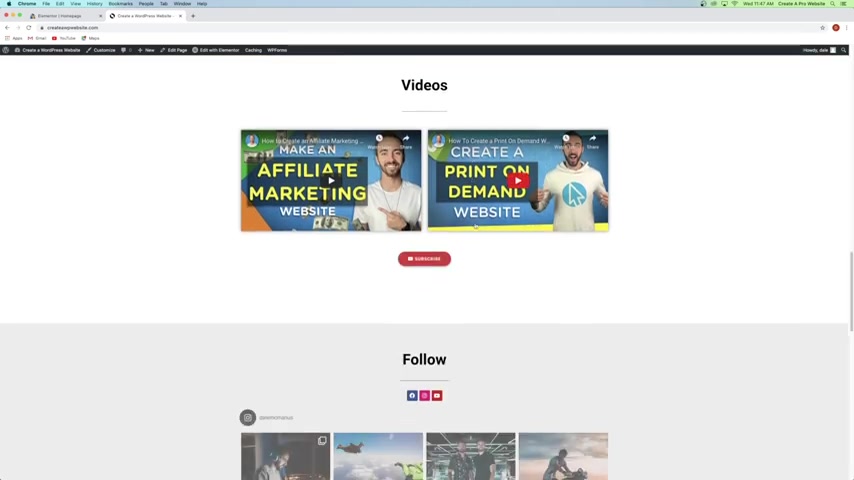
Whenever you click on it , it jumps to different sections on our website which is functioning beautifully .
We've got our gallery section with this beautiful light box .
Whenever you click on it , visitors can scroll through your photos .
We've got our video section .
Our Instagram feed is all hooked up and it updates live as you update your Instagram .
We've got our blog section which I showed you how to create new blog posts and a working contact form at the bottom and everything is working and looking beautiful on tablet , mobile and desktop .
All right guys .
So you've learned so much today and congratulations .
We covered a lot in this tutorial and I really hope you enjoyed the video .
If you did , it would mean the world to me .
If you would hit a like and leave a comment on the video .
And if you want to see more videos on how to build a website and how to make money with your website , then please subscribe the channel .
I have tons of videos on these two topics and we are always putting out new ones .
Also .
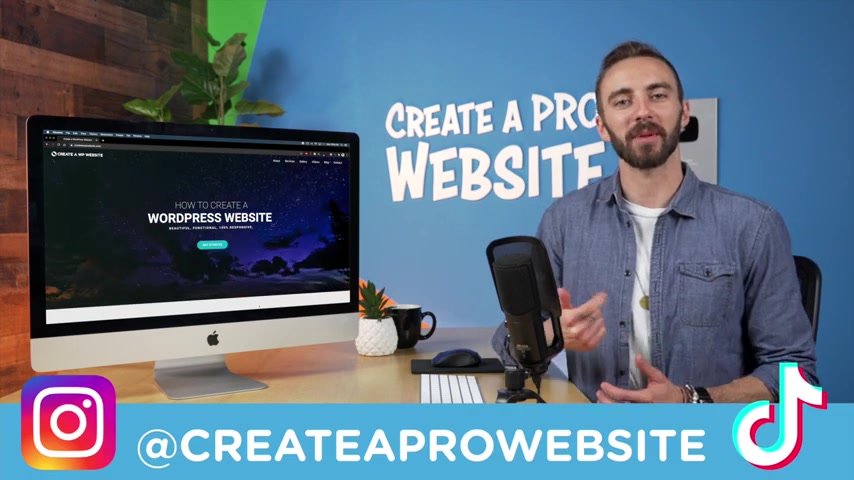
Feel free to check out Creative Pro website on Instagram and tiktok for more quick tips , design inspiration and behind the scenes .
Thank you so much for watching .
I'm Dale from Creative Pro website and I will see you on the next video .
Are you looking for a way to reach a wider audience and get more views on your videos?
Our innovative video to text transcribing service can help you do just that.
We provide accurate transcriptions of your videos along with visual content that will help you attract new viewers and keep them engaged. Plus, our data analytics and ad campaign tools can help you monetize your content and maximize your revenue.
Let's partner up and take your video content to the next level!
Contact us today to learn more.