https://www.youtube.com/watch?v=ZHZ4BjXNM20
How to Make a Food Ordering Website and App in just 30 minutes

Lukaku Barkley .
That .
Yeah .
Yeah .
Yes .
What a goal .
Hey , what shall you order for dinner ?
How about the place where we went last week ?
That's a good idea .
Let me check , but I can't find the place .
Let's go there .
Then I'm too tired .
Let's order somewhere else .
How about the place where we went last week ?
That's a good idea .
Let me check .
Is your mind ?
Hey , I placed the order .

Do you want to know how to create an app or a website like this for your restaurant ?
Then keep watching this video .
Yeah .
Hi guys .
Today we're going to see how you can create a food ordering website using wordpress .
So let's say you have a restaurant and you want to create a website for your restaurant so that you can take online orders from your customers and you can deliver those orders to your customer's location .
You can do that by watching this video .
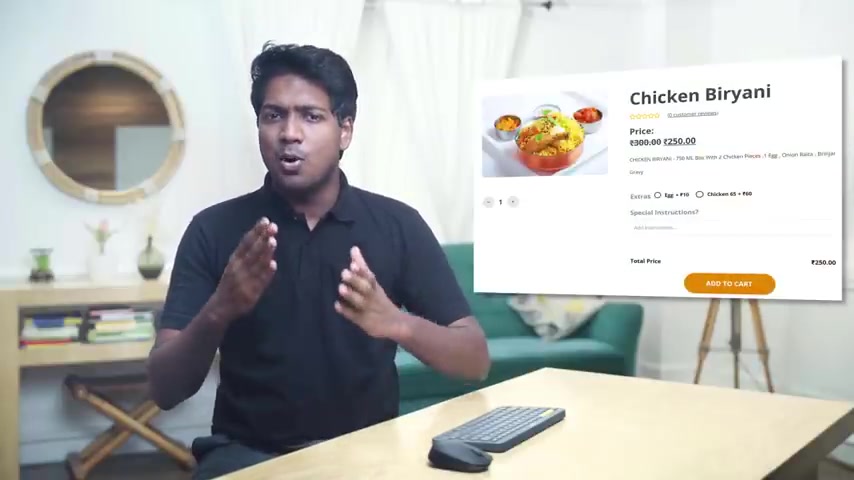
So after watching this video , you will be able to create a food ordering website like this where you can list your food items and when a customer visits your website , they can order any food they want just by clicking order .
Now , once they fill the address details , they can choose when they want to receive the order .
Now , if they want to place the order , they can use this payment method to pay you and place the order .
Ok .
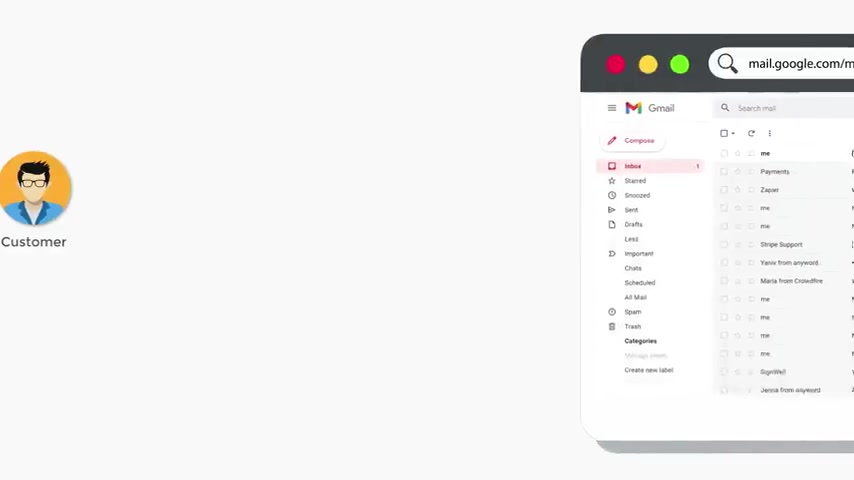
So once someone orders food on your website , you will receive a mail to your inbox like this .
And here you can see the order details of your customer .
Next , we will also see how you can deliver orders to your customers by assigning a delivery person and they'll deliver the food .
We will also see how you can add a location tracking feature on your website like this so that the delivery person can easily find a customer's location .
And it will also help your customers know where the order is .
And we will also see how you can make this website as an app like this so that it will be easy for your customers to place order .
And you can also easily customize your site to any style you want just by using drag and drop .
Ok .
So having a food ordering website can help you get more customers and you can also make it quick and easy for your customers to order food online .
Also a food ordering website will help you build and improve your brand image .

So make sure you watch this video till the end to learn how to create one .
So let's get started .
I'm brand for website learners and let's start creating a food ordering website .
So to create a food ordering website , we are going to do four parts .
The first part is to launch a food ordering website .
So to launch a website , just click the link below this video and it will take you to this website called make A double P dot com .
But you will find the food ordering website .
Now to see how the site looks , just click demo and here you can see the complete food ordering website that we are going to launch .
Ok .
Now to get this food ordering website , just click launch site , then enter your details and click next .
Now , enter your payment details and click sign up .
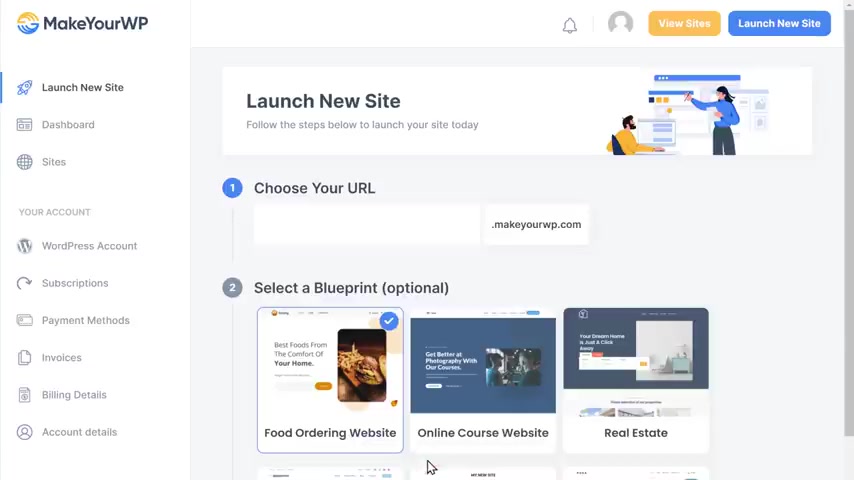
Now , so now we have successfully purchased the website know to launch our site , click launch new site and it will take you to this page .
Now here enter the website address that you want .
I'm going to enter delicious food and now your website address will be delicious food dot make a WP dot com .
This is the address which people will visit to reach your site .
And as you can see , our food outing website has already been selected .
So just scroll down and click launch new website .
Now , if you click visit , you can see that our brand new website has been launched .
Now , this is just a temporary link to your site .
You can easily change this to your own dot com domain .
We'll see how you can do that later in this video .
Ok .
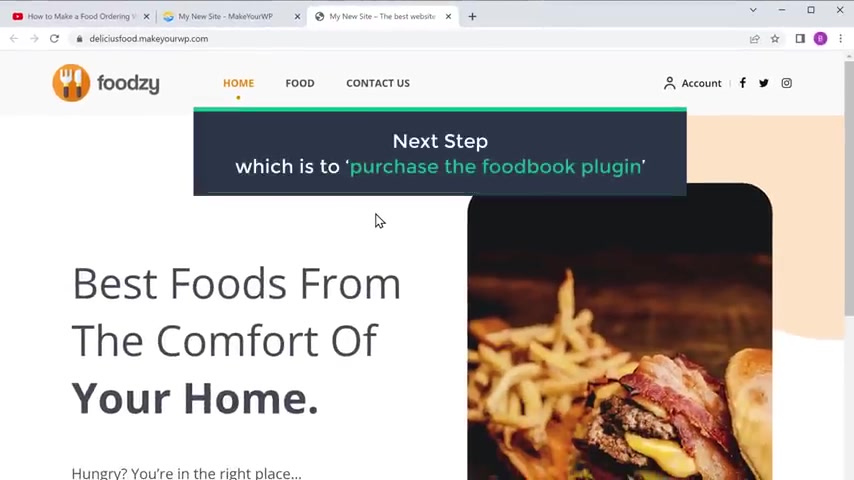
Once you've launched your site , we can now go to the next step , which is to purchase the phone book plug in .
Now in , make a WP , you'll be getting the food book team which has the entire website set up and the hosting now to place the food order on our site and make the site work properly .
We need to get the plug-in license separately .
This plug in will take care of the food ordering process and the delivery of the food on our website .
So to purchase the plug-in , go to the video , you're watching right now and click the link in the description and it'll take you to this page .
So get the plug in , just click add to cart and the plug-in will be added to car .
Now click go to check out and it'll ask you to create an account .
You can fill up these details or you can also use a Google account .
I'm going to use my Google account .
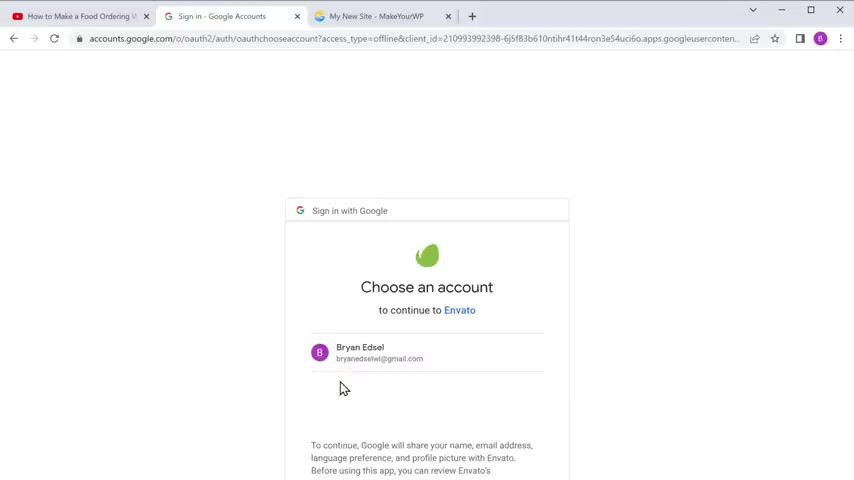
Let's click , continue with Google and then choose your account .
No , get the plug in .
Select the payment method you want .
I'm going to use my card now , enter the card details and basically this is a one time payment and you don't need to renew it every year .
So now we have successfully made the payment .
Once you have purchased the plug in next , we need to activate it .
So to do that , let's go to make a WB click admin and it will take you to your wordpress dashboard .
This is the place where you can control your entire website .
Now to activate the plug in , go to food book licensing .
And here we need to enter the license key .
Now to get the license key .
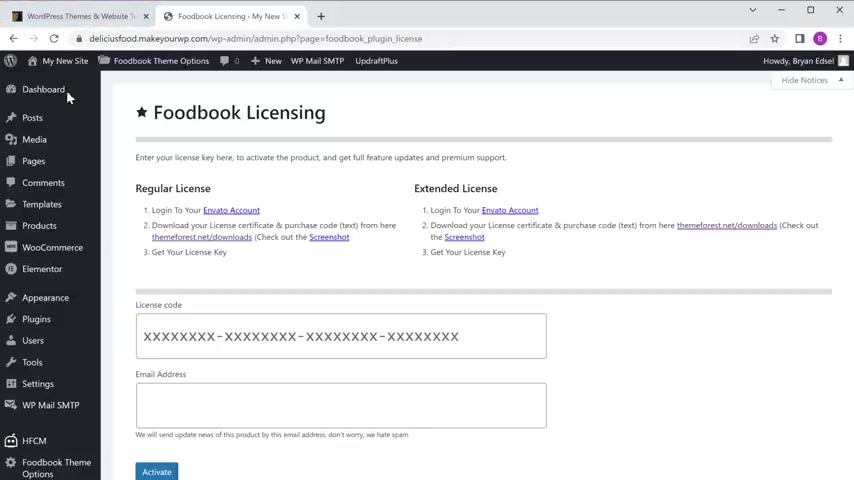
Let's go to this plug in page , click here and then click downloads .
Now go to download and , and the license key will be downloaded .
Now , let's open the document and as you can see this is the license key .
So let's copy this license key .
Go back to your dashboard and paste it here .
Now here enter the email address which you used to buy the plug-in .
Once you're done , click activate here , you can see that the license is activated and we have a complete full ordering website .
So let's go to our site and click refresh .
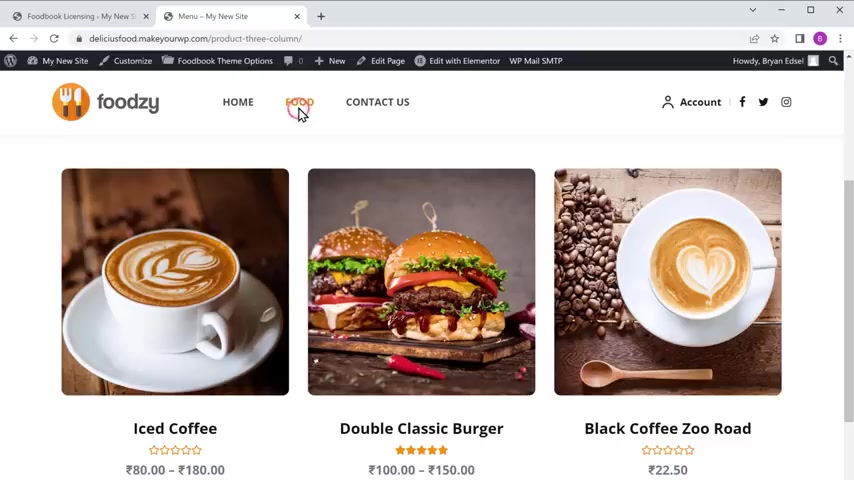
You can see that all the features are added to our site .
Now , if we click on food and click order now on any product here , you can choose the quantity you want and add the product to the car .
So click , check out here , you can give your details and place the order .
So now we have launched a complete food ordering website .
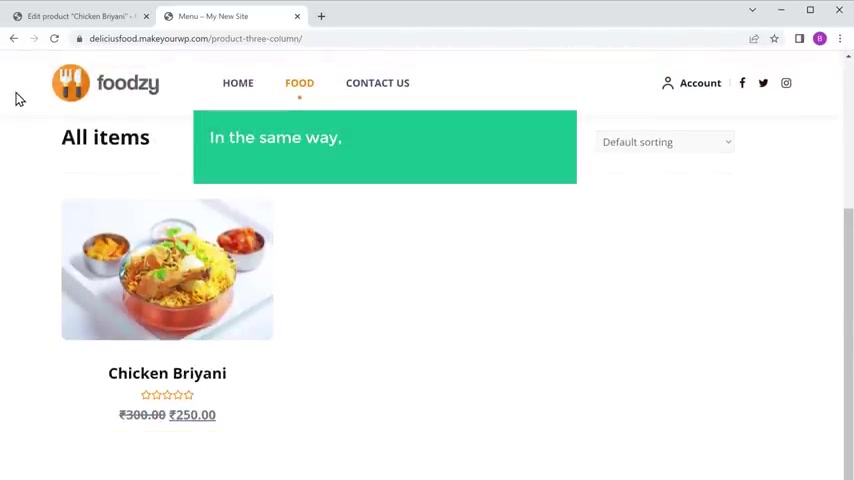
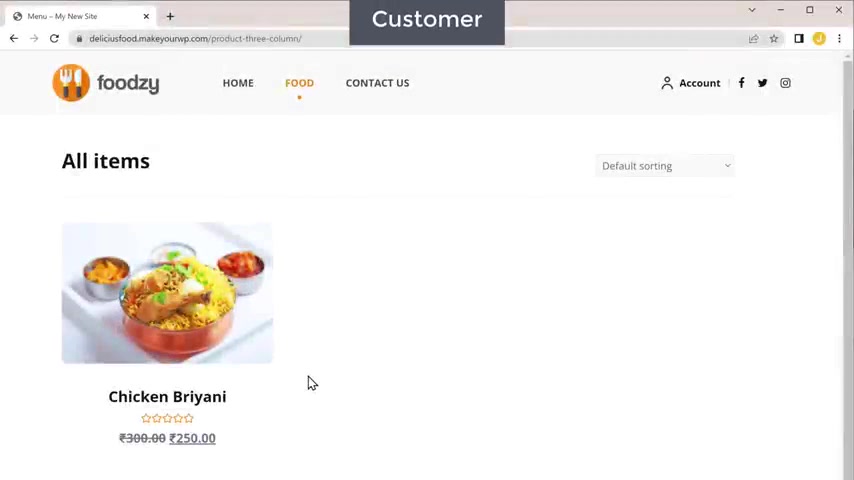
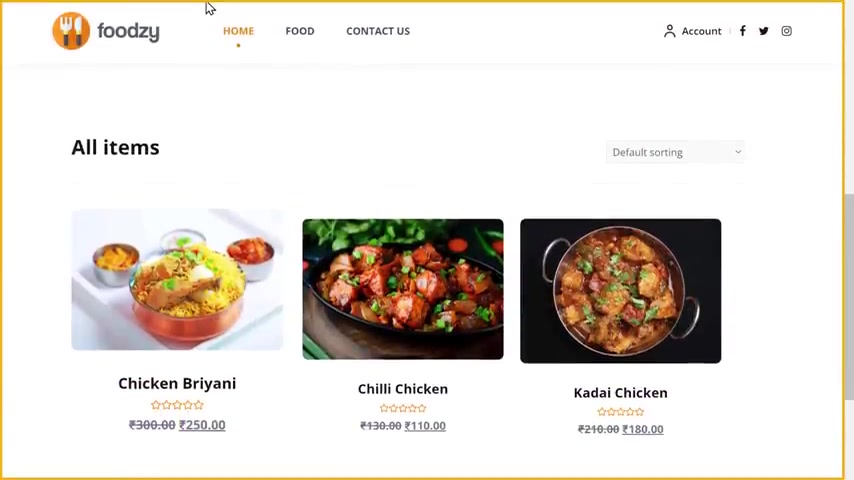
Now , if we go to food , you can see that we have these sample food items .
Now answer of this , how do you add your own food items here ?
Next , let's go to the second part of this tutorial where we see how you can add your own food items to your website .
Once you add your own food items to your site , your customers will be able to order what they want .
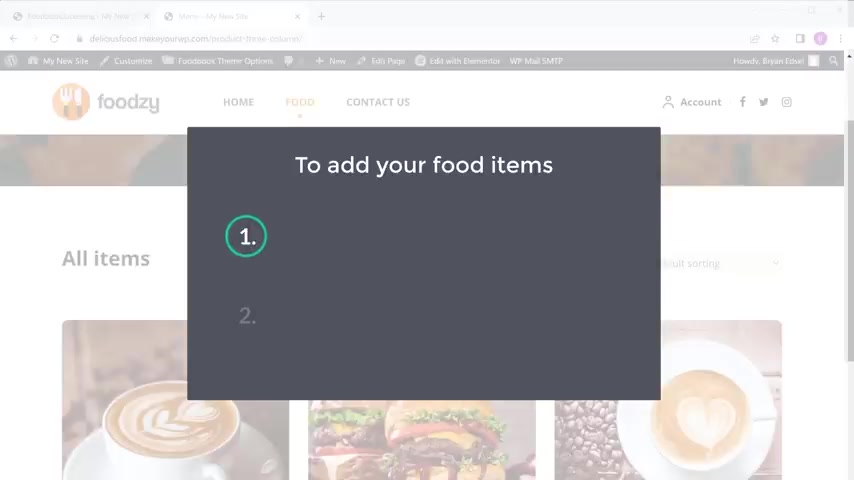
So to add your food items , we are going to do two steps .
The first step is to delete the sample food items .
So to delete them , let's make products .
And here you can see the sample food items which we have on our site , not to delete them .
Just click here to select all the items .
Then click here and select , move to trash .
No .
If we click apply , you can see that all the sample food items have been deleted .
So if we go to our site and click refresh , you can see that the sample food items have been removed and we can now add our food items .
Once you have deleted the sample food items , we can now go to step two , which is to add your food product .
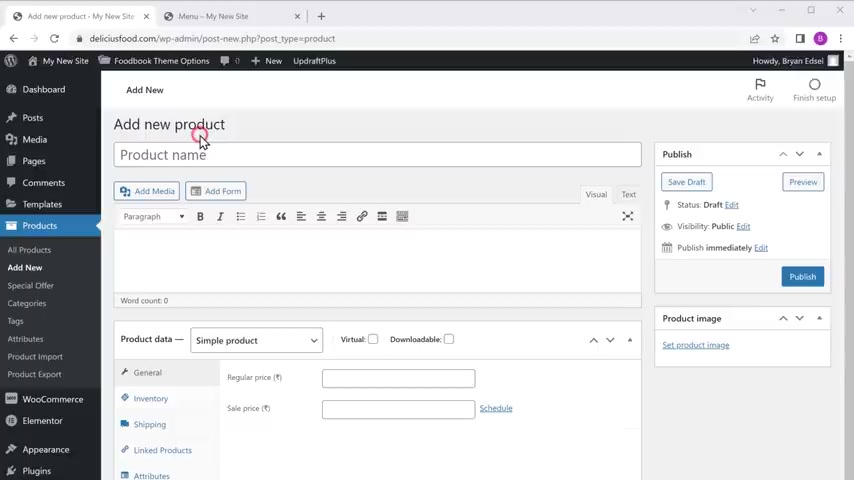
So to add your food product , just go back to your dashboard , click add new and it'll take you to this page now to add your food product .
All you have to do is enter your product name here .
I'm going to enter chicken biryani .
Now here enter the product description and then enter the price of your product .
Once you're done now to add the images of your food product , just click set product image and drag an image from your computer and drop it here .
As you can see the image has been added once you've added the image , click publish and now we have successfully added the food items to our site .
Now , if we go to our site and click refresh , you can see that we have got the food item which we just added .
OK .
In the same way , you can add any number of food items you want once you've added your food item .
Now , here you can see that we are the product price and rupees .
Now , instead of this currency , what if you want to have a different currency ?
So next , let's see how you can change this currency to change the currency .
Let's go to our dashboard , then go to Woocommerce and click settings .
Now scroll down and here you will find the currency option .
Now , if you click here , you can see all the currencies that are available .
So just select the currency you want and click save changes .
So this is how you can change the currency .
Ok , let's say a customer wants to order a food product on your site .
Now , if they go to your site and click order now on a product and click add to guard .
Now if they click , check out it will ask them to create an account .
So if they fill up these details and click sign up , they will get this space here .
They can enter their billing details , but here , you can see that there's no payment method available .
So now to allow customers to make payments on your site and order food , we need to set up a payment method .
So next , let's see how you can set up your payment method on your website .
So to set it up , we are going to do three steps .
The first step is to create an account and raise a pay .
So to create an account , just go to the video you're watching right now .
Now click this link and it will take you to the site .
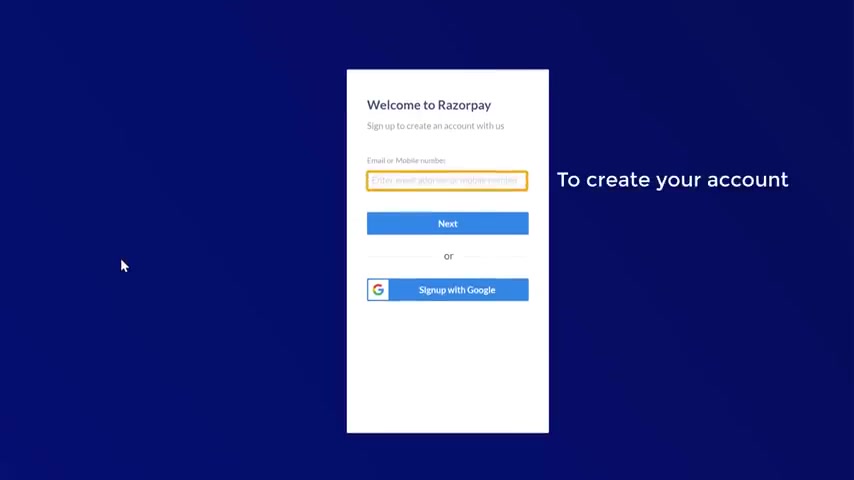
Now , click sign up here and here you need to enter your email address to create your account .
Or you can also use your Google account to create an account in Razorpay .
I'm going to use my Google account .
So click sign up at Google and choose your account .
Now , here you need to select whether your business is registered or not .
So if your business is registered , you can select the type from here .
But if you haven't registered your business , you can select this .
I'm going to select this .
Now , enter your name and contact number here , then click next and it'll take you to the Razor pay dashboard .
So now we have successfully created an account in Razorpay .
Once you've created your account , we can now go to step two , which is to activate your account .
Now , in order to accept payments from your customers first , you need to activate your resume account .
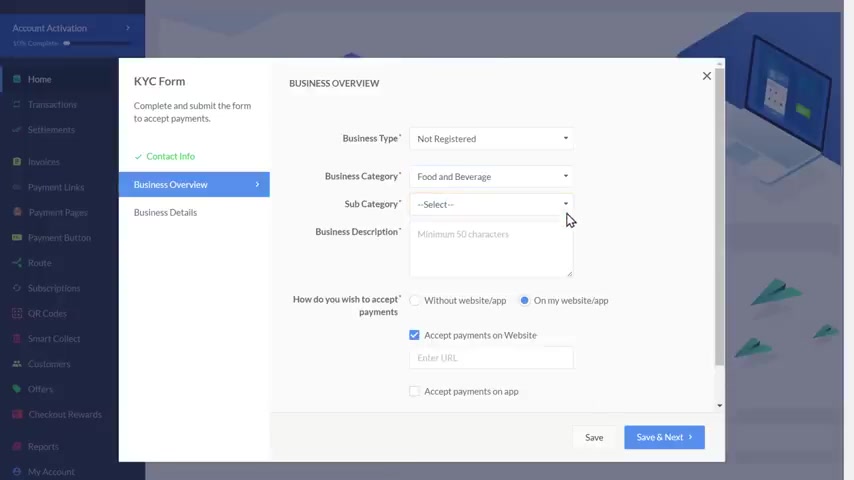
So to activate the account , just click , activate your account and you will get this KYC form .
Now to complete activating your account , you need to fill up these details and submit this form .
So let's fill up these details .
Now , as you can see , we have selected our business type .
Now click here and select the business category .
I'm going to select my category as food and beverage .
Then here you need to choose a subcategory as online food ordering .
And finally , you need to enter the description of your business .
Once you have done that , you need to choose , how would you like to accept payments from your customers ?
If you want to accept payments without your website , you can select this or if you want to accept payments on your website , you can select this .
I'm going to keep this selected and then here you need to enter your website's URL .
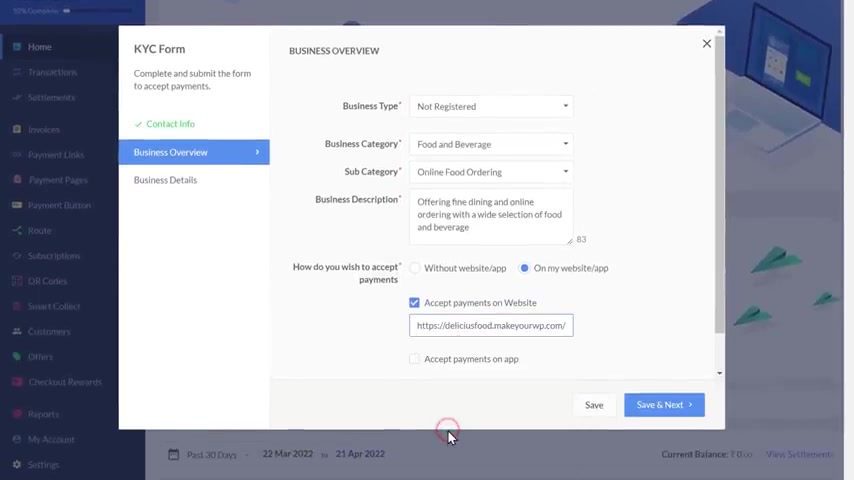
So to get the URL , let's go to our website now copy this URL till here , then go back and paste it here .
Once you have done that , click save next .
Now here you need to enter your business details .
So first enter your P number here and then enter your name which is given in your bank card .
Now enter the name of your business .
I'm going to enter my website name and then enter your address here .
Once you have filled in all these details , click submit and verify and you will get this message .
Now , in order to accept payments from your customers , you need to complete this KYC .
So to complete it , let's click complete KYC .
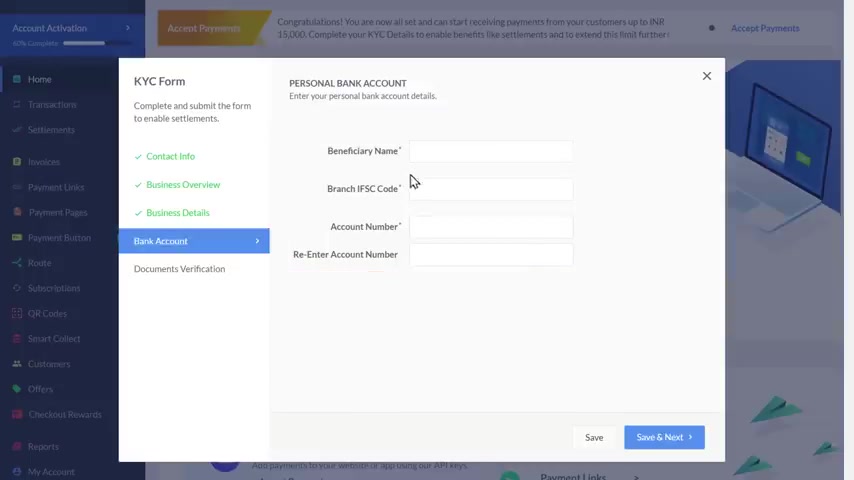
Now here you need to enter your bank details where you want to receive your payments .
So let's enter our details here .
Now , when a customer makes a payment on your site , you will receive that payment to this bank account .
Once you've entered the details , just click save and next .
And finally , you need to give your other details as proof .
So just click here , enter your 12 digit order number and then enter the capture as shown .
Now , click submit and get OTP .
Now you will receive an OTP on your registered mobile number .
Now just enter it here and just click submit form .
Now here , click on the check box and again , click submit form .
So now we have successfully submitted the KYC form .
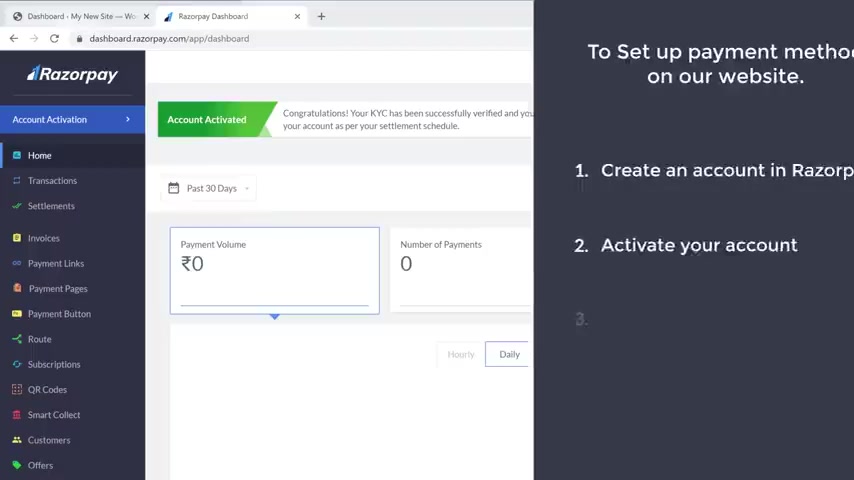
Once you have submitted the form , it will be verified within 3 to 4 working days .
So after four days , if we go back to our account , you can see that our recipe account has been activated .
So now you'll be able to receive payments from your customers and your amount will be transferred to your bank account directly .
Ok .
Once you have activated your account , we can now go to the final step of setting up the payment , which is to create this account with your website .
Now to let your customers make payments on your site , you need to create your resume account with your website .
So to return to your account , let's go to our dashboard , then go to Woocommerce and click settings .
Now go to payments here en dise and click on set up and it'll take you to this page now to create the recipe account with your website .
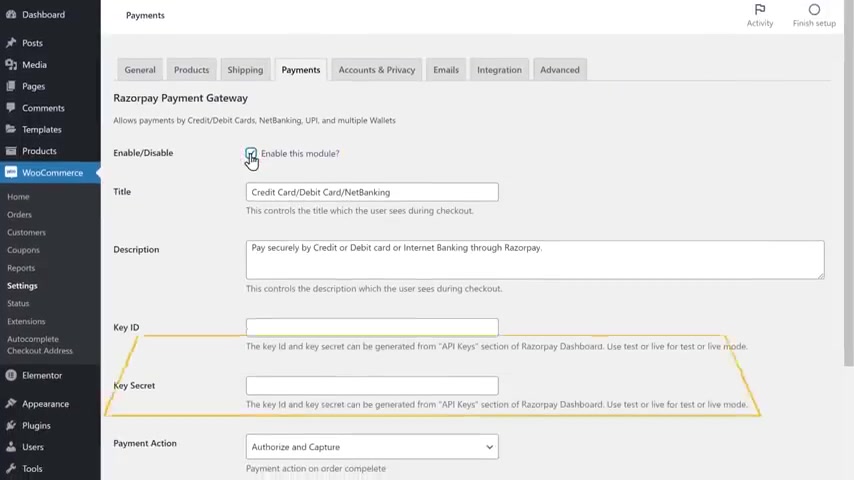
Enable this option .
Then you need to enter these details .
So get these details .
Let's go to our recipe account , click settings .
Now go to API keys and click generate live key .
As you can see , we have got the details which we want .
Now you need to copy these details and paste them on your side .
So first let's copy this one and paste it here .
Now let's copy this and past it here .
Once you've entered these details , just scroll down and click save changes .

Now , as soon as you click save changes , your Razor Pay account will be connected to your website .
So now your customers will be able to make payments on your site using Razor Pay .
Now , if you go back to our customers checkout page , you can see that the payment is not available .
Now , now if you click refresh , you can see that Razor Pay payment has been added and your customers can make payments on your side .
Now , let's pull up these details here .
Your customer can choose when they want to receive the ordered food .
So let's click here and choose the time Now , if they click place order , you can see that they have got different options to make the payment .
So let's say they want to make the payment with card , they can just click on it , enter the card details and then click pay .

So now you can see that the payment has been made successfully and the order has been placed .
Ok .
Now the customers can track the orders by clicking here and it will take you to their dashboard .
Ok .
So this is how your customer can place an order and make payments on your site .
Once a customer places an order , how will you know it ?
Now , as soon as someone places an order on your site , you will get email notifications on your inbox .
So if you go to our inbox , you can see that we have received two emails .
The first email is from Razorpay and the second one is from wordpress .
Now , if we open the first email from Razor Pay , you can see all the details of the payment within three days , this amount will be transferred to our bank account .
Now , if we go back and open a second email from wordpress , you can see the details of the order .
Ok .
You can also see the orders from your dashboard .
So let's go to our Wordpress dashboard , go to full book and click orders here .
You can see the orders which you have received .
Now , if you click view details , you can see the details of the order and the billing details .
So once you get the order here , you can see the status of the order .
So let's select on the way as you can see your tracking status has been changed .
Now , if the customer checks their inbox , you can see that they received an email .
If they click on it , you can see that they received an update about the order status .
Now , if they go back to orders on your website and click refresh , they can also see their update from here .
This is how you can know when someone places an order on your site .
Now , you know how someone can place an order on your side .
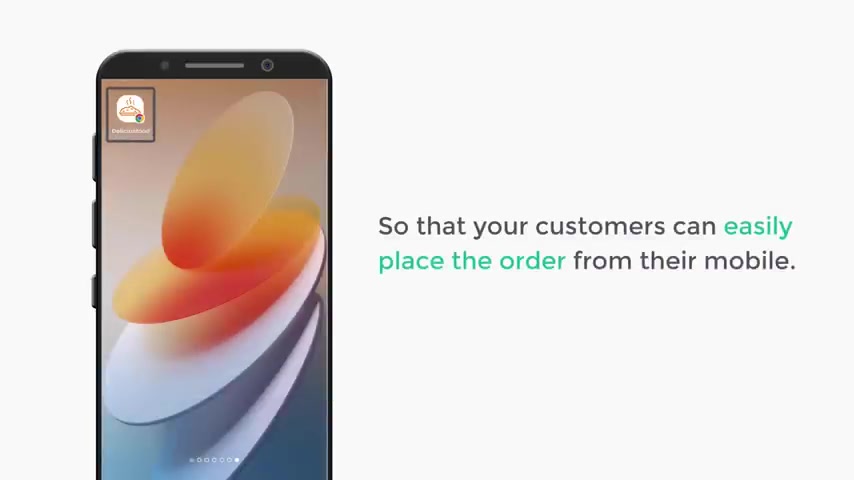
Next , let's see how you can make this website as an app on a mobile like this so that your customers can easily place the order from their mobile to do that .
Click on Google Chrome .
Let's open the site on mobile .
Now , click on the three dots and click add to home screen here , enter the side stream and click add then again , click add .
And as you can see , we have got a shortcut to our site .
Now , if you click on this icon , it'll take you to your side .
As you can see , we have got our exact site in mobile view .
Now let's see how your customer can place an order on their mobile .
So to place the order , just scroll down and click orderer on the food .
Here , you can select the quantity and click add to card .
Now click , check out you enter the billing details .

They can choose when they want to receive the order , choose the payment , then click place order and the order will be placed successfully .
So this is how someone can place an order on your site using mobile .
Ok .
Now when a customer places an order , how do you deliver their food ?
So we need someone to deliver the food to our customers .
So next , let's see how you can assign a person to deliver the food .
So to do that , all you have to do is let's go back to our dashboard , then click users and click all users .
Now click add new and here you can enter the details of the delivery person .
Now click here and assigned the role as delivery boy .
Once you're done , click add new user here , you can see that a new delivery person has been added in the same way you can add as many delivery persons as you want .
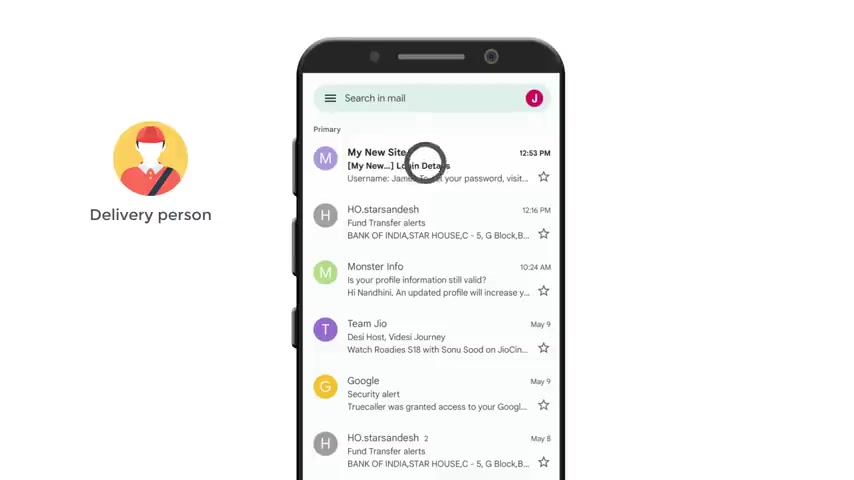
Now , if the delivery person goes to the inbox , you can see that they have received an email .
So let's open it here .
They can see the user name .
Now they can click on this link and set the account password and they can log into the account once they log in .
This is how the delivery person's dashboard looks like once you've added the delivery person .
Now , let's see how you can assign an order to the delivery person .
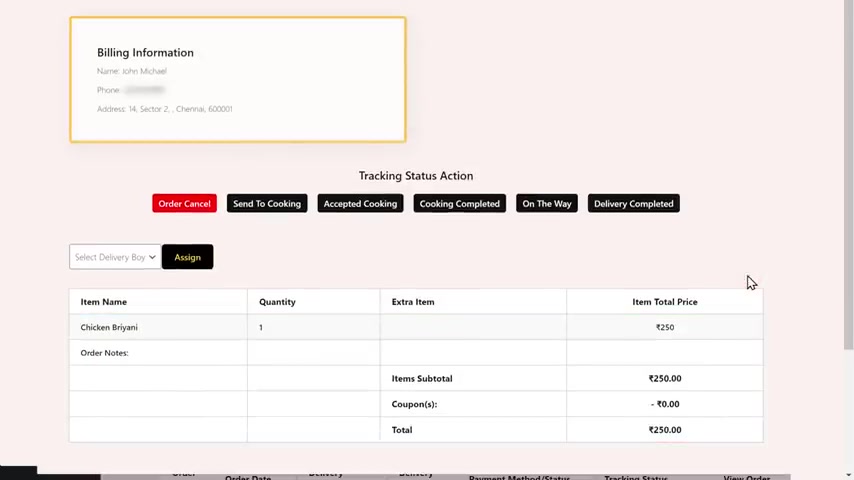
So to do that , let's go to our dashboard and like full book and click orders .
Now click on view details on the order we received not , and you can see the delivery person you have added .
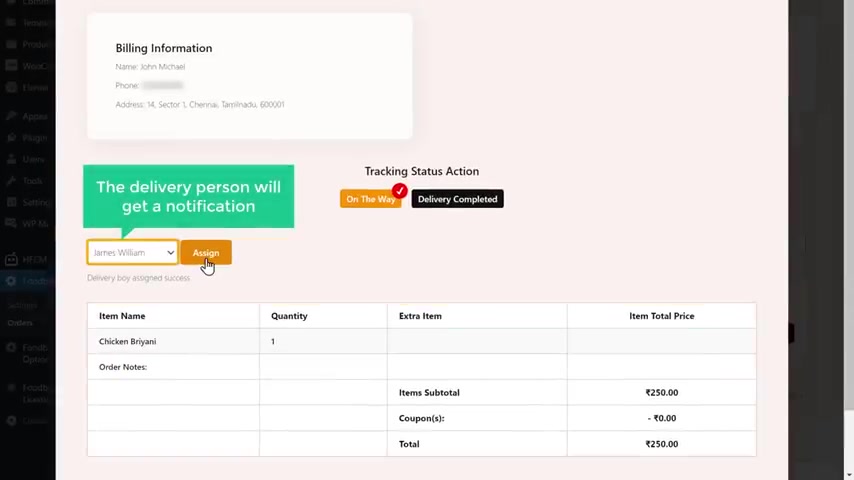
So select the delivery person and click assign .
So this order gets assigned to him and the delivery person will get a notification .
Now , if the delivery person goes to the dashboard , you can see that they have received the order .
And if they click jury deals , they can see the complete status of the order and the location of delivery .
So this is how you can assign a person for delivering the food .
Now , if you see here , we have got the address details like this instead of this , what if you want to get the location on a map like this ?
You can do that by adding a tracking feature to your website .
Next , let's go to part three of this tutorial which is to add a location tracking feature to your website .
So to do that , let's go to our workers dashboard .
Now go to food , book and click settings and location settings .
Now , to enable the location tracking on our site , we need to get the Google Maps API key and enter it here .
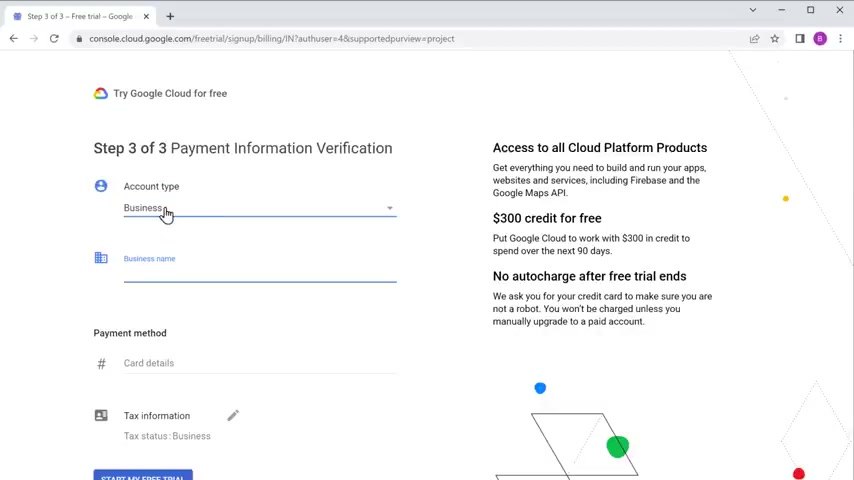
So to get the API key , just go to your browser search for Google cloud console .
Now click on the first link and it'll take you to the site .
Now go to billing and click add billing account here .
You need to give your information .
So choose your country and choose the type of business .
Then click this box and click continue .
Now it will ask you for your contact information .
So enter your mobile number and click send code .
No .
If you check your mobile , you would have received the verification code .
So enter the code and click , verify no and select your account type .
I'm gonna choose individual and it will ask for your card details .
Now , as you can see here , these details will be used for your verification and you won't be charged until the free trial ends .
So let's enter our card details .
Then click here .
Now if you click unregistered individual , once you're done , click start free trial and here you need to enter the security code for your card .
Once you're done , click continue and click , start free trial .
So now we have successfully activated the free trial on Google Cloud .
No great project .
Now enter the name you want .
I'm going to enter Google Maps , API and click create .
Now to get the Google Maps API key , click here and go to API S and services not select library .
And it will take you to this page where you will find the API S for Google Maps .
So to get the API key , we need to enable these two API S .
So let's click on maps , javascript API and click enable .
No go back , click on the place .
It's A P A and click enable .
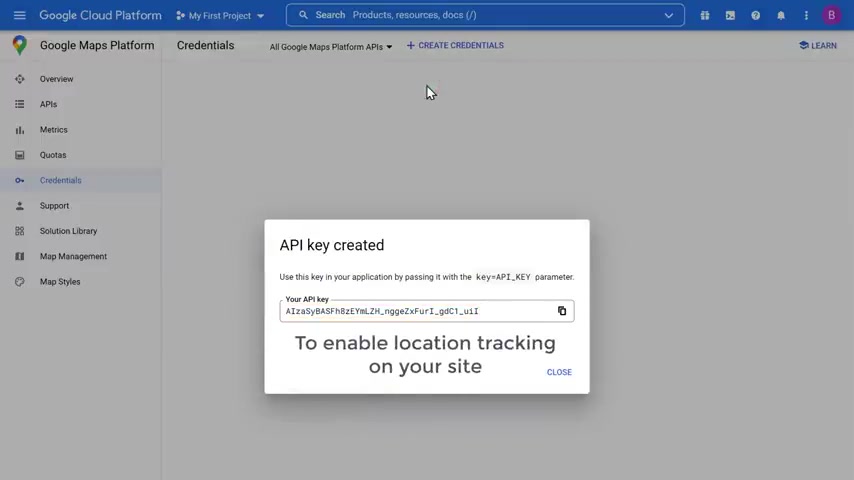
Once the API S are enabled , click credentials , then click , create credentials and select API key .
So now we've got a Google Maps API key .
Once you've got the API key .
Now to enable the location tracking on your site , we need to add this key to our website .
So let's copy the API key .
Go back to your dashboard and pain it here .
Once you're done , scroll down and click save settings .
Now , here you need to add the restaurant's location .
I'm going to select my location .
Now , let's say you want to deliver only to a particular distance .
You can do that by adding the distance here .
I'm going to enter five kilometer .
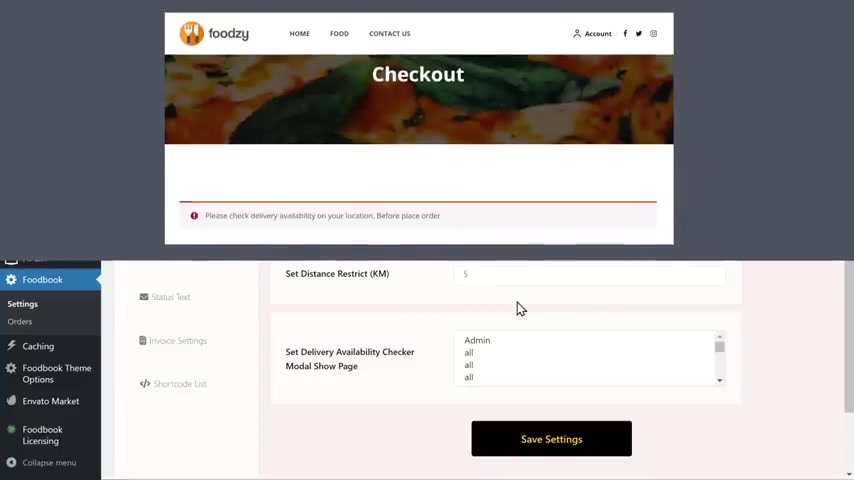
This means when someone places an order which is about five kilometer from your location , they will get a message like this once you're done , click save settings .
Now we have successfully enabled Google map services on our site .
So to see how it works , let's try to place an order as a customer .
So let's go back to our site , click order now and this opens .
Now let's click add to cart and click , check out here , fill up these details and click log in .
Now enter all these details and click place an order .
You can see that they have got different options to make their payment .
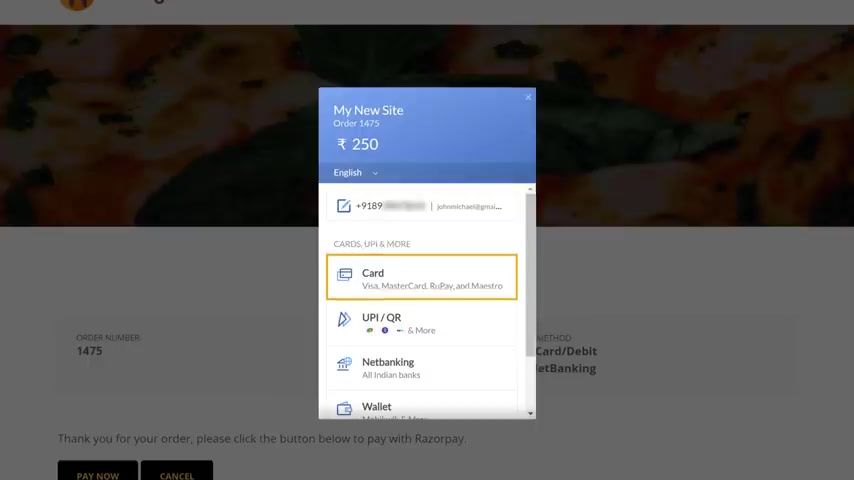
So let's say they want to make the payment with the card , they can just click on it , enter the card details and then click pay .
So now you can see that the payment has been made successfully and you can see that the order has been successfully placed .
Ok .
Once the order is placed , let's go to our admin dashboard , go to orders and here you can see the orders .
So let's click view details and change the order status as on the way , then click here and to the delivery person and click assign .
Now you can see that the order has been assigned to the delivery person .
Now , if the delivery person checks his account , you can see that he has received the order .
And if they click due details , they can see all the order details .
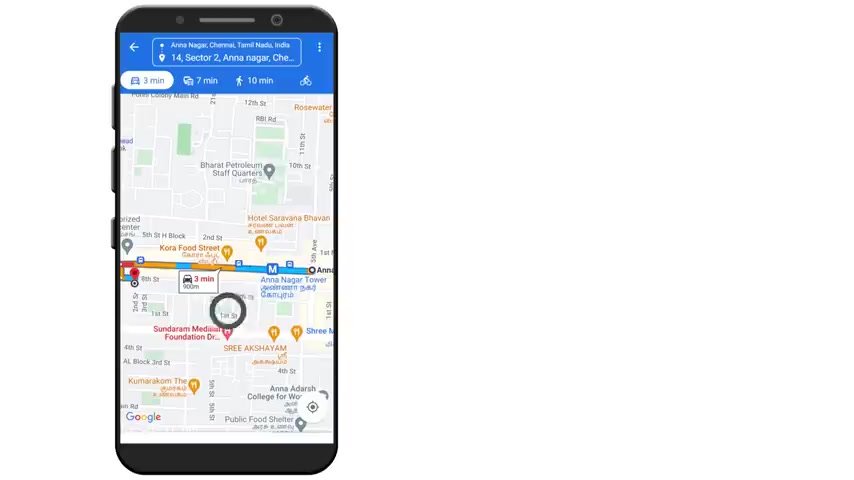
And once they scroll down here , they can see that they have got the location on the map .
And if they click here , you can see that it shows the direction from the shop to the customer's location .
Now they will get the food from us and deliver it to the customer .
Once the delivery person delivers the order to the customer , they can click here to complete the order .
So now you know how a customer places an order and how you can deliver that to the customer .
Ok , now while placing the order , the customer has to type the address manually instead of that .
What if you want to autofill the address details to your customers without entering it manually , you can do that easily by enabling the auto filling feature .
By enabling this , we will get the exact location of the customer which will make it easier for the delivery person to deliver the food to any of the outer filling feature .
You need the Google API keys .
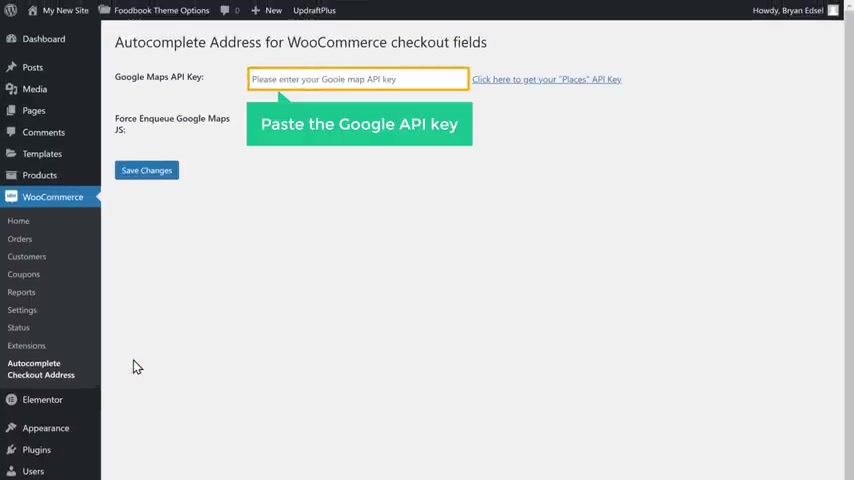
So let's go to our wordpress dashboard , then go to food book , click on settings , then go to location settings and copy this Google API key .
Now go to Woocommerce and click autocomplete , checkout address and past the Google API key here .
Once you're done , click save changes .
Now the auto filling option will be enabled on your site to check that .
Let's go to our checkout page .
Now , if the customer tries to enter the address , you can see that we have got the adder suggestions .
Now , the customer can select the order from here and proceed with the order .
Ok .
This is how you can order , fill the adder details of your customers without entering it manually .
Next , let's see how you can add extra food options to your customers .
Now , let's say when a customer orders a food product , you can add extra food options like this along with the order which the customer might like .
So to create an add on for your food product like this , let's go to our workers dashboard , then go to products .
Now click on the product and scroll down here .
A click on add features and click add group .
Now give a name for your section .
I'm going to enter extras .
Now , here you can add the add on which you want to give and its price .
Now , I'm going to add a Meg and its price has 10 .
Now to add another add on , just click , add , enter the name and it plays once you're done , just click update .
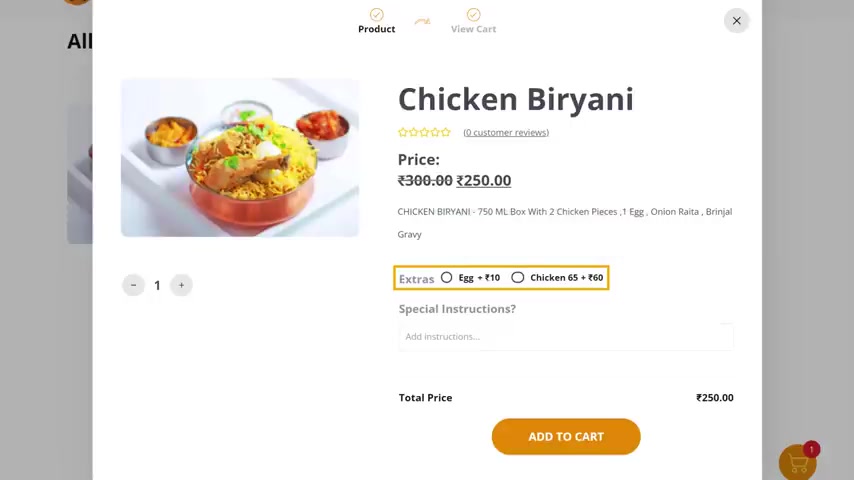
So let's go to our site and the first is Pete , they can see the add-ons which they have created .
Now , if they want to add this to the order , they can just select it and it will be added to their card .
Ok .
Now , here you can see that our website address ends with make a WP dot com .
Now , instead of this , what if you want your website to have a simple address like your website name dot com , which looks more professional .
You can do that by getting your own domain name for your website .
So to do that , let's go to the final part of this video , which is to get a custom domain for your website .
So to get your own domain name , just click the link below this video and it'll take you to webspace kit dot com where you can get a domain for your website .
Now here enter the name you want for your website .
I'm going to enter delicious food dot com .
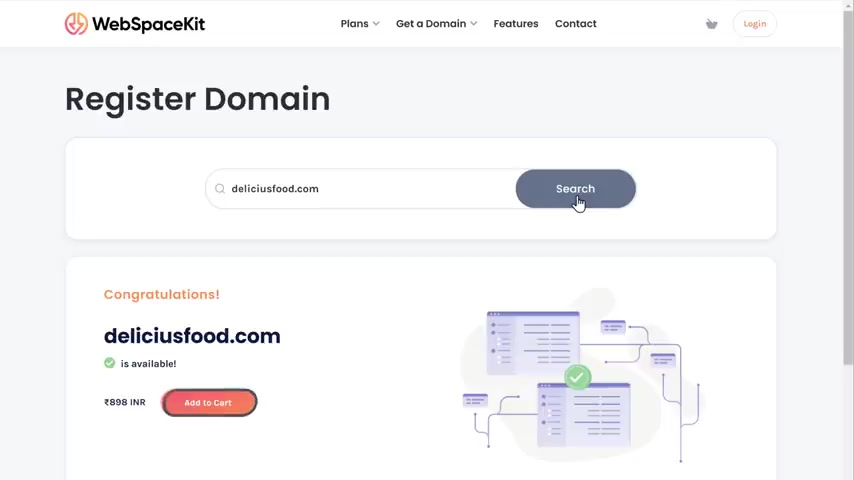
Now , if you click search , you can see that this domain name is available .
Now to get this domain name for your website .
Just click add to cart and then click continue .
Now it'll ask you to select a hosting plan as we already have hosting for our site on Make a WP let's click skip and it will take you to this card page .
Now , here you can see that we're getting our domain for one year and after one year , you need to renew your domain to keep using it .
So to get this domain , let's pull up these details .
No , choose your payment method , no , enter your payment details and we got her out .
So now we successfully made the payment and if you click continue to client area , you can see the domain name which we had purchased .
Ok .
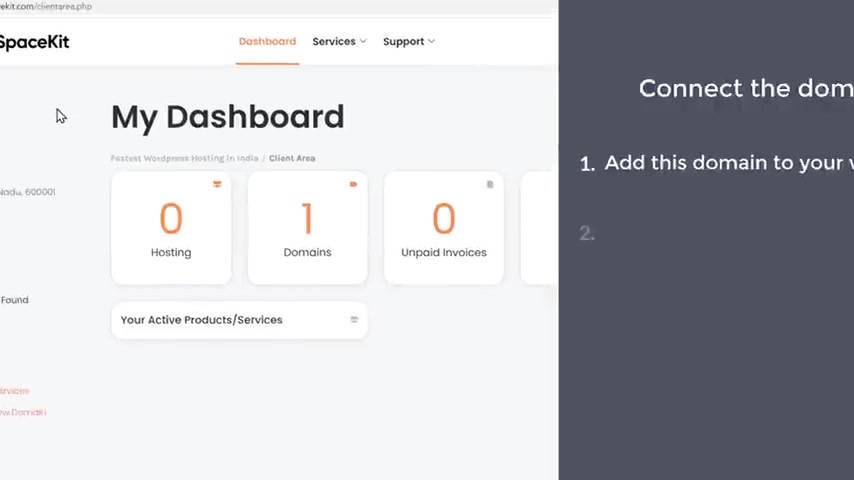
So once you've got your domain , now , how do you create this domain with your website ?
So to create this domain , we are going to do two steps .
The first step is to add this domain to your website .
So to add this domain , let's go to make a WP dot com and click domains .
And here you need to enter the domain name which you have purchased .
So I'm going to enter delicious food dot com .
Once you've entered your domain name , let's go to the final step which is to add the IP address to your domain .
So to add it , let's go to this tab and then click domains and then click manage DNS .
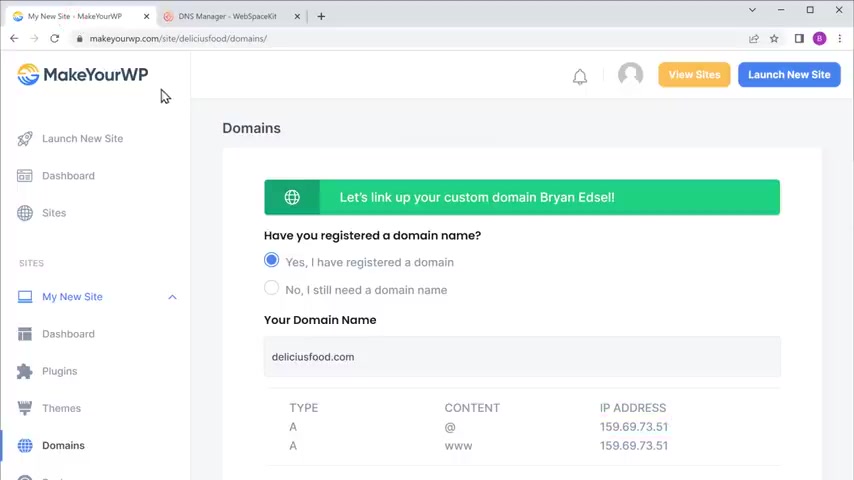
Now next to the air record we need to add a I PR s which is shown here .
So let's go back to this page , copy this IP address , then come back to this tab and paste it here .
Once you're done , click save changes , not the kind of the domain .
Let's go back to MKWP and click on a domain .
So now we have successfully created a new domain name with our website .
So to check it , let's open a new tab and type a new domain name .
Now , free press enter , you can see that we've successfully created our domain and we've got a food ordering website which we just created .
So now our customers can just go to your domain name to access your site and place orders easily .
So this is how you can get your own domain name for your website .
OK .
Next , let's see how you can edit the content of your website .
So to edit the content of your site first , let's go to the page which we want to edit .
Since I want to edit the home page , I'm going to go to that page .
Now , click edit to the mentor and it will take you to this editing section where you can edit any part of the page .
Now , let's say you want to change this text .
All you have to do is just select the text and enter your own text in the same way you can change any text you want on this page .
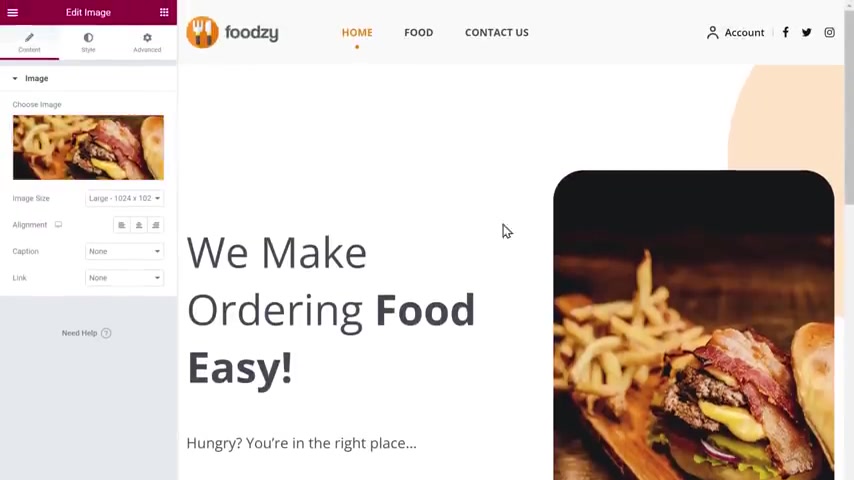
So to change this image , just click on it now , play here and drag and drop the image from your computer .
As you can see , the image has been changed .
In the same way you can change any image on this page .
Once you've made all the changes , click update and your changes will be saved .
Now , if we go back to our site and click refresh , you can see that as has been updated with the changes we made .
Now let's say you want to change this logo .
So to change it , let's click customize , then click head up and click head an app bar .
Now you can see the default logo which is here on our side .
So to change it first , let's delete the logo .
Now click on upload , then drag your logo and drop it here once you're done , click publish .
So check it .
Let's go back to our site and click refresh .
You can see that we have successfully changed the logo .
So this is how you can enter the contents of your site .
OK ?
So that's it guys .
This is how you can make a food ordering website using wordpress .
Now , if you're ready to make your own food ordering website , just click the link below this video and it will take you to the Make a WP page where you can launch a site and start building a food ordering website .
Also make sure you click the subscribe button to see more videos from us .
So thanks for watching .
I'll see you in the next video .
Take care .
Bye bye .
Are you looking for a way to reach a wider audience and get more views on your videos?
Our innovative video to text transcribing service can help you do just that.
We provide accurate transcriptions of your videos along with visual content that will help you attract new viewers and keep them engaged. Plus, our data analytics and ad campaign tools can help you monetize your content and maximize your revenue.
Let's partner up and take your video content to the next level!
Contact us today to learn more.