https://www.youtube.com/watch?v=3BMe5dre9M0
How To Make A Wordpress Blog - Create A Blog With Wordpress - EXTRA THEME
Hey , welcome everybody .
My name is Darryl .
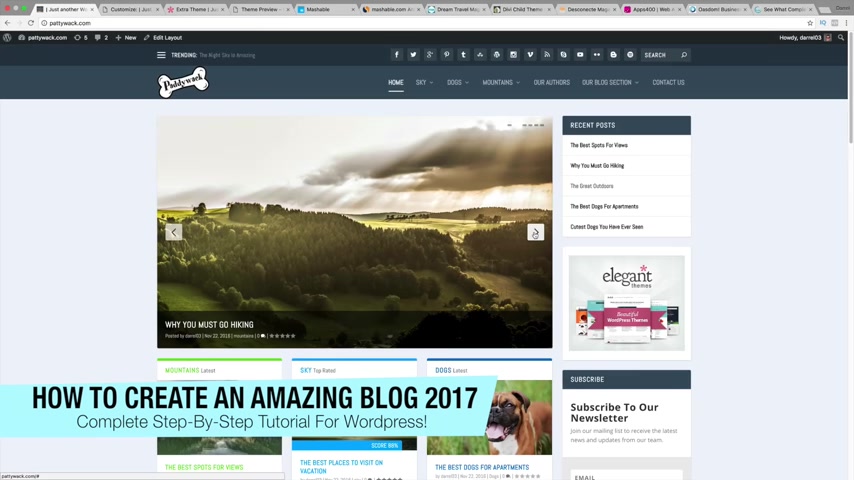
And today I'm gonna show you how to build this beautiful and elegant blog from scratch using wordpress .
And you don't have to have any sort of experience or any knowledge of coding .
I am gonna show you today how to build this blog step by step with no experience required .
And I mean , just look at this blog , right ?
It's a beautiful blog .
It's modern , it's professional , it's a 2017 style blog .
So in this tutorial , I'm gonna show you today how you can incorporate these big beautiful images onto your blog post .
You can give your blog post a name and people can rate it .
And also I'll be showing you today how you can incorporate social media icons .
So if you are on youtube or Pinterest or Tumblr , whatever you're using , I'll be showing you today how you can incorporate these onto your website .
I'll be showing you today how you can have a really cool logo onto your website .
If you don't have one , don't worry , I'll show you today how we can create one really simple over here .
We have this menu right here off the bat , you guys are gonna see that this is just a really modern style menu where it has the pictures , it has the ratings and it gives a brief description about it .
Now , companies like Mashable actually use this same exact style .
Now Mashable receives around 60 million visitors a month .
So we are taking direct inspiration from these huge big giant companies right now .
Another thing I want to note about this theme is that this is a very popular theme .
Dream Travel magazine uses this same exact theme .
This is the same style guys .
This is it .
So we're gonna be using the same theme that even the big guys use .
Now , companies like Aspen Grove studios use this same exact theme because it's just a very modern style look .
It's very popular .
Now , this other magazine company from Spain , they are using the same exact style , right ?
Apps 400 .
These guys are using the same exact theme that we're gonna be using and also always in business .
So a lot of companies actually use this same style because it's just a really professional style blog .
So we're gonna be using the same exact theme that Dream Travel magazine uses and also a lot of other big and notable companies .
Now let me give you guys a quick tour of this website to show you how easy it is to make this and how beautiful it is .
So right off the bat , you guys can see we have this little image right here .
This is an ad .
So if somebody clicks on it , you make money .
Congrats also right here we have our subscribe to our newsletter so people can subscribe to our websites .
And here we have categories .
So we have dogs , we have a sky and we have mountains and this is actually a video .
So people can actually play videos right on your blog .
So today I'll show you today how you can add videos on to your blog .
Now .
Maybe you're those bloggers .
I think that's what they call them today is vloggers where they , you know , have like a uh it's like a , I , I don't know , it's like a blog where they talk about themselves .
I'll show you today how you can add it on to your website along with this follow us section and also our authors .
So in this kind of a theme right here , we can actually have different authors , make posts on our website .
So if you're a team , I'll be showing you today how you can have a team of bloggers , make blog posts on your website .
And I mean , just the style of this theme , it's just a beautiful looking blog , it's just really professional .
And also today , I'll be showing you today how you can incorporate your Facebook like box .
So if you have a Facebook , don't worry , I'll be showing you today how you can add in this really cool uh Facebook , like box .
In fact , people can actually still play videos from it .
So it's really cool that uh that this feature is added on to this theme .
Oops , sorry about that .
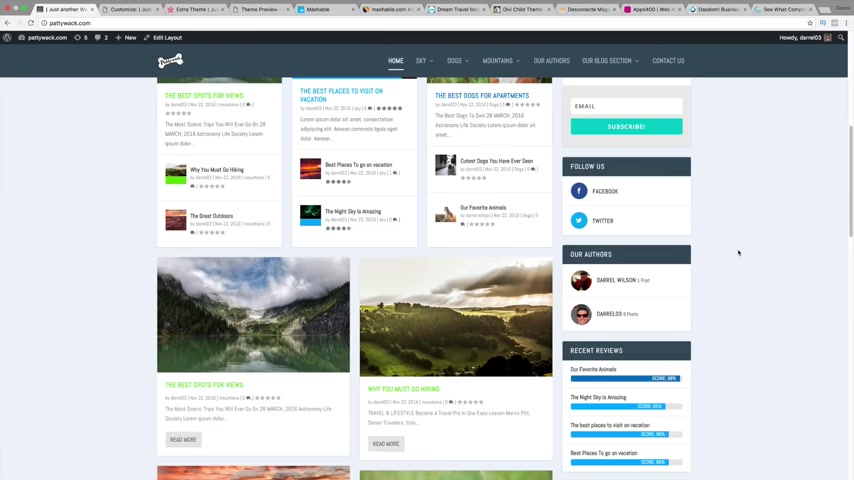
So right here , we have our recent comments , we have more blog posts and we also have an Instagram feed .
So I know there are some heavy Instagram users out there .
So in this tutorial , I'll be showing you today how you can have your Instagram feed on your website .
So if somebody makes a post on your Instagram , it will show up right here on your website .
Now , this also is an additional style blog .
So uh you guys can see we have dogs , sky and mountains just like that .
And you know this right here is our ad .
So if you want to incorporate ads on your website , I'll be showing you today how you can incorporate ads .
And of course , our footer where we have our recent reviews , our author and our subscribe .
And of course , we have our social media icons at the bottom .
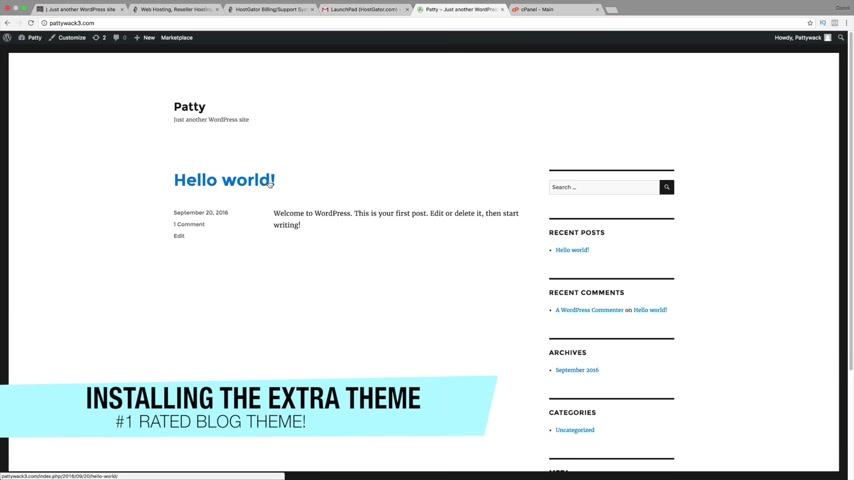
Now , really quickly , let me show you what the blog post actually looks like because this theme is different than other themes .
This blog is absolutely gorgeous .
So I'm gonna click on this right here .
It says the night sky is amazing .
And here we have our recent post , we have our ads on the side and we have a little bit of description and we have a review right here .
You know , 85% and then we have about the author .
So right here , you guys can talk about the author , they can incorporate their social media icons .
So if you have more than one author on the website , you can have , you know , multiple people talking about themselves or saying , hey , check me out on Twitter or Facebook or whatever you like .
Now , also , we can have premade layouts .
So this theme is very different .
This will actually give us the ability to have these beautiful blog posts .
Now , this right here is a layout that I will give you for free .
It's simple .
All you would do is just upload it and insert your text on here .
Everything's already done .
So you're going to be making super professional blogs as a beginner , right ?
You're gonna be ahead of the game .
So if I scroll down right here , you guys can see that I have these pictures right here .
All you need to do is just plug in yours and go .
It's so simple and it's absolutely gorgeous .
So this is our blog post and these actually right here are more advertisements right here .
People can go ahead and share it on to their Twitter , their Google , et cetera and give it a rating and then they can click on next and they can check out the other ones right here .
So this is another blog post I have , you know , and it's just a really professional looking style blog guys , I mean , this is probably my best work yet .
So I am going to pass this on to you .
So you guys can understand how to make beautiful blogs that look just like this right here .
Now , this right here is just a slider so people can go ahead and just slide through the blog post and scroll down .
Now , like I said , this theme is actually mobile responsive .
So I'm gonna go ahead and show you now that the fact that this theme is mobile responsive .
So this is the same website right here .
And this is how it looks on a tablet looks good .
This is how it looks on a phone .
So this is what it looks like on a phone , it looks professional , it looks good .
So , you know , it's totally mobile responsive .
So you don't have to worry about that , it's all taken care of .
Now , another thing I want to talk about is just the pages right here .
So these actually have premade templates , guys , you don't have to have a page builder .
This theme does everything for you .
It creates the page for you creates this tile .
All you gotta do is just go ahead and plug in your contents and you are good to go .
That's it .
Everything is already done .
Now over here , we have our blog section right here .
So like there's more blog posts that we have .
It's just a different style .
You know , the theme gives a lot of style and diversity to make sure that you can really get what you want and achieve the look that you want out of your theme .
So this is our blog section and also our contact section right here .
So this right here is our contact page where people can go ahead and you know , send you an email about it and talk about it .
And the theme guys , I'm telling you , it is the most beautiful theme I have ever come across for a blog .
It is the best for beginners .
It's so easy to use .
So in this tutorial , I'll be showing you how to do that .
And also , you know , you don't have to be creating things about dogs .
You can create anything like this demo right here is about fashion .
So , you know , they are creating a um a website about fashion .
This is the demo for it .
So it's just a really beautiful , elegant style blog .
So today I'll be showing you how you can incorporate advertisements , how you can incorporate pictures , videos and have those really amazing premade layouts on your website .
So let's go ahead now and get started .
If you guys have liked what you've seen so far .
Go ahead and give me a like and subscribe and let's go ahead now and create this amazing blog step by step .
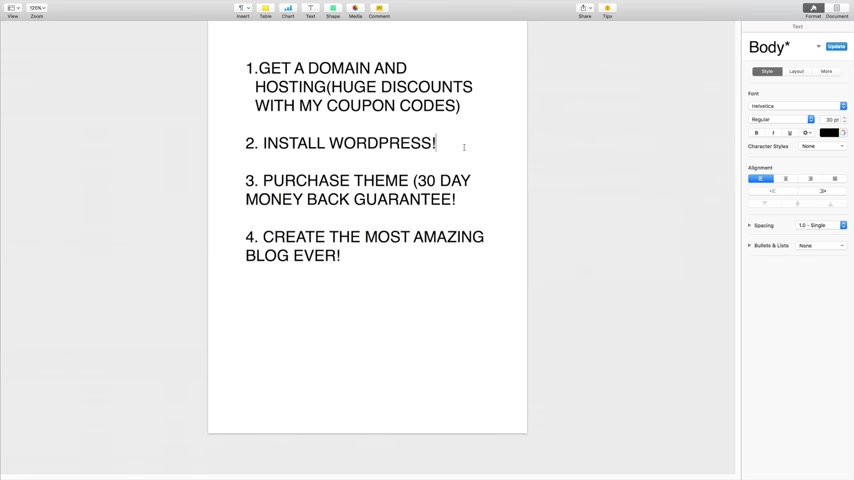
All right guys .
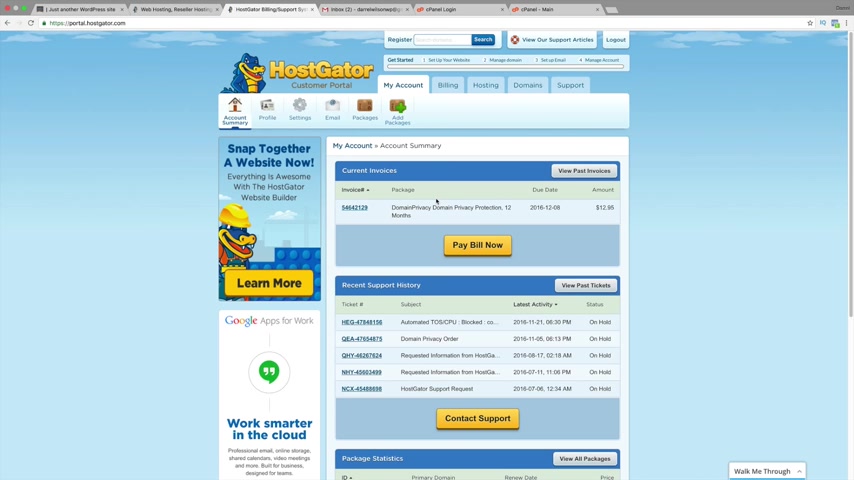
So the first thing I'm going to do is get out my noted right here and we are going to follow these simple steps in order , the first thing we're going to do is get a domain and hosting for your websites .
And not to worry , I will provide you all with massive coupon codes that will save you a bundle of money .
After that , we are going to install wordpress .
Then we are going to purchase the extra theme and not to worry about it .
You will receive a 30 day money back guarantee for the theme and then we are going to make the most amazing blog ever on youtube .
All right .
So the first thing I want you to do is go ahead and click on the link in the description .
It will take you to host gator dot com .
You'll be brought to a page that looks just like this right here .
So go ahead and click on get started now and right here , we have three plans .
We have the hashing plan , the baby plan and the business plan .
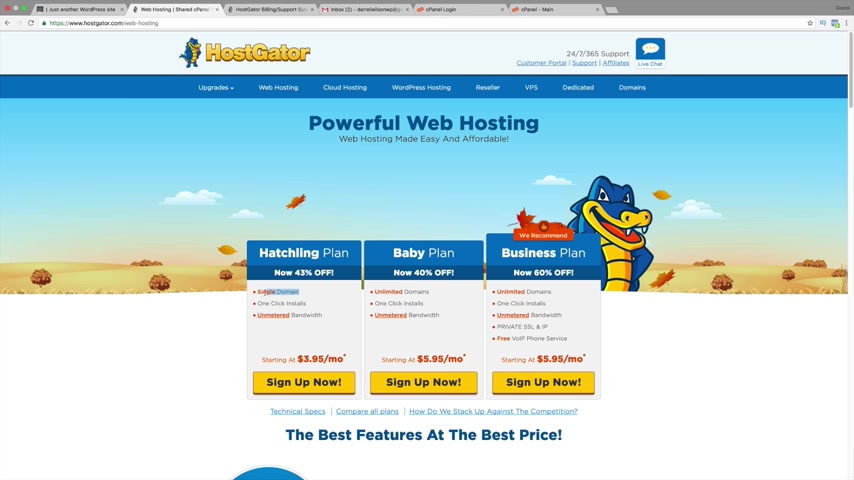
Now , I always recommend the baby plan because with the baby plan , you get unlimited domains rather than just a single domain .
So click on sign up now .
Now go ahead and enter your domain name .
So that's basically your address .
So I'm gonna put , I love Kylo Ren , I love kylo Ren dot com and it is available .
So go ahead and you know , do some research about what you want for your web address .
Now , we're gonna scroll down right here .
So this right here is the domain privacy protection .
So this will basically hide your personal information from the public view .
So if you want to have that , you can leave that checked .
It only cost you around $13 .
If not , you can go ahead and uncheck it if you would like next , we have our hosting plan .
So um we are on the baby plan right now .
Now , I actually recommend doing at least six months and the reason why , because I'm gonna provide you a code and it'll save you more money if you purchase uh more months .
So right here under our user name , we're gonna go ahead and enter in a user name .
Go ahead and put whatever you would like .
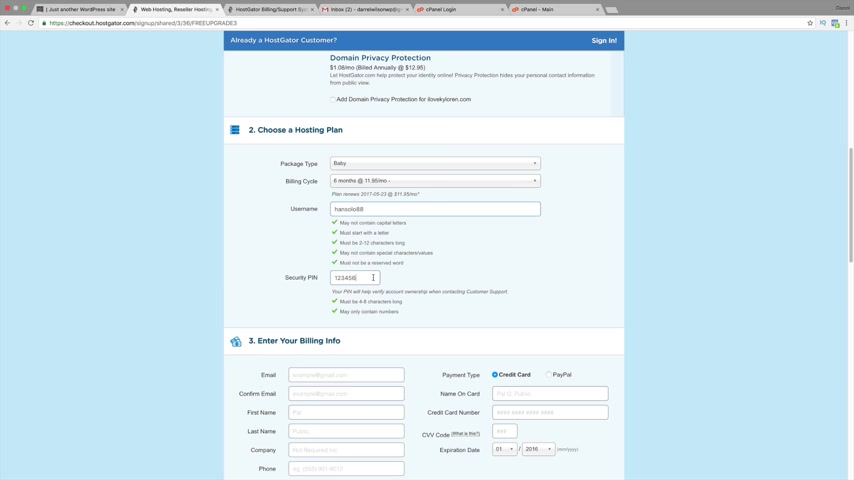
I'm gonna put solo 88 and go ahead and put it in a security pin , you know , 12056 .
Yeah , something like that .
And guys make sure you remember the security pin because you will need this information to verify your accounts with host gator , ok ?
Now you enter in your billing info and make sure your email is correct .
Both times I had a client that put it in wrong twice and it was a total disaster .
So uh make sure you put the email in and confirm it and then go ahead and put in your first name , your last name , your company , et cetera and fill out all this information if you'd like to pay with credit card , you go ahead and pay with credit card .
If not , you can pay with paypal .
Next , we're going to scroll down to the additional services .
Now , guys , I don't recommend any of these because with wordpress , you can do a lot of this stuff for free .
So I'm gonna go ahead and uncheck these right here .
Next .
We have our um coupon codes .
So if you enter the coupon code , Darryl WP 25 and you validate it , you're gonna see the price drop dramatically .
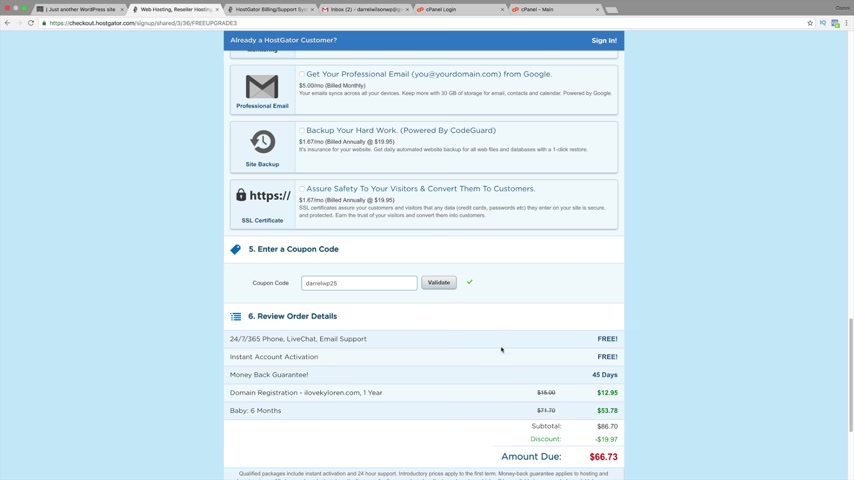
We are going to save a bundle .
So it went from $84 to around 69 bucks .
But also remember to uncheck this right here that does auto check .
Sometimes .
I don't really know why it does that .
So for six months of hosting and to build your own website , it's gonna be pretty cheap .
So after you're done with all this , we're gonna go ahead and scroll down , click on , I have read and go ahead and click on , check out now and then we brought to a page that looks something like this right here .
It'll say get ready .
We're setting up your accounts and you'll have the cool alligator giving you a thumbs up .
Now , this section might take around 2 to 3 minutes to load , at least it did for me .
So just go ahead and give it some time and um , once you're done with that , you'll be brought to your customer portal and you'll be brought to a page that looks just like this right here .
Ok .
So I'll go ahead and wait maybe around 10 seconds for you to catch up .
Hopefully you're here by now .
All right .
Ok .
I'm done waiting .
Ok .
So the , the thing I want you to do now is I want you to check your email because your email is going to give you something that we need to log into our control panel .
And from there we are going to install wordpress .
So go ahead now and check your email and you should get an email address that looks like this from billing , no reply .
And then also from launch pad , you'll get that a little bit later .
But the one I want you to click on right here is the no reply .
And right here you have your control panel .
So you can see right here we have our control panel , we have our user name , our domain , et cetera .
So all you need to do is click on your control panel link and it'll take you to this right here .
And all you need to do is take your user name and put it right here and then take your password they've generated for you and go ahead and put it right here .
And uh once you're done with that , you can go ahead and log in .
But one more thing I want to note that uh in your inbox , you might receive this launch pad thing .
Or wants you to verify your address .
All you need to do is click on this link right here to verify that you are a human being , uh et cetera and that will verify your domain name and it will verify that you're a human being , ok ?
So , uh going back over here , we're gonna go ahead and click on in .
Alrighty .
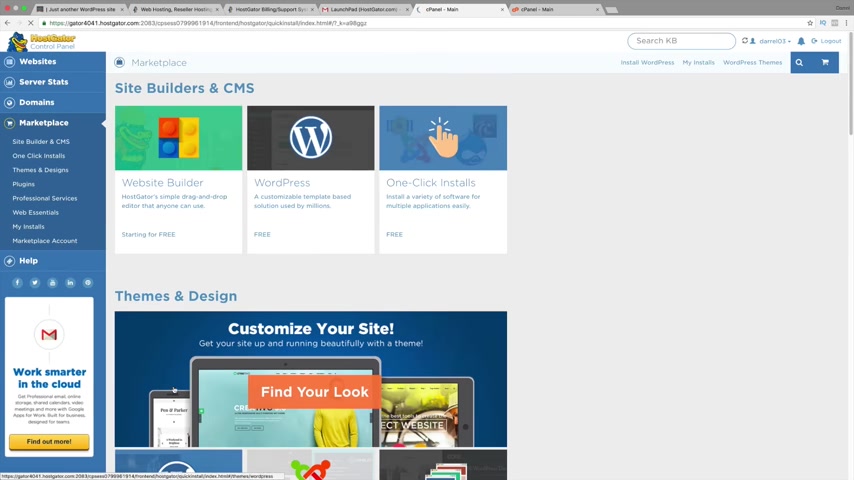
So um this is actually a new control panel that host gator has introduced .
That's why I've kind of decided to use uh you know , host Gator as this company because they're just like a , they're a very , very good company .
My websites are all hosted on it and I love this new platform they've introduced .
It's very user friendly , it's really easy .
So the first thing I want you to do is just go down right here to software and click on click install and right here under wordpress , you're just gonna click on it where it says free now , go ahead and select your domain name .
So I have a lot , but you're gonna go ahead and select the domain name that you purchased and then go ahead and click on next .
Now , go ahead and give you a blog title .
So uh I'm gonna put uh Patty , which is my dog , an admin user .
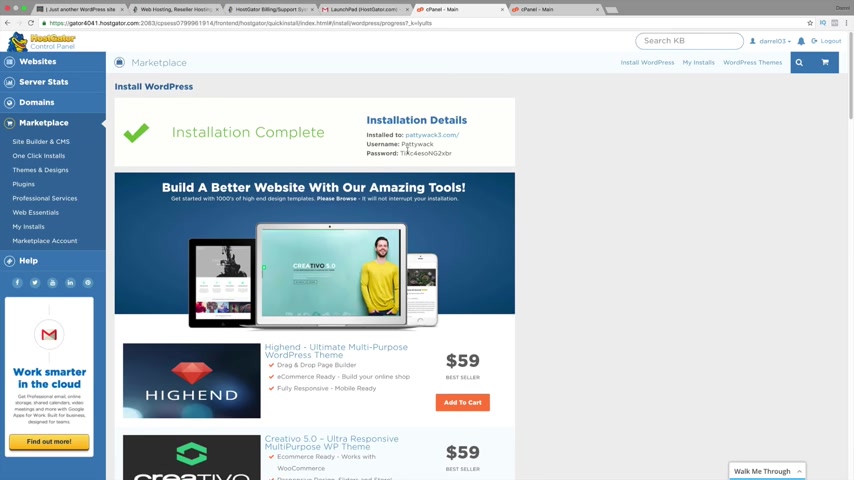
I'm gonna put Patty Whack and then my first name and my last name and then I'm gonna go ahead and put in my um put in my email address just like that .
Now , all you need to do is make sure these are both checked just like that and go ahead and click on install now .
So Wordpress is installing and they also offer you guys these other things , but these are all a complete waste of money .
Don't ever do that .
Ok ?
So , uh the first thing I want you to do is take this password and um your user name and write it down .
Don't forget it .
Ok ?
So , um , you know , make sure you have this in a safe place .
Now , you're gonna have to click this right here .
This your , your new domain .
Now , if you're brought to a portal that doesn't have like a log in information , you're gonna have to wait maybe like , you know , 10 minutes to an hour to two hours for wordpress to propagate .
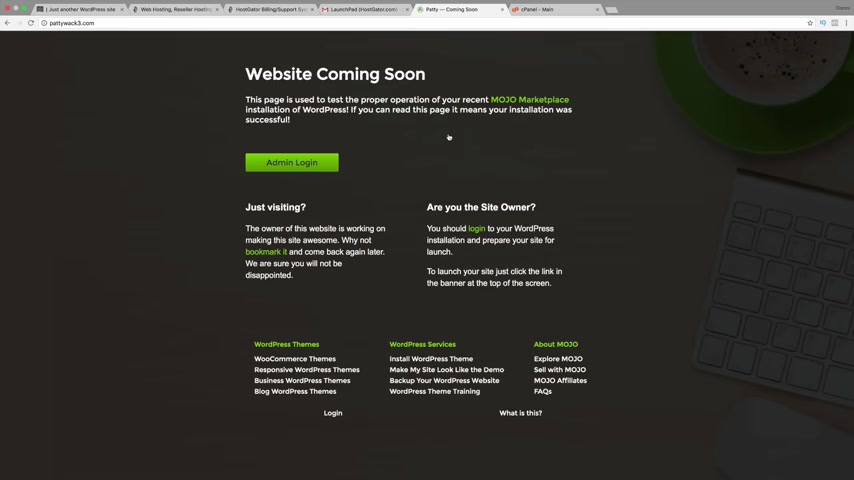
Now on Saint Patty's Day , I had to wait like five hours , you know , if they take longer than an hour , go ahead and give host gator a call and just let them know that it's taking a while to propagate .
But I'm gonna go ahead and click on mine and take the gamble and see if it's done propagating .
Let's , let's go and check it out .
All right .
So mine worked .
So right here under admin login , I'm going to go ahead and enter in my log in information and then I'm gonna enter in my password .
Click on log in .
All right guys .
Congratulations .
We have successfully got domain hosting and now we have installed wordpress Congrats .
This is the bread and butter of where we want to make our website .
Now , if you want to look at your website right now , all you need to do do over here is go to visit sites on the top left right here .
And this is our website .
It's very , very ugly , but not to worry because we are going to make it look amazing .
Ok ?
So we basically let's go back to our , our , our little noted right here .
We got our domain in hosting .
We've installed wordpress .
Now , all we need to do is go ahead and purchase the extra theme .
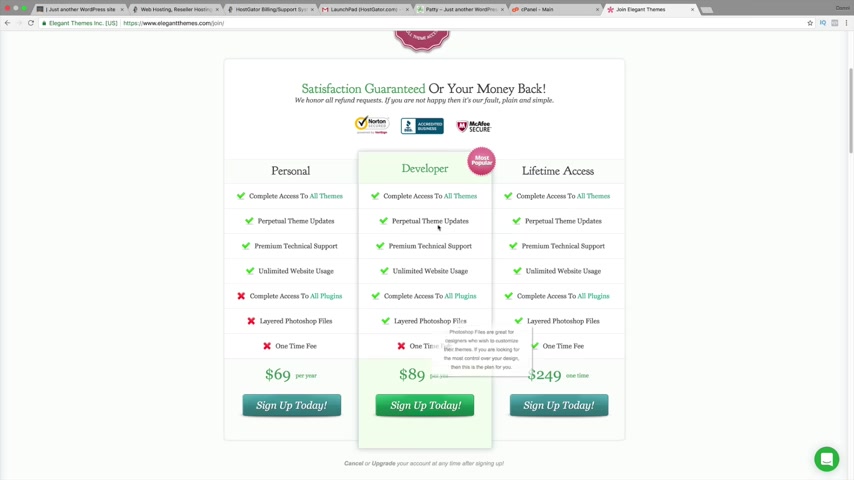
Now guys , the extra theme is made by elegant themes , which is the number one rated theme company on the market .
So you're buying it from a very reputable company .
Now , in order to go there , you guys can click on the link in the description .
It'll take you to the website where you need to purchase the extra theme .
So it's elegant themes dot com .
It'll take you to a page that looks like this .
Now , once you purchase their plant , you're given access to 87 themes and all their plugins and you get a year of unlimited support .
So it's pretty incredible guys .
So if you guys have a problem with your theme , don't worry , you will have a team of developers to help you out with your theme at all .
Time .
It's pretty amazing .
So all you need to do is go over here to join , to download and go ahead and scroll right here .
Now , if you guys use my link , you guys will receive a small discount and it actually gives me a small commission .
So it helps me to continue to make these videos .
So the one I recommend is the um uh the developer .
Now , the reason why is because you're given the access to the bloom plug-in , which was that little opt in form right here on our other website right here .
This right here is the Bloom plug in and I will show you how we can have pop ups , how we can uh easily capture email addresses from all sorts of people .
So over here , I recommend the developer section or you can do lifetime , I have a lifetime because I'm Ad V Lifer .
Uh My website is made with these guys' themes .
So , you know , I would never recommend a product I didn't use , right .
So over here , uh go ahead and click on , sign up today and go ahead and fill out all your information and submit your payments and fill out all this information .
And after that , you'll be brought to your uh customer portal which will look at me like this .
So I'm gonna go ahead and log in and just like that .
Now , guys , I use the divi theme .
I used extra theme .
So , you know , there's other people out there who are like , yeah , go buy this , go buy this and they don't even use it , right .
Like I've seen a lot of those guys now .
I personally use this on my website .
So Darryl Wilson dot com .
This website is made with um elegant themes , uh their themes that they , that they make and whenever I have a problem , I email them , they , you know , they are , I'm sorry , I use their forms and they respond to me right away .
The guys are truly amazing .
They're based in San Francisco .
They're an American company and they're just incredible .
So once you're here , you're gonna see you have like an account , a support , et cetera .
Now , if you guys ever have a question , you guys can go to support and scroll down to extra , which is right here .
Uh Where is it right here ?
It is right here and you guys can basically submit a ticket right here and all these people um ask questions and these guys will answer them and uh they're very good at their time .
They , they answer them almost right away .
So go ahead and click on themes right here and we're gonna scroll down to extra , which is right here and click on download and download a theme package right here , just like that .
All right .
So now we're gonna go back to our website and we are going to upload it .
So , um going back to our website right here uh all you need to do is go over here to dashboard .
OK .
And then over here under appearance , go to themes .
So basically a little rundown guys of what Wordpress is and how it really works is that Wordpress basically is like , um it's like the foundation of allowing people to create sort of structures , like all these people create different types of themes and there's thousands of themes , there's millions of themes out there .
Um You know , and you guys can like , you know , uh check them out on your free time .
But um I recommend uh elegant themes because they're rated the number one for creating just the most amazing themes out there .
So all you need to do is go to upload right here and right here , you're gonna see upload theme .
So go ahead and click on upload theme now right here .
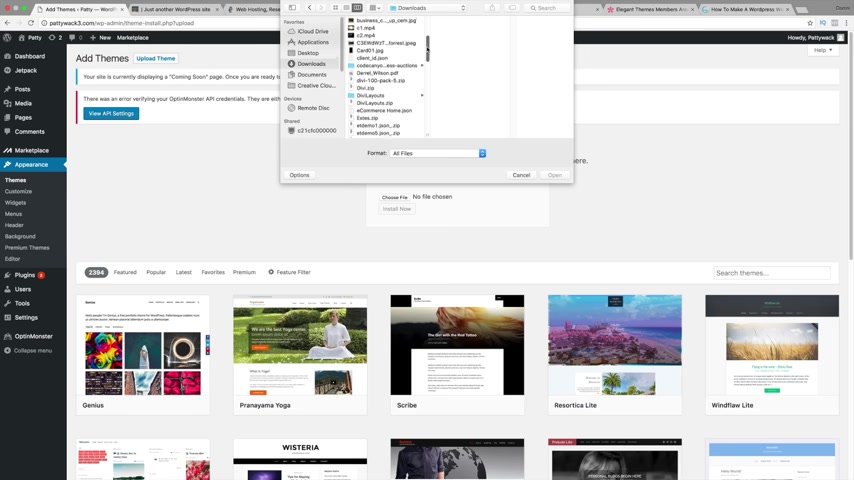
It says choose file and we're gonna select that file that we downloaded .
So under my downloads , it should be there somewhere extra .
Where are you ?
It's there somewhere .
OK .
Let me do this .
I think it might be my desktop .
I don't know .
It always downloads them into the weird spots .
OK ?
I'm gonna go ahead and just do this right here extra .
All right .
So extra dot zip .
Now , I'm gonna click on open and then install now and make sure it's the zip file guys don't extract it , just um install it the way you downloaded it .
You don't need to do any extracting or any hard work , everything is already done .
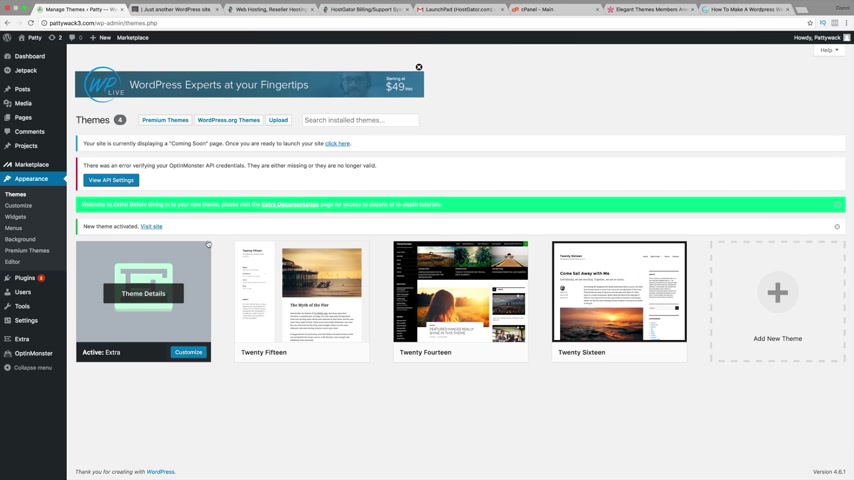
Ok .
So installing theme , your theme has installed successfully .
Ok ?
Uh Go ahead right here and click on , activate .
All right .
So it's activating .
It does take time also , if you're using like a different hosting company , some are much slower and it might take longer , some are faster .
It really just depends on , you know , luck of the draw , right .
So , uh congrats , we've installed the extra theme .
You guys can tell it's a premium , beautiful theme .
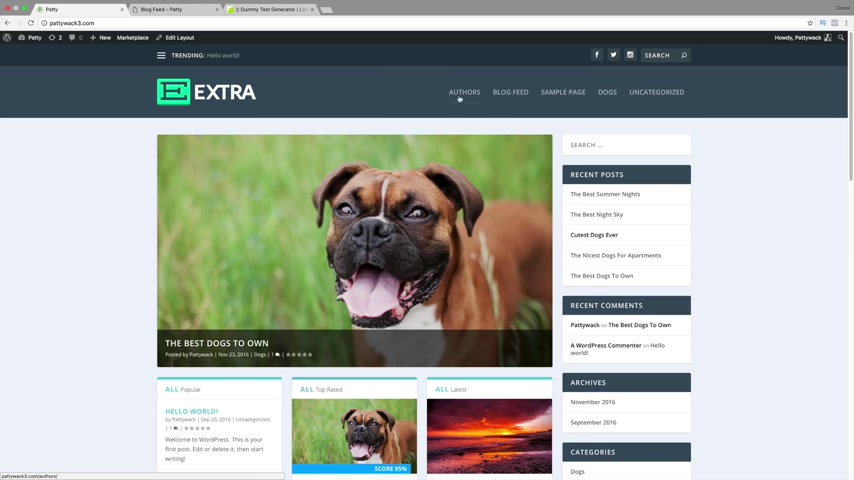
Now , let's go look at our website right here .
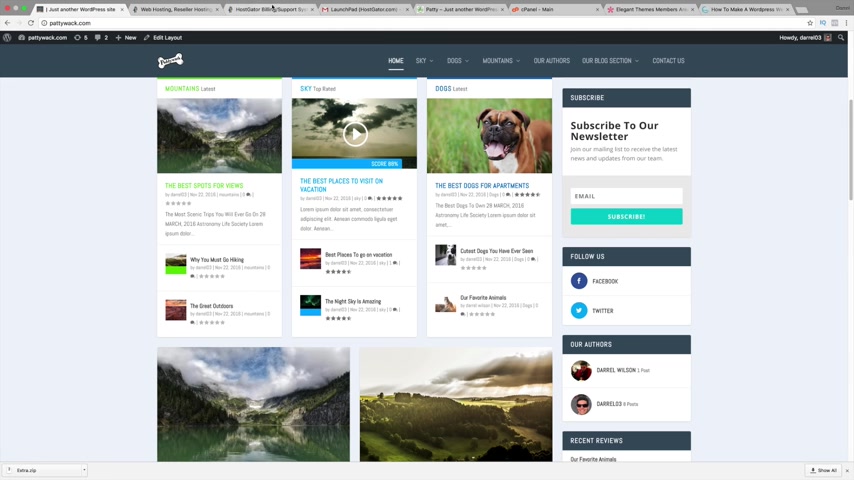
So I'm gonna click on visit sites and you guys can see that it has changed dramatically .
We have our sidebar right here .
We have these gadgets right here .
We have our logo and our social icon .
So , congratulations .
Let's go back and look at our , our progress so far .
We have got our domain done , done , purchased the theme done and now we are going to make the most amazing blog ever on youtube .
Let's go back over here to our website and let's go ahead now and get started .
All right guys .
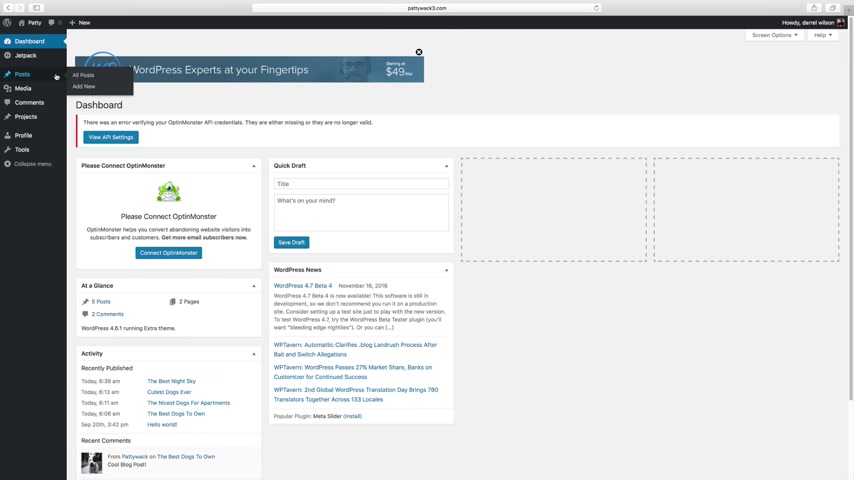
So the first thing I wanna do is go to our settings and change some Perma links , change some passwords just to make sure before we continue that everything is ready to go .
So right here on our dashboard , go ahead and click there .
Now , we're gonna go ahead and scroll down to settings and we're gonna go to Perma links .
Now over here , you're gonna see all these um options right here .
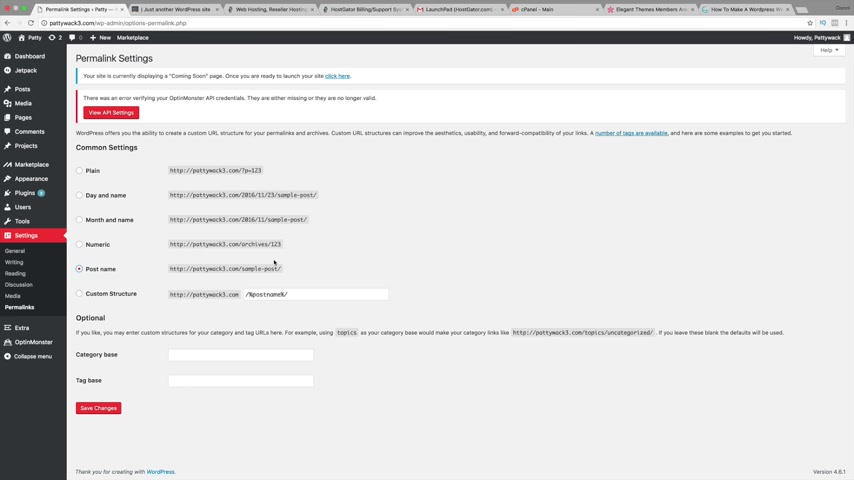
You want to select post name and the reason why you want to select post name is because usually when you go to a website , it's your website dot com dash about us or dash contact , right ?
Not this 20161 11 11 , you know , all this stuff .
So make sure it's under post name and post name is also very good for um co purposes to get your website indexes better .
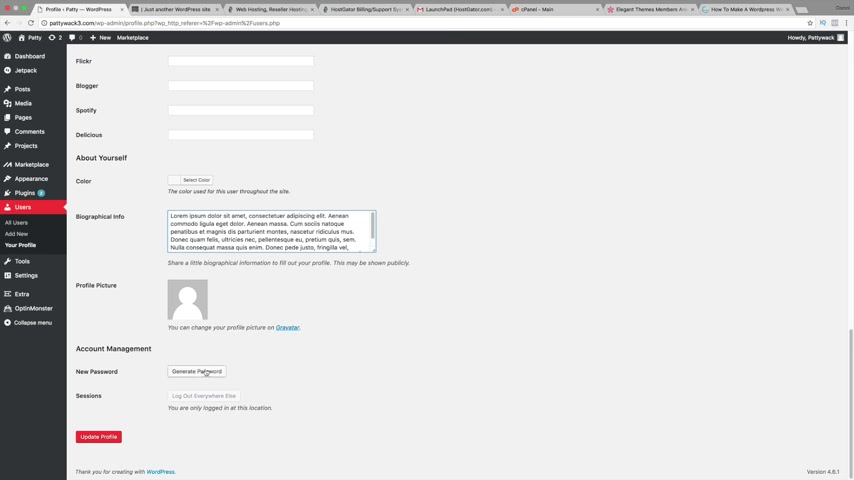
Next , after you've done that , we wanna go ahead and create a profile .
So maybe you want to talk about yourself whenever you make a post , right ?
So over here under users just simply click on users right here and this is uh my profile .
So go ahead and click on your profile and you can change your scheme , you know , if you wanna , you know , change the color of it , you can go ahead and do that .
Uh I'm gonna go ahead and leave it mine as a midnight .
Uh right here .
You can give yourself a nickname also right here .
You can put in your uh email address now , password , I'm sorry , uh website .
So you can go ahead and put in your website .
So remember this is basically like about the author section .
So you wanna go ahead and put something about , you know , your website or your Facebook , Twitter , et cetera .
So I'm gonna put in my website right here and go ahead and just put a knees right now .
You know , I don't really use all of these .
I probably use maybe Facebook and Twitter .
But some people out there , you know , they use everything .
So , you know , that's , that's for everything .
So also youtube obviously have a youtube channel .
OK ?
So , um , we can actually go ahead and put in some information right here .
So , you know , go ahead and put in like uh you know about the author I worked here for .
So and so for about 10 years , you know , you're the author of a certain book , et cetera , whatever you want to do .
Now right here , it says new password .
You can click on generate password and go ahead and give yourself a new password .
So I'm gonna enter in Paddy Wack 77 just like that .
Now , I'm gonna confirm the use week of password and click on update profile .
All right .
So all that information is set now , feel free to take the time to write , you know , uh a biography info , info about yourself or whoever you're trying to talk about next .
We want to go ahead and create a profile picture .
So uh you'll need to go ahead and click on this right here .
It says Gravatt and this will actually take us to another website where we will actually create another profile .
Now , I'm gonna go ahead and click on the log out right here .
And I'm gonna go ahead and , um , I'm gonna go refresh the page .
Hopefully , it doesn't automatically log me in because you know how they kind of store cookies .
So they know it's you .
I want to show you , uh , from the , uh , beginner's point .
So I'll go right here to create your own Gravatt .
So go ahead and enter in your email address right here .
So mine was Darrell Wilson WP at gmail dot com and I'll just give myself a quick user name , oh , automatic .
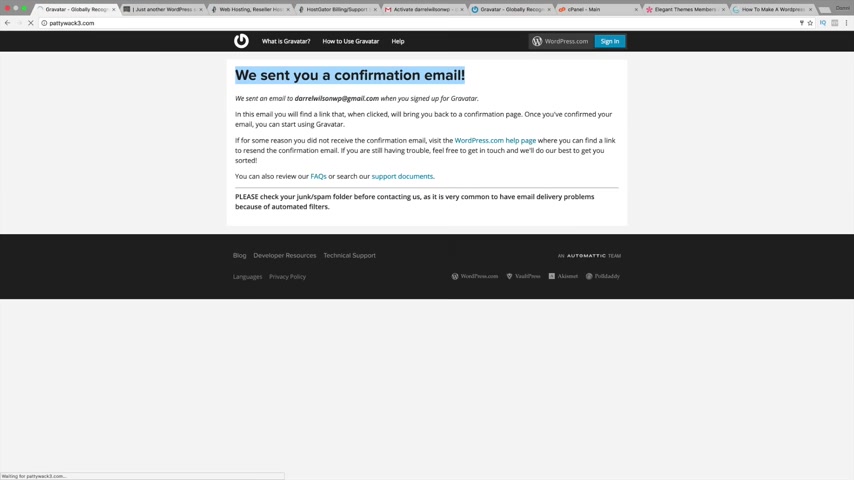
And I'll just go ahead and put in a password right here and I'll go ahead and click on sign up and this is where we're going to basically put in a picture for our um for our uh a profile .
So we sent you a confirmation email .
So go ahead now and just check your profile or your email .
So I'm gonna go to inbox right here and it should come up there it goes .
So go ahead and activate this .
I'm gonna click on activate account .
All right .
So sign in .
All right .
So right here it says , um you know , pick email to modify and I'm gonna go ahead and say , OK , go ahead and add one by clicking here because they're talking about you don't have any images .
So go ahead and click this right here .
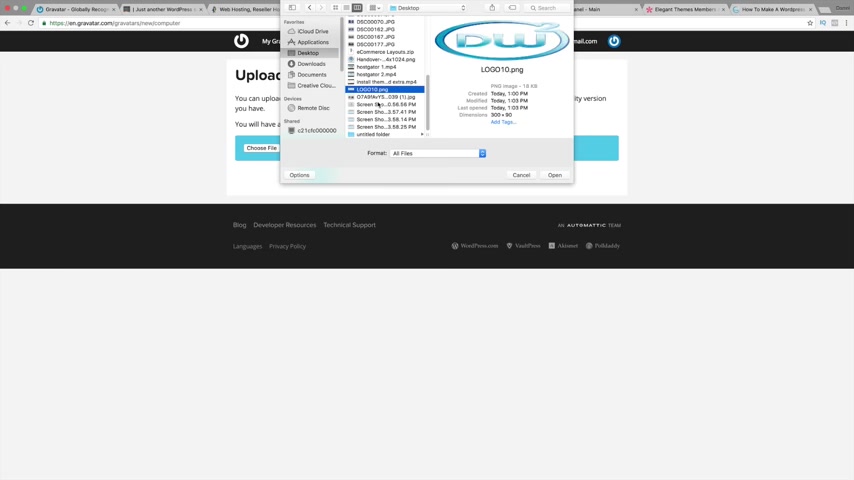
Now , go ahead and just , you know , upload a picture , whatever picture , you know , click on upload new , choose the file and go ahead and just , you know , find one on your computer wherever you're trying to , um , you know , put , let's see if I can find one of me .
I , I don't know if I have any , you know , I'm kind of unprepared when I do this tutorials .
It's like , it's , I got a bad , you know , let's see if I can find one right here .
I think I have one on my computer somewhere .
If not , I'm just gonna go ahead and grab it all .
We're gonna grab this dog .
OK ?
I'm gonna be a picture of this dog right here and click on next whoop just like that now .
Crop and finish .
All right .
So this is obviously rated G , right ?
Anybody here can see this .
So I'm just gonna click on rated G and there you go .
So my picture is uploaded .
Go ahead and maybe give it some time though , you know , if you're working on your website and it doesn't show up right away .
Uh Don't panic .
It might take an hour , it might take , you know , two hours , et cetera .
So over here it looks like they don't even have my image up .
Let me try that one more time .
Let's see here , upload new .
I'll do this one this time .
I'll do this one .
Maybe I didn't click save crop and finish .
Ready A G .
Oh , it's there .
It's just um it just takes time , I guess you have to click on it and , and click on confirm .
So , you know , just go ahead and give it time .
Uh It does that sometimes .
So over here under my profile .
Yeah , it looks like we've added in everything correctly .
Oh , there it goes right here .
So the picture is there now , it does take time guys .
So it , it might be a little confusing saying , oh , my picture's not there .
Uh It just takes a little bit of time .
So let's go ahead and go back to our website now , which was um mine was Paddy whack three .
So you have to go back to paddy whack three or go back to your website .
OK .
So now that we're here , we have actually set the profile , we set the general settings .
It looks like we are ready to create some posts .
All right .
So now let's go ahead and do that .
Let's go ahead and create our first blog post .
So to create a blog post , there's two ways to do this .
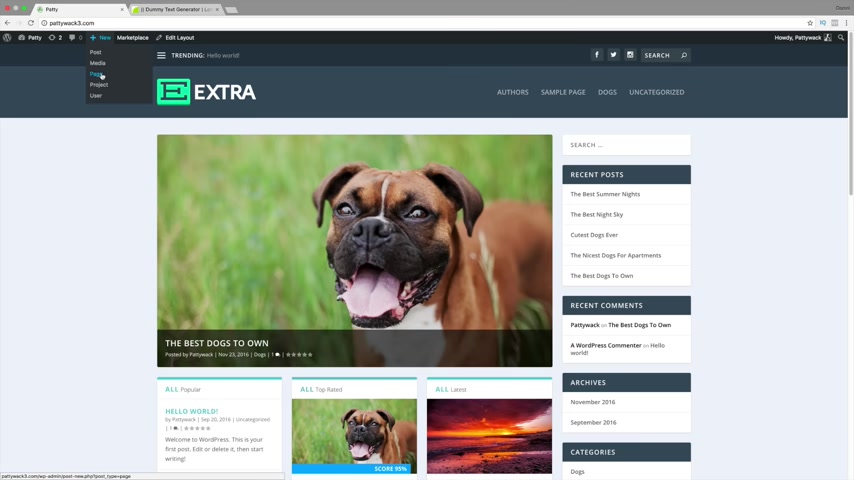
We can go up here to plus new and go to post and this is where all the magic happens .
This is where we're going to make our first post .
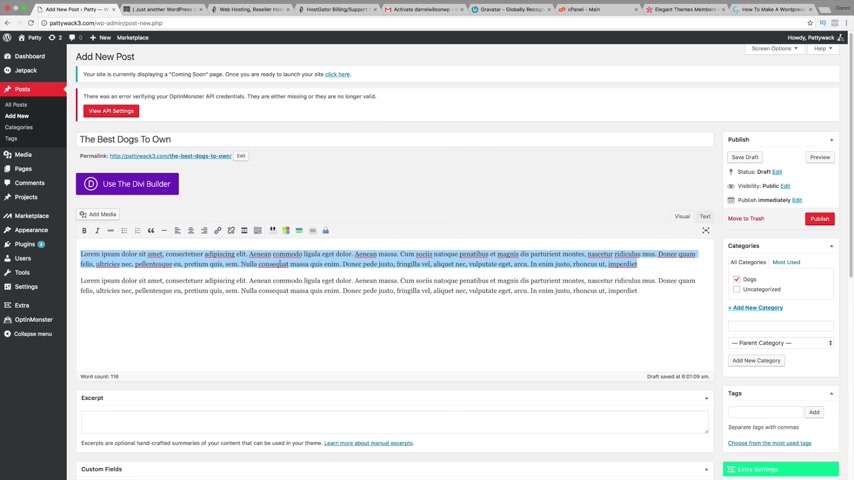
So I'm gonna go ahead and put something in like um the best dogs to own the best dogs to , to own .
Now , right here , we have a lot , we have a lot of sections right here .
But the first thing I want to show everybody is how to add categories , categories are going to be your best friend .
So over here under new categories , click on that .
Now we're talking about dogs here .
So I'm gonna put in dogs and click on add new category just like that .
Ok ?
Now here's where you're gonna enter in some content .
So I'm just gonna go ahead and pay some content in there , you know , go ahead and talk about dogs for little bits , whatever you would like something like this .
We can also , you know , click on this , we can bullit Itala size , you can do bullet list , all sorts of really cool stuff .
We can align center .
But um you know , I don't want to go too much into a lot of these settings because I will talk a little bit more about these and also premade layouts as we go .
So , you know , you can just basically read these like this is insert uh insert a link .
So for example , if you want to make this a whole hyperlink , you can do that something like right here shop now .
And if I highlight this , I can insert a link on to whoever I want to go just like that .
All right .
So when they click on this , they'll be brought to this website here .
So uh going down over here , we have the extra settings .
So this is primarily what I want to talk about more .
So this right here is the sidebar location .
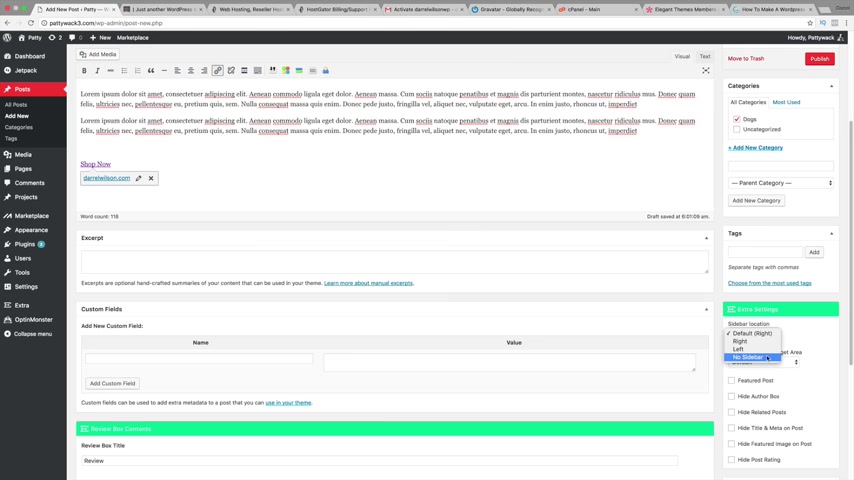
So we do have a sidebar .
So do you want it on the right side .
Do you want it on the left side or do you want no sidebar ?
So that's what the sidebar location means and the choose sidebar , widget area generally , we'll leave it as default , but we will talk more about the footer later on in the tutorial , but you can have like a main sidebar or project sidebar .
But for now , we're gonna leave it as default and we will talk more about the um the footer section a little bit later .
Now featured post .
So on all of your posts right here , you generally want a featured post .
It's what captures people's attention .
It's what they see when they click on the blog post .
So um I actually have a link in the description that'll take you to my dropbox and you guys can actually download some of those images that I have .
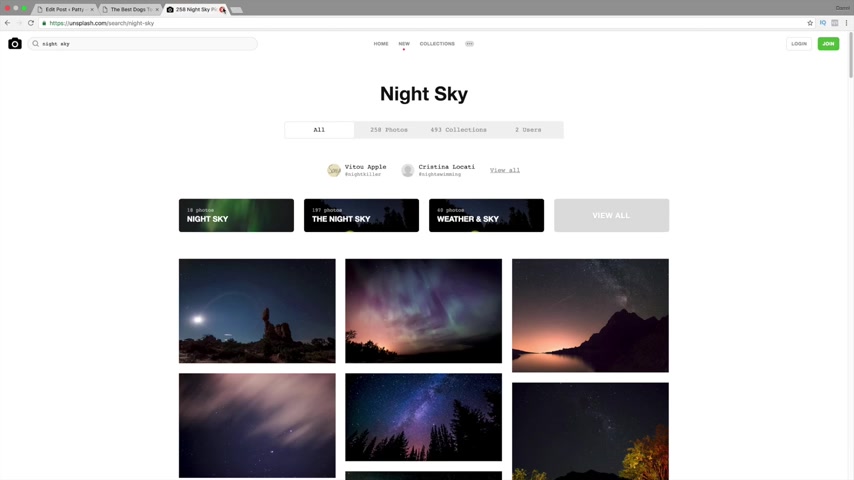
But if you guys need images , you guys can actually go to uns flash dot com .
Now this is the best website to get free stock footage .
So for example , I'm talking about dogs , right ?
So I'll go ahead and type in dogs right here and you're gonna see that these are all free images .
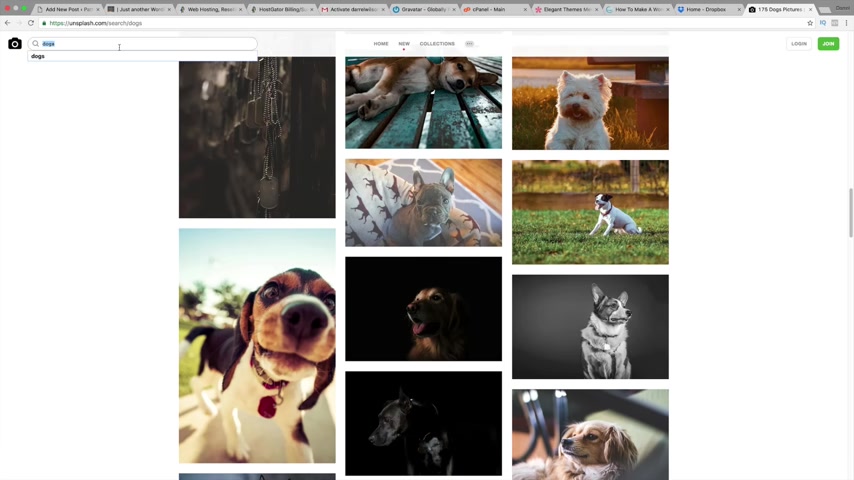
They're extremely high res they look really good and you can just go ahead and browse for them , you know , just go ahead and , and look through some of these images , see if there's some that you like .
This is a really cute one , right ?
So Right , let's say , for example , you want to do Night Sky , something like that .
I mean , guys , they have some beautiful pictures right here and these are just really elegant , professional looking pictures .
A lot of these are done by photographers .
They're very high res and when , when they're high res they are a little large , you know , so I keep that into consideration so you can go ahead and browse through some of these and um upload them , but I already have the images that I currently want .
So over here , going back , I want to go ahead and add a featured post to this .
So going down right here , we're gonna scroll down .
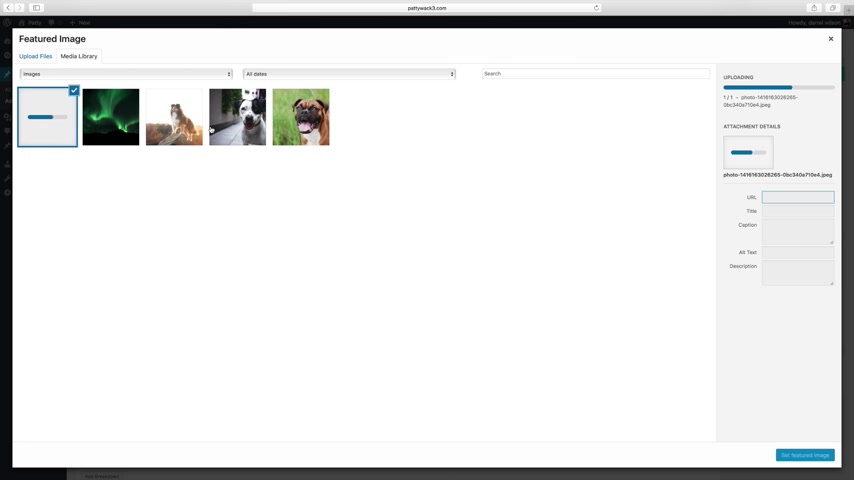
Now , you see where it says set featured image , go ahead and click on that and we are actually going to upload some pictures .
So click on select files now under my desktop right here .
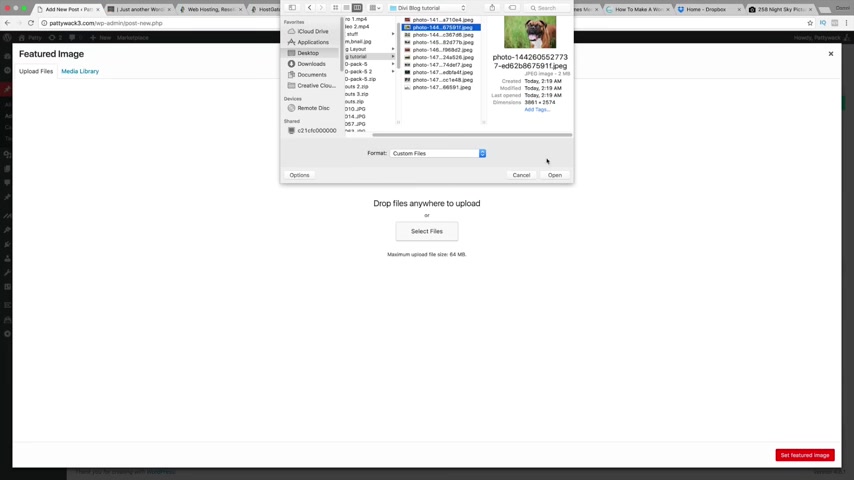
I'm gonna go to my uh uh my little folder right here and I'm gonna go ahead and upload a picture of the dog .
So just like this one right here , click on upload and it is uploading .
Now , remember this is the picture that people will see when they see the blog post .
That is what a featured image is .
And I will show you an example of this uh when it's on uploading .
OK .
So it is almost done .
Now , remember these images from Un Splash are quite large , you know , two megabytes .
This is a four K image .
So it's a pretty good image .
Now , I'm gonna click set featured image .
All right now right here we have review .
So maybe you want to talk about something , you know , let's go ahead and just say for the toll purposes , I'll put , this is one of the best blog posts ever .
Now , you can also give it a title and a rating .
So breakdown .
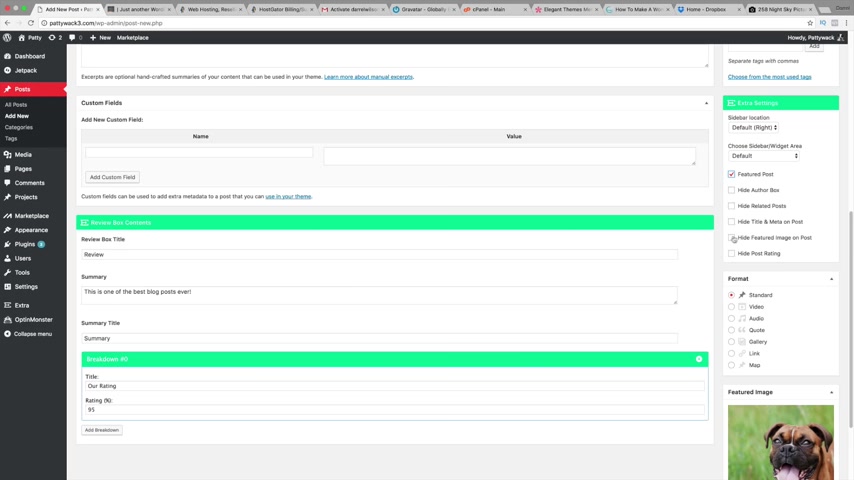
So title R rating and go ahead and give it a review or a writing percent , maybe , you know , 85% 95% just like that .
All right .
Now , we want to go ahead and say , um I want to go ahead and set this as featured post .
Now , if you already have an image , you can actually hide the featured image on the post .
OK ?
So I'll talk more about the hiding featured image on post a little bit later .
But for now , let's just go ahead and post this right here .
So we have our categories .
We have our uh blog post right here .
It's under our correct format .
I will go through each and every single one format to make sure that you fully understand .
But for now , we're just gonna use a standard one and these basically are almost the same thing .
They just add a little bit more features , but I'm gonna go ahead and publish this post now , for tags , we can enter dogs , dogs and something like that .
So tags are basically when people want to learn more about a specific , um , section in your website , there will be tags .
So , for example , you might want to just do tags , uh , dogs and , um , pets .
All right .
So it looks like everything's done right here .
I'm gonna go ahead and now and publish this post .
So I'm gonna click on publish .
All right .
So it's publishing .
There we go .
So , in order to see the post that you made , you can actually click right here and click on preview changes .
It's going to open up a second page and there you go .
Now , I'm gonna close all these windows right here because I do have quite a bit and these are basically irrelevant at this point .
So a little bit um of overview of this blog post .
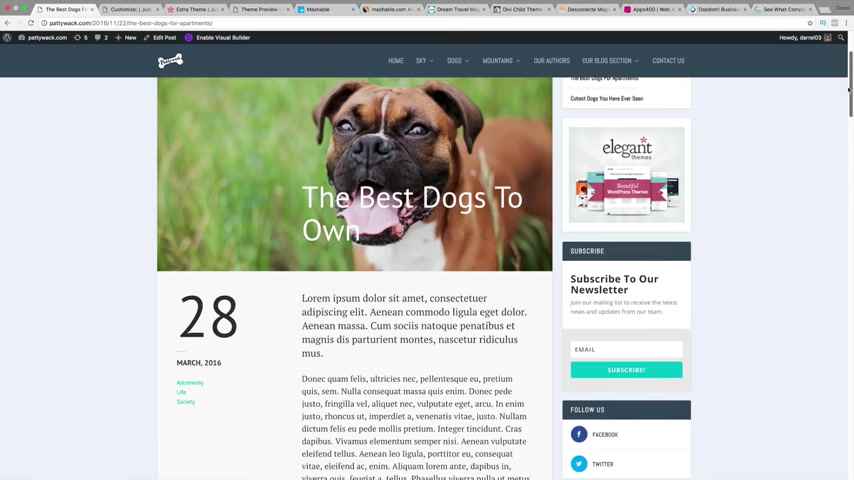
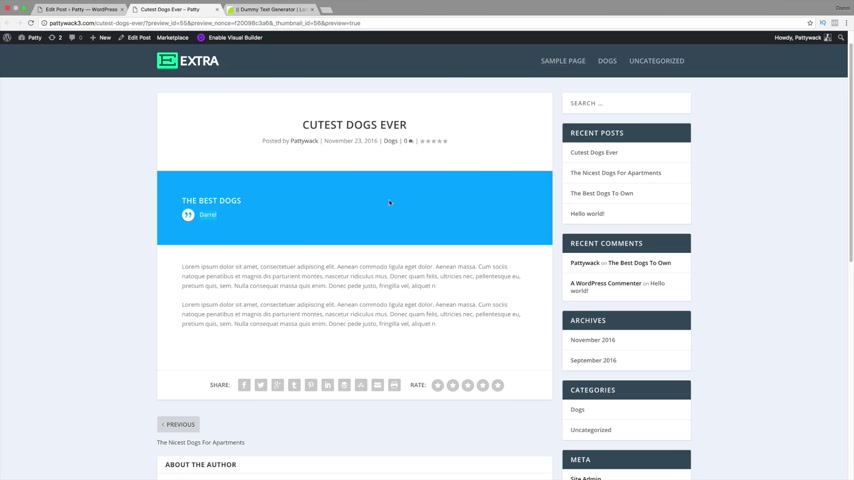
So here is the title , the Best Dogs To Own right here .
And up here we have the featured image right here with our score .
Now , this right here is the text right here .
Now , here it says shop now .
Now , right here I put in the text right there and I added it in the link .
So shop now , shop now right there .
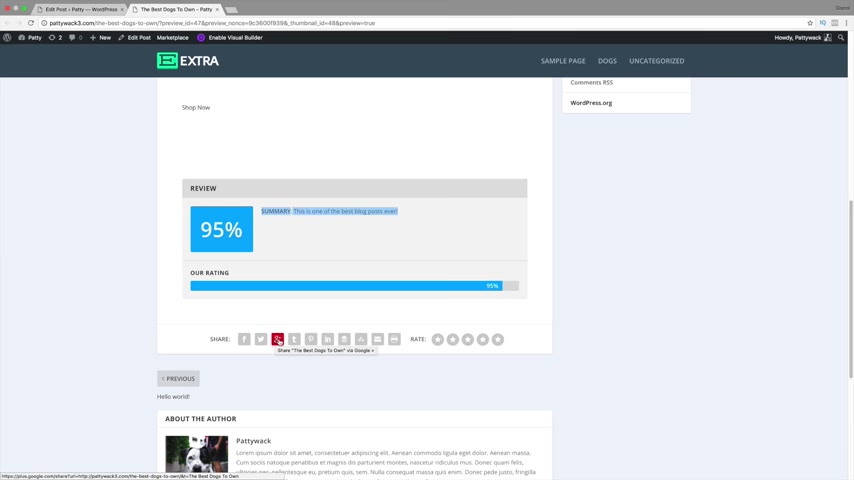
Now , right here , you see the review .
So summary , this is one of the best blog posts ever .
So the content I put right here for review is going to end up right here .
Now , this is actually really good for like affiliate marketing , you know , like where you talk about an Amazon product and say this is really good , buy it , buy it , buy it and people buy it .
That is a very good reason to add in a review .
So right here we have our rating .
We have our share icons right here so people can share it , they can tweet it .
The theme is everything automatically for us .
That's why it's so amazing and easy to learn now .
Uh Right here , we can click on rating , we can go ahead and rate it and about the author .
So we have Patti Wack , which was the picture I put and we have all this cool dummy text along with all of the amazing social icons right there .
Now , on the bottom , people can go ahead and leave a comment about it so they can say , hey , this was a really cool blog post .
So I'll type that in cool blog posts just like that and click on post comments .
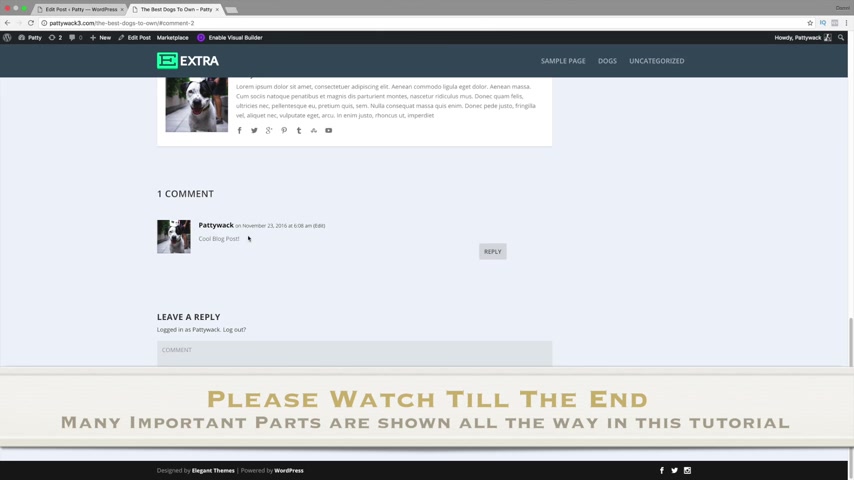
So there you go .
Uh Patty Whack cool blog post .
Now guys really quickly , I know that was very easy , but I want you to stay till the end of the tutorial to watch everything because there's gonna be a lot of stuff that you don't know about .
And uh what I've seen as a youtuber , uh people watch this , they learn how to make a post and then they leave the tutorial and then they're like , how do you do this ?
How do you do this in the comments later ?
And I said it , it's in the video , you just gotta watch it , you just gotta watch it right .
So please stay till the end of the tutorial to learn everything about this because we have to talk about widgets .
We have to talk about the menu , the theme customizer , the logo , there's uh a little bit more to cover .
So the blog post was very easy to create .
Now , let's go ahead and make a second one .
So back over here , I'm gonna click on plus new and click on post .
All right , and I'm gonna do dogs again .
So I'm gonna put um the , the worst dogs to have or the , the which one should I do ?
I don't know the nicest , the nicest apartments , pets , the nicest dogs for apartments .
All right .
And then we're gonna go ahead and select dogs again just like that .
And over here we can go ahead and put dogs pets .
Now over here we can go ahead and scroll down and maybe you want to do a video .
So a video guys is very , very simple .
Now , all you need to do is just go ahead and grab in a video of whatever you want and put it right there .
You can even put the URL right there and right here , you can go ahead and put a summary , you can do the same thing right here as a breakdown .
So it's basically the same thing guys .
All we really did was just add in a specific section , you know , we just added it in like one small section .
So let's go ahead and set a featured image again .
I'm gonna upload select files and I'm gonna do uh this one doesn't work , you know , it's , it's too large , you know , I , I don't know why it didn't work .
So we'll do this one right here .
OK ?
We're gonna go ahead and upload this and now we are going to use a video .
So I , I'm actually just gonna go ahead and use a video that I have from youtube .
All right .
So it is uploading , almost done the best dogs to own .
That is a pretty good blog title alone .
Yeah .
Making titles really catchy is like , that's what really captures people , you know , those , really , those like those headlines .
You're just like , oh , I gotta see this , you know .
So uh there you go , I've added in the video formats and uh right here , you know , we can go ahead and add in some dummy contents just like this and I'll go ahead and put in something else right here .
Now , guys , this is like the basics of the basics a little bit later in the tutorial , I will introduce premade layouts to get those really beautiful looking blog styles .
But I just want to teach you the basic fundamentals of just how to make a blog post .
OK ?
So I'm gonna go ahead now and click on publish .

All right .
So I made my second blog post .
Now , I'm gonna click on preview changes right here and it's gonna open up another window and there you go .
We have another blog post .
Now , if I click on this , it's actually going to display a video right here .
So this is a youtube video that I was currently watching .
So , um like I said , all you need to do is go ahead and just grab in a random youtube video .
It could be any youtube video that you currently want .
So I'll go to my channel right here and like I said , just go ahead and just grab any sort of video you can grab the URL .
So I'm gonna go ahead and copy this and like I said , just go back over here and put it in the specific section for the video just like that and that's it .
That's all you need to do .
So I'm gonna click on update and now we're actually going to create one more post just so that we have um just so that we have three .
What we're gonna do is we're gonna make three posts of each because remember on our front page , we're gonna have a lot of posts in categories .
All right .
So you don't have to make the third one with me , but I'm going to go ahead and make a third one just for , to , to purposes .
So I'm gonna click on add new and this one's gonna be cutest dogs , cutest dogs ever .
Now , I'm gonna go ahead and enter in some dummy text .
Oh , I have to go ahead and enter that in .
Silly me .
So I'm gonna go over here and enter some dummy texts .
All right .
So here we go .
I'm gonna grab this and just paste it in there and maybe add one more and same thing guys .
I'm just gonna go ahead and do you know , set featured image and I'm gonna go ahead and upload the picture of the dog .
Now , I'm also going to use the other format .
So after this , I will show you that what I'm talking about .
So I'm gonna go ahead and upload this other picture of the dog .
Alrighty .
So it is uploading these are some very big images guys , that's why it takes a little bit longer .
But you know , the the resolution is just amazing .
So that's all I really care about , you know , so set featured image .
Now let's go ahead and do quote right here .
So right here we have quote text and then quote , contribute or quote attribution .
So right here , we'll put something like the best and then Darryl just like that .
All right .
So this is the quote section format .
All right .
So up here , I'm gonna go ahead and add this into dogs and then we're gonna click on publish .
I wanna talk a little bit more about what you can do with posts and some other features that you can do .
Now , I'm gonna give this post a name .
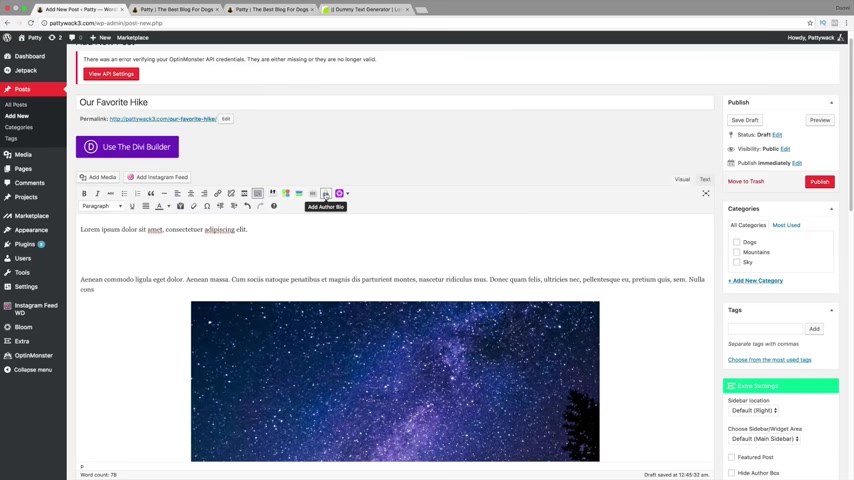
So I'm gonna put our favorite hike and I'm just gonna go ahead and put in some dummy text right here .
Pay some dummy texts .
Now , let's just say you want to go ahead and add in an image right here .
All you need to do is click on add media , go ahead and just select one of your images .
So I'm going to select this one right here .
Actually , this one looks better , right ?
I'm gonna put that one in there now , right here where it says size .
I'm actually going to edit this in the post .
So over here , click on insert into post .
Now if you want to actually change the image , you can click on this little uh pencil right here , click on edit and right here under size , we can have full size , custom size , et cetera .
Now let's just say you want to do a custom size , you can , you know , put whatever you would like right here or we can just do the full size .
And also let's say you want , if somebody clicks on this image , you want it to link somewhere , go ahead and just type in custom URL and just go ahead and put in the website that you currently want it to go to .
So I'm gonna put Darl Wilson dot com and just click on update .
So now somebody clicks on this image , they'll be brought to my website .
Now , let's just say you want to center this .
So right here , you click on it , you see what it says .
Align rights , align center and align left right there .
Now , there are some additional features that you can also do .
So I'm gonna go ahead and just um make some space right here under the uh to uh the Google Toggle Bar .
You'll actually see that it actually introduces a lot more features like text color , um you know , clear formatting , special characters where you click on it and it gives you all sorts of really cool characters you can put on to your blog post such as like this weird a symbol .
So this is , you know , a little bit more what you can add to your uh blog post right here .
Um It's pretty self explanatory guys .
Uh Another thing if I hover over this , I can actually , you know , align center , align rights , I can insert the text , I can do whatever I want .
Now , let's just say you want to add in a button over here .
So right here , I'm gonna make a space right here and I'm gonna go ahead and do the um we don't need to do the buyer author or I'm sorry , the author bio because a lot of these are actually standard with wordpress .
But since our theme comes with a lot of um you know , extras , we don't really need to use these , but I do believe they have like an ET button right here .
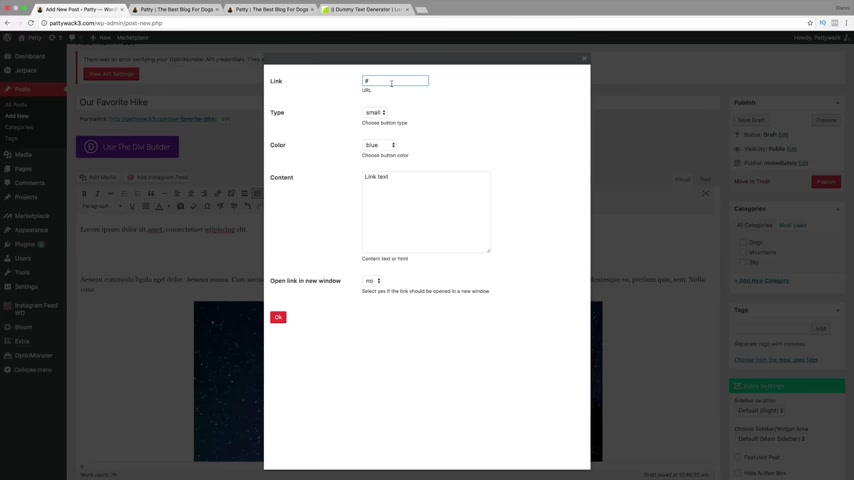
So let's just say you want to add a button into your post .
So go ahead and give it a post link .
So Darryl Wilson dot com , the type , I'm gonna go ahead and put an icon and the content .
So I'm gonna put , click here .
Now , what kind you want it to have ?
Like a download a search refresh , et cetera .
You can just go ahead and go through each of these .
Each of them has a different um like icon style and open link in a new window .
So that means if they click on it , do you want it to automatically open up a new window ?
I'm gonna say yes , because we don't want them to leave our website .
So I'm gonna click on .
OK .
Now you're gonna see all this weird short code come up right here .
So let's go ahead now and just preview this post just to give you a little example of what this is .
So remember guys , I actually centered the image I added in a button .
So right here , you can see I have click here and I have this right here .
The image it's a little bit more centered now .
It is a very large image .
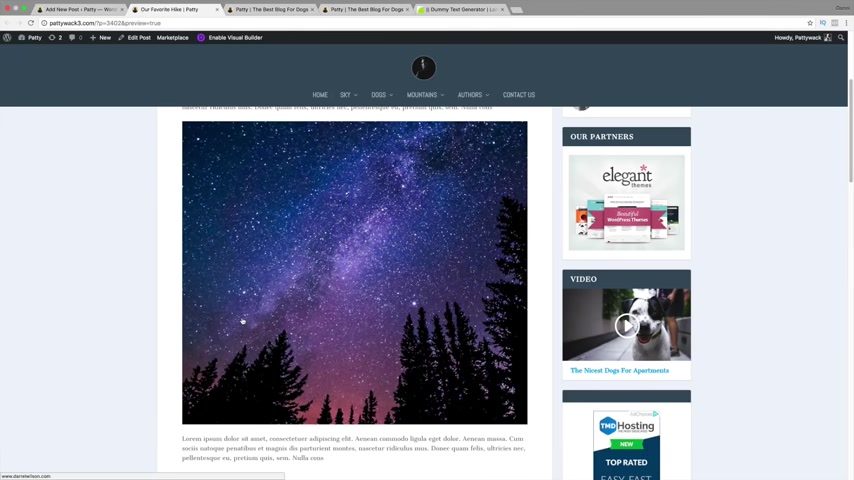
So it kind of basically just fs it fills the entire space .
So if I make it a little bit smaller , perhaps it will actually look a little bit more centered right here and you guys can tell it is a perfect looking blog .
Now , I actually uh updated this because I didn't want to miss anything .
And at the end of my tutorial , I was kind of like , you know , I didn't really go over these options too much .
So I'm kind of like going back in time .
So I , I will be talking more about Instagram feeds and the bloom in form .
You can add all this stuff on your blog post .
So um that's basically all I want to talk about .
Um Let's go back to the tutorial now .
So this was basically towards the end .
Now , we're gonna go a little bit back in time .
Now , these settings right here , we will talk more about these when we talk about premade layouts because there are a lot of reasons why you would want to hide the featured image .
So now let's go ahead and preview the changes .
Let's go ahead now and see what our post looks like .
So right here , we have the best dogs and then we have our quotation mark and the header image is gone for this uh style .
Now , there are reasons why you'd want to do this .
You can add in a lot more text and then add in an author name , like a quote from something inspirational .
But remember if you go to the uh the front of the website , you're gonna see that featured image anyways .
OK ?
So that is basically how we created uh 33 pages or three posts right there .
It was very simple .
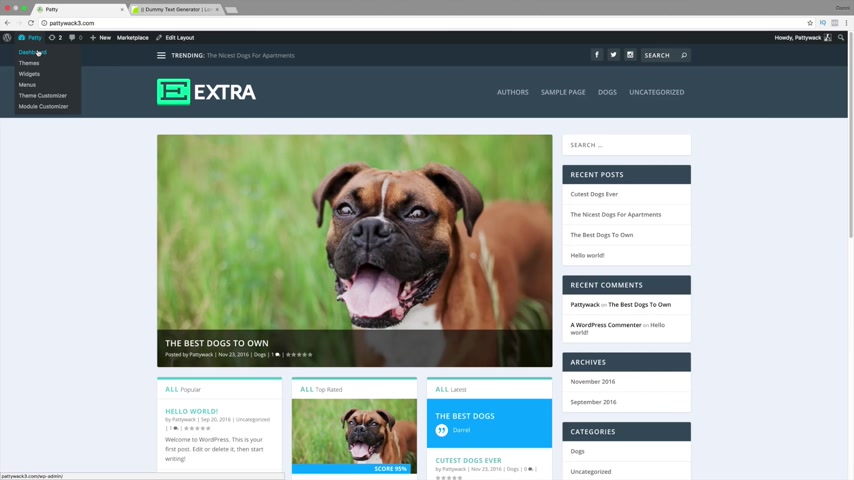
Now , let's go ahead and just go to our home page .
Let's go and see what it looks like now .
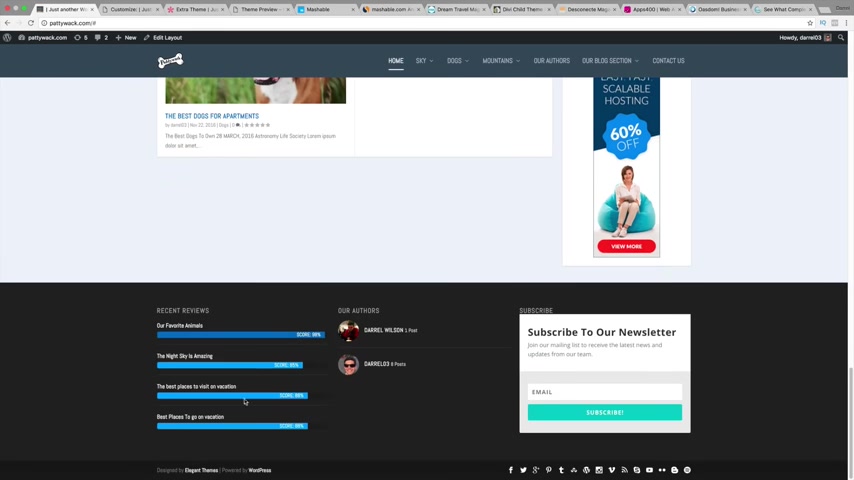
So I'm gonna go over here to visit site and now we have the picture of the dog right here and we have the other picture of the , um , you know , the best dogs to own nice apartment dogs and cutest dogs ever .
And then right here we have that one post that we did of the quotations .
All right .
So that is basically how we do blog posts .
Now , let's go ahead and talk about the layout .
So how do we control where everything is and the way it's designed , right ?
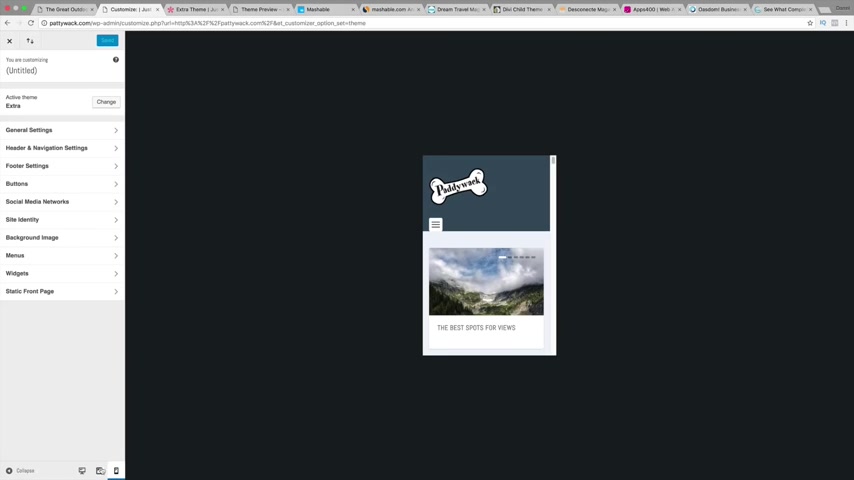
So over here under edit layout , just click on edit layout .
So this is our home page and this is also known as the extra category builder .
This is how we design pages .
So right here , you can see that we have a featured post slider , we have post , post and post .
So later , what we're gonna do is we're actually going to make this a category .
So this is gonna talk about dogs , this is gonna talk about mountains and this is gonna talk about sky .
But let me show you all how to quickly create your own category builder just in case you don't want to use the standard one .
All right .
So right here under uh standard section .
Go ahead and click on that now , what style do you want this under ?
So I just want to go ahead and just copy the regular one just to show you all how this works .
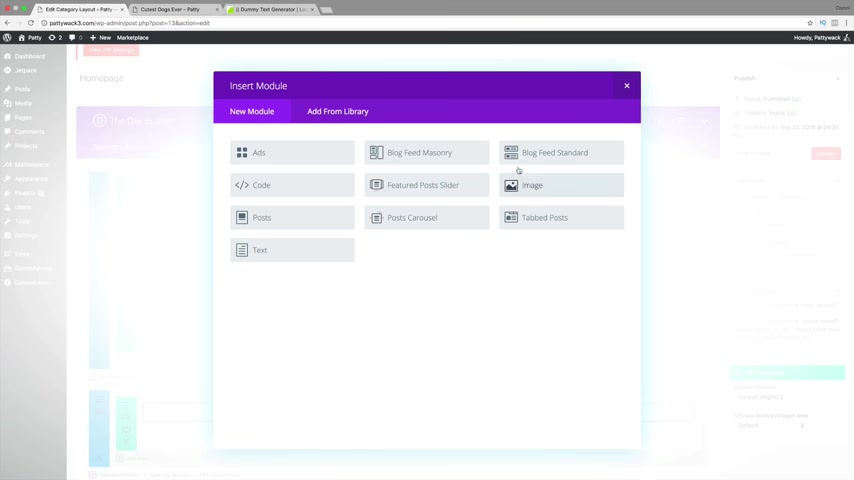
So I'm gonna grab this big one right here and I'm gonna do this a featured post slider .
So the featured post slider is basically like a like a big of the one we currently saw and these are modules .
So these are made specifically for extra .
So this one right here is like an image .
This is a post slider .
This is a tab post .
Remember earlier in the tutorial I showed you the tab post that is basically the tab post .
This is a blog standard feed .
So just like it shows you in the picture , it's just basically a feed of your blog posts .
This right here is your post and this right here is just a random text where you can enter anything in OK ?
But for now , I'm gonna go ahead and click on featured post slider .
Now , right here you see how it says categories .
So you can basically choose the categories that you want these to go on .
Now right here , it talks about post limit .
So how many posts do you want this module to talk about ?
Well , maybe six , maybe three , maybe one , maybe two , et cetera .
Do you want to only display featured posts ?
You can put yes or you can put no .
So right here ignore displayed posts .
So do not display any of the posts that have been displayed on previous modules .
You can need that .
Yes or no .
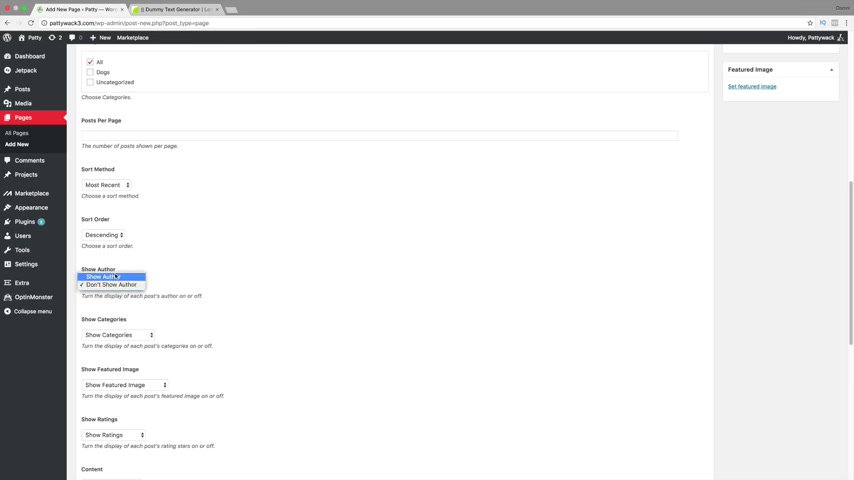
Now , do you want to show the author ?
Yes .
Do you wanna show categories ?
Yes .
Do you want to show the comments ?
Yes .
Do you want to show the ratings ?
And do you wanna show the dates ?
Now , you can also uh enable auto play .
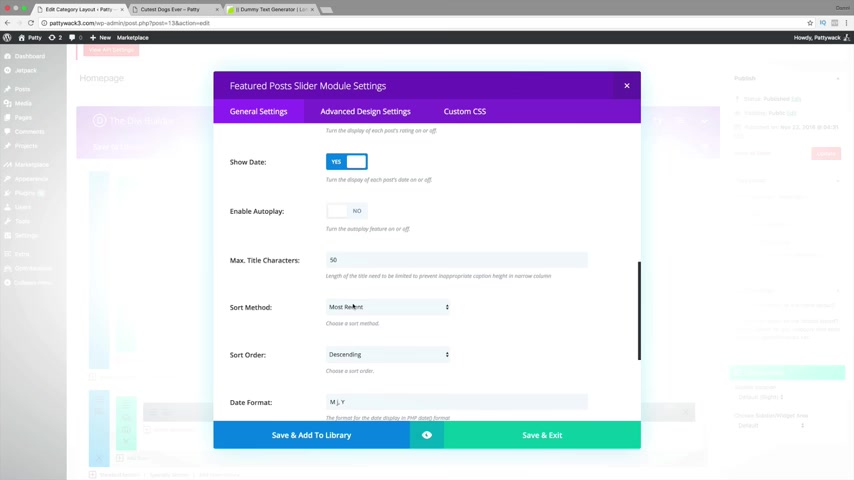
So basically , it would go ahead and continually auto play the posts .
And um you know , you have your sort method right here if you want to do like most popular , most recent uh highest rated on that on that module right there .
As everything here is pretty self explanatory , it's just basically reading it and understanding it .
Now .
Also you can go ahead and do um like a sort method so descending or you can do ascending .
Now , the advanced design settings will talk a little bit later .
These are basically changing the fonts and the color , but I recommend actually doing it from the theme customizer , which we will talk about in just a little bit .
Now , I know I'm saying that quite a bit , but um there is a reason for that .
I just want to make sure that you understand the basics before I jump the gun .
So right here under um uh insert module , we can go ahead and um actually , we'll go ahead and insert another row .
So we have these three post right here .
Now , let's just say we want to create that again .
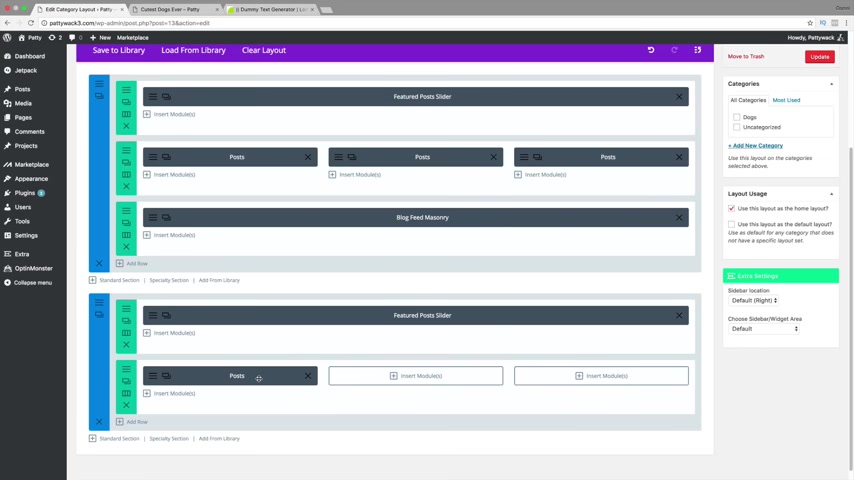
So over here , click on add now , I'm gonna click on these three right here and I see where it says post , post , post .
We can click on insert module .
Same thing guys just click on post .
And let is say on this side , you only want dogs .
There you go .
So we have post right here .
Now , let's just say you want to duplicate this .
You know , it's very similar to the de theme .
If anybody here has been using the Debi theme , it is the same exact thing .
So there it is I made the post right there .
Now let's just say you want to do the blog feed missionary just like this .
Um this layout right here .
All you need to do is click on add a row .
We want one full width style , click on insert module and just go ahead and select it .
That's simple guys and then click on save and exit just like that because I actually recommend to use the standard settings for the extra because they are pretty good .
But for now , that was just a small tutorial on how you can create your own post and everything else .
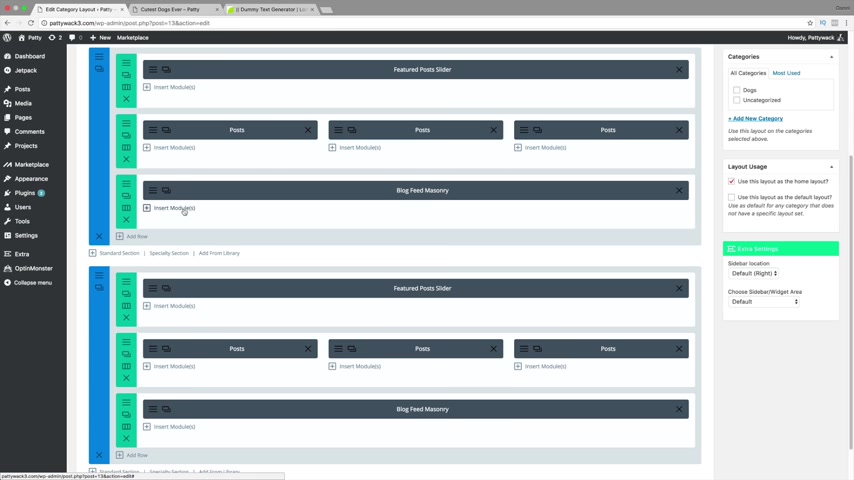
We will come back to this a little bit later to show you the tab post because we will actually insert another module here .
And I'm actually going to show you how you can actually use the tab post .
But for now , I'm gonna go ahead and just delete this and I'm gonna click on update just like that .
All right .
So I'm going , going back to our website right here , going to visit sites now , that was basically the small tutorial of the category pillar .
So now I want to go ahead and create some pages .
So these are blog posts right here , but maybe we actually want to create some pages .
OK ?
So over here under new , just click on page and this is actually going to create a page .
Now , extra guys actually has premade templates for everybody .
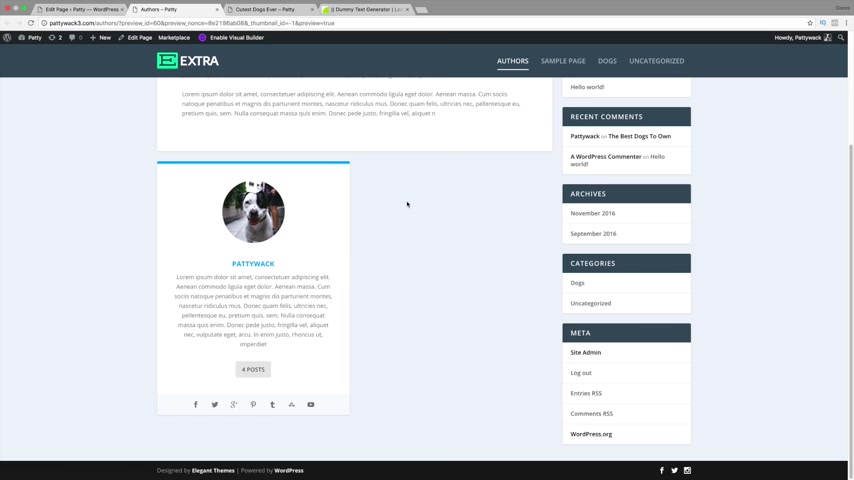
So over here under template , you can select them and maybe you have authors .
So over here , I'm gonna talk about authors and we're gonna go ahead and just select some text right here and some more text and some more texts .

Now right here , we talked about authors .
So I'm just gonna go ahead and select Patty Whack because as of right now , that is the only author that we currently have .
OK ?
But don't worry a little bit later , we will talk more about how to add more authors as well as allowing people to make their own blog posts .
So going back uh we can go ahead and scroll down right here .
We don't need to set a featured image for this and for the cyber location , we want it to the right , choose the side of our widget area .
We wanna leave it as default Um right here we have excerpts .
So is basically like the summary of your content , but we don't , I don't really recommend it because right here is a summary of our content anyways and they're going to see this regardless .
So uh going back right here that looks , that's about it .
Now , the page is gonna already create for us .
So it's , it's very simple to use guys .
So all I'm gonna do is click on publish .
All right .
And also one more thing , the Perma link , you notice how it says patty three dot com dash authors .
That is the reason why we want to set it as um post uh post name because it's much cleaner .
It's really , you know , it looks really good , right ?
So I'm gonna click on preview changes now and this is the author's page .
So right here you can talk about your authors and then right here it gives a brief description about the uh author as well as how many posts he has made and also the social icons .
Now , if there is another one , if there is another author right here , we can actually go ahead .
Um this page will actually create it automatically .
So now let's go ahead and create another author .
Let's go ahead now and let's just say you have a team of authors or a multiple authors that wants to post on your website .
So , um going back over here , I'm gonna click on um Well , first let's go ahead and visit the site and I'm gonna close all these right here .
I have these , all these tabs open .
All right .
So let's go ahead now and create some more authors .
And I also want to do one more setting and this will actually enable people to register on your website and also make comments , et cetera .
So , going into our dashboard right here , we're gonna go to settings and we're gonna go to general now right here under membership , just go ahead and select anyone can register .
So this will basically say people can go ahead and register to your website and log in and make whatever comments they would like to make .
So we've done that now really quickly .
Uh going back to our dashboard right here .
I wanna go ahead and just , you know , take out all this stuff right here .
So right here , just click on .
I don't need help .
This is basically like their standard stuff that they uh put onto our website and also says your site is currently displaying a coming student page .
So go ahead and just take this off and go on and click on , click here and there you go .
So our website is now live now .
We can actually um people can actually see our website .
All right .
So the next thing I want to do is go ahead and add in some users .
So over here under users , click on , add new .
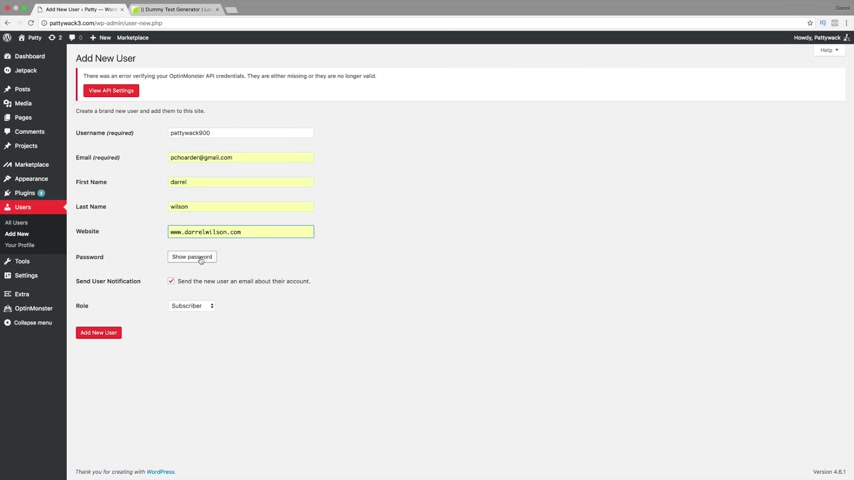
So go ahead and give your new , uh , admin a user name .
So I'm gonna put Paddy Whack 900 go ahead and give it an email address , the first and last name and also website .
Now you can , uh , you know , put in a password right here so we can show the password .
I'll go ahead and put in , um , I don't know , we'll put in , uh , we'll do the same one .
Patty Patty Whack 900 .
Now send a new user and email about their account .
Sure , why not .
And also we want to confirm the you speak of password .
So I'll go ahead and check both of these now under a rule right here .
I want to go ahead and put author , ok ?
So we have the user name right here and we have the password .
So I'm gonna click on add a new user .
All right .
So we have Patti Whack 900 right here .
And now this person can actually go ahead and make some posts .
So let's go ahead and do that .
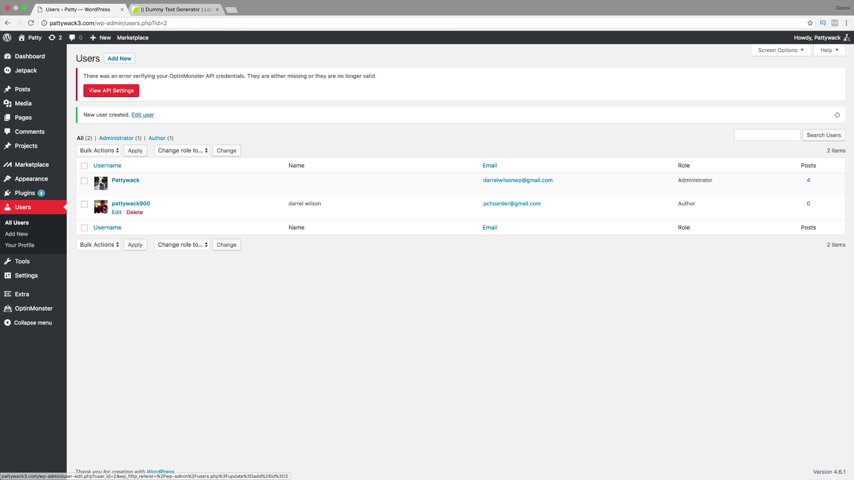
I'm actually gonna log on to another browser and I'm going to log in on this on our website to show you that this person can now make posts .
Now , the reason why I already have an image over there because this is actually already a registered uh Gravatt .
So your new uh author will have to actually do the same process that you did was , you know , create , um you know , a little bit about yourself and go ahead and create an image .
So let's go ahead now and log in on another browser .
So right here , I'm gonna go ahead and refresh this page because we reduced the uh the website coming soon page .
Now , I'm actually gonna go ahead and log in so dash WP admin and I'm gonna go ahead and put in that petty whack 900 then same thing , Patty 900 .
I'll go ahead and click on save password and there you go .
So I'm , I don't need help just like that .
Now , if you guys have noticed right here , this user right here can't really make any changes to the website .
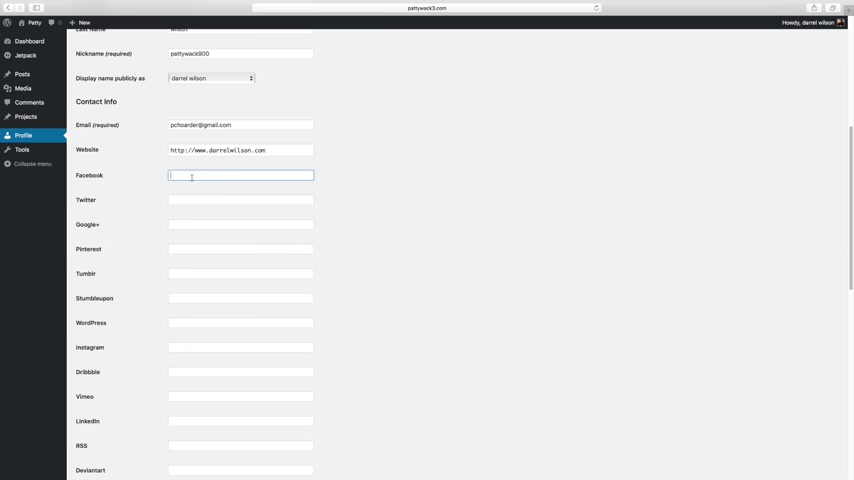
All he can do is , you know , post comments , post , you know , uh you know , post and comments and also change his profile .
If I go to profile right here , the user can do the same exact thing that we did by putting in his Facebook , Twitter , Google , all this good stuff right here .
Talk about himself right here and then put it in .
So I'm gonna go ahead and put in some text right here .
I will go ahead and put in some information .
It's like that these are , these are just dummy things , you know , just to give the icon there and just to make sure it's there .
But uh you know , if you click on it , it doesn't go anywhere .
So I'm gonna click on update profile .
Now , let's go ahead and make a post from this user .
So under posts , I'm gonna click on add new .
All right .
So just like we did before , now this specific user has the authority to create his own posts .
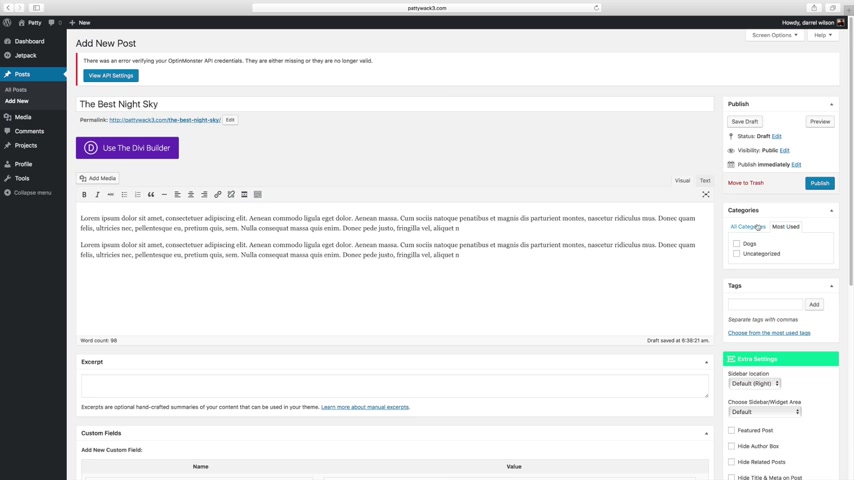
So we're here , I'm gonna put the best , the best night sky and right here , I'm just gonna go ahead and enter in some dummy text and I'm actually gonna um probably go ahead and um now what this user can't do is they cannot create categories .
So the reason why that is is because if the user , if you basically give the user too much power , they can , you know , create categories that aren't really , that you don't really approve .
So right here , I'm gonna go ahead and leave it as UNC categorized and um scroll down same thing like before they can go ahead and put it in a review , a summary , a breakdown .
So I'm just gonna go ahead and put in some dummy text and then our title will put our , our rating .
We'll go ahead and put 80% and um I'll go ahead and set a featured image select files and we're gonna go ahead now and put in the pictures that I currently have under my desktop .

So right here , I'm gonna go ahead and do like a night sky picture .
Let's do a good one .
Let's see .
Oh , that's a good one .
That's a good one .
So I'll choose this one .
That is an 88 K picture .
So it is a pretty big picture .
So now I'm going to upload these pictures .
Now , remember your author can only um make certain changes like posts and comments , that's it .
They can't alter your website in any way , not unless you make them an admin , but we made this user an author .
So going back over here , I'm just gonna go ahead and put publish .
All right .
So there you go .
It is posted .
Now , I'm gonna go ahead and click on a view post right here and there you go .
So now this author has made this post , you can see the rating .
We have a little bit of dummy text , we have a review and there is the author now .
So this is the new author .
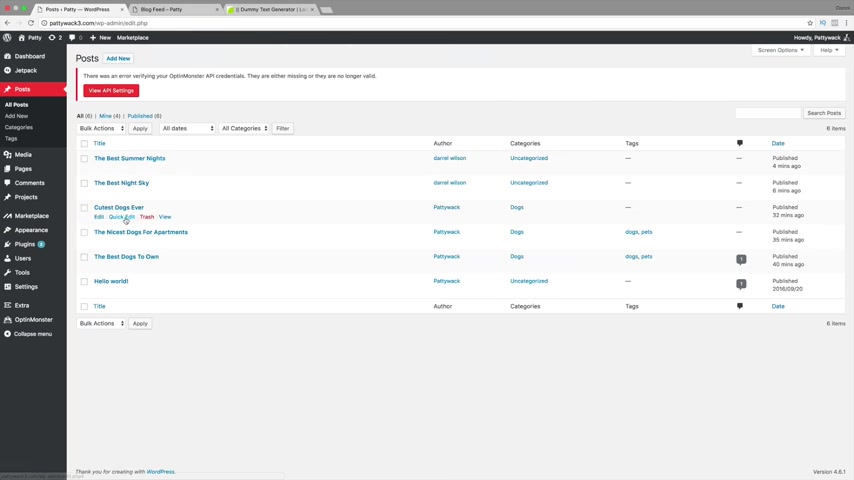
So going back over here to our dashboard as the other user , we can click on all posts right here .
Now , if , if you want to have the user , um I'm sorry if you want to see the post that you've currently made , all you need to do is just click on , you know , all posts , but right here , we have all of his right here under mine and these are all of them right here .
So if you've noticed right here , these are all grayed out .
The reason why this is is because this user cannot make any changes to your posts .
Remember , he's just an author .
So we don't want to give him too much power Right .
So that's basically the reason why um it is like that because we don't want to give that user too much authority to make crazy changes .
So don't worry if you make them an author , there's nothing they can really do except modify their own posts , they can comment and tweak their own profile .
That is it ?
Ok .
So I'm gonna go ahead and make one more under a categorized .
So I'll go over here and do uh add new .
Now , this is just for to , to purposes .
I'm just filling in space .
So I'm gonna put in another one .
So the best summer nights and I'm just gonna go ahead and put in some dummy text .
We will talk about using the Divi builder a little bit later when we use premade layouts .
Don't worry , I know you're wondering what this is .
We will cover that in just a little bit .
Now , I'm gonna do UNC categorized now , same things that featured image and I'm gonna go ahead and get a picture of the night sky .
Something looks like that right there that looks good .
You know , a lot of people were asking me like they were worried about like other people making changes to their website and I said , don't worry about it .
He's just an author .
He can't make crazy changes to your website .
But this is if you have like a team of people uh all collaborating together and you want people to have access to your website .
From other point , this would be ideal because , you know , making blog posts can be really , it can be a lot of time , it can be a lot of work .
So , um I'm gonna go ahead and just publish this post and we'll be done with that .
All right .
So I published the post .
Now , if I want to view it , I can simply click on view post .
And there you go .
The best summer nights , we have our featured image .
We have the same thing right here and about the author .
So that is how you guys would make the author page .
All right .
So going back , I'm gonna go ahead and open the other tab .
Now , we're actually gonna go back to this website on our real account and we're actually going to add in more pages because there are a lot of pages that we need to add in .
So over here under plus new , we're gonna click on page .
And also really quickly you guys can see that , you know , this right here , the best dogs to own patty , the best summer nights by Darrell Wilson .
So we have two different authors .
And if we click on the author's page , we're gonna see that the other author is there and that they can talk about themselves .
And you also see all the posts related to that author .
Maybe people tend to play favorites , maybe people are saying , you know , I like his work better than Patty Wax .
And you know , that's a good way to see , you know , who's a good blogger or not if they write interesting content , right ?
So going back over here , we're gonna go to plus new and go to page .
All right .
So we have our templates right here .
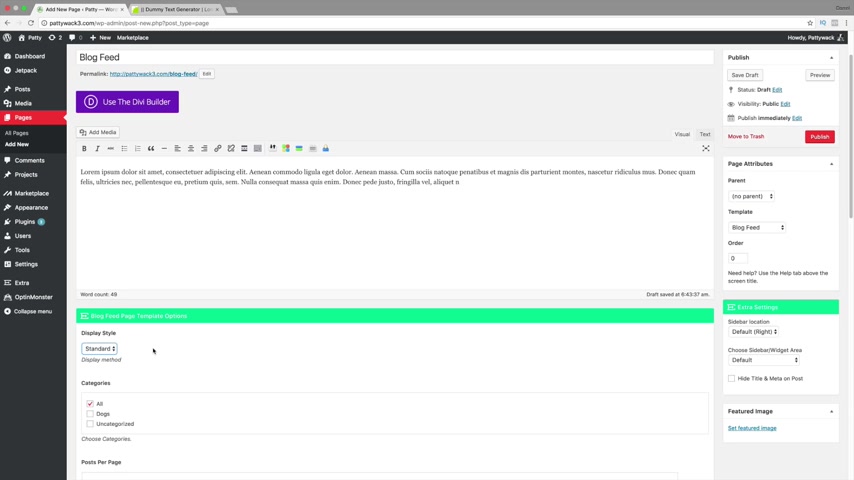
So we have a blog feed .
So a blog feed is basically just an introduction of all your blogs .
So right here , I'm gonna put blog feed and then right here you can go ahead and talk about it like this is our content for our blog .
This is what we want to talk about .
Now , we have different styles , we have the display and we have the missionaries .
But I'll go ahead and talk about both .
I personally like the standard better , but I will show you both just to let you know what they both do .
So post per page , how many posts do you want per page ?
So do you want three blog posts per page ?
Do you want seven ?
Do you want 10 ?
You can have as many as blog posts as you would like , just go ahead and enter it right there .
You can have the most recent now .
I would probably do the most recent .
That's basically saying the most recent blog post you have made will show up at the top .
And these right here are pretty standard .
You can show the author or not show the author , you can show the categories or not show the categories , et cetera , show the dates or not , show the dates , show the ratings or do not show the ratings .
Ok .
So other than that , we don't need to set a featured image for this .
And our sidebar is on the right side .
Generally that's how a blog post is .
But if you want to put your blog or your , I'm sorry , your sidebar on the left side , you can do that too .
You know , I , I've seen people put it on the left side , but for this tutorial , I'm gonna go ahead and leave it on the right side .
Now , I'm gonna go ahead and just publish this post to show you what it looks like .
And then I will actually change the display style to show you the different uh options between two .
So this is basically just the standard blog feed right here .
And I like this .
It's , it's clean , it looks good and it's really easy .
And this was the other one that we made .
The , the quotations .
I think it kind of looks ugly .
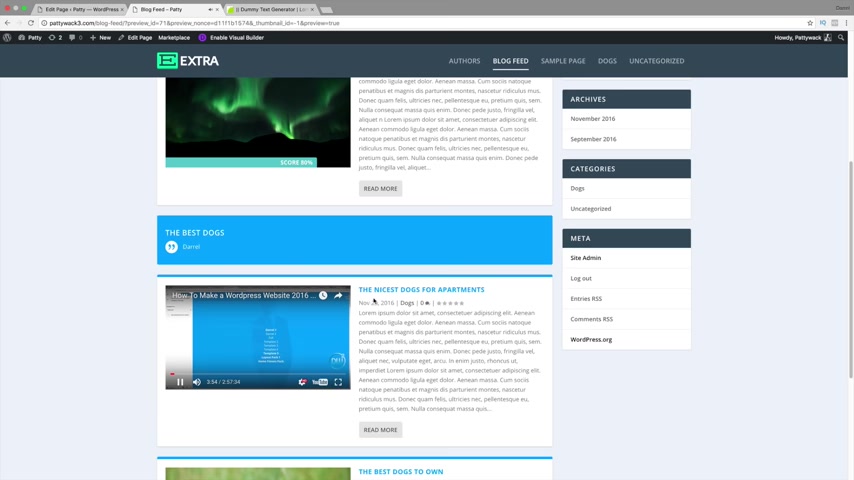
I don't really like this one , but it's , it's in there and this right here is the video .
So people can actually just go ahead and click on it from here , watch the video and go ahead and you know , mess around with that and here they can read more so they will actually be able to view the entire blog post .
So going back over here .
Now , let's go ahead and change this to mess right here and I'm gonna go ahead and click on update .
I like the other one better .
Now , I actually used this style on my website , something like this right here .
You can have it like this .
We should probably change this blog post , you know , I just think it looks really ugly , you know .
So uh going back , you know , this is the other style .
So it depends on what you like .
You know , if you like it like this , you can have it like this .
But I'm gonna go ahead and say , you know what I want it as standard and I'm gonna click on update .
OK ?
Now I'm actually gonna go ahead and change .
I'm a sort of a perfectionist guys .
I kind of like everything looking perfect .
So I'm actually gonna go to that one blog post and change it to the other one .
So what was it ?
The , the , the nice , nicest dogs .
Was that the one it is ?
It wasn't the nicest dogs .
It was , let me see .
It was the cutest dogs ever or the best dogs to own .
Let me see .
That's standard .
It was the last one , this one right here .
So this was the um quotation one .
I think it was , I don't know , I , I don't know where it is .
Let me , let's , let's go find out really quick .
So going back to our blog feed right here , this post right here was the best dogs .
OK ?
So it was the best dogs .
So I'm gonna click on edit post .
Now , say you want to change your blog post , guys , all you need to do is simply just edit it , whatever you'd like to do .
And I'm gonna change this back to standard and that's it , it looked really ugly as the quote , you know , I , I just , it just really stood out and I didn't like it .
So , uh that's why I took the time to change that .
So going back , you know , um we've created the blog feed , we've created the authors and like I said , if you want to go ahead and check them out , just go ahead and click on them .
But let's go ahead now and keep going through the pages and then I'll show you how we can style the menu after that along with adding some cool social icons .
All right .
So over here under plus new , I'm gonna go to page now right here .
We have the other one .
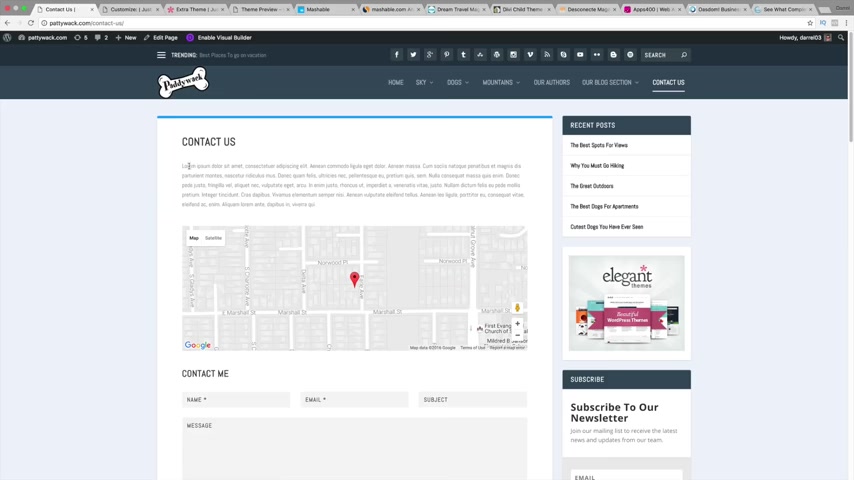
We have the contact form and we have the full with the member login portfolio and the site map and timeline .
Now , the timeline is a really , really cool feature that um I thought was just amazing .
So right here , we're gonna put timeline and we're gonna enter in some dummy text about this , whatever you want to talk about your um timeline and we're just gonna click on publish and I'm gonna show you what this is .
It's a really uh cool feature that they've added on uh extra .
So if you click on preview changes right here , you're gonna see that all the blog posts that you've made , see says September and then November .
So every blog post that you make , it's gonna keep track of it for you .

It's gonna let you know these were all the blog posts made in November .
These were all of them made in October and September , et cetera .
So I made this website , you know , I started around September .
So you guys can see I have a timeline around here .
So the longer the website goes , the more timeline you're going to have now , you can probably like make a fake timeline if you contact elegant themes to make it look like your blog is older .
But um the tutorial , I mean , sorry , this theme does not really uh offer that , but I'm sure you can find like a , a code for them .
You can contact them .
You have a year of um what is it called ?
You have a year of support .
So whatever you want to do .
So that is the timeline .
It's pretty cool .
I like it .
It's a really modern look .
So let's go right now over here under plus new and we'll go to page .
So now we're gonna go ahead and create something else .
So we have the authors , we have the blog feed , uh the contact us page will do in a little bit .
Now , we can actually have a site map .
So maybe , you know , you want to have a site map , but I'm just gonna go ahead and show you what it is .
So I'm just click on publish right here .

And it's basically just a site map of your websites .
It's just basically saying like this is what we got .
So this is what we got .
This is our site map .
So if you want to have this on your website , you can probably put this somewhere .
Um you know , wherever you want , if you want it , that is what the site map is .
So I'm just letting you know what the site map is now going to uh adding new again .
I'm actually going to go talk about the um uh we have a portfolio section .
Now , the portfolio section , you will actually need to create projects first .
OK ?
So this page only corresponds to projects .
So let's go ahead now and create a project .
So over here in our projects , we're gonna go to add new and just go ahead and give your project a name like uh cool stuff .
And I'm gonna go ahead and paste something in there .
Now , um you know , you can add a new category like uh now this is only for projects .
So this is a project for category .

So I'm gonna put mountains and right here you can enter project skills .
So something like uh hiking , we can put outdoors fun .
Now , if you're doing like a business portfolio , you might want to do like seo web design , something like that , that corresponds to what we're talking about .
So this is basically um you know , the project itself .
So over here we have project details , we can give a URL of the project .
So I at dot com .
Now for the project , you all text , you can , you know view the project and you can give a short description of the project .
So I'm gonna go ahead and paste that right there .
And now we need to set a featured image for this .
So I'm gonna click on set a featured image and I'm just gonna go ahead and grab one that we've already done .
You know , there's no reason for me to upload another picture , right ?
So this is basically a brief description of the project details .
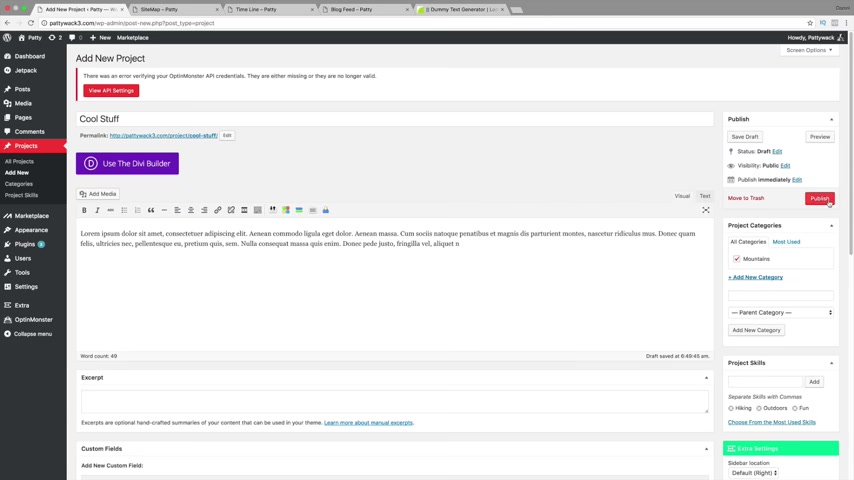
So now that we've actually created our first project , we're gonna click on publish .
Now , this is like I said , it's like a portfolio within your page .
So it's not an actual page , it's just a project .
OK ?
So you can actually click on view project , you can actually see what this looks like .
So this right here is our project and we have project details , we have categories , we have skills and they can view the project and they can comment about it .
So that is a pretty cool thing to add on your website .
If you have projects , you can go ahead and add projects .
So over here under plus new , we're gonna go to page and right here , we're gonna go ahead and select the portfolio and right here we're gonna put um our recent work .
Now , right here , we can go ahead and enter in some dummy text .
Now , you see where it says project categories .
Do you see how this mountains popped up ?
That's because we created the um projects for mountains .
Remember ?
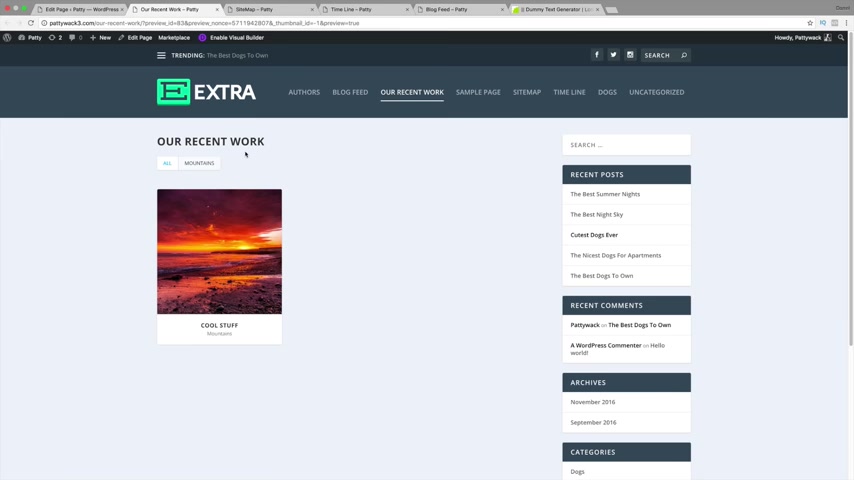
So um that's basically , you know , the portfolio page in a nutshell .
So over here , I'm gonna click on publish and I'm gonna show you now what this looks like .
All right .
So we've created our portfolio page and like I said , uh it's really cool guys , if you have all sorts of stuff , you know , like for example , you can have like uh recent work , you could have projects and you can , you can , people can search it by uh by project category .
So right here , maybe you want to talk about web design , you wanna talk about seo or if you're in a , a fashion , maybe you wanna talk about shoes , pants , belts , and people can go ahead and check it out by project .
So it's , it's like a little page that's like uh made within itself .
It's really cool , it looks really good .
So that is an example of the projects page .
Now , the next thing I want to talk about is the contact us page .
So going back to plus new .
Now also , I want to show you how to add in a page .
Besides going to plus new .
We can go to our dashboard right here and over here under pages , we can click on all pages .
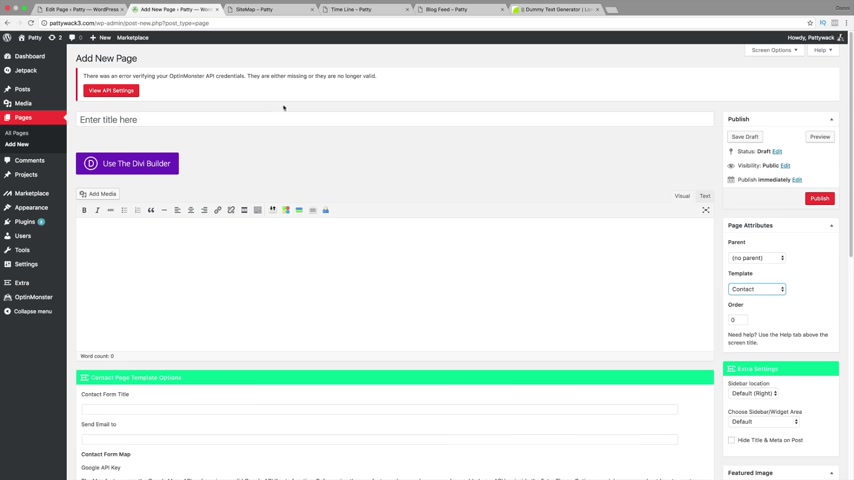
Now , we have authors blog feed .
These are all of the pages we made .
Now sample page .
We don't really need that so we can go ahead and just trash that .
All right now over here , we can click on add new .
Now , this is just another way to create a page .
It's , it's not like different , it's the same exact style .
So going back over here under templates , we can click on contact .
So we're here .
I put contact us and we'll go ahead and enter in some dummy text right here .
You know , maybe you want to talk about yourself like this is uh you know , this is a thank you for visiting our website .
So contact form title , contact me and send the email to where .
So I'm gonna put it to this email address .
Now , guys , we will actually need to have a Google API key .
You need to have a Google API key in order for this to work .
And it's very easy to get a Google API key .
So let's go ahead now and do that .
And so if you want the map on your website , you will need to get a Google API key .
Now , this wasn't required a few months ago , actually , maybe four months ago they introduced it .
And it was kind of funny because it happened during one of my tutorials and I was kind of like what's going on here , something's wrong , you know , it was like , really weird .
So all you need to do is enter in Google API key and you'll need to have a Gmail account .
So right here it's developers dot google dot com .
Just go ahead and click on that right there on the front one .
And right here I have a gmail account .
So I'm already logged in .
So all you need to do is click on get a key and go ahead and create select or create a project .
So I already have tons of them .
But for you guys , let's go ahead and create a brand new project .
So create and enable API key .
Alrighty .
So it is generating our API key for us .
Yeah , I have a lot of them .
Yeah , I have probably like 78 websites and I use API keys for all of them .
So that's it guys .
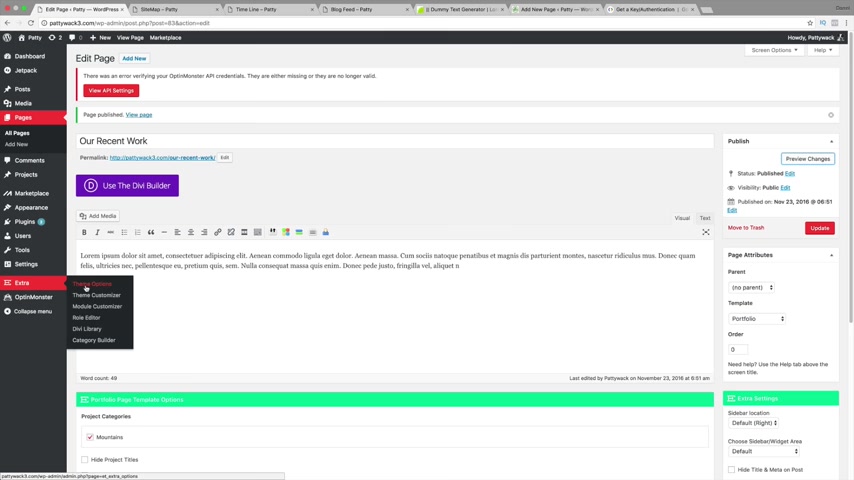
This is all we need right here .
So all we need to do is go ahead and take this and I'm gonna go ahead and copy this .
Now , I'm gonna go ahead and close this .
Now .
We actually need to go ahead and go into our uh settings right here and we need to actually add in the uh code into our theme customizer .
So going back over here , we can go down to extra and we're gonna go down to theme options .
Alrighty .
So these are some , you know , some extra features and extra options .
I'll talk more about this a little bit later when we talk more about the um the logo and et cetera .
So right here under Google API key , all you need to do is just go ahead and paste that in just like that and scroll down , scroll down and click on save changes .
I'll talk more about these features , everybody uh a little bit later in this tutorial .
Um They're pretty standard , but I will talk more in depth about everything here .
So we entered the Google API key in .
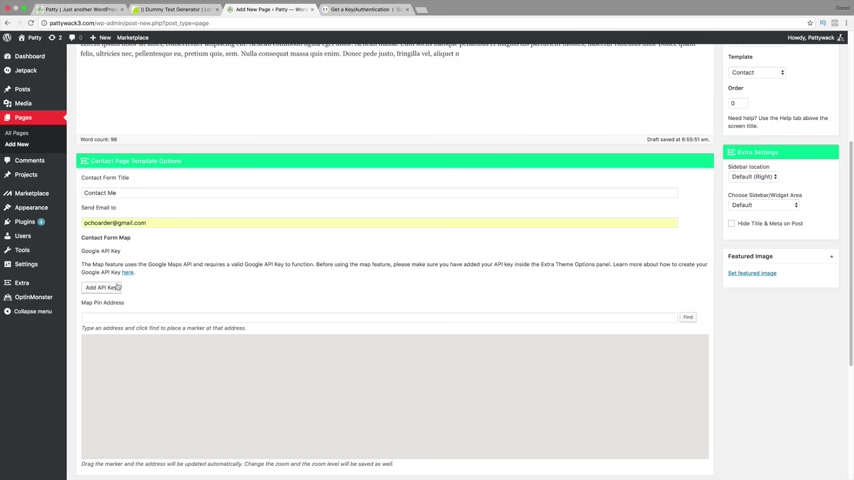
So I'm gonna go over here to visit site and I'm gonna go ahead and close all these .
I have all these things open right here .
Oh So um I'll go ahead and stay on this page .
So this was the page that we were actually creating on now .
I might need to refresh the page .
So it might end up deleting everything .
Let's see if this works right here .
Yeah .
So I have to basically re refresh the page .
So I'm gonna go ahead and have to remake the page from scratch again .
So over here under plus new , we're gonna go to page and we're gonna create our contact us page now .
So contact us and right here , I'm gonna go ahead and enter some dummy text .
All right .
And we're gonna go ahead and paste this stuff in .
All right .
And for the templates we're gonna do contact now for the contact form title , I'm gonna put contact me , send the email to there and then right here , I'm just gonna enter in this random address .
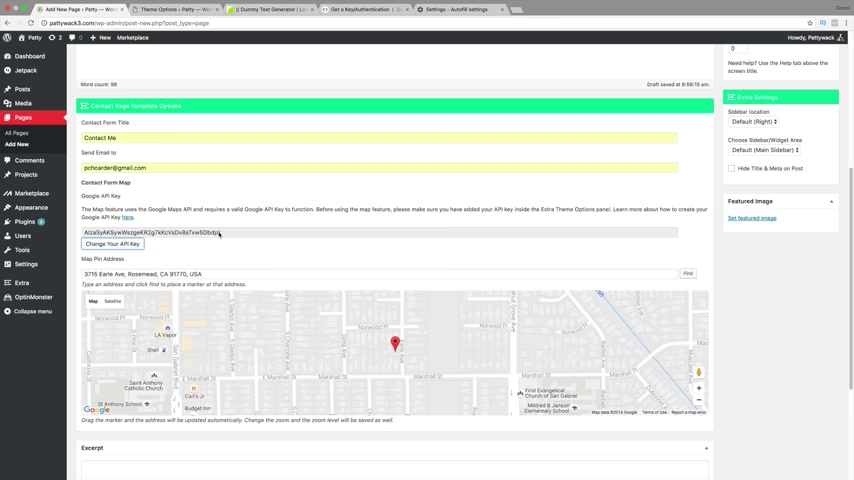
Oops , sorry , go to enter in this address right here .
Let's see if I can .
Uh let's see if the API key works right there .
There it goes , ok ?
So see how the map starts to appear .
So that's only because we entered in the Google API key , ok ?
So when your map appears , you're good to go .
All right , if it doesn't appear double check the API key to make sure that it is working properly , ok ?
So other than that , uh let's just go ahead and publish the page .
That's it .
All right .
So now let's go ahead and preview the changes and there you go .
So we have contact us .
We have a little bit of a description , we have the map and we have this contact form .
Now , it's going to send anything that you put in there to the email address that we actually put in right here where it says send the email to .
So it's gonna send any email to that address , ok ?
So that was pretty simple guys .
And that looks like it's most of the pages that are done .
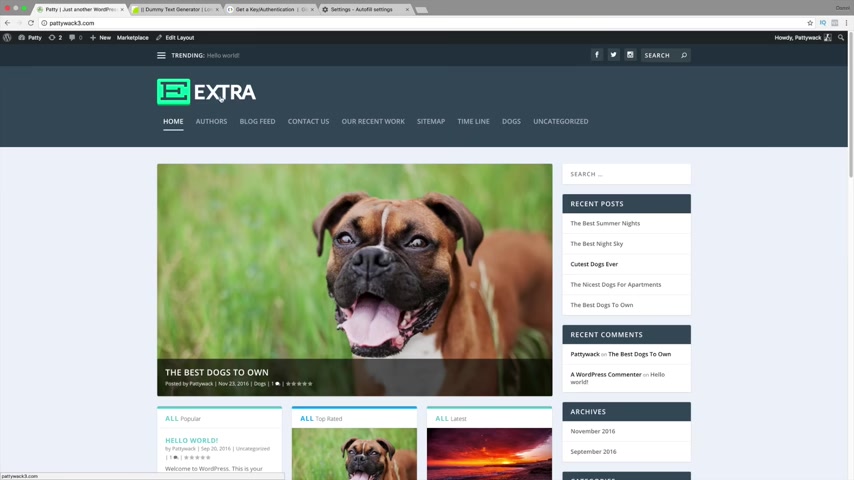
So going back to view the websites .
So our website is starting to come into play .
You know , our , our menu is coming up .
We got our , uh , we got our logo there .
We got our , uh , you know , our posts , everything looks like it's sort of , you know , looking a little bit better than when it first started , right ?
So the next thing I want to talk to you guys about is the , um , premade layouts .
Now , the premade layouts are pretty amazing and you guys can actually download them for free on my website .
So if you go to Darryl Wilson dot com , I'm gonna show you how you can upload the layouts .
And guys , it's super easy to use these , it's so easy .
So over here under Divi layouts , so I actually sell some layouts .
So , you know , if you guys wanna go , but this is for the Divi theme , but I'm actually going to upload some extra layouts for you guys .
So be sure to check these out now right here under Divi blog layouts , just click on that and click on add to cart .
And these are wholly free guys , you know , like I said , it's a prebuilt blog post for you .
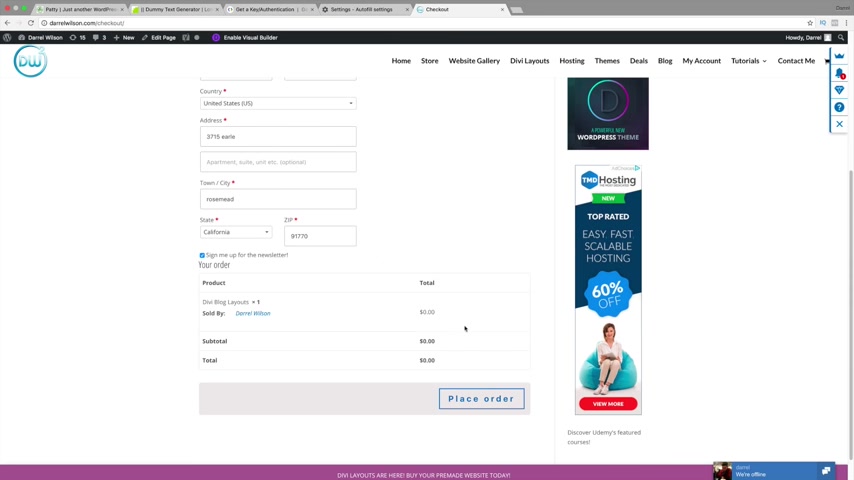
And these are really elegant and they're actually made by elegant themes .
So the company that we actually purchased the theme from um that's the company that made these .
So they're super cool , you know , they're really cool and go ahead and just fill in your information here and go ahead and click on place order .
All right .
So I am purchasing this thing for free and all you need to do is go ahead and click on the DV 105 pack .
So just go ahead and click on that .
All right .
So it is downloading .
So this is around 34 megs .
So they are a little bit big .
But the reason why they're pretty big is because there are pictures already inside of them .
So go ahead and just click on your download and we will actually need to go ahead and open this up .
So right here DV five pack , I'm gonna go ahead and drag this down here .
Um No , I don't need to do that .
So I already have the five pack right here .
So this is it right here .
And if I open this right here , you're gonna see article one , article two and article three , OK ?
So we need to go ahead and upload this to our library .
So it's basically like a pre-made layout kind of thing .
So going back over here , we're gonna go down to dashboard and now we're going to upload these onto our theme so we can apply them anywhere we want .
So going down to extra , we're gonna go down to divi library .
OK ?
So right here it says import and export .
We want to go ahead and click on that .
It's right there .
Now there's exports and there's import .
So click on imports , click on , choose the file now , we need to actually find the file .
So under desktop mine was the pack 500 or 100 pack five .
Now , there's three .
Now guys , you need to make sure there is a dot Json file , ok ?
If it is the zip file , it will not work , ok ?
You must use the dot Json file .
So right here , I'm gonna go ahead and I'm gonna , you know , grab article two , why not ?
And click on import DV builder layouts .
Now , guys , if this gets stuck , sometimes , you know , sometimes it'll just sit at 1% for a while .
Uh If that happens to you guys um just refresh the page and try it again sometimes when you're doing these kind of things , weird things happen in the world of wordpress .
So uh just make sure to just refresh the page if it's , if it's taking longer than like three minutes , uh just try it again .
Refresh the page .
All right .
All right .
There you go .
So I have article two right there .
Now , I'm gonna go ahead and upload the other one .
So ex import , export , import , choose the file .
This is probably the best thing about elegant themes and the divi theme are their premade layouts .
They're just , it's like a pre-made website , you just say whatever you got and you can upload it to any other website .
You know , it's , if you're a web designer , it's like the shortcut to making a website .
It's like a lazy way to make a website .
But a lot of people create their own and they sell them for like , 50 bucks or 100 bucks or whatever the price it is .
Let's go .
It's good water .
The , so it's my favorite .
I don't like Arrowhead , man .
Arrowhead just tastes terrible to me .
I don't know , people love that stuff .
I was like , oh , I can't stand Arrowhead .
I taste it .
It feels like it's like a dirt water , you know , or something like that .
And we're gonna go ahead and do one more .
So , import and export , import , choose the file and we're going to select one and I'm gonna show you each and every one to make sure that you fully understand how to use each layout and um the benefits of it and on these ones , we're actually gonna hide the post .
So I'll talk a little bit more about that once this is done uploading .
Can I hear my dog ?
I don't know if she's snoring .
She's , she's next to me .
She snores .
She does that sometimes , you know .
So these falls are a little bit big guys .
So this is around a 14 14 meg file .

So if it takes time to sit back and relax , go get a drink , go get a beer and um just come back when it's ready .
All right .
All right , cool .
So it looks like they're all done .
They're ready to go .
Let's go ahead now and use these because these are much better than what we're using before .
So , over here under plus new , we're gonna go to post .
Now , I think what we're going to do now is was it the nice we'll do mountains or we'll do uh Yeah , mountains for beginners .
Now , here we're actually going to click on , use the Diy Builder and we're gonna click on load from library , click on add for library and here are articles .
So go ahead and just grab one .
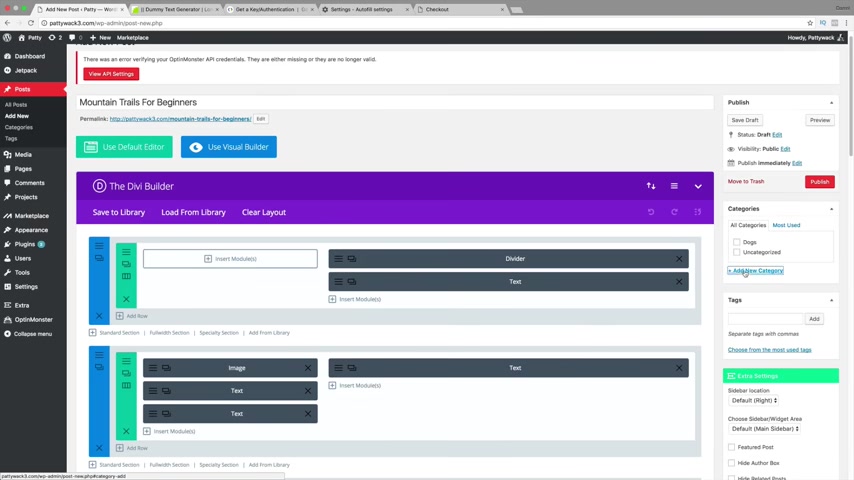
I'm gonna go ahead and grab three and then I'm gonna go under new category and put mountains just like that .
Now , over here , I'm gonna set a featured image .
Um So let's see right here .
I'm gonna go ahead and um select this upload files and I'm gonna go ahead and download the one that I used .
So which one should I use right here ?
I think it was .
Let's see here .
Oh This one's a good one .
That's a good one .
We'll go and upload this one right here .
Now guys , the there are a lot of modules in the extra theme and I have another tutorial for that , which is uh a tutorial on the divi theme and those are all included .
I'll show you a little bit more once this picture is done uploading because there are a lot of modules that you can use uh with extra .
But I've already created like a few of the tutorials on those .
So I , I'm not gonna do it all over again .
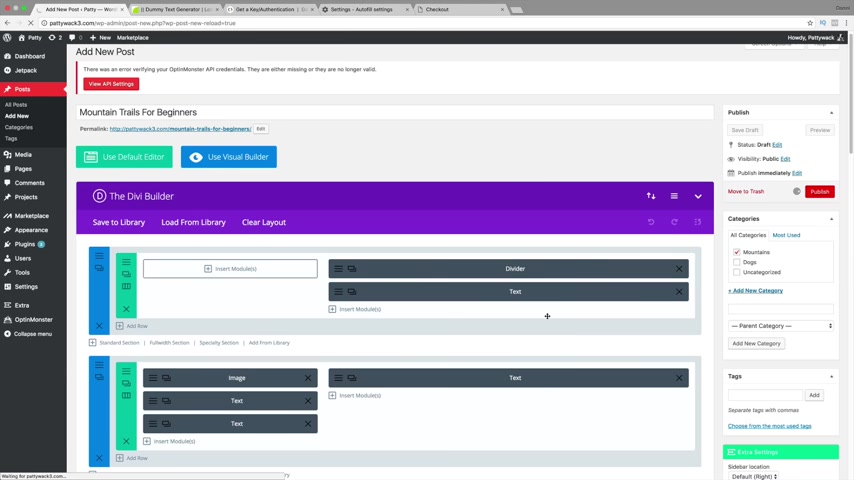
So there it is , we have our featured image and right here you want to go ahead and set hide featured image on post .
Now , I'm gonna actually unclick this and I'm gonna show you the reason why I do that .
So you're gonna see all this stuff right here just like we had before .
These are texts , you know , and um I'll go ahead and just talk a little bit more once we publish this post .
So , um other than that , I'm just gonna go ahead and publish this .
Now , if you're new and you're panicking because there are a lot of cool things right here .
Don't worry about it .
It's super easy to edit .
All right .
So I'm gonna click on preview changes now .
OK .
So we have mountain trails for beginners .
Now , this is our featured image right here .
But if you've noticed , we have another one right here and it kind of looks weird , right ?
But don't worry , I'll go back and change that .
I'm just showing you that , that this is the reason why we'd want to hide our featured image .
So now let's go and look at our blog post .
Now , this is absolutely gorgeous .
This is something that we can be really proud of .
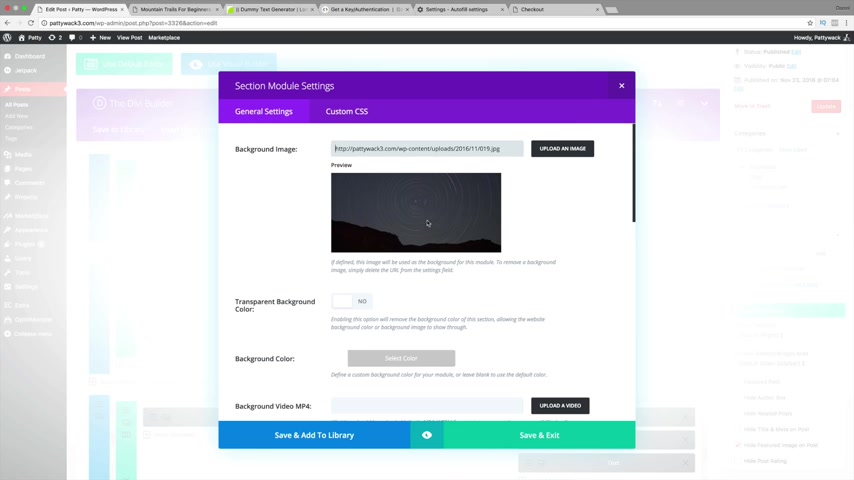
Just like before we have our pictures right here and scrolling down , we have a sign up form and we have these little um uh you know , advertisements right here .
People can share it and it's just a basic blog post guys .
It's a really professional looking blog .
Now , let's go ahead and edit this .
So over here , I'm gonna click on hide this um hide this related post .
I'm sorry , hide the featured image .
Now over here on this blue icon , this controls this little section .
I'm gonna click on this icon right here .
Now you see where it says background image .
This was the image we had right here .
I want this image right here .
So going back over here , I'm gonna click on upload an image and we're going to use this one instead , set his background save and we click on update .
OK ?
Now I'm actually going to introduce you all to the visual builder .
So the visual Builder is a new feature that Elgan themes has released probably around a month ago and it allows you to make changes visually guys .
So it's a much better way to edit your website .
So for example , you guys can see , you know , photo power , what else do you want to put it to , you know , photo stuff just like that .
And right here , let's say you want to change the name .
I wanna change it to Darryl Wilson , Darrell Wilson .
And right here , you know , go you can go ahead and guys and just change whatever you would like .
So let's say you want to change this image .
All you need to do is click on this gear icon .
And where it says image URL , just click on upload and add in whatever image that you would like to your , to your blog post right here .
So um that is a way where you can basically make changes visually .
Now , if you guys are wondering about how to use this page builder and get more advanced and learn more about it , I do have another tutorial on this .
Um It's under um right here under my channel .
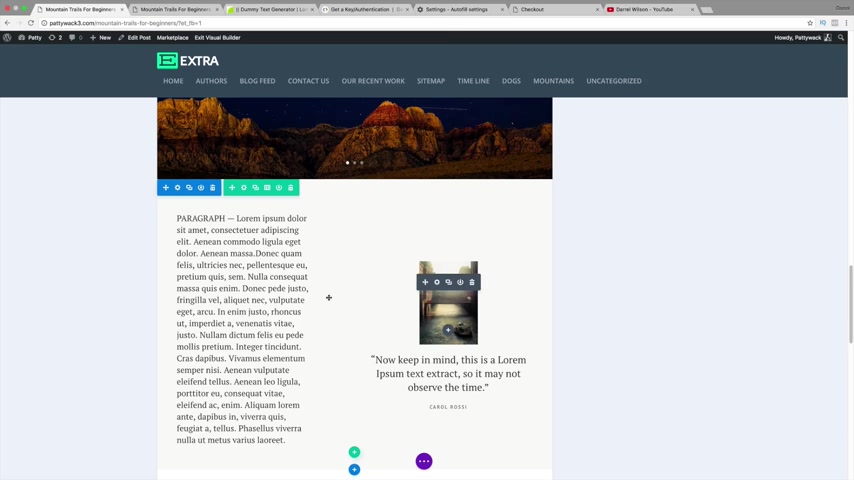
So this is my channel right here and videos you're gonna see that .
I have one right here called How To Make a Wordpress website .
It has around 40,000 views and I talk all about the Visual Builder and every single module in here .
Now , the reason why I'm not talking about it in this lecture because it's basically irrelevant to , you know , teach the same thing twice .
So this is just a shortcut on how to uh make posts .
But if you want to make like different modules and start moving stuff around , you can do that .
But um in this tutorial , I'm not gonna go over too much in depth on the visual builder because I already have a tutorial for it .
So right here , now this contact section will not work for the blog post .
So let's just say you want to delete this whole section .
All you need to do is click on this little trash can trash it just like that .
And now if you want to save this .
All you need to do is click on this little thing right here and click on save .
So it is saving .
Now , let's go ahead and exit the visual builder .
Now let's go ahead and see what it looks like .
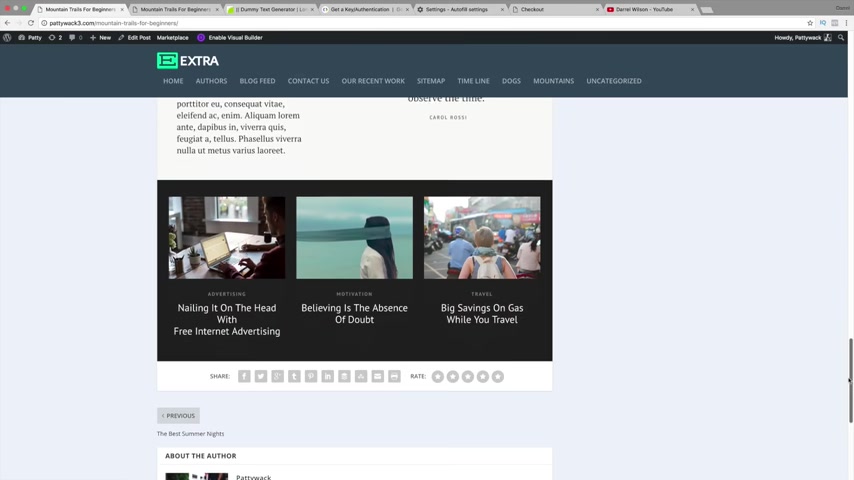
So all the changes were , you know , all the changes were made .
It looks pretty good .
Everything is the same way we want it to be .
We deleted that one section , it is gone , it is gone .
So this is basically how you would use the Visual Builder on your blog post .
Now , this only works for blog posts and um custom pages .
So if you want to use the Visual Builder more , I recommend going to my other tutorial where I spend around three hours and I have another one right here where I spend around two hours talking about the Visual Builder and how to use those modules .
But extra is basically known for blogging because the extra theme has modules that the DIVI theme does not .
So basically each one has a specific job .
This one's for blogging , the other ones for creating like websites like business style websites where you can use like video sliders , et cetera .
But for this theme , this theme is used for uh blogging .
Now , you can actually use the Divi theme because you've actually purchased the subscription .
So you can download the DEVI theme as well .
So you basically have both themes .
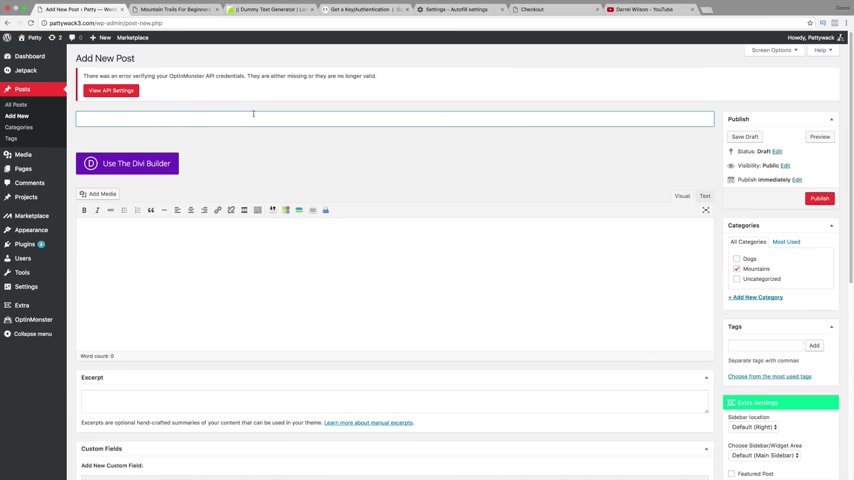
Remember how I said you get 78 or 86 .
Yeah , Divi was included in that .
So you get it for free .
Ok .
So we back to this .
We created a uh post about mountains .
Let's go ahead now and create another premade layout .
So over here in our posts , I'm gonna do something like uh , we're gonna add mounds to this and right here , we're gonna go ahead and put something like um uh the most amazing sunset , sunsets .
All right .
And we're gonna click on , use the Divi Builder .
I'm gonna click on load from library ad from library and I think we use article two .
Let's go .
Now we use article one .
All right .
Now over here under set featured image .
I'm gonna go ahead and click on that and I'm just gonna go ahead and click on um you know , one of these right here , actually , no , I'll just go ahead and upload one of my own .
So I think I did something like this right here .
We'll go and do this one right here .
We haven't done this one yet , right ?
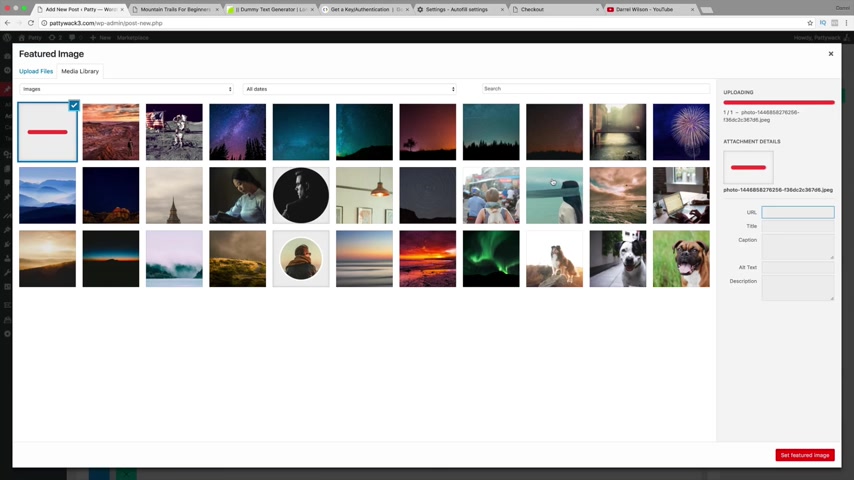
Yeah , we haven't done that one .
The Visual Builder is like a breakthrough of technology .
So like I said , it's um it's a really , really cool piece of technology that you can now use to make websites with and I recommend this one and the diy theme .
They're both like the top two themes from elegant themes .
So I'm gonna click on set , featured image right here and um I'm gonna put , I'm actually not gonna leave it .
I'm just gonna uh leave all these settings uh blank .
And if I want to make changes , I will use the visual builder .
So I'm gonna click on publish .
OK ?
And I'm gonna click on preview changes now .
So there we go .
We have the most amazing sunsets .
We have this right here and we have this right here .
So let's just say I want to actually delete this right here because I already have um a a featured image .
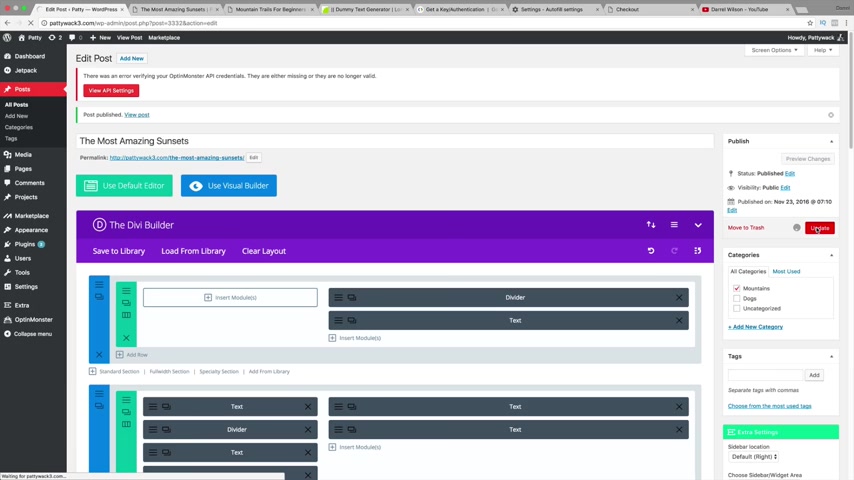
So going back over here , I'm actually just gonna hide the featured image on the post and then same thing right here .
I'm gonna take this and I'm just gonna put in that image and it will , it will replace that image to make it look like it's our new featured image .
OK ?
So we have this one , it's gonna disappear and it's gonna be this new sunset .
Oop just like that .
Save an exit and click on update .
Alrighty .
So I'm gonna click on preview changes and now you guys are gonna see that this image appears over this text and it looks really good and professional .
And if you want to make changes to this , just go ahead and enable the visual builder and you are all set , you can go ahead and make changes to this post .
Now I'm gonna do one more just for control purposes .
So under uh plus post , I'm gonna enter in one more So I'm gonna set the featured image .
Now , I'm gonna see which one we we missed out on .
So we have , I think there's one with like the grass that we missed .
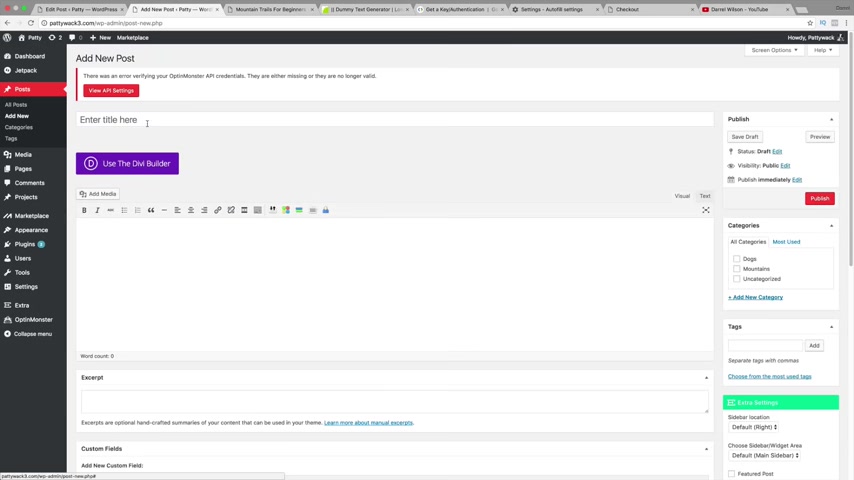
See right here .
We have this one right here .
OK .
So I'm gonna put like the , the beautiful lakes for this post right here .
All right .
So it is updating or uploading .
These are some really cool images and it actually comes with the layouts .
So I'm gonna click this set featured image .
I'm going to hide this on the post .
Now , I'm going to use the Divi Builder , but I'm going to put the best Lakes ever , the best lakes ever .
I'm gonna click on , use the Diy builder load from library add from library and I'm gonna do article three .
Now , now I'm gonna click on mountains because that's the category I want under and over here .
I'm gonna make sure that this one right here is actually set to this right here .
All right .
So saving exits and that's it guys .
I'm just gonna go ahead and publish this now .
That's it .
So just like before we uh we hit the post , we hit the featured post and now we've actually replaced that .
So I'm gonna click on preview changes now and there you go .
So now we have this picture instead , we have the same layouts .
Feel free to go ahead and use the visual builder to make these changes .
Guys .
It's super easy super simple .
And like I said , people can go ahead and you know , talk about the author .
We have our related post down here because we categorize them by mountains .
Remember ?
So now that I've shown you guys the post , let's go ahead and go back to our home page and just have a quick tour of our website .
So like right now , we have our , you know , our dog , we have all , all , all Now , I want to actually change this right here .
So I want these to be under specific categories .
Remember .
So let's go ahead now and change this right here to show specific categories .
And we have our , you know , our blog post right here .
It looks really good , but I want these three sections to only show certain categories .
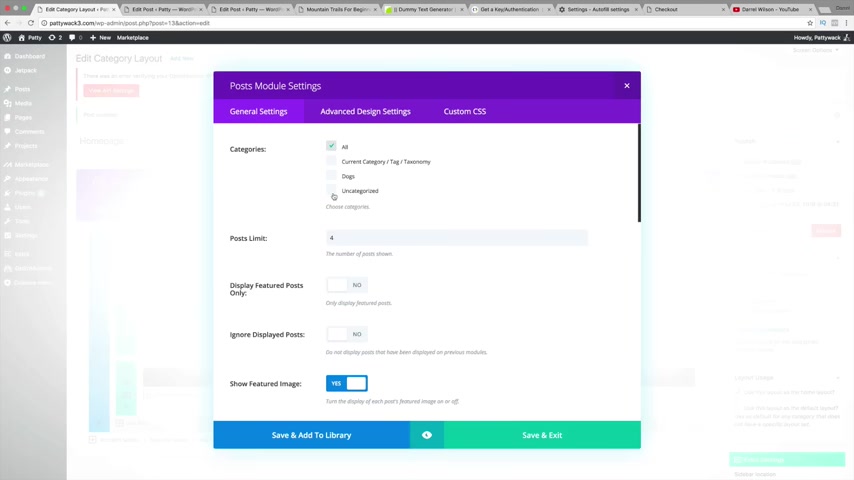
So let's click on edit layout right here now under posts .
So I'm gonna click on posts .
Now , I'm gonna say I want this one to only talk about dogs , save an exit .
Now , really quickly , we need to make sure that these are all checked and click on update .
So this will actually give us the ability to put all the categories on this page .
So right here under posts , I'm gonna go ahead and put unc categorized just like that and click on update .
OK ?
Now , another thing I want to talk about is if you go to this front page and we check these out right here , I wanna show you how to change the color of this specific section right here .
So this is our UNCA our UNC section .
This is our dog section , but maybe you want to actually change the specific color of these bars .
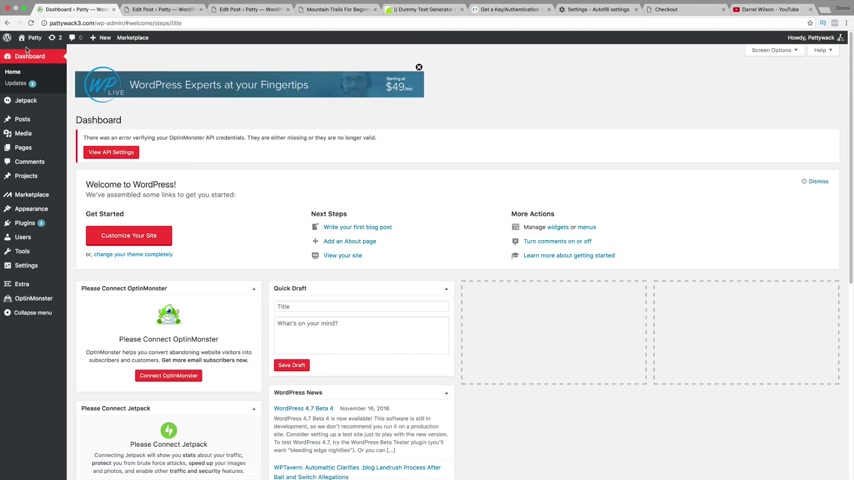
So in order to do that , we're gonna go over here to our dashboard and we're gonna go down to appearance , I think is we need to find our categories .
So it's under our post and go to categories .
So go ahead and click on , you know , dogs .
I'll click on dogs right here .
Now , you see where it says color .
So all you need to do is just go ahead and submit whatever color that you want .
And this will be the new color for your dogs .
So I'll go ahead over here and put maybe this teal color and click on update .
All right now , clicking on categories again for mountains , I'm gonna go ahead and click on edit and maybe leave that to purple , maybe a darker purple .
OK ?
And then for our UNC categorized one , which is just like a , a random one .
I'm gonna go ahead and uh we should probably change this to , you know , I don't like UNC categories .
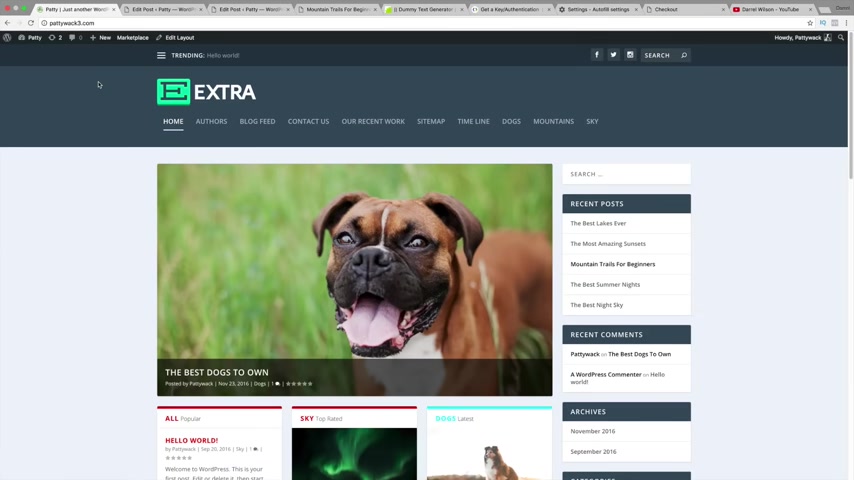
It's just really ugly little puts uh lakes or , or sky and then we'll change this to something like uh uh bread just like that and click on update .
OK ?
So that is basically how you would change the colors for those um specific categories .
So the next thing I want to talk more about is the theme customizer .
So going back to visit sites , we can actually change a lot of these things on our website .
So for example , let's say we want to change this text up here and we want to go ahead and add up some social icons .
Um I'll show you all the theme customized right now .
So over here , just click on theme customizer .
Now , the theme customizer gives us a lot of control about our website and it gives us a lot of features for our website .
So right here we have our general settings , you know , our layouts , so you can have like a box layout .
So , you know , it's kind of box .
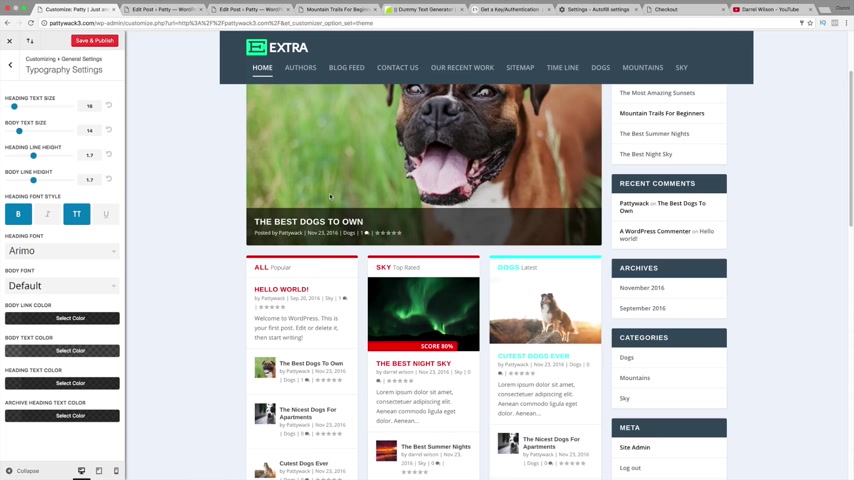
Now , we can have uh a bigger website content so we can make it bigger or we can make it smaller .
I'll leave it as blank .
You can change the ascent color right here .
But um you know , going back , you can , you know , change the sidebar with , you can get as customizable as you would like .
So going back , we have our um our font .
So our heading font , maybe you want to change it as you know , or something like that .
So you can see right here , all the font has changed on our website .
And the reason why I recommend to do it from the theme customizer is because it applies it to the entire website .
So , you know , there really is no reason for you to go through each and every module and change the layout , change the size for every single layout , right ?
Because you're gonna have to do that for every single one .
But if you do it from the theme customizer , it's going to apply it to the entire website , it's gonna make your life a lot easier , right ?
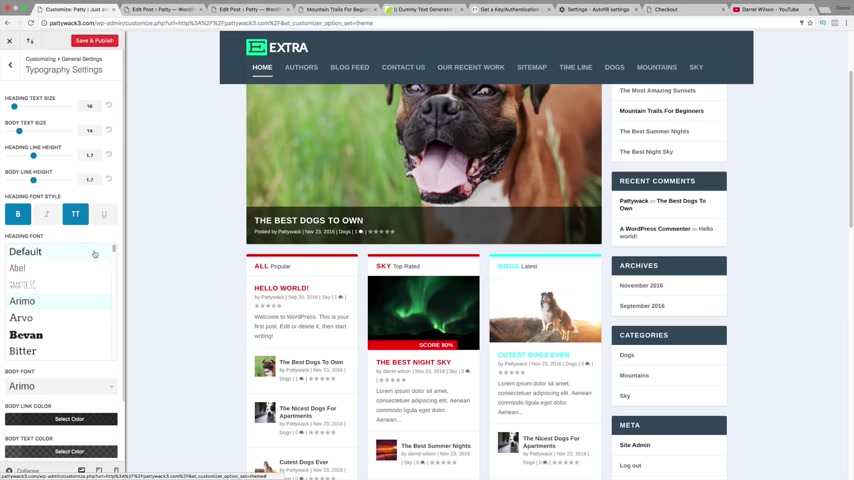
So over here under body fonts , maybe the same uh type as RMO right here and you guys can see the font all changes and they have a lot of fonts guys .
So you guys can actually go through this , check out all their fonts , you know , kinda like that one .
See right here like that's , you can change the body text color , the header text color , all sorts of really cool stuff .
So um you can change the heading text size as well .
You can make it bigger or you can make it smaller but feel free to go through these settings .
They are pretty self explanatory such as your body text .
If you want to make it bigger , maybe you think it's a little bit too small .
You can go ahead and make it super big or you can make it super small .
So I'm gonna click on refresh and I'm gonna save these changes .
All right .
So going back here , we can do background settings .
Now , you can actually set like a uh a box , a color right here .
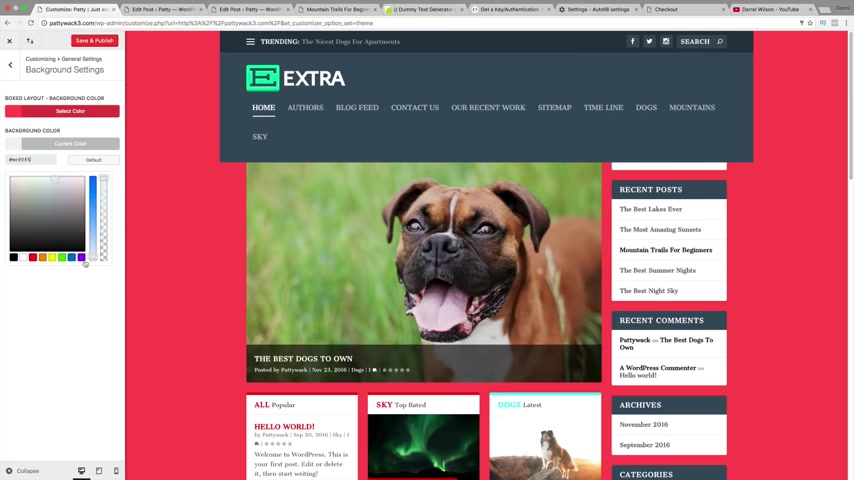
So if it's box , we can go ahead and set the color right there and you can also set a background color as well right here , just like that .
But , you know , I kind of don't like the box layout , so I'm probably gonna go back and change that .
I never like box .
It's like kind of old , you know , it's a really old setting that people use .
So , um , I don't know , probably take that box layout out and click on save and publish .
Now .
Going back over here background settings .
Like I said , you can change the background color to whatever you like .
So that that is basically uh a rundown of some of these settings .
Going back over here , header , navigation , the header .
So do you want your , do you want your , your format centered or do you want to the left or to the right ?
So for example , right now it's to the left , but if you want it centered , you can make it look like that .
Maybe I'll leave it like that for now and click on save and publish .
Going back over here our primary menu bar , we can make this full width or we can actually hide the logo image just like that .

Whatever you would like , we can have the menu height bigger or we can have it smaller the logo height , you can make it bigger or you can make it smaller the tech size , you can make it bigger or smaller .
I'm sure you guys understand a little bit about these Z exams .
So uh the font , same thing , you can change the fonts of this section up here and the text color , the hover over link .
So when somebody hovers over it , what color do you want it to be ?
Also the background color , you can go ahead and change the background color and also the drop down menu line color .
We will talk about the drop down line the , the color uh when we talk about the menu settings .
So basically guys , these are pretty self explanatory .
You guys can kind of have fun um going and customizing some of these um some of these settings , but for now , I'm gonna leave it as default and click on save and publish .
All right .
So going back and we have our secondary menu bar .
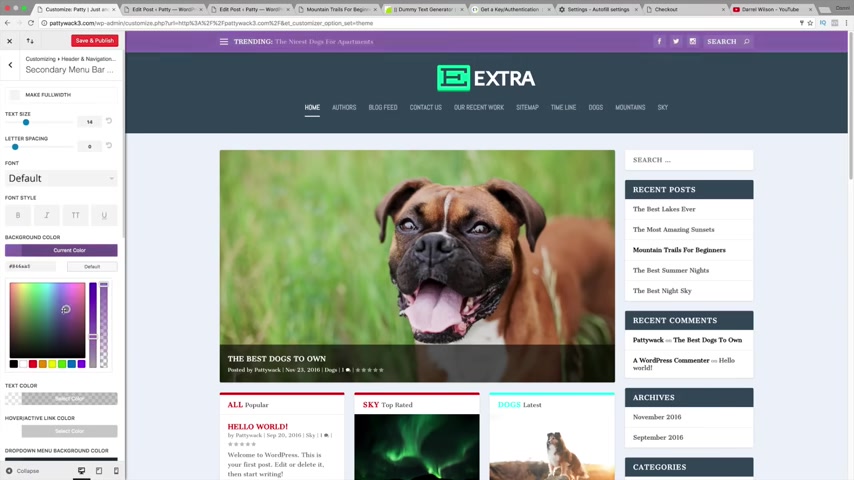
So if you have a secondary menu bar , you can go ahead and change the color right here .
So up there , you're gonna see that this changes colors .
Um So this whole section is the same exact section before except it's only applying to this top section up here .
OK ?
So going back over here , we have our fixed navigation .
So when somebody scrolls down , what do you want it to look like ?
So the menu height , let's say , for example , you want it to stay the same .
So I think it's around like 100 and 30 to see if someone scrolls down .
Yeah , see how the menu kind of stays the same .
So this right here is only referring to when you scroll down and the menu can do whatever you would want to do it .
So for example , let's change the background color .
So up here , it's gray .
If I scroll down , it turns blue , you see that .
So the fixed navigation is when you scroll down through the page .
OK ?
So I'm gonna go ahead and leave all these as defaults and go back and the header elements .
So we want to show the social icons up here .

We want to show the search bar and we kind of want to show the trending bar , you know , I kind of like it , it looks good , right ?
So let's go ahead and leave that up there and I'm gonna go back and go back again .
I think that was all the options right here for the header navigation .
Next we have our footer setting , but we will talk more about widgets and the sidebar , the widgets like the Facebook , all that stuff uh during the end of the tutorial .
OK ?
So I'm gonna go back over here .
If you've added buttons , you can change buttons , but most of us do not have buttons on this .
So going back over here social media networks .
So this is where you're gonna enter those in .
So all you need to do is enter in your , your URL .
So right here , you're gonna see that the Google plus comes up , Pinterest go and enter your URL .
So for example , like it's www dot whatever dot com , this is where you're gonna enter all that information in .
So for now , I'm gonna go ahead and enter some of these right here .
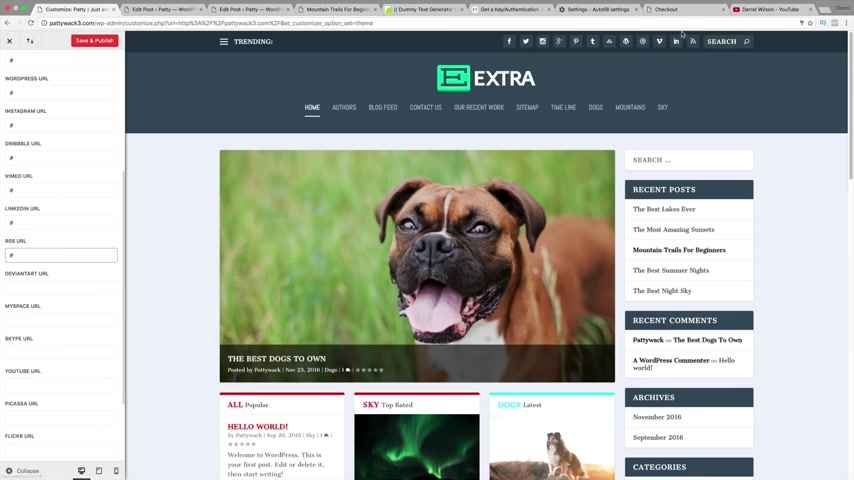
Just , you know , give our website like a little bit more decor and a little bit more , you know , social icons , everybody loves social icons , they just look , they just look like you're interacting with the audience , right ?
So click on save and publish .
Go ahead and go to back site identity .
So go ahead and give your site title .
So Patti Whack the best blog for dogs .
OK ?
And right here on our site icon , this site icon means you see on the top , right , right here , how there's that little symbol that is what the site icon is .
So go ahead and click on select image and just go ahead and you know , uh get an image that represents your websites and uh you guys can see right here how it says Patty and there's a picture of this icon right here .
So this is referring to that specific section of the website .
OK ?
So I'm gonna do crop image , skip cropping or it was cropping .
It was .
So anyways , you see how it appears right up there .

So now it is up there .
So instead of having that ugly hosts gator symbol , you're gonna have your own special icon .
So going back over here , you can actually have a background image .
So let's just say you don't want a background color .
Let's just say you want a full background image instead .
So click on select image and just go ahead and select an image and there you go , we're gonna see this background all be taken over by this image right here .
So if you want to have that effect , you are more than welcome to .
I'm sure there's a lot of other websites where you can get some really cool background images .
But for now , I'm just gonna go ahead and remove this background image and I don't want it on this website .
So going back and uh menus we will talk about next , we will talk more about widgets prosthetic front page .
Um I'm just gonna go ahead and leave it as the extra category layout and um you know , that's basically it , I'm probably just gonna leave it standard .
Uh I don't really see a reason to change it to home page .
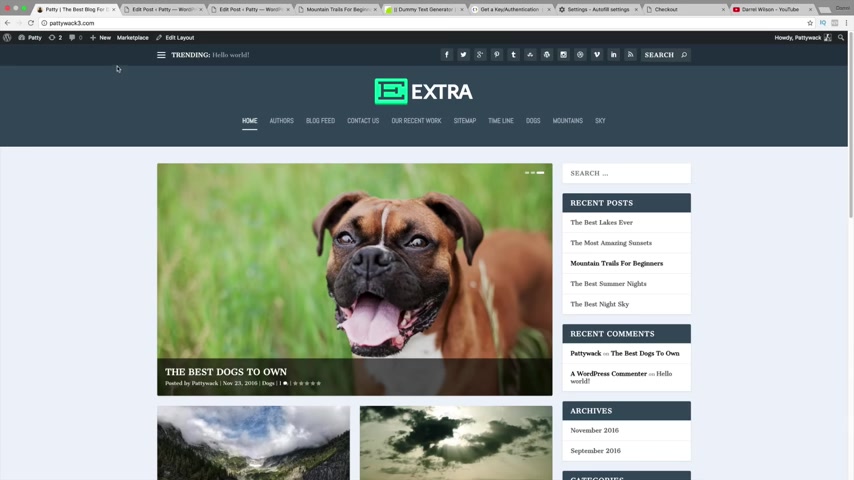
So I'm just gonna click on save and publish now and that is it for that section guys .
So that is a quick rundown of the uh the theme customizer .
It's really simple .
Now , let's go ahead and create that really cool looking menu that we saw earlier before we create the menu , we actually need to create the category layouts for each category .
So it's really simple .
Now , this is a very important part of the tutorial .
So please uh make sure you pay attention during these parts .
So over here under my dashboard , we're gonna go down to extra and we're gonna go down to category builder , ok ?
So now we have our home page , but we need to create a layout for each specific category .
So over here under a new , I'm gonna go type in dogs and I'm gonna select dogs right here because we are on the dog's category .

Now , I'm actually just gonna go ahead and click on insert column , put in this one right here , insert module and maybe just , you know , add in the um the post slider right here and select dogs .
OK ?
So we're basically building a page for each category .
OK ?
So I'm gonna answer another module and I'm gonna do the blog feed standard and I'm gonna put in dogs , OK ?
So I'm gonna go ahead and , and to save in exits and I'm gonna click on publish .
So just to make sure that you fully understand when somebody clicks on the category of dogs , this is going to show up , OK ?
That is why categories are super important .
Now , let's create one for mountains and sky .
So add new , we're gonna do mountains and right here , I'm gonna select mountains , insert column .
I'm just gonna do the same thing .
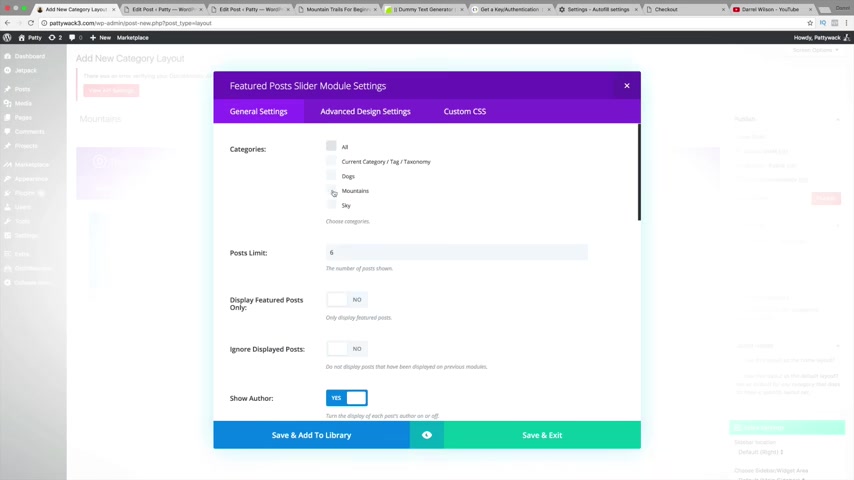
I kind of want them all to look a little bit , you know the same .
So the post slider of only mountains save and exit and I'm gonna add another module below that where I'm gonna add the blog feed and I'm gonna add a different style to mountains right there .
So remember this is only for mountains , OK ?
Click on publish and we're gonna make the last one for sky .
OK ?
So add new sky , you guys will understand a little bit more .
Once we um once we create the menu , you'll , you'll probably understand a little bit more .
So uh insert column , I'm gonna put this one right here , insert module , the post slider , sky save and exit , and then insert module , blog feed , sky save and exit done .
Make sure that is highlighted under the categories for sky and click on publish .
OK ?
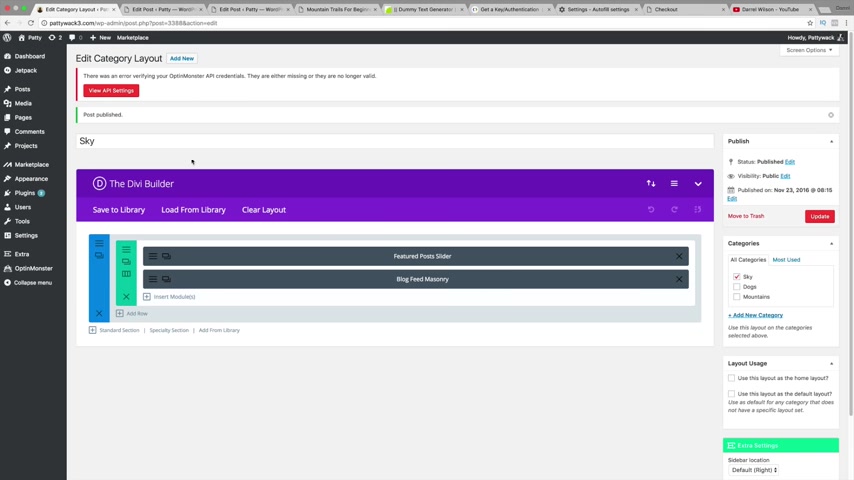
So now let's go ahead and create the menu .
OK ?
So now if they click on sky or mountain or whatever , they're going to see these specific categories come up and that's , you can design the page however you want it .
But um I'm designing it just like this for just the toll purposes , you know , just to make it easy .
So now let's go ahead and go to appearance and go to menus .
All right , and go ahead and just create a menu .
So I like to call it menu one and I'm gonna create the menu .
Now , I'm gonna do uh go to view all and let's just add in the home , the authors , the blog feed to contact us and add that to the menu .
Now , under categories , I'm gonna enter in sky dogs and mountains and add those to the menu as well .
Now I'm gonna drag these two , however , I want them to look .
So something looks like this and like this .
And let's say you want to create a dropdown menu .
All you need to do is go ahead and take this and just simply drag it under it .
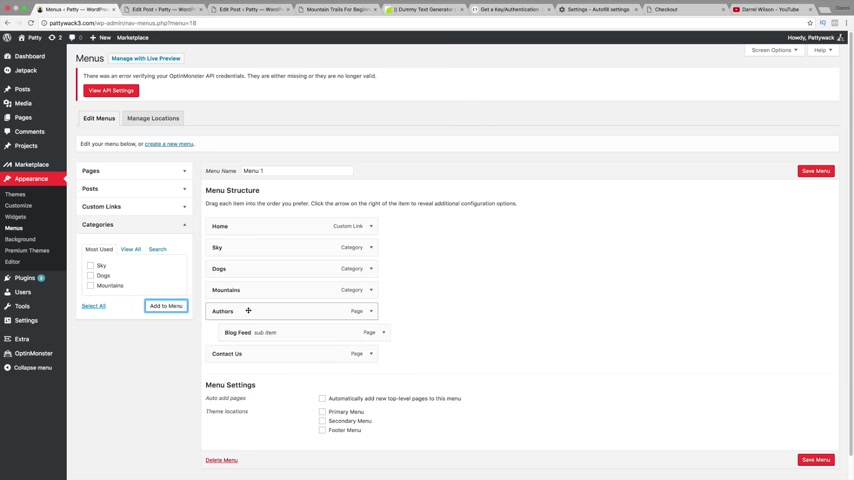
Now , this right here is a sub item for authors .
So maybe you want to do like a blog feed and then you can add all your categories below that .
That's another , you know , way you can design your website .
But I'm gonna click on primary menu and click on save menu now and our menu is going to drastically change .
So I'm gonna go to visit site .
So now we have our menu right here .
So we have Home Sky Dogs , mountains and authors with the drop down menu .
Now , I bet you're wondering , you know , why didn't the um why didn't this other part ?
You know , those , those really cool features show up .
So let me show you how to do that over here under menus .
I'm gonna click on this right here and I'm going to go to the mega menu three featured and right here , the same thing mega menu three .
And you can also do this category right here as the mega menu two menu featured and recent list and click on save menu .
Now that only works for the categories .
OK ?
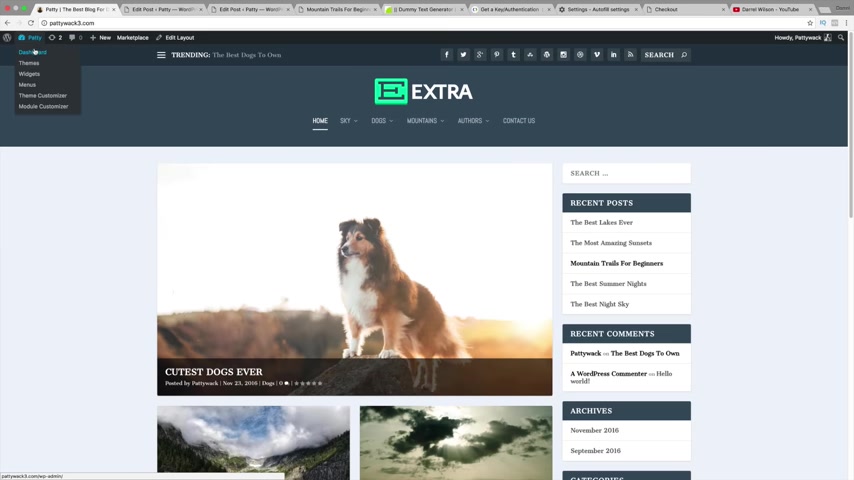
So now let's go ahead and go back over here .
All right .
So if I scroll over it , you guys are gonna see that .
Um We have that really cool looking effect .
Now , this little blank stuff right here , this happens when you have a blog post that is not set with a featured image .
All right .
So I'm kind of good that happened .
So , um in order to get rid of that , I'm gonna go to my dashboard and I'm just gonna go view all posts .
Now , when you first start wordpress , it gives you this dummy thing right here .
Hello World , just go ahead and trash it and we can go and visit the sites .
And now we have this beautiful looking uh drop down menu right here that looks really professional and elegant .
And if we click on this sky right here , we're gonna see that we have the sky slider and then we have the blog post below that because that is how we designed it in the category builder , you remember ?
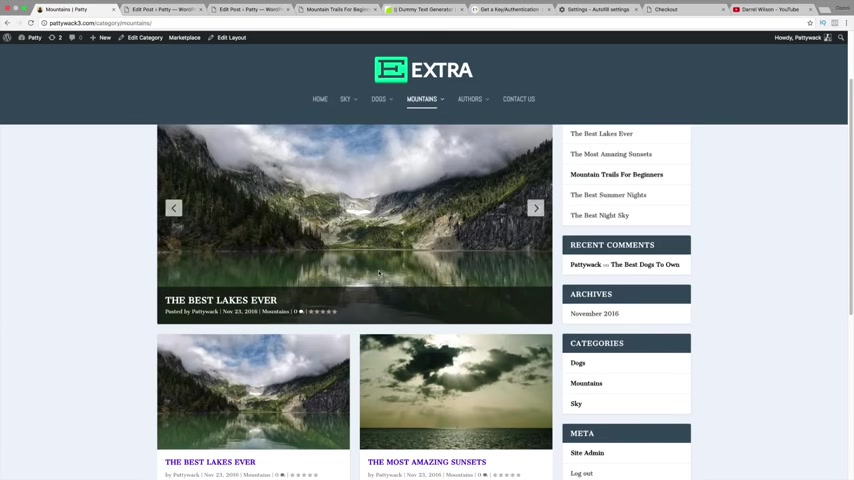
So dogs , same thing I have the slider and I just have the regular cell below that and mountains , same exact thing .
We added the slider and we added the images below that .
Now , we need to actually fix our home page .
So we need to make sure that we have the correct layout for the home page .
So all you need to do is going over to edit layout and now this is for our specific home page .
So use this layout as the home layout .
Yes .
Now this other feature is use this layout as the default layout .
So that basically says whenever there's not something categorized , it's just gonna automatically put this wherever it is .
All right .
So I'm gonna go ahead and change this right here .
I'm going to drag this right here , delete this and I want to add in those three bars that we had earlier .
So these three right here , I'm gonna click on this , the posts .
Now , I want this one to be dogs and then this one right here .
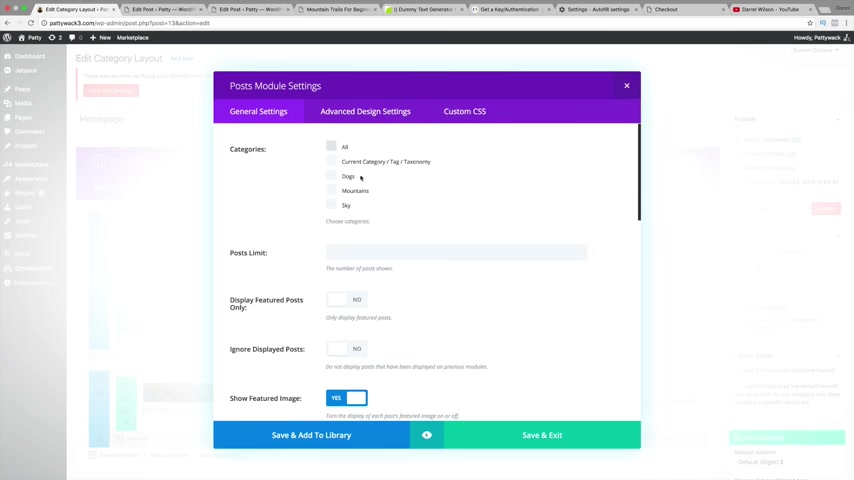
I want to add a post and I want this to be mountains .
This one right here .
We're going to add posts and we're gonna enter it as sky just like that .
Now , I want to go ahead and maybe duplicate this row and drag this one in the middle right here and then I'll go ahead and delete this row .
I don't need it no more .
That's it .
All right .
So I'm gonna click on update right now .
Now , when you do the home page guys , make sure that actually none of these categories are selected .
I made the mistake of selecting that earlier .
So my website did get a little scrambled .
Um So basically when you do the home page , make sure not to select these specific categories .
OK ?
So going back over here , let's go ahead and have a cool test run of our website to make sure all of our categories are set and ready to go .
So this looks really good .
Our categories are right here .
Sky mountains and we have dogs below that .
We have our posts right here , looks pretty good .
Now , going back to sky , same thing .
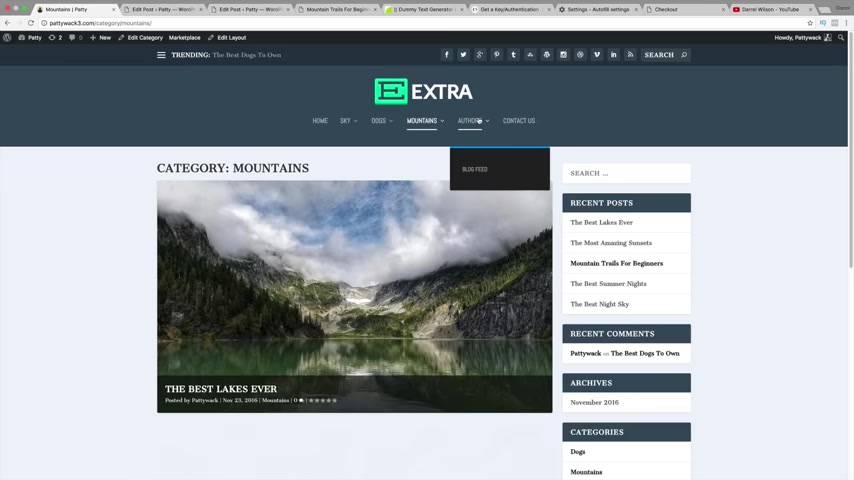
We have our sky builder right here .
Our sky , our category layouts , our dogs , our mountains and we have our authors just like that .
And we have our authors and we have two , remember , we made two authors and our blog feed , which will distribute all the blog posts right here .
And people can go to like page two , et cetera and check out all of these blog pages and also our contact us section right here .
So that is how you guys use the category builder .
Uh It's a little confusing in the beginning , even for me when I first started extra , I was kind of like , I don't get it , you know , but it just takes time to learn it .
And once you're there , it is simple and very easy to use the category builder .
Now , the next thing I want to talk about is the widgets and the logos .
And I'll also show you how you can add a sense onto your website as well , so we can start generating some ad revenue .
All right .
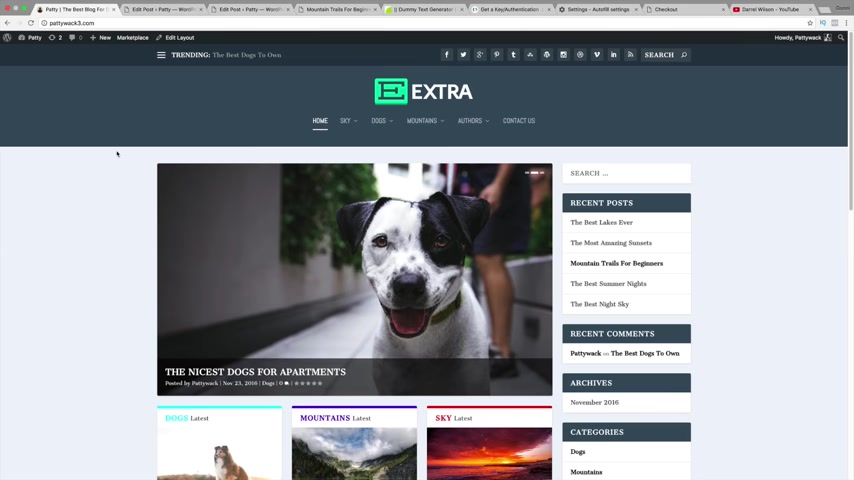
So the first thing I want to do is show you guys how to get a logo .
Now , there is a website where people will design a beautiful logo for you for just $5 .
Now , it's in the description , it's called fiver dot com .
Now , if we just go over here , I'm gonna close some of these tabs right here .
I have quite a bit of tabs open .
I tend to do that all the time when I'm doing these tutorials .
I'm gonna go do fiver dot com .
The link is also in the description if you guys do purchase a logo , I think I received like a , a very small commission for this .
But for example , I was looking for business cards .
These guys will make some really nice business cards for just $5 but we're gonna type in logo and these guys really do make some nice logos for just $5 .
So right here , I'm gonna click on this one right here and you can see some of the uh uh the logos that they have made for just $5 .
I recommend using this website to get your logo because your logo is very , very important .
So I actually got my logo from fiber dot com .
So I've personally used them .
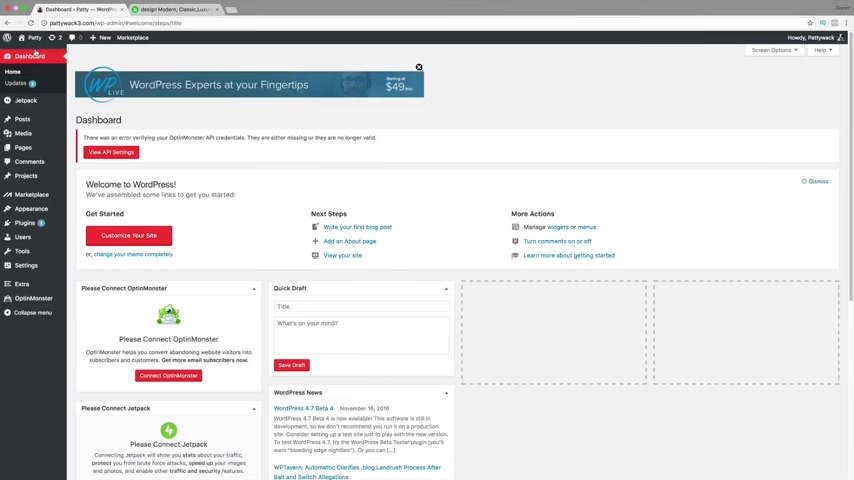
Uh they're pretty good , just go on through some of these right here and you know , pick a logo , uh whatever one you know , you want , you can contact the seller , you know , the basic is $5 .
They do have like , you know , their extra high res for a little bit more .
But um I would just , you know , pay $5 and you know , get your fee , we see what happens .
So uh once you get your logo , we're gonna actually go to our dashboard right here and we're going to upload it in the theme customizer .
So , extra theme options now , right here where it says logo , this is where you're going to enter your logo in .
So right here under upload , you click on upload and then simply just take your logo .
I believe the correct dimensions are around like 300 by 80 something like that .
But I'm just gonna go ahead and just use one of these uh standard ones just for control purposes and click on select .
OK ?
Now , also let's talk about some of these other uh features they have right here .
So the global color is basically like the global color that your website gives .
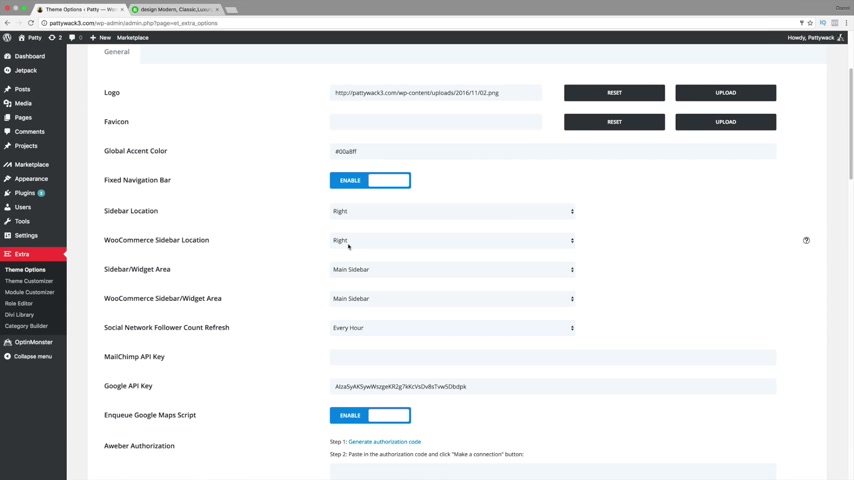
So if you want to change this , this is where you would do it right here uh for Woocommerce .
Now , if you want to create an e-commerce website with the extra theme , you can do that .
However , I have another tutorial on the Ecommerce website .
So um you guys can go ahead to my channel and check that out .
I use the same uh I use divi theme .
So it's relatively the same as extra .
So you should have no problem learning about the shot module also right here .
You know , you can have the social network , uh the account , refresh , et cetera , the mail chip , uh API key , you guys will need that when we do the Bloom plug in uh the Google API key .
Uh If you guys use a weber for your , um you know , your uh your mail uh campaigns , this is where you'd enter in your information .
We can have our social media icon show .
So right here , I've enabled most of them .
You can go ahead and , you know , disable them .
If you would , like , if you don't want all of them , you can disable like the dribble icon , et cetera .
This is also where you would enter in all of your uh URL S .
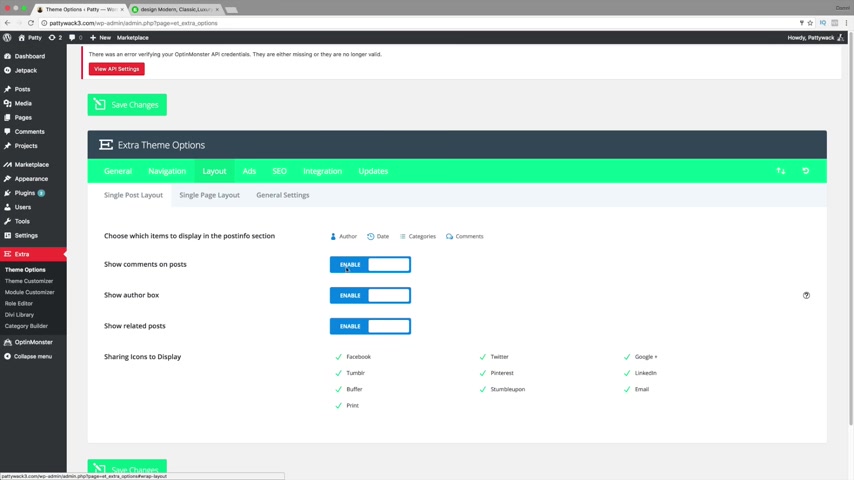
So the number of posts displayed on the category page , you know , I'm sort of against some of these options because I rather do these on the theme customizer , like on the page set up within the back editor because some of them can contradict each other .
Ok ?
Now , smooth scrolling , we can go ahead and enable that .
Now , I'm just gonna click on save changes right here .
All right .
And they also have other things like for navigation .
These are a little bit more advanced , you know , uh exclude pages from the navigation bar .
Uh We have layouts , you know , you can basically uh show uh comments on the post show the author box .
You can disable that um under ads , you know , I wouldn't recommend using this section because we can actually implement it on ourselves with the widgets , which we will talk about in the next section .
So I really don't recommend even using this section uh for SEO purposes .
Um I would go ahead and just leave all of these um uh enabled .
Uh This is basically making sure your website gets optimized .
Everything , you know , goes good , but accordingly , you know , you're posting everything , everything is basically already .
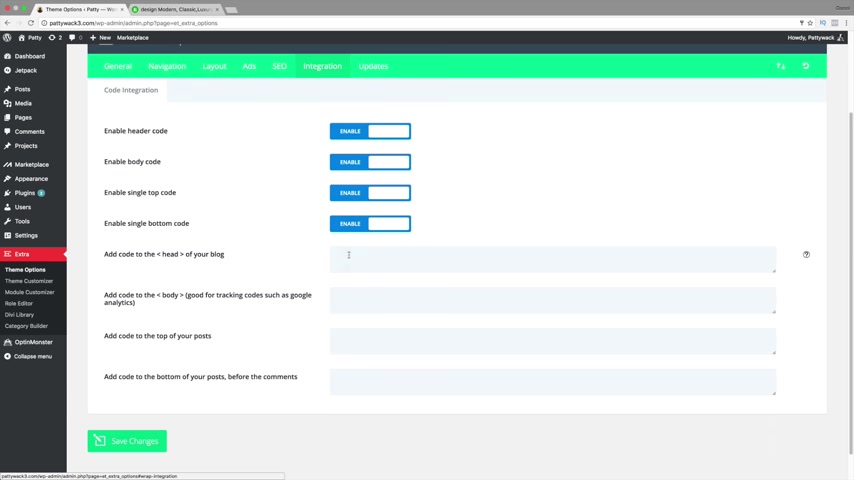
So I wouldn't worry too much about the SEO section .
This is a little bit more for advanced section if you guys want to learn more about SEO , I do have a separate tutorial on that .
Uh For integration , this is where uh if you had custom CS S codes from elegant themes .
This is where you would enter some of it in , but for most of you , you probably won't be using custom CS S .
So uh skipping this section updates , this is where you enter your user name and your API key in order to get your theme updated .
So I'm gonna go to save changes .
Now , let's go ahead and go back to our website and take a look at our logo .
So there it is , we have our logo .
Of course , that's just for toll purposes , you know , it's not really what it looks like .
So now let's go ahead and talk more about the um the widgets , the widgets on the side right here , how we can have like all those really cool widgets and everything else on our right side bar .
And then we will also talk more about creating a footer .
So over here we're gonna go down to widgets right here .
All right .
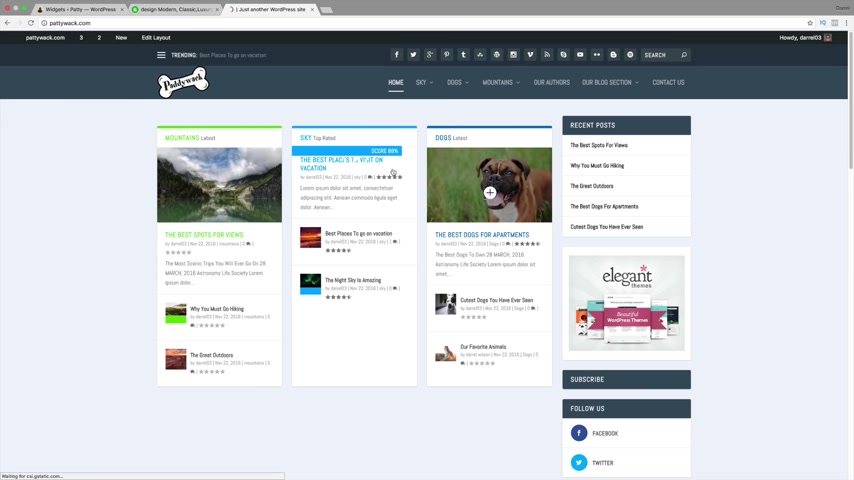
So what is a widget ?
Now ?
I'm gonna go back to patty dot com and show you all what the widgets actually are and how you can better understand it .
All right .
So my site is loading the reason why my site is loading a little bit slowly because I'm actually using super high res images .
So right here , we have our recent post right here .
So over here , let's first delete all of these right here .
I'm gonna go ahead and just delete all of these even to delete the recent posts .
I know I'm gonna post it again , but I'm just doing this for total purposes because I want you all to understand , you know how to really use the widgets .
I'm gonna delete all of these right here .
OK ?
So extra recent comments , I'm gonna go ahead and drag that over there .
Now , if you want to give this a name , you can say like uh our recent comments and click on save .

Now , I'm gonna actually open up a second website of ours , some patty work three dot com and I'm just gonna drag it over here to show you guys the changes live .
So right here our recent comments .
So if somebody has recently uh commented , it's going to show up right here , we can have authors .
So right here , I'm gonna put authors click on save now .
Um Over here , we can put our ads , but I actually like to do it a different way , but I'll show you the extra ads anyways .
So um really quickly about the extra ads , let's say you're an affiliate for somebody .
Like for example , I am an affiliate for elegant themes .
OK ?
I basically bring them customers .
They give me a commission now you can do this with thousands of different companies like Best Buy , Sephora , whoever you want .
So right here , we're gonna put our partners the image URL .
So what image do you want to show there ?
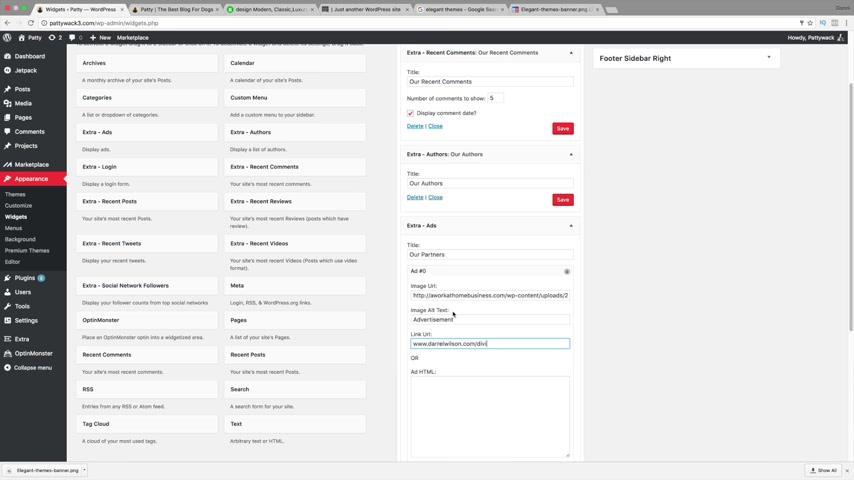
Well , I'm gonna go ahead and go to Google right now and just type in elegant themes and go to images and I'm just gonna go ahead and download one of these .
So this one right here , I'm gonna go ahead and download it and I'm gonna put this to my desktop right here and save it .
OK ?
So going back over here , I want to actually add in this image URL .
You know , in fact , I didn't even need to do that .
This theme actually allows just to copy and paste the link .
So I just need to paste the link right here .
And then the link URL is gonna be my affiliate link just like that .
So now if somebody clicks on this image right here , it's gonna take them to elegant themes and then from there , if they purchase it , I will receive a commission .
So now let's go ahead and go back really quick .
Let's go ahead and refresh this page .
So we added in our authors and we actually added in uh our picture right here .
So we have our authors right here .
It shows them the post they've made and our partners .
Now , if I click on this , that's an affiliate link .
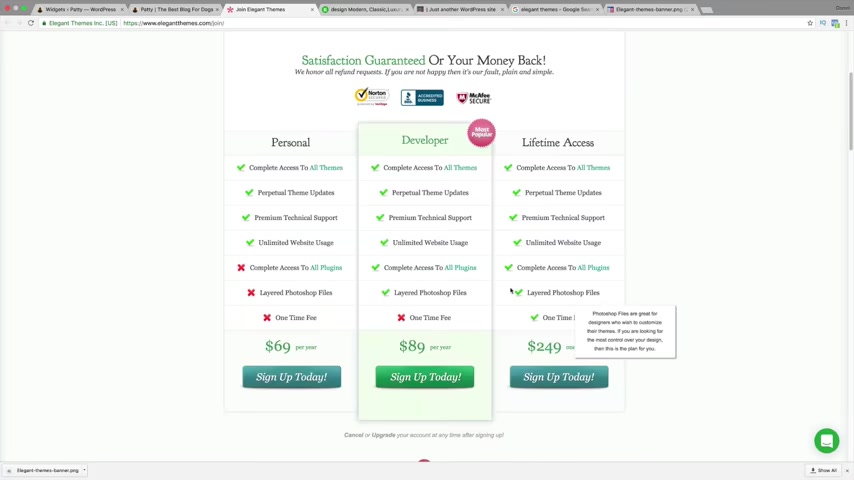
So now if somebody purchases this right here , I will receive a commission .
So if you're an affiliate for somebody that is how you would basically uh generate commissions with the um the extra ads .
OK ?
So next we have uh recent videos .
So if you do upload videos onto your website , this is where um it would show .
So I think I only have one video .
So if I put this over here , I think I only have one .
Let's see if I , if I saved it or not , let's go ahead and save it .
I think I uploaded one video on here .
So refreshing the page again .
Now you're gonna see that my videos right here do appear right here .
So you see where it says videos and right here we have the picture of the video I posted about youtube .
OK ?
So going back and guys , it's really simple , you know , you just get creative .
All you need to do is just go ahead and just drag in the ones that you would want .
Um It's really simple , you know , recent posts , uh recent reviews , et cetera .
Now there is one that is a little bit more complicated .
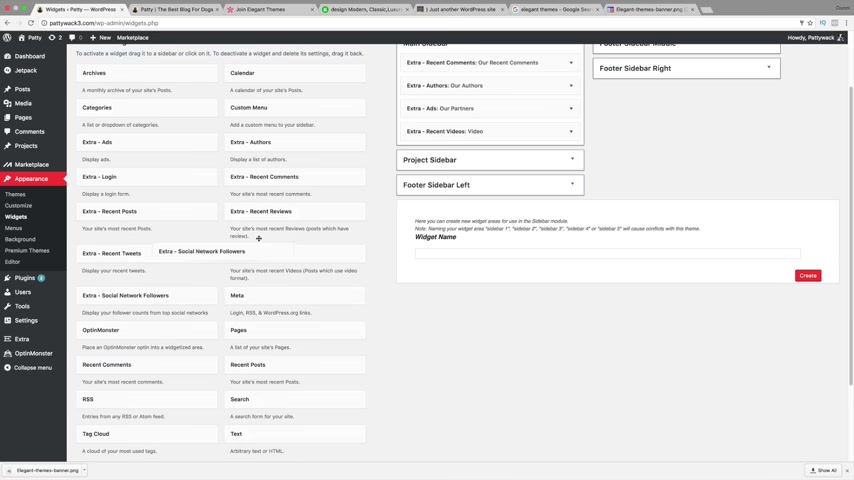
That is the social networks following .
So I'm gonna do this one and then I'm gonna do the Facebook like box and then I'll do the Instagram feed .
Ok .
Well , yeah , I'll do these , I'll do these both just , just to teach you how to do it .
I personally think the social network followers is a little too complicated because you have to go get your Facebook , URL , your app ID , your secret ID .
But you can basically just , you know , add in different ways that make it easier .
But for tutorial purposes , I am gonna show you everything just to not leave anything out because I hate when I visit tutorials and they're just like , yeah , it's simple .
Yeah , go ahead and do it and they leave .
You're like , uh how do you do that ?
You know ?
So let's go ahead and get a Facebook app ID .
So the first thing you want to do is going over to Google and Facebook is probably the hardest one .
Twitter is really easy to get your Facebook app ID .
So right here , we're gonna do Facebook app ID and you're gonna click on developers dot facebook dot com dash apps .
Now , I already have some apps right here .
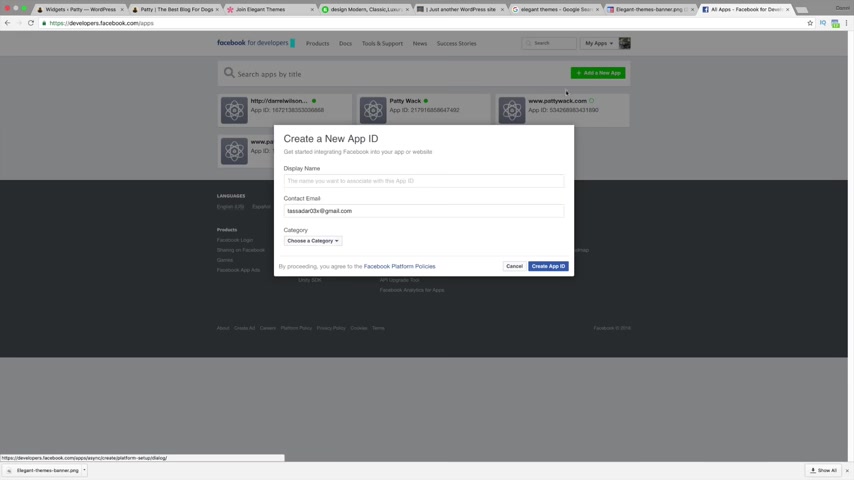
Now , I'm just gonna click on add a new app and then display the name you want with this .
I'm just gonna put um you know , uh the Patty Whack and click on create the app ID Oh , I'm sorry , choose a category .
So I'm just gonna say it's for , uh , education , create the app ID .
Now they give you these really bizarre boxes and these are super annoying but we have to enter them anyways .
So I , I went to click on submits and now it's all gray out and it's because it's actually generating the , uh , the app ID for us .
Ok .
So this is our dashboard for our , uh , our app ID .
And um you know , I know it is a little confusing but this is the app ID that we need right here .
So we're gonna go ahead and take this right here .
Going over back to um this right here .
Go ahead and paste that in now for our app secrets .
Click on show you will need to enter in your password again for your Facebook because they take this really serious .
And then this right here is our app secret .
Now , I'm gonna go over here , put in the app secret just like that .
Now , you will need to enter in URL .
So I have AAA fan page for my website , but you can enter in whatever URL but just make sure it's not privates because if it is privates , then they click on it .
It's probably not gonna show right now .
The last thing we need to do is make this live .
So I believe we had to do that by going to the um the advanced settings right here .
And , you know , I've totally forgot how to do this .
I've done it so many times , but it's just like I freeze up , done this tutor .
I'm like , oh , I forgot how to do it .
So , going back over here and see if I can do this really quick , I go ahead and go to CL apps .
So this one right here , we have our dashboard .
We need to make this one live really quick .
OK ?
So we're gonna go to settings .
I think it's roles or basic advanced .
I thought it was under advanced .
It's probably not there .
Uh under rules alerts the app review .
OK ?
So there it is the app review .
So we need to actually click on that to make it .
Yes and click on confirm .
So sorry guys , you know , I , I don't use the apps a lot for Facebook .
Yeah , I , I really don't because all of the times I just use the Facebook like box now we've made Patty W public .
So let's go ahead now and drag our um I'm gonna go to my Facebook fan page and just go ahead and insert that information in .
All right .
So this is my URL right here .
I'm going to copy this and I'm gonna go ahead and paste this in and this right here .
I'm gonna paste it , but I'm actually just gonna go ahead and take this specific section and backspace it and we're going to just use it like that all Right .
And I'm gonna click on authorize .
Now .
Sometimes you might get a lot of errors .
I got a lot of errors .
Sometimes when I was doing it just like that , just go ahead and just close it and we're gonna go back to our main website right here .
Ok .
And if we scroll down there , it is .
So our Facebook right there and if we click on it , I'm gonna hold shift really quick .
It's just going to open up our Facebook fan page .
Now , I kind of don't like doing that .
It is a little bit confusing even for me because like I said , I don't really use the app too much .
I rather just use another plug-in , but I'm just showing you how to do that for toll purposes .
Now , let's go ahead and add in the Twitter one .
Now , the Twitter one is a lot easier to do .
So going over here to our dashboard .
I'm sorry to our widgets .
So we added in the , the , the Facebook one .
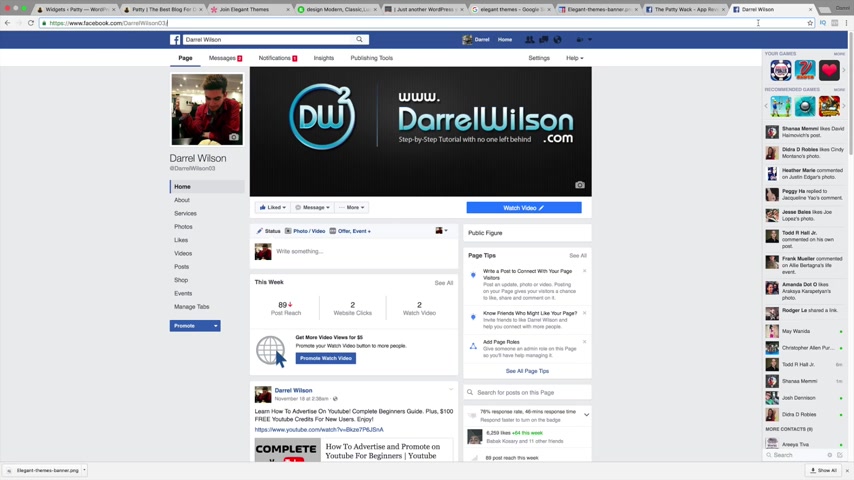
Now we're gonna scroll down here too .
And also you guys can read these , um , these uh little guides and they tell you how to get the uh the ID from each and every one .
But we're gonna do Twitter because Twitter I know is a little bit more popular .
So we need to go ahead and get the URL , the consumer key , Consumer Secrets , access token and the access token secret .
So I'm going over here you know , I better log off Facebook before my friends message me .
That happens quite a bit .
Ok ?
So Twitter api key .
Now you'll need to have a Twitter account obviously before we do this .
So I'm gonna go ahead and sign in .
I think that's it .
Let me see here .
Ok ?
I totally forgot my password .
I'm gonna pause here really quick to get my password guys .
All right guys .
So I remember my password .
Now , I'm gonna click on create a new app and I'm just gonna go ahead and give it some name .
So the Patty Whack and then right here , I'm gonna go ahead and put um the Petty blog right here .
I'm gonna go ahead and put AC TP Patty Whack three dot com .
And then I'm going to leave that blank .
Now I'm going to put Yes and then create your Twitter application .
All right , cool .
So , uh this is basically where we get all that information .
Now , all we need to do is go over here to keys and tokens .
OK ?
So this is our consumer API key .
Just go ahead and copy this and right here we have our consumer , our consumer token , just go ahead and put that paste it .
I'm gonna drag this over here .
So this is our consumer key .
I think I put that in the wrong one .
Yeah .
Consumer key .
Sorry guys .
That one goes up here just gotta kind of match them , you know , just kind of put them where they belong .
And then up here we have our consumer secrets .
So this is the consumer secret one and then put that right there .
Now the access token , so we will need to actually create an access token .
So just click on , create my access token .
And then right here we have our access token .
Yeah , I'd rather just use like the Facebook like Box and Twitter because this is kind of like a lot , you know , but uh you know , this is what it takes , you know .
So , uh right here we have the access token and then I'm gonna copy this and then I'm gonna go ahead and paste that in there just like that .
And I'm gonna go ahead and give my URL right here .
So you need to just go ahead and get your Twitter URL and mine is going to be , I think it's this right here .
Copy that and just paste it in there just like that .
Ok ?
And I'm gonna click on um authorized and we'll click on save actually , just save because that's for the other one right here .
So click on save and now that I've done that , we can go back over here to our website and I'm going to refresh this page .
All right , and there you go .
So now we have the little Twitter Box there .
It's authenticated .
Everything is good to go .
Now , let's go ahead and introduce you to some uh plugins .
Like the Facebook , like box , the Instagram box and also the Google ad sense .
So over here , we're gonna go back over here and under widgets , just go ahead and click on widgets .
Now , we're actually gonna use the arbitrary text right here .
We're gonna use this right here , but we actually need to get the plug in first .
So over here in our plugins , we're gonna go to add new .
Now guys , a quick synopsis of plugins , they're like apps for the iphone .
That's it .
That's all they are .
It's just added features for your wordpress website .

So I'm gonna do Facebook like box and I recommend using this one right here .
This one right here works pretty well for me .
So I'm gonna click on install now and activate it .
All right .
And also I'm going to go to plugins , add new up here and I'm going to install the Instagram one .
So Instagram .
All right .
So Instagram , I'm gonna click on install now and activate it .
Alrighty .
So the first thing I want to do is going over to our um plugins .
I'm sorry , we need to go to our widgets .
So appearance and go to widgets .
Now we're gonna scroll down if you notice right here .
We have our Instagram widgets and we also have the widget Facebook like box .
So simply just drag this way up here and go to give it a title .
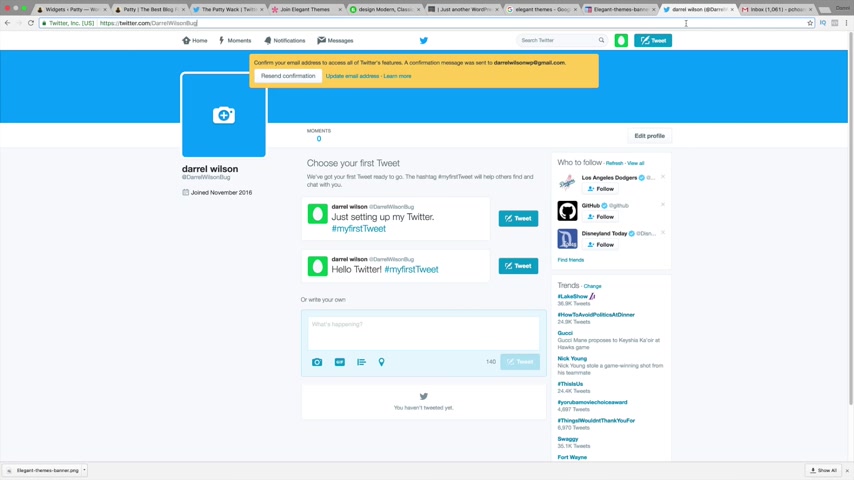
So follow us or um what is it like like us now page ID .
So all you need to do is go over to your fan page of Facebook and simply just take the URL for your fan page .
Now , I recommend using the fan page because if it's private guys , it's probably just gonna give them a private message error .
So this is my fan page right here .
Now , I'm gonna go ahead quickly and close all of these because we are done using all of these .
Alrighty .
And I'm going to put this page ID right here and paste it in there .
Now for the width I recommend doing around 300 I think 300 is the correct size for that specific section .
So I'm gonna click on save .
Now , I'm gonna open up Patty whack three again and now the widget should be there .
So scrolling down here and there we go .
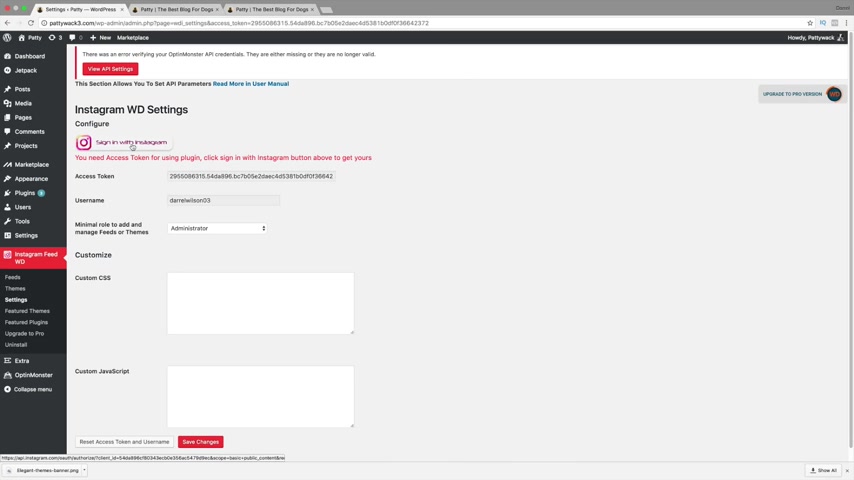
So we have our like us , you guys can see we can talk about it , we can do whatever we like .
So now let's go ahead and do the Instagram one .
So taking Instagram , we're gonna go ahead and drag it down .
Now , we actually need to use the settings first .
So let's go ahead and save this .
Now , this right here is a new feature .
So we need to click on this and we need to first authenticate our Instagram .
So right here , we can do sign in with Instagram and it already worked because I was already logged in all .
You need to do is get your access token and your user name and just click on save changes .
All right .
So now let's go back to our appearance and go to widgets and our Instagram feed .
You guys can see that I can actually use the feed .
I'm sorry .
We need to actually um uh use the settings .
We need to actually uh create one .
So go back to your Instagram and go to add new and just do like you can , you can have the thumbnails .
Now , these ones right here are only available in the pro version , but I like the thumbnails anyways .
So I'm gonna click on um apply .
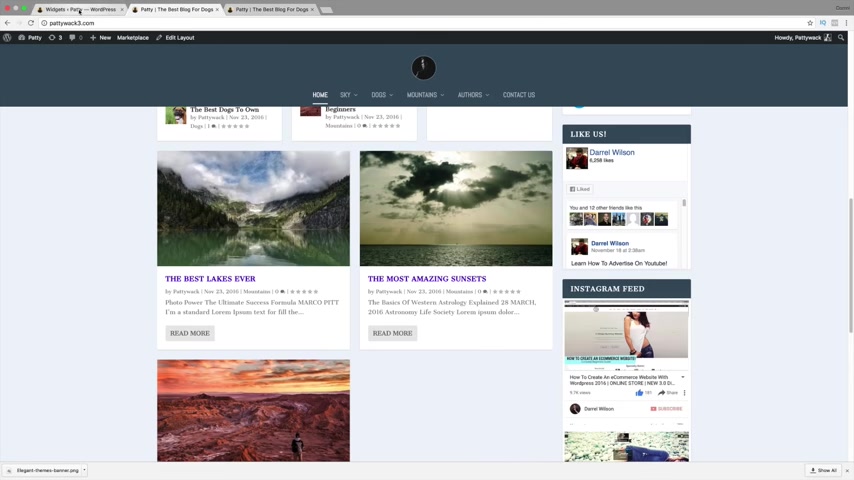
I think we also need to click on save .
Just yeah , save is always good , right ?
So we have our sample feed right here .
So we can actually just go ahead and go back to our widgets and simply just add that in appearance and widgets .
Now guys , there are millions of plugins .
So even for me , it's really hard to sort of keep up with all these widgets that come out like there are so many of them .
So it's kind of hard to keep up with all of them .
So now let's go ahead and go back to this right here and refresh the page .
And now let's see if our Instagram feed shows up there it goes .
So we have our Instagram feed right here looks pretty good and we can change the style , you know , we can have like a different layout , uh whatever you'd like , but that's basically a rundown of how you can add in your Instagram feed next .
Let's go ahead and add in or actually before our um our ad sense , let's go ahead and , and we don't have a footer yet .
You know , we have , we have this whole tutorial with no footer yet .
So let's go ahead and add in our footer .
So guys , it's really , really simple .
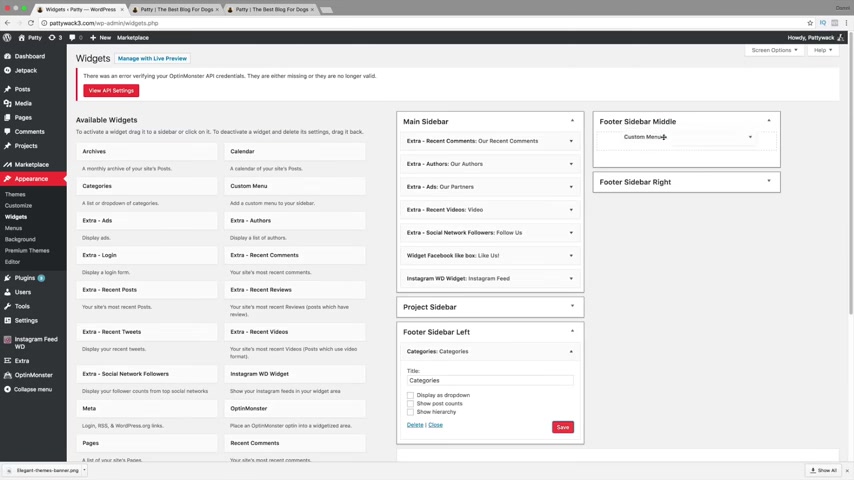
So right here under like the foot bar , uh side bar , uh uh footer , sidebar , left side , just add in whatever you like , you know , add in categories just like that , no categories .
OK ?
And then maybe over here you want to add in , you know , of , of a Facebook like box again or um we can add in like a custom menu , put in our menu , put our menu and then over here you might want to add in something like a face or the extra login .
So people can actually log in and comment and et cetera .
OK ?
So going back over here now let's go ahead and take a look .
Now the guys , the login will not show up because we are already logged in .
If we log out from a different point of view , it will show up .
So there is our Instagram feed , our website is looking smoking hot .
So we have our categories right here .
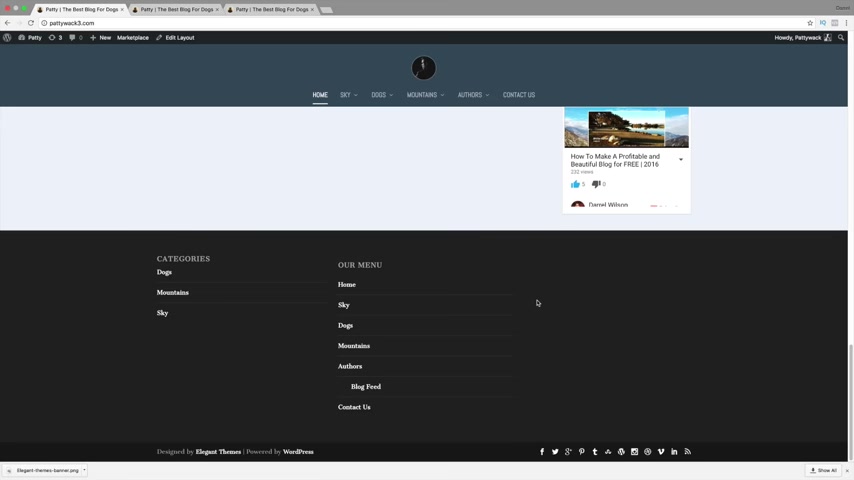
We have our menu and then right here the , the , the login will show except since we already logged in , it disappears .
OK ?
So that's basically how you guys can customize your footer .
You know , you just throw in the widgets wherever you would like .
It's really simple yet , you know , practical .
So , uh one more thing , um maybe you want to add in like an arbitrary text , maybe you want to add in something about an about us , right ?
So going back over here to our widgets , let me show you guys how to add in the arbitrary text .
So right here , I'm gonna go ahead and put this right here actually .
Yeah , to the left and then just put like about us , maybe just throwing some , you know , some dummy text in there , you know .
So I'm gonna go ahead and grab some dummy text and also remember that you can customize this specific section in the theme customizer , ok ?
So go ahead and click on save now .
Let's go ahead and refresh the page and see how that looks .
So right here , obviously , the text is dark , but remember you can decorate that within the theme customizer , OK ?
So that's basically how you guys can , you know , get customizable with your footer .
You guys can do all sorts of stuff like just go ahead and just drag whatever you would like to the specific parts because the foot footer sidebar , middle is the middle parts , the footer sidebar , right is the right parts and of course the left side is the left side .
So it's pretty self-explanatory to use and create the footer menu .
OK ?
So next , let's go ahead and talk about Google adsense .
Let's talk about how you can start generating money with adsense .
So the first thing you need to do is go over to Google and just go ahead and create a Google Adsense account .
So just type in like uh Google Adsense and then click on this first one that comes up now because I already have an account .
So you'll actually need to go to sign up right here and you will need to actually sign up with an account .
It's very simple .
But once you're done doing all that information , I will meet you at the dashboard .

All right .
So this is my uh current uh my assets account .
Now , all you guys need to do is go on over to my ads right here and like I said , if you don't have like one like right here , uh My , my thing is already good .
So my status is active .
So all you need to do is go to add a new unit and then go ahead and give it a name .
So now I always recommend doing automatic size responsive because this right here will automatically respond to whatever size um menu bar that you have or widget section that you have .
So it is automatic , it will look good .
So I'm gonna click on save and get code now .
We're giving this big piece of script right here .
So all you need to do is take all this right here , right ?
Click it , copy and go to close .
Now , let's go back to our um our website right here .
Now , in the arbitrary text right here , all we need to do is go ahead and just take this arbitrary text , put it anywhere we like and then just paste that in there just like that and then just click on save and the ads will start appearing probably within .
I don't know , I'd say an hour , two hours , sometimes it's instant .
But uh right here , you can see that the status is new .
So the ads probably will not show up .
And right here it's a big blank box , but just give it time guys , I promise it will show up .
It just takes time for Google to sort of authenticate and , you know , they , they do their weird thing where they take like an hour for no reason , you know .
So that is basically how you would enter in Google adsense and you can go ahead and check your home , you know , about the impressions , you know about if you've , if you've earned any money or all that good stuff .
OK ?
So that's a quick rundown of Google adsense .
Now , the website is actually coming along really well .
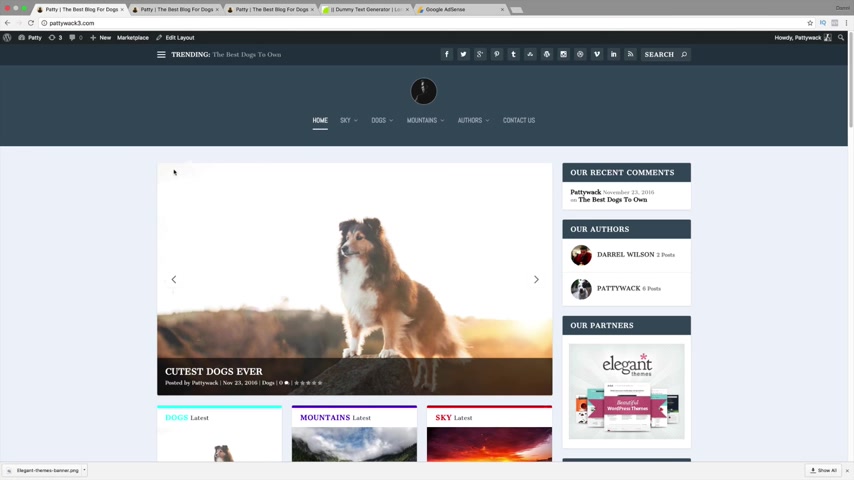
The only thing I really did not talk about is the Bloom plug-in , which is basically what you get when you get uh the extra theme .
So going to elegant themes right here , we can actually download the bloom plug-in .
Now , the Bloom plug in is a super cool plug-in that enables you to um create opt in forms , uh pop ups , all sorts of stuff .
So uh go ahead and scroll down right here to Bloom , click on download and plug in package .
All right .
Now , we're gonna go back over here .
We're gonna go down to our dashboard and plugins and we're gonna go to add new .
Now , all you need to do is go to upload , plug in , choose the file and uh we need to find the Bloom plug in .
There .
It is Bloom .
There we go install now .
All right .
So I'm gonna click on , activate the plug-in .
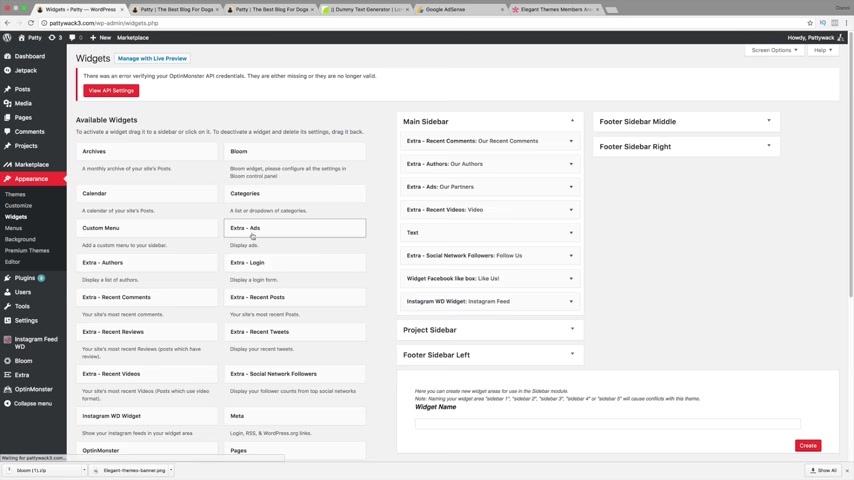
All right .
Now , if you want to use Bloom as a widget , all you need to do is go over to your appearance and go to widgets and you're gonna notice that Bloom comes up .
So you just simply need to go ahead and just drag it over there and then um you know , select your opt in form and then that's it .
So I'm gonna click on save .
Let's see if this shows up without the opt in form .
I don't think it will .
Mhm See .
So , yeah , it did not show up because we need to create an opt in form .
Now .
Lucky for you guys .
So right here it says subscribe .
Lucky for you .
Guys , I actually have , you're gonna love me , but you're gonna hate me under my channel right here .
Do you go to my videos ?
I actually have a tutorial on it right here for the bloom plug in guys .
So it is about 15 minutes long .
It shows you how to use the bloom plug in , how to make pop-ups , how to add all sorts of cool stuff .

You guys can see my like ratio is pretty good on it .
So it's very good content .
I'm just , just too lazy to show you guys .
So I made this tutorial .
So I'm just gonna go ahead and direct everybody over there .
I will put this link in the description for you .
But other than that guys , congratulations on your new blog .
I hope this tutorial was very clear and very good .
There's something I miss .
Please feel free to let me know this theme uh is a amazing and beautiful looking theme .
You can do all sorts of really cool stuff with it .
If there was something I missed , put it in the comments below .
If there was something that was amazing .
Go ahead and give me a like if you really liked it , go ahead and give me a comment and a like and also subscribe .
So that's it guys for my tutorial .
I really hope that I've helped you create your blog website from scratch .
I really hope by now that you can sort of start generating money if you guys have any questions or you want to submit your website to mine .
Feel free to contact me and let me know guys .
I will see you all later .
Are you looking for a way to reach a wider audience and get more views on your videos?
Our innovative video to text transcribing service can help you do just that.
We provide accurate transcriptions of your videos along with visual content that will help you attract new viewers and keep them engaged. Plus, our data analytics and ad campaign tools can help you monetize your content and maximize your revenue.
Let's partner up and take your video content to the next level!
Contact us today to learn more.