https://www.youtube.com/watch?v=p9jXInqP5j0
How To Make a Multi Vendor eCommerce Marketplace Website with WordPress 2022 (Like Amazon)
Welcome back , party people .
My name is Darrell Wilson .
And today in this video , I'll be showing you all how to create a multi vendor e-commerce website with wordpress .
So that's kind of a long title , right ?
So before we begin , let me explain what a multi vendor e-commerce website is , how it all works and how you can let vendors sell products on your e-commerce website .
A multi vendor e-commerce website allows other users to register as a vendor and sell products on your website .
When a vendor creates a product on your website and sells it , you then receive a commission of the sale for that product sold .
Your website can register vendors automatically and you can adjust the commission rates for each of your vendors .
For example , if the vendor creates and lists a product and sells it for $100 and you have a 30% commission rate applied , you would then receive $30 and the vendor would receive $70 .
It's pretty straightforward .
Plus the whole sign up process is really simple .
Vendors can register directly on your website with a sign up form .
You can then approve or disapprove the vendor after the vendor has been approved .
They can start listing products on your e commerce website .
You may also moderate and review the products before they are published on your store .
After the vendors have made some sales , they can then request a withdrawal at any time .
Now , once a vendor makes a withdrawal request , you can review it , pay your vendor and continue business as usual .
And I'll walk you through this whole process today , step by step .
All right .
So here is the multi vendor website that I'll be providing you guys a little bit later in this tutorial .
So I'll be giving you guys this layout for free to help you guys uh with your multi bed store .
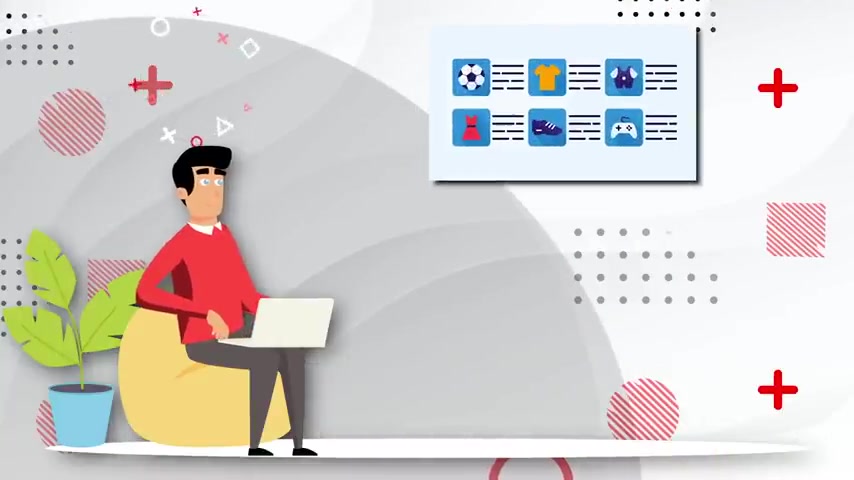
Now , here we have a list of products , right ?
And these products are actually sold by different vendors .
And when those vendors sell a product , you would then make a commission of that sale .
And then here is just the landing page .
You know , we have some more featured products .
I added this really cool countdown timer here .
So these are more of like a flash sale and stuff like that .
And then as we scroll down , we just have some more product categories so you can insert your product categories and then scrolling down here .
We have a uh section with more categories .
So we have like emphasis on this phone and then we just have more uh products here and then we have our footer at the bottom So it's pretty nice looking websites .
And um I'm gonna go ahead and show you guys the other pages .
Now , uh this is a layout that you guys will get for free later .
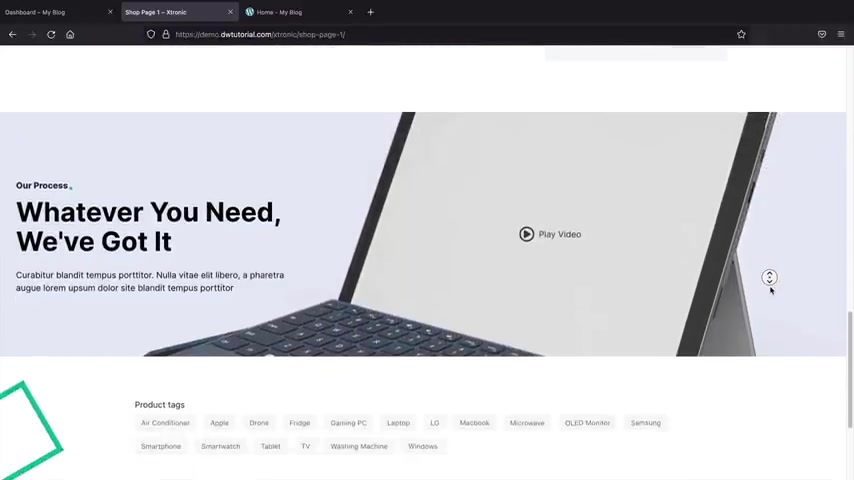
And this actually comes with four different shop pages and also two different product pages .
So for example , I just click on one here just to give you guys a quick example , this would be like shop page one and here we have a list of different products and we added this sidebar in here to kind of Upsell multiple products .
I just really like the layout design of this .
And then on the right side , we have more testimonials where people can say , oh my gosh , this product was amazing , you know , and stuff like that .
And then below that , we just have some more uh up sells and stuff like that .
Let's go ahead and go to shop page two .
And this is just another variation .
So it just depends on how you want to approach your multi vendor store .
But this is more of a broader sense .
So we got rid of the sidebar .
We added this timer here and then we have a list of products .
So you guys will receive multiple shot pages as well .
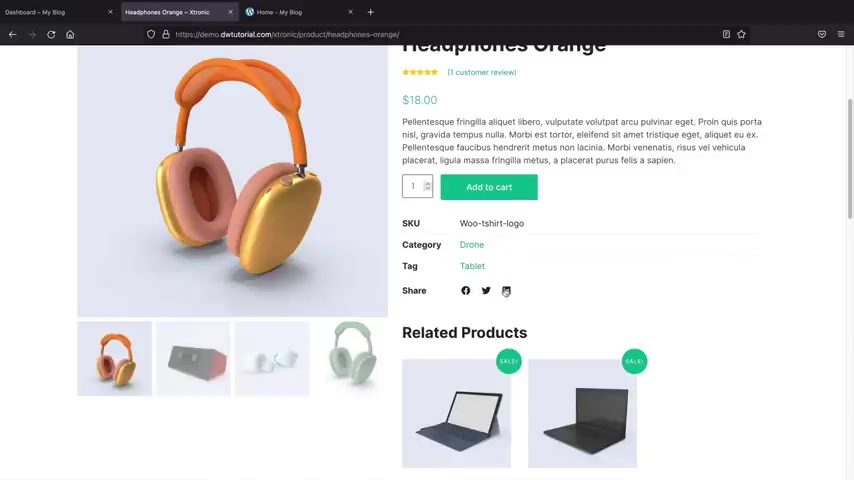
Now let's go to take a look at the product page .
So this is an example of a product page and we have a list of products .
Uh We have uh you know , the category people can share it to their favorite social networks .
And then we also have related products here .
And then also we can get more information about the vendor selling this product .
So here under uh vendor info , they can see who's actually selling the product .
We have reviews and additional information about this product .
And we also have shipping details .
If you want to add in shipping details to your product , they can always go ahead and click on product inquiry as well and get more information about this product from the vendor itself .
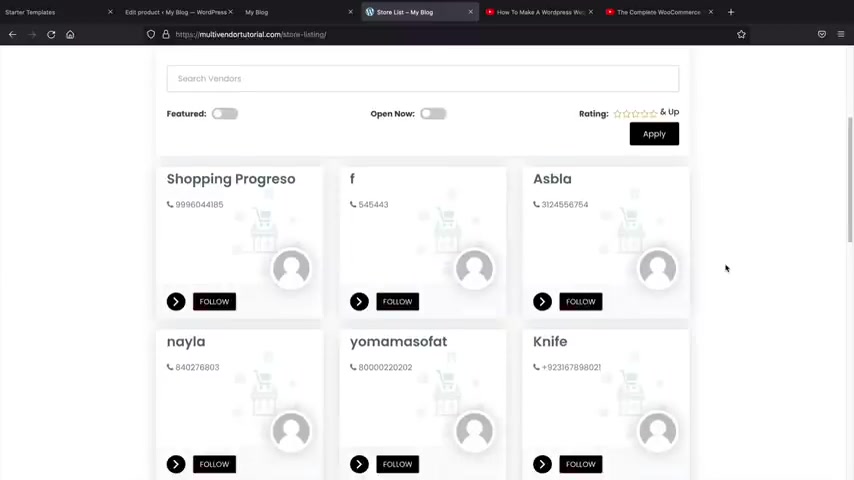
Now , let's talk about the actual vendor list .
So right here , I'll click on store list .
All right .
So next , you'll see a list of our stores .
So this says meet our vendors and we have three different vendors , right ?
We have Jay , the Smith Store and the Becka Shop and these are your typical vendors .
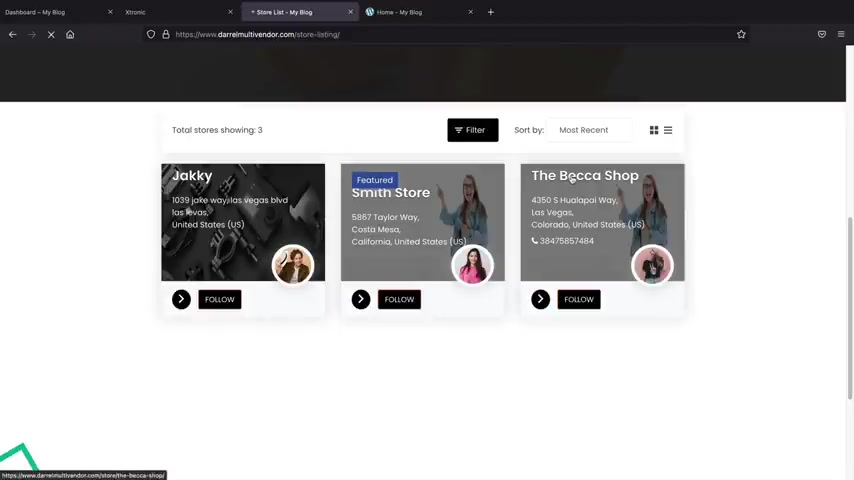
Now , also your visitors can click on follow and they can follow these specific vendors and get notified when they upload new products .
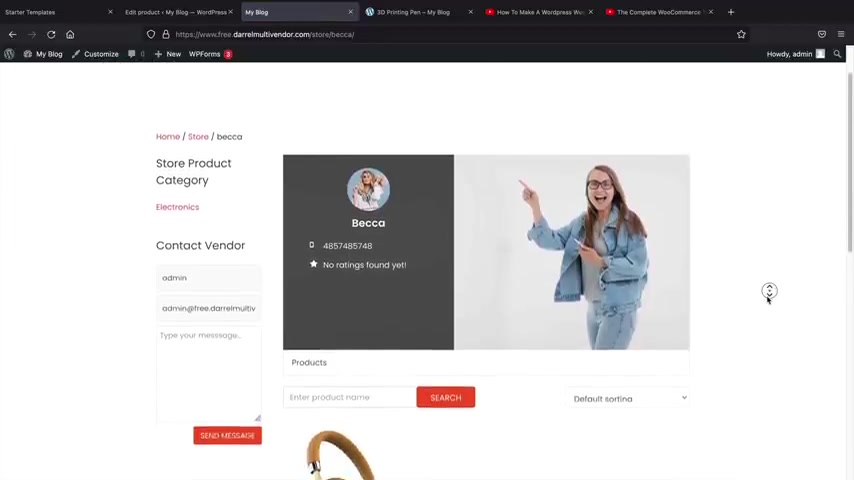
But I'll go ahead and click on the Becca shop right here .
So this is the Becca shop and you guys can see it just looks really clean on the left side .
They can contact the vendor , they can get support , they can follow , they can always email the vendor as well if they have questions relating their products and then they can follow , you know , they can share this as well .
And then below that is a list of various products .
So these are all the products that the Becca Store is selling .
And when someone purchases these products , you guys would make a commission on your multi vendor e-commerce website .
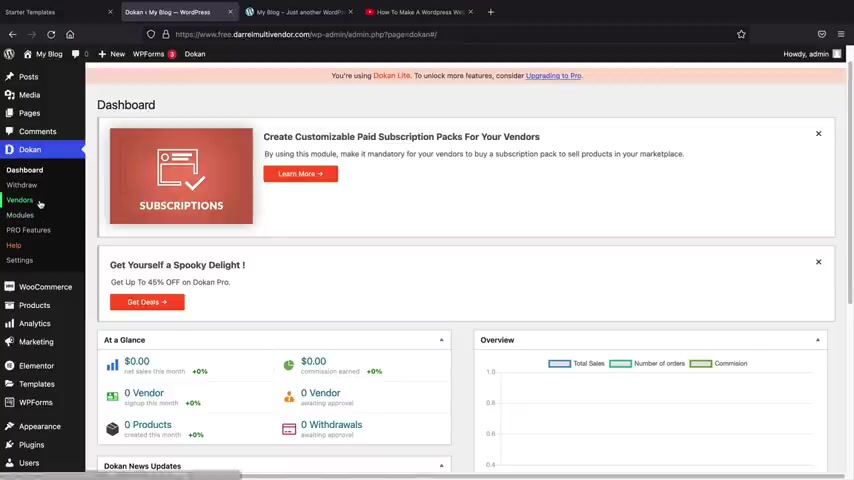
Now here is the dashboard for your vendors .
So when people sign up to your website , this is the dashboard , they are given and from here , they can go ahead and view a list of their products , their reports , their reviews and all this information .
So for example , I'll just click on products here and then you'll see a list of the products that this vendor is selling .
They can delete these products , they can change the price , they can upload more products .
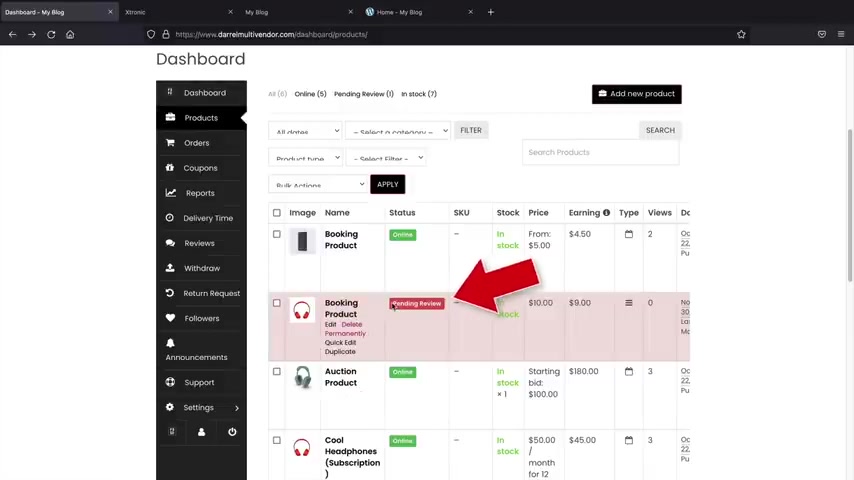
And we also have different type of products .
You know , we have auction products , booking products and subscription products .
However , that's in the pro version and I'll be talking a little bit more about that later in the video .
But uh here you can see that the vendor has a lot of control over their products .
And if they want to add a product , they can click on , add a product right here and then simply go through the process of adding a new product to your store .
Now , you can also see that this product is pending review and that's because you as an admin will have to approve this product before it's published to your store .
So you do have a lot of control over what products are listed on your multi vendor store .
On the left side , you can see uh the vendors can create coupons as well .
They can also request withdrawals , they can see list of their followers and also announcements .
Now , I'll be very honest , some of these features are only in the pro version , but a lot of these are in the free version of this plug in .
So I'll cover more of that in the video .
But uh right here , I'll click on dashboard .
So this is the vendors dashboard .
And from here they can see a list of their sales and also their earnings .
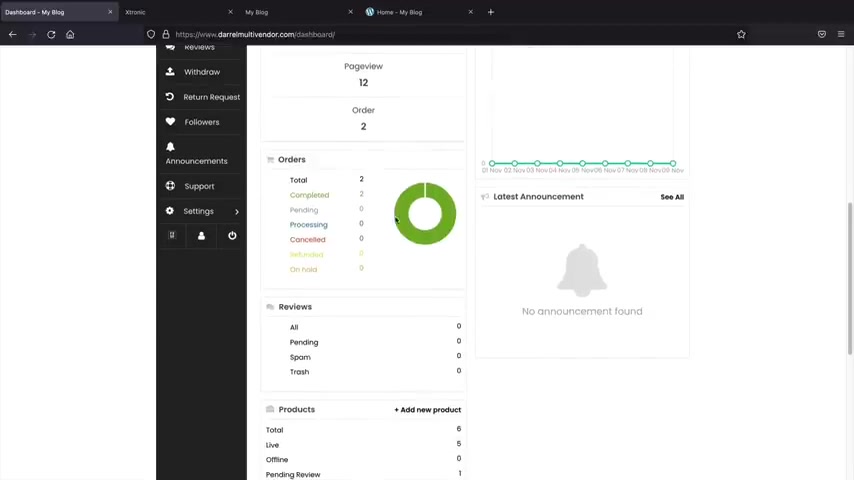
So this is the money that they are currently earning and the remaining of this balance is the money that you gain in profits .
And then below that , we have some more statistics .
Uh we have latest announcements and stuff like that .
On the left side , the users can actually request a withdrawal at any time on your store .
So I'll click on withdrawal and here you can see that we have actually uh asked for a withdrawal .
So we asked for a withdrawal of $50 .
And right now it's currently being reviewed by the admin .
Now , I can cancel this and just give you guys a an example here .
So this is a pending withdrawal , but I'll go ahead and cancel it and say , you know what , I want to withdraw 100 and $50 through paypal and then I'll submit the request .
All right .
So as of right now , we are waiting for the admin to approve the withdrawal .
So let's take a look at what this looks like from the admin point of view .
All right .
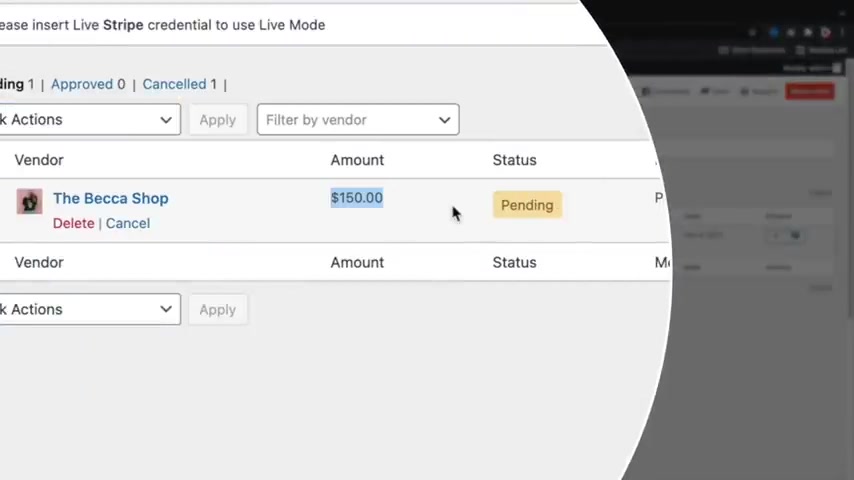
So I'm back on the admin website and I'm gonna go back over here to my dashboard and on the left side , we're gonna see Doon and here I'll just click on withdrawal and then we can see a amount of 100 and $50 and they have requested to be paid and we can go ahead and approve this and pay them directly through paypal .
And that's it .
After you send the money , you guys can continue business as usual .
So these are the current vendors that are selling on your multi vendor store .
And let's say , for example , you know , you just want to get rid of a vendor or you want to restrict their selling .
Uh Right here , I'll click on status and this vendor can no longer sell on your store .
Now also remember that every product that they upload , you'll have the option to moderate before it's published to your multi vendor e-commerce store .
But so right here , let's click on the products under the Becca shop and these are the current items that Becca is selling on our multi vendor store .
Uh Right here , you can see this is pending .
So this is actually waiting for us to approve the product before it's published to our store .
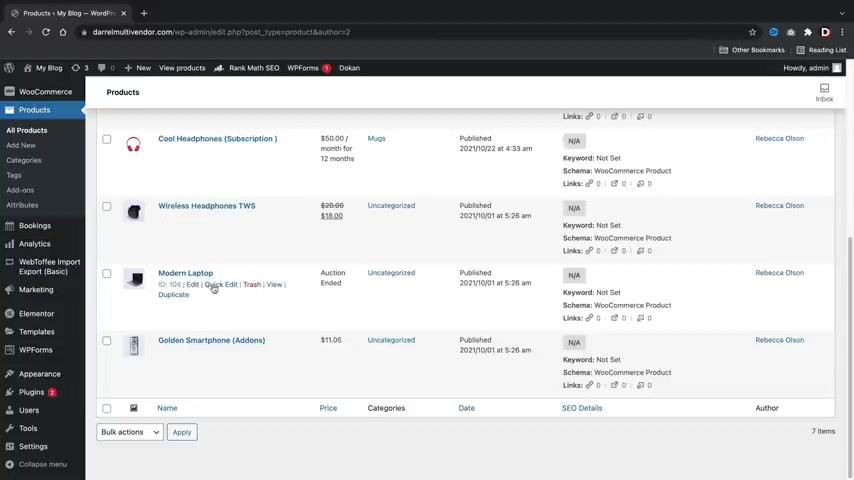
And let's say , for example , you guys , uh you know , they upload a product but it's not up to par with your website .
You guys can actually edit their products at any time .
So for example , I'll click on quick edit here and then we can change the price , we can change the sale price , we can change the description and we can pretty much change anything we want about the product .
So let's say , for example , your vendor just doesn't put enough description or they make some sort of typo .
Uh I'll just go ahead and delete this and then leave it like that and then I can update this product .
Now , when I update this product , this will reflect on our store .
So you guys can actually update and moderate the products that vendors list on your e-commerce website .
You also have your own personal dashboard where you can see how much money you have made , how many vendors have signed up what products they have sold and you'll also be notified if you have pending vendors , you can also see how much commission you've made .
And then also we have this graph and this will actually show you how much money you've made and also how much commission uh you owe to your vendors as well .

Now , we also do have a lot of add-ons we can add to our store .
For example , if you want to enable follow store , you can have that turned on or off if you want to let the customers know when delivery time will be expected , you can turn that on .
Also , you can integrate this with rank math seo .
So you can display the products how you want in the Google search results and then just have a few more other options like store reviews , uh table rate shipping .
This is for very advanced shipping and then subscriptions and stuff like that .
So you can turn these on or off just depending on your needs for your e-commerce website .
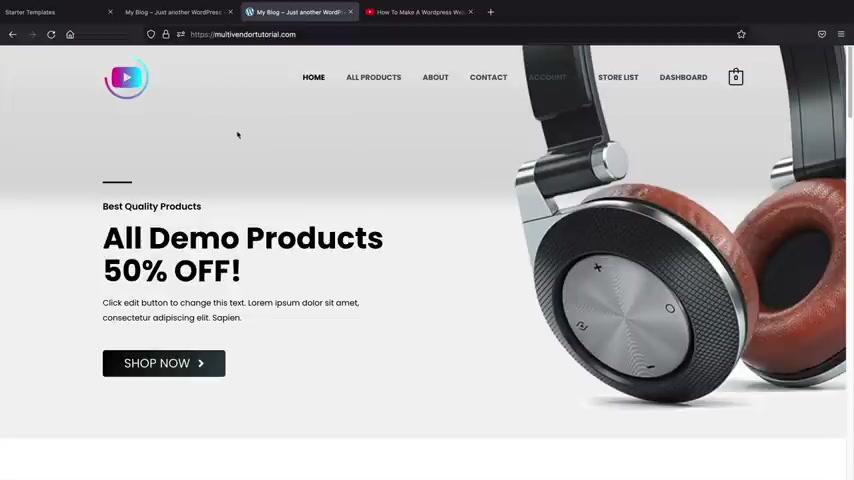
So this is the current website that I'll be providing you guys today in this video .
We'll also build a starter website together and this is an example of the starter website .
Now , this is using a free version of the Astro theme and it's just a free theme that we're gonna be using and we'll go ahead and practice with this first and then once you guys get comfortable , we'll go ahead and import the starter template a little bit later in the video .
Now , multi vendor e-commerce websites are very lucrative and it's a great way to make money .
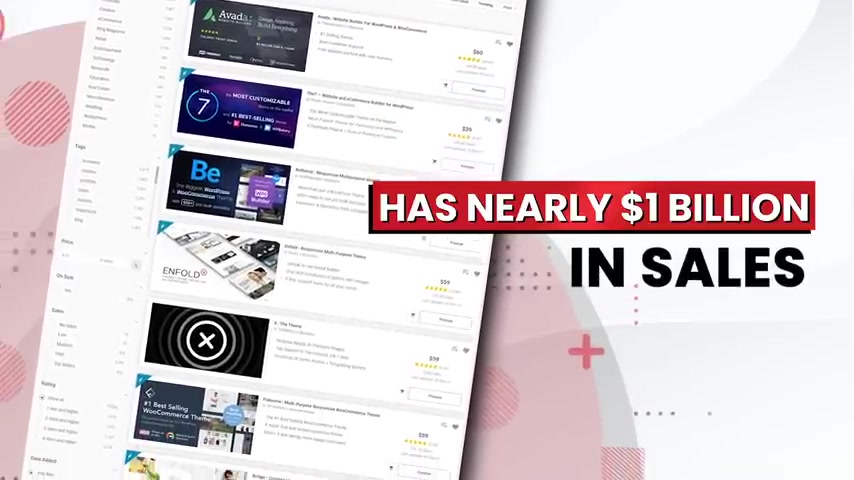
And here are some examples of some successful multi vendor stores , Etsy dot com , template monster dot com .
Amazon dot com , flip cart dot com and theme forest dot net .
The force alone has nearly $1 billion in sales .
So you can see multi vendor stores are really profitable .
And to be honest , guys making this multi vendor e-commerce website is really simple .
We'll be using a free theme and also a free plug in called Do .
Now there is a pro version .
So first we'll show you guys how to make the website with the free version .
And then later , if you guys decide to upgrade , I'll be showing you how to use all of the pro features of the Doon plug in .
The pro version of bacon does have some unique options like allowing your vendors to create bookable products where vendors can create booking appointments , subscription products , where your vendors can create subscription based products on your website and even auction products where your vendors can allow your visitors to bid on products on your multi vendor website .
Vendors can set the expiration of the auction or even at a buy it now price .

Now , if you guys do decide to upgrade to the pro version , we have a link and a discount code .
I think it's like 20% or something in the description below this video .
If you guys do use our link , it does help us to continue to make these tutorials for you guys all for free .
And as a bonus , we have also created a free charter template for all of you that you can use on your multi vendor e-commerce website .
It looks really great and I'll show you guys that a little bit later in the video .
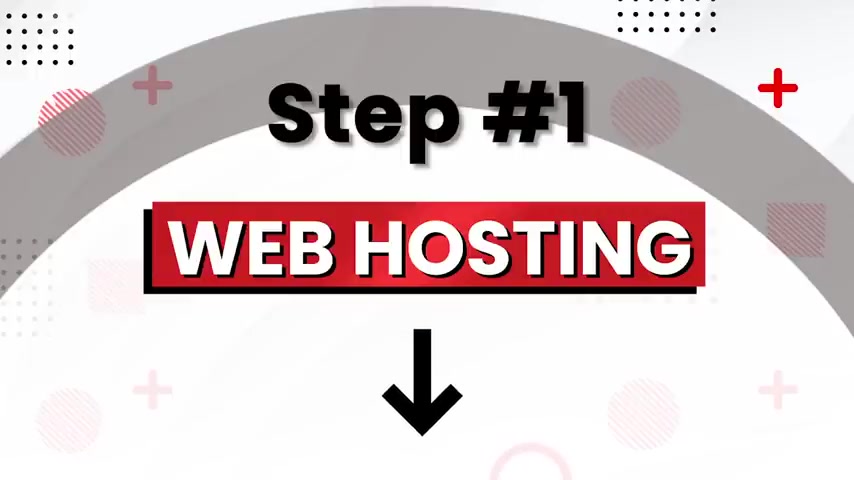
So with that said , we're going to build your multi vendor e-commerce website in five simple steps .
Step one will get your domain and hosting and I'll also show you all how to install wordpress on your multi vendor e-commerce website .
Step two , we will download a free theme and then start designing the website using a drag and drop page builder .
Step three , we will install the free plug in do con which will allow us to build our multi vendor e-commerce website .
I'll show you how to add vendors set up tax and shipping and also add payment gateways on your multi vendor website .
Step four , I'll show you how to use the pro version of .
Do .
I'll explain what's included in the pro version and show all the features that come with it just in case you guys decide to upgrade and step five , I'll show you how to import this beautiful free charter template .
This is a free template that we created for you with various shot pages and product pages and you can import this on your website and we'll walk you through how to do that step by step .
So let's jump to step one and get web hosting .
Now , there is a link in the description of this video and it'll take you to a page to purchase web hosting and welcome to name here dot com .
Now , I've been recommending name here dot com for years and people love it .
In fact , this month alone , we have had zero down time with name hero .
So you will have a really reliable websites and also our low time is under one second .
So we do test these servers to make sure that the websites are fast and uh reliable .
So you guys will have a really good deal with name here dot com .
Now , once you guys get here , go ahead and click on , get started .
Now , now we have four different plans .
We have the starter cloud , the plus cloud , the turbo cloud and the business cloud .
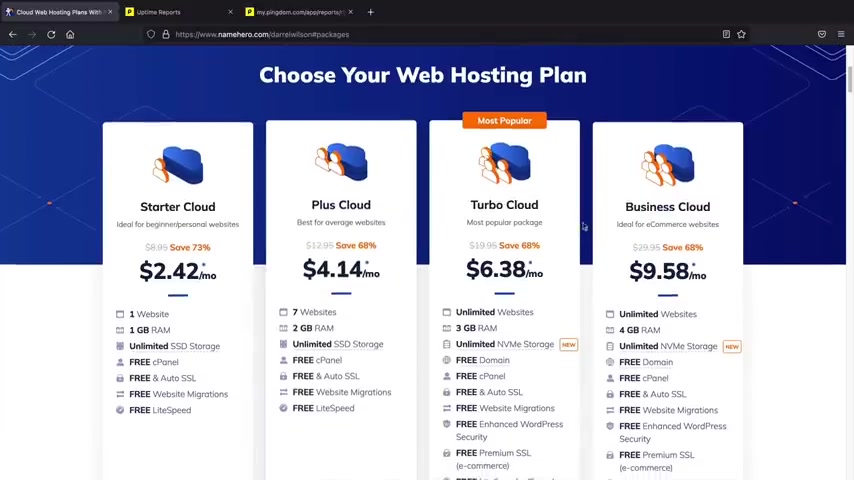
Now , it really depends on your budgets , but I recommend the Turbo cloud because with this , you can host unlimited websites , you also do get access to the new ND storage , which is just gives you a little bit more performance uh for your websites .
But uh go ahead and just select the package that works best for you .
Obviously , I'd probably go with the Turbo cloud because you do get more performance .
But if you're on a budget , you can always go with the starter cloud or the plus cloud as well .
And once you guys select the package , you'll go ahead and scroll down and then you'll click on order now .
All right , cool .
So next we're going to enter in our domain name .
So a domain name is the web address that you're using .
So for example , name here dot com , you can see here , I was kind of messing around with this .
So we have a drones R us dot com .
You could put anything that you want .
So this would be the name of your website for your ecommerce website .
For example , I'll just do ecommerce tutorials , the Z and search .
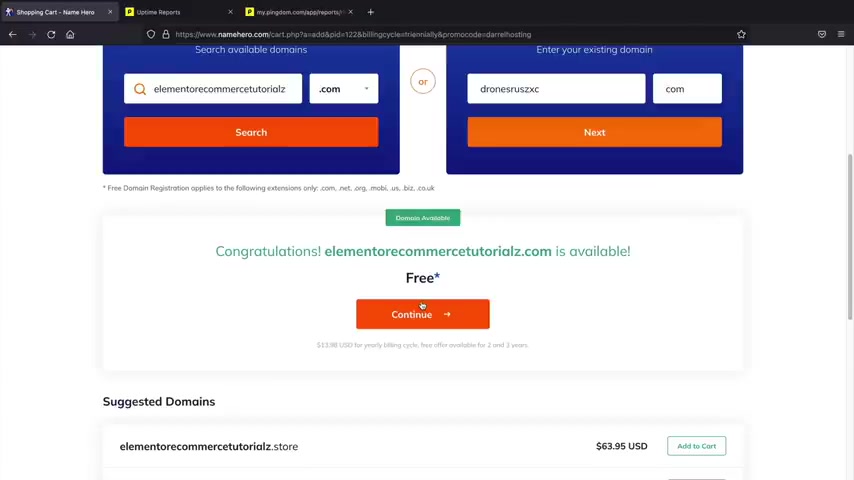
Oh , hopefully it's available .
There we go .
Yeah .
So you guys also do get a free domain with name Hero .
So , that's pretty cool .
You guys save yourself another ?
I think it's like 14 bucks a year .
Uh , once you guys select the domain , you know , give it some thoughts .
I know it's , you know , it's personal , it's your website .
So give it some thoughts and once you're here , you'll click on continue .
All right , next , we need to select our building cycle .
Now , uh , personally , I recommend one year , uh , one year you still get a large discount and this will also help you decide if this is for you or not .
So , go ahead and select one year or a billing cycle that works best for you and we're gonna scroll down here .
Now , there are some up sells and personally , I don't think you really need any of these up sells .
Uh , a lot of these are available with free plugins and stuff like that .
So , uh , I wouldn't recommend any of them .
Uh , we do get a free SSL with name Hero .
That's pretty cool .
And we do need that to accept credit card payments on our website .
So that's another pretty cool reason , uh , to sign up with name Hero here .
I'll click on continue on the right side .
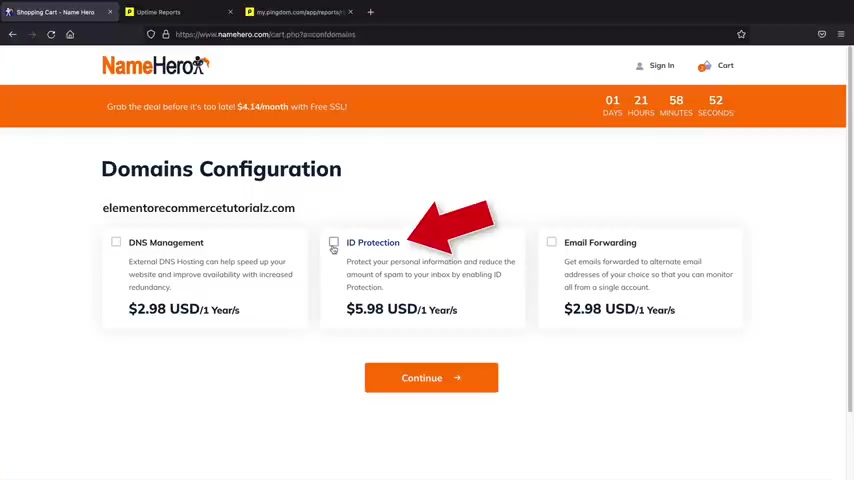
Now , this I do recommend I recommend getting the ID protection and this will protect your personal information from spammers and companies trying to sell you all sorts of stuff .
Trust me guys .
If you don't have that checked , you're gonna get emails for Viagra from seo companies from uh all sorts of really crazy companies .
So , uh I recommend the ID protection .
Uh once you select that , you'll click on continue and for a year of hosting with name Hero , depending on your package , you can see you're paying less than $100 for the entire year .
So you do get a really good value with name hero dot com .
And here you can see we have the hosting package , we have our domain registration and you guys did save quite a bit of money uh using that link in the description of this video .
Now , once you guys are here , we'll go ahead and scroll down and you'll need to create account .
So you'll put in your first name , your last name , your email , your billing address , all this good stuff .
I'm sure you guys have seen these uh screens many times on the internet .
Now , one thing I do want to mention uh try to write down your support pin .
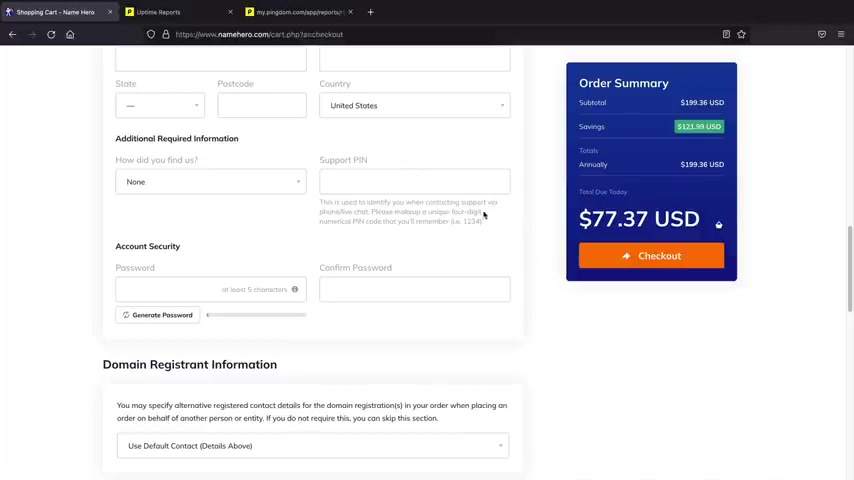
Uh This will actually help verify um once you need like help or something , they'll ask you for your pin .
So they'll verify that it's you who's making the phone call or messaging them on live chat .
And also keep scrolling down here .
You can pay with credit card and paypal and coin base .
Oh , Cryptocurrency .
And also uh credit card looks like they have it twice here .
But yeah , it doesn't really matter .
So you'll go ahead and select a uh payment method that works best for you .
And also you'll go ahead and fill in these payment details and make sure to enter in your social security number .
I'm just joking .
It's a joke .
There's no social security needed .
And uh once you're done with that , you will click on .
I have read yada yada yada and I'm sure you guys will read the terms of service , right ?
And once you're done with that , you'll click on the checkouts and I will meet you in the customer portal .
All right , and welcome to your new dashboard .
So this is your current dashboard .
As you guys can see , I had many different packages , many domains and I also have tickets with name Hero and they really help me out with all of my problems .
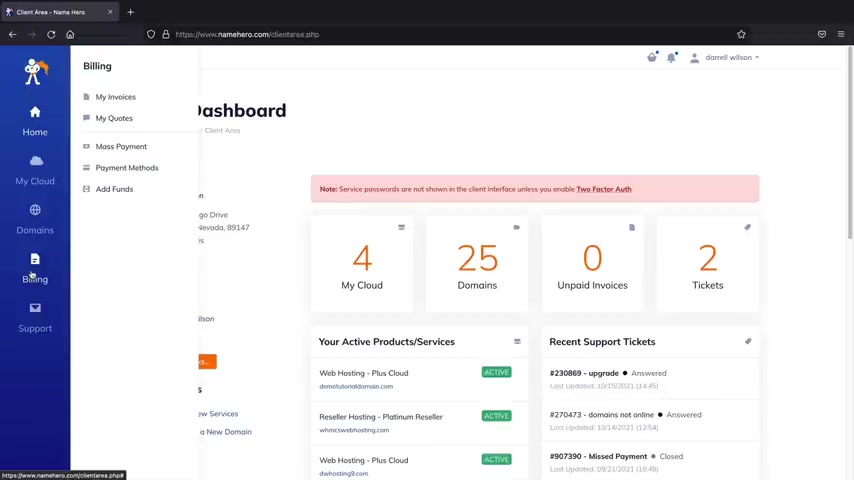
So this is just your interface on the left side , you can see your hosting packages .
These are your current domains , you can always register a new domain .
Uh also billing .
So if you want to see your payments or you wanna add funds or you wanna adjust your payment method , you can do that here and also the support .
So if you guys run into something weird , I know with websites things just kind of get weird sometimes .
Uh you guys can always open a ticket here and they will help you out with all your problems and they are pretty fast .
I mean , I think maybe under one hour they can help you guys with all your problems .
So once you guys are here , let's go ahead and install wordpress onto our new domain .
You'll first click on my cloud .
Now , here we have hosting packages .
Now , you should probably only have one here .
So just go ahead and click on your hosting package .
And next , we're going to see this log into C panel .
Go ahead and click on login to C panel .
All right , cool .
So now we're going to go ahead and install wordpress onto our domain .
So up here , we'll type in wordpress .
Here we go .
We have Wordpress manager by Soft Taus .
We'll click on this .
All right .
And from here we're going to install wordpress .
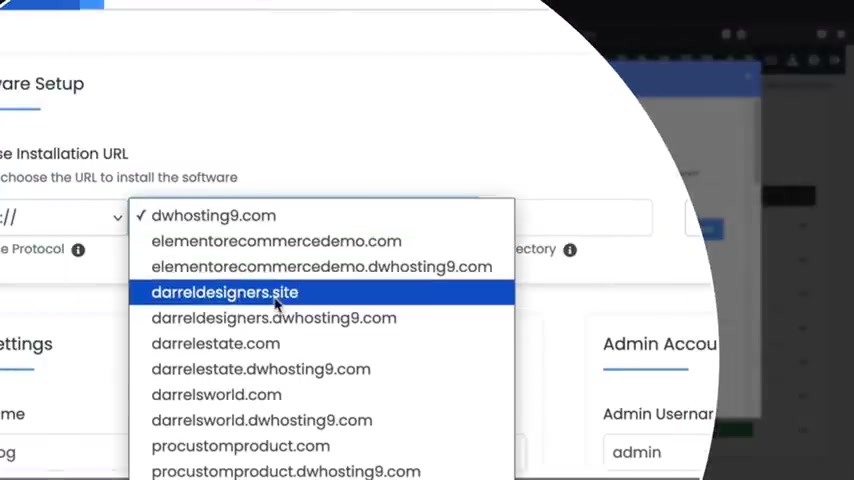
You guys can see I had many installations of wordpress already , but right here you'll click on install and now we're going to look for the domain that we purchased .
So right here , you have the choose domain section .
So you'll probably see your domain that you purchased .
I'll just go ahead and select this one , but you're going to select the domain that you purchased and for the protocol , make sure this is htps , which is the SSL now for Indi directory .
Make sure nothing is here .
All right , I don't know why that's there by default , but oops , oops , but uh , make sure nothing is there because that will install your domain onto like your website dot com slash something and you don't want that there .
Yeah , just don't have that there .
Make sure that's make sure that's empty .
Now for the admin user name , go ahead and give yourself an admin user name and a password and this is what we are going to use to log into the website .
So whenever you want to build your website , you're going to use these login credentials .
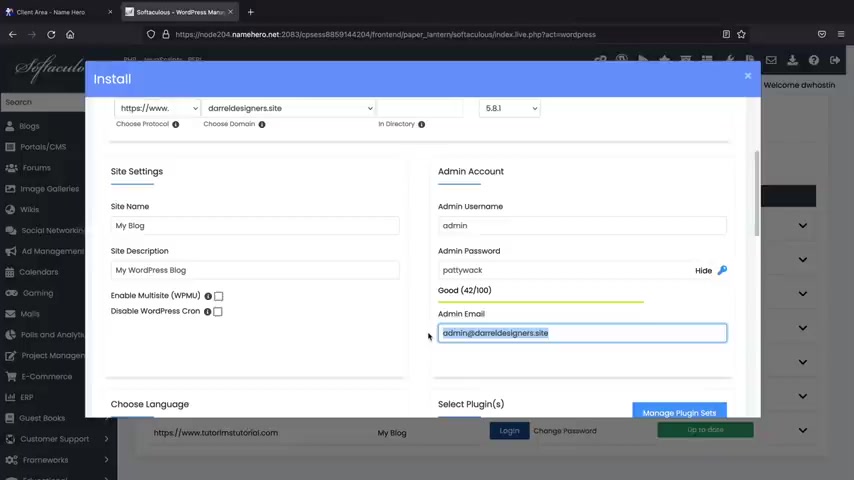
So make sure you write these down .
I'll just put admin , never put past guys .
Uh Make sure this is something unique .
I'll just put uh paddy whack and your admin email , make sure that this is an email that you have access to because when you forget your password , they will send this information to your email .
So I'll put in my , my gmail account here , my famous PC Hoarder , which I do get tons of spam .
And below that , you can always select your language .
We can always adjust the language as well uh inside the wordpress dashboard and I'll show you how to do that in just a bit .
And we're gonna keep scrolling down here to the bottom .
They have these other themes they want us to use , but uh we're not going to use these and right here you'll click on install .
Yeah , they said 3 to 4 minutes .
That was not 3 to 4 minutes right now .
Here we have install wordpress and this is the Administrative URL Administrative URL .
So just go ahead and click on this link and this will log you in to your website .
All right .
Awesome .
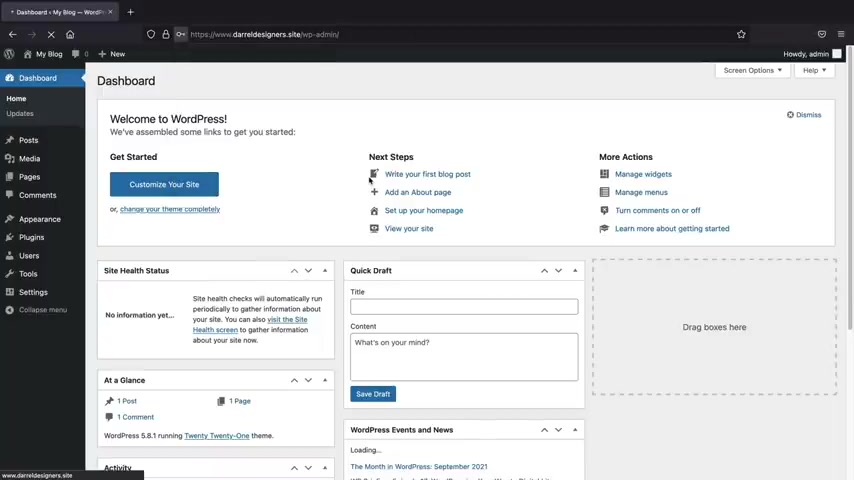
So now we have a wordpress installed and our website is now live on the internet .
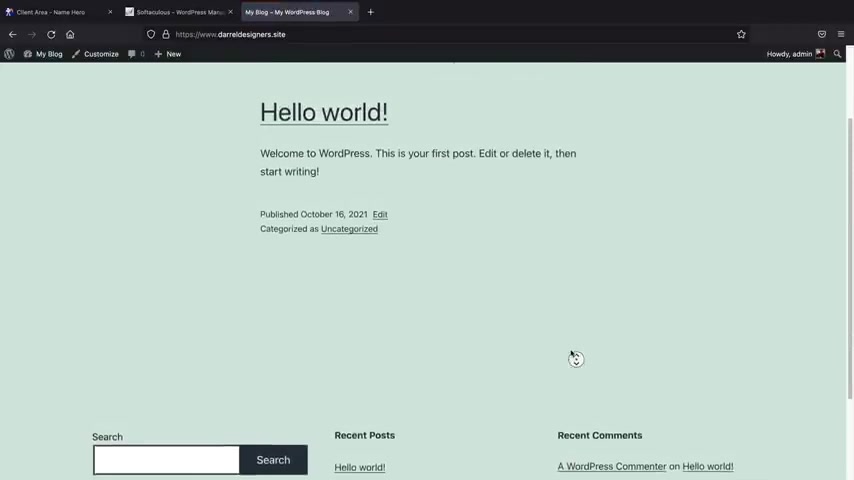
And if you want to see what your website looks like right now on the internet at the top left , right here , you'll just click on visit sites and this is the current theme that they are giving us and it is really bland , really boring , ugly , but not to worry , we'll make it look really good .
So to go back to your dashboard , go ahead up here and click on dashboard .
All right , congratulations .
You guys have your website and it's now online .
So we're ready to rock and roll here .
So now let's go on to step two and start designing the website using the elements or page builder .
Now , we're gonna be using a free sort of templates to build out our e-commerce websites and then you guys can design it and customize it the way you want .
So with that said , let's go ahead and go back to the video now that we have our website online .
Now let's go ahead and adjust some of these general settings .
The first thing we want to do is go to users and click on a profile .
Now in the future , if you guys ever lose your password or if you want to change the color scheme , this is where you're going to do it .
Uh , I think for this video we're gonna use midnight .
I just like midnight .
It's really easy to see .

Uh , these other ones are just really , really tacky .
I mean , this is , that's way too much , you know .
So , yeah , I think we're gonna go at midnight .
I just like that .
It's a lot easier to see .
And , uh , we're gonna scroll down here now , you can always adjust your email .
So , uh , you can always change your email and remember .
This is important because if you forget your password , the password will be sent to that specific email .
So you can always adjust that at any time .
And below that we have a new password , this is where you're going to , uh , change your password .
So for wordpress , if you ever want to change your password , this is where you're going to do it .
And once you've made all the changes that you want , you'll go ahead and click on update profile .
Now , let's say , for example , you guys speak a different language on the left side right here , we have settings we'll click on in general .
Now , here you can enter your email or you can update it at any time .
So if you get a new email address and you want to update it , you would do that right there and below that we have the site language .
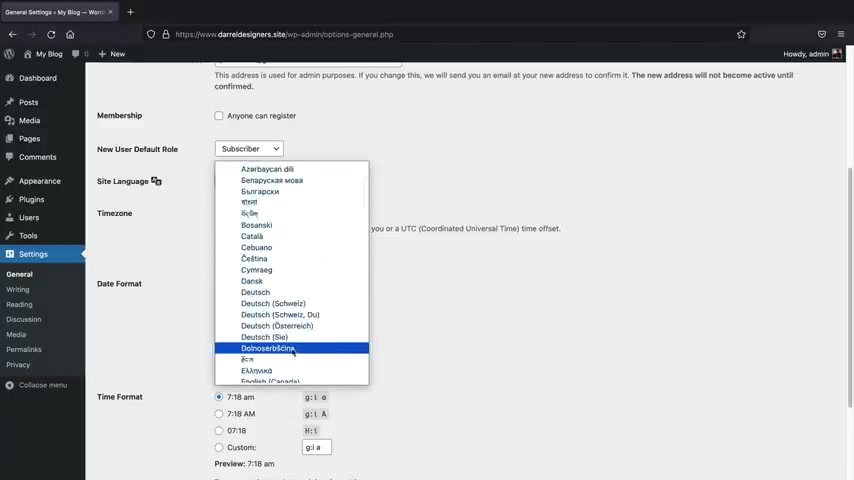
Now , if you change this , uh this will actually apply to the back end .
So you can put any language that you speak .
So if you speak Spanish , Portuguese , Arabic , Hindi , whatever you can adjust the language or your uh back end options .
And below that , we'll go ahead and click on save changes .
The next thing that we need to do is we need to adjust our Perma links .
On the left side , you go and see Perma links .
Now , here we have a few options , but you want to select this as post name .
And the reason why we do this is because when you go to a website , you see like , you know , your website dot com slash shop , right ?
Not like all this , you know , numbers and this looks really cluttered and ugly and the post name option is the best for seo purposes .
So once you select the post name , you'll scroll down and click on save changes right now , let's say , for example , you guys want to log in and log out of your websites , maybe you're at a friend's house and you wanna , you know , mess around with wordpress .
Uh First , what I'll do is I'll log out .
So right here , I'll go ahead and click on , log out .
So right now I'm logged out of my website and there's no way for me to enter it .
So whenever you want to log into your website and make changes .
You'll go to your address , bar and type in dash WP , dash admin and press enter from here .
You guys can enter in your login credentials that you guys use to install wordpress .
So I believe mine was admin and it was paddy .
Right , Paty .
We can always take a look here , remember me and loin .
So that's how you guys can log in and log out of your wordpress website .
So you can pretty much work on your website from any location .
All right .
So now that we know how to adjust the general settings and stuff and you guys are getting more comfortable .
Let's now make the site look a little better by installing a wordpress theme .
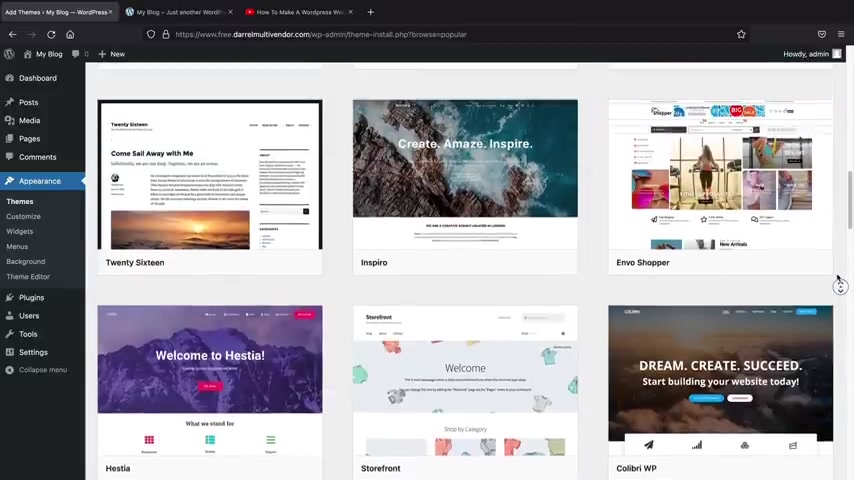
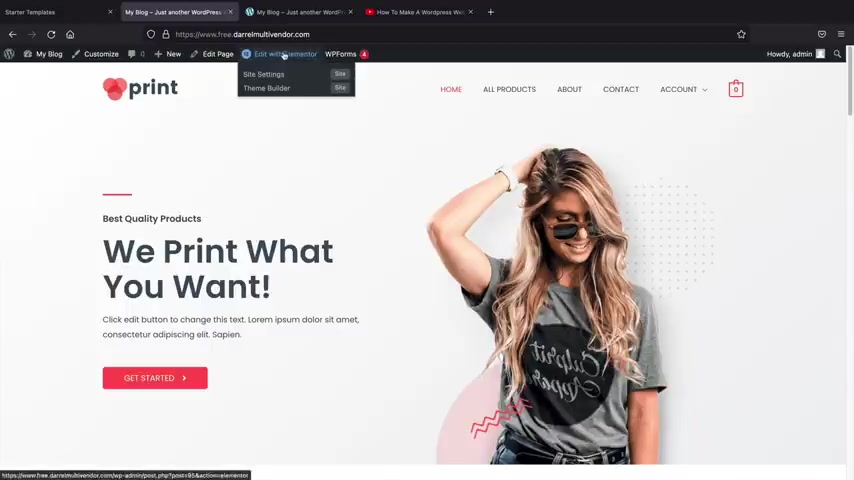
So on the left side , we'll go to appearance and click on themes and then we'll click on add new .
These are like default themes .
Now , essentially guys , how themes work is themes are kind of like the structure of your website .
So when you have like a shot page or a blog page or something like that , generally the theme controls that .
However , for the actual page itself , the page builder is doing most of the work .
So when you see these demos , uh most of this is done with the same page builder .
So it's not really a good representation of the theme , but the theme that we're gonna be using for this video is called Astra .
It's this one right here .
It is the most popular one in case you guys cannot find it for whatever reason , you guys can just uh type in astra and here we go .
So this is the theme that we're gonna use .
We'll click on details and preview and uh it'll change a little bit .
You're a site .
But uh at the top right here , you'll just click on install after you install it , we'll click on , activate .
All right .
So after you guys install it , it'll tell you about their starter templates .
You guys can go ahead and click on , get started .
If this does not pop up for you .
For whatever reason , you guys can always uh access the starter templates in the astra options on the left side and then click on install and port or plug in .
It's the same thing , you know , it's , it's the same exact thing , just different locations .
All right .
So we're going to select a page builder .
We're gonna be using Element or for this video because it has some really good integrations with the uh the multi vendor plug in .
So let's click on element to All right .
And they do have tons of starter templates .
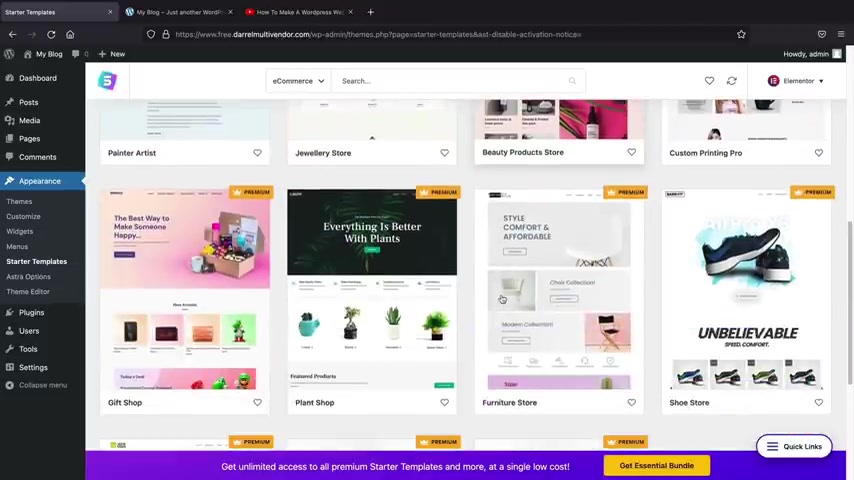
But to organize this , let's go to uh all up here and we'll go to e-commerce .
And if you guys want to see the free ones , we'll click on free .
So these are all of the free starter templates that you guys can use and they have some really nice demos and all you need to do here is you just need to go ahead and click on a template and then import it .
Now , we're going to remake this template right here .
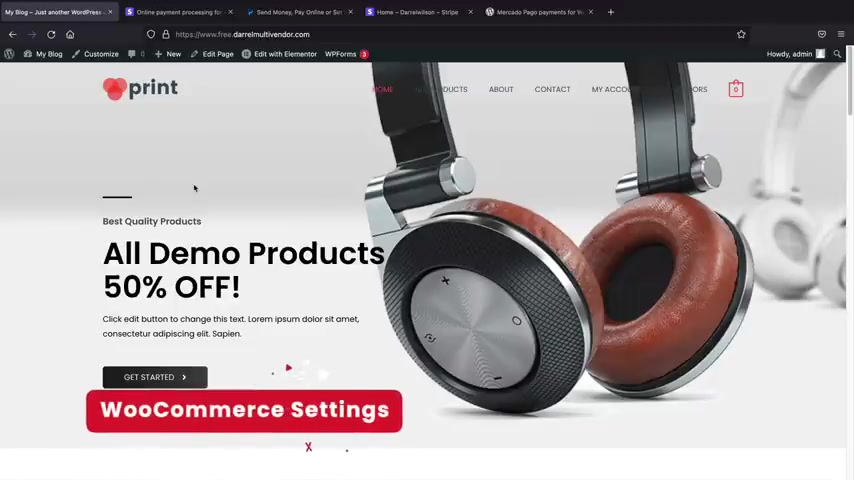
Now , essentially what I did here was I just used one of the starter templates , but I replaced the images and I just kind of added my own images and colors and fonts and it looks like a completely different website .
So you can see that this just looks like , you know , something that's not on the list , but it actually is , I just kind of , you know , I use my imagination and I just recreated uh this layout using one of the Astros starter , premade templates .
Now , if you guys do want to upgrade to the pro uh I have a discount and a link in the description .
If you guys do want to have access to any of these Pro templates .
Uh These are just more um ecommerce uh templates you guys can use uh for your multi website , but you don't need to do to do that right now .
So let's just go to free .
And the demo that we're gonna use is this one right here called custom printing .
So once you click on this , click on import complete site and it's gonna ask you a few questions .
It's gonna say like uh you know , who are you ?
I'm just gonna say I'm a , you know , intermediate , I'm building a website for myself and I'll click on next and here you can choose to sign up for their , uh , you know , their emails and their promotions if you don't want to , you can just click on skip here at the bottom .
All right , now it's going to import all the plugins and the demo content onto your new website .
So , just give it like one or two minutes .
All right .
Awesome .
So , once the demo content has been imported , just click on view sites .
All right .
And this is your new wordpress website .
So if you kind of scroll down here , uh you'll see that uh all the demo content has been imported uh correctly .
All right .
So you can just go ahead and take a look .
Also , you can check out the other pages like the about us page , you know , make sure everything looks good .
Also , if you go to all products , uh Astra has imported some demo content for us .
So these are just demo products , but you can easily just replace these with your own products .
But uh it creates everything for you .
So the shop and everything else .
So before we go on any further , let me just give you guys the quick basics of mentor and wordpress .
So let's say , for example , you want to design your website , you'll click on edit with element to here at the top .
OK ?
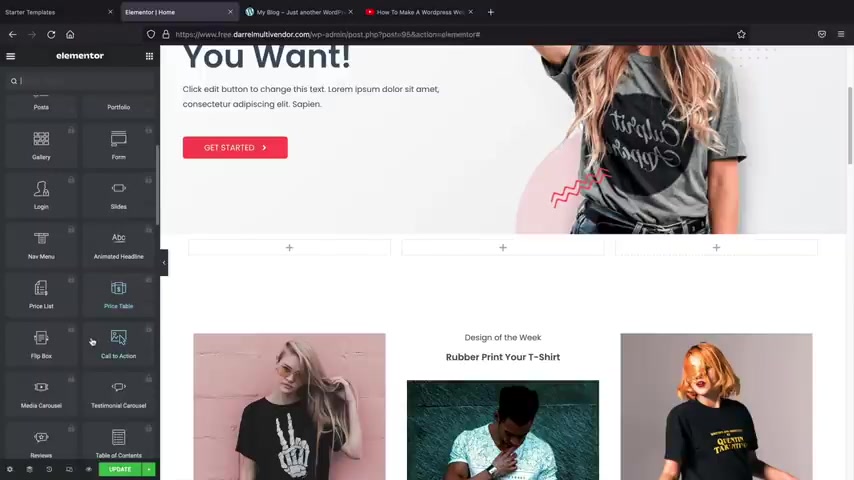
Now on the left side , you're gonna see widgets and you can drag and drop these widgets onto your wordpress .
Website .
So you see how there's this little blue line , you can just kind of , you know , drag and drop these elements like a button here and uh an icon and uh there , there we go .
And then there's always three tabs , right ?
There's the content , the style and the advanced .
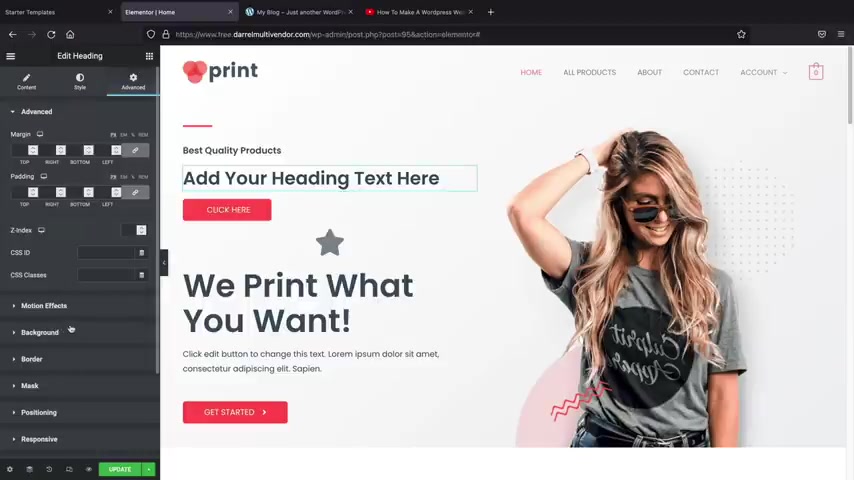
So the content actually changed the contents and the positioning of the actual uh elements .
The style will change the color topography , tech shadow and everything else and then advance gives you like the margin and the padding options .
And you can also do things like um add in effects , you know , like there's like motion effects and little like animations you can have for your specific elements .
So that's kind of like what these are all referring to .
So you'll see here how it says fade and down , fade and right and you can change like the animation and stuff like that .
So uh that's what the advanced tab refers to .
But uh I want to delete these .
So to delete elements just right click and delete , right click and delete and right click and delete .
Now , let's say for example , you want to add in like a new section here .
So maybe you want to add in a new section in between these .
So I'll just click on this little plus , hit this little uh column and then you can select how many columns you want .
So I'll just select three , you know , why not ?
And then I'll go to the elements tab and then we can just drag and drop elements in here .
Now , you can see here on the left side , there's these PRO elements and these are exclusive to elements or pro .
Um You guys don't need to get elements or pro for this video .
But if you guys do decide to upgrade to the Con pro , they , you have some elements that work with the Doon pro and Element or Pro .
So I'll leave a link below to Element or Pro if you guys decide to buy it out later , but you guys don't need to buy it now and you can just go ahead and just drag and drop these Element boxes and you know , this is a demo and then here you can change the icon to whatever icon that you'd want .
So they just , they do have tons of elements .
You guys can kind of go through and , and mess around with and you know , you can get some beer and just , you know , dragon elements all day , you know , here we go .
So uh right here you can upload your own image and stuff like that .
Now , one thing I do want to point out really quick is how to added spacing in between the top and the bottom here .
So let's click on these six dots and go to the advanced tab for the padding .

I want to uncheck this and all you need to do here is just add in padding , which is space to the top and also to the bottom like that looks good .
All right .
So that's just a quick little overview of how to use this page builder .
Now , I'm not gonna go through all the basics with you guys because I already have a full another video dedicated on that .
It's about an hour and a half long and to speed this video up as much as possible .
I just don't want to sit there and talk about every element because we can easily sit here for another uh one hour .
You know , like this is how we do it guys .
You know , it's like it's like , uh it's very simple , you just mess around with it .
But um that's how like you would use the page builder in a nutshell .
Now , whenever you want to make changes , just click on update here at the bottom .
All right .
Now , one thing I do wanna talk about quickly is just how to add pages and add them to the menu .
Once we do that , we will then talk about how to customize this page and make it look like something like this .
It's pretty simple , right ?
But uh I'll walk you through that in just a bit .
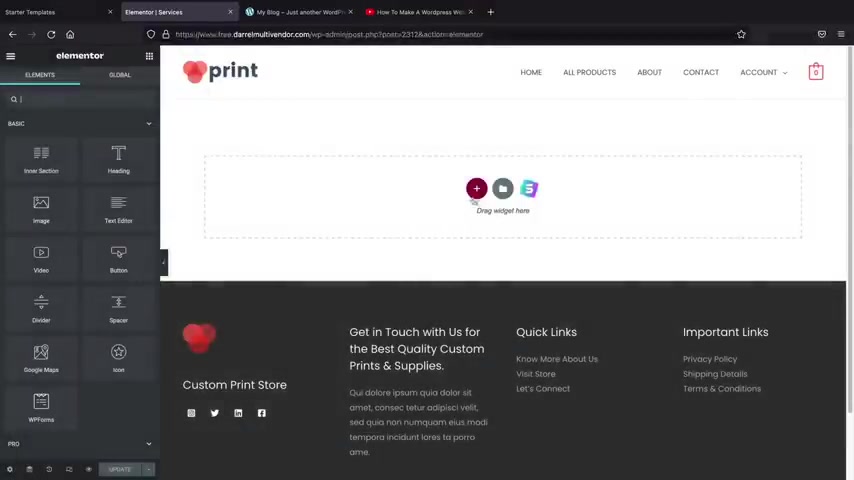
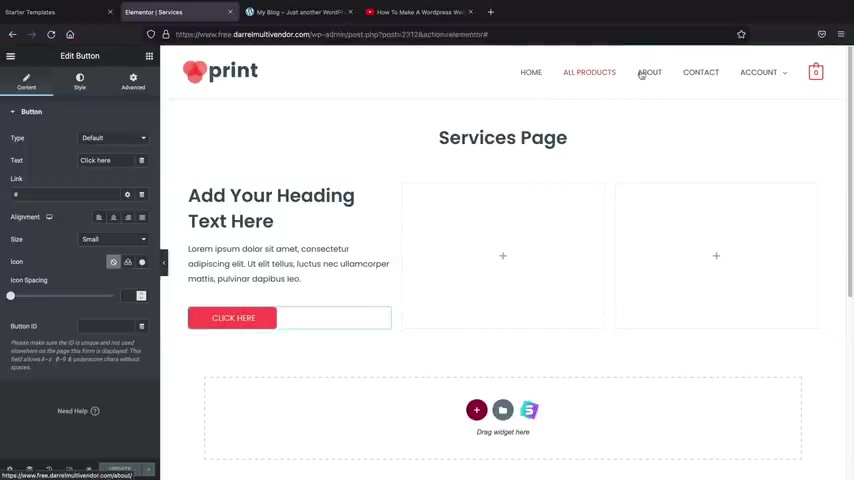
But to add pages to your website , just go to plus new and go to page and this would be like the services page , right ?
Services , right ?
Services page and then up here , I'll click on publish and publish and then I can view this page or we can edit with element or so , just like we actually uh use the page builder on the other pages .
We can keep using the page builder to design the rest of the website .
So here we go , this is , this would be like your services page and you know , you guys can just go ahead and drag in elements here .
You know , we can add in a heading like uh this would be like the , you know , the services page right .
Here we go services page and then I'll send it and then on the advanced tab , you guys can tell I'm a pro at this stuff , right ?
Because like , you know , II I know what to do , but this is like a , you know , here we go services page and then maybe we can add in like a background color or something like that .
So uh you'll just have to kind of go through this on your own time and just kind of learn how to just drag in elements .
It's pretty simple , you know , you guys can see just by looking at this .
Um It's really simple to use and learn .
But um that's how you guys can use the page bolder on other pages .
Now , let's say , for example , you wanted to add this page to the menu , right ?
So we have this menu up here .
Uh Let's go ahead and quickly add the services page to the menu .
So I go to exit a dashboard .
All right , then we'll click on this little uh wordpress logo up here and then we'll go to appearance and go to menus .
Now , right here , we have select a menu to edit .
I want to select the main menu , right ?
Because this is the main , main , primary menu of the websites .
And on the left side , you're gonna see a list of all of our pages here or click on view all and we'll just find the uh services page , right ?
So services add to menu and then you'll see a list of all the pages and we can kind of drag and drop these pages uh wherever we want on the website .
Once you drag in the page to the place you want at the bottom , right ?
You'll click on save menu .
All right , cool .
Let's take a look here at what we've done .
All right .
So now we have the services right here .
So we have the product services about contact .
And if you click on the services , uh it'll , you'll see that it was that page that we were working on .
So it's really simple to add pages and use this builder and also add them to the menu .
Now , let's go ahead and quickly talk about how you guys can design and customize this page really quickly .
So I want to turn it in something like this right here .
So I'll just give you guys a quick crash course on how it's to add in background images , adjust this text .
I also do have demo images for all of you guys in the description below this video .
So this will help you guys follow along in this e-commerce tutorial .
So the top right here , let's click on edit with element or and let's just go ahead and just design this home page and then we'll jump into the multi vendor aspect of this tutorial .
Now , if you guys do already know how to use element or there is a time stamps in the description where you guys can skip this small section .
But if you guys are brand new to wordpress and you have no idea how to use this builder .
Uh Let me just go ahead and show you how to design and customize uh parts of the website .
Now , I already showed you guys how to drag in elements on this page , right ?
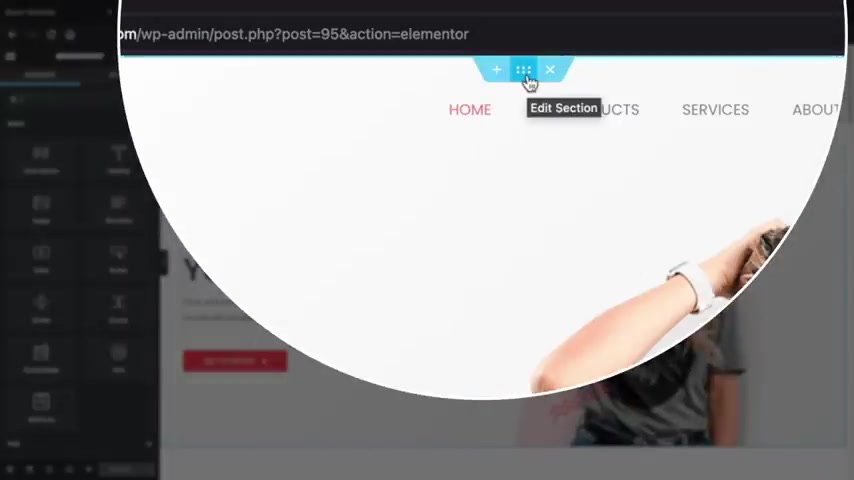
But let's say , for example , you guys want to change this background at the top right here , we have these six dots .
So I'm gonna click on edit section and then go to the style tab and then for the background , I want to select a classic , but here we have image , right ?
So I want to select a background image here .
So I'll click on image and I want to upload files now really quickly .
Uh Astra does have a Pixie Bay integration where you can use uh images from Pixie Bay and you can just import these as your background .
So if you want to type in like a sunset or something like that , they have tons of images where you guys can use uh courtesy of Pix The Bay .
So yeah , if this applies to you , you guys can go ahead and , and knock yourself out .
There's some really nice images .
I mean , they really do like look at this like I don't even know how they get these images , you know , they're really nice .
But um what I'm gonna do here is go to upload files and this is how you would upload your own files to your multi website .
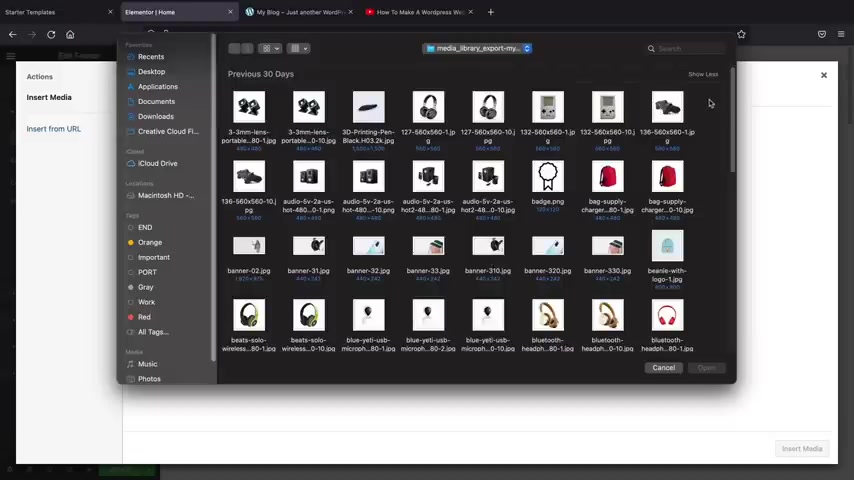
So right here , I'll click on select files and here is a list of all of the demo images that I have created for you guys .
So you guys can go ahead and just select all these images here and then you guys can just upload these to your wordpress website .
So I'll click on all these images and then I'll click on open and then just give it about like a minute or two to upload all these images .
And remember these images are in the description of this video and they are for free .
You can use them on any website you want .
All right .
So I uploaded those images .
Now , the image I want to select from my background is this one right here , I'll click on insert media .
So this allows us to change the background .
Now , um you guys might also notice that this girl is here and that the image is kind of skewed .
Not to worry , I'll first click on this girl and I'll delete this .
Then I want to actually make this full width .
So let's go back and click on those dots and go to layout .
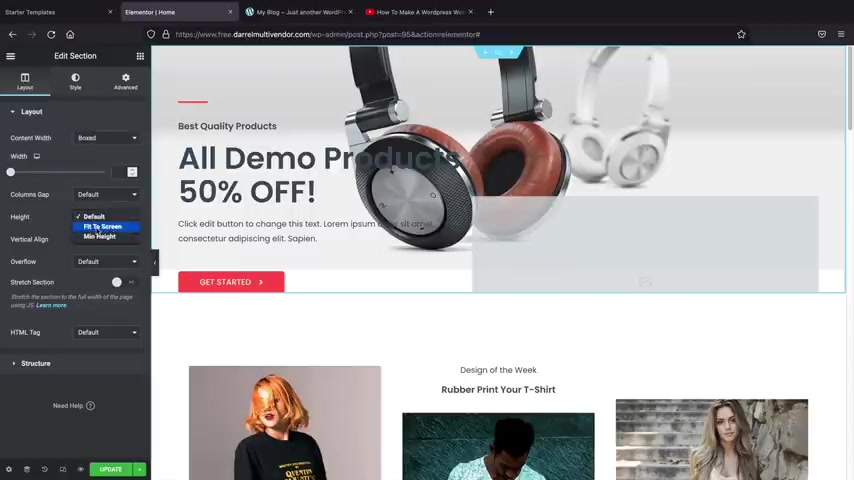
And now for the height , we can select the height to either uh fit to the full screen or we can give it like a custom height , you know , something like that , something like that .
There we go .
Now , also you might notice that this image is kind of like uh it's kind of cut off so we can force the image to cover the whole section .
So if you go back to the style tab for the actual size , we can do cover or contain , but I think cover works best and I don't want repeat .
So let's do no repeats and then we can go ahead and position this uh to where we want this to go .
So for example , I'll just do custom and then kind of put the image where I want it to be , right ?
Something like that minus 800 pixels .
And if I want to see what this looks like , full width , I'll just close that .
And now you can see how that looks a lot better , but uh I might want to actually move that .
Uh Here's click on the dots again .
I might want to just , you know , move this back just a little bit here .
Let's just do 600 .
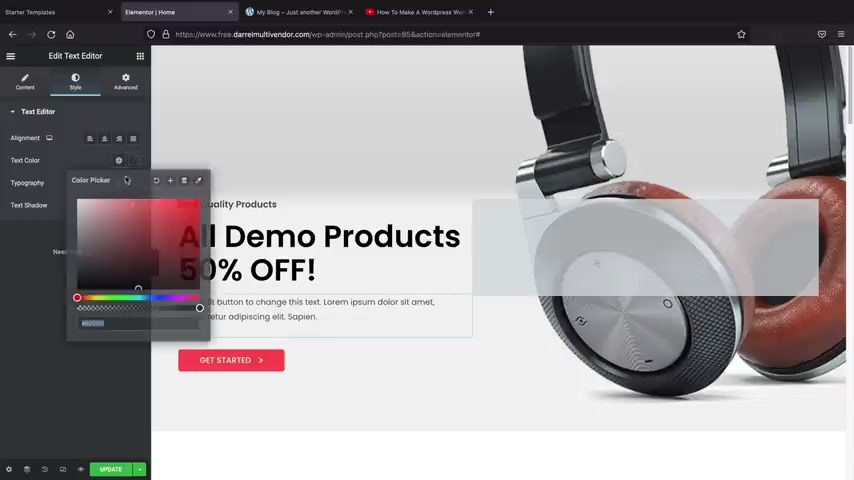
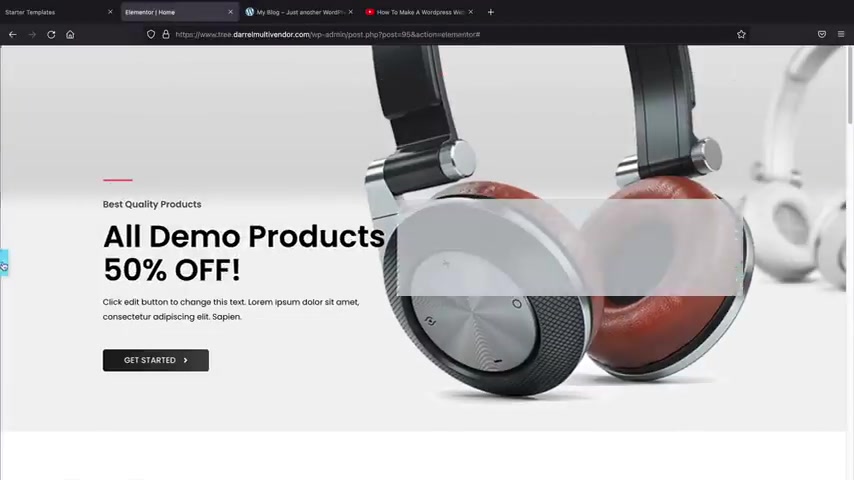
Now , the next thing I did here is I just changed the text to a solid black .
So what I can do here is change this text color to black and I can do the same thing for this text .
You know , I can just adjust the background color , right ?
And uh also for this button , you guys might notice here how I have this black button , but I also have this other gradient button over here .
Um So this is actually a gradient button because I just didn't want it full black .
So to change it to a gradient , I'll click on this pencil , go to the style button .
And for the color for the actual background color , we get to like gradient .
So I think I put a black background and kind of like a a small , a small white right here .
So here I'll do black right ?
And then we just did this really faint , faint gray or something like that .
And then I just changed the location a little bit .
So you can see how we can adjust the location .
I'll just angle this a little differently .
So I put the white more in the end .
Yeah , like something like that just a little fade on the tip right there .
So that's how I basically made that , you know , landing landing page in a matter of seconds , you know , it was really simple .
And then of course , I just changed the logo and also this divider , we can just change that as well , do something like black .
So for the style , uh we'll just change that to black and then I'll just click on update .
Now , we'll talk more about the logo and also the menu a little bit later in the video when we talk about theme customizer .
But you can see how quickly you can adjust the website and change it just by changing the colors and the background and the images to make it look like a completely different website .
So now that you guys have a good understanding of how to use the elements or page builder , uh let's go ahead and move on to the next section where we are now going to activate the plug in to kind of turn this website into a multi vendor e-commerce website .
So to log out of this builder , we'll click on this hamburger menu and click on a view page .
Now , as of right now , if we go to all products , this is an e-commerce website .
So people as of right now can come to this website and purchase these products and they can check out and they can use their credit card .
We will get into uh creating products and everything in the next section .
But uh I'm just letting you guys know that this is a fully functional e-commerce website .
Now we need to add the multi functionality to this website .
So let's do that .
All right , cool .
So at this point , you guys have a fully functional e-commerce website and we're all ready to go .
Let's go ahead and move on to the next step and let's install the free plug in that allows us to turn our e-commerce website into a multi vendor e-commerce website .
So after we install this free plug in , uh vendors can sign up on your website and they can create and list products and then you guys can kind of split up commissions .
So you guys ready .
Let's get started .
Let's go to my blog and go to dashboard .
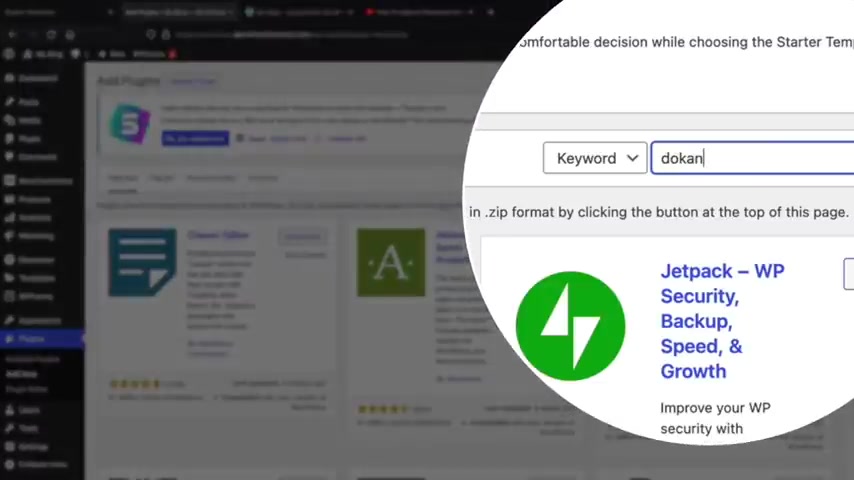
Now let's go down to plugins and click on add new for the search plugins .
We're gonna type in Doon Doon is a plug in that gives this this e-commerce website , e-commerce functionalities .
So let's click on install .
Now .
This is the plug in here and click on install .
I'm gonna close this tab and then I'll click on activate .
All right , cool .
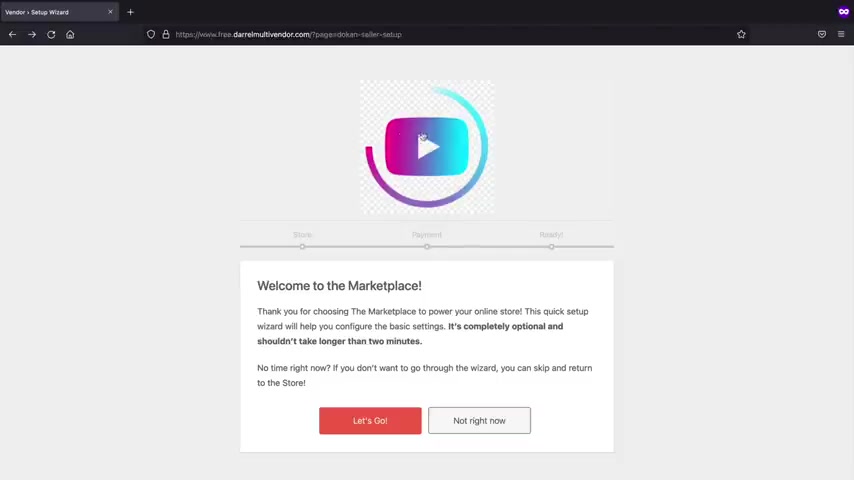
Now it is prompting us for a setup wizard .
So let's just go through the setup wizard really quick .
Let's click on , let's go .
So this is the store URL .
This would be the actual name of like the the store slash vendor .
So you can change that URL .
But uh I just want to leave that standard and we can adjust all these later in the general settings .
But this is like the who pays the shipping , who pays the tax .
And again , we can adjust this a little later .
So you don't have to make your decision on that .
Now , let's go ahead and click on continue .
And then here you can select either you if you want a flat rate or a percentage .
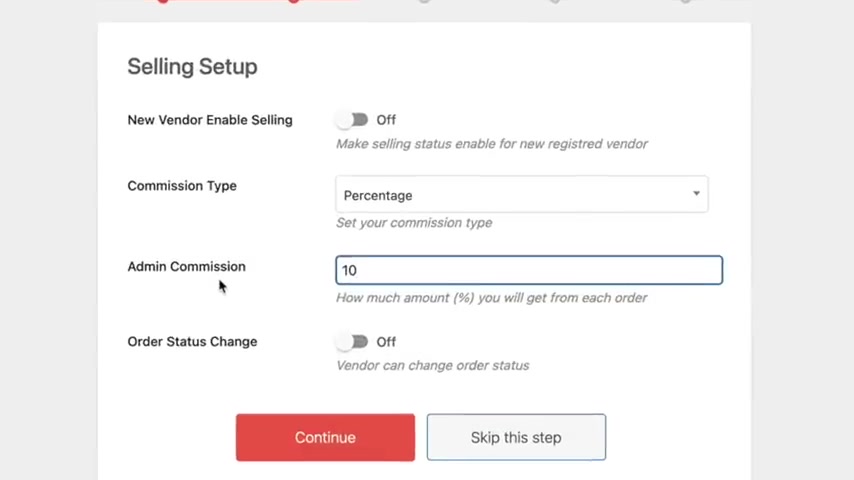
So for example , if someone sells a product for $100 and your commission is 10% you will then receive 10% of the sale .
So you make $10 from 100 bucks .
Makes sense .
You can also do a flat fee and a flat fee is just like a dollar amount .
So for example , uh $3 .
So every product that sells on your vendors , e-commerce store , you'll make $3 off every purchase or every sale .
But I think percentage is more practical almost like it's 2 15 .
So our , our not 2 20 our commission rate is 20% and I'll click on continue here .
You have withdrawal methods so we can select paypal or a bank transfer .
Uh We will talk more about these options again a little bit later when we um you know , go through the withdrawal and stuff like that , but I'm gonna turn on bank transfer for now .
Now , here we have minimum withdrawal limits .
So what is the minimum amount of sales they need to make in order to withdraw ?
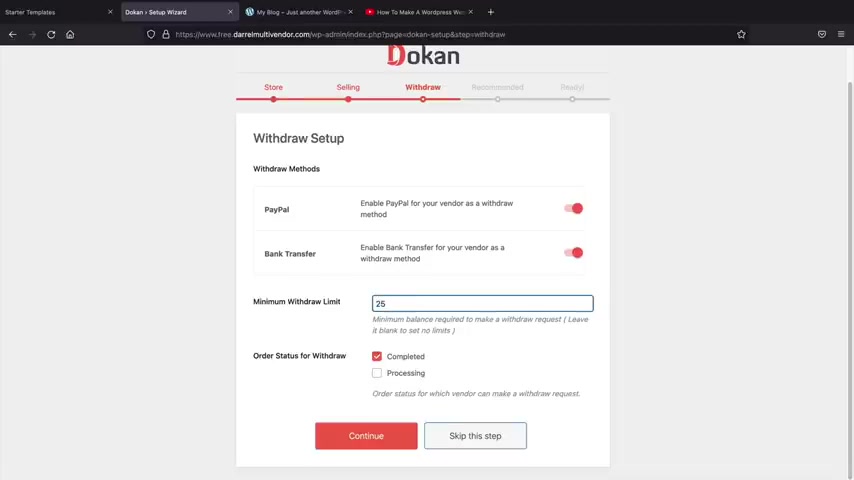
So if you put like 25 then they must have $25 in sales to then ask for a withdrawal .
So that's what the minimum withdrawal limit is referring to .
Uh , once you select that we'll click on continue .
Next , we have some plugins .
Now , these are just additional plugins that you can have on your store .
Uh I'm not really gonna be covering these too much .
These are like email marketing S MS notifications and also a tracking .
However , woocommerce already does have tracking .
So I'm going to uncheck these and click on continue .
All right .
So now it's saying your marketplace is ready .
Click on visit Doon dashboard .
All right .
So this is the actual dashboard for Doon now , really quickly just in case you're brand new to wordpress .
In order to use Doon , you will need to have the Woocommerce plus installed .
Woocommerce is a plug-in that gives your website the functionality .
So do is more of an add on .
Ok .
So I just want to make that very clear .
We make products with Woocommerce and do is an add on that allow us to turn these products into a multi vendor website .
If you do not follow the demo and you do not have uh Woocommerce installed , you can go to plugins and click on add new and then for the search plugins just type in Woocommerce .
It's a free plug in .
It doesn't cost you anything at all .
And all you need to do is just install this plug-in .
Now , this is what turns your plug in into an e-commerce website .
Do con is what turns your website into a multi ecommerce website .
Makes sense , right ?
You guys got that .
Oh , I didn't lose you .
Right .
But uh woocommerce was automatically installed when we imported the demo website .
So we don't need to install it .
It has already been installed for us .
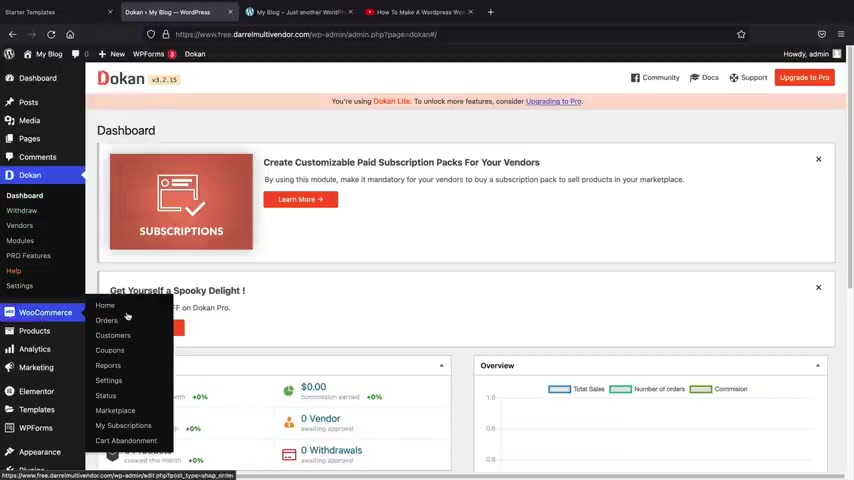
So let's go to the do dashboard .
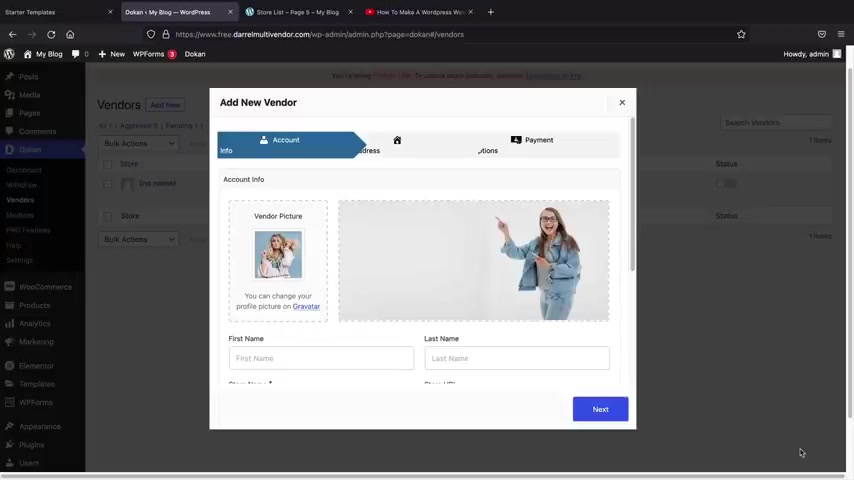
Now , the first thing I want to do is I want to show you how to manually create vendors and products .
So vendors can actually register for free on your website automatically .
However , let's say for instance , you just want to know .
Well , how do I add my own vendors ?
Let's do that under the vendors tab , you'll see you have a list of vendors .
So whenever people sign up on your site , they will all be displayed right here .
But let's first create our own vendor .
So this is the vendor's picture , right ?
So let's click on vendor picture and here you can upload a picture of your vendor .
So I'll just select this girl , right ?
And then we can crop it , show a little bit of stomach , maybe , maybe that'll make more sales .
Who knows ?
Or no , that's it .
All right .
We , we can't crop it .
That's all she gets right now .
We can also upload a banner .
So the banner is the image that will be displayed on the back of the shop .
For example , I'll go over here to my store list and just give you a visual .
So these are actual people who've registered on my demo website guys .
So I'm sorry , but uh I'll just go to the last page and you'll see that we have these background uh banners .
So that's where the background banner is being uh displayed .
So I'm going to select this one here .
It's just this , it's just this girl pointing , you know , it's just friendly , you know , I'll select the image and then you can crop it to your liking and then click on crop image at the bottom , right ?
All right .
So we have the uh I guess the background image .
Now , what is the name of this vendor ?
I'm gonna put Rebecca New Smith .
What's her store name ?
I'm gonna put Becca's .
That's her store name is Becca .
Here she can put her phone number and then also her email and also she can create her own user name .
So this is like the Becca Store , you can also generate a password for her .
Now , when you create a vendor , this email will be sent to them , automatically notifying them that they created a new account .
So for example , we'll just put Patty or paddy whack .
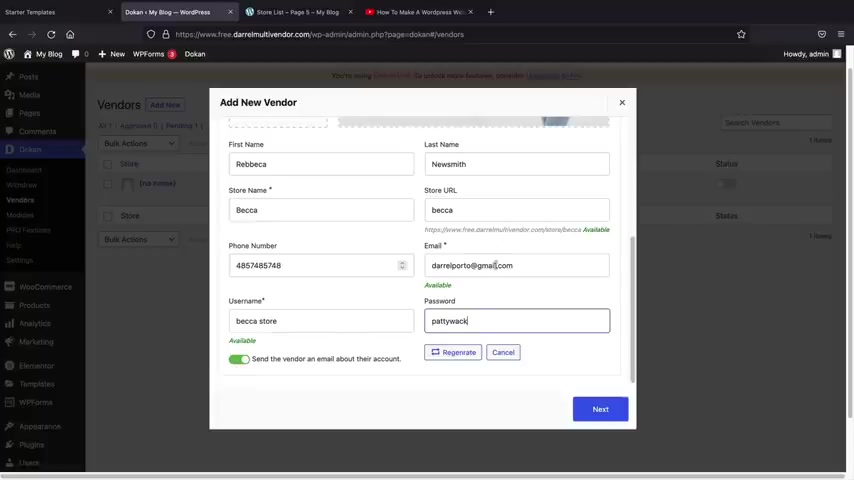
So here we have send the vendor an email about their account .
So from here , they can go ahead and log in to their uh account and then they can start adding products .
So once you set that you'll click on next , now they can enter in their street address and um , their country and state now , this is optional .
It's not required .
But , uh , if you go over here , you'll see that we have their , uh , you know , this is where the information would be displayed .
You don't have to set this information .
It's optional .
So that's strictly up to you .
But , uh , I'll click on next and then we have payment options .
They can go ahead and enter in their account name , their bank name , the routing number and their bank address and all this stuff .
And this is only available for you to see .
So this will not be available for the um you know , for your users .
Uh I'm sorry , it will not be displayed on your store .
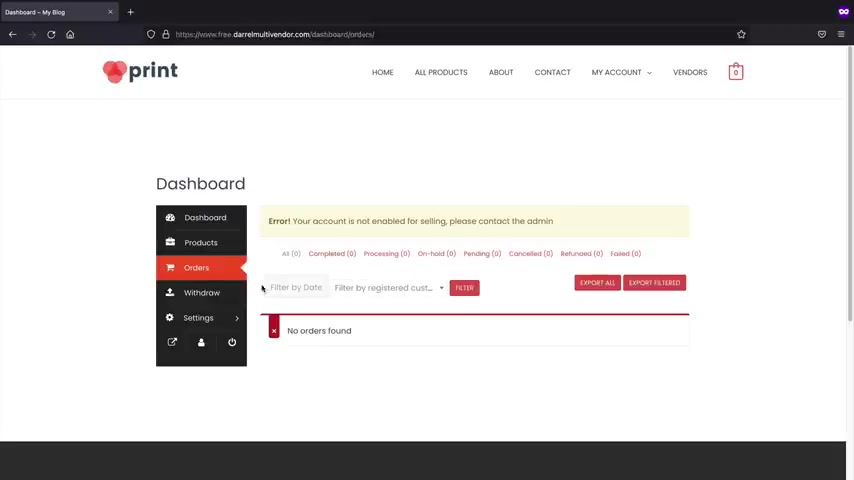
They can also enter in their paypal email and uh you can click on enable selling , this will allow them to start selling on your websites here .
You have published product directly .
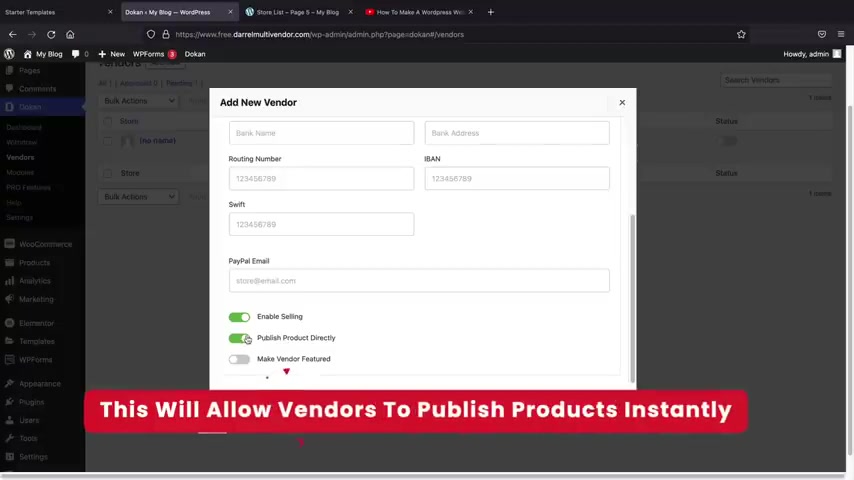
This will basically say that they don't need your approval .
So it'll just go ahead and you know , they'll just be able to publish the products without pending and then this is make featured which you can see here .
We have this feature tab .
So that's what that's referring to , but I'm gonna go ahead and just leave all of those unchecked except for this one and then click on create vendor .
Sorry for that text is being a little weird up there .
Sometimes , sometimes weird stuff happens , but there we go .
So now we have our vendor and uh we we now have a live vendor on our website .
And right here we have this status .
Now , if you uncheck this status , that means you disable them from selling on your websites .
So at the bottom , right , it says this vendor has been disabled .
If you want to enable them , you will check that and this will allow this user to continue to sell on your website .
So that's how you can create vendors on your website .
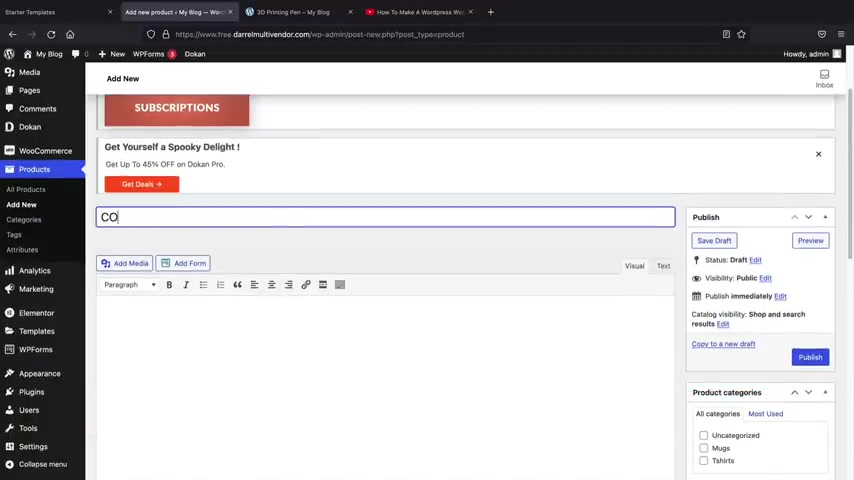
Next , let's create a product .
So right here we have products , right ?
And I'll click on add new and I will go back to our demo websites just to give you some examples of where this is just in case you're not sure of how these products are displayed .
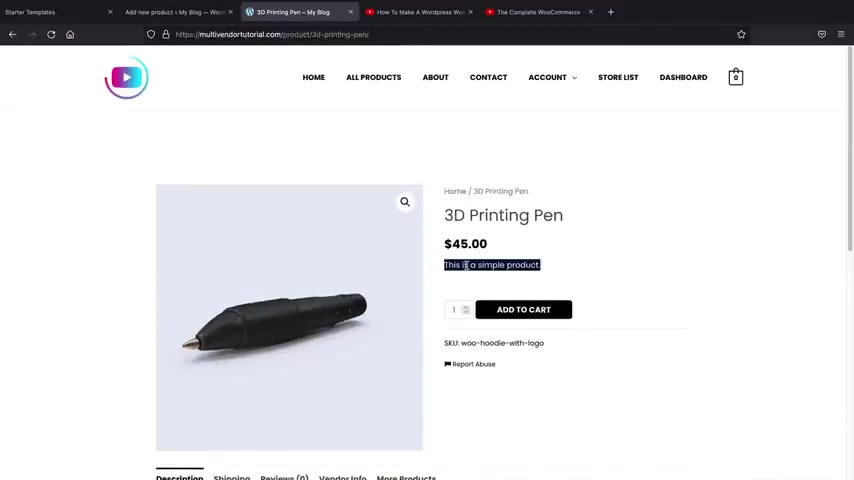
So you have this 3D printing pen , OK ?
So this is the name of the product .
So I'll just do like uh the cool headphones , right ?
Cool headphones .
I'm gonna go ahead and close all these banners here .
These are getting really annoying .
They're a little aggressive with these banners .
It's kind of , it's kind of too much .
What do you guys think , you know , write them an email be like , hey , I was watching Darryl's video and your ads are way too much .
But uh these are cool headphones .
Now , this is the long tail description .
So this description will be displayed at the bottom right here .
OK ?
So you can put like , you know made in China made in India , you can talk about the materials , whatever .
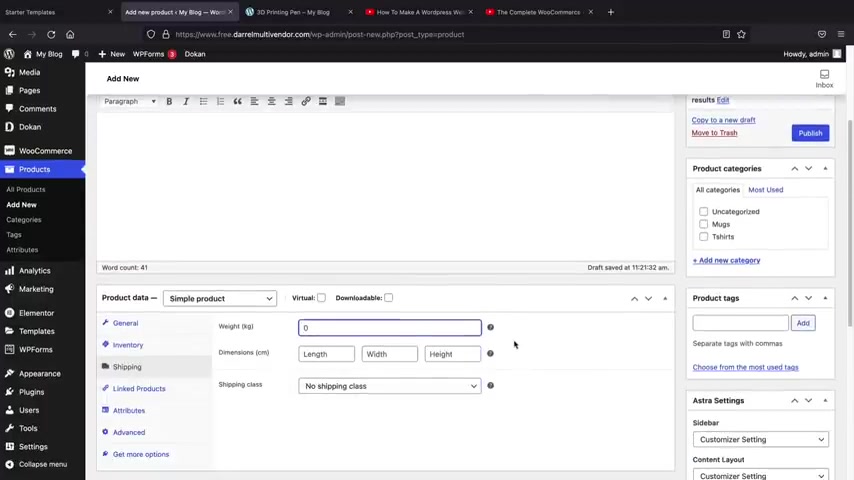
Here we have price , I'll put $100 and we do have these other options like inventory , shipping , link products and stuff .
Now , to be quite honest , guys , I have a full another video on Woocommerce .
So this is the Woocommerce tutorial .
It's about two hours long and I go through pretty much every single option that Woocommerce has to offer .
However , I'm not going to go through everything because I've already made a full another video on that .
And again , this video is more for the multi vendor aspect , but you guys can learn all this just by simply watching .
So we have the price of the product , right ?
And you know , you can go ahead and select inventory like a skew number in stock .
Also , you can put the shipping dimensions of the length , the width , the height and also the width .
Now , before we go any further , we need to create a category for this product .
So this is gonna be electronics right on the right side , you'll click on add a new category .
Now , categories are actually uh required for this video because uh for vendors to post products , they will need to put products into categories .
We will talk about the uh vendor making products a little bit later , but right now , we are like making our own .
So here we go electronics and we'll click on add a category .
So just remember , you must have product categories in order for vendors to create products , we'll scroll down now .
Uh here , we'll just put in some short description .
So the short description is this description right here .
It's actually the most important description .
This is where you're gonna talk about the product and where you're gonna try to make sales , right ?
But uh I'm just going to put in some demo content for now just you know , just to put something in .
And then I also want to set a product image .
So the product image is the actual image they're going to see when you post the product .
So I put cool headphones , right ?
So let's put the image and we can also set the product gallery .
So these are the images that are displayed .
Actually , we don't have any on this one , but I tell you what , we'll , we'll see what they are right now .
Uh We'll grab that one , add this to the gallery , essentially product galleries .
They show more images of the actual product .
So we've actually created this product right now .
Let's just click on publish .
But I'm gonna leave this window open because I want to explain something after I make this product .
So I'm going to right click and open this in a new tab .
All right .
So there is the product , right ?
We have the short description , we have the product itself and then we have the product gallery which just shows more uh variations of the products and we have the category as well .
And when someone clicks on this category , it will then display all the products that are in that specific category .
Now we created this product by ourselves , right ?
But maybe maybe Becca had a problem and you know , we want to make this product for Becca , right ?
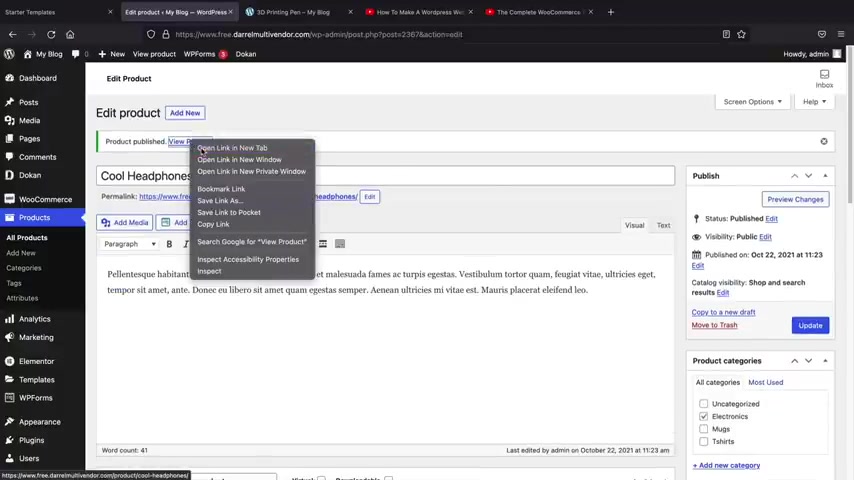
We can assign this product to Becca .
If we choose to do that on the bottom , right here , you'll see vendor , we can have Becca as the actual vendor .
So now this product will be displayed in Becca's Store and Benda will be the person credited by creating this product .
So let's go ahead and click on update .
All right .
So we have cool headphones and now we have a vendor information .
So now basically Becca is the vendor and if I click on Becca right here , it will then take us to Becca's store .
So this is Becca's Store .
Uh People can contact Becca directly , they can um you know , send her an email , we have her information and we also have a list of all the products that Becca has created .
Now , we can customize this page with the pro version of do and I'll talk more about that a little bit later .
But uh you guys can see that this is a general store where we can just see what she's doing .
We can see your information and all the products that Becca has listed , they will be displayed here .
So now that we've created this product and we have vendors .
Now , we need to actually add the store list to the menu .
You can see that we don't really have a store list .
Now , this is optional .
You don't have to do this , but I just want to show you that um you can add a store list to your menu .
Very similar to our demo websites .
We have the store list and this will display a list of all of your vendors .
These are my lovely subscribers who just put in random stuff just because they want to test it out .
You guys can also test this out by yourself .
You know , you can just see how this all looks by checking out the demo websites .
But let's go back to our website here and let's go to our dashboard .
So the next thing we're going to do is now we are going to add the store list to our menu .
So let's go down to appearance and click on menus .
Now , I wanna select the menu .
So for the menu , I'm gonna select a main menu and click on select .
Now , astra already created the menu for us .
So usually you'd have to create your own menu .
However , this is our current menu and we can add stuff to this menu .
So on the left side , you'll see view all , let's click on view all and we're gonna find the my accounts and we're also going to grab the store list and then I'll click on add to menu .
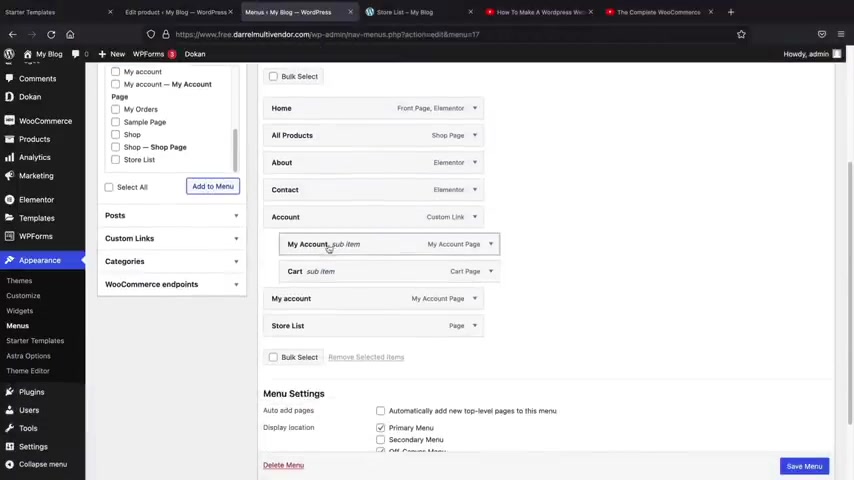
It looks like my account was already there .
I didn't even see that .
That's weird .
But uh I'll just do this , I'll just go ahead and remove this , remove this and then I'll take the cart and put that under my accounts .
Now , you can rearrange this to your liking .
You can also change the text .
So let's say , for example , you don't want this to say store list .
You can type in vendors , right ?
Vendors makes a little bit more sense .
Um Once you're done with that on the bottom , right , you'll see save menu , click on save menu .
And now let's take a look at our websites .
OK ?
So we have the home , we have all products , the about the contacts , we have the uh my account and then we have vendors .
Now we will adjust the color of this menu a little bit later in the theme customizer section .
So don't worry if you , if you like want to change this , we can adjust it , but let's click on vendors .
All right , cool .
And we'll scroll down and we will then see Becca .

So now people can actually go directly to Becca Store and they can see what Becca is selling , so they can have full access to your vendors .
All right .
So now that we've actually shown you how to create vendors , let's quickly go back to the general settings and then I'll show you how you can accept vendors on your website automatically without having to actually create your own vendors .
So over here we have con and we have the settings tab .
All right .
So the first option is the admin access .
So that basically doesn't allow vendors to come in the back end like this .
So if they do log in , they don't have access to the back end and stuff like that .
And this is actually uh checked by default .
Now , here you have the vendor set up wizard logo .
So when users actually sign up on your website , like we signed up earlier , which logo do you want displayed ?
Maybe you don't want the Doon logo , right ?
So you can white label that .
So for example , I can put in my logo , right ?
I use this one here , I think , right ?
And this is the logo that's going to display in this setup wizard .
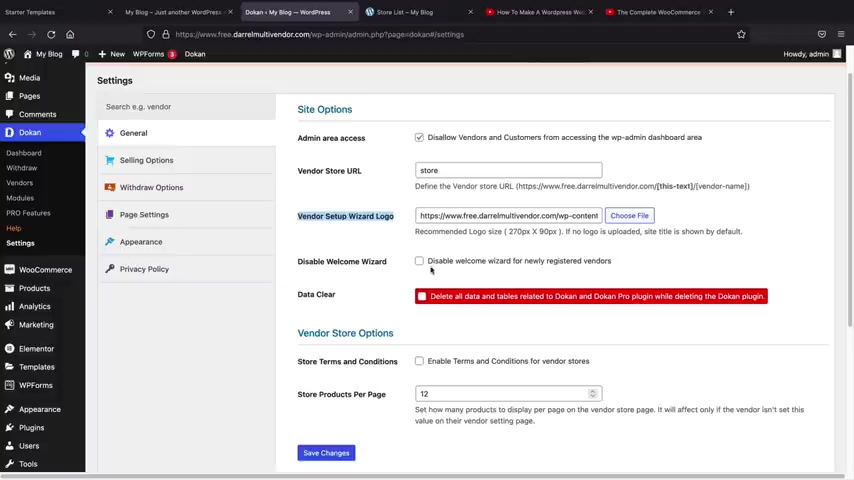
Remember how we first installed Doon and there was that logo , we can adjust it to our logo to make it look cooler here .
You have the welcome wizard .
So you can actually disable the wizard if you choose to do that .
But I think that's actually really helpful and I do want to keep that here .
You'll see the terms and conditions so you can create your own terms and conditions page and then you can have that checked .
So users must select the terms and conditions .
Uh Here you have the store products per page .
So once you select those , you'll then click on save changes now to make a um terms and conditions page .
That's really simple .
You'll just go over here back to your site , go to plus new and page .
I'll close this little pop up and this would just be like your terms and conditions and then you would type in your terms and conditions here .
Now , there's also a website where you can get a free terms and conditions for your multi vendor website .
You guys can use this website .
It's called terms and conditions generator dot com .
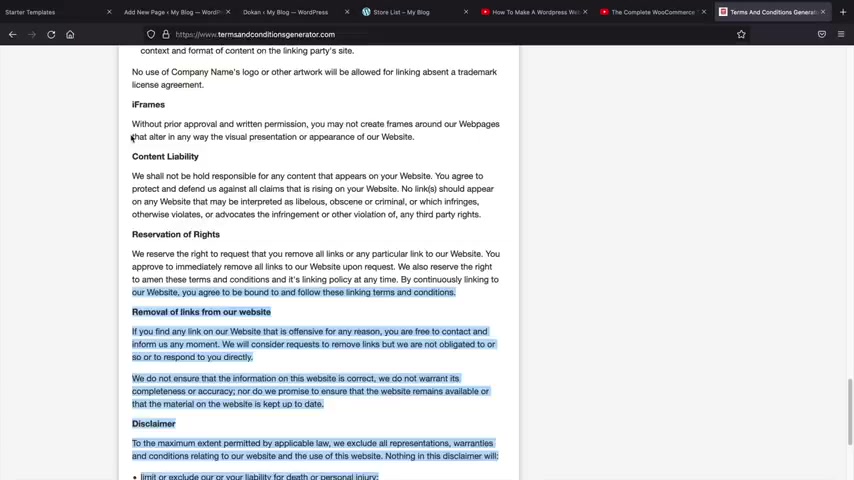
You simply input your information you talk about uh you know what you want to put like cookie , um whatever and you can adjust this , uh I guess you wanna say contract or whatever to your liking , you will obviously have to modify it and adjust it .
But uh you can have something to work with .
But uh what I'll do here is I'll just go ahead and copy this , go back to our sites and then just paste it and then publish it .
So this can be your terms and conditions .
So that means when they sign up , they must agree to your terms and conditions because uh yeah , terms and conditions actually are very important because um you're dealing with a lot of money and with other people's money .
So they might want to , you know , you might want to protect yourself and have a terms and conditions page .
So I'll go ahead and suck that box and then click on save changes .
Next , we have these selling options .
So let's click on selling options .
And here you can adjust the commission as well .

So just like before the wizard , you can set the commission , um you can allow newly registered vendors to add products .
Now , when vendors actually create products on your store , it will be put in a pending state .
That means you must approve the products that they create .
If you don't want to review the product , you can say , you know what it's ok .
I try the vendors .
Uh I go ahead and allow uploads .
So just remember that if you have that checked , they do not need your approval to post products .
So that's a very important setting .
Just remember , um they will need , you know , they will need your permission to post products .
But if you have that checked , they do not need your permission , right ?
Uh Allow a vendor to update status order .
This allows them to just change it to like processing to complete it .
Not a big , not a big deal .
Uh vendor switching allow vendors to switch to a vendor accounts .
I'm not really sure about that , but uh I think this is the most important one that you need to have checked or checked or unchecked .
But uh I'm gonna leave this unchecked and then click on save changes .
Next , we have the withdrawal options .
This again will allow you to um send payments like paypal and bank transfer to your um your vendors page settings .
These are the pages where your um pages that do creates are propagated .
So for example , the dashboards on the dashboard , the my orders is the my orders .
I would just leave this here .
However , we now have a terms and conditions page .
So I want to go ahead and select the terms and conditions page and select save changes .
All right , pretty simple , right ?
You guys with me , let's go to appearance .
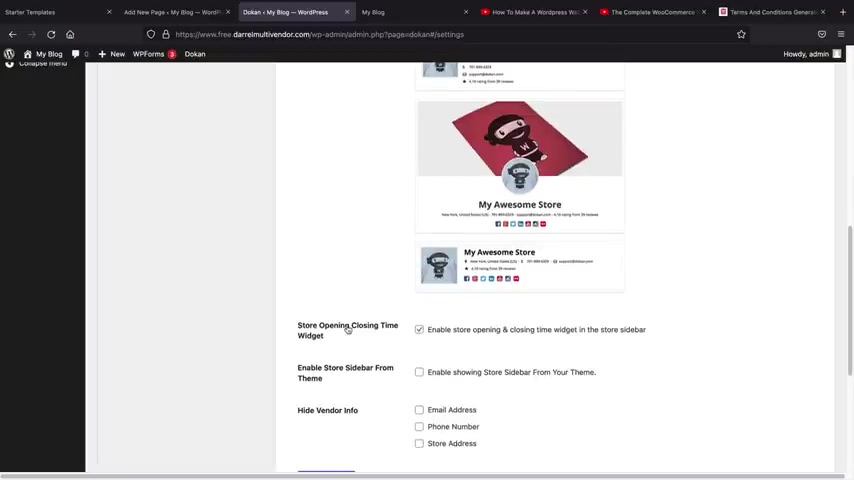
So the store header templates is the actual template of the actual uh vendor store .
So if you want to adjust this , you can change it .
So for example , if you want the picture of the girl over there in the background , we'll select that .
And uh yeah , we can adjust to say , do you want to hide the email ?
Do you want to hide the phone number ?
So maybe some vendors you don't need to display their phone number or the address ?
You can always hide that information if you choose to do that and then you click on save changes , you'll then see that this has all changed .
So now the picture of the girls down here and we have this background image like that .
So that's how you can adjust your uh header templates .
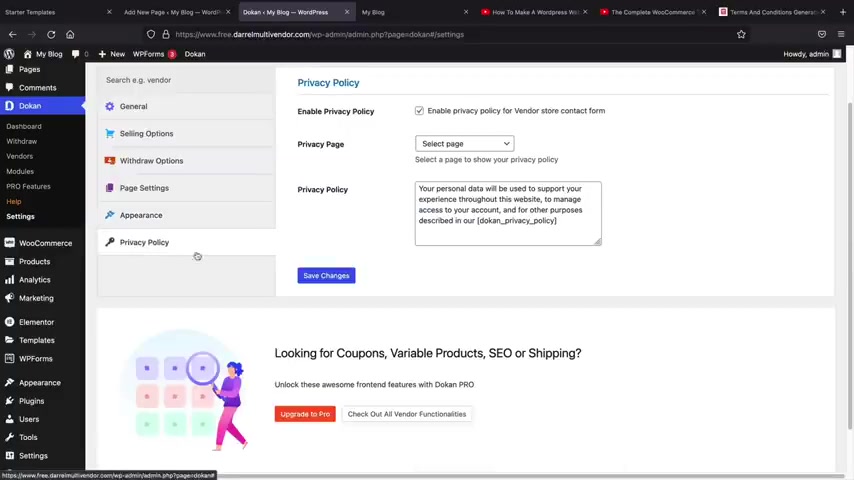
And then here you have the privacy policy .
You can always create a privacy policy just like we created the terms and conditions .
Um I'm not gonna go through that , but you might want to create your own privacy policy and then select the page .
Like for example , um you know , this right here is the , you know , the privacy policy page and then click on save changes and they will need to check this box when they sign up for your store .
All right .
So the next thing I want to talk about is how to allow vendors to register on your website .
Now , I'm gonna open this in an incognito window .
So a new private window , I'm gonna paste this and I'm just going to going to pretend that I am a random person coming to the website and I want to register as a vendor .
So here you'll see that uh we have my account now , you can change the my account to something like register or something like that .
And here you'll see we have login and register so you can register as a or they can register as a customer .
But I want to register as a um as a vendor here .
So I'll go ahead and put in my , you know , an email address and I'll put , I am a vendor and then here they'll put in their information .
So I'll put in Darrell Wilson , uh Wilson , my shop name , right ?
So they can just , you know , sign up on your website directly and this will be in a pending state .
So , don't worry but I'll put uh you know , this is my number on 702 , the Las Vegas zip code , man .
There we go , Nevada .
I'm a Nevadan resident , you know .
So I feel good .
Uh Once you actually uh once they go through that process , they will then click on register .
All right .
So once the vendors have registered , they will then be brought to the setup wizard .
And here is the logo .
I probably got rid of the background , but uh you guys get the point right ?
So there's the logo .
So you'd want to put your logo in the doon options .
Uh From here , let's click on , let's go and they can input their store information so they can put their products per page the streets , the city , uh all of these stuff that applies to them .
They can also skip this step if they don't want to input their information .
Uh right here , I'll just click on , skip this step here .
They can put in their paypal information , also their bank name , their bank number , the name of their bank .
Uh I'll just go ahead and put in uh the paypal address .
I'll leave it like that and click on continue .
And then from here they can access their store .
So let's click on go to store dashboard .
All right .
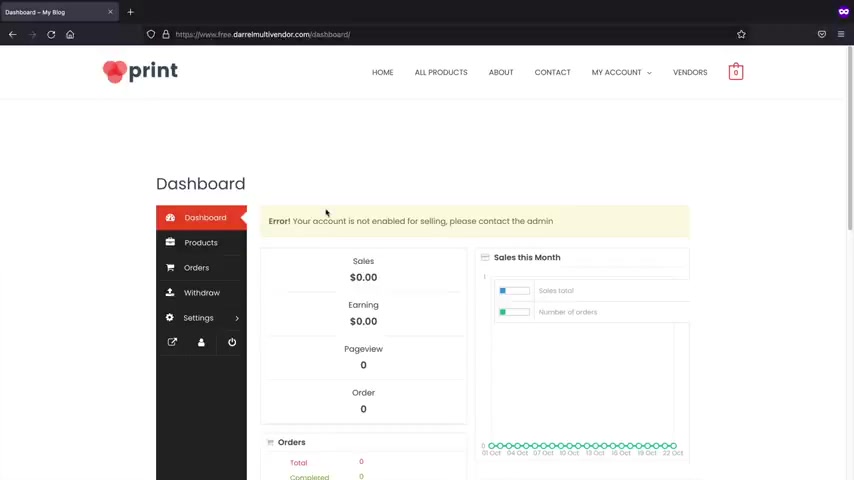
So this is the actual dashboard for your vendors here .
They can see the sales , the earnings , the page views and they have all the analytics .
They need um to create products and everything else .
On the left side , you'll see products .
Now , when they create products , this will display a list of their products .
Here is orders , the orders will display uh if they have sold the product , if they were canceled , if they were funded .
And here we have the withdrawal tab from here , they can go ahead and ask for withdrawals , however , there is no money made .
So it says you do not have a sufficient balance .
And then we also have the settings tab where they can uh you know , adjust their banner , upload their photo and they can always design the store just like BECA Store was , you know , design and everything .
They can also go to edit accounts and they can go through their account options , like change their password , they can log out and also they can click on visit store .
So now that we've created a vendor , we now need to approve this vendor to sell on our store because remember we give them the ability to sell in our store , but they are not automatically approved .
So let's jump back to our other store .
All right .
So here is my dashboard .
Now , I'm gonna go to vendors now , you will also get an email notifying you of a new vendor sign up .
So be sure to check your email and do will actually send you an email that people are registered on your site .
So now you see that we have the new vendor Wilson , but we need to approve him .
So let's go to the status and then we'll click on status .
So now we give the vendor the ability to sell products on our store .
So now I'm back at the vendor store and I'm gonna refresh this page and this , this little notice should disappear because now we have the ability to create products by yourself .
So let's add a new product .
Now , this is from the vendors point of view .
So these are the , this is like the process of people signing up .
This is the experience they'll have when creating a new product .
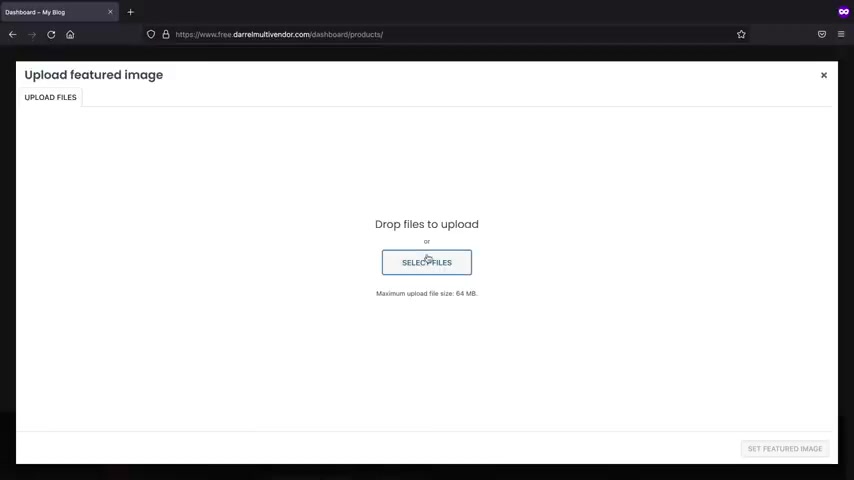
So here they'll go ahead and enter in an image , right of their product .
They don't have access to your media library .
So they will need to bring their own images .
And this will be like a , you know , portable speaker and the price is $100 .
And here we have categories .
Now you notice here how we have the categories .
So we need to have a category in order for them to list products .
So this is the electronics and then from here they can just paste some demo content .
So this is some demo contents and uh they can create the product .
So let's click on create product .
All right .
So now you'll see that this is pending review .
So you will need to go ahead and manually approve the product once they create it .
So let's jump back to our other website .
So here we go , we are back in the admin websites .
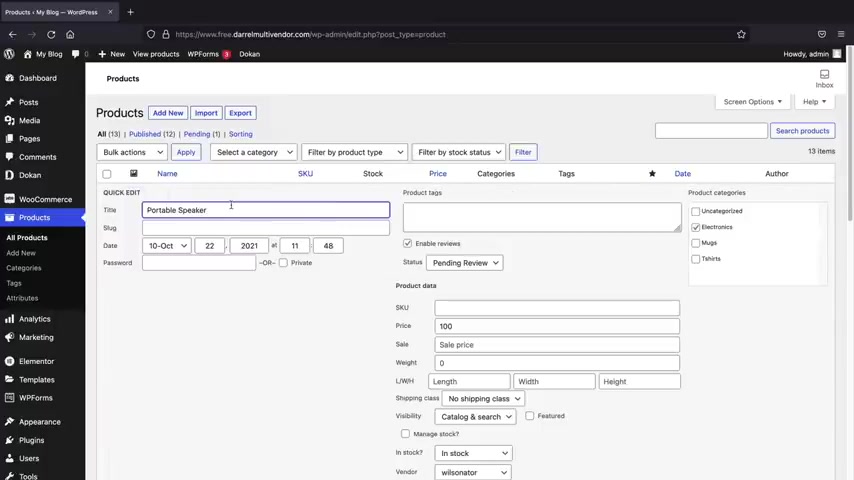
And if you go to products right here and click on all products , you will then see that we have the portable speaker but it's pending .
So we need to approve this product .
So uh if I click on quick edit right here , I can actually approve it that way by just going to published .
But if you actually want to click on the product itself here , let's just uh let's let's get out of the quick edit .
I'll click on the product and we can actually update what they've done to the product .
So if you feel like there's not enough description or if you feel there's something you need to add , uh we can click on the product and then we can add more to it right here .
So saying , hey , you know what uh they put this is some demo content but uh you know , maybe maybe we can add something for them or whatever you wanna do .
And then here you have the vendor .
So the vendor is Wilson and all you need to do is just click on publish .
All right .
So , congrats .
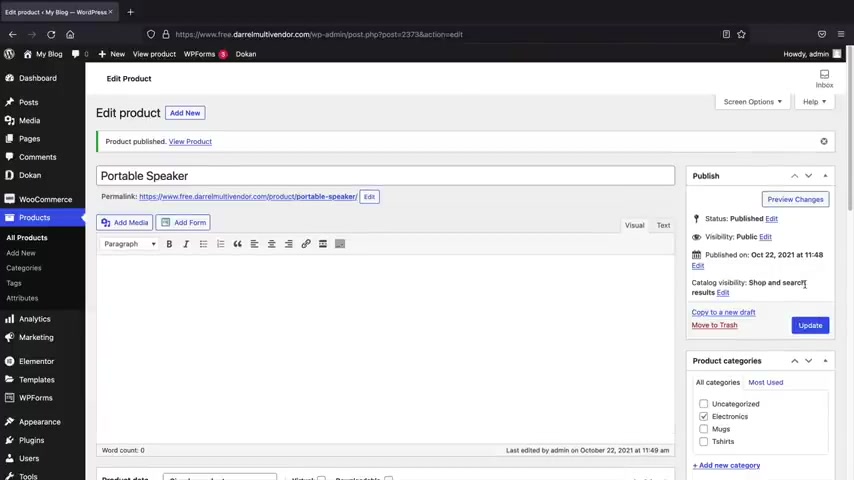
So now the vendor has actually listed the product on your website successfully and you can double check this by simply just going to visit sites and just taking a look yourself , you know , like uh is this product available ?
Well , let's just click on all products and we should see the portable speaker .
There it is .
And if we click on it , it will then say the vendor information as Wilson and this will display in Wilson store .
So um they can go ahead and see all the products that Wilson Nader has created .
So that's pretty simple , right ?
And also remember guys to check your email .
Now , every time there is a vendor signing up on your websites , every time a new product has been created , you will be automatically notified by woocommerce .
So they will say , hey , this person made a product , go check it out .
You can see that this is in the pending status and we can adjust that option again in the general settings .
So if you don't want to manually approve it , you can go in the general settings and just say , hey , anyone can publish a product if they choose to do that .
All right .
So that's pretty much the basics guys of the multi vendor part , I've showed you guys how to accept vendors and also how to approve products .
Let's jump into the next section where we will talk about the Woocommerce settings where we will talk about shipping tax and also how to add payment gateways on your website , so you can start accepting credit cards .
All right .
So let's go ahead and walk you through on how to set all this up .
Now , before I go any further , I just want to let you guys know about some of the merchants that you guys can use .
Uh you guys can use stripe dot com .
Uh You can sign up for free that does not cost you anything .
There's no credit check and you can use this uh to accept payments and also for Google pay as well .
You guys can also use paypal .
Paypal is a very popular worldwide uh payment merchant .
Um Also a lot of my users are from South America .
You guys can use the Mercado Pago payments for Woocommerce .

Uh This is a plug in and I will be making a separate video on how to add this to your e-commerce websites .
But in this video , I'll be showing you how to integrate your website with both paypal and with stripe to accept credit cards .
So let's first go to our dashboard and we're gonna go to Woocommerce and go to settings .
Now , the first thing we're going to do is we need to set up shipping and also tax .
But uh before we do that , we need to enter in our store information .
So if you want to put it in your store , you can go ahead and put it in here .
I'll just put that .
I am from uh Las Vegas .
So Las Vegas , wait , it was a city .
Oh no , Nevada , Nevada .
There it is .
And there is my zip code .
Now , this part is pretty important .
This next part .
So here we have the selling locations .
Now , if you want to sell to all countries , you can leave that checked .
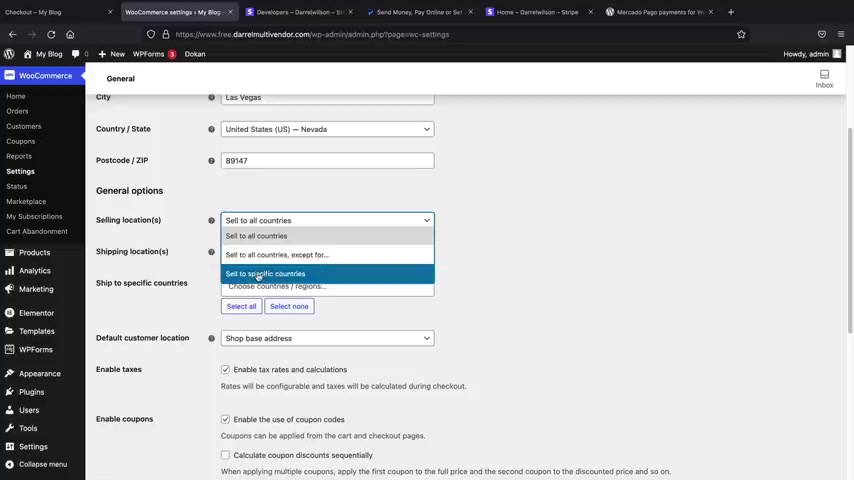
Let's say , for example , you want to sell to specific countries or you can even exclude countries .
So let's say for example , I'm in the United States and I only want to sell to Canada , Mexico , United States because they are the closest for me , you also like sell to specific countries and then you can enter the countries that you want to sell to .
So uh if you want to do business with only specific countries , you can just go ahead and put them there .
So put USA , Canada and Mexico .
And here we also have shell to , I'm sorry , ship to specific countries .
So if you sell to specific countries , you might also want to ship to those same specific countries and this will help you out just in case someone buys your product from really , really far away and you don't know the tax rates and stuff like that .
So uh I'll just do the same here .
I'll do uh All right , we're gonna do Canada , Mexico and the United States .
And then we want to make sure that taxes are enabled because taxes will give us the ability to add a tax rates .
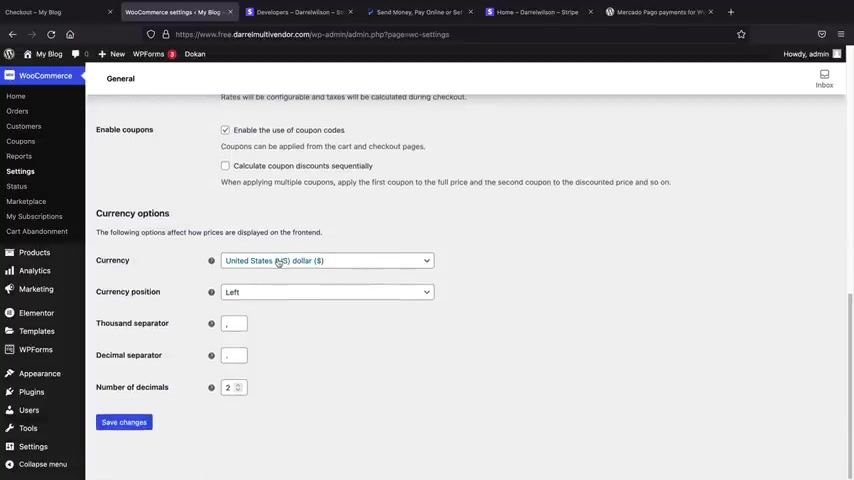
And then we want to enable the use of coupon codes here , you can adjust your currency .
So if you want to change the currency to the dollar or to any of these other currencies , you can go ahead and do that .
I'm gonna leave mine as dollar and then click on save changes .
All right .
So now that we've actually applied the tax , you will now see that the tax tab has been created .
So let's add a tax rates .
Now , in most of my other videos , if you are in the United States , I do recommend having automated taxes .
However , for a multi vendor website , I gotta be honest , I'm just not sure on how that works .
So I just want to select a standard rate of tax .
So let's click on standard rates and here we have country code .
So let's say for example , you are in a specific country , you can click on country code and you can enter the tax rate for that specific country .
For example , we will see uh you know , uh Austria , the country code is A T for Austria , uh for Bulgaria , it's BG for Canada , it's C A .
So whatever country that you're in and you want to apply a specific tax rate to that country , you will then just enter into the country code .
But uh for my , for my demo , I'm just gonna put United States .
So here I'll click on insert row .
The US country code I believe is Unite .
There is us , right ?
For United States , right ?
United States is us .
So I will just put in us , right us and then I just want to enter in a tax rate .
So for me I'm in a specific state , uh , state with , I think it's like , I think Nevada has 00 tax or personal tax , but I think they do have a tax of , I don't know , it's just about 5% .
So basically , if people purchase the products in the United States , they will be charged a 5% tax .
All right .
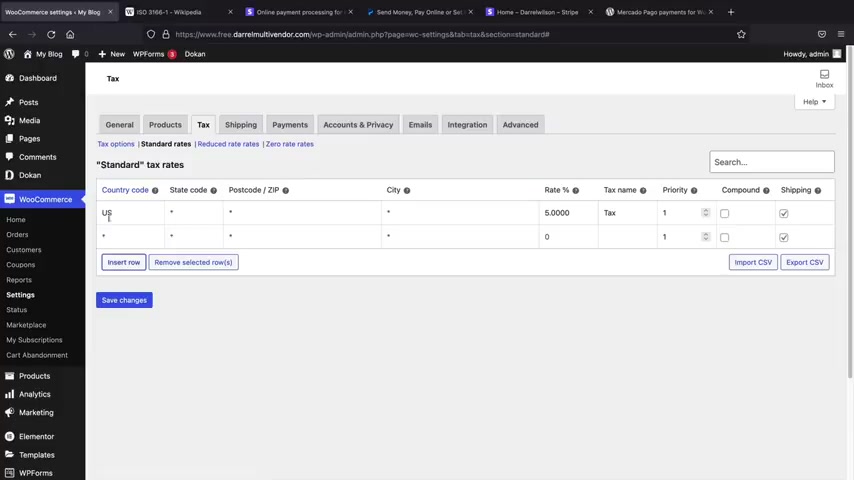
And then I will just uh click on save changes .
Now , let's say , for example , they also buy this product in Mexico or something or if you want to set a tax rate for a different country .
Uh I believe Mexico is MX , right ?
So Mexico is MX and then I'll just say the standard tax rate for Mexico is 8% .
Uh These are just for demo purposes only guys .
I do not know the tax rates of these countries .
So , uh don't copy what I put .
Um But uh this is just how you can enter your own tax rate and then I'll click on save changes .
All right .
So if someone buys our product from Mexico , they'll be charged 8% tax .
If they buy it from the United States , they'll be charged a 5% tax rate .
So that's pretty simple .
Now , let's set up shipping .
Let's click on the shipping tab .
Now , the first thing we need to do is add a shipping zone .
So let's click on add a shipping zone .
So this is for the United States , right ?
And this region is for United States .
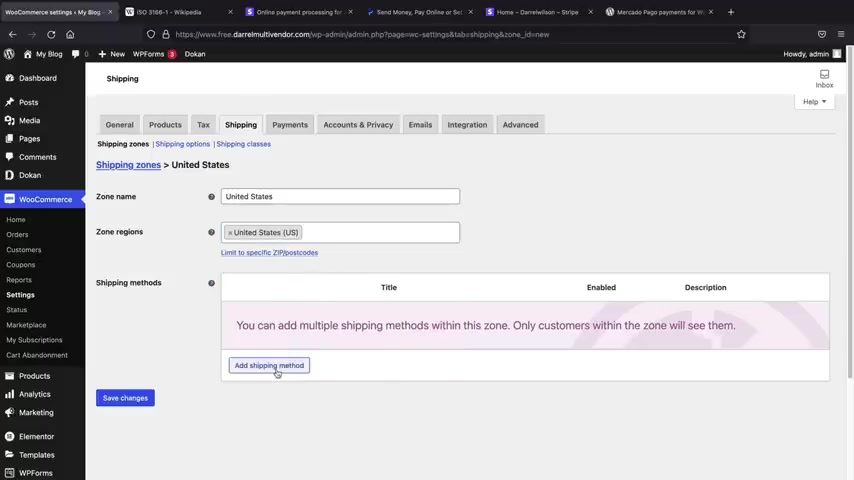
So , what is the actual flat rate for shipping for the United States ?
Well , let's add a shipping method here .
I'll select a flat rate .
Right .
And , um , I'm gonna click on edit here so we can change this method title if you want .
But , uh , we'll just put shipping , right ?
Shipping , shipping rates .
Is this taxable or no ?
I'm gonna put , no , and the shipping rate is $5 .
So , basically shipping costs $5 in the United States and I'll click on save changes .
Now , we also have shipping in the other countries right in Mexico and also Canada .
So let's set another shipping zone for uh Mexico .
So I click on shipping zones and here I'm going to add a new shipping zone and this will be from Mexico and I'll click , add a shipping method .
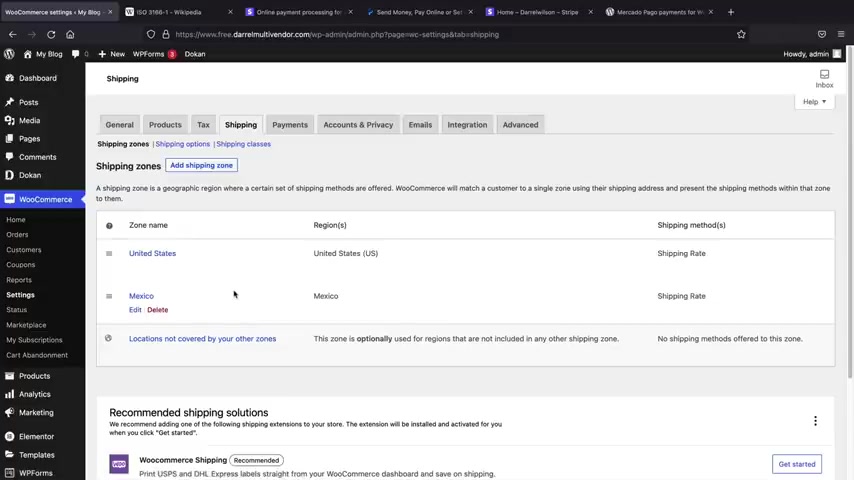
And for this flat rates , I'll just say , uh Mexico is also $7 because um , it's a little bit farther from us .
So we might have to pay more in shipping fees .
So let's click on edit .
I'll put $7 not taxable and then I'll just leave that as flat rate or you can just change it to shipping , shipping tax or whatever you want to put shipping rate or whatever .
So there we go .
So now Mexico is being charged $7 and United States is being charged $5 .
Now , let's say , for example , Canada buys our product , right ?
But we don't have a shipping zone for Canada .
So let's just say , for example , that , uh someone bought something from your store that's not in the country that you expected .
You can , you can have a fallback rate .
So that means let's say someone buys it from Colombia or from Brazil .
And somehow they got , you know , they , they purchased our product .
We can select a shipping rate for countries that are not on our list .
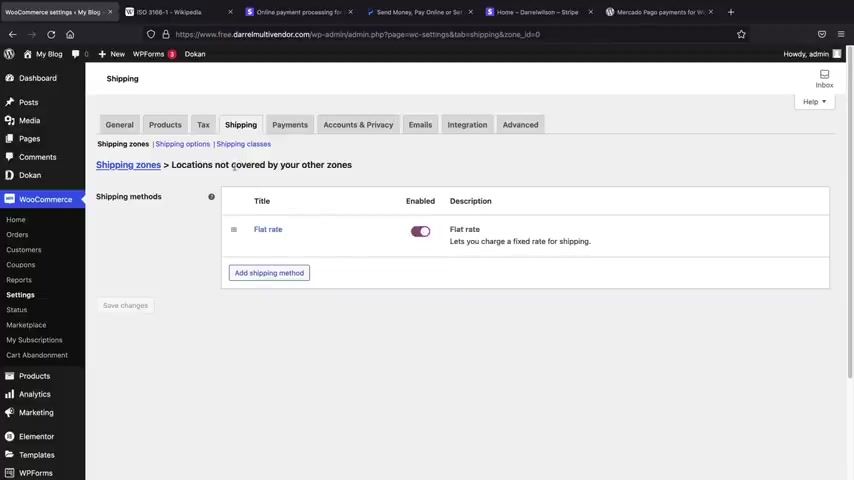
So let's click on add a shipping rate and I'll click on edit hero but not taxable .
And this is a $10 tax or a $10 shipping fee .
So what that means is if someone buys our products from somewhere that's not on our shipping zone , this is a fallback rate .
So this is , this is what will be charged by default if they are not from Mexico or the United States .
Now , there is one thing I do want to talk about as well .
Let's say , for example , I'm in the United States and someone buys something right in next to my city , right ?
I am in Nevada .
I am in Las Vegas , Nevada .
And I don't want to charge them the standard rate because there's probably the the shipping rate is probably very small .
So we can add a free shipping .
Let's click on add shipping zone and this will be Nevada and here I will type in Nevada , right ?
And add a shipping zone .
Now , instead of selecting a flat rate , we have free shipping and I'll add a shipping method .
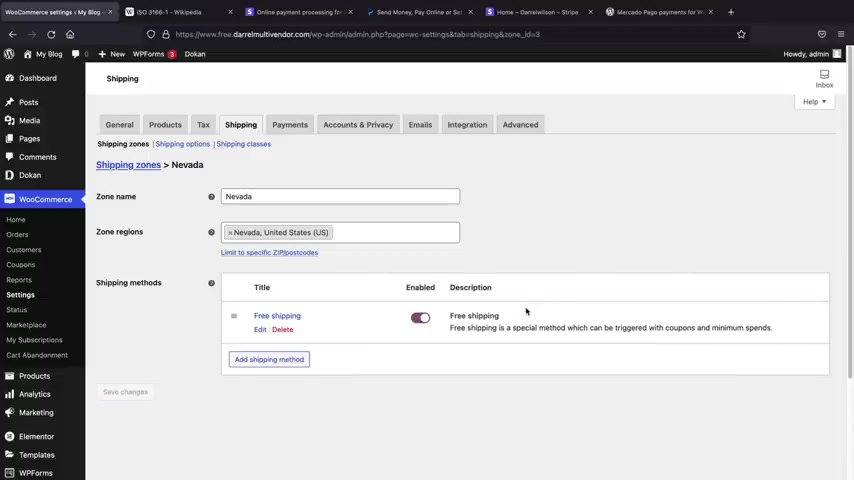
Now , you can assign free shipping to any country or any place that you would like .
You don't even have to have a specific region .
So we can , you know , charge Mexico or we can give Mexico uh free shipping if we choose to do that .
But uh right here , click on edit , free shipping requires .
What free shipping requires a minimum order amount , a coupon or both .
I'm gonna say a minimum order amount of $20 .
So what this means is people must spend $20 on our store and then they will qualify for free shipping .
All right .
So that's what free shipping means .
And I'll click on save changes .
You guys with me , you guys got that .
All right , cool .
So let's just uh let's just step back here and just see what we've done .
So , um people in the United States will be charged $5 .
People in Mexico will be charged .
I think it's $8 .
However , people in Nevada will get free shipping because uh we are located in Nevada .
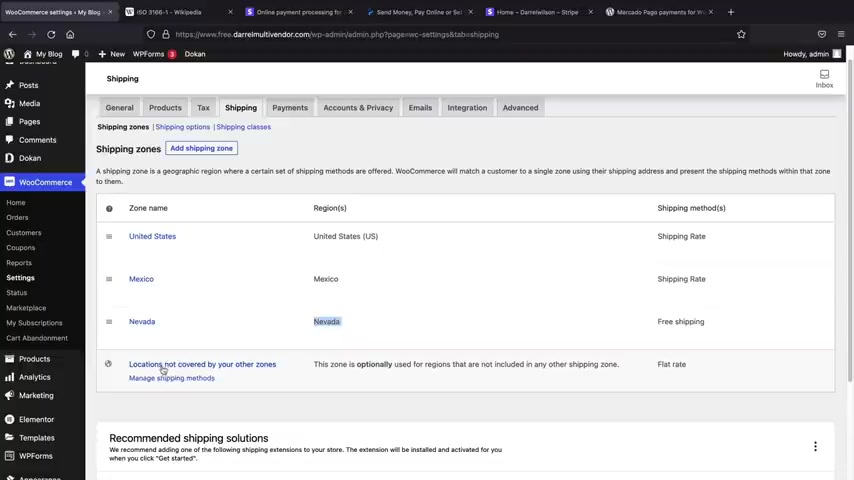
So shipping is cheaper and then we forgot about Canada , but that's ok because Canada will be charged the locations not covered by our other zones .
So even though we didn't list Canada , they will still be allowed to purchase products because we have uh put this on the locations not covered .
Hopefully , that makes sense guys .
Um If you guys have any questions about that let me know in the comments below .
So now that we set up tax and shipping , we can now go ahead and accept payment , credit cards on our site .
But before we jump into the payments really quick , I just want to step back here and just show you a option about your vendors .
So let's go to the dashboard and go to settings .
So here we have selling options now just to be clear or it is the , I think it's the general , right ?
Oh , no , yeah , selling options .
So right here you have shipping fee recipients .
So who will be receiving the shipping fees ?
Who will be receiving the tax fees ?
Now , I'm not an accountant guy .
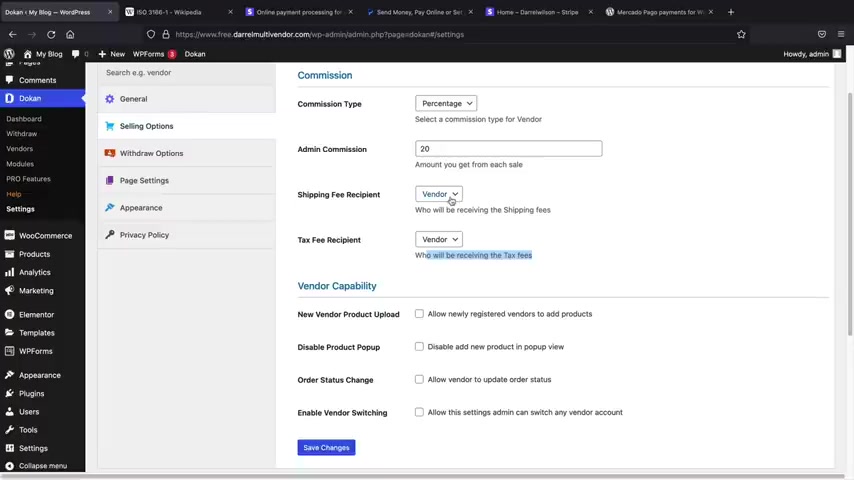
So , uh , it just depends on who wants to receive the tax and who wants to receive the shipping fees .
You can give it to your vendors or you can give it to your store .
It just depends on how you run your store , but this is a very important setting , uh , that you need to take into consideration when you guys are doing your shipping and your tax .
So just , uh , you know , just be mindful about that .
That's what that option is referring to and it , it is a big deal , you know .
So just , just , uh , think about that .
So now let's go ahead and talk about payment gateways .
Let's go to Woocommerce and go to settings .
I'm gonna go ahead and close this window and let's click on payments .
Now , I know specific countries do like bank transfers and cash payments .
So you can enable bank transfers and cash payments .
However , just remember they will allow it to be purchasing products on your store and then they pay you later , right ?
So that's what uh cash on delivery and bank transfers mean .
But here I'll just click on save changes and turn on cash on delivery .
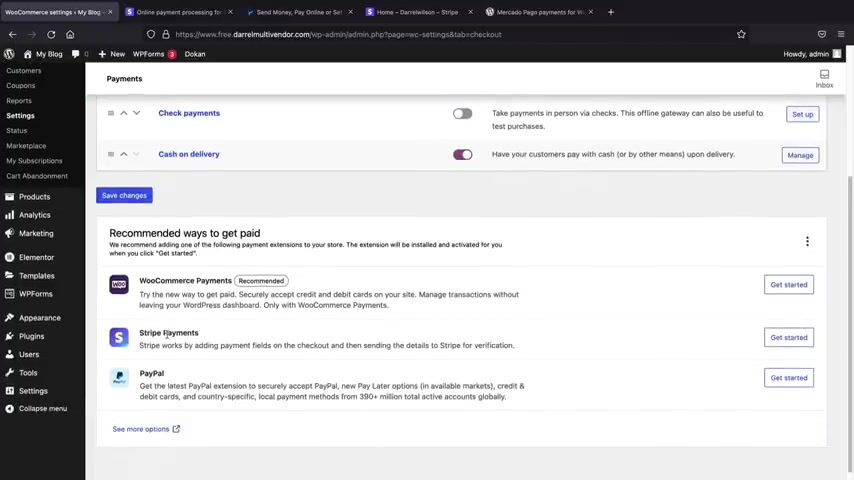
However , we need to integrate Stripe and we also need to integrate the paypal plug-in uh for your store .
Uh We have stripe payments right here , but I want to show you how to find it just in case they delete this little like notice or whatever .
We'll go to plugins and we'll go to add new and then for search plugins , we will type in Stripe .
Now , the plug in that we're gonna use is called the uh Woocommerce payment gateway .
So this is the one right here .
Uh Once you see it , you'll click on install now and then we'll click on activate .
All right , now we'll go back to Woocommerce settings and then we'll go to payments and now we're going to turn on the Stripe credit card .
So we're going to turn on the credit card and then we'll click on set up .
All right .
So now that we've actually had this already , we just need to go ahead and copy and paste some codes .
So let's go back to Stripe .
Now , you guys will need to sign up and make a free account .
Uh So just go through the process , sign up , it's free .
It doesn't cost you anything .
You will need a bank account and this serves all of the United States , all of Europe , Mexico , I believe Brazil as well and parts of Europe .
So you might want to check the country codes of , uh where they operate , but they're pretty global and if they don't serve a country that you're from , don't worry , we will fall back with paypal .
So this is like the general dashboard of your store where you can see your payments and everything .
Now this is live payments .
And if you want to test this first , we will click on test mode .
So remember test mode is basically just seeing if it's connected on our store .
Let's go ahead and , and connect this to our store really quick .
So let's go to developers right here and then we'll click on API keys here .
We have the publishable key .
Let's copy this and let's paste this on our store .
Now we are in test mode .
So make sure enable , test mode is checked and I want to paste that there , right ?
And I'll go back and then I'm gonna go ahead and paste the secret key .
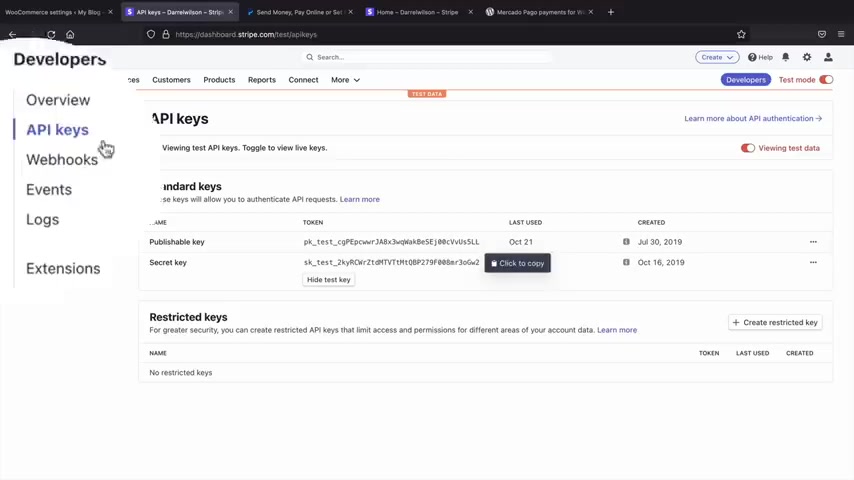
Let's go back here and we'll paste the secret key .
Next , we have this web hook end points .
So I'm gonna go ahead and copy this right .
Copy this .
Go back to our little store and then we're gonna click on web hooks on the left side and we're gonna add an end point , just copy and paste that end point , tell stripe why you're using this .
So we are accepting payments .
And then right here you have select events , click on select events .
We're gonna select charge and charge captured .
So all I'm saying here is that I just want to use this to accept credit cards on the website .
We'll click on add events and then add an end point .
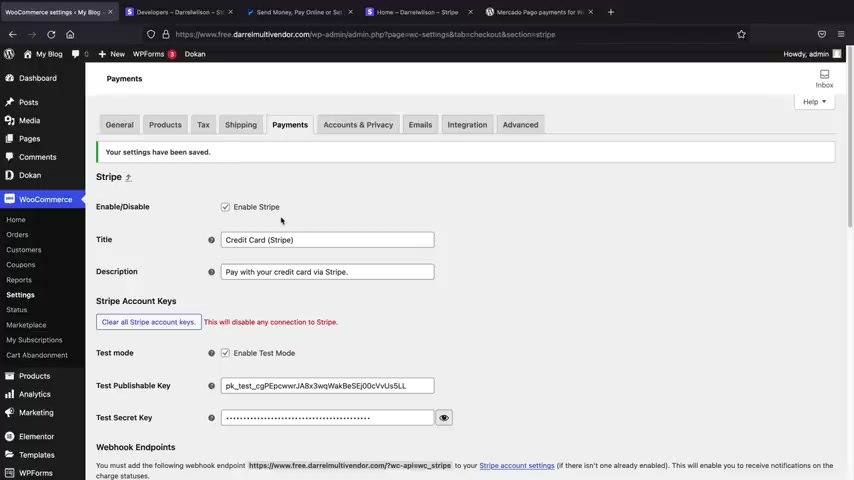
So once you've done all that , you just need to go ahead and reveal the signing secrets and this is the signing secret and we'll copy that and we will paste that right there .
All right , cool .
Now you might want to say who you are .
So this is the multi vendor website and this will be put on the user credit card statements .
So you want to make sure that you put a statement descriptor .
Also make sure to leave this checked .
You want to capture this right away here .
You can select if you want apple pay and Google pay , that's really up to you .
But um you can check out these other options like they have a new payment experience or a faster experience or whatever .
There are some options you can mess around with , but uh we're pretty much done .
So let's click on save changes and that's it .
Your website is now connected with Stripe and you can now start accepting credit card payments .
Now , just to be clear , you guys will need an SSL on your website .
Um When you sign up for hosting or , or name hero , they do give you a free SSL .
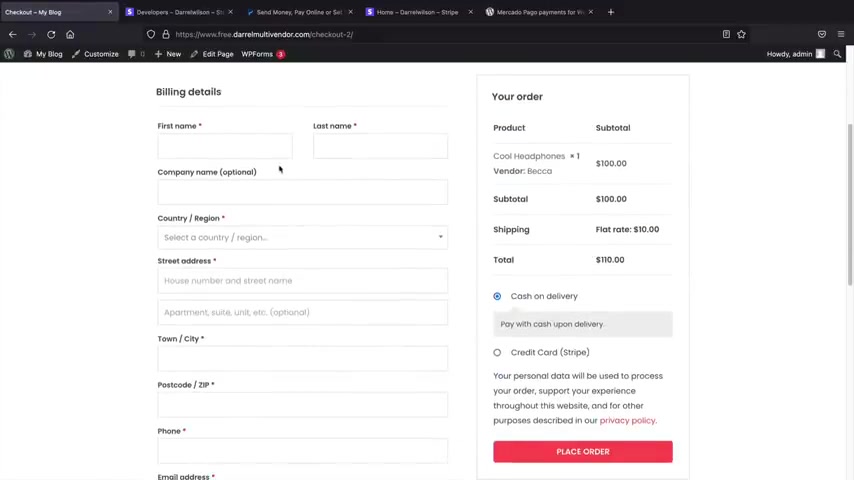
So you wanna make sure your SL is enabled .
So just make sure you have a valid SSL because you will need that to accept credit card payments .
Now , let's go ahead and run a quick test transaction just to see if this is working right .
Let's go ahead and buy some products , all products .
I'll click on this one here and I guess who , who is this ?
Is this Becca ?
Who is this ?
Uh Becca ?
All right , let's buy Becca's products .
So now we're buying Becca's products .
I'll view the cart and you can see here we have the tax of $5 .
Now , we've also been charged $5 for shipping .
So we know that's working and then here , click on , proceed to check out your users will then have to fill out their information .
So here we go .
Now , once the user fills out all their information , they'll click on credit card and here they can enter in their credit card information .
So this is the demo credit card that I'm using .
I will save this .
Now , remember this is in test mode .
So for test mode , just use the 424242 and then we'll click on place order .
All right .
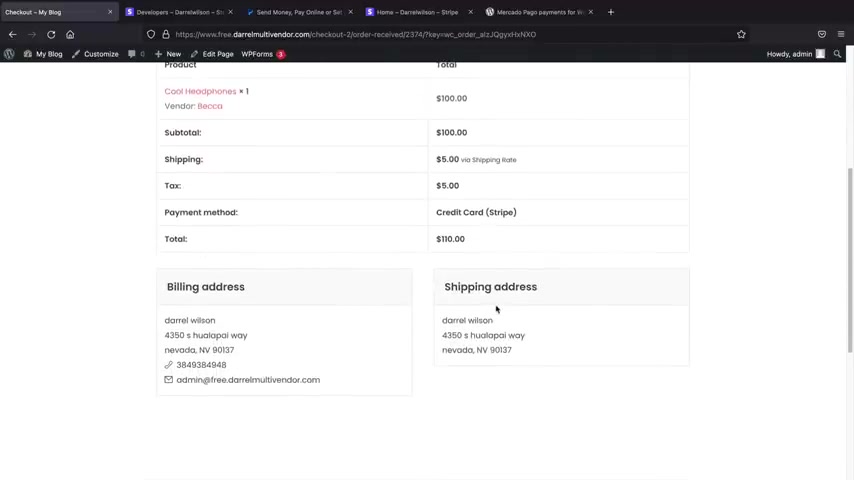
So we have now received the order .
Now , you will also get a confirmation email notifying you that this person has purchased a product .
The vendor will also get an email notifying them .
They have uh sold a product on your store .
So now that we've actually uh you know , sold the product , let's go ahead and check our Stripe account here just to make sure that everything went through correctly .
Uh Let's go to payments and we should see a transaction of 100 and $10 and there it is .
So we have the transaction for 100 and $10 we have the customer and also the time .
So now we know that stripe is integrated and we know that we can start accepting credit card payments on our site .
Now , let's say , for example , you want to accept live payments on your website .
It's really simple .
Let's just go back to our dashboard here , woocommerce settings and then under the payments tab , we'll click on Stripe .
So stripe manage .
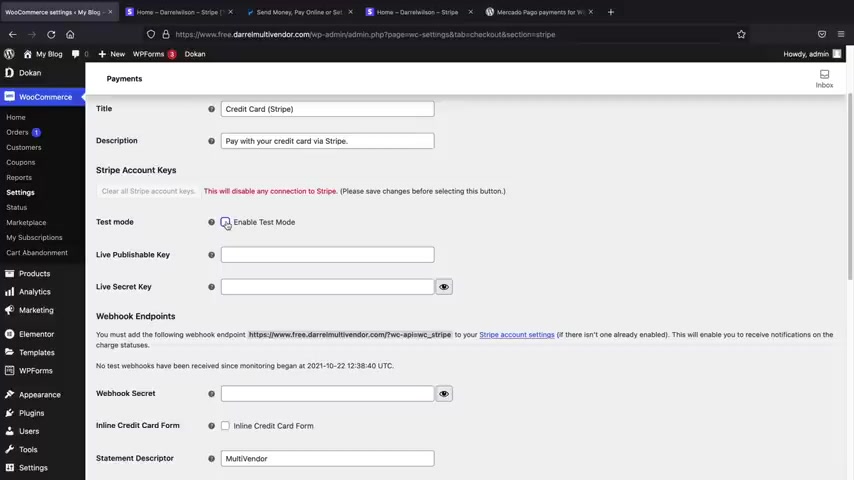
Now , here we have test mode enabled .
So if you want to accept the real payments on your website , just go ahead and disable this and then go through the same exact process as you did before .
So let's go back over here to Stripe , make sure you turn off test data and then go through the same exact process .
So you'll click on developers API keys and then just do the same exact thing .
So just copy and paste this , I'll just walk you through it really quick copy and paste .
Guys , please don't buy anything on this store .
People actually watch my videos and then they actually go back and they um you know , they buy stuff and I said guys , like this is for test purposes only , you know , and I , I don't know if they're just trolling me .
They just want to have fun .
But I get like , people are like , hey , man , I bought something , you know , but I have to refund them , you know .
So I'm like , well , you know , uh don't do that , you know , uh accept payments , right ?
Select endpoints , charge , charge , captured , add events at end point .
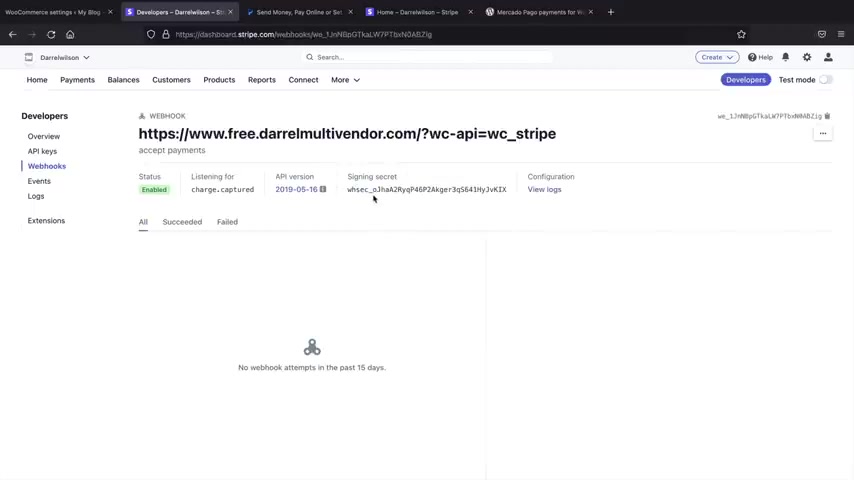
So all I'm doing here is I'm doing the same exact thing we did before , but it's just for live payments .
So here paste that , let's do an online credit card that actually makes a little , it makes a pop up .
It's pretty cool .
Uh But once I hit save changes at this point , this website can now start accepting real people's credit cards .
So anyone can come to this website with their bank card and they can then go ahead and use their credit card on my sites and then we will , you know , get their credit card money or whatever or their , their , we'll make money , you know .
So that's how we can integrate Stripe onto our website .
So now that I showed you guys how to use Stripe right now , let's talk about paypal .
Now , recently , Woocommerce did some really weird integrations with paypal and their default plug-in isn't really working well and I know that because I checked out the reviews and they were terrible .
So go over here to plugins and go to add new and we're not going to use the default plug-in with Woocommerce anymore because I've had too many users complain saying that it doesn't work and even myself , I've used it and it doesn't work .
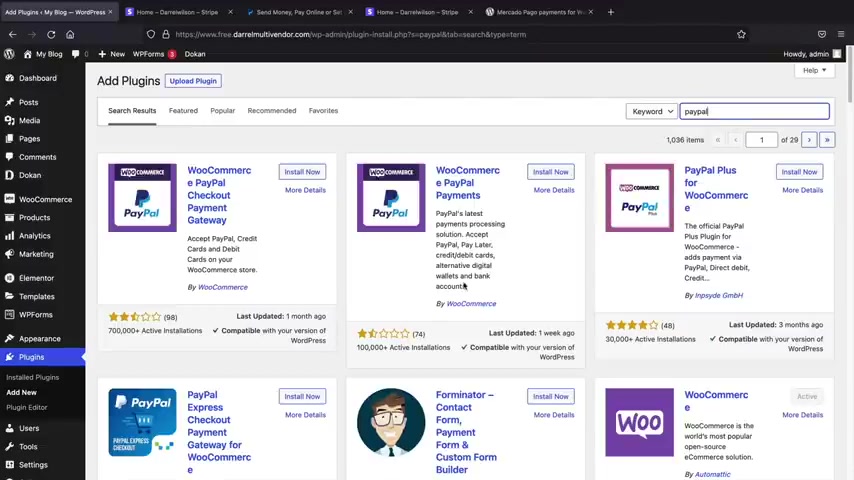
Uh This is the plug in that they want us to use .
And you guys can see uh it just has really , really bad reviews and I myself just couldn't get it to work .
So I want you guys to use this one right here .
It is called the paypal Express checkout .
It is created by Web Toffee .
Uh This one works really well and all you need to do is copy and paste the API and it's really simple .
So go ahead and click on install now and activate .
All right now we need to go to paypal .
Now , one thing to know guys is paypal does require a business account .
So uh before you can use a personal account .
But uh now you cannot , the only drawback to this is that a business account does have a monthly fee of , I believe it's $35 .
So I need to go through the process and create a business account .
It's really simple .
I have a business account and uh I've been using paypal for years , but uh once you guys create a business account accounts , I'll then show you how you can connect it really quick .
So I'm gonna go ahead and log into paypal with my account .
All right .
So this is my paypal accounts .
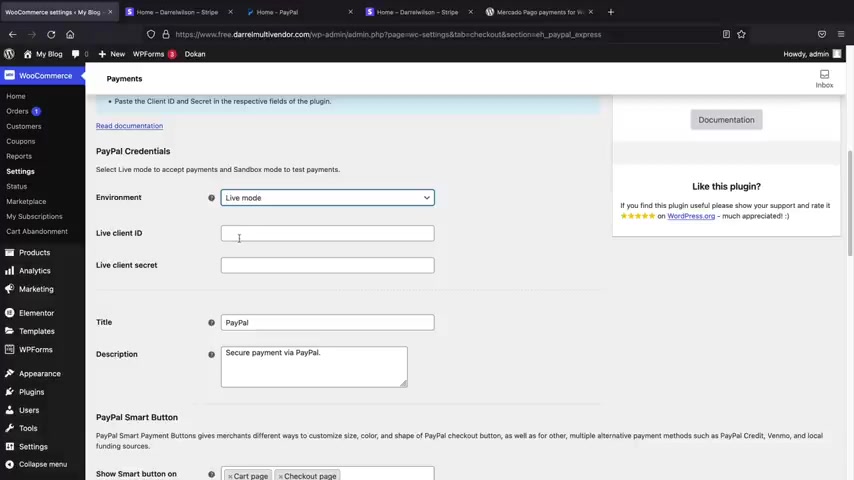
So I got some cash in here and uh yeah , we're ready to roll .
So let's go back to our website here and I want to now integrate this .
So uh let's go first find , I believe it is the paypal Express plug in and I wanna click on settings this time here .
I want to enable this , right ?
So I want to enable the paypal payment gateway .
I scroll to the bottom and here we have the environments .
So I want to make sure this is a live mode , right ?
So a live mode , this will allow us to accept real credit card payments on our website .
But uh before I do that , let's just click on save really quick at the bottom because I enable the paypal and I just want to refresh it and let them know that I want to enable .
Now also right here we have payment button .
I want you guys to select express check out .
This is actually a much faster alternative for your users to check out and it's really , really easy .
So make sure you select enabled and then express checkouts .
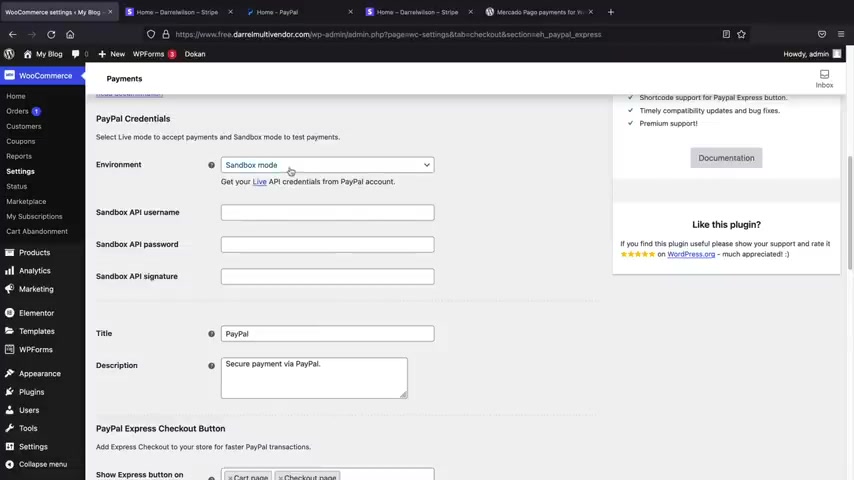
We'll scroll to the bottom and then for the environment , I want to change this to live mode .
Now , right here , this says obtain your live API credentials from paypal account .
So click on this little live link right here and this is going to open up a new browser and it should log you into your paypal account .
All right .
So once you guys have clicked that link , it will then take you to the area where you need to uh copy and paste the API .
So it's really simple guys , just go ahead and click on show you're just going to copy this and you're just going to paste in the user name , the password and the signature right there from these three credentials .
All right .
So I went ahead and I put in my API information .
So all I need to do now is scroll to the bottom and click on save changes and that's it .
We are now synced up with paypal and now we can start using paypal on our multi vendor website .
Pretty simple .
So now let's go ahead and buy something really quick .
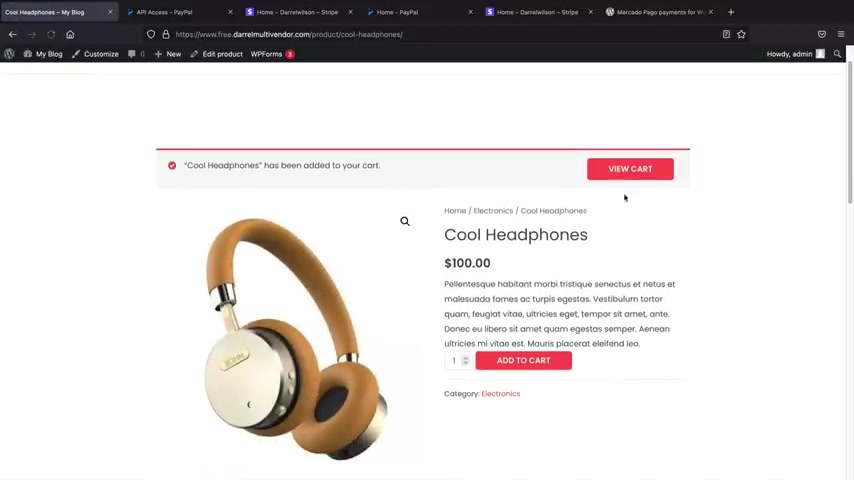
I'm gonna go to my vendors and we're gonna go to BECA now , the last thing that I want to show you all is , let's say , for example , users purchase enough products on this store to request a payout .
How do we do payouts ?
Well , let's just go ahead and just quickly do that here .
I will go to proceed to checkouts .
We have the paypal buttons now , pretty cool .
You can turn these on or off at the options .
But now you'll see that we have paypal as an option .
So we have paypal , we have a Stripe and we also have cash on delivery .
Now , for this example , I'm just going to use cash on delivery because this ca actually counts as real live money .
So we can actually request the payments uh with cash on delivery .
So I'm gonna click on place order .
Ok .
So we have now purchased enough money .
So Becca can now ask for a withdrawal .
So let's go ahead and go to the uh vendor part for Becca .
So we logged into Becca's dashboard and you'll notice that we have $220 in sales .
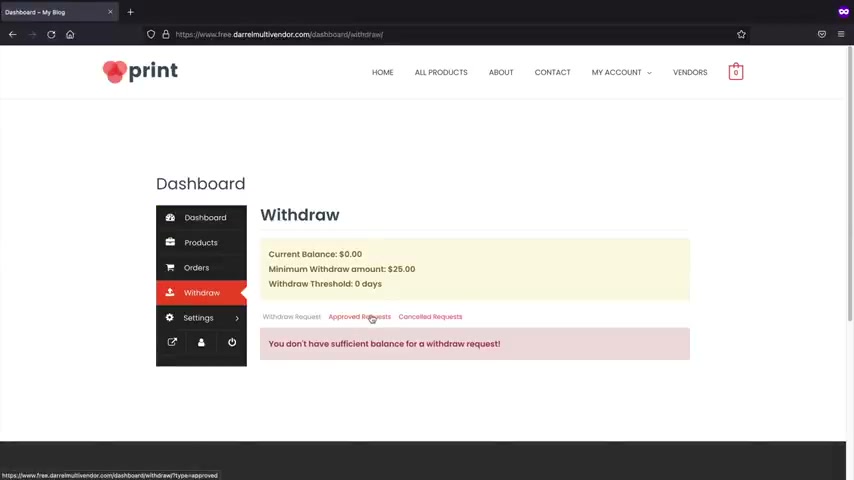
However , if we go to withdrawal , um you're gonna see that uh they still cannot make a withdrawal .
Now , the reason why uh she cannot withdraw the money is because as the admin , you need to approve the sales first and then they'll be allowed to accept a withdrawal .
So let's jump back to the admin website .
All right .
So I'm on the admin website .
Now , remember you have been notified by emails about these sales .
So don't think that like you're just clueless or something .
So all you have to do to approve the orders is go to Woocommerce and go to orders .
So here are the actual orders and you can click on the order and see all the information about the seller .
Um You can you know , take a look at everything , make sure everything looks good .
But um , once you want to go ahead and approve the order , you'll go to status and goes to , uh where is it status or did I just pass it ?
Complete it ?
There we go .
Ah , there it is .
And then just click on update after you select completed .
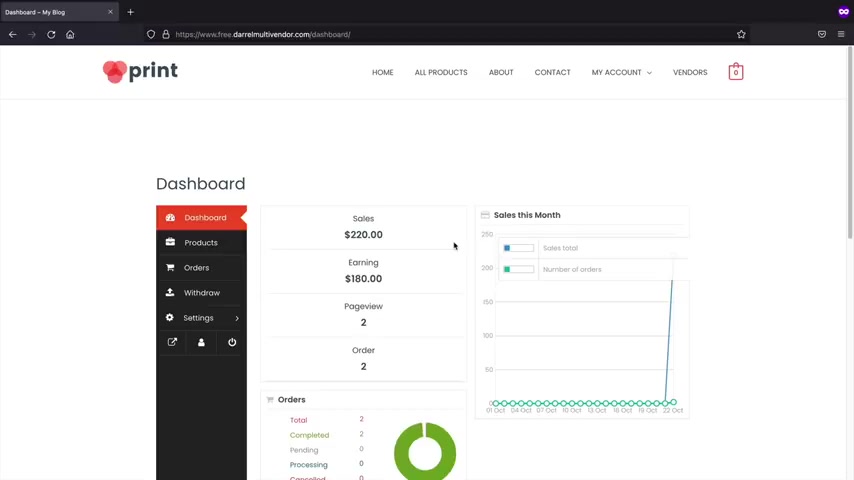
You can also do this a lot faster by clicking on orders on the left side , clicking on the actual uh order and then just going to complete it and apply .
All right .
So once this has been done now , Rebecca can request a payment .
So let's jump back to Becca's website .
All right , we're back at Becca's website .
Sorry guys , if I'm jumping back and forth .
But this is the best way to show you all .
This is Becca's websites and now you'll see that we have earnings , right ?
So let's go to withdraw .
Remember she has $220 in earnings or sales , but we took a commission rate .
So , uh right here , I want to say , uh , you know what , I want 100 and 50 bucks and we can do paypal or they can do bank transfer because remember when they signed up , they had the option to put their bank information .
You can always go that route if you want .
But uh I'm just gonna put paypal and then go to submit requests .
So now you'll see that this is in a pending review .

So right now , we are waiting for the admin which is the , you know , you right to go ahead and uh finally approve the payment .
So here is the withdrawal requests and you can see that she asked for paypal .
Now , if you're not sure about her paypal account , you can just go ahead and click on her name and she should have her email that she used to sign up with .
So you're saying , ok , this is her paypal email .
I'm gonna go ahead and send her the $150 right now , right using paypal .
And once you send her the money through your paypal accounts , you'll then leave a notes or you can go ahead and approve the request .
All right , and at this point , she has been notified that you have successfully paid her .
Now , in case you guys have absolutely no idea on how to send payments guys , it's really easy .
I'll just go ahead and show you , uh , you can just click on pay and get paid and click on send money and then all you would need to do here is just enter in the email for your vendor .
So , uh her email was uh Darryl porto at gmail dot com .
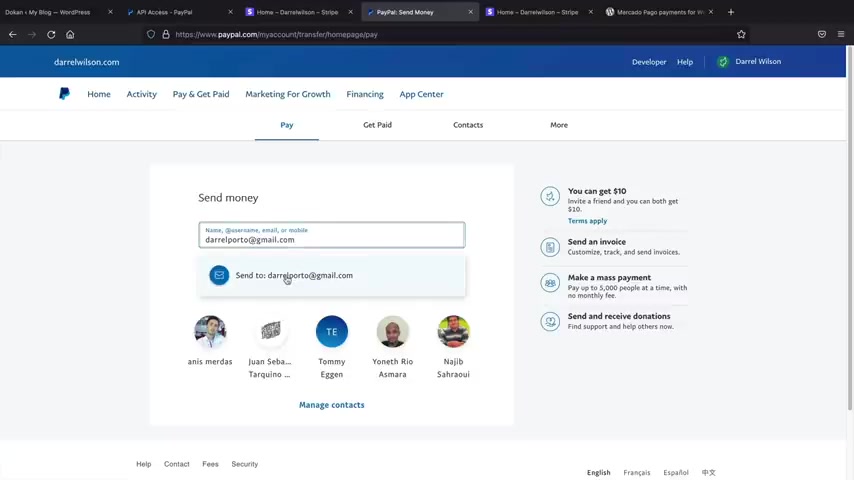
You will simply enter their email and then you will send it to them once you click on their email .
Paypal will say , well , how much you'll just put the amount 100 and $50 and then continue and then send it .
So after that , you would then send Rebecca the $150 and then everything is good .
So you have now successfully uh paid her request .
Uh She has received her money , the money that you received will be either in the paypal account or your Stripe accounts and then you guys can continue business as usual .
So hopefully this section help you guys out .
If you guys , if you have any questions for me , feel free to let me know in the comments below .
Also , if you guys like what you've been seeing so far , make sure to give this video a big thumbs up and also leave me a comments about what I can do to improve .
But now that we talked about the free version and we talked about the basics of everything .
Let's move on to the next section and talk about the pro version of do and everything that it has to offer .
All right , cool .
So at this point , you guys have a fully functional multi vendor e-commerce website .

It's pretty simple right now in this next section , I'll be showing you how to use the Deon Pro version .
Now , the Deon Pro version does give yourself a lot more control over your store .
It also gives the admins , I'm sorry , the vendors a lot more capabilities like bookable products , auction products and stuff like that .
So in this part of the video , I'll be covering all of the Doon Pro features and everything it has to offer you guys ready .
Let's get started .
All right guys , welcome to the Doon Pro section of this video and this part of the video , I'll be showing you all of the pro features that come with Doon .
Now earlier in the video we used the free version .
However , if you guys do decide to upgrade , we'll be giving you a walkthrough of all of the pro features .
Now , if you guys do decide to upgrade , we do have a link and a coupon code .
Uh in the description of this video , if you guys do use our link , it does help us to continue to make these videos for you guys for free .
So let's go ahead and take a look at the pricing plans .
So do offers four different plans , right ?
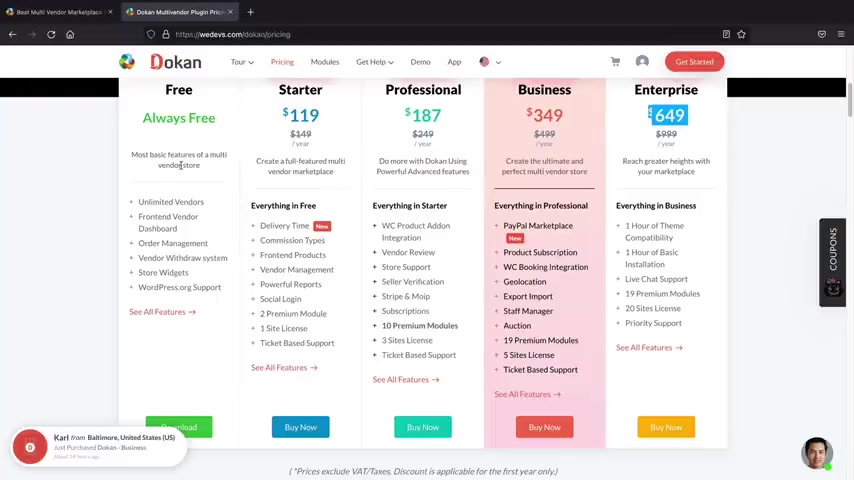
Because this is the free plan now at the time of recording this video , I'm in like the winter time right now season .
So there's a lot of promotions and sales going on .
So at the time of recording this video , these are only promotional prices and these are their base prices .
However , our coupon code will give you guys a discount that almost matches that .
So not to worry .
Now , there's four different plans and we purchased the business plan .
The reason why is because um the business plan offers the most features and we're gonna go ahead and walk you through uh all of the features to help you decide which plan works best for your multi vendor website .
I also do want to let you guys know that this company does give you a 14 day money back guarantee for any reason .
So if you guys do purchase one of these plans and you feel like it just doesn't work out for you , you guys can always get your money back guaranteed with a 14 day money back guarantee .
All right .
So in this part of the video , guys , I'll be showing you the difference between the free versions and also the pro versions .
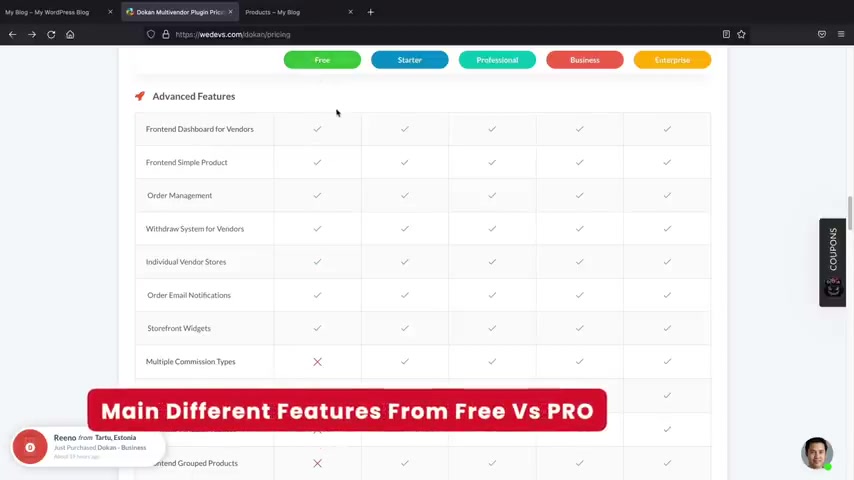
Now , recently we used the free version in the video and in this part of the video , I'll be showing you the pro version .
Now I went ahead and I purchased the business plan .
The business plan offers the most features .
However , you might want to pick a plan that works just , you know , works good for you and your uh multi vendor website .
Now , what I'm gonna do here is I'm going to give you a visual of what's different on this multi vendor website .
I'll also show you the different products that you can create like a booking product , a subscription product , uh product add-ons and also a uh auction product where users can auction um you know , products on your website or you can have like an auction website like ebay on your multi vendor website .
So what I'm gonna do here is just go through these and just uh kind of show you what changes now the advanced features applies to the starter , professional and business .
Hey guys real quick .
Before we talk about the next section where we talk about the product products that you can create .
There was a large update that do created during the creation of this video .
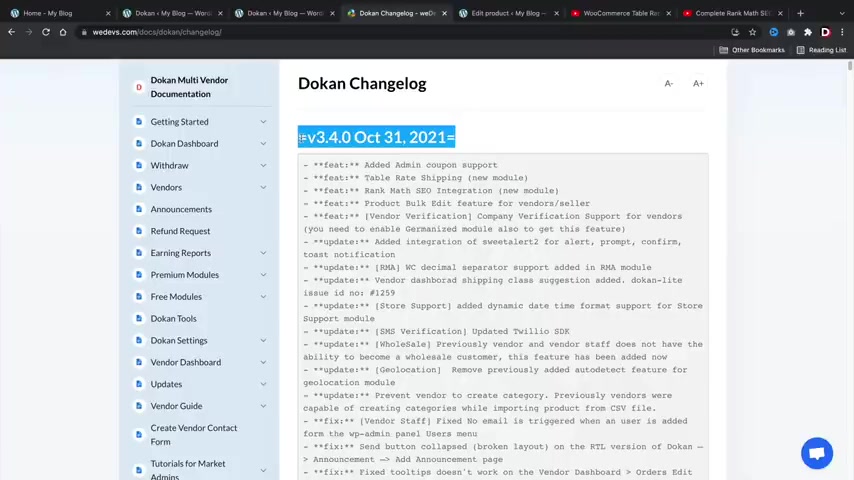
So uh what I had to do here was edit the video and include this section because there were some notable features that are actually pretty important that I do want to go over to kind of talk about what changed in the new updates of the Doon Pro version .
Now , the first thing is um when you go to your and your settings , you'll see a lot more tabs , you know , and you can go ahead and search for store support , live search .
They do have a lot more options here if you want to check these out , but a lot of these might not apply to you , but some of them might like , you can now add delivery time .
Uh You can adjust the shipping status , the vendor subscription .
So there's just some general more options here that you guys can go through in the Doon Pro version .
So be sure to go ahead and check those out .
Now , one notable feature is the fact that they now have the coupon support .
So let's say for example , you have vendors rights , but um maybe they have coupons that uh you want to restrict or you want to have a little bit more control over your website with the coupons .
Uh We can do that with this new feature .
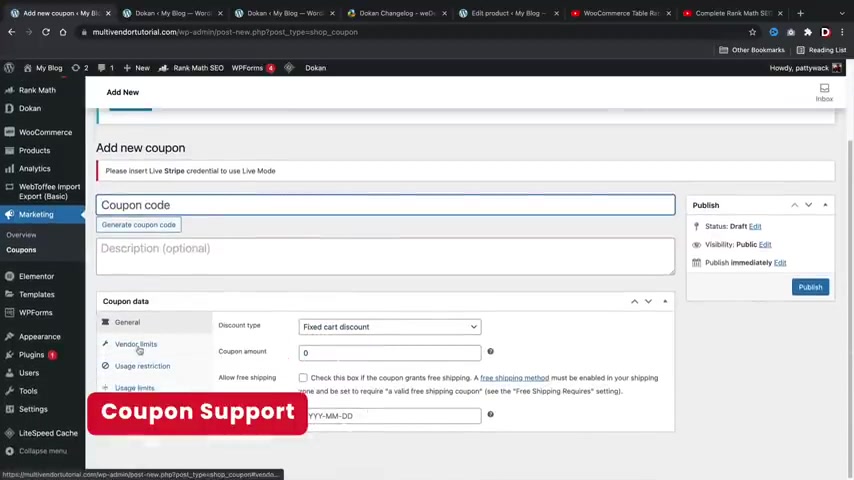
So right here , I'll go ahead and click on create a coupon and you'll see this new uh tab right here that says vendor limits .
Now , this was uh created during the updates .
So right here , you can go ahead and kind of adjust um you know what you want on your site with vendors , you can display coupon codes for specific products or you can exclude products .
So this kind of gives you a little bit more control over your vendors because before uh you didn't have any authority over what they would put on for sale and now you do .
So this is a really cool feature .
I really do like that .
Uh Next , we have the table rate shipping .
Now , this is a very important update and uh I'm gonna go ahead and log in on Becca's website to give you guys an example of what happened .
Ok ?
So this is Becca's dashboard and I'm gonna go over here to settings and then let scroll down and click on shipping and then we'll scroll down and now you're gonna see your zone areas .
Now , if nothing appears here , that's because you need to first create a shipping zone .
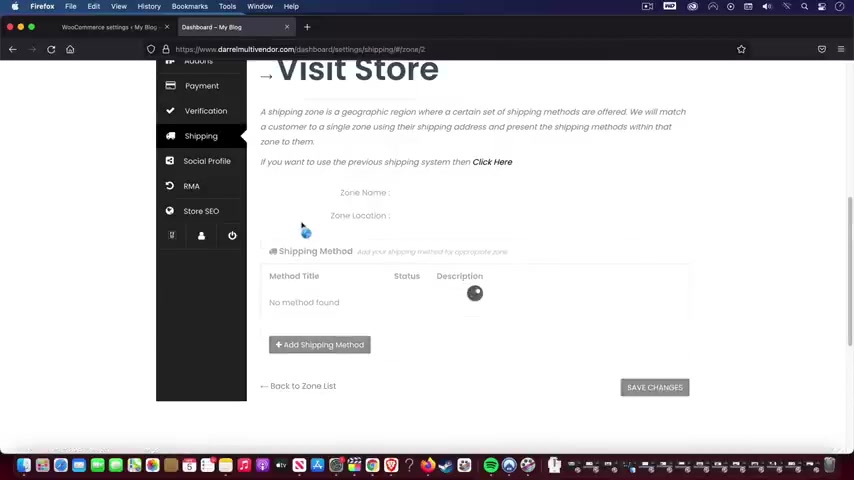
But uh I'll go ahead and click on other areas .
Now , this can be anything like United States or Mexico or whatever it is that you want to ship and then you'll see an option for table rates .
So I'm gonna click on edit here and then you'll see that you have this option for table rate shipping .
Now , what table rate shipping is essentially is you can basically uh ship based off of weights , off of dimensions , off of quantity .
It's a very advanced method of shipping .
So you can see you can ship based off of the price , the weight and also the item count as well .
Now , uh table rate shipping can be a little bit more complicated , but uh I have created a full tutorial on the table rate shipping plug in if you decide to add it to your website .
So this is the video right here .
It's called the table rate shipping plug in .
It's about 40 minutes and I gave you three different examples of how to apply uh advanced shipping to your store .
So if you guys do want to go ahead and check out this video , I will leave this in the description below of this video .
All right , let's go and take a look at the next feature , which is the rank math integration .
Now is a very popular sco plug-in .
In fact , I do have a video on it which is quite popular that people really like .
So with this update , you guys can go ahead and add specific seo titles to your products for your multi bed store .
Let me just go ahead and give you an example here .
So I'll go over here to my products and I'll click on all products and then I'll just click on any product and then we'll scroll down and then you'll see this option right here .
That says rank math seo now this is if you have the rank math plug-in installed and you have the , the , the con pro plug-in installed as well .
And then here you can edit the snippet .
So you can basically change how you want this to look like in the search engine .
So for example , uh we can adjust it to just a title , you know , or you know , put the site title , Darrel Wilson dot com or whatever .
And then here you can kind of uh change the description now what this does that this will help seo so this will actually help the product get kind of index better and it just gives the users uh that are searching a better idea of what the product is in the search results because uh usually it'll just pull up random information from the product and you , I don't really have a lot of control over it .
But with this update , you can now kind of display the products the way you want it to be displayed in the search results .
And they have some other options here like the schema markup , which is actually pretty cool uh social where it tells you like what it looks like in the search results .
Now , I believe the schema is for the pro version .
I do have another video on the pro version as well .
If you guys decide to go that route , you don't have to buy the pro version .
To be honest , you guys can get away with just the free version , but this is just an option that they added in their new updates .
Next , we have the product , book edit feature for vendors .
This just allows vendors to uh book edit products all at the same time , I'll just give you guys a quick example here .
So if we go back to our uh our vendor , our Becca's website , let me click on products .
We can now go ahead and you know , do something with like a bulk , right ?
So we can edit in bulk , delete in bulk and even publish products in bulk .
So it's a small feature , you know , but it's also nice to have because maybe they're , you know , creating hundreds of products and they can go ahead and bulk uh select products or publish products and stuff like that .
And the last feature is called the vendor verification .
Now , what this will do is this will actually verify your vendors and show vendors on your website that they have been verified .
They'll have to go through a process of setting up and connecting their social media profiles .
Now , it's a little , it's a little time consuming to be honest .
So I will just go ahead and leave this uh article in the description below this video if you guys decide to go that route .

But essentially here you can see that um I'll go ahead and scroll down here that your vendors can submit information and then you can approve or reject the vendors , you know , just based off of what they have submitted or you know , whatever it is that you want to approve or your rules for your multi vendor website .
So again , I'll go ahead and leave this article in the description below of this video .
But these are the major changes that happened while I was recording this video .
But uh these other changes here , they're just minor tweaks and updates , you know , they've , they've updated some stuff and they fixed some stuff like bugs and stuff like that .
But uh yeah , this just was a large update and I just wanted to cover uh these features that were created during the uh creation of this video .
So with that said , let's go ahead and jump back to the pro features of this plug-in .
Now , this is for your vendors only .
So your vendors will have like a much more premium uh way of controlling their store .
Let me go ahead and give you an example here .
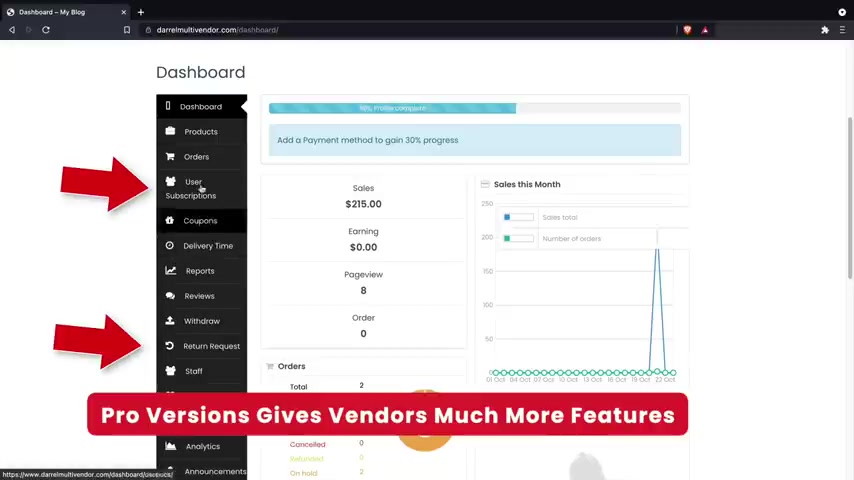
So this is the vendors uh dashboard and right away , you guys might notice that they do have a lot more tabs .
So in the free version , they only have like maybe like five or six tabs .
But in the pro version , they have a lot more options .
So they can have subscriptions , they can now create coupon codes and have discounts for their products .
They can select delivery times and also they get a better uh interface as far as reports go .
So this would be like their like report section where they can see their sales by day , their top selling products , their top earning products , which I think that's the same thing , right ?
And then also their statements .
So now they can go ahead and download statements and they can export those , you know , for their accounting purposes or whatever it is .
But overall , this is a really big improvement uh from like the default free version .
Uh Also now users can see the reviews and I think they can participate in like when people leave a review , they can see what's going on , you know , if they left the review , uh we have return requests and also staff .
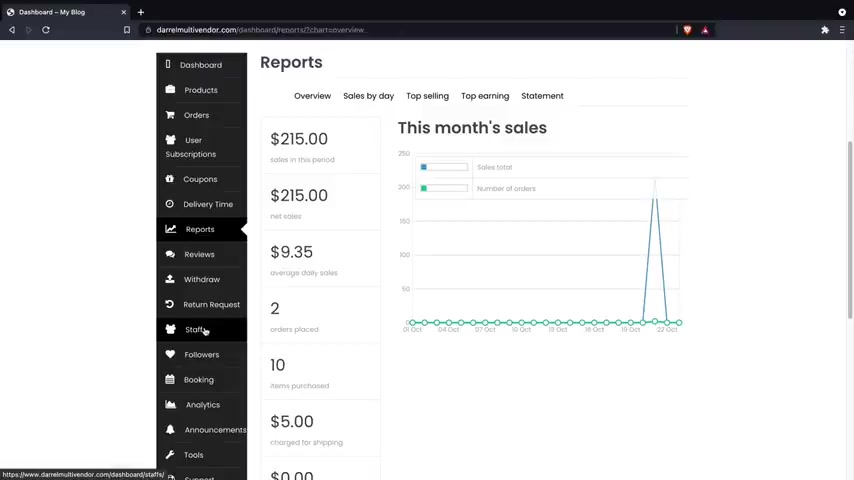
Now this is actually really useful because uh creating products can be very tedious .
But now with the uh staff option , your vendors can now create staff so they can upload products for them , so they can create new uh new staff and then they can help them upload products and stuff like that because , you know , creating products is pretty tedious , you know , it takes a long time .
Now this is a really unique option .
Is the followers .
Now if you go to your store list , you will then see that your um your visitors of the websites can now follow vendors .
And this is good because if they have products , they can notify the followers and they can come and they can purchase those products .
And remember if your vendors make money , you make money , right ?
So , you know , that's actually good that they can start marketing towards your own customers , right ?
That's pretty helpful .
Also , we have the booking uh integration and also the subscription integration .
We'll talk more about that in the next section .
Those are products uh here , you have analytics and also , so your vendors can now have announcements on their store as well to give uh users announcements and stuff like that .
So overall , you know , the vendor does get a large upgrade with flexibility and control over their dashboard and you can always design and customize this page guys using the page builder .
You know , you can add like a banner here , you can take out the dashboard , just click on edit with element to and you can edit this page .
So , uh but yeah , this is all available in the uh the starter professional business and the enterprise plan .
All right , let's go ahead and keep scrolling down here .
All right .
So that is the uh vendors uh you know , the vendors uh interface .
Now , this is where things get really different between the plans .
So I purchased the business plan and the purchase plan does give you a lot more options like the product subscriptions .
And also I believe it is the , uh , all these options down here , like the product inquiry , *** , live chats and stuff like that .
But , um , uh , what I'll do first is I'll just go ahead and just give you guys an example of the subscription .
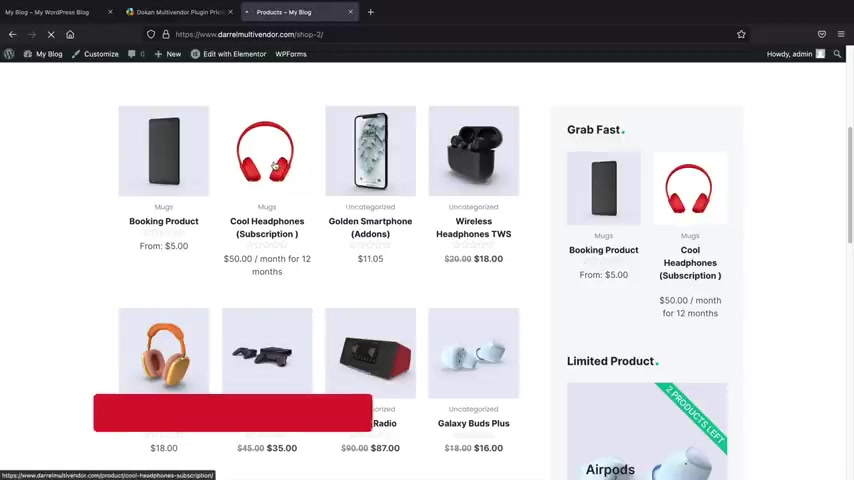
So the subscription allows you to have subscription based products on your website .
This means your vendors can sell subscriptions on your websites and they can have a lot of options and control over these products .
So for example , um they can go ahead and uh you know , offer a subscription price for $50 every month , every day , every year , they can have a free trial , they can have a sign up fee and then they can also have this taxable and stuff like that .
So they can create their own subscription based products on your websites uh if you want to do that .
And um you know , I don't really know a lot of sites that do that , but it is a very lucrative industry to have subscriptions because then you're getting paid , you know , every month or every year or every 30 days or something like that .
Now , also we have the paypal marketplace .
Now , this is for like splitting payments and stuff like that .
Now , you also get the option to split up payments between sellers .
So you can get very dynamic , you can split up payments between uh two vendors and yourself .
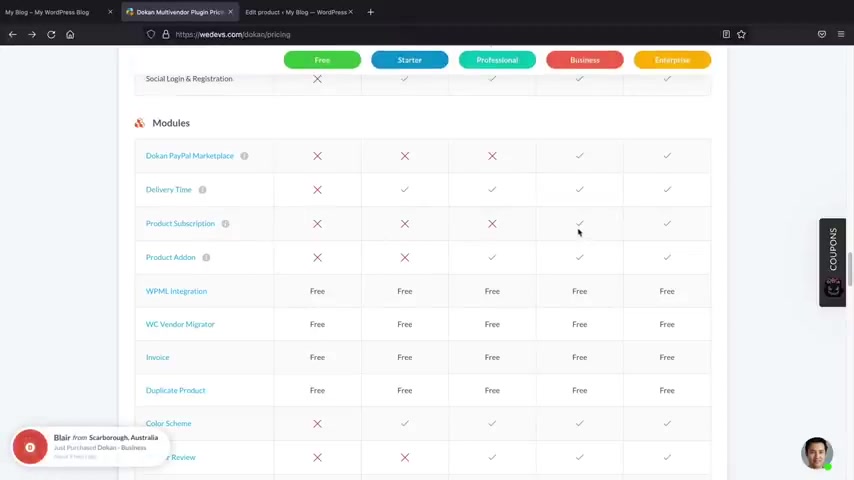
So maybe you guys can have like a three way um three way , three way purchase plan , right , or whatever , you know .
So it just gives you a lot more flexibility and control uh for your multi store .
Also , you have product subscription again , that's only in the business plan .
Product add-ons is actually really useful .
So product add-ons is having the ability to add uh add ons on your product .
Like um you know , if you want to add something for $5 more or something .
Uh Here , you can see that we have gift wrap for $5 or silk wrap or something like that .
So you can add up sells , you know , and that's kind of what they are or add-ons like , for example , for $5 more , you can get this for $10 more , you can get that and you can create as many add-ons as you would like .
And I'll just give you a quick little example of this .
So you will see that uh we now have the , is it the add-ons right here or add ons ?
Yeah , right here .
So we have gift wrapped and you can create as many add-ons as you want .
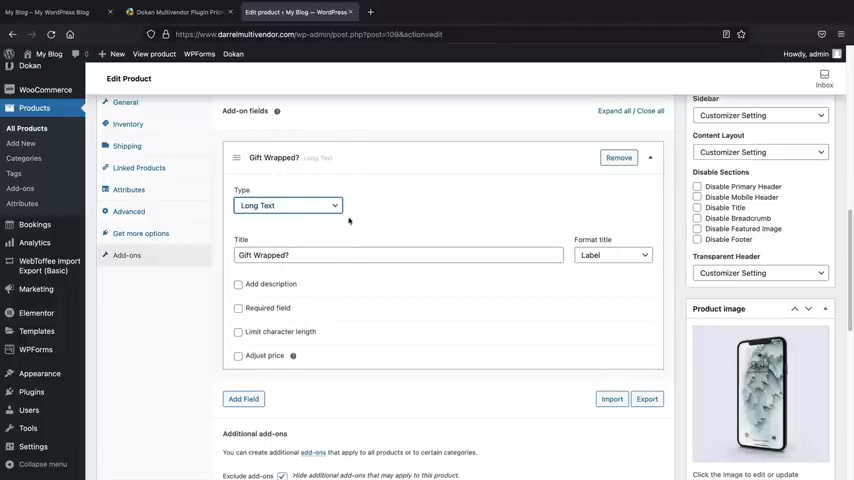
And here you'll see you can have check boxes , you can have text , people can upload files like for example , if they uh if you're selling shirts and you want to uh you know , see a , a visual of the shirt they want , or they have a file for their shirt , they can upload it and they do have a lot of options so they can , uh you know , they can have all these options on your sites and that's pretty useful .
So that is an example of the product add-ons .
So let me just go ahead and show you the last two products , which was the booking product .
So this will allow people to book on your website .
Now , I know my buttons look a little weird and that's because I'm , I was kind of messing out with it earlier .
But uh from here , users can actually click on the dates and they can have a booking .
You can select the booking per , you know , per day , they can have a schedule .
Um And yeah , so the booking plug-in is very uh dynamic .
There's a lot you can do with it and they can click on a book now .
They can also book based off time as well .
So uh the booking plug in is a little dynamic .
Now , I do have another video on the Woocommerce bookings plug-in .
It's right here .
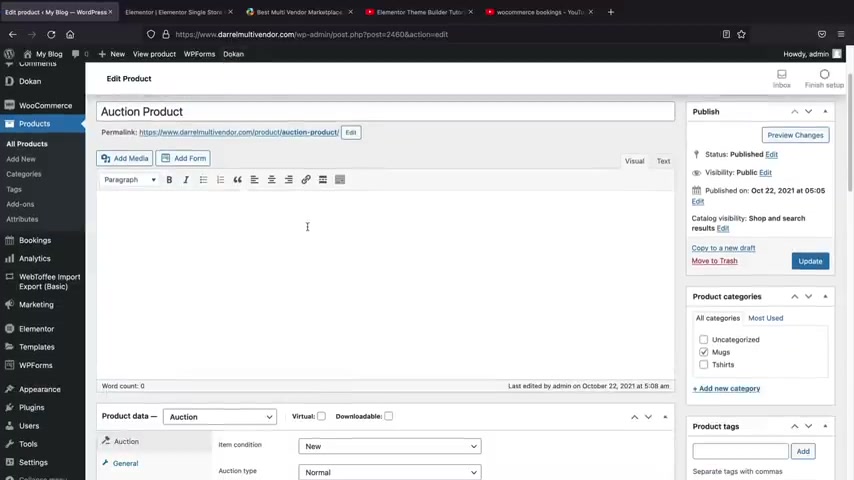
So the plug in itself , I gotta be honest guys , it is a little advanced if you're brand into wordpress .
So I have this video , it's 30 minutes long and this will kind of help you guys understand how to use the Woocommerce booking plug-in on your e-commerce website .
And lastly , I do want to show you guys , the last product , which is the auction product .
I did tell you guys , I would show you guys a little bit later , but uh this is the auction product and if we click on it , we can now see that we can see there's a starting bid .
Now , there is a lot of options for the uh auction products .
So let me go ahead and scroll down here just to give you an example .
you can set the starting price of the actual uh product and then you can have a bid increment .
This means when someone bids , they have to bid at least $30 .
So let's say for example , five , you know , so that means if somebody bids the minimum bid increase would be five .
You also have the reserve price .
This means um you don't want to sell the price lower than this .
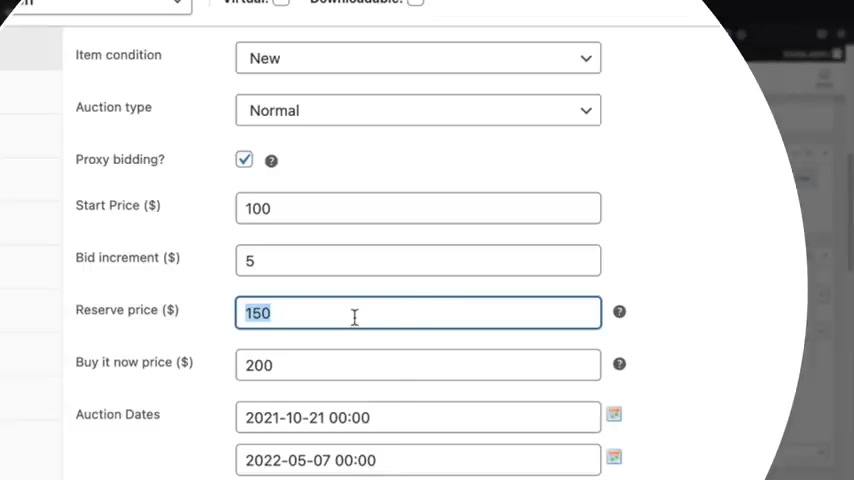
So regardless of what happens in the auction , uh you do not want to sell the price for less than 100 and $50 .
And if it does not meet 100 and $50 the price , I'm sorry , the product will not sell .
So uh the reserve price is like a safety net .
Basically , you can also have a buy it now price .
And this is basically saying , look if you want to just skip the auction and if you want to just buy the product right now , you can go ahead and do that as well .
So , uh yeah , this is the auction products .
And uh you can have this available on your e-commerce store .
But I do want to go ahead and mention a few things about these products really quick .
So in order to have the auctions on your website , you will have to go ahead and purchase the plug in that gives you the ability to have auctions .
Now , remember do con is an integration .
So it adds the integration for these plugins .
It doesn't come included .
And I just want to be very transparent and tell you guys that before you buy the pro and saying , oh , you didn't tell us that you have to actually purchase another plug in to get that feature .
And the simple answer is yes .

So you will have to purchase the uh simple auctions plug in to get the ability to have auctions on your store .
So you'll go ahead and install this plug-in onto your sites and then you will uh purchase the pro and then this option will be available to have auctions on your um your multi vendor websites .
Now , the same thing also applies for the subscriptions .
So you can have subscriptions on your website .
However , you will need to purchase the Woocommerce subscriptions uh plug in in order to add it to your website .
So you'll see here under the plugins tab .
If I click on install , do does um integrate with these plugins .
I know that's kind of a bummer .
But uh yeah , I mean , I'm , I'm just , I'm just the messenger guys , you know , I'm just the messenger .
So uh here is the Woocommerce bookings and then we also have the Woocommerce product add-ons and also the simple auction as well .
So , uh you will need to purchase those uh plugins first and then you can uh add in to Con Pro and then they will integrate together .
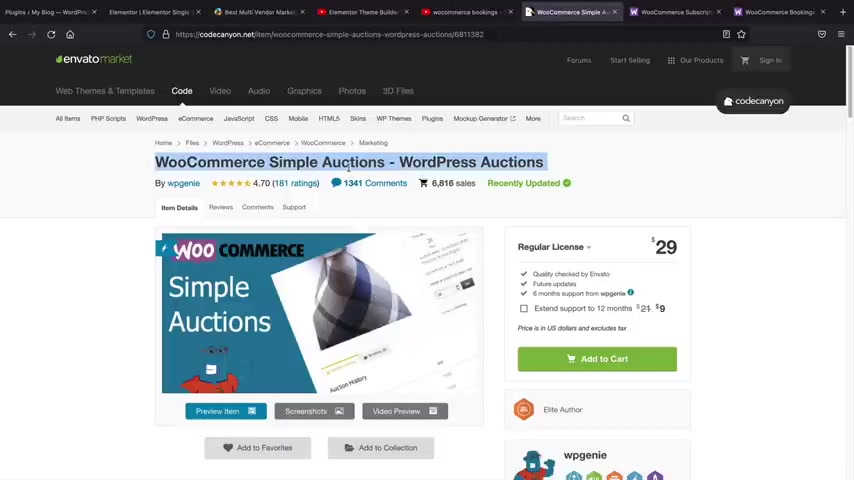
So that means your vendors can then offer bookings , your vendors can offer subscriptions and your vendors can then offer uh auctions on your website .
So I just want to make that very clear for everyone just so you guys know what you're , you know what to , you know what you're buying and stuff like that .
But we'll go ahead and scroll down here so people can leave , you know , vendor reviews , store support , seller , verification , uh stripe connect .
Now Stripe Connect is for uh again , splitting payments with Stripe .
As I showed you earlier , we can accept payments with Stripe .
But if you want to be able to split it up and stuff like that , you have that option .
And then we have some other ones like following store uh request vendor , staff manager , uh product inquiry .
So this allows customers to actually uh message the user about a product .
So for example , if we go to the store list and then I'll go ahead and click on one of the vendors , we can now see that they can uh get supports and you can change this to like uh get inquiry or , you know , whatever .
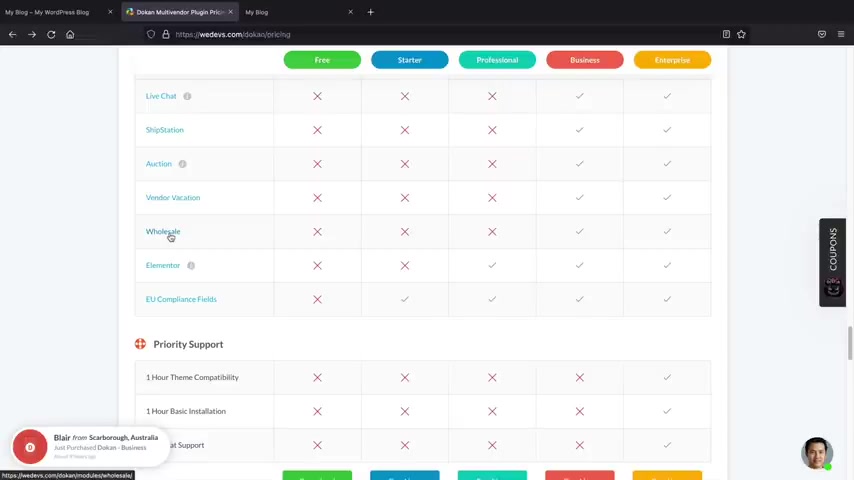
But um they can go ahead and ask questions about the actual product uh to the vendor themselves .
So they can kind of be like your own support team .
So , you know , that kind of actually that might help with like support requests and stuff .
But uh let's keep going down here .
Uh We have the option for a wholesale .
Now , wholesale will allow your vendors to create special prices uh for individuals like for example , they can go ahead and sell , they can sell like 100 of these phones for a lot cheaper .
So they'll have the option to kind of have like a like the Ali Express style website where they can have like a back end wholesale price that's exclusive for specific uh buyers .
And then below that , we have the Element or edition .
So with this uh feature , you can actually create your own stores , you can build your own vendor stores .
Now , this right here was created with the Element or Theme Builder .
So let me just give you a quick example of this just to give you um you know , just to give you an example of what you can do .
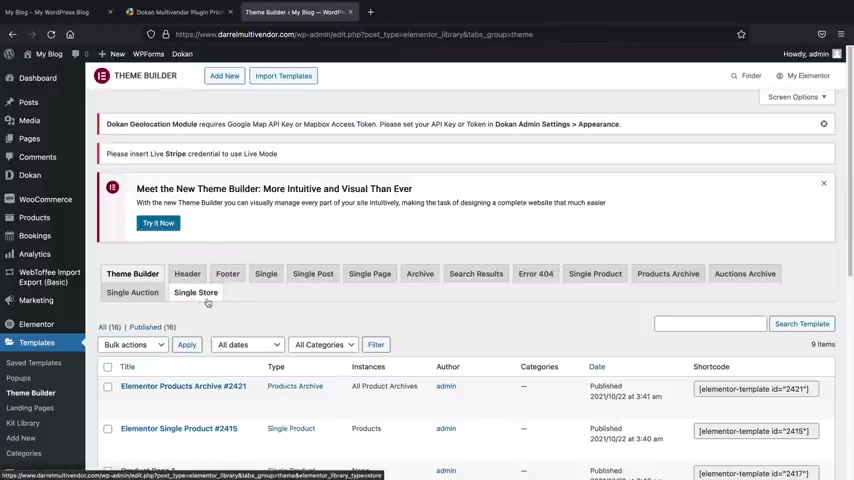
So this is available in the , in the theme builder only .
So if you go to the templates or go to Theme Builder , and now you'll see that we have an option for a single store .
Now , remember you must have elements or pro and also the pro version of do con in order to get this feature .
So here I'll click on start now and just give you an example of what this does .
All right , for single store , I'll click on plus now before we go any further , I do want to let you guys know I have a full another video on the element or theme builder .
Um So this teaches you the ins and outs of the theme builder .
It basically allows you to have a custom header and a footer and a bunch of different custom shot pages and stuff like that .
So if you guys do need help with the elementary theme builder , I will leave this tutorial in the description below this video for you guys to check it out later .
But uh let's go ahead and go back over here .
Now , I can actually build a custom store from scratch using the elementary theme builder .
For example , I'll just click on inserts and I'll just use one of their premade templates just to kind of speed this part up .
All right .
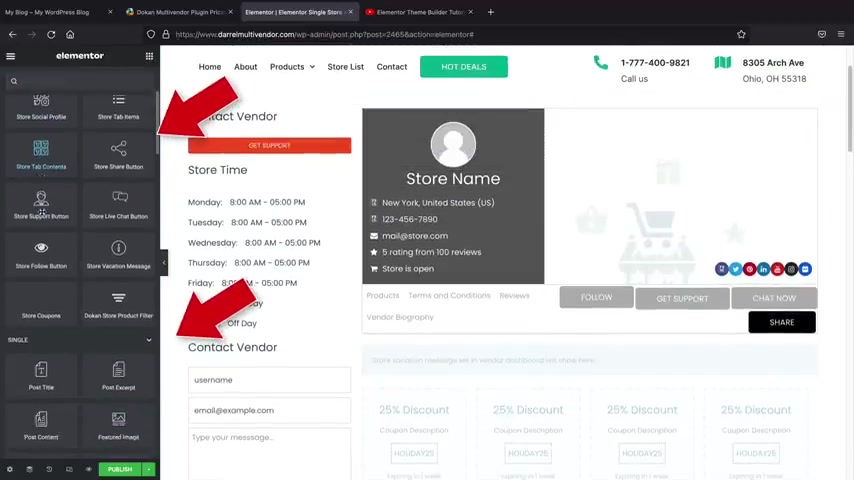
So now you'll see that we have the store name and we have the uh you know , the vendor and we have their products and stuff like that .
Now , what we can do here on the left side , we now have store elements .
So just like we kind of built the pages from scratch .
Now we have the do options or the elements or modules that we can use specifically for stores .
So you can have a store follow button .
You can add in a live chat , right ?
So a store live chat button , this will allow them to like live chats with your store .
Um Here you have store content tabs and maybe a profile picture , right ?
You can put a profile picture and remember this dynamically updates .
So whatever profile picture the user has , it will display here automatically .
Now , I know this looks a little messy and stuff .
Maybe I should , maybe I should clean it up , you know , maybe there we go , you know , let's , let's let's clean the store up a little bit , you know , we'll OK .
We , we have too many buttons here .
We'll delete this one , you know , but , but you guys get the point right ?
You know , you guys understand what I'm talking about here .
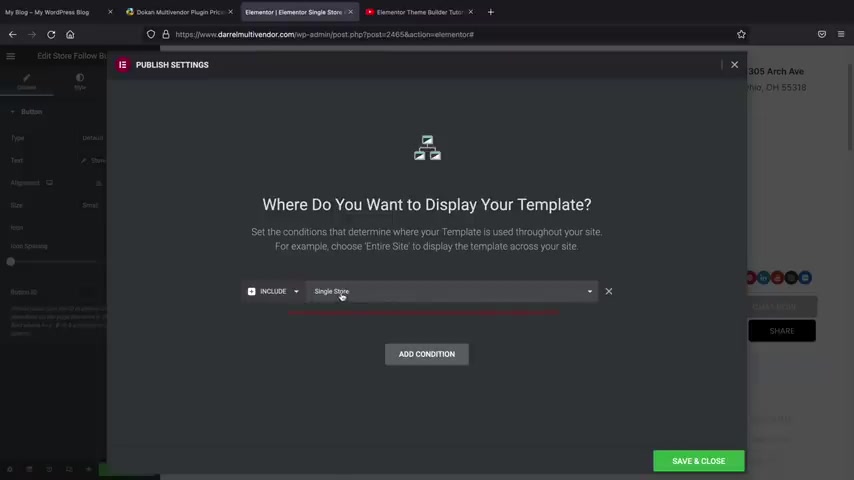
So you can custom build the store list from scratch using the elementary uh pro and the Doon Pro .
So just remember , you will have to purchase the professional uh plan in order to get this feature or the business and the enterprise plan .
All right .
But uh once you guys do that , you can go ahead and publish your changes and uh you know , save it .
So I'll click on publish , I'll add a condition and I want this to be applied to single stores .
So basically , I want to override the current defaults and I want to have the single store available on all of the um you know , on the templates .
So I'll go ahead and click on save and close and there you go .
So now we have our new custom store that we created from scratch .
You'll notice here how this is dynamically updated .
So we have this image and that dynamically updated to the vendor .
And if I go to another store , it will also dynamically update between all of the vendors .
So it applies to your entire website .
So that's pretty cool .
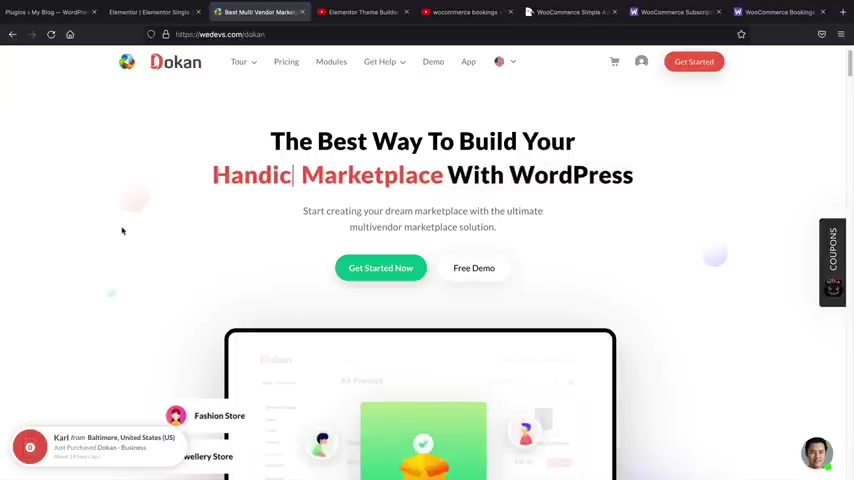
But uh that's an example of what the uh do pro professional and business plan does .
You can have a custom uh store using the theme builder and also for priority supports .
Uh If you guys need a lot of help and some of you might , you guys can use the enterprise plan and remember my coupon code works for all plans .
So if you feel like that might fit your budgets , go for it , we'll leave a link below and a coupon to help you guys out with your multi vendor website .
I hope you guys enjoyed this part of the video .
If you guys have any questions for me about any of these things that I talked about , feel free to let me know in the comments below .
Also make sure to like this video .
And if you guys have any feedback for me , let me know in the comments below .
And uh now that you guys have stayed this long .
Let's move on to the next section and give you a free layout that I created for you guys for your multi bender website .
Well , guys congrats on making it to the end and as a bonus , we have created a free lay out for all of you that you can use on your multi vendor store .
Now , parts of this uh layout are with the free version of Element to , However , the like the Shot pages and the product pages , those are for Elementary Pro only .
So if you guys do decide to upgrade Elementary Pro , we do have a link as well in the description .
But uh let's go ahead and show you guys how to import this layout on your multi vendor website .
All right .
Well , now it's time to give you guys something special , which we're going to give you a free layout for your multi vendor websites .
Now , we have two layouts .
Actually , we have this layout here , which is ideal for a multi vendor website .
And we also have a layout called Finley .
Now , I've already created another video on this , but uh you guys can actually use this on your uh e-commerce website .
Now , what makes this unique is we offer four different custom product pages .
I'm sorry , shot pages .
And we also offer two different product pages along with a custom my Accounts cart and checkout page .
So we realize everyone out there has like their own preference .
And style of , you know , of how you want to see your shop .
So this is an example of like shot page one .
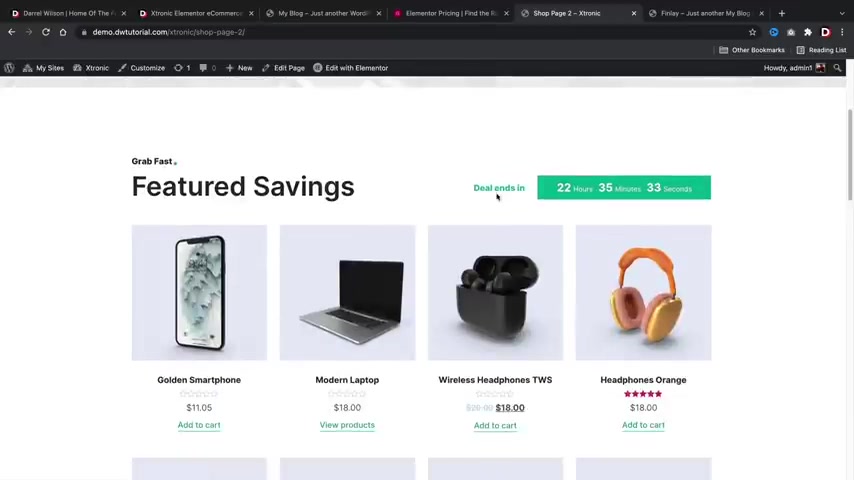
You guys can kind of like and of course you guys can adjust this to your liking .
You know , you don't have to use everything 100% you can download it , you can add in your own images , maybe even change the color scheme .
But overall we like this structure , you know , it's like really nice .
You can see we have this uh this style , we have this countdown timer and you know , it just looks really clean and ideal .
And I think this is a , a great booster for your uh multi website .
So you can check out all the shot pages and we also do have two other product pages .
So um yeah , this is one of them and then also we created the second one and uh it'll look something like that as well .
Uh We just kind of took away the uh that little top header section and stuff like that .
So yeah , you guys can go ahead and download this for free on my website .
So let me go ahead and show you guys how to import this layouts .
Um First thing that you're gonna do is you're gonna go to my website Darrell Wilson dot com and you guys can download this layout for free .
Now , this is in the description of this video as well .
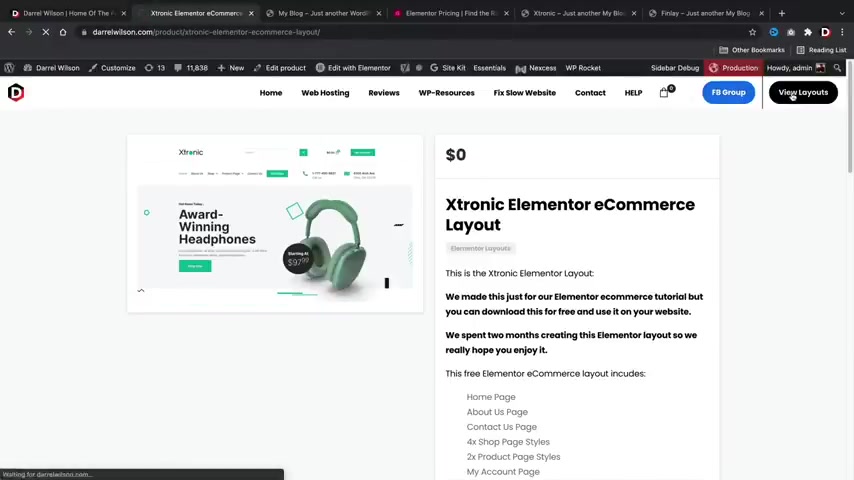
I have other videos where people said , hey Darryl .
Uh we can't find the layout and you guys , it's in the description .
It's gonna be under my products .
Now , if you can , if you still cannot find it , let me just step back here and uh hold on .
Oh , that was weird .
Uh It's right here under my uh my template .
So it's called the Tronic Element or Ecommerce layout .
And all you have to do here is go to add a cart and then just , you know , just buy it like you're buying something else except this is free .
It doesn't cost you anything .
Uh proceed to check out and then you'll get a zip folder .
So go ahead and place the order .
All right , and there you go .
So now we have the electronic layouts .
So just click on the actual layout and then you will download a zip file .
All you need to do after that is open the zip file and then you can import and drag and drop these on to your website .
So what I'm gonna do is I'm just going to drag and drop them on this website .
So this is the demo website that we made in the video , but I don't really need it , you know , it's just for to , to purposes .
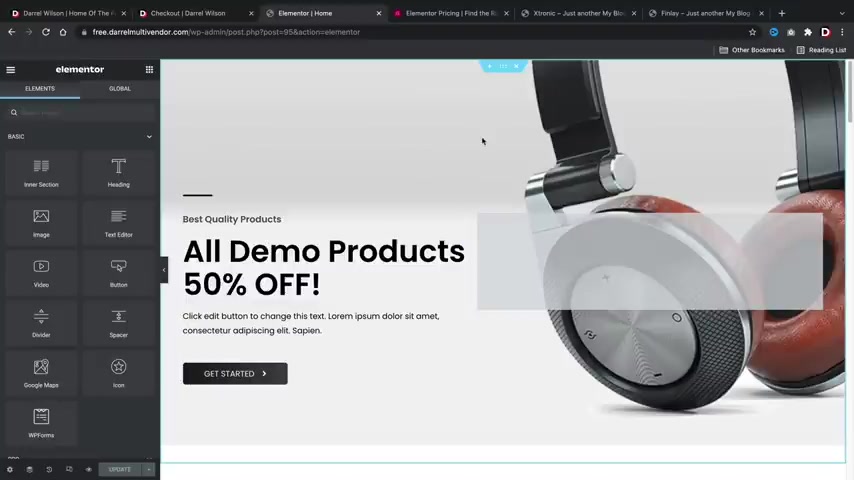
Now , also guys , I do want to let you know that parts of this layouts are using element or pro not all of it , but most of it , in fact , if you guys do want to use the uh the header and the footer uh that will require element or pro .
And uh we made these because a lot of users tend to upgrade to Elementary pro .
So we want to kind of extend it , you know , all the way across , right ?
So the first thing that you're gonna have to do is you're gonna have to upload this to your websites .
So there's several ways to do that .
You know , you can do it from your library or you can even use it while you're using the page builder .
So right here , I'll click on edit with element to .
All right .
And I just want to delete everything and I'm just gonna delete this entire website here .
So , uh I don't really need any of this .
I'll just go ahead and delete it .
All right .
And now we're basically starting with the a blank page , right ?
So I'll just click on this template section and click on upload .
I'll select the file .
Now , you first need to double click and open the actual file .
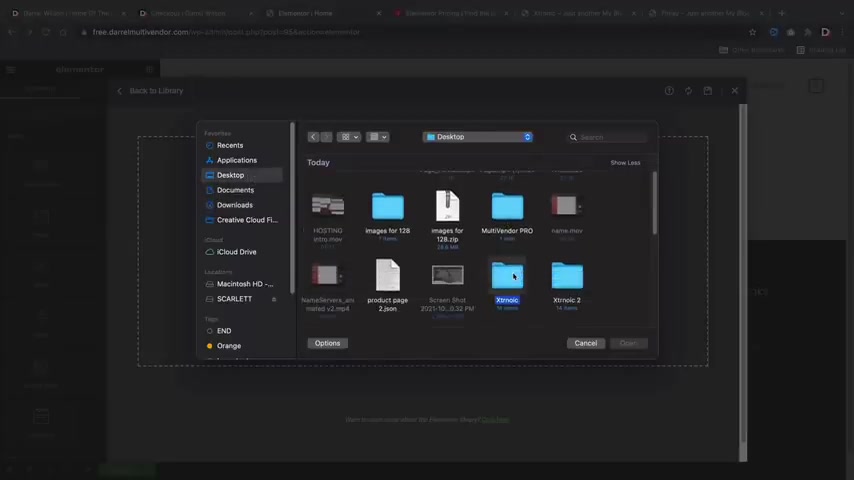
Once you do that , you will then see that there is a folder and it'll be called ex like this .
Go ahead and double click on this .
You'll see a list of the available pages .
So you'll see the home the about the shop pages and we have named them all for you guys .
So you guys won't get confused .
So I want to import the home page right .
So the home page is right here , I'll click on open and now it's importing this layout onto my website .
Ok .
So there is the home page now , click on insert and click on .
Yes .
All right .
And there it is .
So we can see our layouts , everything looks good .
Now , if there's anything that you guys want to change , uh just feel free to make your own modifications .
But uh we have successfully imported this entire layout .
So uh that's how you can import the pages .
So if you'll do the same thing for like the home page , the about us page , the contact also the my account and the checkouts and the cart page .
Now , in order to modify those specific pages , you'll just need to go ahead and go to like for example , like the uh you know , the cart page and then you'll click on edit page .
So it's a little bit different for the cart checkout and the my account , you have to click on edit page first and then you'll click on edit with element or in the back end .
Now that only applies for the cart my account and the check out the other pages , it's like just as normal .
So for example , this is the um you know , this is the actual cart page , but I want to do is I'm just going to delete it and then I'll import the Cart page that I created here .
I'll click on select file in the car page and open next , I'll click on insert and there you go .
So now we have the carts and then we have the icons here and then we also have the uh icons here at the bottom that we created for you guys .
If you want to change the color of this , this will , you'll have to go through the theme customizer and uh edit it .
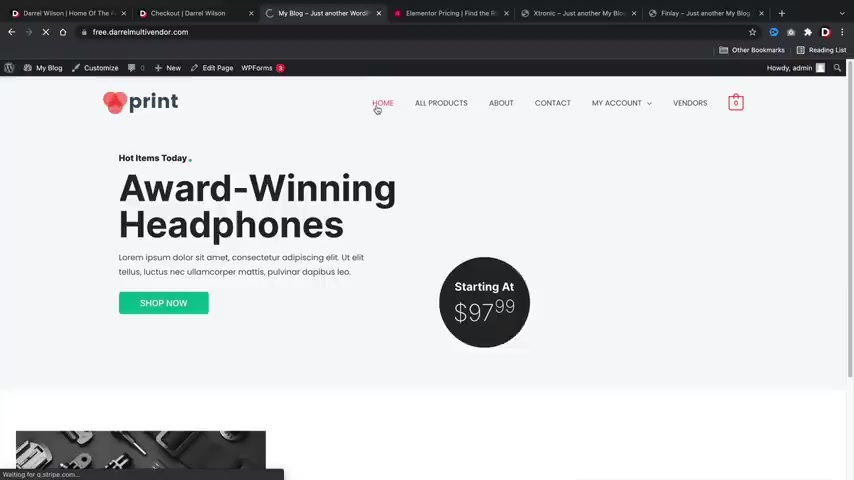
And also if you want to make this bigger , you know , you can just click on it and just make it full width and then stretch it across , right .
So stretch section , you know , so you can fully modify this to your liking .
But uh once you're done , you'll click on update .
So you'll go through the process of doing that for your pages .
Now , the header in the footer , the shop and the product pages , you will need to have the elements or pro because that requires the theme builder .
So let's do that really quick .
Let's go to our dashboard .
If you guys do need help with the elements or theme builder , I do have a full another video on that and I'll put that in the description below of this video , but it , it allows you to have like a custom pages , custom headers and footers and all sorts of cool stuff .
So you'll go to templates and go to theme builder .
Now , this is after you purchase and install the element or pro version , you guys can install any plan .
They do have $100 plan right here .
It looks like they're kinda like they're kind of hiding it , you know , but uh you'll just go ahead and purchase Element or pro and then upload the plug in to your website .
I think most people watching this already have the uh pro version .
Now , let's say , for example , you want to add in the header , uh you can click on , add a new header .
They also do have this new visual editor and I want to use this instead .
I actually like this a lot better than the um the All right .
So I'm gonna click on header and I want to import the header now .
So uh click on select files and then we'll find the header page , right ?
Or Jason .
There it is header and we'll import this layout .
I will insert the elements or header and then I'll click on publish and I want this to display on the entire website and click on save and close .
All right .
Now , we can go ahead and take a look at our website .
So I'll access to the dashboard .
I will visit the site and there it is .
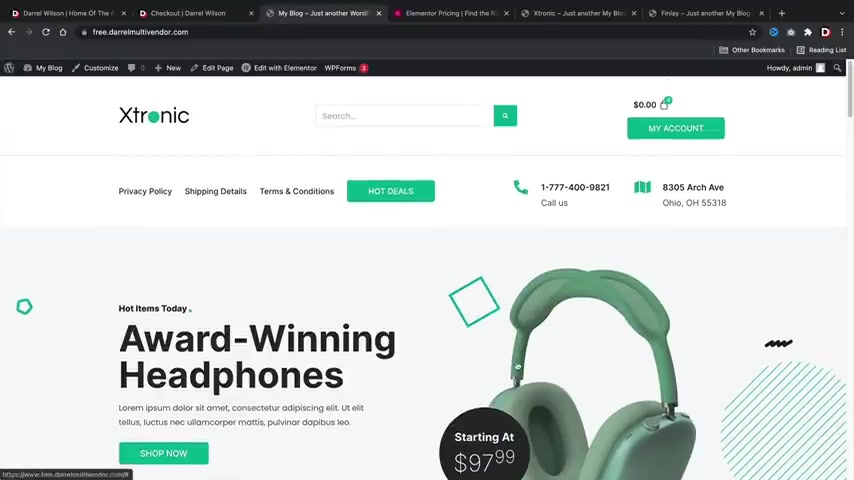
So now you see that we have our header and all you need to do here is just adjust the menu , change the colors and you're on your way to having the same exact website .
Now , let's say , for example , you want to add a custom shop page and also a custom product page .
Now , I'm not gonna go through every single one , but I'll just touch base on how to do it really quick .
So , templates , theme builder and then right here I'll do uh I'll click on , try it now and now we have the product archive .
I'll click on plus for the product archive and then I will import the layouts , select the files and this will be like shop page one or something .
So I'm going to insert this and say yes and click on yes .
All right , cool .
So this is my new shop page and uh yeah , everything looks good .
And if you want to change anything or add something , you can just go ahead and insert it .
Now , all you need to do here is click on publish , add a condition and I want to put this for the shop page and then I'll click on save and close .
Now , if you guys do need help with the elements or theme builder again , I do have a full another video on the theme builder from the INS and the outs where we create a custom product page , custom shop page , a custom product category page .
I mean , we really get in the nitty gritty and we really create all types of pages .
So I'll leave that video in the description of this video .
So now that we've created a custom shop page , you can also create custom product pages .
And it's the same thing .
So let's click on a theme builder and now we're going to create a custom product page like this .
And there's two different layouts so you guys can choose between both of them .
And uh yeah , it's pretty simple .
So I'll just walk you through it really quick here .
I'll click on , try it now and this time we'll click on single product and click on the plus icon .
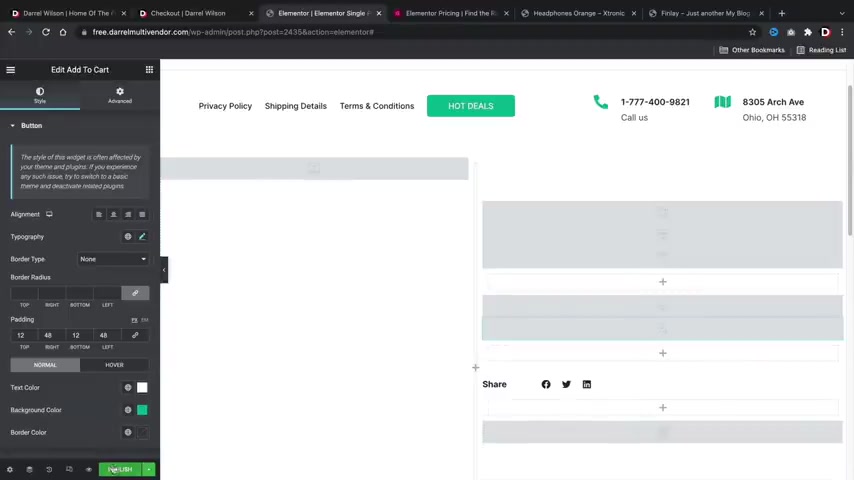
And from here , I will click on the arrow icon , select file and I will import uh we have product page two , single product one and click on open .
Now .
I will insert the single product page .
All right .
So I have imported the single product page .
It might look like this and that's just because these are using the Woocommerce elements .
But when your product uploads , it will dynamically update and everything will display uh where it should .
So let's click on publish here and just test it out .
So I'll click on publish , add a condition and this will be products , right ?
These are all my products .
I'll click on save and close at the bottom , right ?
All right .
So this layout you guys can use on as many websites as you guys would like .
I hope you guys like it .
Just go ahead and adjust the colors .
You know , you can just switch things around , adjust the fonts and everything to fit your liking .
But I think once you um you know , once you have a multi vendor website .
It just looks really practical , it looks really good .
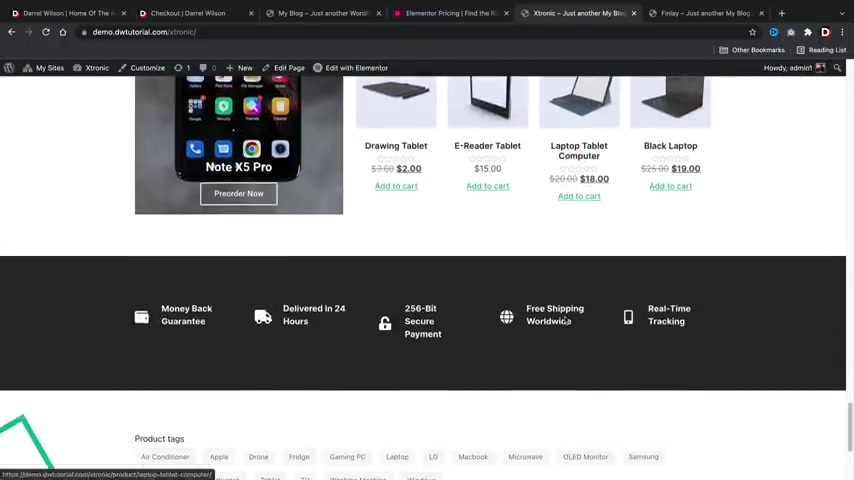
And I think this is a great start for a multi vendor website .
So yeah , you guys can use this for free .
Also , be sure to check out the other layouts .
You guys can also use this for free as well .
You don't have to use the same exact images and color that we used .
Obviously , you can just kind of steal the structure , you know , just like uh take the structure , change the image , the color and it'll look like a completely different website .
So I truly hope you , you guys do enjoy this layout .
I hope you guys also enjoy this video .
We spent a long time making this layouts for you guys and hopefully that we explained everything , step by step .
I really wish you guys the best for your multi vendor e-commerce websites and congrats on building your website .
Well , guys , thank you guys for watching this video and I really hope this helped you guys out creating a multi vendor website , you know , off the script and everything .
Uh I work so hard on these videos guys , you know , I I create the outline .
Uh We create the demo website , we create the structure to make sure it's perfect for all of you .
So I really do hope you guys enjoyed this video .
And if you guys have any questions for me about , I don't know what kind of theme do you use for or any questions about this ?
Let me know in the comments below and I will do my best to answer all of the uh questions .
So guys , my name is Darryl Wilson and I will see all of you party people in the next video .
Take care .
Are you looking for a way to reach a wider audience and get more views on your videos?
Our innovative video to text transcribing service can help you do just that.
We provide accurate transcriptions of your videos along with visual content that will help you attract new viewers and keep them engaged. Plus, our data analytics and ad campaign tools can help you monetize your content and maximize your revenue.
Let's partner up and take your video content to the next level!
Contact us today to learn more.