https://www.youtube.com/watch?v=a-4VdVnNJ4U
Drawing Wet Face Portrait _ Tutorial for BEGINNERS

टोपी और ऍम ऍफ करने के लिए मैं पहले यूस किया हूँ यहाँ पे लाइट आॅफ करने के लिए पहले फोर बी और लाइट सेटिंग करने के लिए ऍम ऑटो बाॅस ऍम यू सिंग दिस फॅस के बाद हम लोग यूस करेंगे तो बी ऑॅल फॅमिली ज्यादा नहीं उस करूँगा कहीं कहीं पे डॅालर्स इनमें यूस करूँगा ॅ तो अगर आपने हमारे चैनल को अभी तक सब्स्क्राइब नहीं किया तो मुँह जल्दी ऍफ करले और सपोर्ट करे हमारे चैनल को वन मुँह सब्सक्राइबर अचीव करने में ।
और अगर आपको ये विडियो अच्छी लगेगी तो मुँह से लाइक और शेयर करना नहीं भूलिएगा और साथ साथ काॅस्ट करना तो बोल रहे हैं ।
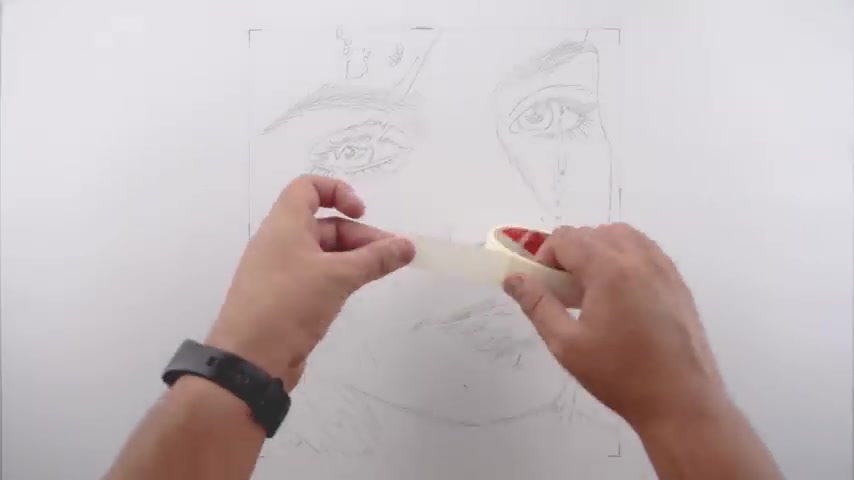
इस तरह से हम लोग ॅ बनाएँगे कुछ इस तरह से इस तरह से आप देख सकते हैं मैं यहाँ पे यूस कर रहा हूँ पहले ऍम इस तरह से मैं आपको बताया आ गई पहले एॅफ सब टाइम वो भी छोटा खेडी फॅसने के बाद मैं यहाँ पे यूस करूँगा एक्सॅन जो आपको बाजार में आसानी से मिल जाएगा दिस उं स्पॅाट उसको मैं कुछ इस तरह से यूस करूँगा ब्लॅक करने के लिए क्योंकि आप जानते हैं ब्लॅक इतना महंगा है और मेरे लिए ॅ था ।

जब मैं दिन था मैं यहाँ पे यूस कर रहा हूँ तो वो ऍफ करने के लिए कुछ इस तरह से डाँट करते हुए वो लोग फिर यूस करेंगे यहाँ पे ऍन डिंग सिस्टम जिसको आप कान में यूस करते हैं तो मैं यहाँ पे यूस करूँगा सिर्फ ब्लॅड करने के लिए ।
कुछ इस तरह से ब्लॅक करने के बाद हम लोग ट्राई करेंगे ।
हाँ ॅ इसके बाद ड्रॉ करेंगे हम लोग नाक गाँधी जी का ।
और अगर आप ऐसा ही विडियो उं चाहते हैं तो प्लीज मुँह डिस्क्रिप्शन में ऐसा ही होल्ड मुँह लिंक मैंने डिस्क्रिप्शन में दे दिया ।
आगे ही उसके बाद हम लोग यहाँ पे ड्रॉ करेंगे आउं ।
उसके लिए मैं पहले यहाँ पे एक लाइन ड्रॉ कर रहा हूँ ।
जिस तरह से आप देख सकते हैं चश्मा के सीधे सीधे ।
उसके बाद हम लोग लाइन ड्रॉ करने के बाद लाइन के बीचोंबीच ड्रॉ करेंगे ।
मुँह कुछ इस तरह से बहुत सारे मतलब कुछ इस तरह से स्ट्रॉक करने के बाद फॅस ।
आप चाहे तो इस विडियो को पौं करके स्टेप बाई स्टेप हमारे साथ उँगली बना सकते हैं और ये बहुत ही आसान है ।
आप चाहे तो इसे एक बार ट्राई करेंगे , ये आसानी से बन जाएगा ।
तो जिस तरह से हम लोग को बनाएँगे , ऍसे और उसे करेंगे ।
टोपी और फॅस बनाने के लिए तो मैं यहाँ पे आपको एक ट्रिक बताऊंगा ।
ॅ मेरी आपसे निवेदन है कि प्लीज मुँह अगर आपको ये विडियो अच्छी लगी तो प्लीज अपने दोस्तों के साथ लाइक और शेयर करना ना बोले ताकि हमें सपोर्ट मिल सके ।
फिलहाल मैं यहाँ पे यूस कर रहा हूँ ।
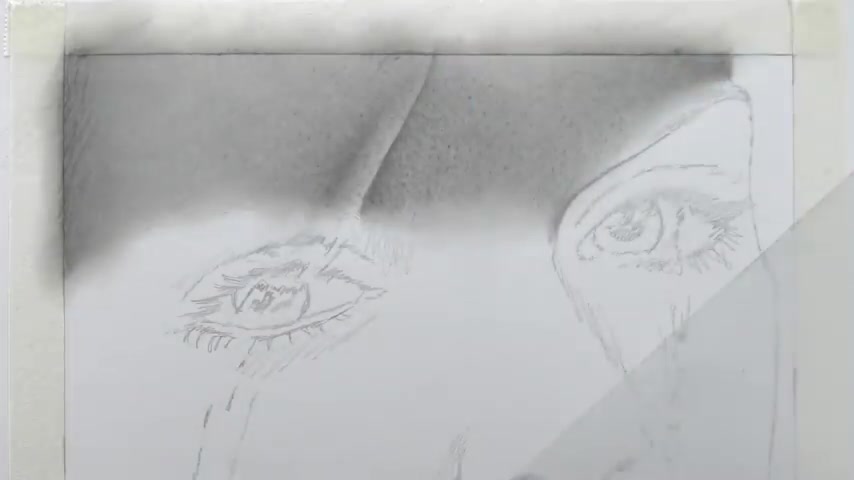
ऍम जैसा कि आप देख सकते हैं डिस्प्ले पे मैं इसे लाइट सेटिंग कर रहा हूँ यहाँ पे चश्मे के लिए ताकि एक फॅमिली सके यहाँ उसके बाद हम लोग यहाँ पे यूस करेंगे ऍम दो आॅफ करने के लिए उसके बाद मैं यहाँ पे यूस करूँगा ।
कॉल ड्रॉप करने के बाद जो भी और फॅसा उसे और करने के लिए किस तरह से आप देख सकते हैं ।
मैं यहाँ पे यूस कर रहा हूँ मुँह करने के लिए ।
ऍम ऍम दो आइवर ड्रॉप करने के बाद हम लोग पहुंॅच करने के लिए ।
उसके बाद मैं यहाँ पे ड्राॅ ।
इस तरह से आप देख सकते हैं ।
ये एक आसान तरीका है राष्ट्रिक बनाने के लिए ।
उसके बाद मैं यहाँ पे क्या ऍम मैं पहले यूस कर रहा हूँ यहाँ पे फॅस ये स्मॉल सर्कल बनाने के लिए ।
उसके बाद मैं यहाँ पे यूस कर रहा हूँ ।
ऐसे पैसे और ऊपर की ओर मुँह करते हुए नीचे मैं लाइट कर रहा हूँ तो कुछ इस तरह से एक फॅमिली है और मैं हम लोगों ने बनाया है महात्मा गाँधी जी का , उसके बाद हम लोग करेंगे महात्मा गाँधी जी के आपको कुछ इस तरह से मैं यहाँ पे यूस कर रहा हूँ अभी फॅमिली थोडा सा डाँग करने के लिए ।
उसके बाद मैं यहाँ पे यूस करूँगा ऍफ करने के लिए अब हम लोग यूस करेंगे डाॅॅ के लिए वो भी और सिक्स ऍम इस तरह से आप देख सकते हैं ।
मैं भी यूस करूँगा ऍफ करने के लिए उसके बाद मैं यूस करूँगा फाॅगिंग करने के लिए इस तरह से आप देख सकते हैं उसके बाद मैं यूस करूँगा ।
उसके बाद हम लोग करेंगे ट्रेस महात्मा गाँधी जी के कपडे को मैं यहाँ पे यूस कर रहा हूँ ऍम मुँह कहीं कहीं साइड में सो वी ॅ कम्पलीट हो लाॅट फॅमिली मैं आशा करता हूँ की ये विडीओ से आपको कुछ मदद मिली होगी ।
ॅ प्लेस जल्दी से लाइक करे और सर करे अपने दोस्तों के साथ और मदद करे हमारे ऍम करने जय हिंद जय भारत ।
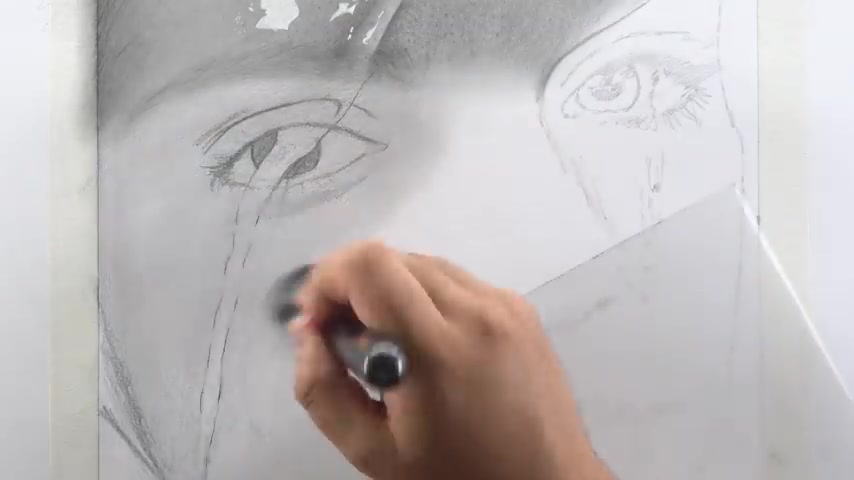
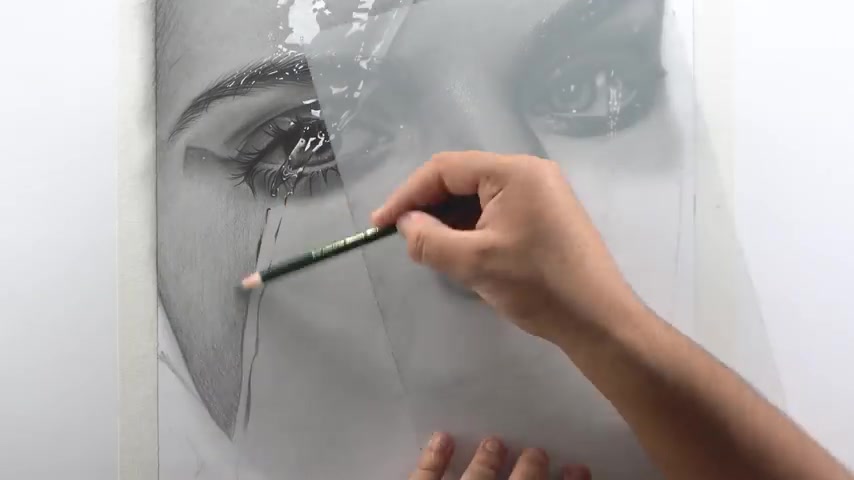
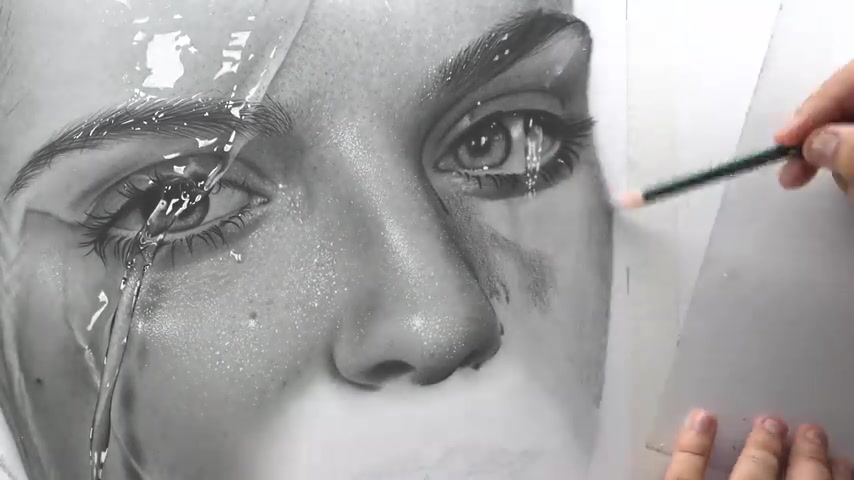
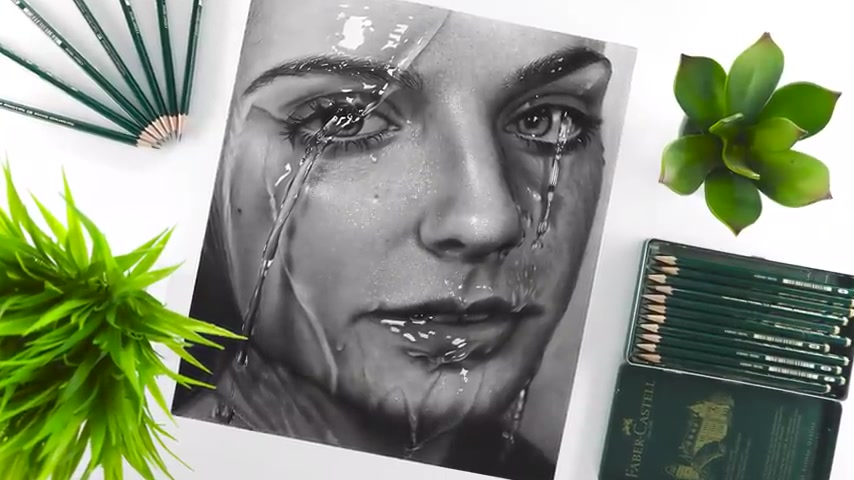
Now moving on to the nose portion And as always , I wanna fill it with a paste there first and then use a three B pencil to add these darker shades in the shadowed portions .
Also make sure you darken the nostrils using a five P pencil before blending the three B shade , OK ?
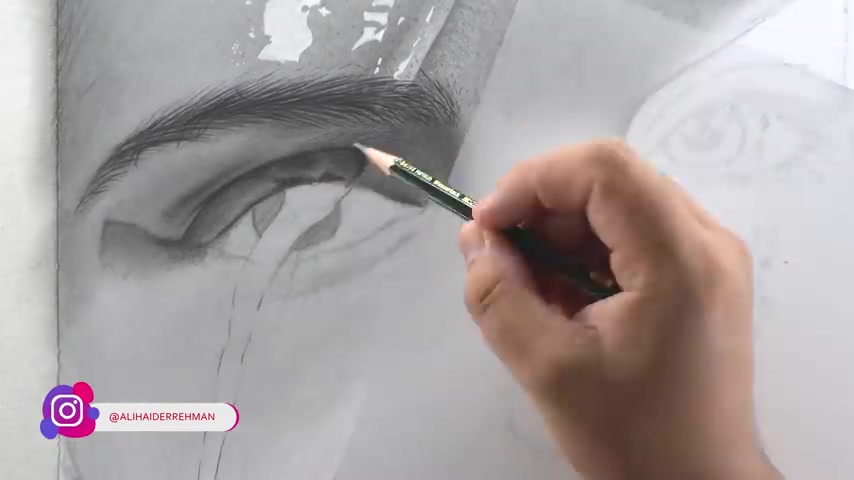
Now use your B or nine B pencil and darken the shades in the nostrils and around the nose where required I also used a two edge pencil to blend the roughness of the shade due to paper texture .
Now use your need eraser and tab it lightly in this middle portion of the nose to highlight it and lighten the shades .
And then use your P pencil and add the stored and texture on top of the nose and blend each and every dot using the blending stump to make the skin texture again , make a sharp to fit your knit eraser and dab it lightly in between the black dots to add these light highlights .
Ok ?
Now use your general pen and fully highlighted portions of the nose with these small dots and texture and then lighten some of them using a small dry brush just like this .
OK .
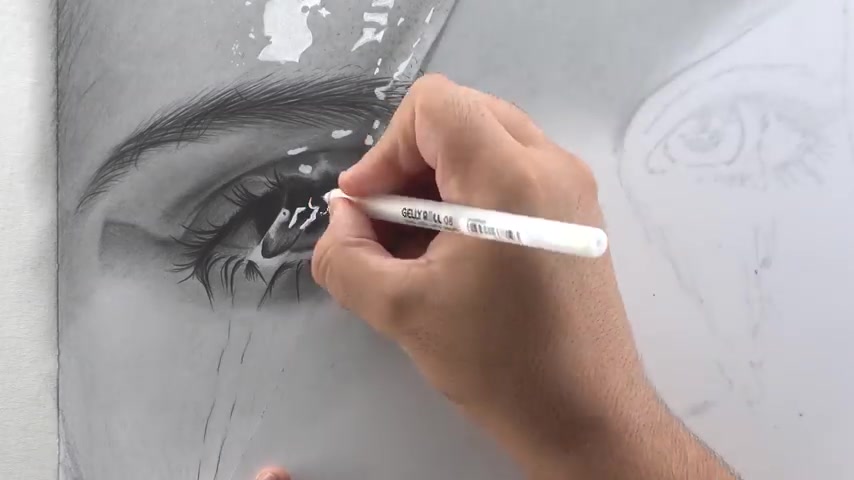
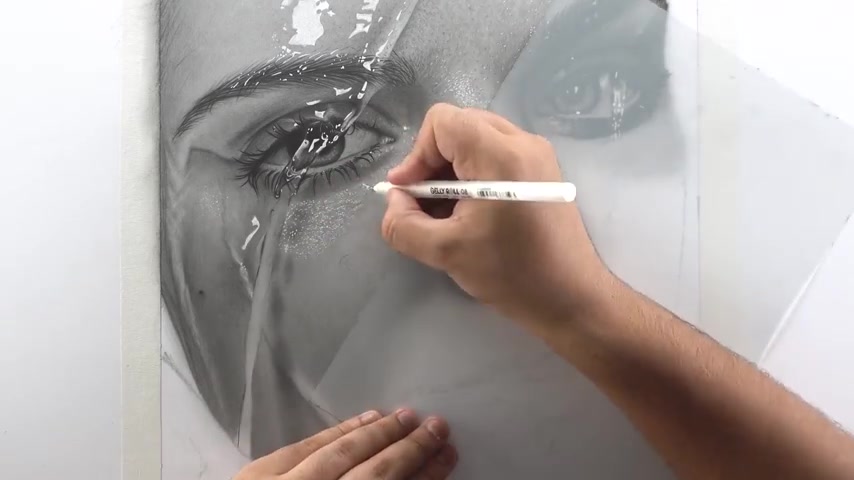
Now , moving on to the cheap portion and first of all , fill it with a B pencil and blend it using a draw brush and then use your TV pencil and then fill the lower shadowed portions with darker shade and also darken the outlines of the water drippings and then blend this layer using a draw brush .
Now use the five P to darken the outlines of the water drips where required and then use your mono zero to add the highlights in the water drips chairs like this .
You can also use your chair roll pen to add the sharp white highlights and texture .
Now I'm gonna put the same process on the remaining cheek portion except this long shadow of this main water drip .
I'm gonna shade it using a three B pencil and then darken the shades using A five B .
And for this skin texture , I'm gonna use the mono zero first to add these light white dots and texture and then I will use a B pencil to darken the portions in between these white dots just like this and also add these dots in the lower cheek portion and blend them using ultra brush .
Then use the general pen to add these sharp white dots and highlights for this skin texture .
In order to add these light smudges and dots in between this skin texture .
I used a small piece of paper and shaded it with a P pencil and then use the blending storm to pick up the shade and use it for the dots and also lightly blend the extra sharp highlights using ultra brush .
OK .
Now , for this main water drip , I'm going to darken the outline using an eight P pencil and fill the middle portion using a five P and then use your mono zero and general pen to add the highlights in between .
Ok .
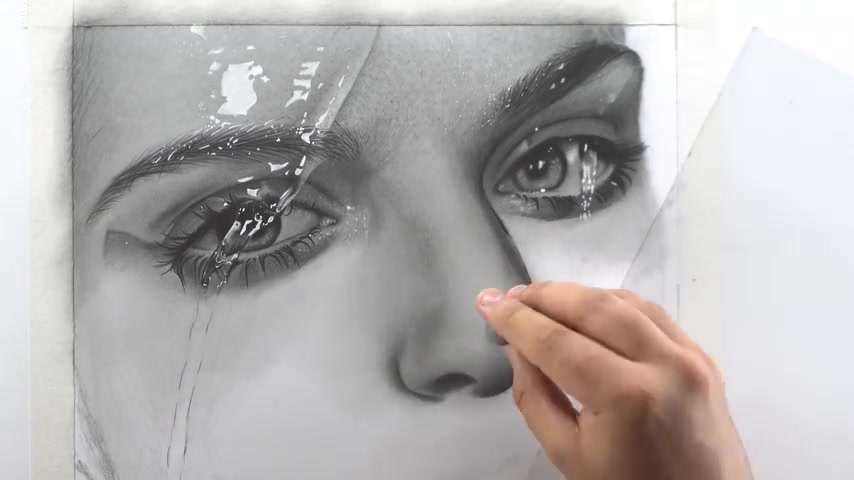
Now moving on to the right cheek and again , the overall process is similar to the left one , but the water dripping and cheek portion is slightly out of focus .
You need to add all the main highlights using the mono zero and neas you can also use the general pen when required but don't fill all the highlights with sharp white pigment .
OK ?
Now , moving on to the mouth portion and first of all , I'm gonna darken the outlines of the lips using a five B pencil .
So they don't fade away during the blending process .
Now share the upper lip using A P and then three B pencil as the right portion is out of focus .
We don't need too much details in there .
But for this left portion , you need to add the skin texture using the same doting and blending technique and then add the white dots and highlights using the cherry roll pen .
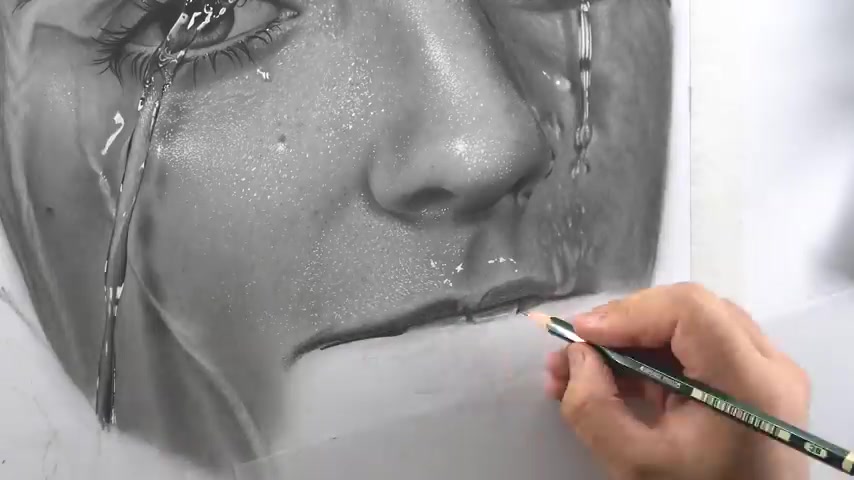
Now lightly darken the upper lip using three B and also darken the outlines for the teeth and lower lip and then fill the lower lip portion using a P pencil .
Now I'm gonna fill the lower lip using a three B pencil and flatten the rough texture in the shade using a two edge pencil and also blend the shades using a draw brush .
Now use your five P pencil and fill the extra dark portion of the lips with darker shade just like this .
Now lighten the middle portion of the lower lip using the knitter eraser and then use the mono zero eraser to add the highlights on the teeth and upper lips , et cetera .
And then use the general pen to add these main fire sharp highlights .
Ok .
Now , moving on to the chin portion and as always , I'm gonna fill it with the paste layer first and then use a three B to add the dark shades in the shadow portions .
Also darken these outlines for the water tray .
Before blending the shades just like this .
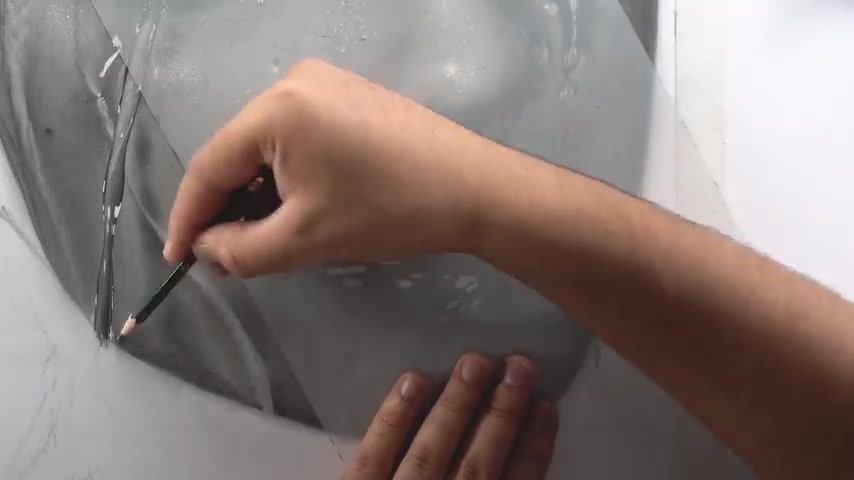
She will also use the tissue paper hair for blending .
Now use the Fay pencil and further darken the lower portion of the chin along with these outlines for the drips .
Now use the knitter rar and pick some of the extra shades from these areas in between the drip and also add the highlights inside the drips and then add the white dots and highlights in highlighted portion .
OK ?
Now , for the net portion , I'm gonna use the HP pencil first and darken all these rough outlines and then use the same P pencil to fill all this area with the base layer and then use the draw brush to blend this layer .
I'm gonna use a two edge pencil to flatten the rough texture of this shade .
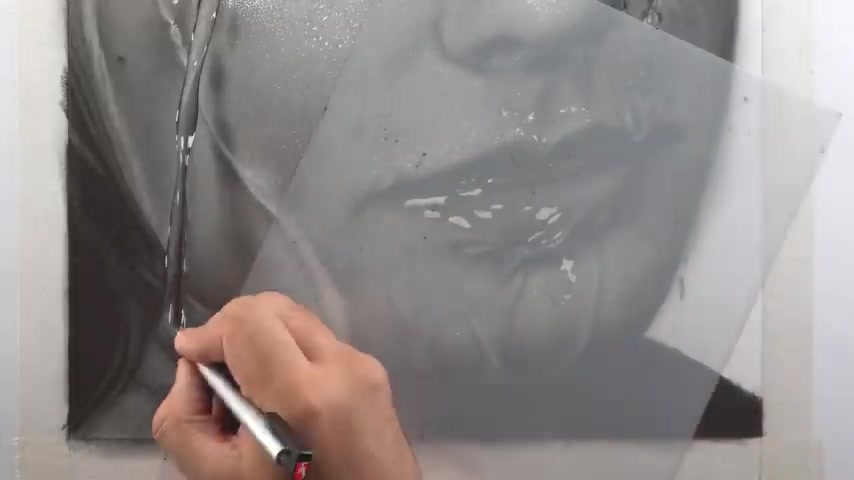
Now further darken the shadowed portions with the same three pencil and add the highlights using a need eraser and mono zero eraser and also extend this main water drip and add the highlights on it using a cherry roll pan just like this .
And also add the highlights for these water drips below the chin portion .
OK ?
Now moving on to the background portion and first of all , I'm gonna fill it with the base layer using a B pencil and then add the second dark layer using a three B pencil .
And for this light water drip in the background , you just need to darken it with the five P pencil first and then use a mono zero to add the highlights in between .
You can also use the electric er or road pen to add the sharp highlights if required .
And with this last I feed on with this hyper realistic fat face portrait .
So I hope you enjoyed and learn something new from this one .
If you want to get the real time video of this drawing , you can visit my patron profile .
And if you are a big and want to learn sketching from scratch and enjoy my course on Udemy , you can also buy this original drawing through my website or order a custom portrait of your loved ones as a gift for this upcoming Christmas .
All the links are in the description down below .
So thank you so much for watching and I'll see you in the next one .
Are you looking for a way to reach a wider audience and get more views on your videos?
Our innovative video to text transcribing service can help you do just that.
We provide accurate transcriptions of your videos along with visual content that will help you attract new viewers and keep them engaged. Plus, our data analytics and ad campaign tools can help you monetize your content and maximize your revenue.
Let's partner up and take your video content to the next level!
Contact us today to learn more.