https://www.youtube.com/watch?v=5FMc0dFqt8c
How to start your portrait drawing.
Hello , I'm Stephen Bauman .
And in this video , I'm gonna be showing you one of the original head simplification models .
And this one is from Andrew Loomis .
What I love about it is that it's simple and it's generic and it applies to just about any situation you could find yourself in .
When you're drawing a portrait , you can use it to establish proportion construction and even the perspective of the head , I personally use it as a jumping off point for developing my own head structure template that I use in all of my blocking courses and portrait lessons .
Let's get to the demo so I can show you what makes this particular method so cool and so practical .
I'm going to be demoing here a basic Luis head structure template .
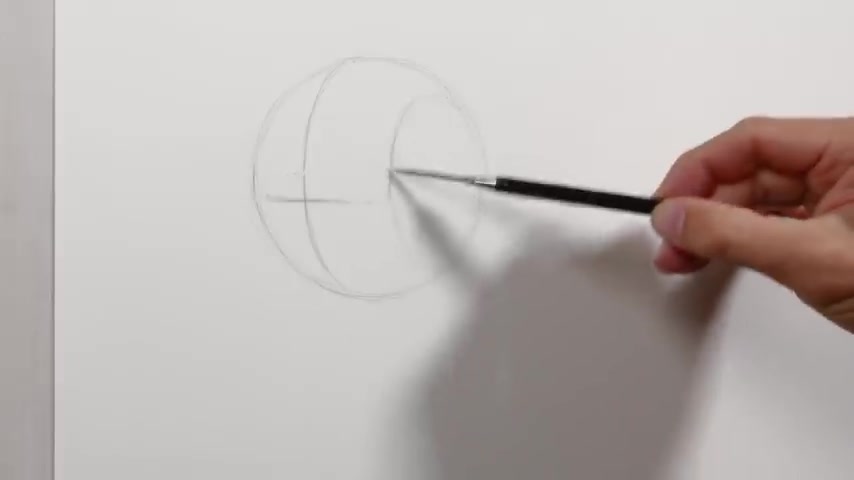
And that always starts out with this sphere .
The reason that Luma says he chooses a sphere is because uh in terms of the geometrical shapes , you could start out with it is one that at the very least resembles most the cranium in making this circle .
Of course , it's very easy to test the proportion of your circle to see if you have it about right .

Uh just measure the height versus the width .
Uh Here I wound up uh pretty precisely on a , a decent proportion .
Now , at this point , we're still in a flat state .
And the first thing that Luis wants us to do is to gain some sense of volume .
Right now , the easiest way to create volume or to create form uh is by using contour lines .
So what he recommends is that we start with a kind of vertical center line for the head , right ?
We would think about that ellipse traveling around the back of that sphere .
Right now , this line , of course , we're not gonna see this is around the the back of the sphere .
But what we do see is this vertical center line to the sphere .
And what that tells us , right , if we think about facial symmetry is that tells us that this head is turned to the left .
After that , we start with a horizontal axis .

Eventually , this is meant to show the brow ridge .
When we do the same thing I want you to both imagine but also draw through the ellipse so that we can see basically where the eye level that we're looking at this from is we're looking a little bit down on the head .
So we see that that brow ridge ellipse .
So this then roughly corresponds with the glabella slash brow ridge .
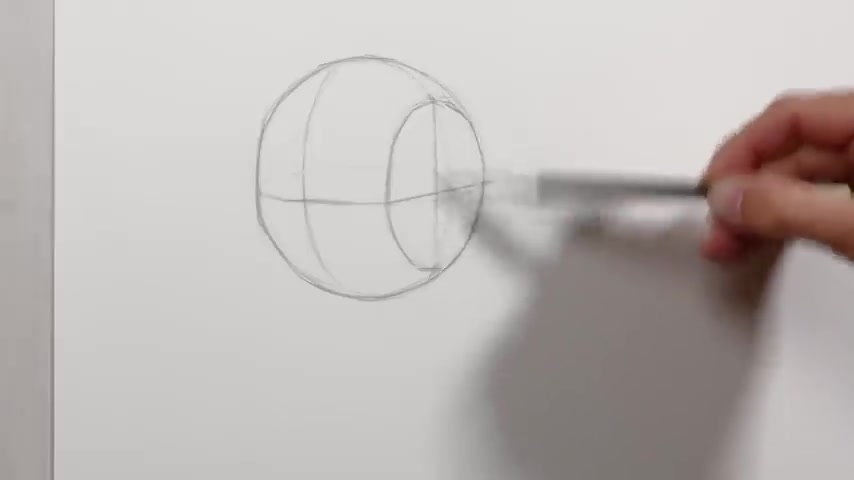
Now , the next step in making a Luas head is that you should shave off the sides of the sphere .
Now , by that , what we're talking about is to take an ellipse much like this one and say basically that we have sliced down the side of the sphere and we have removed kind of shape that would not be unlike this like this kind of domed piece , right , that we've uh we've just cut off from the side of the sphere .
Now , this ellipse at the side of the head here will line up essentially with the edge of the forehead or what will be referred to as the temporal line .
Even though we are looking at this head from the right hand side and seeing less of the left hand side , what we want to do is also mirror that same cleaved edge or that same cut edge of the sphere on the other side .
Are you starting to see a theme develop in this ?
This is a theme of structural symmetry , what we do to one side , we can also do to another side .
And in this way , we ensure that the head that we're building has infused in it , that sense of structural symmetry , this horizontal axis here actually becomes important .
And I'm going to replace this dotted line that I made a nice clear cross because the next thing that we're gonna do is transform this from a cranium into something that also has the rest of the skull or the rest of the head attached to it .
We're gonna continue this vertical center line here pretty much straight down .
Now , that vertical center line is going to terminate here in the chin .
I'll talk a little bit later about the length of this and the proportions that Luis recommends for the head .
The next steps can come in a variety of orders based on who you see doing it .
But I'm gonna go ahead and start to indicate the side plan of the face here coming down to the chin .
Next thing I wanna do is find the jaw , which here is relatively easy , right ?
So it's just about the halfway point of this ellipse .
So we have this vertical axis coming down that should be more or less where we find the jaw on an average head .
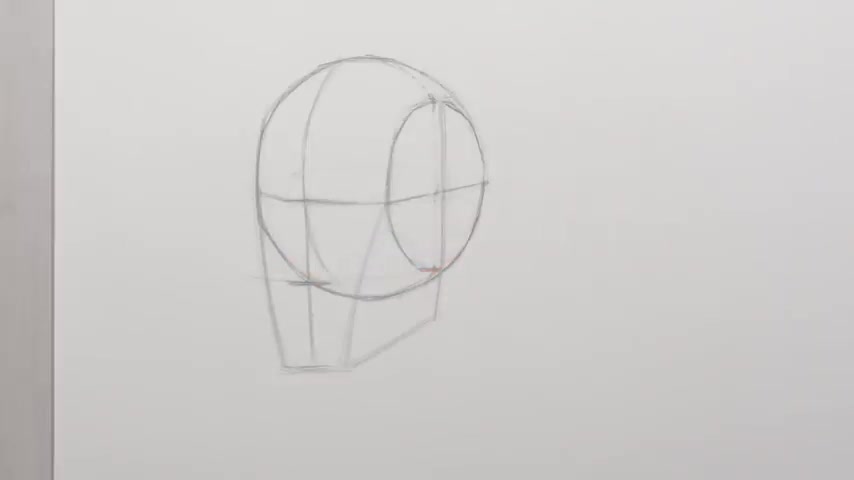
Now , this is a really important point to remember just about everything about the lum head or at least where we're starting from here is about a generic head .
It's not about a super specific one that comes later after that , I'm gonna make that front plane of the face that mirroring edge to the one that I placed out here on the left hand side , you could do this before or after .
But let's go ahead and place the nose , the brow ridge like this should have a corresponding parallel line at the bottom of this ellipse , which will indicate more or less where the nose will hit along that vertical center line .
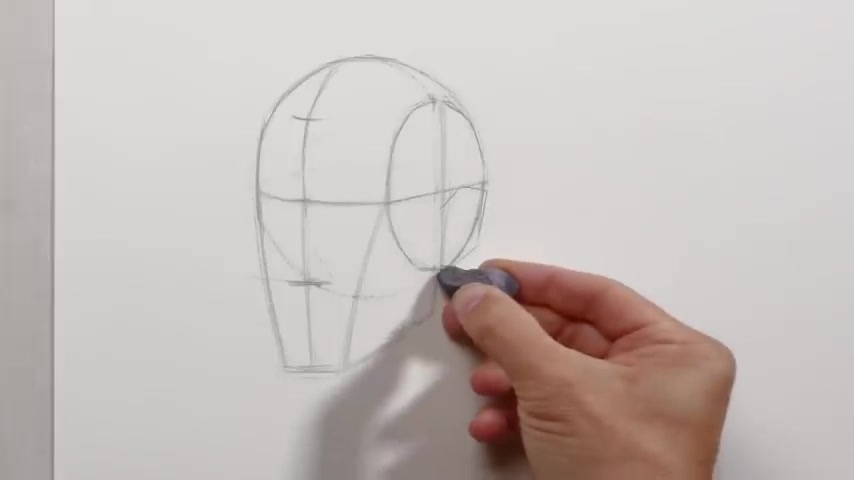
Now , in establishing the proportions of the head , something that Loomis does that maybe is a debatable merit if you ask me , uh is that he wants to establish the thirds of the face .
So from the chin to the bottom of the nose , bottom of the nose , the brow ridge , and then from the brow ridge , he likes to include uh what he refers to as the hairline .
Now , I guess that a hairline is a useful landmark for a really generic average head , maybe it starts to communicate a major plane shift in between the top of the cranium and the front of the forehead .
Uh But in my opinion , and you can kill me in the comments if you want to .
But in my opinion , it's a little bit of an arbitrary marker uh unless you're going purely from imagination .
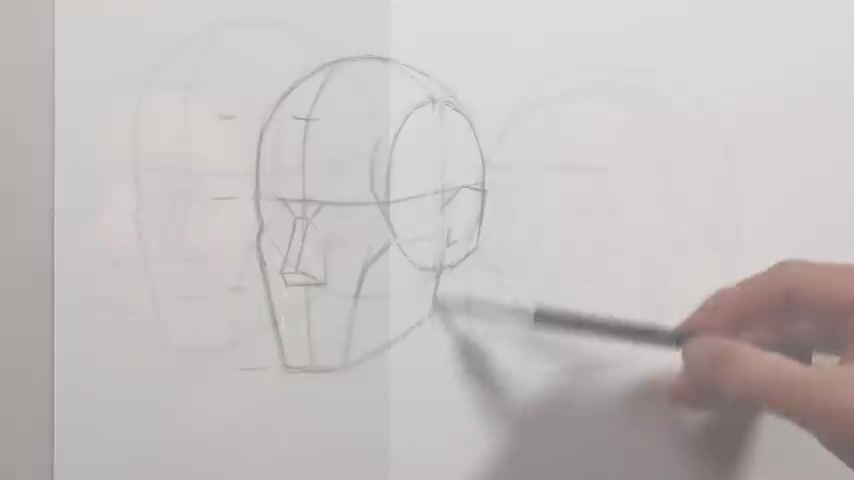
Uh Whereas when I'm building a head , I usually tend to draw from a reference , the location of the ear as it corresponds to the line of the jaw back here , right .
So we have a brow ridge coming across here and then slicing back on a flat axis .
We have the line of the mandible kind of coming up to the bottom of this vertical axis .
Uh Essentially the ear should sit somewhere in that vicinity on a slightly backward tilting axis .
So if we make a shape just about like this , we can give that sense of the location of the ear and we're drawing a lum head from this three quarter angle .
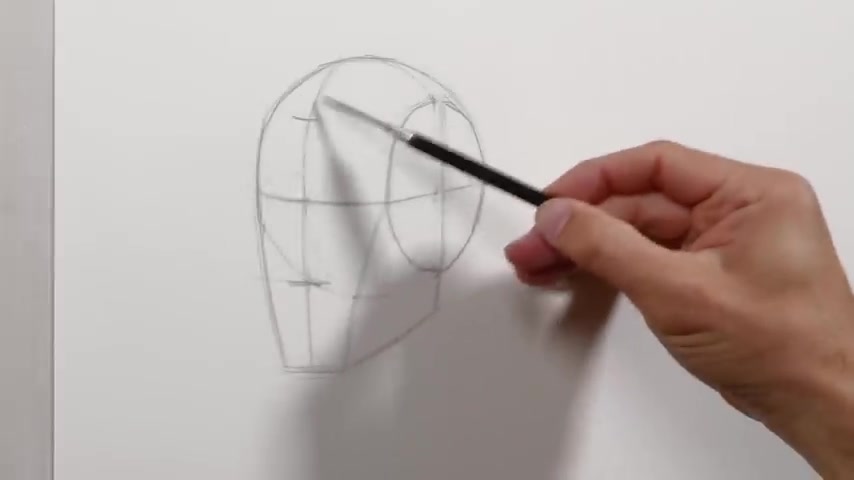
Now , in addition to that , I like to indicate the Zygomatic bones or the cheekbones and where they correspond to this block in structure .
It's not a required step for a lum head .
But I think it's nonetheless a very interesting one to do because it gives just a little bit more realism to your initial block in maybe helps you recognize things slightly better than you would without .
It also lets you show that classic back edge of the eye socket .
Eventually , that zygomatic bone would go right back here to the external auditory , which is your ear hole .
And then also the back edge of the forehead comes a little bit forward from where we climb the ellipse .
We could also just the heck of it , we can project a nose outward from here .

Now , thinking about the nose , we know that the bottom plane of the nose at the center of it , we have the septum and that hits right along the center line .
And we also know that the glabella sits here also along the center line and the brow ridge from there .
It's really easy to just project a plane outward to show the top plane of the nose , to show where that plane turns before you know it , you have a nose projecting forward from the head .
Now , believe me , when I say this is just the beginning of the ride , there's so much more you can do with both the lum head block in template and also just blocking templates in general .
But this is enough to allow you to get to a place with your drawing where you could actually exercise your observational skills to get you to a place where your drawing could look really quite specifically like the model I talked initially about those proportions , right where Luis wants you to see the head in terms of these thirds right now , depending upon the orientation of the head .
If it's tilting back , it's tilting forward , you're gonna find uh that there's a different set of proportions in between these because of for shortening , but also from individual model to individual model .
We're also going to find like a lot of divergence between the length of the nose , the length of the bottom third of the face .
There's going to be a lot of differences and this would be the moment when you want to implement those differences and create something that looks a little bit more from a proportional perspective like the model that you're drawing .
Oh by the way , this bottom third should have the uh the mouth as well , which is gonna be more or less equidistant uh in between those two ends .
So let's pause here and recap really quick the various stages of making this lum block in , we want to start out with that circular cranium shape , add to that a vertical and horizontal line that will take the shape of it in your lips .
These give the head a sense of three dimensionality .
After that , we want to shave off the sides of the cranium and add a cross to it .
This will become a landmark later on in the drawing from there , we start to add the shield shaped front plane of the face that goes from the brow ridge down to the base of the chin and also represents the side planes of the jaw .
Following that , we mark out the head in thirds , we go from hairline to brow ridge to bottom edge of the nose , to the bottom of the chin .
These marks make up the basic proportions of the face .
And of course , they do change .
If the head tilts up or tilts down at this point , we have a basic lum head .
What I've decided to do here is to also add a projecting planer nose and also the location of the ear in relationship to the rest of the features of the head .
In order for this block in style to become most useful to you , you're going to need to practice drawing it from different perspectives .
So drawing 9 , 10 2030 lum heads , all looking in different directions will be a great way for you to internalize this information and become really effective when you're drawing portraits .
If you're looking to learn more about this style of block in and also other styles of portrait block ins , you can go to my Patreon page , I run a course there called the block in boot camp .
We focus on exactly these kinds of issues and help you get better at the most important stage of the drawing to get there .
Just follow the link at the top of the description of this video .
Thank you so much for watching this video .
I'm Stephen Bauman and I will see you next time .
Are you looking for a way to reach a wider audience and get more views on your videos?
Our innovative video to text transcribing service can help you do just that.
We provide accurate transcriptions of your videos along with visual content that will help you attract new viewers and keep them engaged. Plus, our data analytics and ad campaign tools can help you monetize your content and maximize your revenue.
Let's partner up and take your video content to the next level!
Contact us today to learn more.