https://www.youtube.com/watch?v=RQMhN_R2MfU
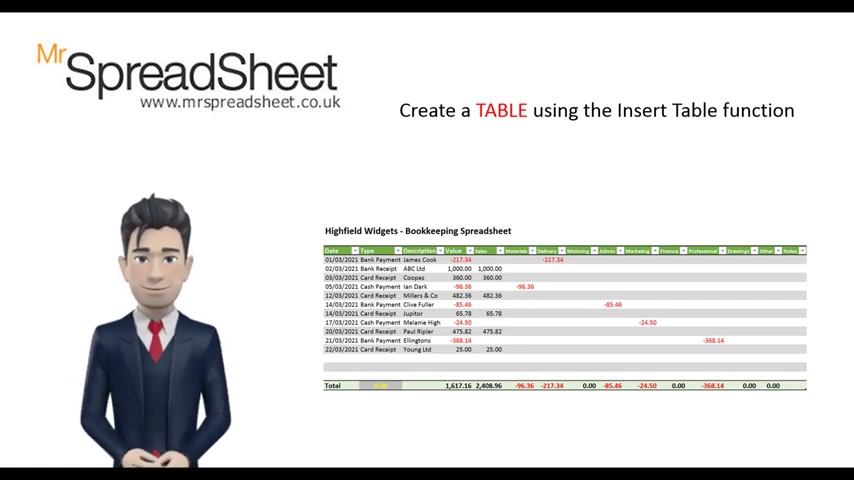
Create a Bookkeeping Spreadsheet in Excel in 10 minutes
Hello and welcome to the Mr Spreadsheet youtube channel .
In this video , I will show you how to create a simple bookkeeping spreadsheet for you to record your business transactions .
During the tutorial , I will use a basic data table created with Excel's table creator tool and I will incorporate a data list dropdown box and also examine Excel's filtering tool to analyze the data .
The completed spreadsheet is very easy to use and can be expanded and adapted to your specific requirements .
As usual , I will show you how to get a copy of the final template later on in this video .
And if you need any help on the Excel functions that I've used , then please do leave a comment below .
I hope you enjoy watching .
OK .
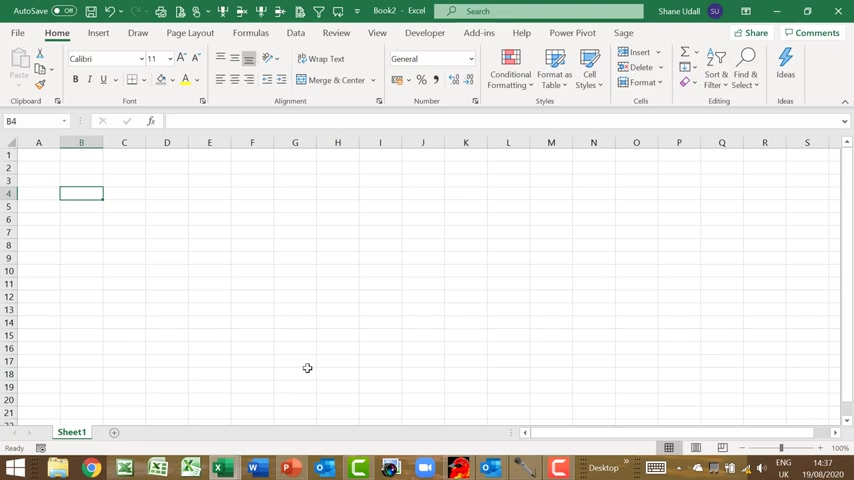
We will start our bookkeeping spreadsheet by entering the word date in cell B four , in cell C four , enter the word type in cell D four , its description and in cell E four type in value cells F four through to 04 contain the analysis details for each of our transaction lines .
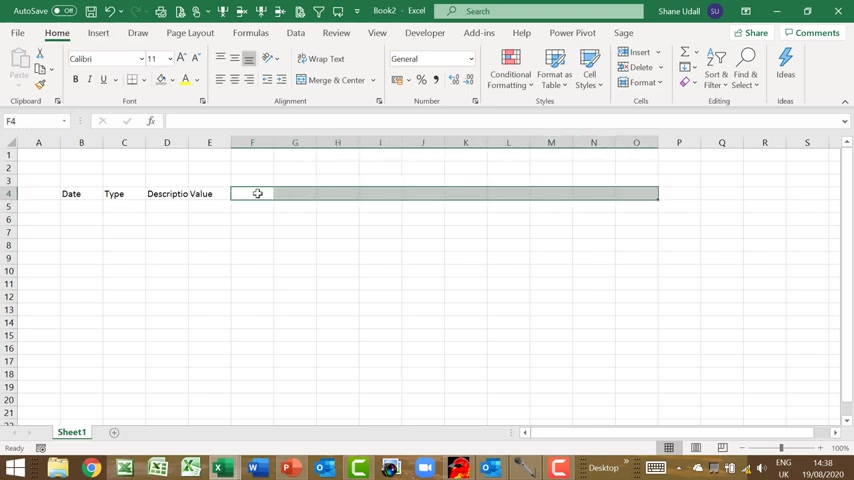
I have entered sales materials delivery , motoring , admin , marketing , finance , professional drawings and other .
Finally , I have added an additional column called notes in cell P four .
Now you may have different analysis types for your business , but don't worry because you can always change these later .
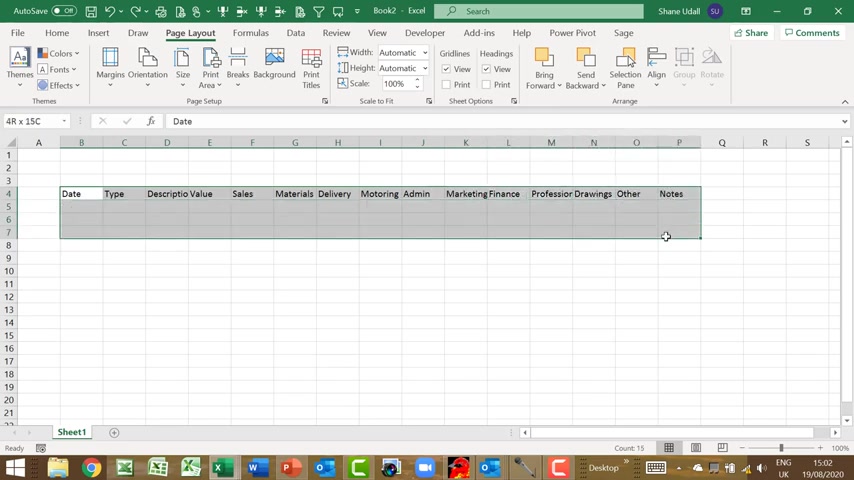
Now that we have our bookkeeping spreadsheet headers , we can use Excel's create table routine to automatically prepare a precise and well formatted table for us to use .
So select the range B four through to P 18 .
And whilst this range is highlighted , select the insert ribbon and from this ribbon , click on the table tool , the create table dialog box will now open , accept the default data range and check the my table has header box .
Now click OK .
You now have your bookkeeping spreadsheet table .
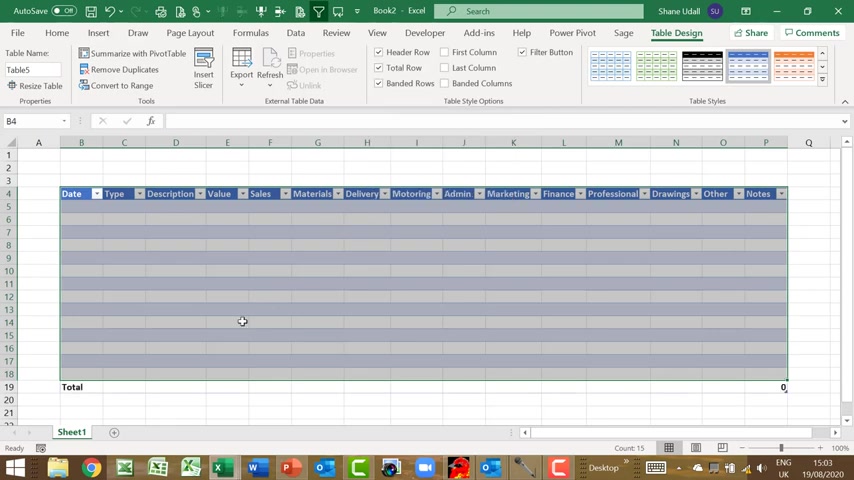
We just want to make a couple of changes to this check the total row box to add an extra row at the end of the table so that we can total the individual columns , select a table style to your liking .
And finally from the page layout ribbon uncheck , the view grid lines box so that we have a crisp clear background to our worksheet .
Now every transaction needs a date .
So enter the first of March 2021 into cell B five press enter and the column width expands to accommodate this date in C five , the type column , we want this to be one of six transaction types .

So we need to create a list of these and then create a drop down box from which to select one of the six types .
Let's create this list but locate it off screen , navigate to S four and enter in the word types and in the six rows directly beneath this , enter your transaction types .
Mr bank receipt , bank payment card , receipt , card , payment , cash , receipt , and cash payment .
Now highlight these six transaction types and from the formulas .
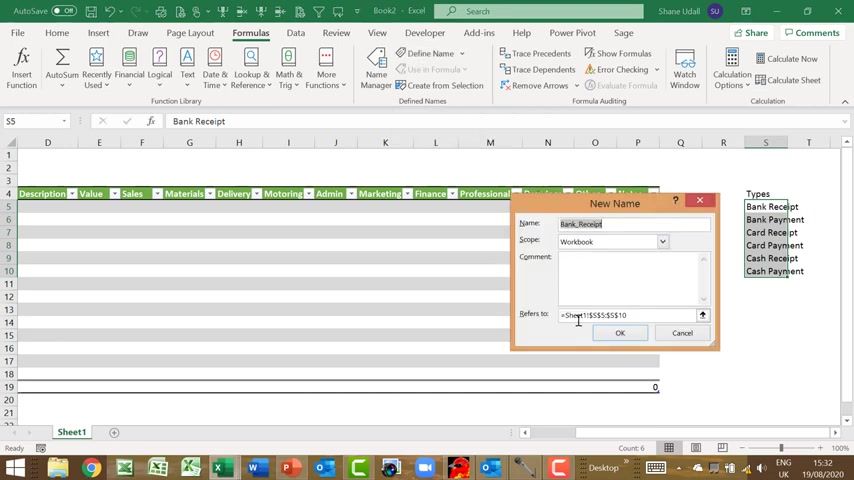
Ribbon click on the define name tool , enter types in the name field of the new name dialog box and click .
OK .
Now press the home key on your keyboard to return back to our bookkeeping spreadsheet with your cursor in cell C five .
We can now create a drop down box selector which will allow us to choose from the transaction types that we've just created .
Select the data ribbon and choose the data validation tool in the allow field , select list and in the source field , enter equals types and then click .
OK .
A drop down box now appears to the right of C five .
Inviting us to select one of the six transaction types .
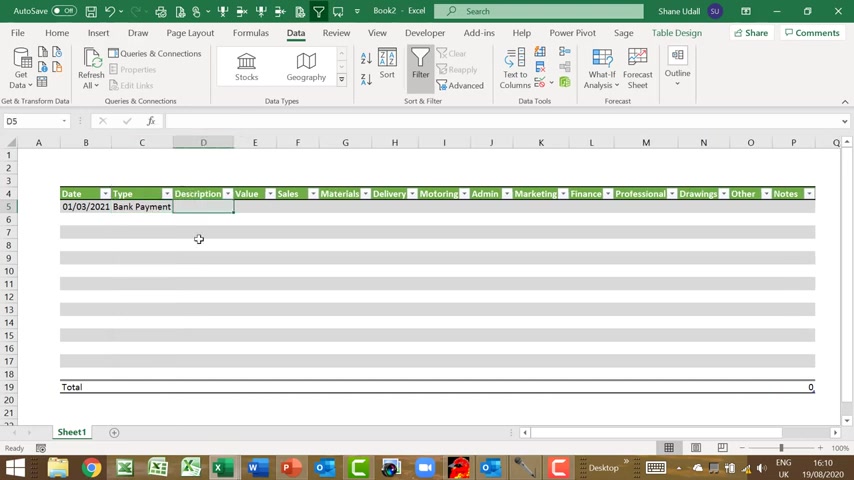
Please choose bank payment , adjust the column width to accommodate the contents .
And in cell D five enter James Cook and enter the value minus 217.34 in cell E five .
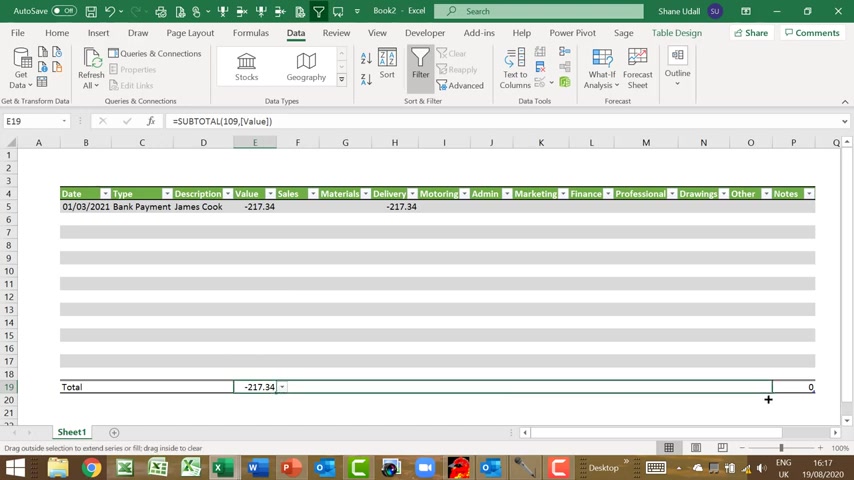
We will analyze this transaction to delivery .
So navigate to the delivery column and enter minus 217.34 in cell H five .
OK .
We have now completed all of the essential information for this transaction .
Now , we need to add some totals .
We need to copy the formula in C five such that all rows now have the drop down function and we need to add a check routine and finally add a title and format .

Our workbook select cell C five , the first row of the type column and simply drag down to cell C 18 each row now populates with bank payment , simply delete these by highlighting the range C five to C 18 and pressing the delete key on your keyboard .
The narratives disappear but the drop down box still remains , navigate to the totals row for the value column .
This is cell E 19 .
And from the drop down box , select the sum option .
Now drag this formula all the way across the worksheet to cell 0 19 .
Such that we have totals for all of the columns , you can delete the contents of cell P 19 as we do not need these to make sure that our data entries are correct .
We need a check total .
This check total will ensure that the figure in the value total is equal to the sum of all the analysis totals .
So navigate to cell C 19 and enter in the formula plus E 19 minus some open brackets and then select F 19 through to 19 and close the brackets .
This value should always be zero .
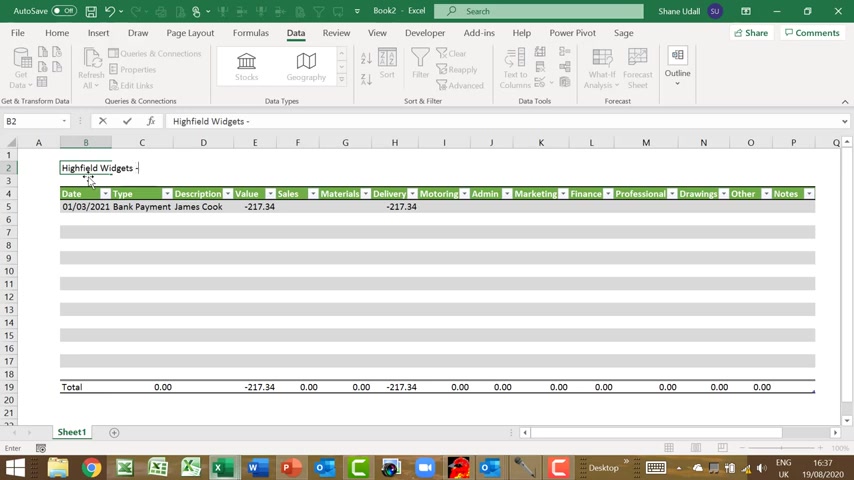
If it is not , then there is a data entry that needs correcting with your cursor in cell B two , enter in a title for your bookkeeping spreadsheet .
Make this bold and increase the font size .
Now highlight the range F five through to 0 19 .
And from the format cells tool select number and set to two decimal places with the 1000 comma separator box checked and negative numbers to display in red , preceded by a minor sign .
Now click , OK to complete snap the range B 19 to P 19 and change the background color to make the totals row stand out and make this bold and increase the font size .
Now to emphasize our check total .
Navigate to cell C 19 apply a different background color and a different font color and center .
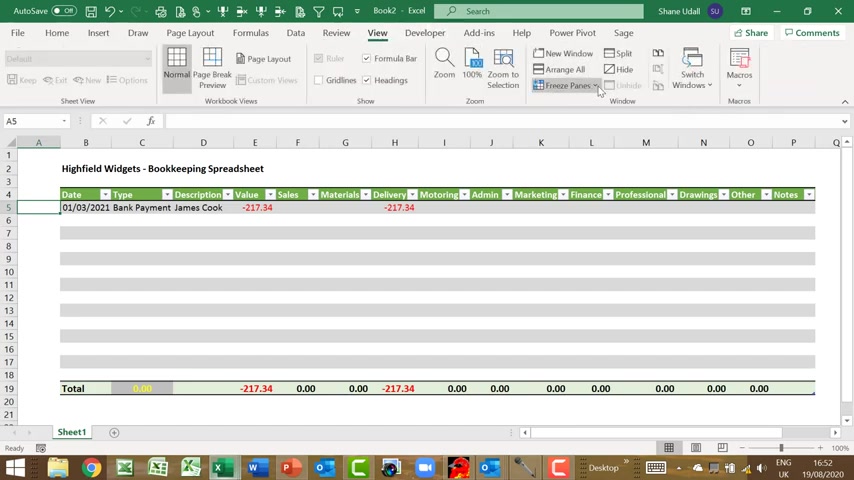
The cell contents finally navigate to sell a five and from the view ribbon , choose the freeze pains tool such that when you expand the bookkeeping spreadsheet , we can easily navigate upwards and downwards whilst the column headers and the title remain in view .
Now let's test out the bookkeeping spreadsheet in the second row .
Enter the date second of March 2021 and choose bank receipt from the type dropdown box .
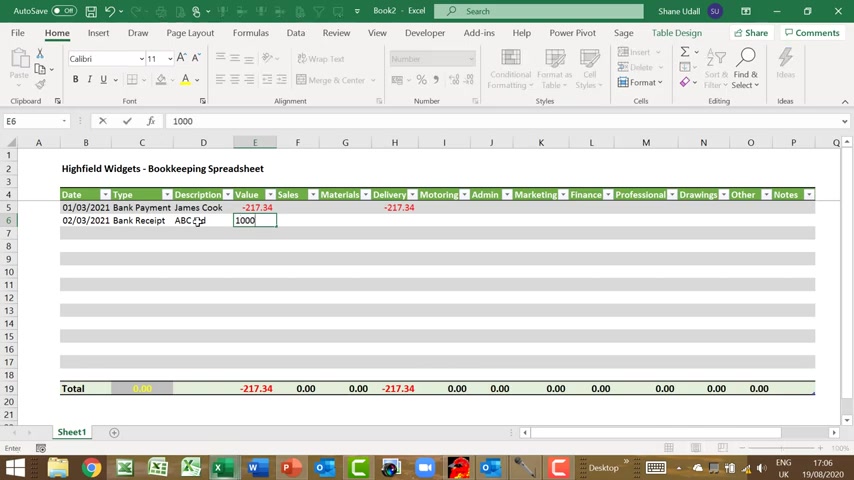
Enter ABC limited in the description field and as this is a receipt , enter the positive value of 1000 in E six .
Analyze this to sales and then check that your entry is mathematically correct by ensuring that your check total in cell C 19 is zero .
Now , as you progress , you will eventually run out of rows .
You can simply use the insert row tool from the home ribbon to add more lines .
Always making sure that you copy the dropdown box feature in the type column to populate these new rows .
I have now populated the bookkeeping spreadsheet with a month's worth of data .
And in this final part of the video , I will demonstrate the use of Excel's filtering tool to further analyze our data .
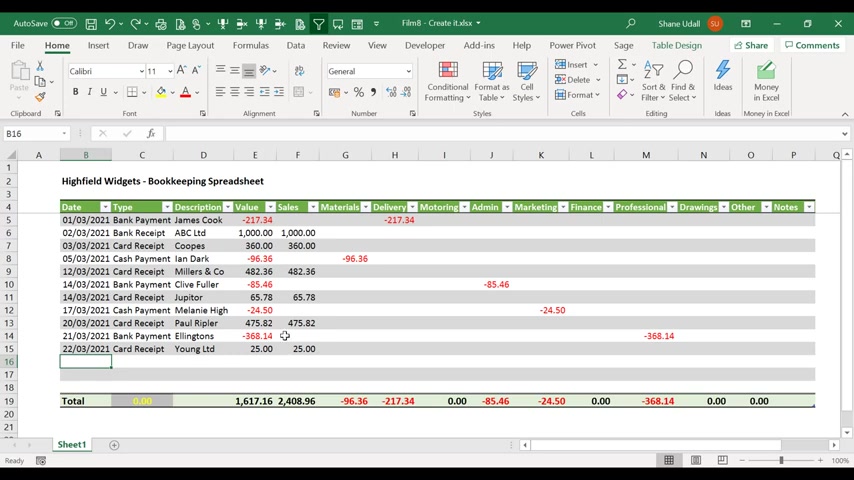
Please pause the video for a moment and copy the data on screen into your worksheet .
Now let's say that we want to know the value of our card receipts in the month .
So click on the downward pointing arrow in cell C four , then uncheck the select all box and then check the card receipt box once you click on OK , the bookkeeping spreadsheet will truncate showing only the card receipt transactions .
You can use this filtering routine across the entire spreadsheet and you can use multiple variables .
Just click the undo tool to revert back to the full table and that completes our video tutorial on how to create your bookkeeping spreadsheet .

We do hope that you enjoyed our spreadsheet video and that there was lots of content that you found both useful and informative .
No , if you would like us to send you a copy of this spreadsheet file , then please subscribe to our channel and give this video .
A big thumbs up .
Alternatively , please visit one of our channels on Facebook , Instagram or Twitter .
Now , if you are a small business and want to keep your bookkeeping records in Excel , then why not watch our accounting spreadsheet tutorial alternatively , why not view our how to keep your accounts in Excel video .
This is our easy to use and inexpensive solution for your small business bookkeeping needs .

Thank you once again for watching our spreadsheet video and Oh , yes , please do subscribe to our channel .
Are you looking for a way to reach a wider audience and get more views on your videos?
Our innovative video to text transcribing service can help you do just that.
We provide accurate transcriptions of your videos along with visual content that will help you attract new viewers and keep them engaged. Plus, our data analytics and ad campaign tools can help you monetize your content and maximize your revenue.
Let's partner up and take your video content to the next level!
Contact us today to learn more.