https://www.youtube.com/watch?v=FRLTOBBkm2I
Use Your iPhone Like A Professional Photographer (Full Camera Guide)
This video is teaching you the three things you need to know to shoot like a professional photographer with just your iphone .
You'll go from taking photos like this to shooting photos like this .
After watching this video , my name is Chris Peta and I teach creative business and photography here on youtube .
After my iphone 14 pro review video , I've had a lot of people asking me how I'm able to take photos like this on just my iphone today .
I'll share a preset with you for free that I love using all the time .
Today .
I'm teaching you three things you need to know to be able to take $5000 camera quality photos with just your iphone .
You don't need the iphone 14 pro for this , but it will help if you have the 12 pro or later .
Let me tell you a story real quick .
Last weekend , I went on a trip to Seattle .
It was an awesome time with my friends , but something happened that hasn't happened in five years for me .
I went on this trip without bringing my main camera .
That's right on every trip I would go on for the past five years .
I'd bring my main camera .

I was shooting on at the time if you've seen my iphone review video , you know what I'm about to say next , the iphone 14 Pro has replaced my Sony A seven R four as my main walk around camera .
So I want to test it as a travel camera too .
It did not disappoint throughout my trip .
There was never a single time when I missed my Sony camera , I was able to zoom in and out with the different lenses , shoot and raw and add these photos afterwards to my liking .
We went to the farmers' market and it was perfect for a street photography as well .
This was a fast paced environment and I was constantly fine tuning my settings on the phone as I was shooting , I'm super happy with all the photos I ended up taking especially this shot of flowers at the market .
This is incredible stuff coming out of an iphone that I always had with me during the trip .
This video is going to teach you the three things on how to use your iphone to take professional looking photos .
Like the first thing we need to do is switch up our setting before we can begin taking photos like a pro .
We need to get the right settings in place for our camera .
Your photos might suck because your settings suck .
There's a few key settings that most people miss when they get their iphone .
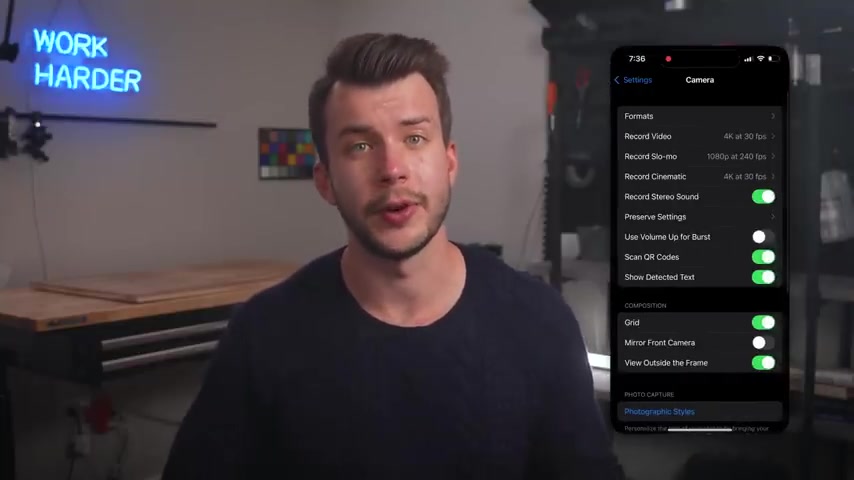
So right off the bat open settings and scroll down to the camera .
First , we're going to go into formats .
I like to keep camera capture as high efficiency , then we'll go down and enable Apple Pro raw .
This setting is huge .
This gives you quick access to this button up top in the camera app .
Next , I like to shoot at 48 megapixels for my raw files .
I want to be able to zoom in and rec crop the photos from the main camera without losing quality down here .
We have Apple Pro res .
This is for videos .
I almost never use it because the files are just so large , but you can leave this on .
So you'd have the option to use it if you want to back to the main camera settings .
I like to use four K 30 for video .
And I also recommend turning HDR off if you do any close processing with your video HDR will look weird since it's hard to process in the normal editing software back in the main camera settings .
Let's go to preserve settings .
This menu is really important .
This menu gives you more control over how you shoot when you close your camera app , all your settings reset by default here , you can preserve those settings .
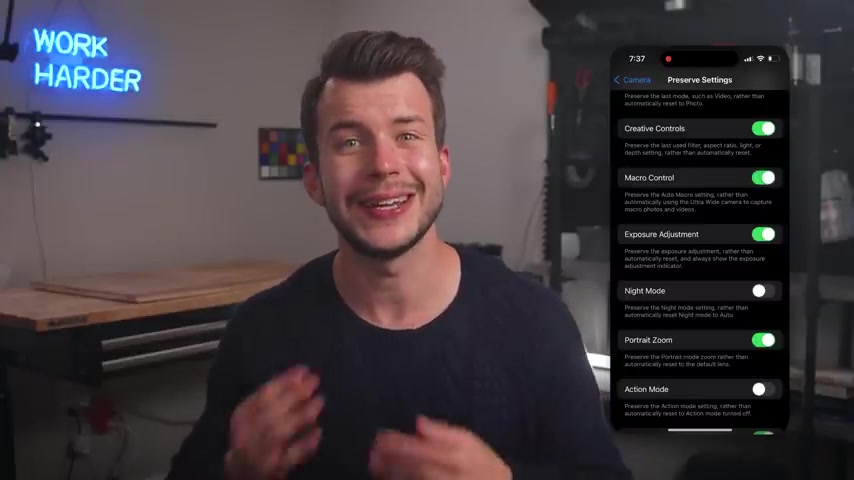
So if you were to reduce your exposure , it would reset again after you close the camera app .
If you don't have preserve settings , turn on some things here are personal preference , but take a look at what I have here and you can go ahead and copy them .
I like keeping creative controls , macro exposure and night mode all on in this settings .
Tab now turn on the grid here to help with your composition .
This provides you with a three by three grid that overlays on top of the camera app .
Have you heard of the rule of thirds ?
Well , here you go .
This grid helps guide you in your photography process .
Finally go to photographic styles .
I like to have rich contrasts on around 50% here .
And my opinion , this just makes everything look better .
There are other styles that you can mess around with too .
One thing about photographic styles .
This is only applied to photos that aren't shot and raw .
So for the most part , if you plan on editing a photo after a shoot , take it in raw , otherwise you don't have to shoot in raw .
But for the sake of this video , almost all the photos we shoot will be in raw and that's it for settings .
I know there are a lot of settings here .
So I appreciate you bearing with me .

Let's get into the action number two on our list .
How do we shoot like a pro your photos suck because you can't expose or compose them .
Exposure and composition are the two biggest things you need to get right .
If you want your photos looking like this , your phone takes care of almost all the settings like aperture shutter and iso .
But did you know you can still adjust to exposure ?
Here's a quick lesson in exposure .
A good exposure makes or breaks a photo .
Generally speaking , each frame has two parts , the bright parts and the dark parts .
Photographers call these parts the highlights and the shadows .
The interaction between the highlights and the shadows helps make a photo interesting .
Professional photographers often will expose for the highlights .
This means the highlights are perfectly exposed and the shadows look dark .
I love this look .
The iphone does something different .
It will expose for the entire scene it sees .
Usually this means it exposes for the shadows .
When you expose for the shadows , the highlights become blown out and you lose out on all the contrast in your photo .
We are here to prevent that .
We're going to force phones to expose for the highlights .
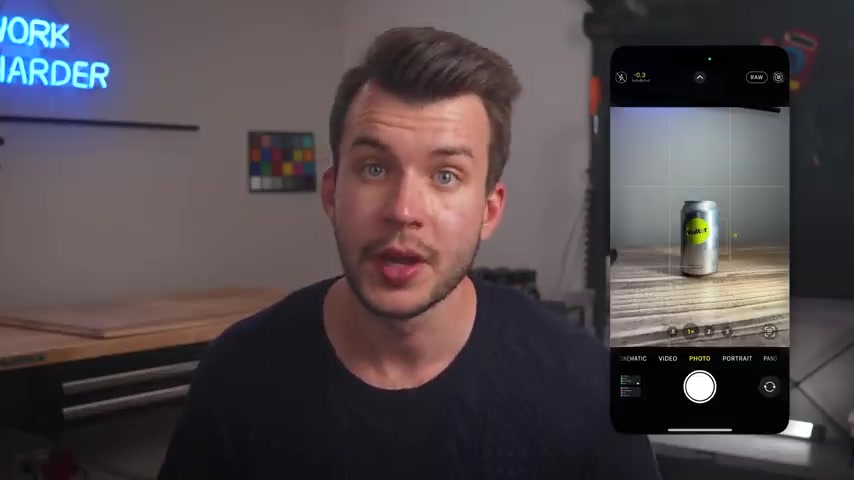
The easiest way to do this is to simply tap on a subject in your frame and adjust the slider to the right of the focus square .
This will bring down the exposure to your liking .
You can move the slider up and down to perfectly exposed for the highlights just like a pro photographer does .
You want to make sure to keep the shadows nice and dark and the highlights as perfectly exposed as you can .
This may seem odd at first and you'll mess up the exposure a lot starting out but with some practice , you'll develop a photographer's eye for this kind of stuff , you'll be able to nail the exposure every time .
If you think your shadows are too dark .
I have good news and the editing process will be able to recover these shadows pretty well .
You can't do that with highlights underexposing has this huge advantage that the data in the shadows isn't lost .
It can always be brought back later .
There's another way to go about this as well .
You can hit the arrow up top here and then click on the plus minus sign on the bottom and then this pulls up the exposure compensation menu .
I always have this set to at least minus 0.3 .
You can around with this and see what you like over time .
If you have preserved settings on , it'll keep this setting every time you open the camera app , which is awesome .
Now for really low light photography , I actually drag the exposure all the way down to minus 1.7 or minus two .
The phone loves to expose for everything it sees in the frame .
And at night , this means a lot of shadows you don't want to expose for the shadows you want to expose for the highlights , especially at night .
So what can we do to combat this ?
We drag the exposure all the way down .
So the phone thinks it's under exposed when in reality it looks just right .
Check out these photos I took at a concert last week .
Side note , this was a Fred Again concert and it was one of the best concerts I've ever been to just an incredible performance .
So in the photo here , you see the room is dark , other than the lights on stage , my phone was perfectly exposed for the lights on stage because I was shooting at minus 1.7 .
If I didn't have these settings , the photo would look completely washed out .
The rule for night photography is to underexpose .
OK .
So hopefully you're in exposure pronoun , it'll take a lot of practice , but stick with it .
Now , let's talk .
Composition , composition is how you frame your shot .
It's what makes or breaks a good photo .
Each frame has many elements in it .
It's your job to show all the elements in the best way possible .
First off , let's talk about the rule of thirds .
This basically states to keep your subject on the left or right of an image .
Remember those grid lines we enabled earlier , you want to align your subject on one of those lines .
If you can do that , every time your photos will begin to look way .
One of my favorite composition tips and an easy one to implement is to shoot from a lower angle .
If you're photographing down the middle of the road , don't just shoot at eye level .
Try and crouch down a bit and get that street and part of the shot too this gives you leading lines and takes your image to another level .
Speaking of leading lines , these are any lines in your image that guide your viewer's eye .
When someone looks at the image , their eyes will wander by introducing leading lines , you get to decide what the viewer looks at and in what order .
Pretty cool , right ?
So three composition tips are fine and all , but they aren't strict rules to follow either .
Feel free to learn these and then break them as you wish .

Let your creativity shine through .
The iphone 14 Pro has three cameras .
Four , if you include the two X crop , this gives you a lot of options .
When choosing your composition , it lets you shoot wide on the main camera .
There's an ultra wide camera for those super wide shots and a telephoto lens for getting shots far away .
We also have the two X camera and macro mode and night mode , but that might be a bit much for this video .
We're still learning the foundation which you can learn the rest from .
Once you have that groundwork set .
Personally , I find myself either shooting on the main camera or on the telephoto lens .
All these cameras give you a lot of options when learning how to shoot properly and that can be bad .
My advice would be to actually limit yourself to one or two of these cameras at first learn them really well and then move on to the others .
This way you can apply the principles from this video into that one camera option without getting overwhelmed by all the choices I didn't cover shooting a manual or using third party camera apps here .
Personally , I feel like that adds unnecessary friction to the phone photography process .
And with an iphone , you're leaning away from what the camera is .
Anyways , this is just a simple point and shoot camera .
So take it for what it is .
Anyways , let's talk about editing .
But first , if you're a photographer or looking to actually start a business and make money from your hobby , I've got a free checklist down below .
It's got over 2000 downloads and walks you through the first steps to jumpstart your creative business in 30 days .
Free download below .
Ok .
It's no secret that your favorite photographers on Instagram edit their photos some heavily , some lightly editing has a bad reputation .
Sometimes people think editing creates an unrealistic photo .
But the reality is that your phone already does some editing behind the scenes as soon as you capture the photo a lot of the time .
This isn't how the scene actually looked in real life .
It's just what your phone thinks it looks like .
That's where editing comes in .
Every photographer on their own photographic style and edit .
And I certainly have mine today .
I'll share a preset with you for free that I love using all the time when you shoot in pro raw .
Editing really helps bring out your photo .
I love using lightroom mobile for all my editing .
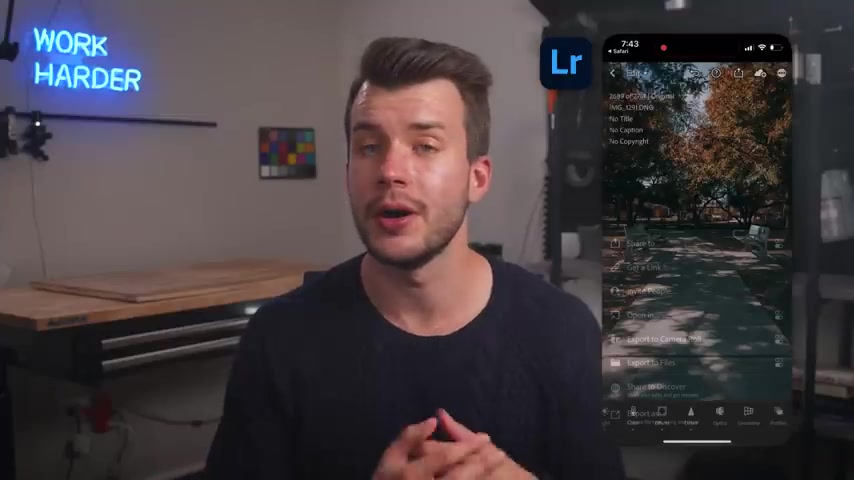
I'm going to walk you through my editing workflow real quick here .
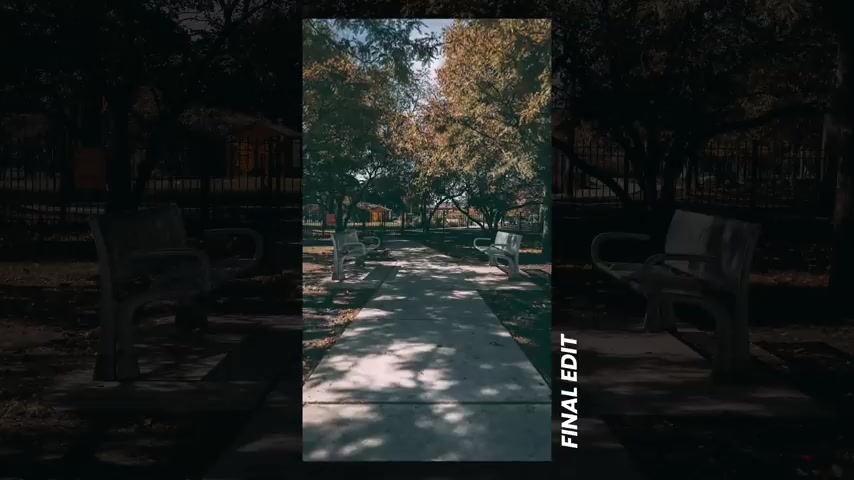
This is the final edit we're going to see here .
You can actually see all the principles I was talking about earlier .
We have a combination of highlights and shadows throughout the scene .
Here , we have a sidewalk as a leading line here and I got down low so I can really emphasize that sidewalk .
Finally , we have benches on the third of the frame to add more interest into the scene .
Pretty cool how it all comes together .
Let's edit this photo .
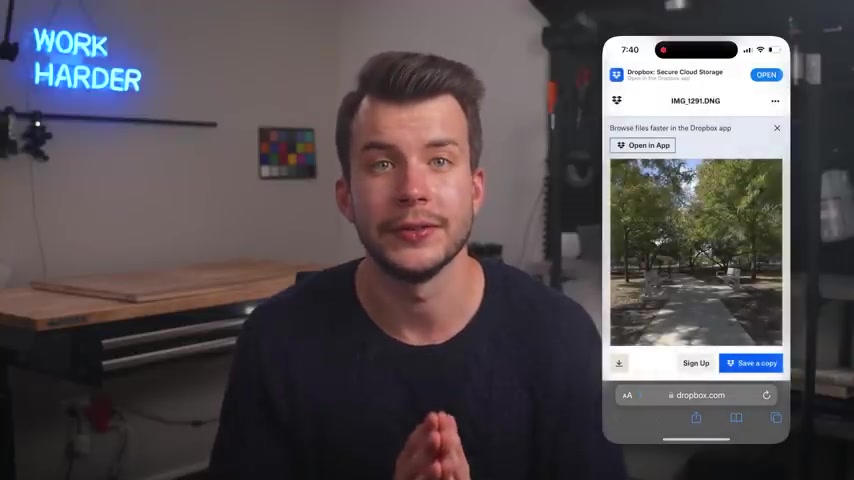
First of all , when you import the pro raw files into light room , they always look super dark .
This is just how Apple exports them as raw files .
So don't worry about that .
Let's brighten this up a bit with the exposure .
Then we'll go ahead and adjust the highlights and the sha shadows .
I usually drop the highlights and bring back the shadows next .
I'll adjust the blacks here to bring in some more contrast .
It's fall in Chicago .
So if we want to adjust these leaves , we can as well .
Let's go to the color tab and open up the mixer and change the green and yellow hues .
So we have a more fall theme to it and there's the basic edit .
It looks a lot better than what we started with .
Now , let's use my signature preset .
You can get this down below for free .
There's no email required or anything .
It's the one I applied to .
Almost all my photos .
I'll walk you through how you can apply this step by step right now .
First grab your phone , go to that link below for that free download .
Hit , continue on the website .
Click , download in the bottom left , hit , download on the screen and now go to your downloads tab select the file , hit , share , scroll to lightroom down here , hit launch lightroom right now and you've got it in lightroom , hit the three dots in the upper corner .
Select create preset , name your preset and hit the check mark and that's it .
You can now apply my preset to all your photos .
Now let's apply this to the photo we have right here and make some minor adjustments .
That looks great .
Let's adjust the exposure to brighten up a bit , bring down the highlights and then bring back a bit of shadows .
I think it's looking good so far .
But let's adjust those trees up top here as well .
We'll slightly yellow and green hue sliders to make these trees look a bit more like fat .
Finally , we can go into the effects tab and add in a bit more of a vignette to draw more focus down the path and we're done .
Can you believe this was shot on an iphone from here ?
You can export your photo and share them all over the place if you do share on social media .
Tag me at Chris on Instagram on Twitter um at Chris underscore on Twitter .
I always respond to everyone .
So that's the best place to talk to me .
Now you have the knowledge to shoot pro level photos on your phone .
It's in your hands now to practice , practice , practice .
It'll take a while , but it'll give you something to do before my next video drops in a week .
My name is Chris Pitta and I'll see you then .
Are you looking for a way to reach a wider audience and get more views on your videos?
Our innovative video to text transcribing service can help you do just that.
We provide accurate transcriptions of your videos along with visual content that will help you attract new viewers and keep them engaged. Plus, our data analytics and ad campaign tools can help you monetize your content and maximize your revenue.
Let's partner up and take your video content to the next level!
Contact us today to learn more.