https://www.youtube.com/watch?v=VEtU4Co08yY
2023-07-11 07:12:14
YOUR FIRST SOURDOUGH (Sourdough Bread For Complete Beginners)

So unfortunately , I think most people's first attempts at sourdough bread end in failure .
So in this video , my goal is to show you how to make the simplest possible loaf of sourdough bread .
And to speak to the fundamentals of this process so that you can make a crusty rustic loaf of sourdough bread at home .
If you don't have a sourdough starter and you want one .
I made a video a couple of weeks ago called How To Make a sourdough starter .
I will definitely throw the link down in the description for that .
And if you don't want to sit around for 2 to 3 minutes of sourdough bread theory up front here , that's the time stamp .
Click ahead if you want to get right to business .
OK .
So you've captured and cultivated your sourdough starter and now you've moved on to the maintenance phase .
We are giving that starter , fresh water and fresh flour on a daily basis to keep it in good shape for eventually baking bread .
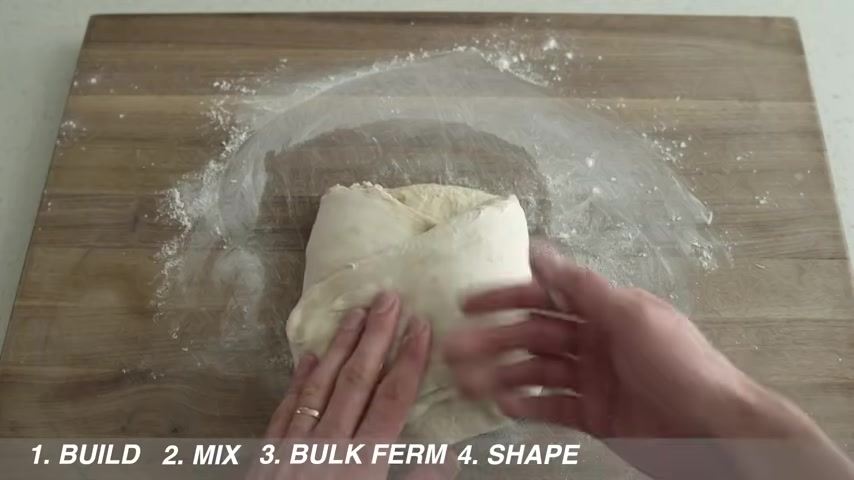
So to go from starter to finished loaf , we need to follow six stages of the sourdough process .
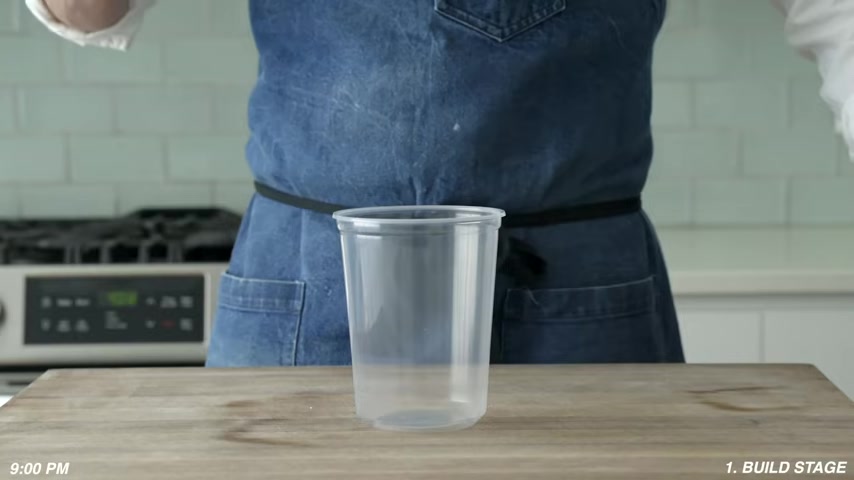
The first stage is where we take our starter from this daily maintenance stage and build it into 11 for our bread .

11 is basically just a custom blend of sourdough starter flour and water that you make for an individual dough to leaven it .
Think of your len as the engine for your bread .
This stage can take anywhere from 6 to 24 hours depending on the ratios or the temperatures .
And we'll call this the build stage .
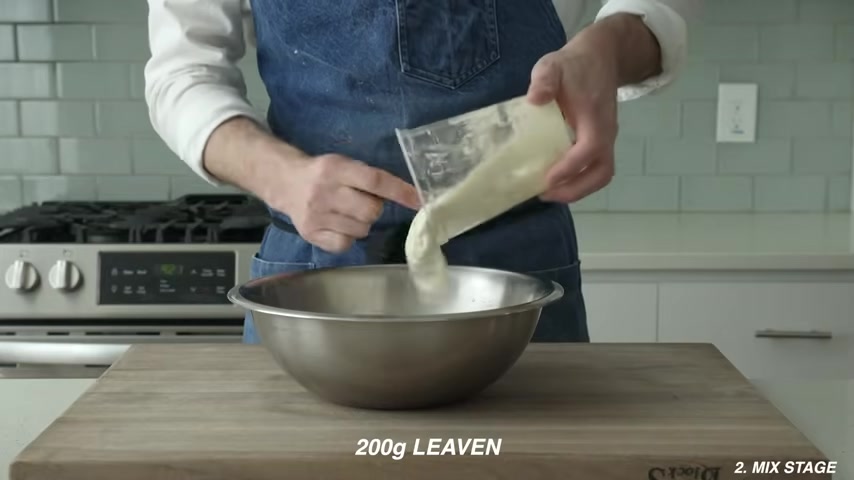
In the second stage .
We combine the flour , the water and all the leaven that we just mixed with some additional salt because bread without salt is gross .
And we call this the mixed stage .
That's simple enough .
In the third stage , we ferment that dough that we just mixed with wild yeast and bacteria from our len .
This produces gas in acidity and we call this step the bulk fermentation .
We're also gonna be doing some strength building folds that are really important to this process .
Think of adding strength as like a secret ingredient that doesn't weigh anything , but it's essential to creating a good loaf of bread .
Adding strength to a dough is just as essential as adding salt without it .
It doesn't work .
OK .
Stage four is the shape stage .
The bulk fermentation has given us a nice gassy blob of dough .
And now it's our job to organize that blob into a nice strong taught loaf of bread that will properly rise in the oven and hold itself up during the bake .
Stage five is the proof stage .
This is where we continue that gas and acid production to grow the size of the loaf .
This is a really essential part of the process and a lot of recipes either misunderstand this part or leave it out altogether .
And then finally , stage six , the bake stage , that's where we bake the loaf of bread .
And that's pretty self-explanatory .
Of course , there's tons of ways that you can manipulate this process to make better and better versions of sourdough .
But think of this as like the training wheels version of sourdough bread .
We've taken a lot of the water out to make it so that anybody can handle it .
We've really upped the amount of sourdough starter as well and we're not gonna be making any fancy shapes or shooting for like pornographic Instagram crumb before we start mixing though .
Let's talk about the tools you need to get this thing done .
First up , you need an active sour dough starter .
Again , check the link in the description for my video on how to make one of these things .
Next up is a digital scale weight .
Measurements are much more accurate when it comes to making bread .
And as a professional baker , 100% of the breads that we made were measured in grams .
However , I will put the volumetric measurements for this recipe in the description for those of you guys without scales .
Next , you're gonna need a sturdy spoon like this one .
Then a medium bowl which I highly recommend a 12 inch stainless steel one like this .
It's restaurant great .
It will last forever and it's pretty cheap .
I'm gonna be mixing and fermenting the dough in this bowl behind that .
You need something to proof the loaves in .
These are linen line bread baskets and they're great .
But if you don't have a proofing basket , that's no , I'm gonna be showing you another option and it'll be cheap and something you probably already have on hand .
Next , you're gonna need a way to trap steam and heat around the loaf during the bake for me .
I use a Dutch oven .
Most of the time , this one is really worn from hundreds of loaves being baked in it .
But if you don't have a dutch oven or you don't want to put the wear and tear on your nice one .
I will be showing you a cheaper lower tech option later in this video that also works just as well .
Finally , you're gonna need a way to measure temperature .
I have a few digital instant thermometers here and one of them is a laser that's dope .
Ok .
Now , to actually make a loaf of sourdough bread , we're starting with stage one of this process at nine pm the night before we wanna make our bread .
This stage is where we build our 11 .
So grab your sourdough starter in a high sided vessel and into that measure 100 g of room temperature water or in this case , 78 F or 25 degrees Celsius .
On top of that 25 g of our ripe sourdough starter and then 100 g of all purpose flour from there .
I'm gonna stir everything up to combine .
It should look like thick gloppy pancake batter .
Excellent .
Now , a lid goes on and we're gonna ferment this on our countertop overnight .
12 hours later this len is fully ripened and it's very full of life .
It smells sweet .
It's slightly acidic and to make absolutely sure that you have a ripe Len .
A good trick is to grab some warm water and scoop a little bit of starter into it .
This is called the float test .
And if your starter is sitting on top of that water , you're good to go .
Now I'm gonna grab my mixing bowl and I'm also gonna check the temperature of the water for this dough .
92 F or 33 degrees Celsius is what I'm looking for .
So for stage two or the mixed stage into this bowl , we're gonna measure 310 g of water .
200 g of that overnight , Len that we mixed yesterday and there should be about 25 g of that left in the container .
By the way , we're gonna use that to perpetuate our starter from here on out .
So set that aside and then behind that 400 g of all purpose flour , 50 g of whole grain wheat flour and finally 12 g of salt .
I'm gonna grab my sturdy spoon now and start stirring everything up to combine real quick .
I've been asked a lot in the comments from these bread videos , why I use all purpose flour instead of bread flour .
The shorter answer is that bread flour is too strong for me in the US where I live all purpose flour is a very hefty 11.7% protein that is plenty to properly strengthen a European style hearth bread .
OK ?
Back to mixing once this dough has come together and form a shaggy mess like this , we're gonna lose the spoon and switch over to a wet hand .
Now I'm just gonna jump in with my wet hand and give this a simple squeeze to combine .
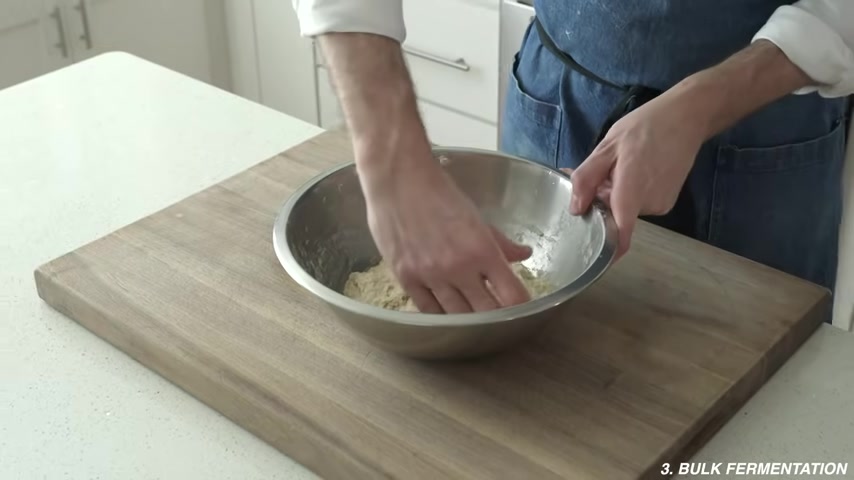
I'm pinching and turning and folding to get all of that starter and salt evenly distributed throughout the dough .
Everybody 2 to 3 minutes of this mixing , it's looking pretty good .
But as you can see , it's still sticky and shaggy and it's a total mess , but it's at least a well mixed and properly combined .
One , don't worry about this .
It is normal .
It should look kind of sticky at this point .
You're gonna see how we get it from here to a more bread dough looking thing in a few minutes from here .
I'm gonna pop a lid on this and then throw it into a warm place to begin stage .
Three or the bulk fermentation stage .
In this case , the warm place is my oven with the light turned on and I'm gonna come back in 30 minutes after that 30 minutes , you can see that there's not much action going on in this dough and that's totally fine .
We're gonna give this dough the first of two strength building folds to do that .
I'm gonna grab a big old grip of dough from the side .
I'm gonna stretch it out as far as it will let me go and I'm gonna fold it over to the opposite side .
I'm gonna repeat this move three more times .
One fold for each side .
As a reminder , we're doing these folds to layer the gluten network and replicate the mechanical work that happens in a stand mixer .
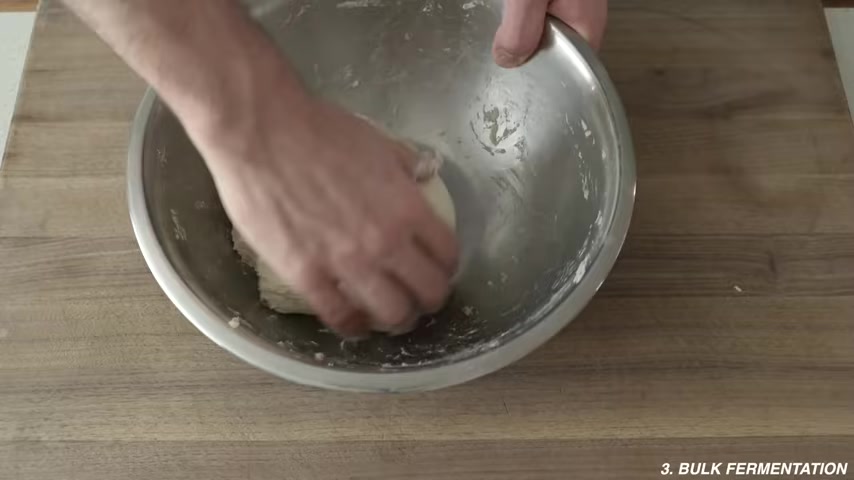
Once we got four folds done , now we're gonna fold up the corners maybe do that three or four times .
And from there , we're gonna finish this up by gripping folding and rounding this dough into a nice little ball .
I'm grabbing the bottom , folding the dough in half and then tucking it up under itself to stretch the top out and that looks good .
Now , the lid goes back on , we throw it back in the oven or a warm place and we check back in 30 minutes .
OK .
Here we go 30 minutes later or 60 minutes total into this bulk fermentation .
Now , it's time for set two of folds .
This is gonna be an exact repeat of what we just did .
That's four folds on top by some corner folding , then a slap and fold , rounding thing to get things into a nice tat ball .
I'm also gonna check the dough temperature here .
As you can see mine's rolling at 77 degrees .
And I just wanna mention dough temperature is one of the main ingredients in good sourdough bread .
If yours is running significantly colder than this , you might want to pop your oven on for a second to get a little heat in the box .
That's what I'm doing here .
Pop it off after maybe two minutes .
And then now you've got something that's gonna raise the dough temperature a few degrees .
All right , after two hours or three hours total .
Since we've mixed dough bulk fermentation is complete .
As you can see , this dough ball is now buoyant and alive and it's grown by about 50 to 60% .
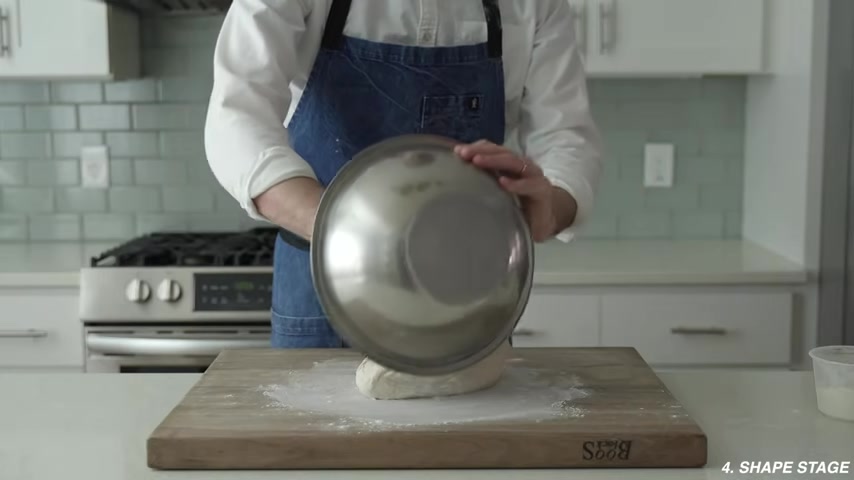
Now , we're gonna move into stage four , the shaping stage for that .
We need our loaf proofing basket that I mentioned earlier .
I'm gonna lightly flower that and be liberal .
If this is the first time you're using these baskets , the dough can stick and stand by .
If you don't have a proofing basket , I'll get to the other proofing option in a second .
Now I'm gonna flower the dough , then the work surface and then I'm gonna flip the dough out .
We're gonna cut right to the POV cam so you , you can see exactly what the B boy sees .
Ok , we've got our dough ball on the table ready to go .
I'm gonna grab the bottom with some well flowered fingers and then I'm gonna pull that and stretch it all the way out .
I'm gonna fold that up to close to the top of this dough blob , press it down lightly and I'm gonna brush off excessive flour from here .
Now , I'm gonna grab the sides and stretch those out about 8 to 10 inches on each side .
Then I'm gonna fold the left over to the right side and then the right goes over to the left side .

Tap that down , brush off excessive flour .
I , I both the camera oops now grab the top and stretch it out and fold that back towards the bottom .
Make sure it's stuck really well from here to make sure that there's maximum internal strength .
We're gonna fold in the corner .
So in goes the top left and then cross over from the bottom left and then the top right .
I'm gonna tuck in a few more times wherever the corners are left sticking out .
And there we go , we've got a nice tight bull shaped loaf that's definitely gonna be ready to party in the oven later on .
Now we're gonna scoop this loaf , seams side down into my palm .
Then I'm gonna grab the basket and plop that thing in there , seam side facing up .
You guys from there .
If you want some additional peace of mind , you can fold back the corners of the loaf a little bit to get that last little bit of strength and tension sealed in .
Now to move in to stage five , the proofing stage , we're gonna cover this with a tea towel and let it rise on the counter for about 90 minutes .
And if you're thinking , hey , bra what if I don't have a proofing basket ?
That's no sweat .
You can definitely use the stainless steel bowl .
We just fermented our bread dough in .
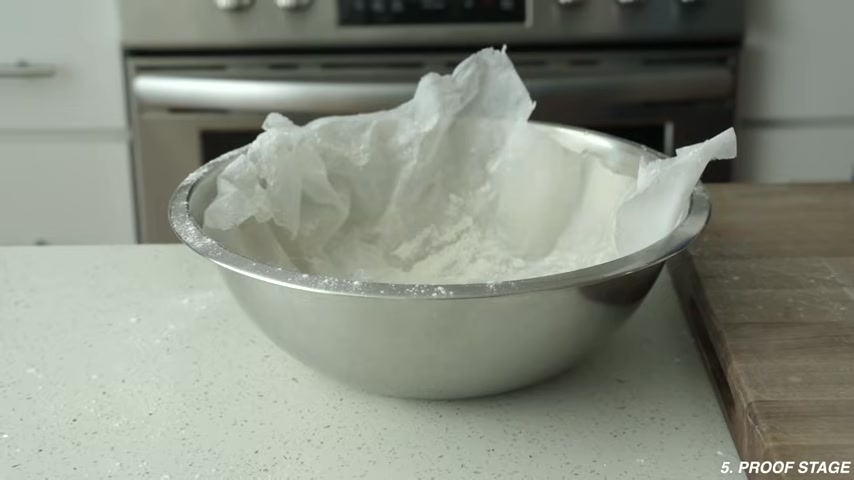
Just make sure you have some coarse non absorbent , not very sticky cloth in there .
I'm using some flax linen that's usual an insect barrier in my garden .
Any improvised proofing situation will definitely need to be flowered very well to prevent stick .
And once you got that shaped up , we're gonna pop that in there loaf seam side up and let it proof just like we did in the basket .
Ok .
It's been about 90 minutes .
But before we look at our proof loafs , let's look at the two ways .
We can actually bake this bread at home .
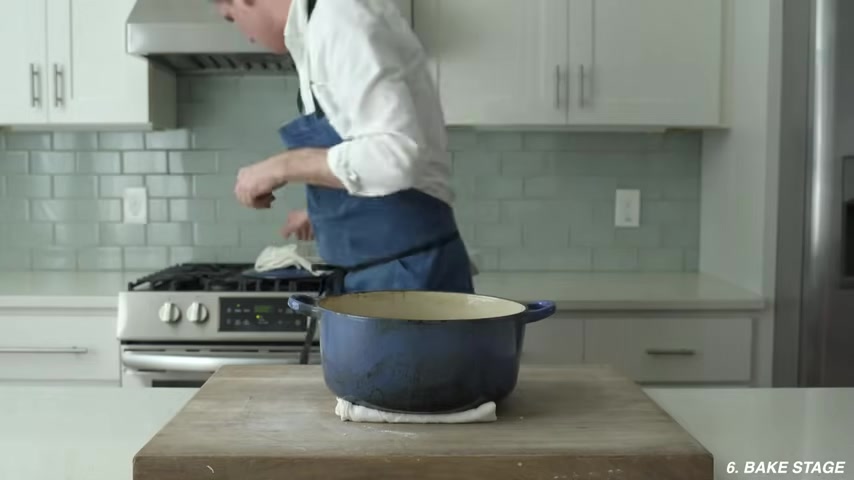
First is a dutch oven like I mentioned before .
And the combination of the lid and the cast iron give us that perfect hot steamy air around the loaf and it allows it to rise and spring the way it should .
I'm gonna load this thing into my oven at 500 degrees or 260 degrees Celsius and preheat it for 30 to 40 minutes .
Option two is a cheaper , more rugged diy way to party .
I've got my ratty $20 pizza stone here , I've got a cast iron pan that I filled with about $3 worth of landscaping lava rocks .
And then I've got a little baking dish with some wet towels rolled up in it .

The rocks and the towels go under the stone And when we bake , I fill both of those things with boiling water and we get tons of quick steam from the rocks and some long slow steam from the wet towels .
Thanks to the fresh loaf bread for him .
By the way , for the inspiration for this method .
You guys rock .
OK .
Let's take a look at this loaf .
It's been 90 minutes since we shaped it or roughly 4.5 hours since we started this process .
And now we've got a nice puffy boy that's properly proofed up a good way to know whether your loaf is proofed is to actually poke it .
The loaf should receive the poke and barely hold on to it and then pop right back out .
And if your loaf isn't there quite yet , don't sweat .
It , just give it some more time .
We really wanna make sure that this thing is fully proofed before we bake it .
Now , to bake the , this thing , we're gonna grab a little round of parchment paper that we cut I'm gonna throw down some semolina flour or corn meal to prevent the dough from sticking to it .
And I'm gonna flip this loaf onto that paper seam side down .
Next .
We need to create a weak spot on top of this loaf .
So it reaches its full potential in the oven .
Usually a lamb or a razor blade is used .
But I'm assuming most beginner bakers out there don't have one of those .
So to keep this diy , I'm gonna use scissors .
I'm gonna give the top of this loaf .
5 to 6 rustic chops , nothing too organized or special .
Then I'm gonna scoot it to the side and grab my hot dutch oven .
I'm gonna lift this parchment and lower the whole loaf in , put the lid on the Dutch oven and then I'm gonna throw it back in the oven and turn the oven down to 485 degrees and bake the whole thing for 18 minutes to do this .
The frugal diy way .
I'm gonna flip my loaf out into a pizza peel or on the back of a tray with some semolina flour .
I'm gonna give that loaf a scissoring .
Then I'm gonna slide it into the oven on the pizza stone .
I'm gonna cover the glass of my oven door with a towel so that I don't break it .
And then I'm gonna pour boiling water into the preheated lava rocks and then onto the wet towels .
And from there it's just like the Dutch oven .
We're gonna be baking this at 485 F 2 51 Celsius for 18 minutes .
During that 18 minutes , the loaves in the oven are gonna spring upwards .
The cuts we made are gonna provide a weak spot for all that upward energy to go without a proper score on top .
They're gonna explode out this side and we would have a really ugly under risen loaf .
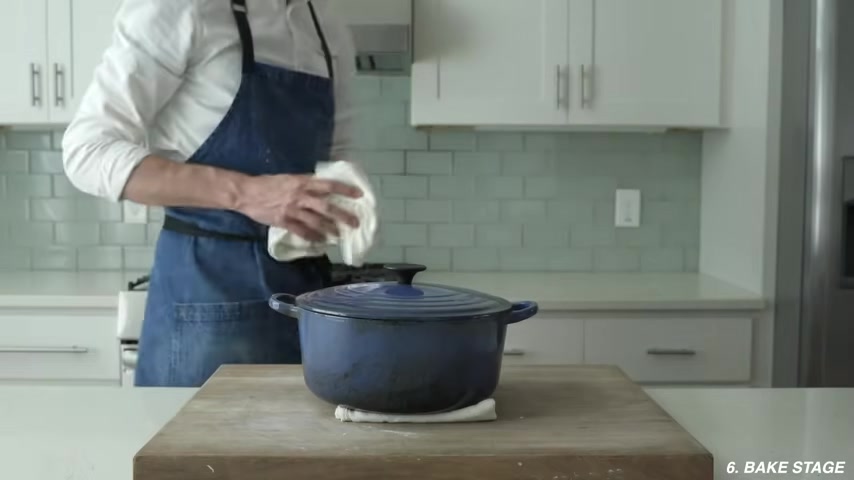
After 18 minutes of baking , I'm gonna pull out my Dutch oven , take the lid off and let's take a look .
The loaf is fully risen .
It's totally ripped through the cuts that we made and it looks organic and it's kind of tough .
We're load it back into the oven and finish baking and I'm gonna turn the oven down to 4 65 F 2 50 Celsius .
And I'm gonna keep baking for 25 more minutes and same deal .
By the way for the pizza stone slash lava rocks loaf .
After 18 minutes , we're gonna take out the steaming agents .
We're gonna turn the oven down to 4 65 and bake for about 25 more minutes .
Now , finally , after that 25 minutes , we've got a fully risen , simple , easy , beautiful loaf of sourdough bread .
We're gonna pop it out of the Dutch oven or off the pizza stone and let that thing cool for 30 to 40 minutes .
Let's take a closer look at the crust .
It's dark , it's blistered and it's very well set .
The inside of this thing is creamy and chewy and it has just a hint of acidity .
We did the whole thing with wild yeast that we captured and that's pretty amazing .
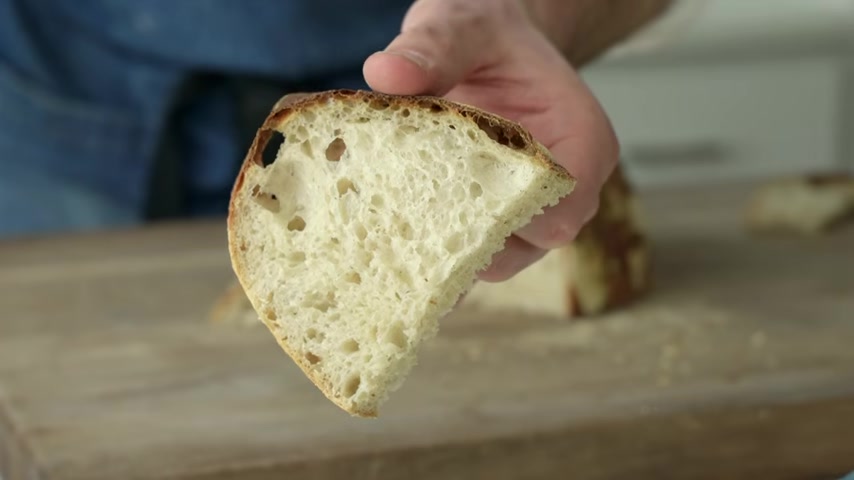
But look , this loaf is not gonna win any awards for the most open chrome or the deepest , most nuanced sour dough flavor , but it is delicious and it's a great place to start .
Once you have success at this level , there are just so many ways that you can refine and build on this process to make a bread that is so good and special that you literally can't go buy anything close to it in most parts of the world .
If you have any questions about this process , please hit me up in the comments .
I try to answer as many questions as possible that are asked politely .
And hey , before I get out of here , anybody who's bought me a coffee over on Ko recently ?
Thank you very much .
And if you guys like this video , please consider giving it a like maybe watch a couple more of my videos over there as always guys .
Thank you so much for your time and attention .
Thank you for sticking around and we'll see you next time .
Partnership
Are you looking for a way to reach a wider audience and get more views on your videos?
Our innovative video to text transcribing service can help you do just that.
We provide accurate transcriptions of your videos along with visual content that will help you attract new viewers and keep them engaged. Plus, our data analytics and ad campaign tools can help you monetize your content and maximize your revenue.
Let's partner up and take your video content to the next level!
Contact us today to learn more.