https://www.youtube.com/watch?v=jH_7YMQQHT4
How to Tie a Half Windsor Knot Mirrored [vertical video]

Behind in , across out .
I'm going to show you how to tie a half , Windsor knot in one minute .
Then I'll do it again , slower and have tips and tricks .
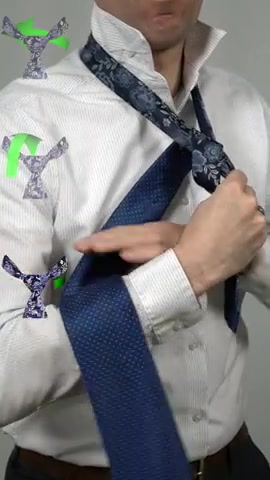
Half the tie around your neck , backside of the tie facing down , adjusted for length .
More on that later cross the wide end over the narrow end , making an X grab the center of the X .
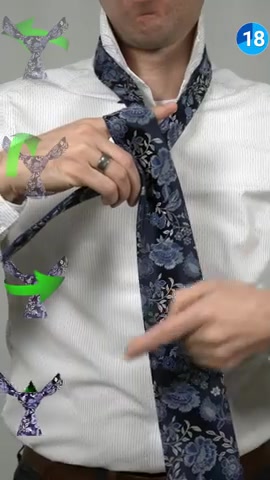
Step one is behind , take the wide end of the tie and make it go behind the tie hole .
You should see the back of the tie .
Step two is in , take the wide end of the tie and make it go in the tie hole .
You should see the back again .
Step three is a cross , take the wide end of the tie and make it go across the tie hole .
Bonus tip , keep your finger here .

You should now see the front of the tie .
Step four is out , take the wide end of the tie and make it go out of the tie hole to finish up .
Put the wide end of the tie where your finger is and pull it through , tighten the knot around your neck by holding the narrow end and sliding the knot up , you're done .
If the tie is too short , you can tug on the wide end of the tie to try to get it closer .
If that doesn't work or if the tie is too long , then you need to start over before we start this next try , pull the narrow end out of the knot .
But hold this spot here , use this spot as a marker for where the X crossed last time , then go either shorter or longer based on your needs .
Here's where we adjust for length .
My tie length video link in the description has more details , but generally for a half Windsor knot , we start about here .

If your tie is a thick material , you are tall , you have a larger neck or if you have a shorter tie go less here , otherwise go more cross the wide end over the narrow end , making an X grab , hold the center of the X .
This area here is the tie hole tip .
If you want to know how to tie a half Windsor knot , you can tie a full winds or knot but just skip the first out step .
The half Windsor knot steps are behind in across out step .
One is behind , take the wide end of the tie and make it go behind the tie hole .
The back of the tie should now be showing step two is in , take the wide end of the tie and make it go in the tie hole .

The back of the tie should again be showing step three is a cross , take the wide end of the tie and make it go across the tie hole .
Tip , keep a finger here .
The front of the tie should now be showing .
Step four is out , take the wide end of the tie and make it go out of the tie hole to finish it up .
Put the wide end of the tie where your finger is and pull it through tip , squeeze the bottom of the knot and pull the tops apart to create the triangular shape .
Another tip as you pull the knot tight , you can use a finger to try to create the dimple , tighten the knot around your neck by holding the narrow end and sliding the knot up again .
If the tie is too short , you can tug on it to try to get it closer .

But if that doesn't work or the tie is too long , you just try again .
Don't listen to Yoda .
What does he know about trying ?
Are you looking for a way to reach a wider audience and get more views on your videos?
Our innovative video to text transcribing service can help you do just that.
We provide accurate transcriptions of your videos along with visual content that will help you attract new viewers and keep them engaged. Plus, our data analytics and ad campaign tools can help you monetize your content and maximize your revenue.
Let's partner up and take your video content to the next level!
Contact us today to learn more.