https://www.youtube.com/watch?v=fPrEtEh3v8g
How to Draw a Rainbow Unicorn Cake 🌈🦄🎂
So starting with the jaw line , we're gonna angle in and on the left side , we'll do the same thing So right here , angle in right about the same height as the nose and will just draw two lines coming in towards the chin .
This got the same thing on the right side and then we're gonna tuck some ears underneath .
So right here on the side of the head with curve up and out , we'll round it out and we'll draw just a angle line coming in towards the side of the head for the inner ear detail .
We're just gonna step in a little bit , just draw a curve like this and just pull it down on the side inside here along this line .
I'm just gonna draw like a backwards c let's do the same thing in the left side here , but it's gonna get tucked in underneath this bank .
So you're just gonna see the top edge like that and I'll probably pull down underneath as well up in between the eyebrows .
We're gonna draw some frown lines and just a couple of curves going out like that .
Ok .
So we got the face .

So it's just nice and even all the way across .
So then from there , we're gonna come to the bottom and I'm just gonna start to draw the bottom part now and we're gonna drape this over the cake .
So let's just start to go back .
I'm just gonna go back and forth .
So it's just a little bit easier for me to figure out what's but you can just go back and we're just doing the same thing .
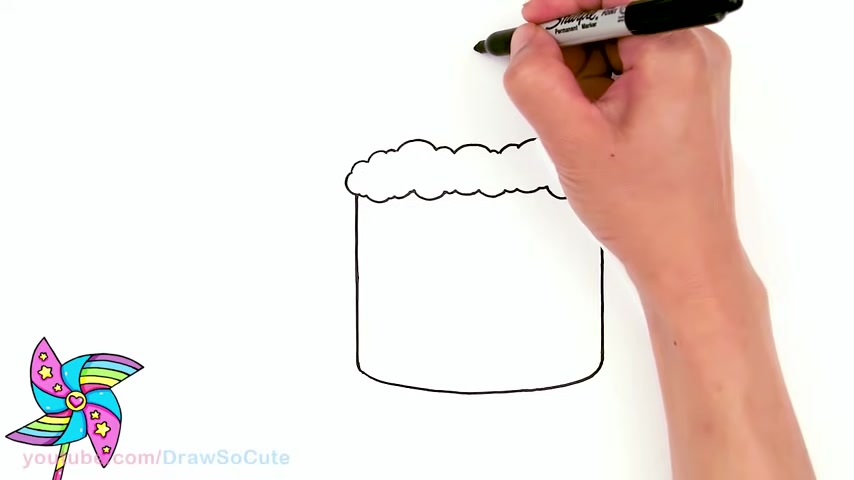
So something like that and then now we can go ahead and draw the cake .
So let's come in a little bit since the clouds are , are kind of draping over the cake .
So about right here .
Uh right here .
So with these two points , I'm gonna come straight down on both sides .

Now , let's get into the most complex part , which is the hair and this is just a series of overlapping spikes .
So we're gonna start in the middle here .
So from this point , I'm gonna curve up to one of the spikes here like that .
Just do the same thing on the right side , just mirror it as we go and then we'll take this point curve down tuck that in underneath that hair bang this one , we're gonna tuck in on the hairline like that in the center .
Here , there's a longer one that goes up and the hair sort of curves over towards the left .
So right up here , curve up and towards the left .
We'll tuck that in underneath the right spike .
Now , we're gonna go along the side and just layer in behind some more spikes .
So right here , I'm gonna curve up , I'll curve that right into that hairline right there .
On the right side , we'll do the same thing .
So cur it up and then just tucking that in there and we're gonna move down again .
So we're gonna go down here , got another spike and that down just above the ear on the right side .
We'll do the same thing .
So I'm just curving that in like that .
Now , there's a few more spikes that come down the side here .
So we'll step down , curve out , tuck that in behind the ear here , on the right side , we'll do the same and then we'll do two short ones on the side here .
So right here , curing out and tucky med just like that .
Now , let's go in and just layer in the hair and behind .
So I'm gonna start on this side , I'm gonna draw one big one in between these two spikes like that .
This one I'm gonna go in the opposite direction .
I'm gonna go out that way because the hair is brushed over towards the left that way .
But here , let's draw a big one in here in between .
Let's pull that in like that .
And I might want to draw one more in here just to fill in that gap that and then we're gonna go over to the side here .

So up here , we're just gonna step in draw a curve around the color like that .
Now we're gonna draw the shoulders .
So up here , I'm gonna draw an angle line coming down in behind that hair bang coming out .
Same thing on the right side .
Now , I'm gonna make the shirt all torn up on the sides here .
So I'm gonna draw the sleeves down to the belt , which will be right about here .
So I'm gonna do is I'm just gonna draw just a series of wiggly lines coming down like this .
And as I get down to the bottom of that V I'm just gonna curb it in , let's go to the right side and do the same thing .
So just a series of curvy lines and I'll just pull that in like that in the middle here .
I'm just gonna draw a little scoop .
This just put some wrinkles in the shirt down here .
I'm gonna draw a curve going out on both sides .
Now , these are gonna merge into the top of the shirt above the belt .
So from here to here it's gonna curve and just connect it like that inside the bottom here , we're just gonna show that the shirts being pulled in .
So on the left , I'm just gonna pull up like that , right .
We'll pull up and then maybe one more here .
We'll draw a little curve like that .
Let's draw on the sash .
So on either side , we're gonna step in and draw a short vertical line on both sides , we'll connect those two points with a curve on the bottom of the stash across like that .
And then to show some wrinkles , we're just gonna draw a couple of curves across like .
So from here , let's get into the leg .
So I'm gonna draw the legs and the feet probably down to about here .
So in the middle here , let's start with that center seam on the left side of center , it's gonna draw a curve like this .
On the right side , I'll curve in as well on the sides of the hips on the side of the sash here on the left , I'm just gonna curve in and we're gonna do a series of folds in the pants .
So right here , I'm just gonna draw a little plete a couple lines coming down and then on the side , I'm gonna step in a big curve coming out and then back in like that , we'll work our way on the inside .
So from this point at the bottom curve in towards the left , in towards the right , we'll do a little overlap .

So up here , we're gonna curve it again like that and we'll work our way towards the ankles , which I'll draw down to here .
So I'm just gonna draw one more layer of folds coming in like that and then we'll do one in the inside again .
So I'm right here and finally , I'm just gonna take this point and curve all the way around to the inside that .
So it looks like an overlapping pan fold just like that .
Just to finish that off .
We'll draw in a little bit of the ankle .
So at the bottom here , I'm just gonna draw it like a half circle on both sides .
We're gonna draw the cuff of the boots and we're just gonna circle around this on both sides .
Just want you to show a little bit of a pattern by drawing a couple little lines along the edge and then we'll draw on the feet .
So I'm gonna start with the one on the left .
So right inside here , I'm gonna draw a curve point down to the heel , curve in towards the ball of the foot from here .
I'm gonna do another curve .
So this one's gonna go all the way to the tip of the toe .

So up here on this first index finger curving up , rounding out the edge of the thumb and I'm pulling that in and right at the bottom here , I'm gonna draw the thumbnail on the edge of the thumb .
Here , I'm gonna curve around for the palm of the hand and we'll layer it in behind the wristband with the curve for another curvy little wrinkle like that .
Let's start with the shoulder .
So up here we draw a curve coming down , we'll draw on the bicep .
So doing an overlap , curving down and then the forearm overlap in towards that wristband .
Now the under part of the arm .
So right here curving down , do an overlap , straight line coming down , curve that in underneath the wristband .
And then the bicep from the inner part of the elbow , draw a little curve like that .
And then one little thing I wanna add is a little tear in the knee .
So right up here , right in the knee area , I'm just gonna draw a couple of little curves like that .
OK .

I'm gonna connect those two points with a curve coming down and up on the bottom side because I want to show the fabric sort of folded over .
I'm gonna draw a line coming down little curve like that , just tuck it in underneath right in here .
I'm gonna show the kneecap .
So a little curve like that and that's pretty much it there .
We have it , there's team Gohan SSJ two from Dragon Ball Z .
I hope you enjoyed this lesson .
Please make Sure you check out our Dragon Ball Z playlist .
We have a ton of characters in there .
Thanks for watching .
We'll see you again soon .

It's the hardest curves to draw to make it look right .
But I'll try my best .
So we're just basically bringing all in .
OK ?
So here we go kind of following your base of your cake .
They get it , yay , something like that .
So the goal is to just have this curve and make sure wherever you protrude out on this side , it's basically almost the same on the other side .
OK ?
So then now let's do this one more time .
We're gonna thicken this base to bring down a straight line on the edge .
And then we're just gonna follow .

Mind was created .
There we go .
Now we got a base for our cake .
OK .
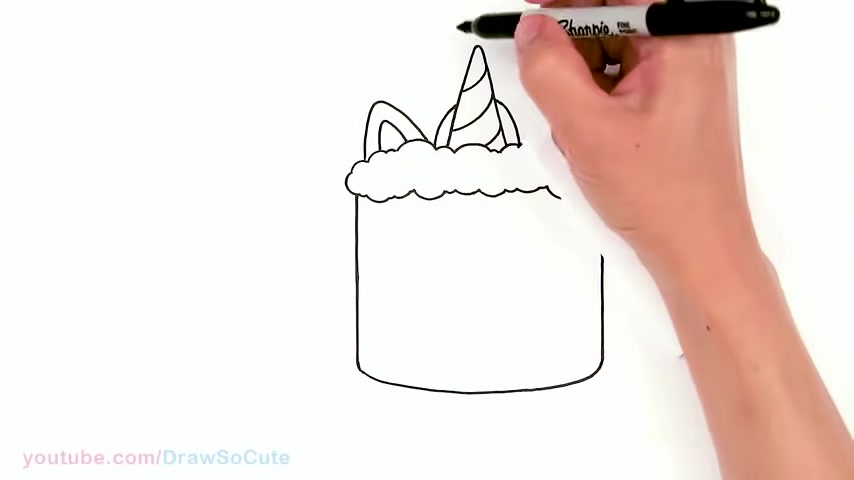
So then now um I'm gonna uh change to a thinner sharpie just to draw the little details , especially the rainbow because it's so thin and I have to draw six stripes in here .
So I'm gonna come and find my center once again since I'm doing six .
So I see here and here and I'm just going to follow or outside .
Ok .
So I'm just gonna go ahead and do that .
So add three here and three here .

Ok .
They are finally done six stripes in there and then I'm gonna come in here for the clouds and just add some details just to make it extra fluffy .
Yeah .

Ok .
So then I have some of the details in for the clouds to make it fluffy .
And then now for these hearts , let's add a string of um circles .
Yes , connecting to the top of the clouds .
I mean to the clouds .
Give me one more here .
So they're all done .
I hope you'll have fun drawing this cake as much as I did , drawing it for you .
Thanks so much for watching .
And if you haven't already , please make sure to subscribe and turn on your notification bell .

So you won't miss any new draw .
So cute videos .
See you later .
Are you looking for a way to reach a wider audience and get more views on your videos?
Our innovative video to text transcribing service can help you do just that.
We provide accurate transcriptions of your videos along with visual content that will help you attract new viewers and keep them engaged. Plus, our data analytics and ad campaign tools can help you monetize your content and maximize your revenue.
Let's partner up and take your video content to the next level!
Contact us today to learn more.