https://www.youtube.com/watch?v=6Kn0MFAaQDM
Facebook Ads Tutorial 2023 - How To Create Facebook Ads For Beginners (QUICK GUIDE)

Hi guys today , we're going to see how you can run Facebook ads to increase traffic to your site .
Let's say you have a site and you want more people to visit your site .
You can do that easily by posting an ad on Facebook .
So after watching this video , you will be able to post an ad about your website on Facebook like this .
And Facebook will automatically show you that to people who might be interested in your site's content .
And if they click it , it will take them to your side .
So in this way , you can get more traffic and customers to your business .
You can also tell Facebook exactly which types of audience that you want to show your ad .
For example , you can choose people of a particular age or gender , all their interests and more .
So you can literally pick the audience you want to attract .
Ok , I'm Brian from upset learners and let's get started .
So this is the site for which we are going to create an ad .
Now to create an ad on Facebook , we are going to do five steps .
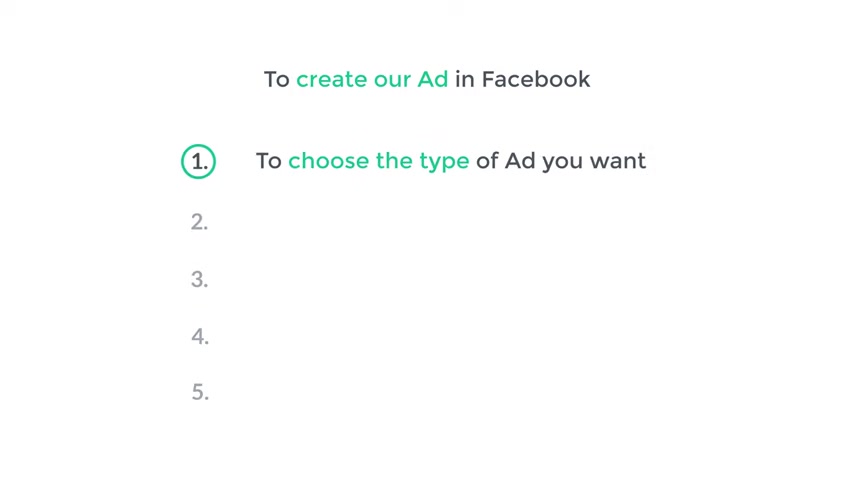
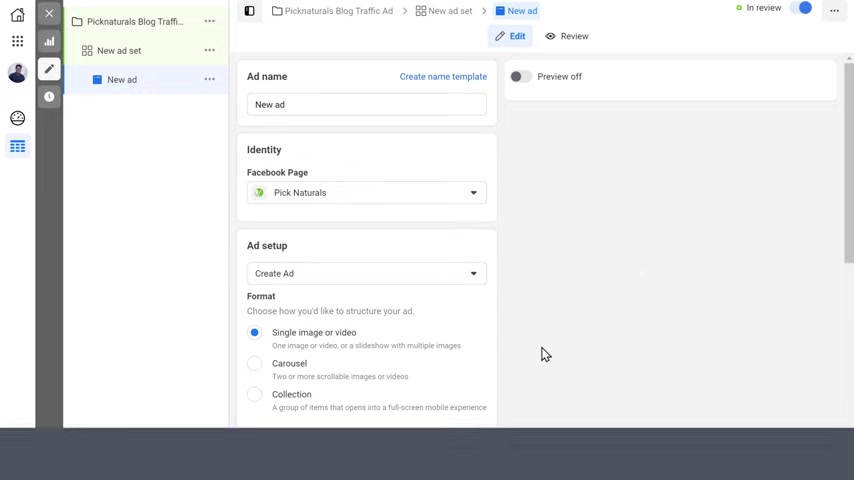
The first step is to choose the type of ad you want .
So to choose it first , we need to log into our Facebook account .
So to log in , let's go to facebook dot com slash as manager here .
Enter your account details and click log in and here click accept .
Once you have logged in , just click create .
Now here , choose the type of ad you want to run as I want to increase traffic to my site .
I'm going to select graphic and click continue .
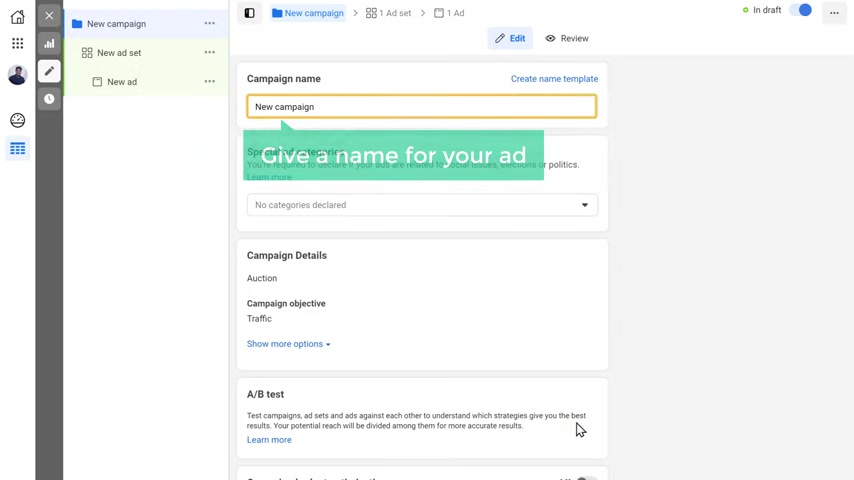
Now here give a name for your ad .
I'm going to enter pick Naturals block traffic at and click next .
Now here you need to choose where you want to increase the traffic .
As I want to increase traffic to my website .
I am going to let it as website and scroll down .
Once you have selected the type of ad we can now go to step two , which is to set a budget for our ad .
Now , in order to run the ads , you need to pay some money to Facebook and here you can set how much money you want to spend on your ads .
So I did click here .
Now , you can either choose daily budget or a lifetime budget .
I'm going to select daily budget and here enter your budget .
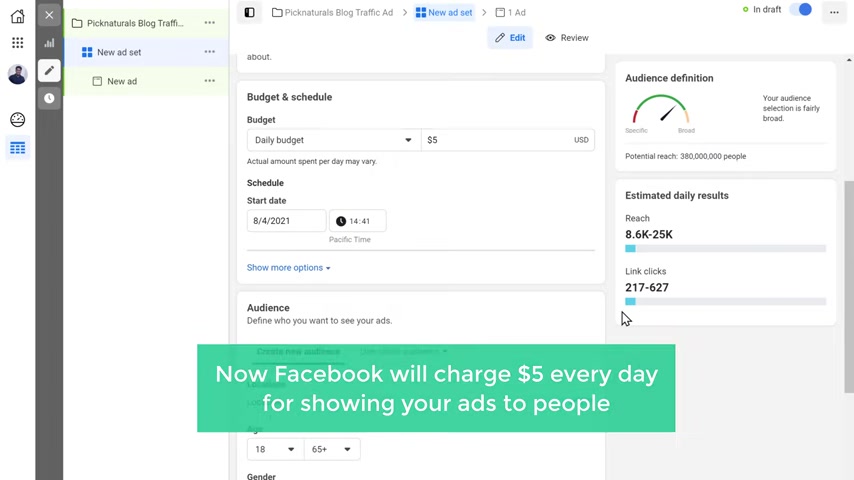
I'm going to enter a daily budget of $5 .
So now Facebook will charge $5 every day for showing ads to people .
You can start with the minimum budget and after seeing the results , you can change this later , once you have set the budget for your ad , we can go to step three , which is to select the audience for our ad .
Now , by selecting the audience , you will be able to reach people who will be interested in your ad .
So to select the audience first , we need to select the location of our audience .
So just click here and enter the location you want , I want my side to reach people in Bangalore .
So I'm gonna search for Bangalore , then select it and here select the age group of your audience .
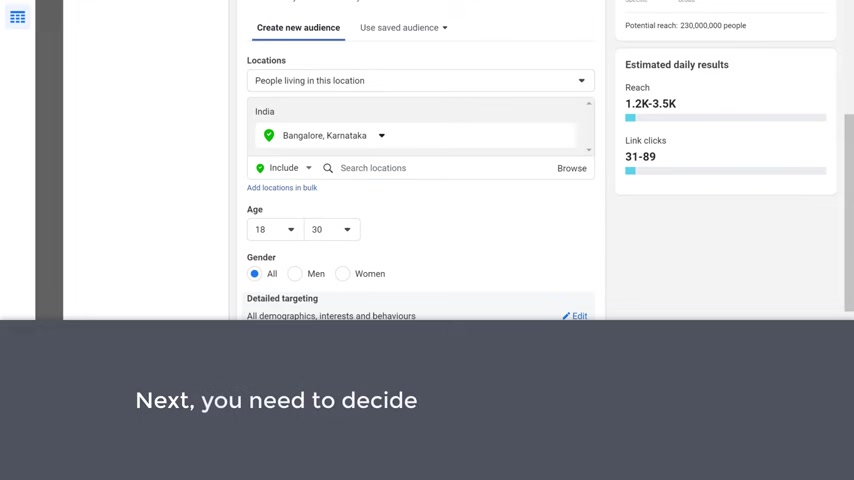
I'm going to select up to 30 .
Next , you need to decide who will be visiting your site .
Now , let's say you have a site related to beauty products and it has content related to beauty products for women .
Then you can choose women here as my site is about health and fitness .
I'm going to let it rest all next , you need to choose the people who might be interested in your products .
So let's click it and click browse , then select interests as my blog is about fitness .
I'm going to select fitness and wellness and here I'm going to select weight loss .
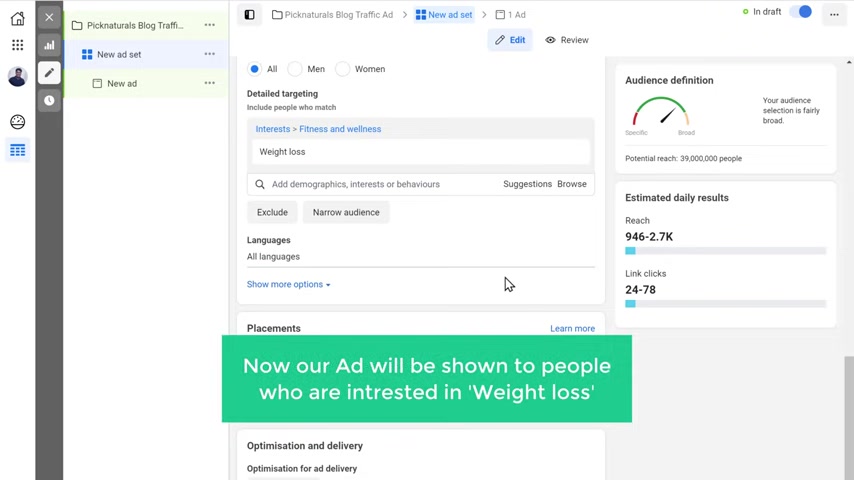
So now a ad will be shown to people who are interested in weight loss .
Now , if you want to target a similar type of audience , just click here and here you can find options related to your interest .
No , I'm going to select diet food similarly you can select as many options as you want .
Now , if you want to narrow down your target audience even more , you can use this option .
Now using this option , you can prevent your ad reaching a particular type of audience .
So for example , if you don't want to show your ad to people who already like your page , you can use this button to exclude those people from your target audience .
Now this option is useful if you're promoting your brand and reaching new people next .
If you want , you can also target people who are interested in other places like yours .
So let's go to Facebook .
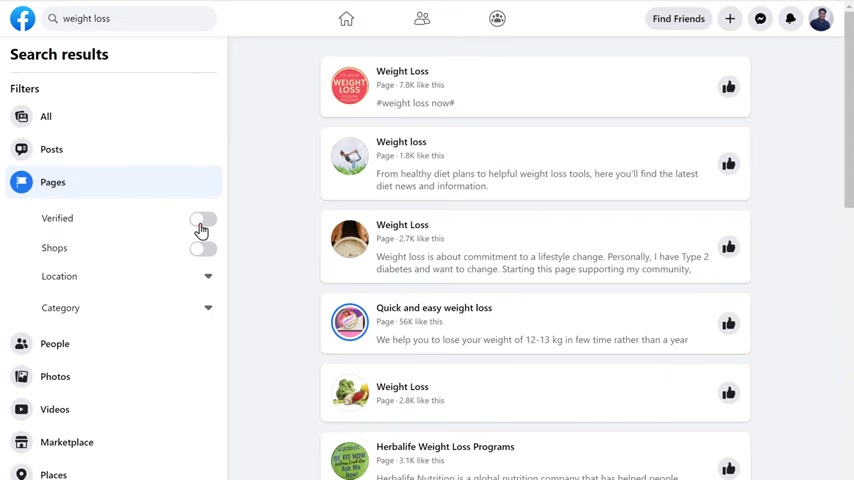
He has searched for weight loss , not select pages and enable verified here and you will get all the official pages related to weight loss .
Now , if you want to show your ad to people who are interested in this page , just copied his name .
No , go back to a manager and paste it here .
Similarly , you can do this for any page .
You want to target that audience .
Once you have done that , just scroll down and click here .
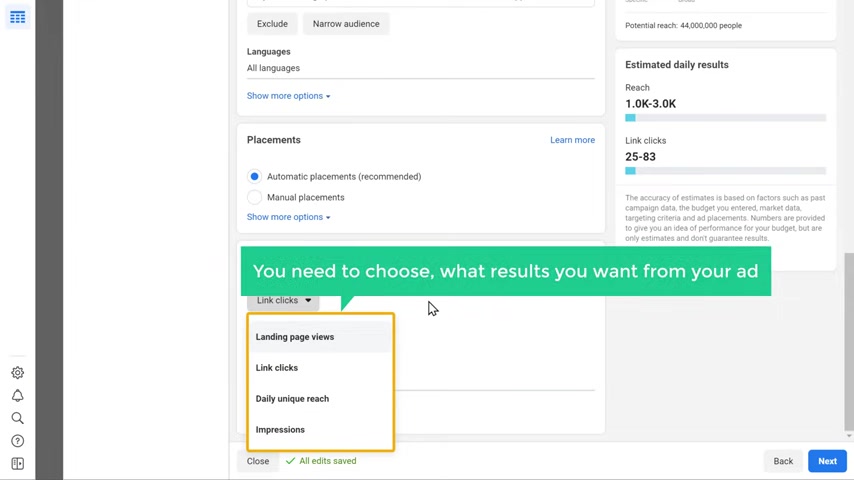
Now , here you need to choose what results you want from your ad .
As I want people to click on the ad and visit my site , I'm going to select landing page views and click next .
So now we have successfully selected our audience .
Once you have selected your audience , we can go to step four , which is to design your ad So to design our ad first , you need to create a Facebook page for your website .
Now , if you already have a Facebook page , you can just select it and start designing the ad .
So I'm going to create a Facebook page .
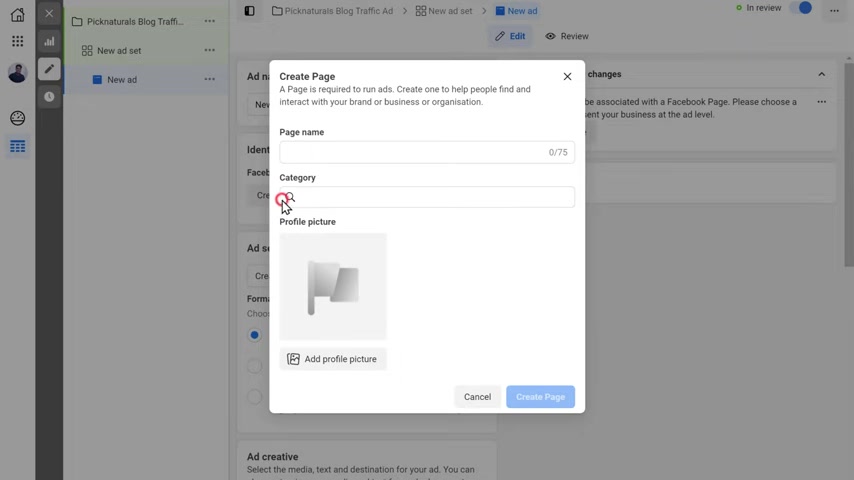
So to create a Facebook page , click create page here , enter a name for your page .
I'm going to enter pig naturals .
Next , you need to select the category that matches your business .
So let's search for help and you can see we got options related to health .
I'm going to select health and wellness website and finally , we need to add a profile picture for our page .
So let's click here .
Now select the photo you want .
I'm going to select this and click open and the profile picture will be added .
Once you have done this , just click create page and your Facebook page will be created .
Once you have created your page , we can start designing ipad .
So to design it , right , just click here .
Now , if you already have a post on your page , you can select this option and you can use any post on your page to run your ad .
I want to design a new app from scratch .
So I'm going to select this now .
Just scroll down and we can start designing an ad .
When designing your app .
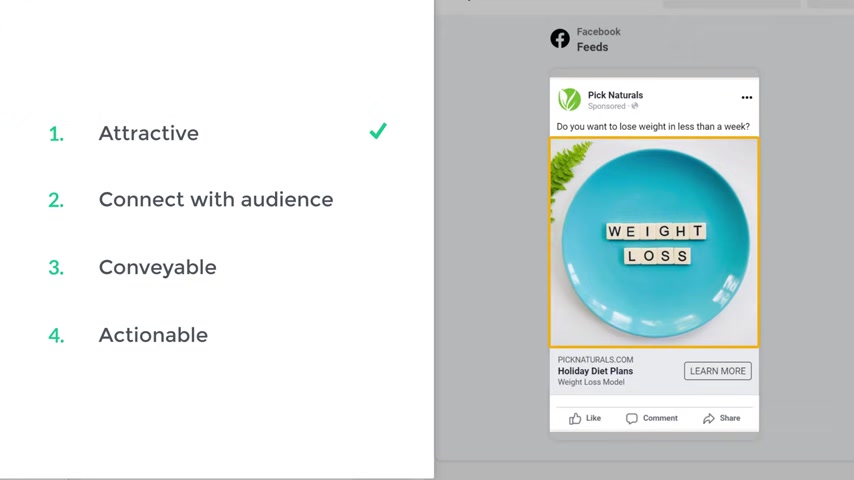
You can use the AC C A method .
The AC C A stands for attractive connect convey and action .
These are four important rules .
You need to keep in mind while designing .
So let's see these types one by one .
OK .
Now people usually scroll through Facebook quickly .
So in order to make them stop and see our ad first , we need to attract the people with our ad , we can do that by showing an image which can attract people easily .
So first , let's add an image or video which we want to advertise not to do that .
Let's click add media and select what you're going to add .
As I want to add an image , I'm going to select add image , then click upload .
Now select the image you want to add a open and then click next .
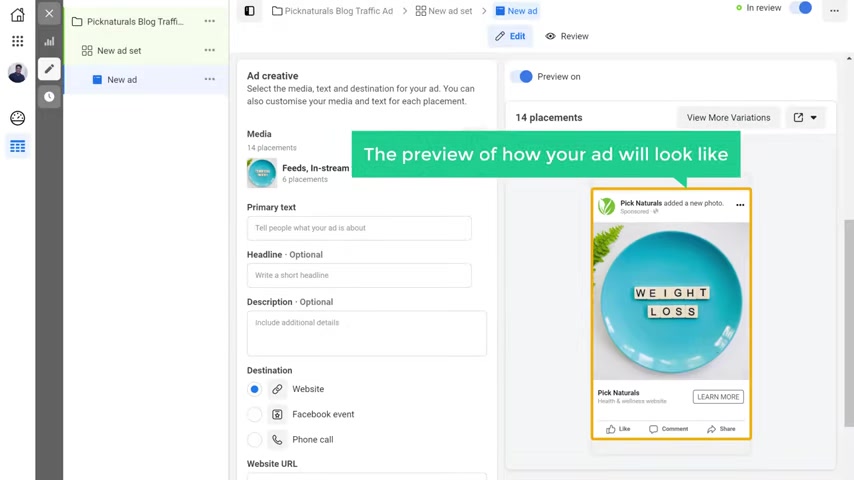
Now here you can see the preview of how your ad will look like once you have created an attractive visual , people are more likely to stop and see your ad .
Next , we need to connect only with the people who will be interested in your content .
You can do that by explaining their needs in a positive way .
So let's enter the text which you want to show here .
I'm going to enter my text next , you need to convey how your ad will be useful for them .
So let's enter that in our headline and description .
So now we are providing holiday diet plans , which will be useful for them .
And finally , you need to provide a call to action for your ad .
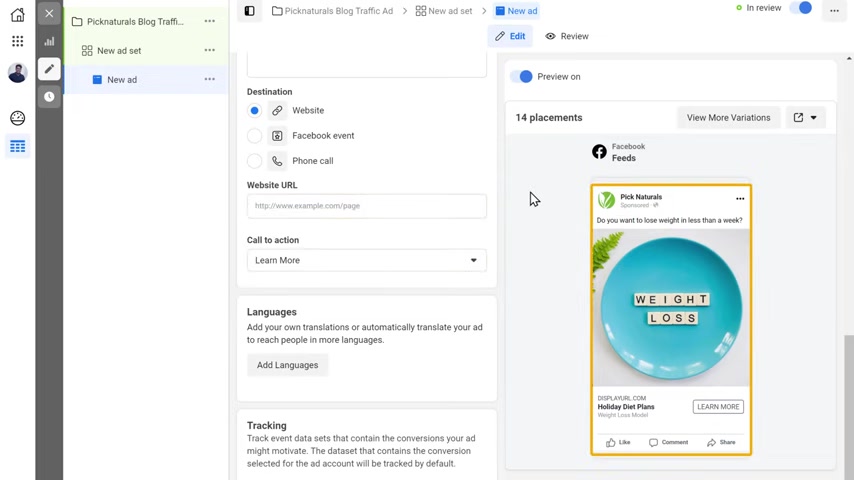
So here you need to enter your site's address where you want the audience to be taken .
When they click on your ad , I'm going to enter the URL of my blog .
So let's go to our site and copy this address and then paste it here .
Now click here and select the text you want to appear here .
I'm going to select this .
So make sure you always add a call to action on your ads .
So now we have designed our ad using the ad tools we had .
As you can see , we have an image which attracts and here we are connecting with the people explaining the need and then we provide a solution for their need .
Now , finally , we are providing an action which will take them to your side .
Once you have designed your ad , we can go to the final step which is to publish your ad .
So once you have made sure your ad is good , you can go ahead and publish your ad .
So to publish it , right .

Let's click publish , not choose a payment method and click next here under your card details and then click save and your card details will be saved .
Now , Facebook will automatically take the daily budget you have set from your safe payment method and your ad will be published after being reviewed by Facebook .

Now , if you see here a a is in review , so now Facebook uses their ad which usually takes less than an hour and once your ad is reviewed , it will be posted on Facebook and you can see the status as active like this .
So now we have successfully published our ad on Facebook , which means a rad is now live on Facebook .
So to see how our ad looks like , just click here and select , share a link , then click copy to open a new tab and base it here and then press enter .
Now , if you scroll down , you can see that we have got our ad .

So this is how your ad will be shown to other people .
And if someone clicks on an ad , it will take them to your blog post like this .
Now , we have successfully created and published an ad on Facebook .
But how do you know whether your ad is working successfully ?
So next , let's see how you can check the results of your ad .
So to check the results , just click close and here you can see all the performance metrics of your ad .
Now , this is the number of people to whom Facebook has shown your ad .
And here you can see how many people have seen your ad and the number of people who have clicked on your ad .

Now , if these numbers are low , you can try making changes to your rat , like increasing your budget or using a different image which can attract more easily or by providing different offers .
After doing this , you can run the ad again , you can repeat this process until you see better results for your ad .
Also , if you don't want to run your ad , you can disable it here any time you want .
Ok .
Now , as you can see here , Facebook charges money for each click .
This means that when a person clicks on an ad , Facebook reduces the amount from a budget and when the budget limit is reached , Facebook will automatically stop your ad .
So this is how you can see the results of your Facebook ads .
OK .
So let's say someone has visited your website through your ads but leaves your site without any conversion .
So you want to rear the same booster and send them ads in the future .
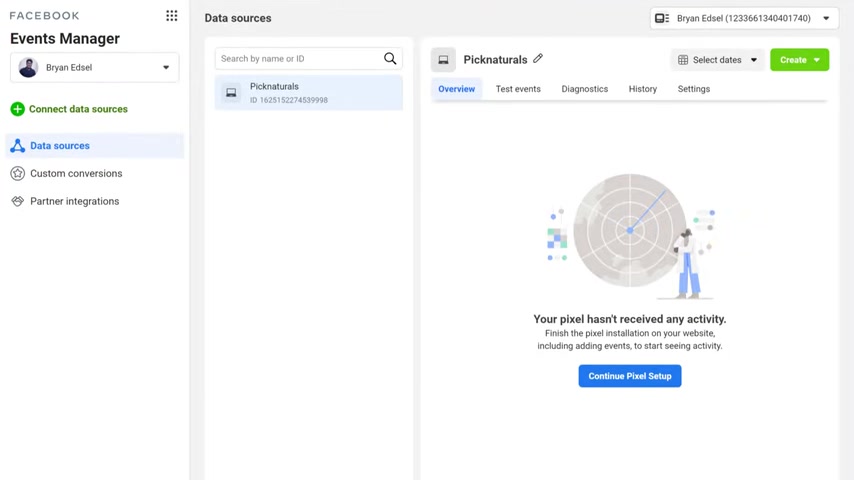
You can do that by creating a Facebook pixel .
Facebook pixel helps you track the actions of the boosters on your website and using these details , you can re target the same audience which will boost your conversion rate .
So next , let's see how you can set up Facebook pixel to to set a pixel , we need to connect pixel with our site .
So to connect it , let's go back to the ads manager .
Now , click here and select events manager .
Now select connect data sources .
Yeah , select web and click , get started .
Now select Facebook pixel and click connect .
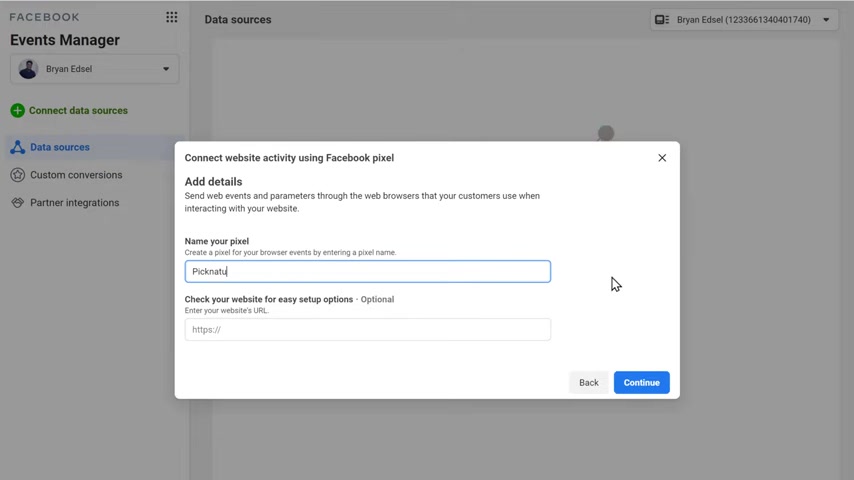
Not here , just give a name and then click continue now to connect Facebook with our site , we need to install a plug-in on our website .
So to install the plug in , let's go to our wordpress dashboard , go to plugins and click add new cure , search for pixel FB .
Now , instead of using Facebook's plug-in , we're going to use this plug-in since it is smaller in size and works better .
So to install it , just click , install and click activate .
So now we have successfully installed the plug in .
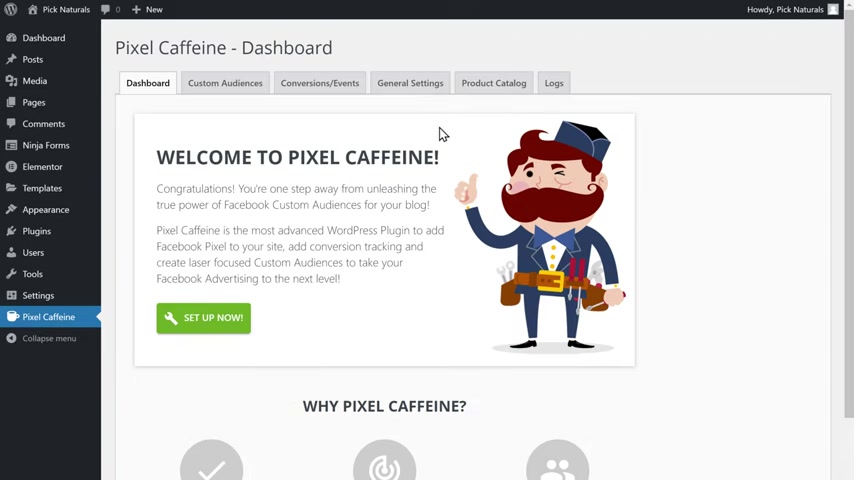
Once you have installed a plug in to connect your site with Facebook , just click set up now .
Yeah , enable this option and click Facebook connect now , click continue and click , OK , select your account and click apply .
And you can see we have successfully created our site with Facebook .
Now , Facebook will be able to collect the data of the visitors on your site .
So to test it , let's go back to events manager and then go to test events here .
You need to enter your site's address .
So let's go back here , copy this and paste it here and click open website .
As you can see , Facebook is receiving activity from our site and here you can see the events on our side .
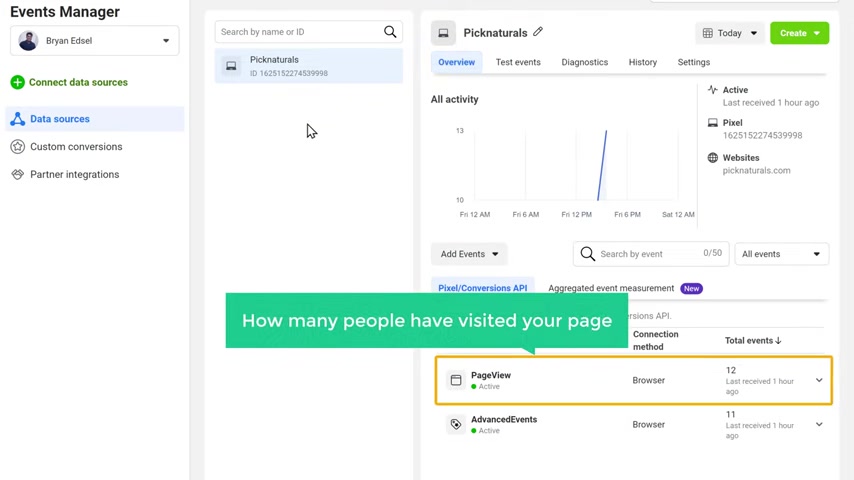
Now , if you want to know how many people have visited your page , just click here and here you can see how many people have listed your page .
So now we have the activity of the visitors who visit your site once you have set up Facebook pixel .
Next , we can start using the data in our ad to re target our audience .
So to do that , just click here and select a manager and here , click edit .
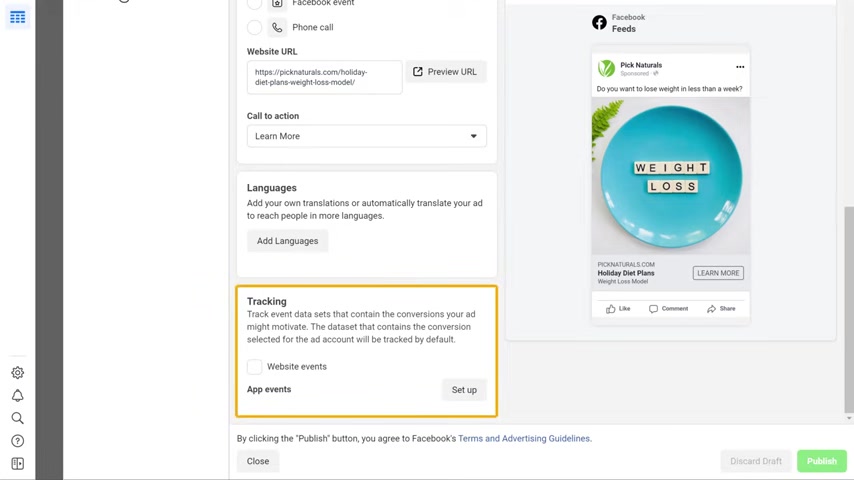
Now select the ad to be created , then scroll down here , select website events , then click my place and your ad will be published after review .
So now our Facebook ad will be able to use this data to narrow down our audience even more .
Similarly , you can run as many ads as you want along with the data from your site to reach your target audience .
So that's it guys .
This is how you can run Facebook ads to get more traffic to your site .
Now , if you want to know how to run Facebook ads to promote your products and grow your business online , just click the link below this video to check out this complete course on Facebook ads on Udemy where they will cover how to run different types of Facebook ads and how to create better content for promoting your e-commerce site .
So just click the link below this video to check out this course and also make sure you subscribe to website learners to get more videos like this one .
Thanks for watching .
I'll see you in the next video .
Take care .
Bye bye .
Are you looking for a way to reach a wider audience and get more views on your videos?
Our innovative video to text transcribing service can help you do just that.
We provide accurate transcriptions of your videos along with visual content that will help you attract new viewers and keep them engaged. Plus, our data analytics and ad campaign tools can help you monetize your content and maximize your revenue.
Let's partner up and take your video content to the next level!
Contact us today to learn more.