https://www.youtube.com/watch?v=wa4TgXCgmRQ
BEST Settings for Mavic Air Photos

I sometimes forget how amazing a camera drone is for taking pictures .
It's like having an airborne tripod that you can position in the sky to make some really unique perspectives that is not possible from the ground .
In this video , I will share my best recommendations for Mavi Air for the camera settings for you to take the perfect picture .
If you stick with me to the end of this video , I will share the secret behind some of these really stunning photos that you see online .
But before we get to that , let's roll that intro .
Do want to improve your video skills , learn about E wheels , then consider subscribing to my weekly tips , test and tutorials .
And while you're down there , then hit the bell notification as well , so you don't miss out on notifications for me .
You open the photo menu with the three lines below the capture button .
There are three tabs in the photo camera menu , and the first one is the exposure menu .
At the top , you can choose between auto and manual , and like with video , there's no reason for the camera to take these decisions for you , so switch it to manual ISO is the camera sensitivity , and you should aim to get that to 100 as this produces the best quality image with not too much noise .
The shutter speed is the time that the camera sensor is exposed to light .
This one should be set as high as possible to freeze the frame without the the picture being under exposed .
Opposed to recording video .
We are not interested in long exposure times as this introduces , blur or motion blur to the picture .
We want to freeze the frame unless we want to introduce an artistic effect by exposing the picture for a longer period of time .
Long exposure photography .
That is a big topic that could be covered in a separate tutorial .
Let's move on to the next menu item .
The image size should be set to 43 to get the most information in your picture , as the standard 16 by nine format is a crop version of 43 , the image format should at least be raw .
If you're serious about your pictures with the raw image format , you get all sorts of information that you need when you need to post process the image with J .
The image is pressed in the drone , and crucial information could be lost for good .
I usually use both because the JPEG is significantly smaller and provides an easy overview of the composition .
White balance , style and colour profile are indifferent to raw , so they can be adjusted later in post .
It can be stressful enough if you are on location , so it's beneficial to keep it simple .
However , if you plan to use the JPEG , then there's get these parameters to suit the situation .
In this way , you will get a good picture to look at to evaluate your composition in the APP before we look at all the shooting options under the photo menu , let's check the settings under the gear wheel .
Always have the histogram enabled , as this is a major help assessing if the picture has been over under exposure , especially if you combine it with the over exposure warning stripes .
An important pro always exposed for the brightest area of the picture , even if it makes your all old picture look dark .
Information lost in the bright areas are lost for good , where most information that is hidden in the dark areas can be recovered in post grid should be turned on .
So you have a three times three grid that will help your composition .
According to the rule of thirds , the whole topic composition could be covered in a whole separate video , so I don't want to get too much into that right now .
The LED S on the drone must be turned off during photography and video so they don't interfere with the footage .
Save onstage .
Panorama pictures are turned on by default .
So we leave that and , uh , it can't harm to have the original footage from your panorama in case that you need it continuous file index that gives each image a new , unique name .
This is an advantage because this prevents all writing or deleting of existing images .
So now we're all excited to see what options are hidden under the photo menu that will allow us to take the perfect picture .
Single picture .
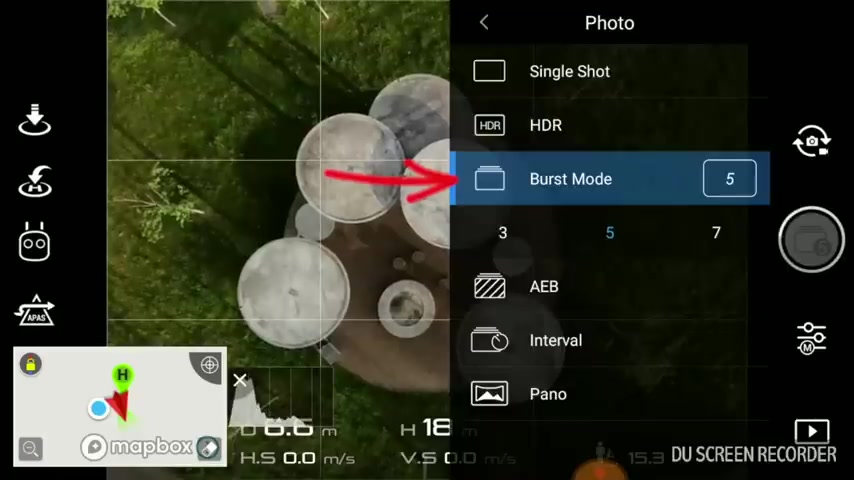
This is not recommended as you're 100% depending on that single picture .
To be perfect , it's much better to use the first option where multiple pictures are taken in series .
This way , you have more options to choose from when you get back home .
Now .
At the beginning of this video , I promised to reveal one of the secrets behind some of these great looking drone shots that you see on social media .
And what they use is something called bragging or a B , or auto exposure bra .
This is nothing less than brilliant .
When shooting raw images , you get the most possible information stored in the image .
But with the Mac pro and mavi air with relatively small image sensors , there's still information that gets lost , especially if you take pictures of compositions that contains both bright and dark areas .
At the same time , like a sunset with the A B , the drone takes five pictures where two is over exposed and two are under exposed , collecting the maximum information from both the dark and the bright areas of the image .
When you post process the pictures , you can combine them all into one single image containing the maximum information .
That's pretty smart .
You can choose a EB based on three or five images .
Five images is clearly better than three .
The HDR option is an automated version of a EB where the drone makes the job for you , combining the pictures and you get the final result right away .
However , the result is often better if you do it yourself .
If your image is not big enough at the 12 megapixel layer , you have the option to make a Panorama picture where you could stitch together multiple pictures up to 32 megapixel .
The most famous format is likely the sphere .
You have seen that multiple times on the social media .
But don't underestimate the vertical panorama where you have three images one above and one below if you're doing postal material .
Lastly , there's the interval photo option that will allow the drone to take photos with the fixed time interval until you stop it or it runs out of memory .
I can easily see this , uh , uh , function being used for doing a time lapse .
But battery life is becoming quickly a limiting factor .
That's it .
Now you know all the secrets behind a good setup for shooting photos with your drone now the hard part .
But also the fun part is to go out there and capture some stunning compositions .
If you have any questions to this video , then drop them in the comment section below or head over to the drone Wheeler Facebook group and continue the discussion over there with me and some of the other subscribers .
Finally , if you're new around here , then consider subscribing and at the same time , give the video a like , as this helps me a lot to understand if you want more of this kind of content Thank you for watching and see you on the next one .
Are you looking for a way to reach a wider audience and get more views on your videos?
Our innovative video to text transcribing service can help you do just that.
We provide accurate transcriptions of your videos along with visual content that will help you attract new viewers and keep them engaged. Plus, our data analytics and ad campaign tools can help you monetize your content and maximize your revenue.
Let's partner up and take your video content to the next level!
Contact us today to learn more.