https://www.youtube.com/watch?v=W9ED11cU594
How To Create A Blog In 30 Mins ~ 2023 ~ Make A Blog Tutorial For Beginners

If you're looking to build a blog with easy to follow ups in 30 minutes or less at no cost to you , then you've come to the right place .
OK .
Hello , I'm Yoda and welcome to my youtube channel .
This video will use all the current web design and web development techniques to build a fully responsive blog that automatically adjusts to meet the screen needs of any computer , laptop , tablet phone or any other handheld device to get started .
The only hard cost we have is web hosting and that's where your website lives .
And that's gonna run us 3 to $10 a month with your web hosting .
You'll get a free domain , a value of $15 as well as an SSL key which makes your web pages secure and that has a value of about $99 .
As for software requirements , there are none , everything we're gonna need .
We're gonna do online as for system requirements .
This website tutorial is compatible with both windows and I OS systems .
All you need is your favorite browser and access to the internet and you're ready to go .
I recommend Chrome and Firefox browser of choice as I've had some students in the past that had complaints about compatibility issues with Safari opera and internet explorer .
Now , during this course , if you run into any troubles , just leave a comment below the video and I'll be more than happy to assist you and don't be shy about asking for help .
I've been a web master instructor , A K A the Web Yoda for over 20 years and I love to hear from my students .
But if you could please pay it forward .
If you could like the video , subscribe to the video , share the video , tell your friends about the video .
Those are the kind of things that help get the word out there .
So other students like you can find this video .
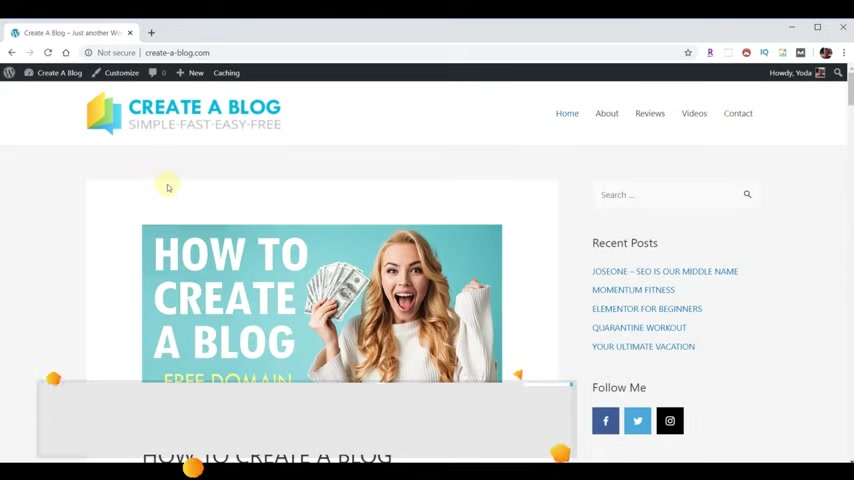
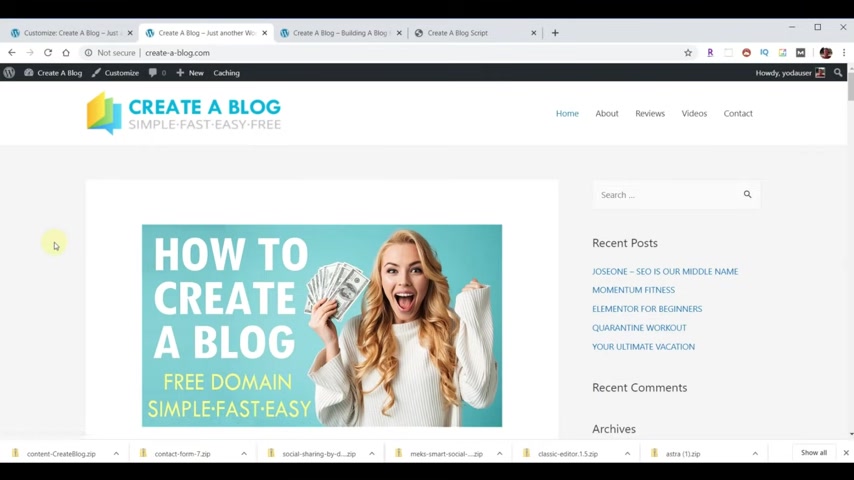
So let's go ahead and look at the blog we're gonna build today .
This is our home page and any and all posts that we put in our blog will be accessible from our home page .
Next , we have an about page which includes some text and a picture of me .
We have a reviews link which is basically a collection of all the posts that we've did that were considered reviews .
We have a videos link which is a collection of all the videos that we added and then you can click on any of the most recent ones .
We're gonna learn how to add this social media .
We're gonna learn how to add a tag cloud to the side and inside of an individual post .
We click on one of these , we'll learn how to add a play button to make a video play .
And we'll also learn how to add social media options for sharing your posts .
And finally , we have a contact page in case people want to access you and ask questions about your blog .
So we're ready to start our blog , but we need a place for our blog to live that requires web hosting .
Web Yoda has partnered with host Gator who has been voted number one host provider by PC magazine for many years running as part of this partnership , web Yoda students receive up to 75% off plus a free domain name to take advantage of this offer .
Simply go to host gator dot com slash web Yoda in your browser .
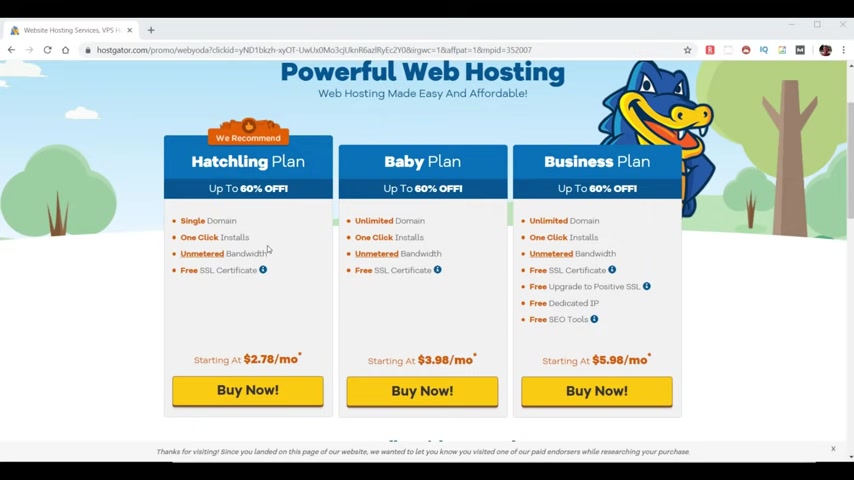
Now , this takes you to the partner page for host Gator and Web Yoda and it reveals our three choices for hosting plans .
Currently as part of this partnership , host Gator is going to offer us a free domain name provided .
We sign up for one of their annual plans and it turns out this is actually the most affordable choice for us .
If we scroll down , we can reveal the pricing for each of the plans .
All three of the plans come with one click install .
So that means when we go to install the software , it's gonna allow us to build our website .
We can just click a link and it'll install everything for us .
They also come with un metered bandwidth , which means we don't pay for the traffic that comes to our website no matter how small or large that might be .
And finally , they also come with a free SSL certificate , which typically runs around $99 a year .
And you say , ok , what is that ?
What do I need that for ?
Well , that's a little lock up here in the top left .
It allows your page to be secure .
So the information going to and from your website is secure .
At this point , you need to decide which one of the plans is best for you for our purposes .
I'd recommend the hatching plan if you have one domain or the baby plan , if you plan on building multiple websites , and then if later you find you need additional features , you can just upgrade to the business plan and pay the difference .
So in your case , you probably need the hatching plan , which is just a single domain .
So we'll choose that .
So our first step is to pick a domain name .
In our case , we're gonna pick create dash a dash blog dot com .
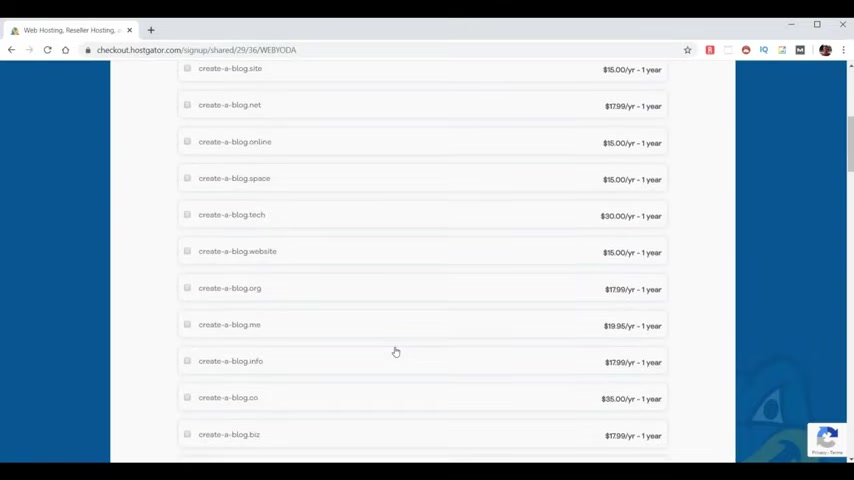
Now I notice here the dot com is already there and if we click to the right , it'll tell us if it is available and in our case it is available .
So we're gonna scroll down .
The next item is domain privacy protection .
And basically what they'll do is for $14.95 a year , they'll hide your name , your address , your information , like your email and stuff like that from people being able to see it .
Now , for me , it's gonna be on the website anyway .
So I don't feel like I'm giving anything away .
So I'm not going to choose to pay for that next where we picked our package type .
We chose the hatching plan because we only have one domain .
So we want to look at our billing cycle within the billing cycle .
If you purchase one month , it's $5.48 but it's only for that first month and then the price goes up .
If you go all the way up to 36 months , it's gonna be $2.71 and it's gonna be 61% off .
Now to get the free domain , you got to pick 12 months , 24 months or 36 months .
So let's go ahead and pick the 12 months .
It says $76.40 .
But let's see if we can do a little bit better than that .
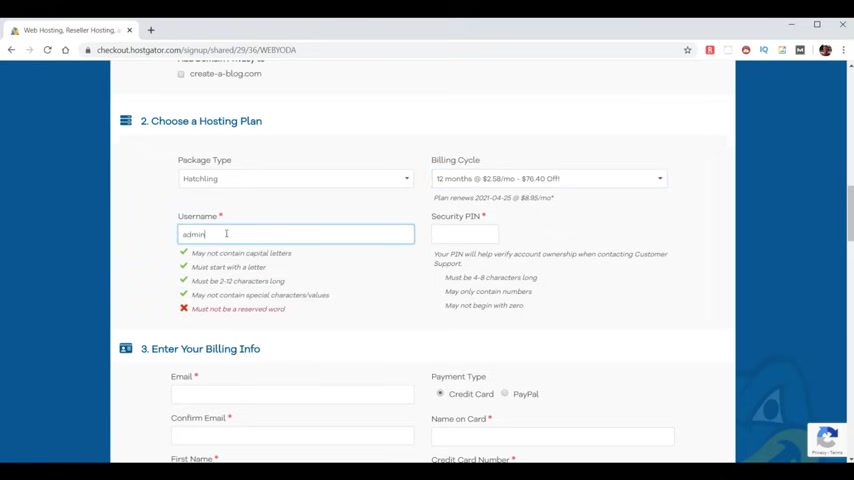
Now , we're gonna pick a user name in my case , I'm gonna pick admin Yoda in a security pin .
Then we want to put it in our billing information .
They'll scroll down to additional services .
Now , we don't need any of these services , but I'll explain them real quickly .
The first is an SSL certificate .
We already get that for free .
So we don't need to add that .
The second is for them to protect us from hackers .
I know firsthand , they're gonna give you protection whether you asked for it or not .
So there's no reason to pay for this additional thing .
They're gonna want to protect their servers from both the internet and from you .
So they're gonna definitely stay on top of this .
Next .
We don't need to pay for an email for our domain name .
I'm gonna show you how to make an email forward for your domain at no cost at all .
Next , they offer a backup service where to do daily backups .
But I know firsthand they do monthly backups for you .
And also if you click on this link at the very top up here , I'll go ahead and give you a video that'll show you how to make your own backups without having to pay them a regular fee like that .
We'll turn that off if we is not in the box , go ahead and type that in so we can get the best possible price .
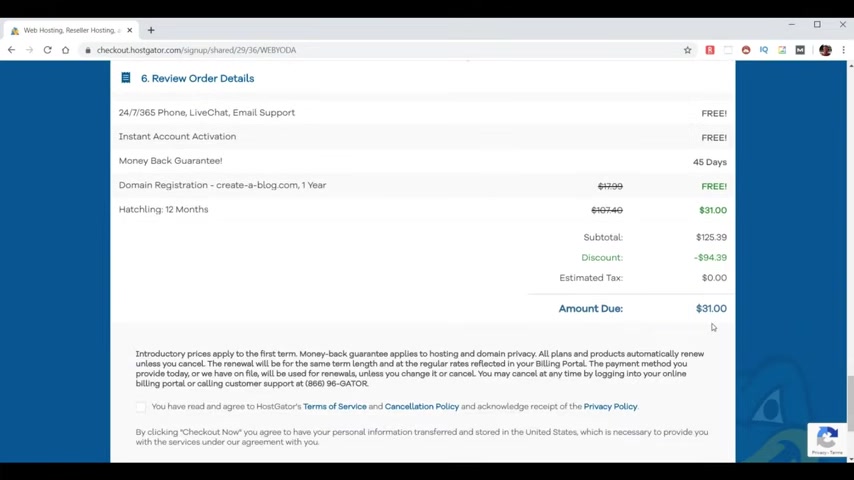
Now , notice down here , our price is $31 that's basically 75% off and a free domain name .
So that's pretty good .
Also , remember this comes with a 45 day money back guarantee in case you change your mind .
Now , all we need to do is agree to their terms and choose check out .
Now , now that your payment is complete hosts Gator is getting your account ready for you .
Now , your hosting account is complete and you're ready to access your hosting account .
Next , just proceed your email account and look for an email from host gator dot com that has your account information .
If you purchase a domain name while setting up your host Gator account , then the next piece of information will not apply to you .
If you already owned your domain name and didn't purchase one with this process , you're gonna need to get your domain name to point to your hosting area to do that .
You need to point your domain name to the name servers for host gator .
All of my domain names live at godaddy dot com .
Why I needed to go into the DNS at my Go Daddy account and point that domain to the host skater name service is shown here .
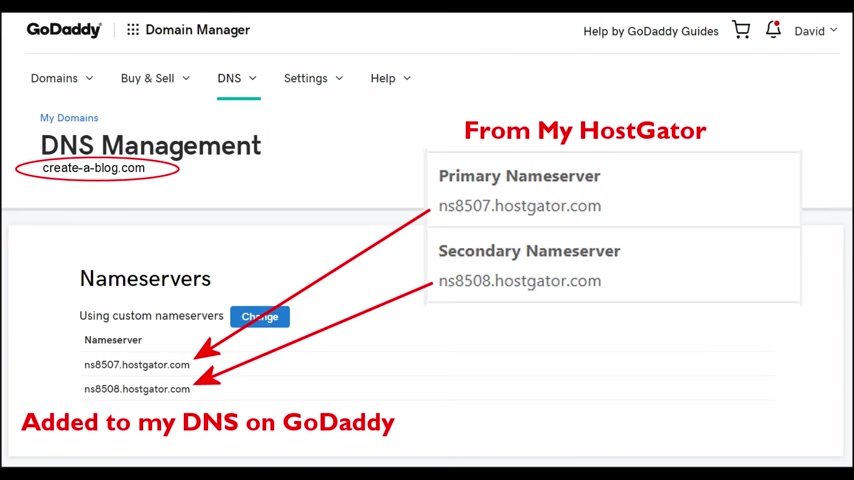
Now , if you're not using go daddy dot com , it should be a similar process .
And if you have any trouble , just contact your domain company and they can give you further assistance to log into our hosting account .
We're gonna need our user name and we're gonna need a password .
We're gonna take that password and we're gonna copy it to the clipboard .
And now you want to go to the control panel , which is how you access your hosting space .
So we'll click on this link and that takes us to the control panel , log in page .
Now , my user name and password are already there .
So I can just choose log in and that takes you to the home page for your host gator control panel also referred to as C panel by some people as promised .
I'm gonna show you how to make your own email forward , so you don't have to pay for email .
So what you're looking for is email forwards option .
It could be under your popular links and if you don't see it there , you can click on email on the left that brings up all the email options and you choose email forwards there from this screen .
You choose , add a forward .
In this case , it's gonna be comments and I wanna pick my domain .
Now , you probably only have one domain instead of a pot load of them like I do and I'm looking for create a blog dot com .
And now what email do I want it to go to ?
In my case , it's gonna go to my gmail , click on add a forward and our email forward is complete .
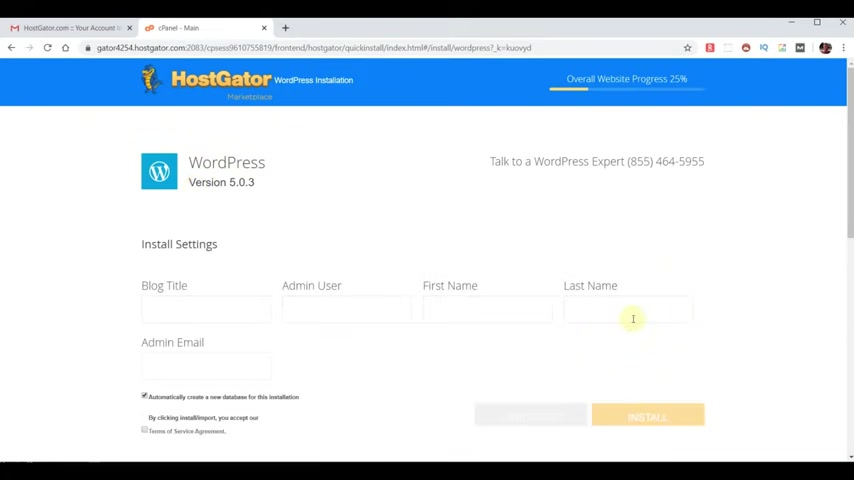
Now , let's go back to our host gator control panel and we're ready to install wordpress so we can get our blog going .
So we're gonna choose Wordpress installer .
Now we need to choose our domain again .
So we'll choose our blog domain .
We'll hit next .
We'll get a blog title in this case , create a blog and Yoda user Yoda .
Yeah , and Yoda , it'll automatically create a database .
Do all the work for us , we need to accept their terms .
Hit , install .
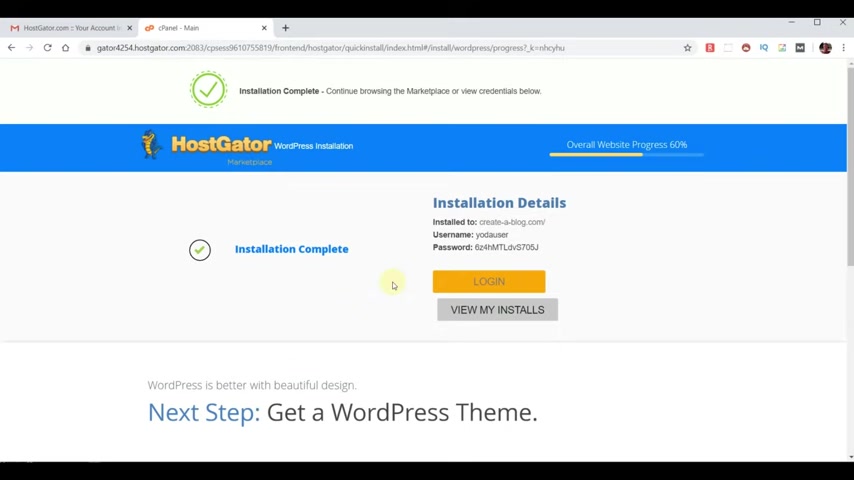
This process takes maybe 15 seconds .
Now , our installation is complete .
At this point , we're probably gonna have to take a small break .
And that's because we just set up a hosting account that has a new domain .
The hosting is immediately available , but the domain takes a while to propagate across the internet so that it's able to be accessed to test to see if your domain is ready .
The first step is to open a new tab .
So you don't lose access to the user name and password or what we just set up .
Now , go to your domain name .
And if your domain is not ready , you'll get a message that says this site cannot be reached .
So you'll likely need to take a break for about two hours and then come back again and go back to your domain and refresh and see if it works when it's ready .
You'll get a page that looks like this one that says website coming soon .
So let's go ahead and close that test tab .
Now , we're looking at our control panel again .
So we're going to choose the password , copy that to the clipboard because you can't possibly remember that .
Click log in now and then from here , put in the user name and password in my case , Yoda user and here's that new password and log in .
I don't want to save it right .
Now and they're asking you is your email , correct ?
Yes , it is .
Now , the first thing we wanna do is give ourselves a new password .
So we'll close that little advertisement .
There .
Always gonna be advertisements .
We're gonna close that one and close that one .
So we're gonna go to users , click on my user and near the bottom is where we can do our password generate password and I'm gonna hide it and I'm gonna put whatever I want it to be .
And if for some reason you picked a weak password , you simply have to confirm that you understand it is update your profile .
And from here , if we go up to this corner , we can log out and we're back to our login screen .
Well , one of the questions is how do you get to your login screen ?
The answer to that is go to your domain name , front slash WP dash admin and hit enter and that'll get you back to your log in page .
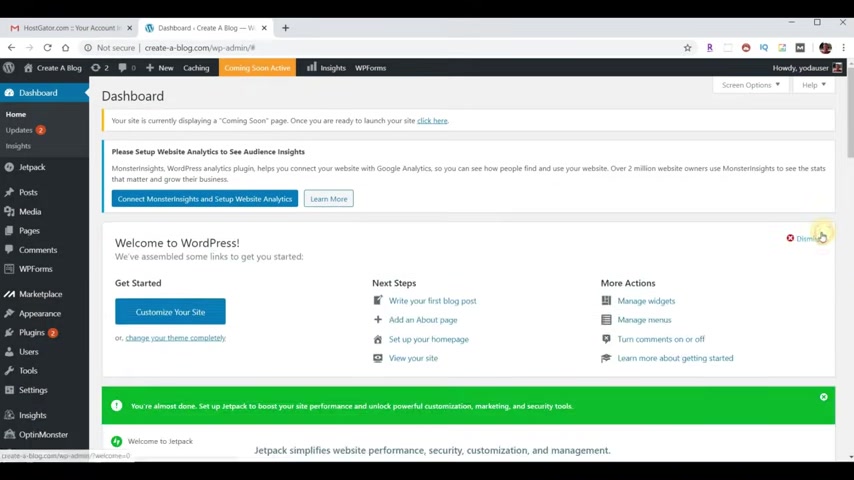
So let's put in our user name again and our new password and now click log in and now it logs us in with our new password with wordpress installed .
We're ready to start working on our blog .
The first thing we wanna do is be able to see our blog .
So let's come over here where it says create a blog and under it , it says visit site .
If I right , click on that , I can open it in a new tab .
Now , if I click on that tab , I can see what our blog currently looks like .
It's a whole lot of nothing .
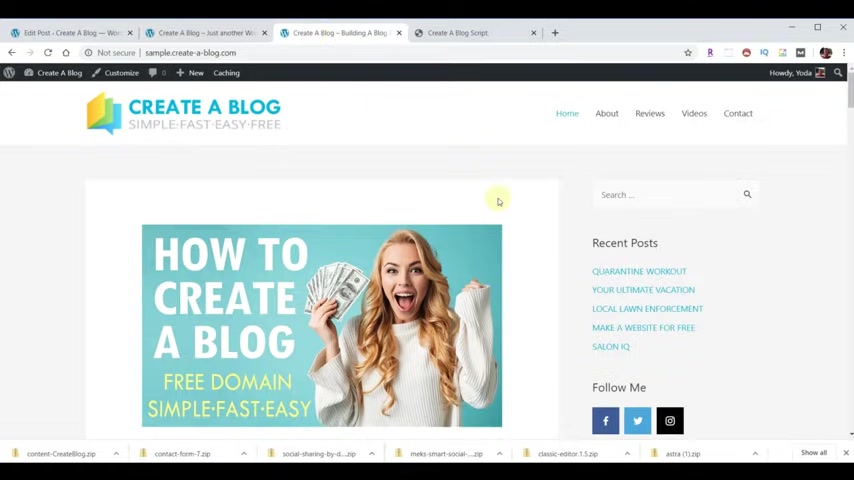
Now , if we open up another tab , we can go to our sample site in this case , sample dot create dash a dash blog dot com and we can see what the site is going to look like .
So our blog we're gonna create , it's gonna take us about 10 minutes total .
We got a long way to go .
It seemed like , but it's actually gonna be quite easy .
Now over here , we don't need the email tab anymore .
So let's go ahead and close that one .
So our first step in creating our blog is to pick a theme .
In our case .
If we go to a browser , we open a new window , go to web dot com slash theme .
It comes up with a list of all the themes for the different projects we have to do .
Now , if we scroll down , create a blog is what we're doing , we're gonna download the astra theme .
Do I click on that ?
And it shows that it's done .
Now , if I go back to our dashboard , I'm ready to install that theme .
But we'll come down here under appearance .
We'll pick themes .
So from here we pick upload .
Now we'll choose upload theme and down in this box , you gotta be careful of these little advertisement .
They can make the box have to be , might have to scroll to get to it , choose file in my downloads folder .
We see there's the theme .
So we select the astro theme , click open .
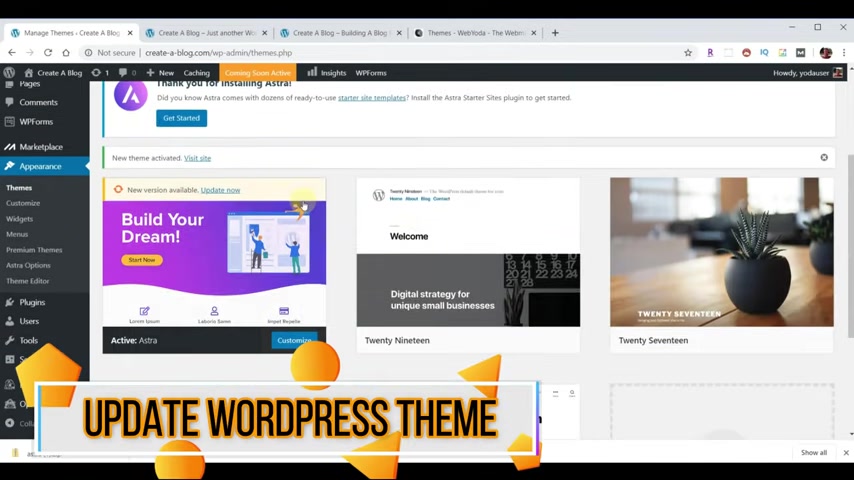
Now we install and once the install is complete , we need to choose , activate .
And once it's activated , the first thing I like to do is to see whether or not it's up to date .
So here's our new theme and right here , a new version available update now and now our theme is up to date .
Next , we wanna add the plugins we're gonna use for our website .
So we're gonna go back to our browser and at the web site under resources where we can pick plugins .
And we're going to scroll down to this project , create a blog and we're going to download these four plugins .
I just click on each one of them .
The question I get a lot of times is how come you have to go here to get them when you might be able to just do them directly inside a wordpress ?
Well , the answer to that is is that not all the plug ins will be available on all hosting environments in all situations .
So I want to make sure there's not a chance that you don't have access to the correct plugins .
And so now we've downloaded the four plugins we're gonna use .
So I'll come back to my Wordpress dashboard .
Now we're gonna choose plugins .
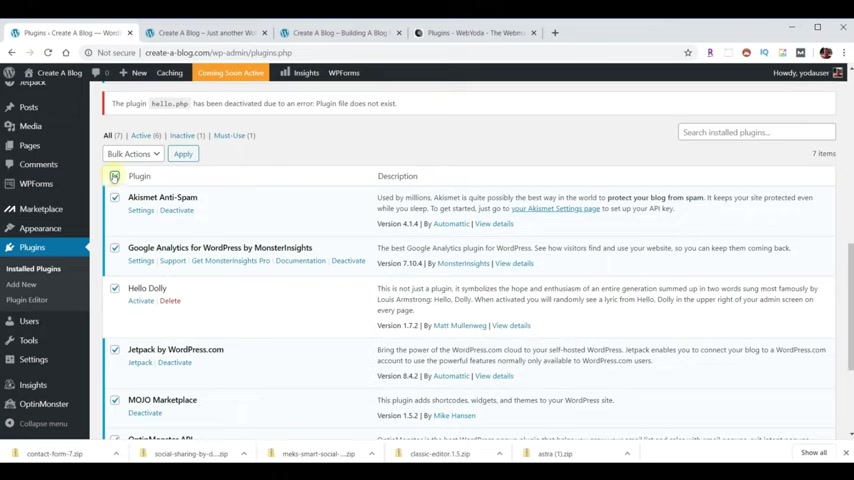
And before we install any plugins , I want to remove all the other ones because these are for somebody else's website .
So to do that quickly , if you pick the box here at the top called plug-in , we can select all of them .
And just above that , it says bulk actions , choose that down arrow .
And first we need to deactivate them .
Now we hit apply .
Now , at this point , all the plugins are deactivated .
Now , we need to select them all again by choosing that check box bulk actions .
Now we can choose delete and apply .
Are we sure ?
Ok .
Yes , we're sure .
Now all the plug ins have been deleted and now all we have to do is upload our four plugins .
So we're gonna choose add new upload plug in , choose file .
It doesn't matter what order you do these in .
We're gonna pick that one first open install .
Now activate plug in three more to go at noon .
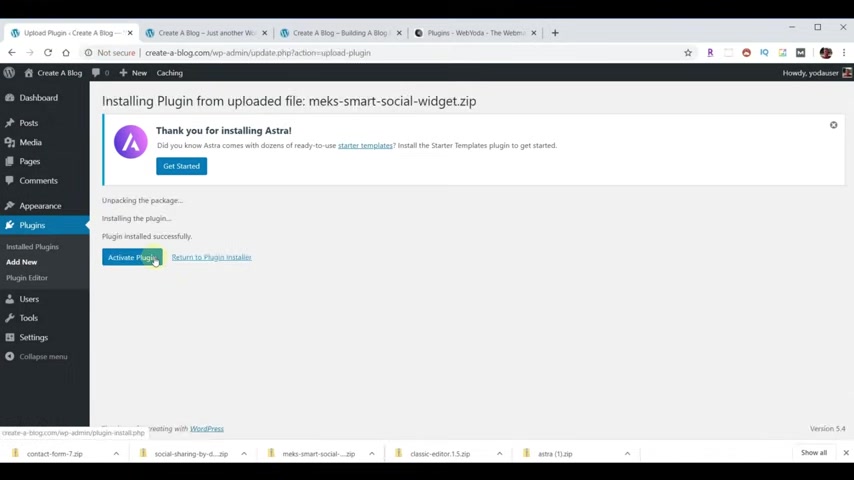
Upload plug in , choose file , pick the next one open install .
Now always activate plug-in two more to go at no upload plug-in .
Choose file , pick that one open install .
Now , activate plug in .
We have one more add new upload plug in , choose file , pick that one open install .
Now finally activate plug in .
Now these new plugins are available and we want to see if any of them need to be updated .
The easiest way to update them is to choose this box again to select all our plugins book action .
Now we'll choose update , apply and it'll update all of them for us now that our plugins are updated , we're ready to start working on our blog .
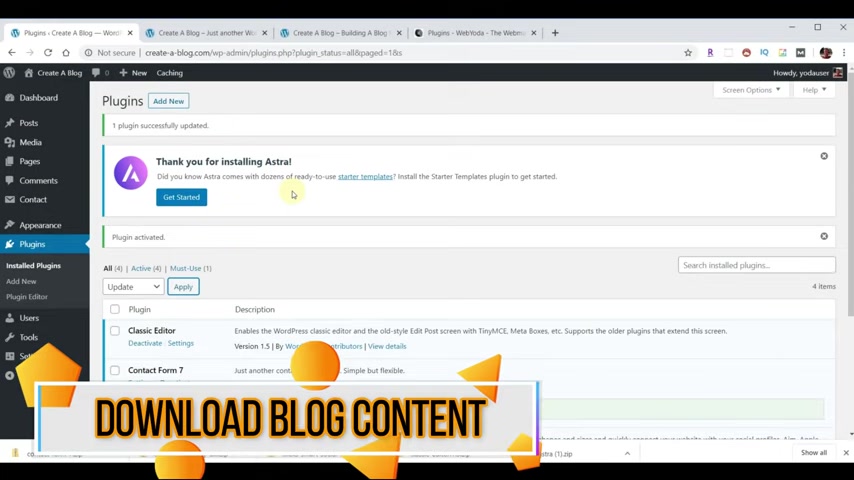
So if you want to follow along , I have a collection of all the content used in this example .
So we'll go back to web Yoda , scroll to the top and the resources , website content .
Now under here , we picked our same one and we're going to choose content , great blog dot zip and that downloads it .
And from here I can show it in the folder and now I can right click on it and extract all and it makes a folder that has all that content .
And so I'll just close that other one and we'll keep this one available for working with .
Also within the same section , we have a script for what we're about to build .
So if we click on , create a blog script , it'll bring that script up .
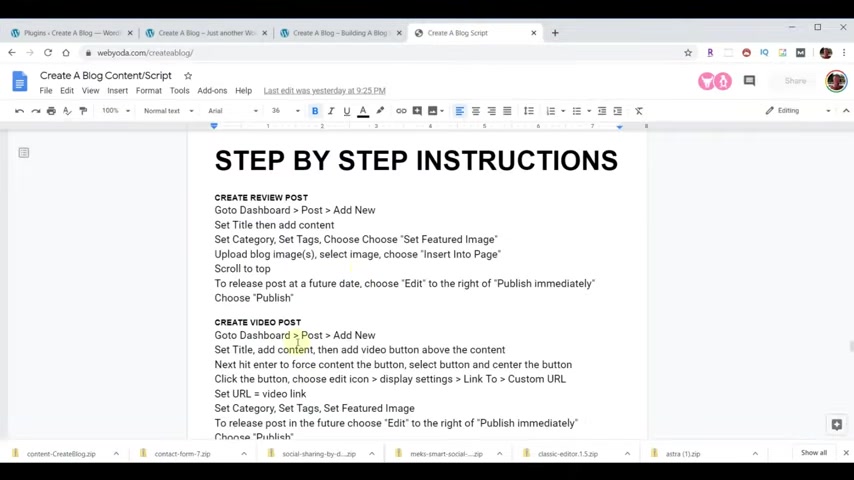
And when you scroll down , there's all the content that we're gonna have to put for each of the posts in and all the way at the bottom , if you keep going down are step by step instructions that we're gonna use to follow along .
So let's go ahead and go back to wordpress now to work with our blog .
The first thing we need is a couple of posts .
So we're gonna add some post first .
Now remember in our script over here , here's our instructions for doing that .
And over here , I'm gonna walk you through it .
So I'm gonna click on Post and the first thing I wanna do is get rid of the Hello World Post .
If I hover over it , I can choose trash and that's gone .
Now to start a new post from post , you go to add new and now you want to enter a title and the title for our first post gonna be Jim Gray Designs .
Now , I want some content for my post .
So I'll paste in my content .
Now , on the right hand side , we wanna add a category in this case , this is a review .
So we're gonna add a category , we'll call it reviews , add a new category .

And now that's selected categories are the different types of blog posts you're gonna do .
So for example , we're gonna have reviews and we're gonna have videos .
So let's go ahead and make the second one .
So I add another category , videos , add category and I'll uncheck that because this isn't a video .
Next , we're gonna add some tags .
Tags are basically keywords that are associated with the post .
So in the case of Jim Gray designs , we're just gonna put home theater add tag .
Now we're gonna scroll down some more and finally , we wanna add the featured image .
So we're gonna select a featured image and we have no media content right now .
Now we could click on select files , but an easier way to get access is to bring up that folder that we made .
And I'm gonna actually select all that's in that folder because I'm gonna have everything at once and just drag it over here and it'll insert all those at one time and I'll have all the stuff that I need .
Now , being organized is really a great way to make this work quickly for you and they load pretty quickly .
Now going forward , everything we need will already be there .
Now for Jim Gray design , this is the picture we're gonna use for his feature .
I make all these 800 by 4 50 set featured image .
And at this point , we want to scroll back up and we're gonna hit publish .
Now we have a post .
Now if we go back to look at our website , we hit reload .
Now we have a post .
So all of a sudden we have something , however , it looks nothing like this .
Let's go back to wordpress , go back to the top and let's add another post .
This post is going to be Bliss Spa by Lauren that we'll put in the content for her post .
We'll scroll down .
She's also a review .
Her tags will be spa services .
We'll hit add , scroll down , set the feature image .
And now since they're already all here , it's easier to pick one .
We'll pick this one that's gonna be hers again .
All mine .
I made 800 by 4 50 .
Let's set featured image .
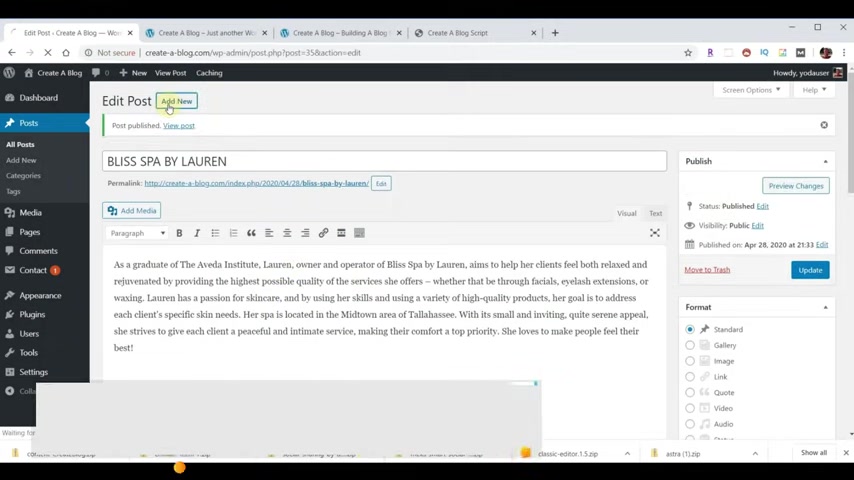
Now that one's set , go to the top hit publish .
Now we're gonna add a new post and this one's going to be a video post .
So let's see how that's gonna differ .
In this case , it's going to be how to create a blog , which is basically the post about the site we're making .
Here's our content and above the content , I want to put a button that's gonna allow us to click to view the video .
So I'm gonna put the cursor just before the content right there .
I'm gonna click on add media and I made a button in advance .
So we'll click there .
We're gonna insert it and now I'm gonna click on the button , the image and I'm gonna tell it to be centered .
And now I'm gonna click on the pencil and I want to give it a link and so under display settings , you see link two , we'll get a custom URL and we're gonna put that link for now , obviously , we're making the video .
So the link to the video is not available yet .
I'll have to go fill that in later .
So hit update now we'll scroll down .

It's also a video for tags .
I have a bunch of them hit add and those are all associated with this particular video , this particular post , we'll scroll down .
Set a featured image , featured image for this one is right there .
Set featured image and let's make one more come up to the top notice .
There's no a post button .
And that's because I haven't published this one yet .
We'll hit publish .
Now , the add button shows up .
We'll add one more .
This one will also be a video post .
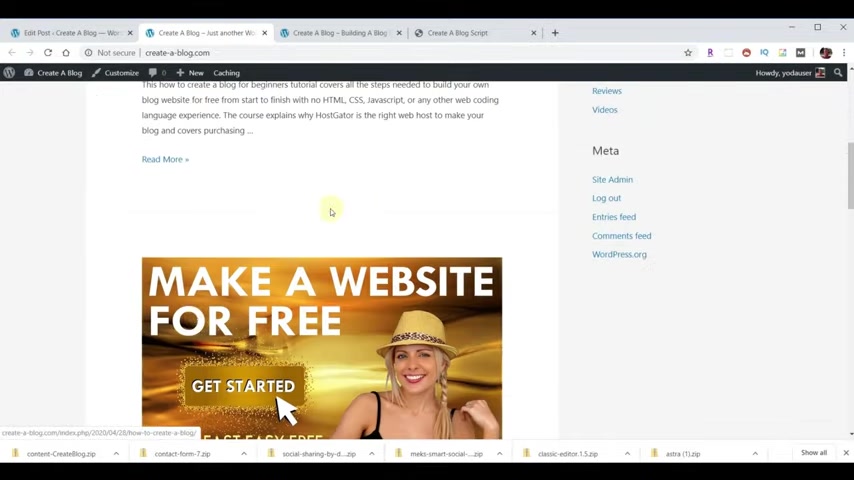
This one will be make a website for free , put in the content .
And we also want a button here .
So we'll put the cursor there .
Add media , choose our button again , insert into post , click the button , click the image , hit the center .
Now it's in the center .
Pick the pencil under display settings , link to choose URL .
In this video , we do have the URL for it .
And if you wanted to build a whole website and not just a blog , this will be the one you'd want to go to .
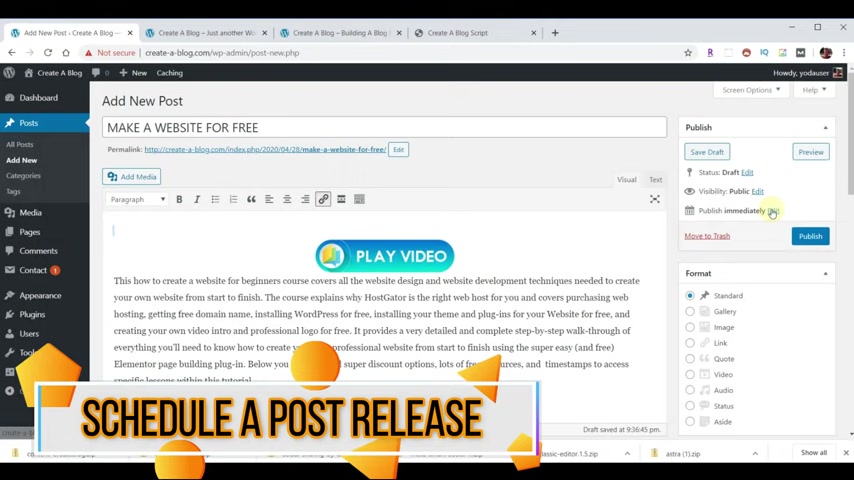
We hit update .
So we'll scroll down .
It's also a video , roll down , we'll put it in our tags , hit , add , roll down , pick our featured image set , featured image , scroll to the top and we're ready to publish .
Now , for some reason you wanted to publish this at a later date , you could click edit and set a date and it wouldn't publish immediately .
It would publish it on whatever the date you set there is .
I just want this to publish now .
So I'll just hit publish .
Now , if we go back to our page and hit reload , you see that these are all there .
The four we made also , they're in the reverse order of how we added them .
So we added that one first and then this one and then this one and then this one .
So what happens if you want this one to be at the top all the time ?
Meaning we want to pin this to the top of our blog .
So we go back to wordpress .
Now we'll click on posts .
Now we want to select the post that we want to pin .
So in this case , it's how to create a blog and I can either click on this or click on edit and I can go back in and I'm editing that on the right hand side over here .
It says visibility public .
If I hit the edit next to that , I can choose that box and that'll pin it to the top .
Now instead of publish , it says update , we come back to our site , we hit reload .
Now we scroll to the top and now that one will always be at the top and we add newer ones , they'll be between these two .
I'll come back over here and go back to post .
So we currently have four posts .
I'm gonna use a little magic to add a bunch more and there we go .
Now , now that we've added a bunch of new posts , notice under categories and tags .
If you scroll up and down , you can see if you missed any by accident .
The next thing we want to do is to learn how to add a link within a post .
So let's choose the Jose one post right here .
We'll choose edit and within the content , select Jose one .
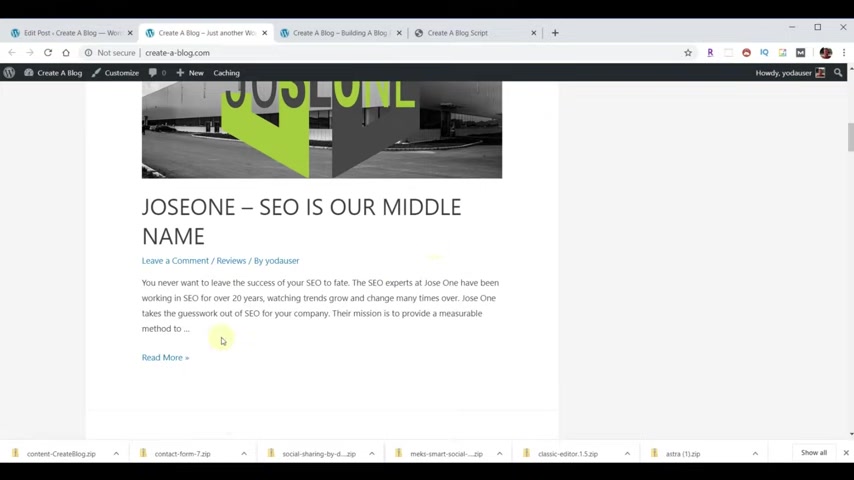
Now , we can choose the link tool .
Enter the URL hit , enter on our keyboard and now there's a link there and we hit update .
If we get back to our blog and reload , we'll see that .
It's not here in the review of it .
But when we click on more , now there's a link to it .
And if we click on that , it takes us to their website .
And these guys do a really good job if you're looking to improve the seo for your website blog or video whatnot .
All right .
So back to our blog .
Now , at this point , I want to add an extra couple of pages and I want to make a menu right here and right now it just says sample page , which was one that came with the product .
So we'll go back over to our dashboard for wordpress , just click on pages and sure enough , there's that page .
That was the sample page .
Now , if we click title here at the top , it selects all those under bulk actions , move to trash hit , apply .
We can go ahead and get rid of all of those .
So let's add a couple of pages .
We're not gonna put anything on them yet , but we're gonna just add them first .
And so we're gonna click on add new and the first page is gonna be about and we'll just publish it .
And now let's make a second page , add new .
This one will be contact and we'll publish it .
Now , we have all the pages for building our menu to build a menu .
You want to go to appearance menus .
And the first thing we need to do is name our menu .
So I'll name it main menu , create menu .
Now , we can add items to our menu .
So we're gonna add our contact on our about page a menu and then I'm gonna add our categories .
So I'll choose both of those , add menu .
And then some people like to have a home button .
If you want to do that , we'll go to custom links , put in the URL for your website .
And what's the name at home ?
Add the menu .
And so now we have all the items and then we can drag them around and put them where we need them at .
And I like that swing , hit save menu .
Now we scroll down .
We need to choose where we want the menu to show up .
I'm gonna choose primary menu and then click save menu again .
Come back over here , reload and there we have it .
We hit home .
It takes us back to our blog .
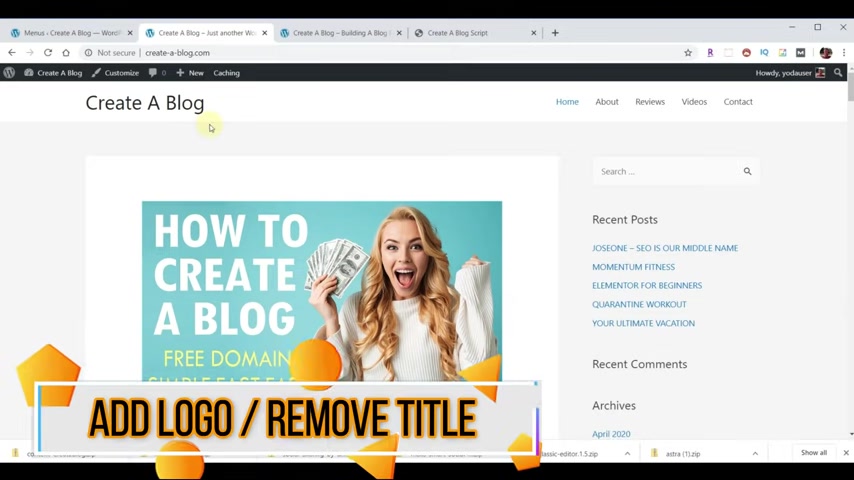
Now , let's replace this text with a fancy logo .
So we'll come back to the dashboard and now we're gonna go to appearance customize , header , site , identity and under logo , choose select logo .
And we already have a logo .
We'll choose that one .
Well , hit select and we don't want a crop .
So we'll skip cropping and it'll show up there and we don't need a different logo for mobile devices .
So we'll turn that off now for the logo width .
Let's just put 3 50 now we scroll down and we're trying to get rid of this text right here .
So we'll just turn this off and it goes away .
We hit publish , get back to our page , hit reload and now I have a great logo and now you're saying to yourself .
But yeah , I don't have a logo .
Guess what ?
I got a free solution for you .
Just click on the link at the top , right ?
It'll take you to a video that I made on how to create your own professional logo free of charge online in about five minutes time .
Now that our header is complete , let's update our footer .
So if we go to the top , we can hit this back arrow , hit it again and then we can choose footer and we can choose Butter Bar and right here where it says theme author , I'm just gonna put Web Inc now you can put anything you want in this box .
Now , we can publish , we'll go back to our page .
Let's scroll to the bottom and hit reload and now it says web right there .
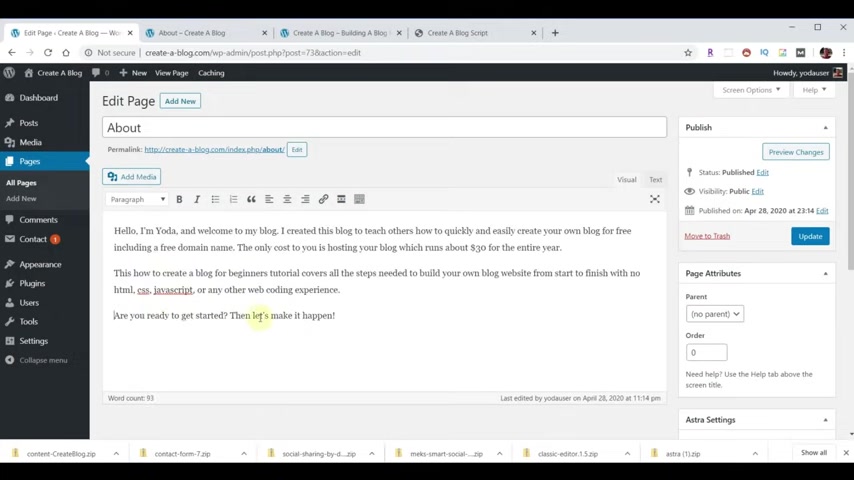
Now , if we scroll back to the top , let's work on our about page , right Now our about page is empty .
We're going back to wordpress , exit out of that to go to our dashboard from here .
We're gonna go to pages and then we're going to either click on about or edit .
Either one of those takes us to the edit and we already have a title .
So we'll put our text in there .
Sometimes you got to take extra spaces out and now I want to make this bold and I wanna make it clickable to our video again .
Since I don't have the link yet , I just have to put something in there as a temporary placeholder .
And now I wanna have a picture to the right hand side .
And so we're gonna choose to put our cursor there again right there at the beginning of our content add media , choose a picture of me hit insert .
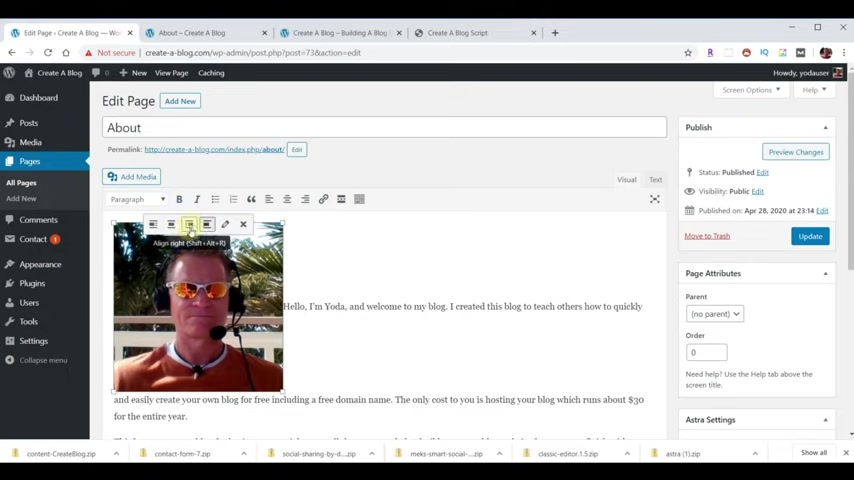
Now we're going to click on the image , we're going to choose this to align , right ?
And we can hit update , go back to our page , hit reload and now we have an about page .
Finally , we need to work on our contact page to put a form in here .
Actually , quite simple .
We're gonna go back to our word press in the dashboard .
There's an item called contact .
We'll choose that .
And then for the contact form it's already built for us , we can click on that and highlight it , copy that to the clipboard .
Now , if you click on this particular form under the mail tab .
It shows you what email address this form is gonna go to .
It's the one you use to set up your wordpress , but you can change this to whatever you want .
That's the email it's gonna go to .
So let's go back to our pages .
We'll click on our contact page .
Now we're gonna paste in that short code .
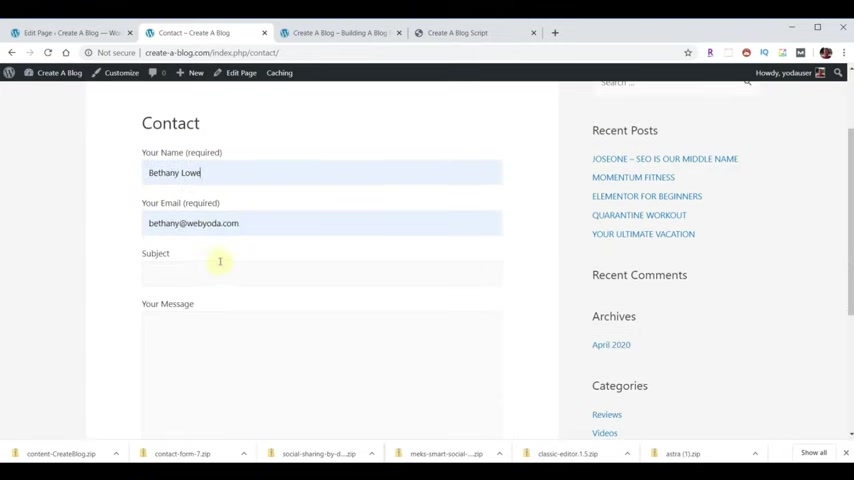
We'll hit update , go back to our page , hit reload .
I can send a message from Bethany to me , hit , send message sent successful .
Now that our pages are complete .
I wanted to make a few updates to the individual post themselves .
So if we click on home , it takes us back to our main home page .
And if we click on any one of the read mores or on the graphic , it takes you into a post .
Now if you scroll down one of the first things you'll notice this says buy Yoda user .
Well , maybe we want this to say something different than that .
And when you click on it , it comes up with this information .
It says Yoda user .
What if I want to be able to customize that information ?
So we go back over to wordpress and then we go to our users , we click on our user name and then here if we give it a first name and then we give it a nickname and then you can give it a display name .
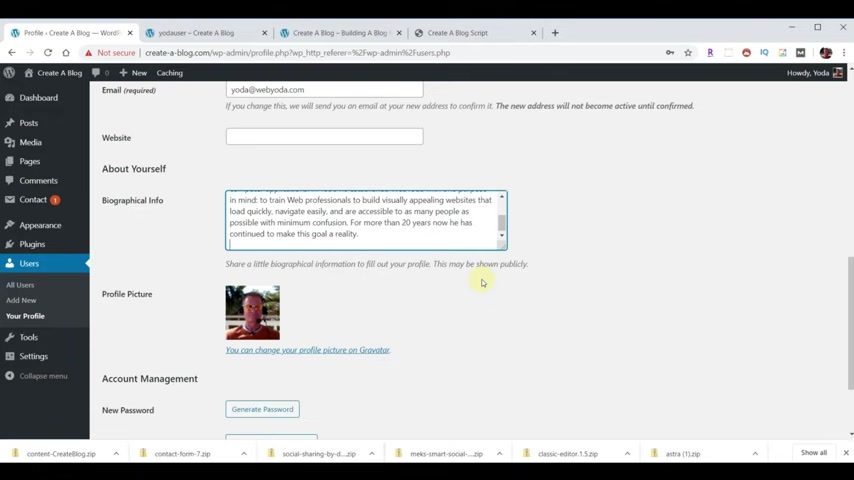
In this case , Yoda , obviously , you can put what you want , I'm just giving you an example and then you can put a biography in there .
If you needed a picture or a change of picture , you can click on that link to do that .
You hit update profile , hit reload .
And that has really nice information about the author .
Now , if we back up notice where it says Yoda user , when we reload , now it'll say Yoda , he'd say whatever your name is .
Now , we wanna add social media to our blog post .
There's two ways of doing that .
One is social media that shares your post and that's what's right here when we added a plug in , one of the plugins automatically added that to the bottom of all of them .
Another thing is we want people to be able to go and visit our social media .
So we're gonna add some links over here to the right to do that .
So we're gonna go back to wordpress and under appearance .
We're gonna choose widgets and one of the plugins that we installed does just that .
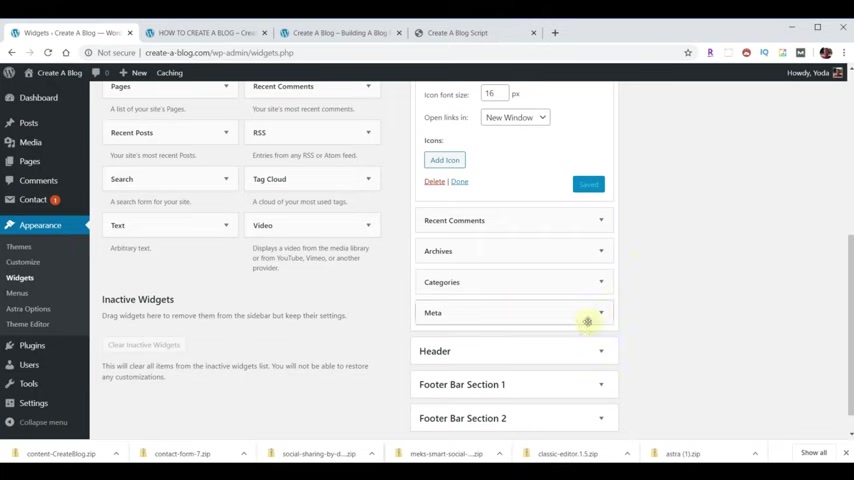
So we're gonna choose this social media widget and let's drag it here right under recent posts , we can scroll down and now you need to add your social media and to do that , you first need to click this add icon button and I'm gonna do three of them .
So I'm gonna click this button three times to make it a little easier to understand .
And then I'm gonna pick an icon .
So the first one I'll pick is Facebook .
The second one I'll pick is Twitter .
And the last one we'll do is Instagram .
Now , I need to put the link for my social media for each one of these .
There's Facebook and Twitter and Instagram .
We hit , save you , go back over , we hit reload and there it is ready to go .
Another neat thing to do is to have the tags that we added to our pages show up in the list on the sidebar as well .
So let's go ahead and add that .
So we'll go back to our word press .
We're already in the widget section so we can go ahead and add the tag cloud here .
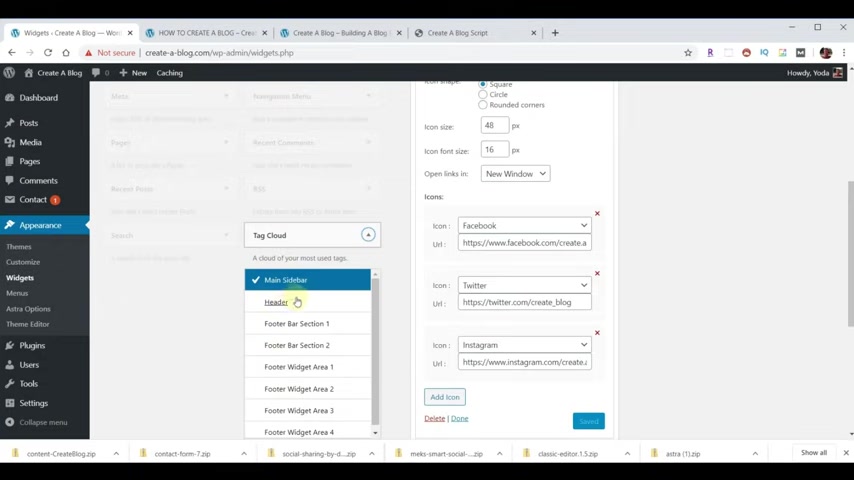
I know last time we just drugged this over , you can also pull down on this , choose which one of the areas you want to go to .
In this case , it's already choosing main side bar .
And then when you scroll down , you can do add widget and it'll show up in the list so we can close that back down .
And now it shows up at the bottom of the list and you can drag these wherever you want just like that .
Then now we can go back to our page hit reload .
And now I have a tag cloud notice some are bigger than others .
That means that that word was used more often .
And what's neat is that if you click on one of these let's say I click on free .
It brings up all the posts that have that in it .
Notice how the tag is capitalized .
Well , it's capitalized because I capitalize it when I added it .
So if you want them to look like this , you need to make them capital to begin with .
Back to our home page and believe it or not , our blog is complete .
Now , I truly hope I covered everything you needed in this tutorial .
Now , if there was something I didn't mention or you had additional questions , please leave them .
I'd be more than happy to answer them for you .

But if I don't know the answer , I'll go , hey , I don't know .
But if I do know the answer , I can find the answer , I'll give it to you and maybe we can work on it together .
So I really enjoy doing this .
I hope you had a great time as well .
The only real payment I'm looking for if I could possibly get a subscribe out of this , possibly a like out of this , that'd be super helpful .
But outside of that , I just hope you have a great day .
Peace out .
Are you looking for a way to reach a wider audience and get more views on your videos?
Our innovative video to text transcribing service can help you do just that.
We provide accurate transcriptions of your videos along with visual content that will help you attract new viewers and keep them engaged. Plus, our data analytics and ad campaign tools can help you monetize your content and maximize your revenue.
Let's partner up and take your video content to the next level!
Contact us today to learn more.