https://www.youtube.com/watch?v=aGsQxXUEvc4
Day to Night - Take and Make Great Photography with Gavin Hoey
In this video , I turn day into night using a coloured gel and some flashes Arama TV presents Take and make great photography with Gavin Hoey .
Hello , I'm Gavin Hoe and you're watching Adirama TV brought to you by adirama the camera store that has everything for us photographers .
And today well , you join me out in the woods because we're going to do a shoot in the daytime .
But I'm gonna try and make it look like we're working at night .
Now it is a summer's day here in the UK , which means it's grey overcast with a little bit of drizzle in the air .
But I'm not gonna let that put me off .
I can still turn day into night using a few tricks with flash .
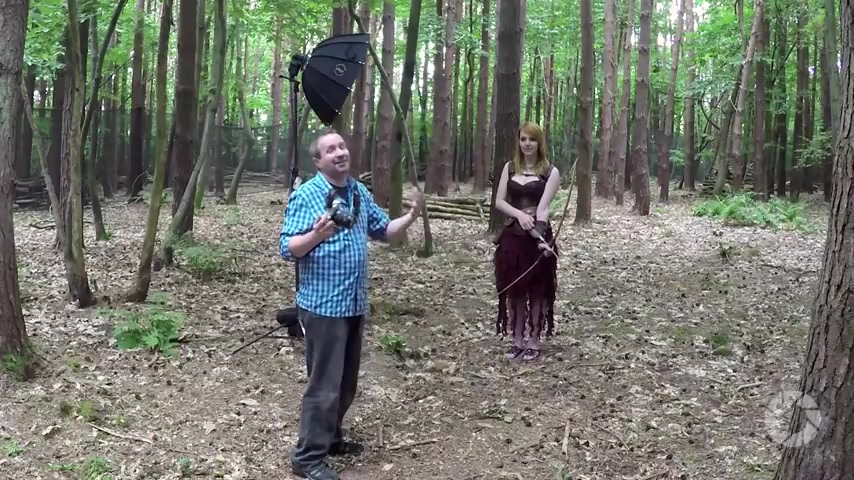
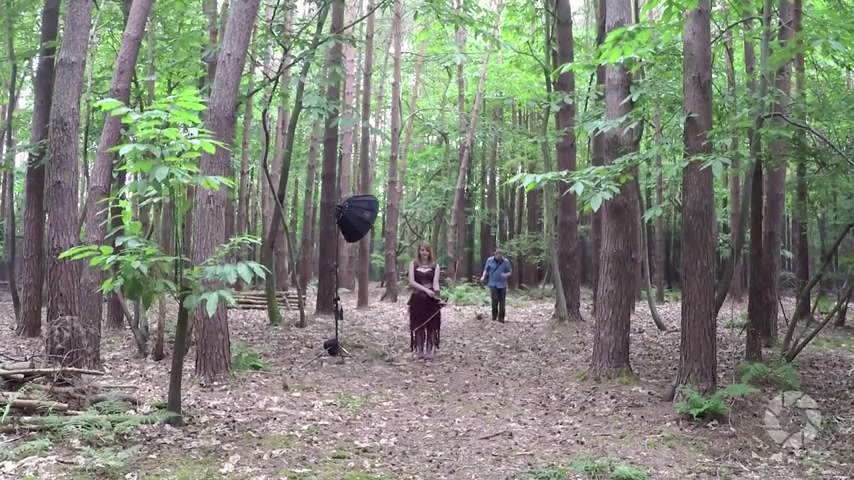
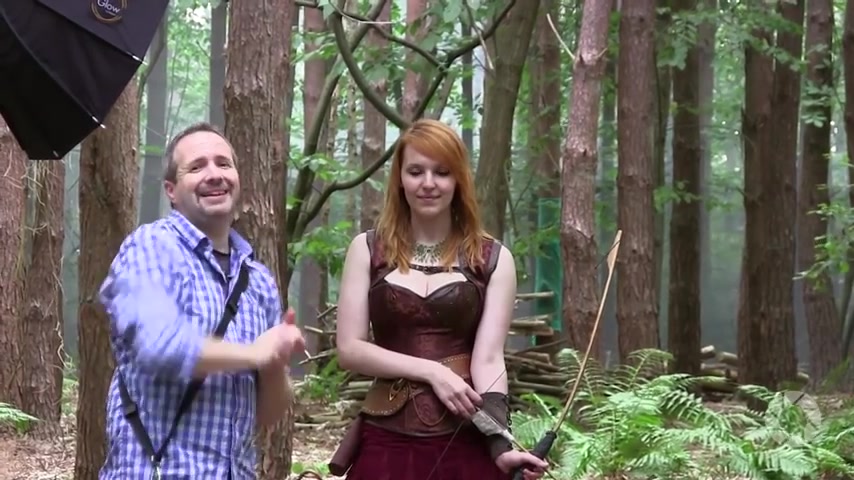
So today I've been joined by Kerry , who is suitably attired for the Woodlands here .
We've got this nice little archer shoot in mind .
Now I'm gonna be using flash for this , But let's just start with a simple shot just with the ambient light to show you what we're getting with natural light .
OK , Kerry .
So if you'd like to sort of aim it towards the camera , I suggest yeah , that's lovely .
And as you can see , it's a perfectly fine if a little bit unexciting shot .
So to add the sense of drama , I'm gonna use Flash and I'm gonna overpower the ambient light .
Now , today isn't a lovely sunny day , so that shouldn't be a problem for pretty much any flashgun that you've got .
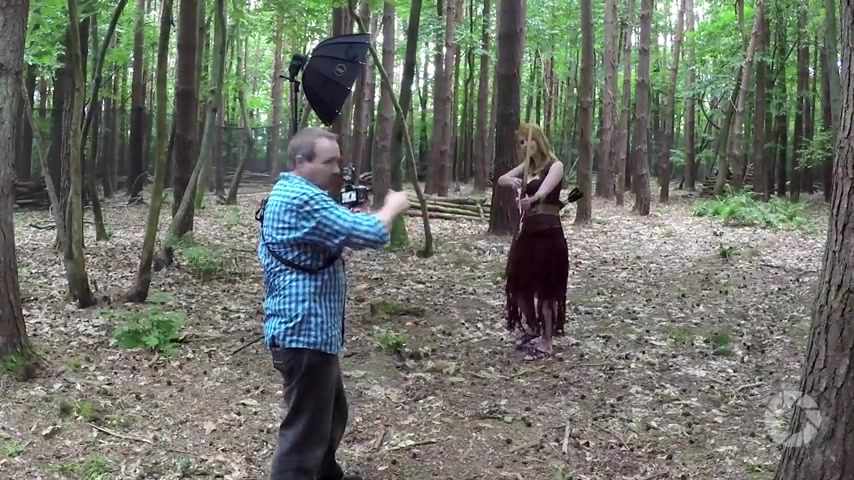
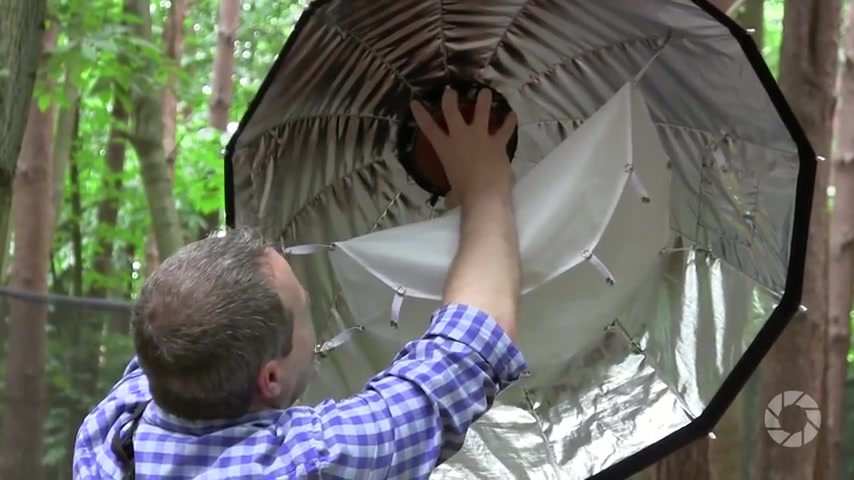
But I'm using the Adora Streak Light 3 60 is my main light , and I'm using an Adora Glow soft box .
I've removed the out of ale , so it gives a bit more direction and shape to my light .
So let's start with the ambient light metre reading .
How much light is it actually here ?
Well , I've switched to manual mode because whenever I'm shooting flash , I'm gonna work in manual mode .
That's kind of a given and the best way to go .
Uh , I've chosen F four as my aperture .
That should give me enough depth of field to make this interesting , but I should be able to blur the background if I need to .
So if I point my camera at Kerry and I let the metre figure things out , it'll tell me correct exposure 1/10 of a second , and that looks like a fairly ordinary shot .
It looks the same as it did before .
What I want to do is overpower the ambient , so I'm going to increase my shutter speed to reduce the amount of light that comes through .
So let's increase it by one stop , and that means doubling my shutter speed to 20th of a second .
Let's increase it again by another stop , so that's doubling it once more to 1/40 of a second .
And that's OK .
But for this to look like night time , I'm going to go the extra step further .
I'm gonna double this once again to an 80th of a second three stops under ambient exposure , and everything is looking really dark and really sinister .
So remember the settings 80th of a second F four .

I need to make this flash produce exactly that amount of light .
So let's get my flash metre and I'm going to set the shutter speed to an 80th of a second ISO 200 press the test button on my remote .
Here we go .
And when I hit exactly the same exposure from the flash as I've set in my camera , I'm good to take the pictures right .
Let's just take a shot like that .
So same as you were before Kerry .
That's lovely .
And as you can see , Kerry is now perfectly lit .
But that background remains as dark as it was before .
We've overpowered the ambient .
That's the first step done .
Now , one of the problems when you shoot against a dark background is that your subject can just merge in with the background and and they don't really separate .
So what this is is a background light or a separation light .
Now , this is literally gonna go in behind .
Where you put this is entirely up to you .
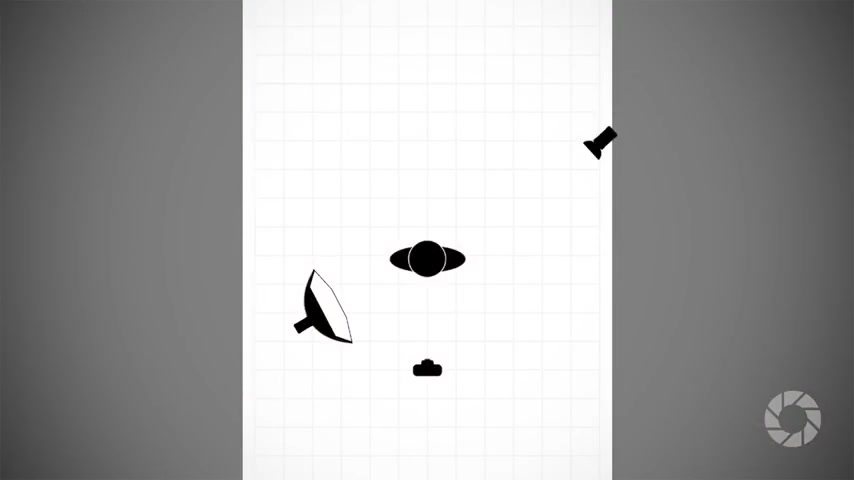
I'm gonna put it over here , though , OK ?
So I'm going to come in at the side , pointing this back towards Kerry .
Let's work out the metre reading for that .
So because I only want to metre the background light , I need to make sure the little white Cone is pointing at the flash .
I want to metre , so it's still set exactly the same as before .
I'll pop this just above Kerry's shoulder .
Press the test button .
I can see this is F 2.8 .
Now , I think I'd like to balance up the amount of light on her shoulders with the face .
So I want one more stop of light from that little speed light .
And again , I can do that here on the remote .
If I just switch channel to the one that the speed light is on , I can increase the power .
Three clicks is one stop and bingo .
I'm on F four .
So I've managed to do that .
Of course , if you don't have a remote control like this , you can just walk over and change it , but just saves a little bit of leg work .
OK , let's take a test shot , see how that looks .

And that just gives me that nice little bit of rim lighting around the side of Kerry and that separates her beautifully from the background .
So whilst that's given me the lighting that I want , it doesn't give me the feeling of night .
It's just basically dark , so I'll switch from the normal auto white balance and I'm gonna go to tungsten or incandescent , and that should make everything look really blue .
Let's see how that goes , and that is very blue .
Indeed , it does feel like night time , but now carry all the skin tones are wrong on the model .
It looks a little bit weird .
Great in the background .
Not so good on the skin tones .
So to counteract the the blue on our model , I'm gonna put a gel in the main key light .
And I'm gonna put an orange gel , which should be the opposite in the colour temperature to the blue .
Now , if you want to do this precisely , you can buy perfectly colour balanced gels that will work and give you almost no post processing at all .
I'm not quite that lucky .
So I'm just gonna pop this onto the flash , tighten it up .
Here we go .
And we'll just do a nice little shot just in that bit .
Thank you very much .
That picture will come in handy later .
I'm also gonna reme her as well .
So let's figure out whether the light is now correct with that gel .
It adds a little bit like a sunglass .
It just stops some of the light coming out .
So we're looking for F four .
I'm actually F 2.8 .
I've lost the stop of light with that gel .
I've just got to remember to move my remote so I'm adjusting the right light .
I can add a stop more light and I'm back to F four .
OK , let's take a test shot .
Here we go .
That looks really good .

And , of course , warm light on Kerry from the main flash .
But that background light adds a cold splash of light cos it's unfiltered , and I think that looks fantastic .
So those shots look really good .
But for this to really feel like night , we're gonna add one more exciting and dynamic part of the shot .
We're gonna add some smoke or mist .
Now , if you want to see how I do smoke , go check out my previous video where we covered how to do smoke away from the studio and you can find that on the Adora Learning Centre .
Now I'm gonna light the smoke , and I'm gonna use my second streak light to do that and then I'm gonna take it way back .
So smoke really looks best when it's lit from behind .
Especially if you're after a sort of a moody nighttime shot .
I'm going to put this in behind Kerry , so I'm going to try to figure out where I'm gonna stand and put it there , and the reason I've put it behind Kerry is twofold .
Firstly , I think it'll look really nice with a halo coming around her , but also , if it's hidden behind Kerry , I won't have to Photoshop it out .
That's got to be a good thing .
OK , let's try this a few seconds to get going .
Let's Here we go .
Let's do a test shot .
First of all , now that looks vibrant .
Way back over here .
Still there .
That's good .
It's still good .
Stand up for me , Terry .
Wow .
So those came out really well .
They look fantastic on the back of the camera , but there's still a little bit of Photoshop work to be done .
So let's jump into Photoshop and do some editing right now .
So setting up the lights and getting the white balance changed and putting a gel onto the flash .
That all takes time .
But the advantage of doing that is that I should now save a lot of time here in post production .
Now it doesn't mean to say there's not going to be any Photoshop .
There's always some Photoshop work to do , but hopefully less than you might imagine .
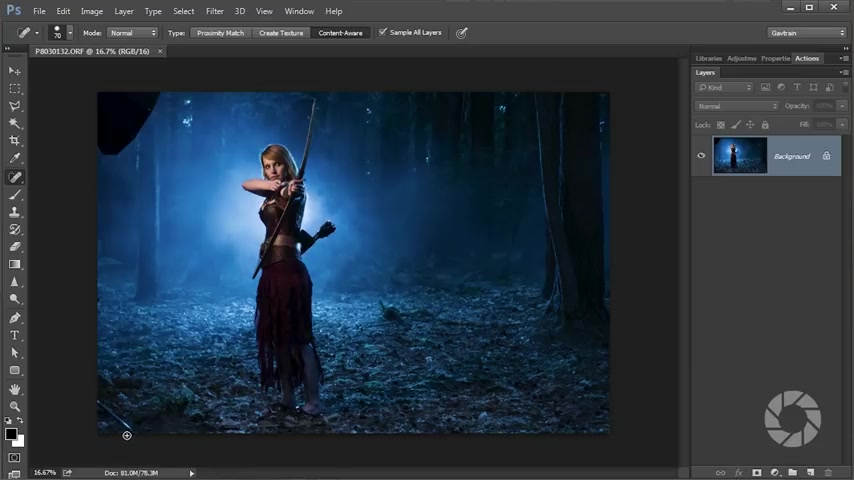
Let's have a look so This is the shot that I want to edit , and it looks pretty good straight off the camera .
I'm really pleased with that .
However , there is a definite warm tone to the face that I would like to remove .
That's where this picture comes in .
Now you might remember this one .
It was a sort of a grab shot , but this is the bit I'm interested in .
That's the the great card that can help me to get close to the right white balance and to do it .
I just get the eye dropper tool here , the white balance tool , and click anywhere on this grey area .
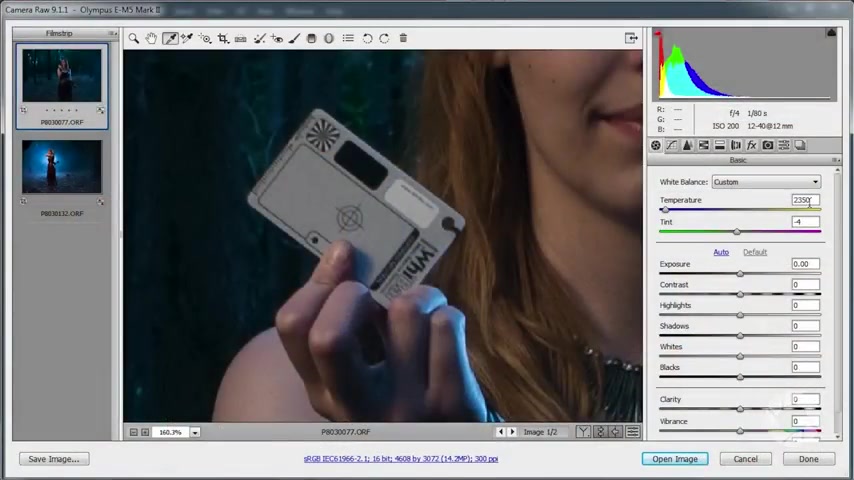
And that should remove the colour casts and gives me a a colour that is technically correct .
Now , did you notice the word technically in there , technically correct and aesthetically correct ?
They're not the same thing .
This will get me close .
But there are whole other things that have changed .
That might mean that I'm not gonna keep the technically correct answer .
The colour of the smoke had a an impact .
There was some daylight contamination , which was all part of the plan .
Little things can just tweak the results , but let's have a little note of the numbers here .
We've got 23 50 for the temperature , minus four for the tint .
I jump back to my main image .
I can type those exact numbers in 23 50 minus four and then have a review .
Do I like the effect ?
Am I happy with the colours ?
It's close .
I reckon .
It's still just a a little bit warm on the face .
So maybe we'll just take that down to 22 50 .
So we'll take 100 off the temperature that looks slightly green .

So maybe we'll just put a little bit more magenta in there .
We go to zero , and I recon .
That is good .
That suits the look of the image that I want now .
Everything else could be changed if it needs to .
But I think we got it more or less right in camera .
Maybe just a little bit more clarity in there .
That's always a good thing .
And we'll just push up the colours a little bit just to have a nice , um , good base of strong colours .
Now I do find the blue maybe a little bit too strong , so I'm gonna jump over to the HSL stroke Grey Scale .
I'm gonna come down to the blues .
Well , let's go to the saturation , first of all , and then I'll take the saturation for the blues down .
Not gonna go that far , but it's good to know that you can really change this if you want to .
And we'll just bring the blues down about sort of T minus 20 something like that .
Whilst I'm here , let's jump over to the luminance and just increase the luminance of the oranges , which are , of course , skin tones .
And that just adds an extra level of brightness on the skin tones .
Now , I'm happy with that so I can click on open image , and I can leave camera raw behind and jump into Photoshop .
Now , you probably notice these two bits .
Here there is the edge of the soft box , and also the light stand leg is in the shot because I wanted a wide shot .
These things are just going to creep in sometimes , but fortunately , they're really easy to remove .
I'm gonna use the the spot healing brush just to remove the the leg there .
Oh , there's another little something there .
Uh , this is a little bit bigger .
So not gonna use the spot healing brush for that for the larger parts , I will use the patch tool and I'll just draw roughly around the thing I want to patch .
And then the lovely thing with the patch tool is you can move the the sampled area , but you get a sort of preview and I can line up the edge of the tree .
Something like that .
That looks OK , Let go .
And there you go .
That looks pretty good .
A bit of fine tuning required with the spot heating brush just to take away a few little weird bits and bobs .
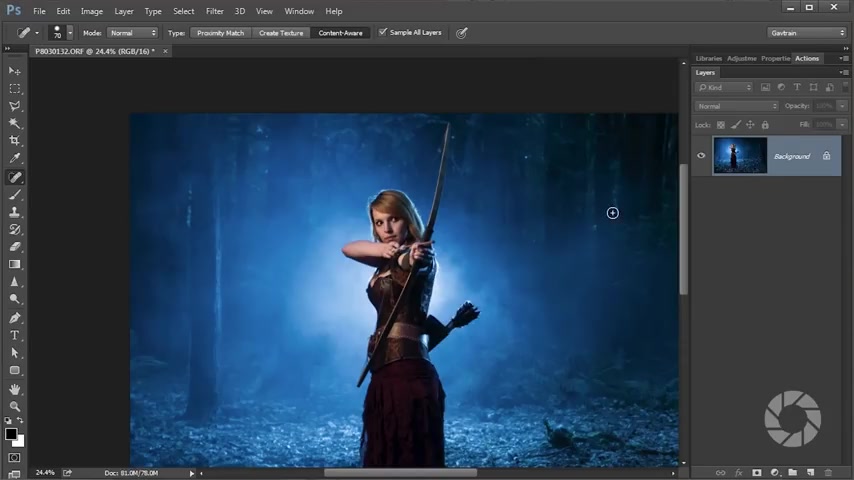
And I'm also gonna remove all of these little parts too .
So this is where the daylight was just coming through the the leaves .
And if this really was a night time , of course the sky would be jet black , so they don't quite fit in with the feel of the image , but are nice and simple to remove .
OK , and there we are .
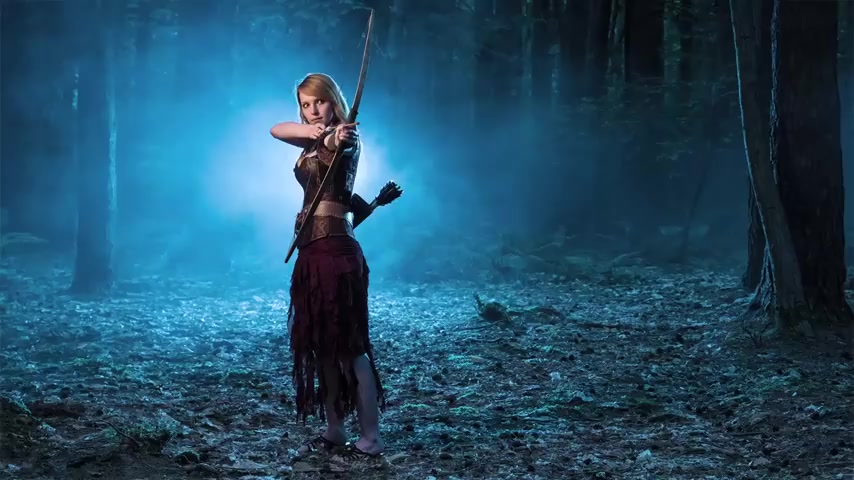
There it is , my daytime to nighttime image completed and it's looking rather super .
There we go .
The final picture really does have that night time feel , and I absolutely love the effect .
Now , if you want to see more videos for myself and the other amazing presenters here in Arama TV , you know what you've got to do .
You've got to click on the subscribe button .
I'm Gavin Hoy .
Thanks for watching .
Do you want great looking prints at low cost ?
Be sure to visit our easy to use online printing service .
Adirama Picks has professionals who treat your images with the utmost care that you can count on for a quick turnaround on photos , cards or albums .
Use adirama picks dot com
Are you looking for a way to reach a wider audience and get more views on your videos?
Our innovative video to text transcribing service can help you do just that.
We provide accurate transcriptions of your videos along with visual content that will help you attract new viewers and keep them engaged. Plus, our data analytics and ad campaign tools can help you monetize your content and maximize your revenue.
Let's partner up and take your video content to the next level!
Contact us today to learn more.